 Notch
Use your browser's Print (Ctrl/Cmd + P) and choose Save as PDF. This page works offline once you've opened it with a signal.
Outdoor Table
This DIY outdoor table is made out of 2x6 boards that are screwed together with pocket holes.
- Difficulty
- Easy
- Time
- 1.3–2.5 hours
- Cost
- $$
Cut list
| Part | Qty | T × W × L | Material | ✓ |
|---|---|---|---|---|
| Table top boards | 5 | 2" × 6" × 6" | — | ☐ |
| Legs | 4 | 2" × 6" × 28" | — | ☐ |
| Cross supports | 6 | 2" × 6" × 20" | — | ☐ |
Materials
| Item | Qty | ✓ |
|---|---|---|
| Treated lumber boards, 2"x6"x8' | 5 board | ☐ |
| Treated lumber board, 2"x6"x10' | 1 board | ☐ |
| Treated lumber board, 2"x6"x6' | 2 board | ☐ |
| 150 grit sandpaper | 1 each | ☐ |
| 220 grit sandpaper (use any other grit in between these two for a better finish) | 1 each | ☐ |
| Box of 2" Kreg Blue-Kote screws (see tools list) | 1 each | ☐ |
| Box of small washers | 1 each | ☐ |
| Powder-coated legs from Semi-Exact (link in Extras tab) | 4 each | ☐ |
| Outdoor wood stain | 1 each | ☐ |
Overall cost: $$. Lumber varies by region, species, and season, so we give a band rather than a figure.
Tools
- Circular Saw
- Drill / Driver
- Impact Driver
- Pocket Hole Jig
- Random Orbit Sander
- Bar / Pipe Clamps — optional
Instructions
1. Cut and fasten the table top
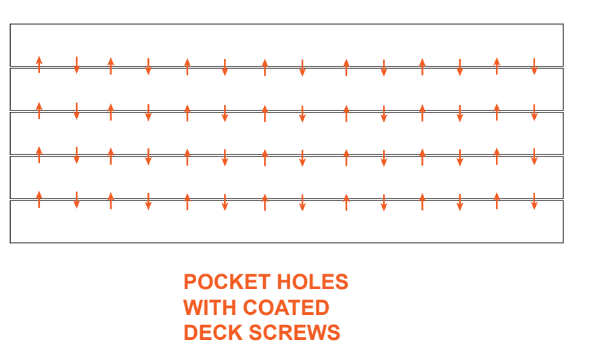
Cut 5 pieces of 2x6 at a length of 6'. Connect the pieces to make the top using pocket holes every 8 inches on the under side of the table top. I used washers as spacers with the pocket screws going through the center to make gaps for rain water about 1/8" to 1/4" wide.
2. Assemble the legs
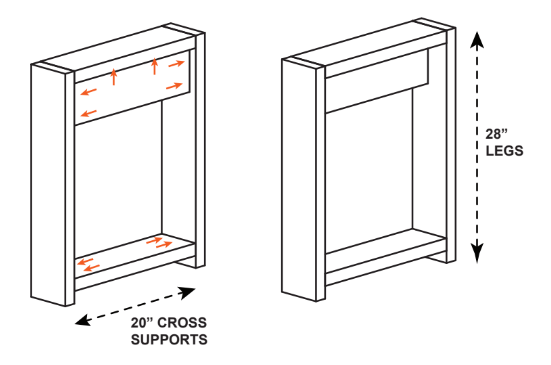
Cut 4 legs 28" long and 6 support pieces 20" long. Use pocket holes to connect the pieces. I placed the holes on the inside or under side of the pieces so that they would be less visible.
Tip: Note - as seen in the video, you can choose to use the powder coated legs (linked in the Extras tab) instead of building your own. Skip this step if you are using the powder-coated legs.
3. Add the legs to the table top
Screw through the top cross support on the legs to connect the legs to the table top. Ben noted that he placed them symmetrically so that they supported multiple boards.