Notch
NotchUse your browser's Print (Ctrl/Cmd + P) and choose Save as PDF. This page works offline once you've opened it with a signal.
Kreg Workbench with Drawer
Add a drawer and shelf to your Kreg Workbench frame to give you plenty of storage for all your screws and jigs!
- Difficulty
- Easy
- Time
- 3.3–6 hours
- Cost
- $$$
Cut list
| Part | Qty | T × W × L | Material | ✓ |
|---|---|---|---|---|
| Bottom Shelf | 1 | 3/4" × 19" × 27" | — | ☐ |
| Back Panel | 1 | 3/4" × 5" × 27" | — | ☐ |
| Front Spacer Blocks | 2 | 3/4" × 1" × 5" | — | ☐ |
| Drawer Braces | 2 | 3/4" × 5" × 18" | — | ☐ |
| Drawer Box Sides | 2 | 3/4" × 4" × 16" | — | ☐ |
| Drawer Box Front/Back Pieces | 2 | 3/4" × 4" × 21" | — | ☐ |
| Drawer Bottom | 1 | 1/4" × 16" × 23" | — | ☐ |
| Drawer Front | 1 | 3/4" × 5" × 23" | — | ☐ |
Materials
| Item | Qty | ✓ |
|---|---|---|
| Plywood, 3/4" 4'x4' sheet | 1 board | ☐ |
| Plywood, 1/4" 2'x2' sheet | 1 board | ☐ |
| 3/4" coarse thread pocket hole screws | 18 each | ☐ |
| 1 1/4" coarse thread pocket hole screws | 18 each | ☐ |
| 1 1/4" fine thread pocket hole screws | 10 each | ☐ |
| Pair 16" ball bearing drawer slides | 1 each | ☐ |
| Drawer pull or knob | 1 each | ☐ |
Overall cost: $$$. Lumber varies by region, species, and season, so we give a band rather than a figure.
Tools
- Circular Saw
- Drill / Driver
- Pocket Hole Jig
Instructions
1. Assemble Workbench Frame
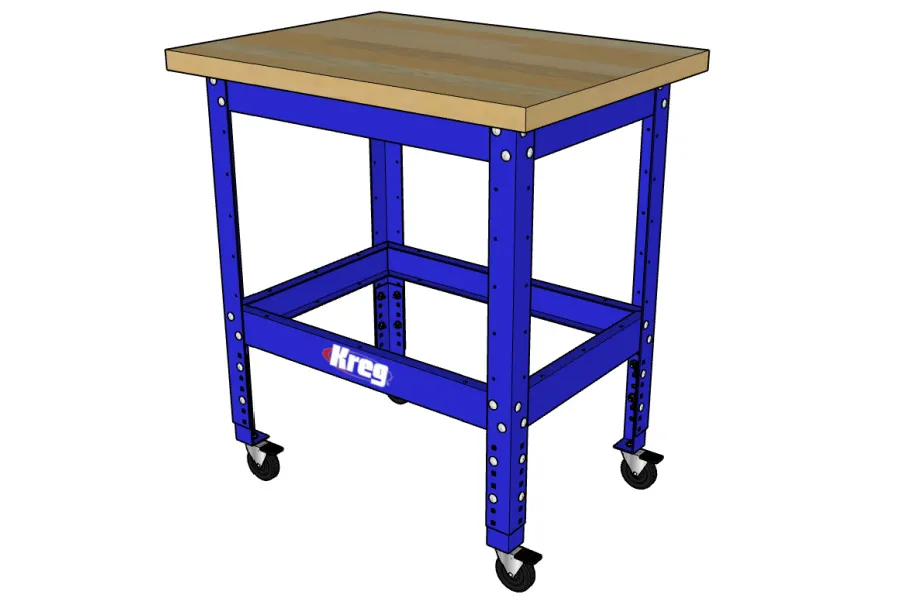
- Assemble Kreg Workbench Frame according to directions included. Install adjustable feet OR caster wheels (I used caster wheels so it's mobile!).
- Attach 24" x 32" Kreg workbench top leaving 2" overhang on all sides using 1 1/4" fine thread pocket hole screws according to the instructions included.
Tip: Check manufacturer's instructions Make sure to follow manufacturer's instructions to assemble the workbench frame and attach the top.
2. Install Bottom Shelf
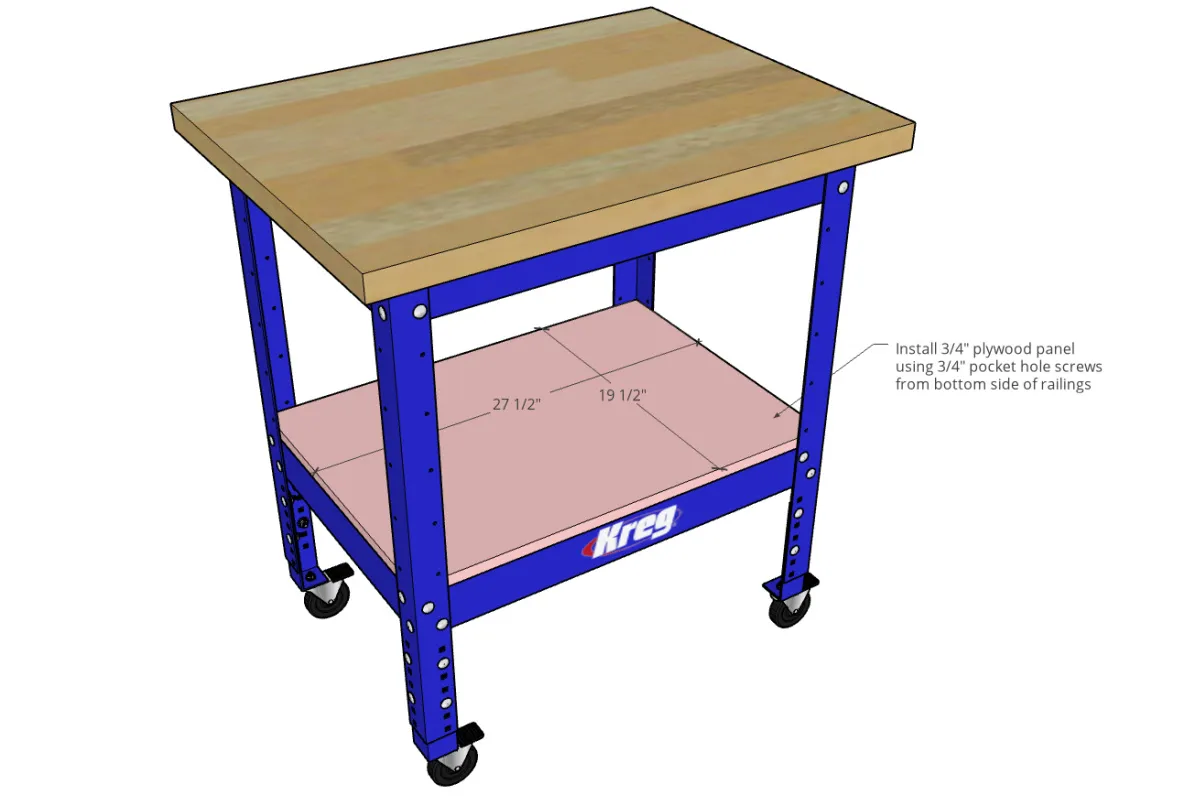
- Cut a piece of 3/4" plywood to 19 1/2" x 27 1/2" using a circular saw and Kreg cutting guides (or cutting method of your choosing). See cut diagram.
- Place this shelf onto the bottom rails of the workbench and use 3/4" pocket hole screws through the bottom side (through the pre drilled holes in the rails) to secure the plywood in place.
Tip: Using screws from the bottom The rails in the workbench have predrilled holes to drive your screws through. Flip the workbench on its side for easier access.
3. Install Back Panel
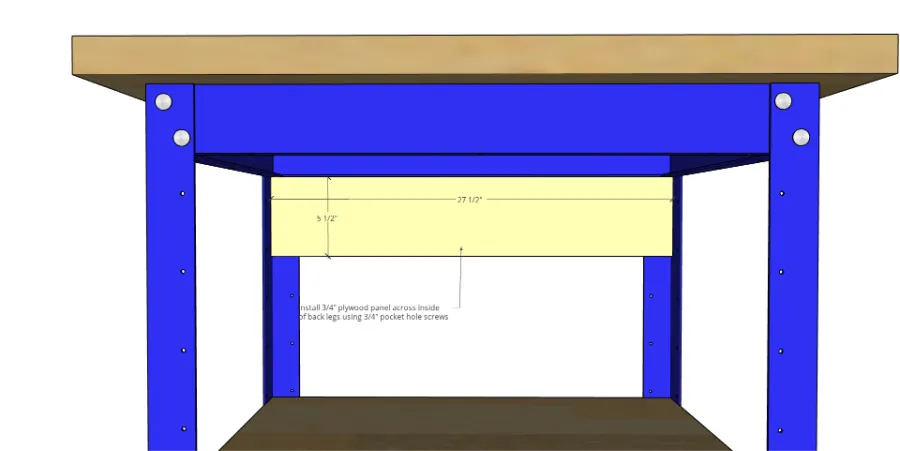
- Cut a piece of 3/4" plywood to 5 1/2" x 27 1/2".
- Place this between the two back legs of the workbench frame so that it's touching the top rail on the inside. Use 3/4" pocket hole screws through the predrilled holes in the legs to secure this pieces in place.
4. Install Front Spacer Blocks
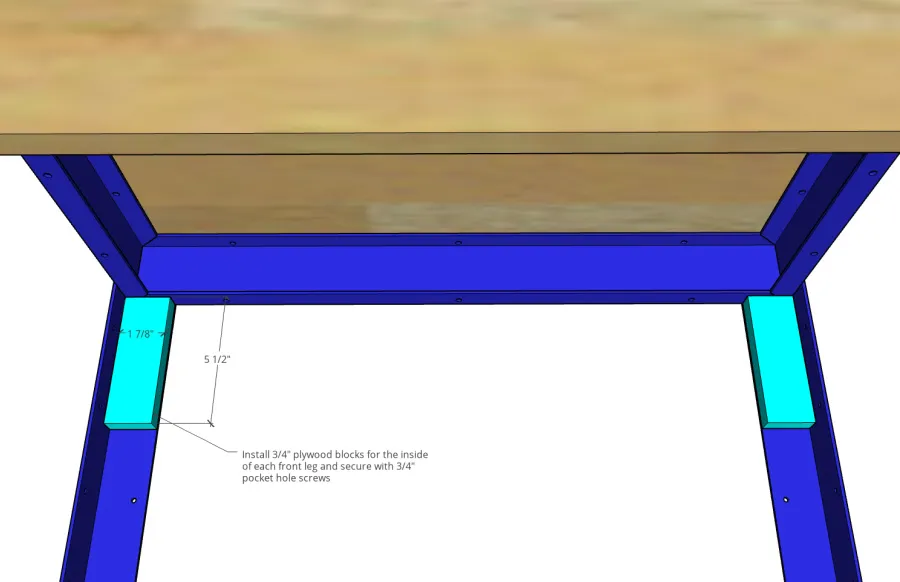
Cut two pieces of 3/4" plywood to 1 7/8" x 5 1/2". Install one piece on the inside of each front leg like shown so that they are touching the top rail. Use 3/4" pocket holes through the predrilled holes in the legs to secure.
5. Install Drawer Braces
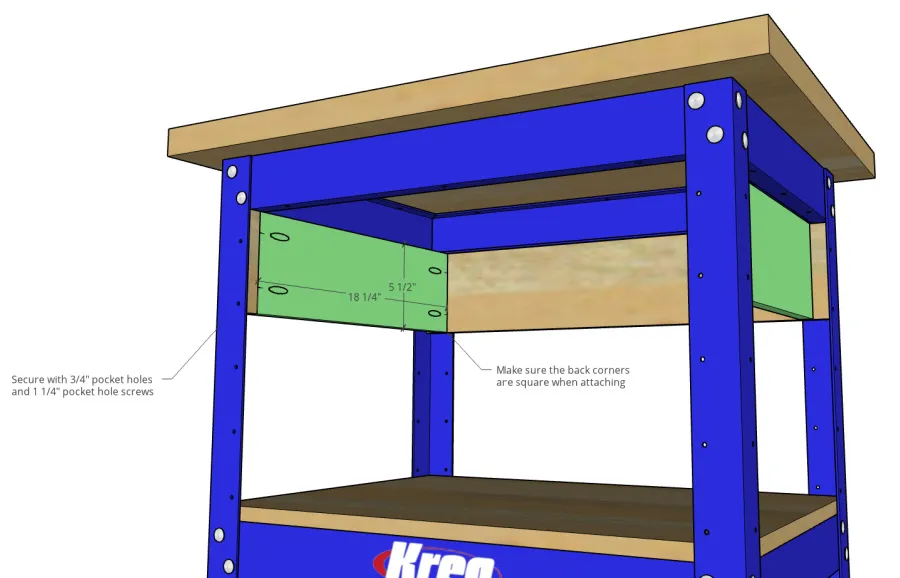
- Cut two pieces of 3/4" plywood to 5 1/2" x 18 1/4".
- Drill 3/4" pocket holes into the ends of each piece. Secure between the front blocks and the back panel using 1 1/4" pocket hole screws. Make sure that these pieces are flush to the inside edge of the front pieces and the back corners are square.
Tip: Pay attention to the back corners Make sure the back corners are square! Note that the inside edge of these drawer braces at the front are 1 7/8" from the inside corner of the legs. So they should be 1 7/8" from the inside corner of the legs at the back as well. Use a square to double check the back panel and drawer braces are square to each other while installing. If they aren't you'll have issues with the drawer once installed.
6. Install Drawer Slides
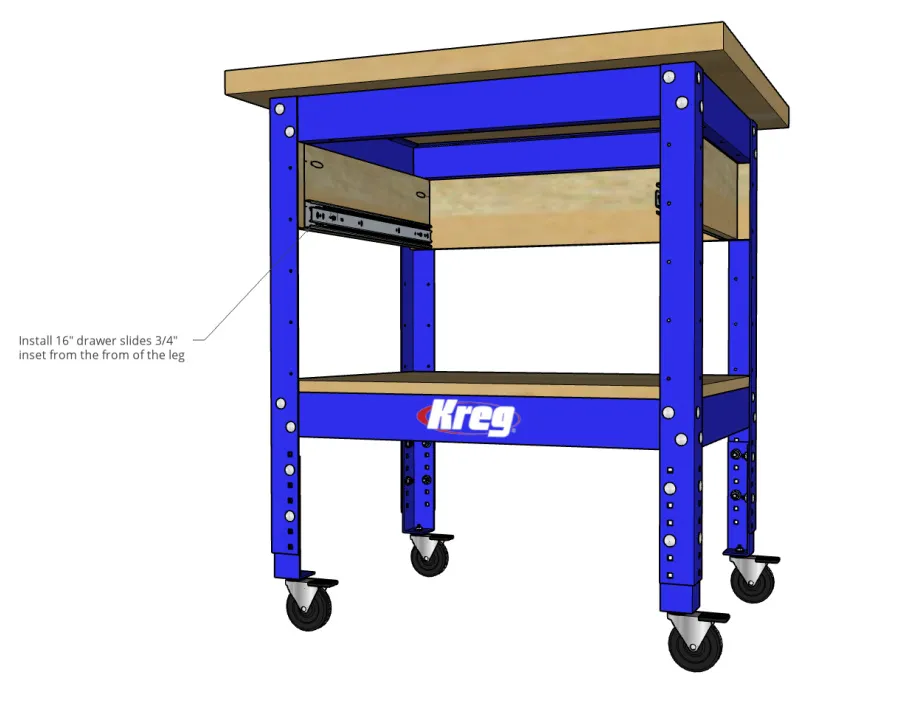
Install (1) pair of 16" ball bearing drawer slides onto the braces from the previous step so that they are 3/4" inset from the front legs. Install these flush along the bottom edge of the drawer brace panels.
Tip: Installing Drawer Slides For more information on installing drawer slides, see the link below.
7. Assemble Drawer Box
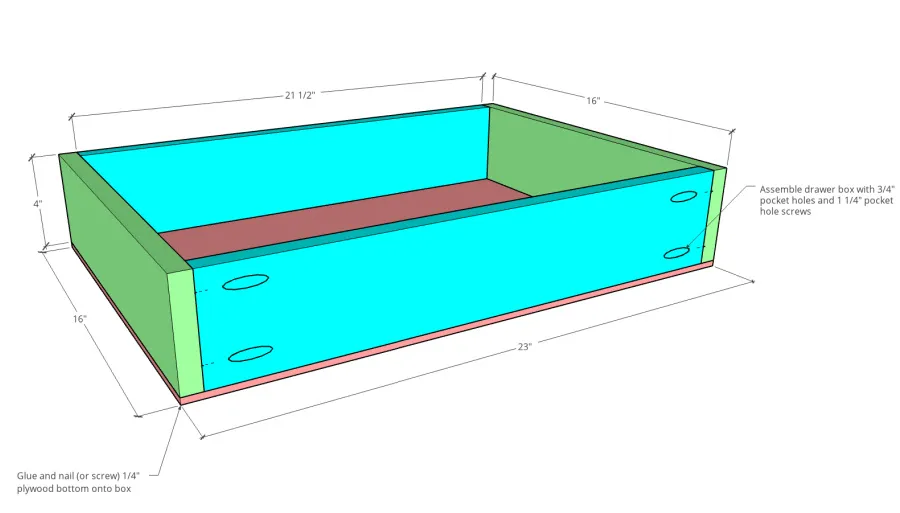
- Cut two pieces of 3/4" plywood to 4" x 16" for the drawer box sides and two more pieces 4" x 21 1/2" for the drawer box front and back.
- Drill 3/4" pocket holes into the ends of the 4" x 21 1/2" pieces and assemble between the two sides to create a box using 1 1/4" pocket hole screws.
- Then, cut a piece of 1/4" plywood to 16" x 23" and glue onto the bottom of the drawer box. You can add some brad nails or screws to secure the panel while the glue dries.
8. Install Drawer Box
Install drawer box onto slides so that the front of the box is 3/4" inset from the front of the legs and the top is approximately 1 1/4" below the top rail.
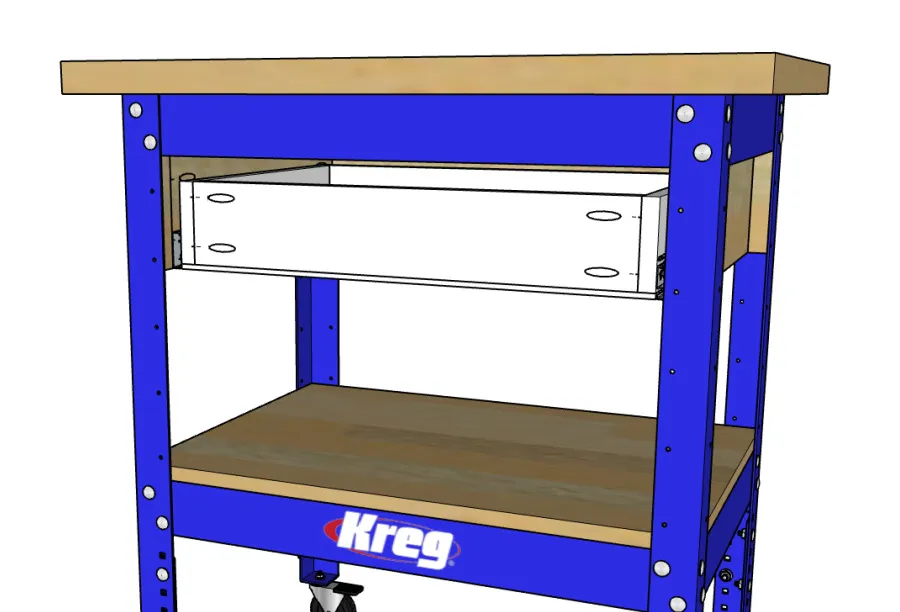
9. Attach Drawer Front
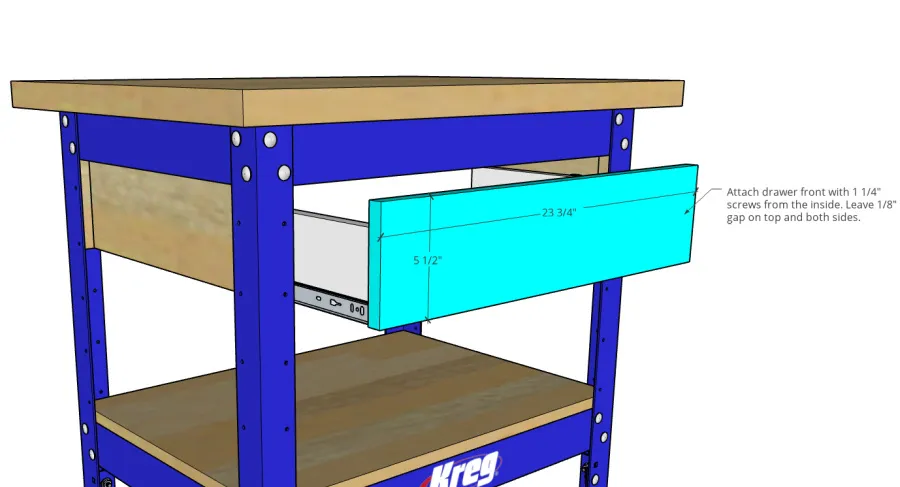
- Cut a piece of 3/4" plywood to 5 1/2" x 23 3/4" for the drawer front.
- Attach this onto the drawer box using 1 1/4" screws through the inside of the drawer box. Make sure to leave 1/8" gap on the sides and top around the drawer front.
- Once installed, add a handle or knob as desired.