 Notch
NotchUse your browser's Print (Ctrl/Cmd + P) and choose Save as PDF. This page works offline once you've opened it with a signal.
Small Bathroom Vanity
This Small Bathroom Vanity is ideal for your extra powder room or guest bathroom.
- Difficulty
- Intermediate
- Time
- 4.5–9 hours
- Cost
- $$$
Cut list
| Part | Qty | T × W × L | Material | ✓ |
|---|---|---|---|---|
| Legs | 4 | 1" × 2" × 27" | — | ☐ |
| Side rails | 8 | 1" × 2" × 16" | — | ☐ |
| Top rails | 2 | 1" × 1" × 25" | — | ☐ |
| Bottom shelf boards | 2 | 1" × 5" × 30" | — | ☐ |
| Bottom shelf boards | 2 | 1" × 2" × 30" | — | ☐ |
| Top inset support plywood piece | 1 | 3/4" × 14" × 26" | — | ☐ |
| Top inset pieces | 4 | 1" × 5" × 14" | — | ☐ |
| Top inset pieces | 2 | 1 1/2" × 2 1/2" × 2" | — | ☐ |
| 2x3 frame pieces | 4 | 1" × 2" × 31" | — | ☐ |
| 2x3 frame pieces | 4 | 1" × 2" × 19" | — | ☐ |
| 1x3 frame pieces | 2 | 3/4" × 2" × 18" | — | ☐ |
| 1x3 frame pieces | 2 | 3/4" × 2" × 30" | — | ☐ |
Materials
| Item | Qty | ✓ |
|---|---|---|
| Board, 2x3 96" | 6 board | ☐ |
| Board, 1x3 96" | 2 board | ☐ |
| Board, 2x2 96" | 1 board | ☐ |
| Board, 2x6 72" | 1 board | ☐ |
| Board, 1x6 96" | 1 board | ☐ |
| Plywood, 3/4" Thick Quarter Sheet | 1 board | ☐ |
| Vessel type sink | 1 each | ☐ |
| 2 1/2'' Pocket hole screws | 100 each | ☐ |
| 3'' screws | 20 each | ☐ |
| Stain or Paint for desired finish | 1 each | ☐ |
| High moisture finishing sealer | 1 each | ☐ |
Overall cost: $$$. Lumber varies by region, species, and season, so we give a band rather than a figure.
Tools
- Brad Nailer
- Circular Saw
- Drill / Driver
- Impact Driver
- Jigsaw
- Miter Saw
- Pocket Hole Jig
- Random Orbit Sander
- Table Saw
- Bar / Pipe Clamps — optional
Instructions
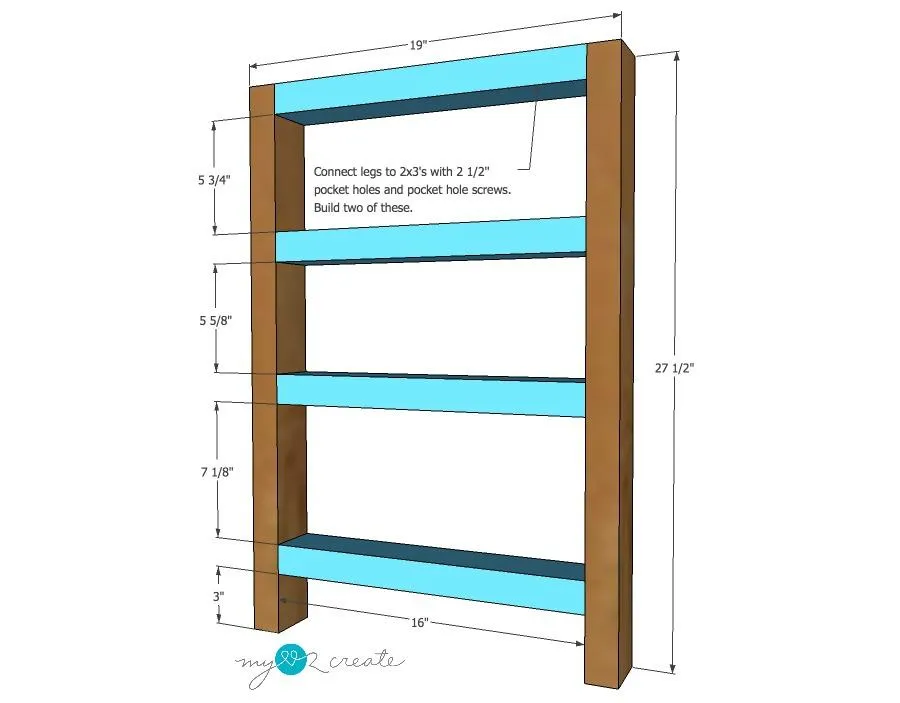
1. Legs and side rails
Build two sets of legs and side rails. Attach rails to legs as shown.
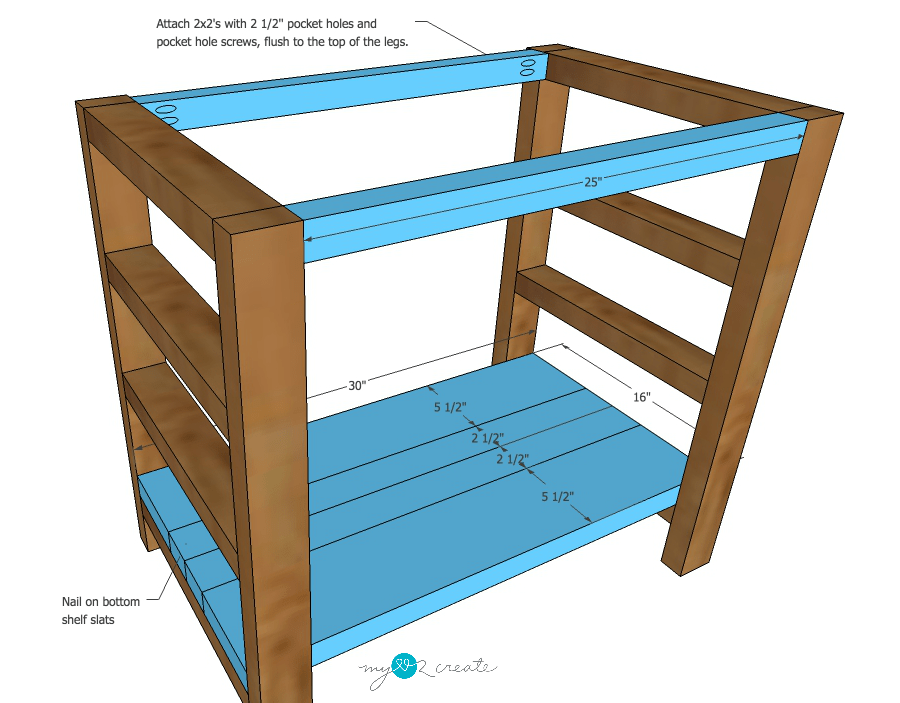
2. Add top rails and shelf boards
Connect the two leg sections with the top rails. Nail on the bottom shelf boards.
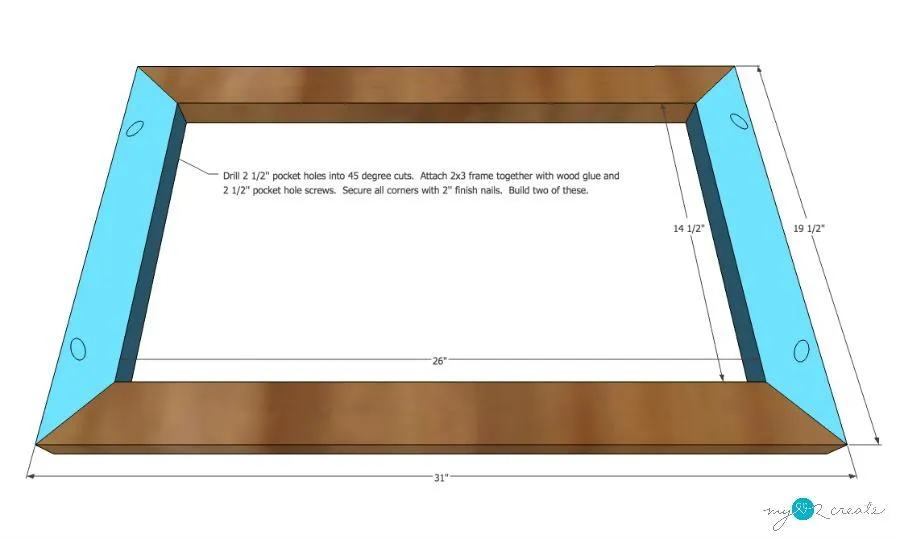
3. Build two 2x3 frames
- Build two 2x3 frames as shown for top section of vanity.
- Cut corners at a 45 degree miter.
- Attach with pocket holes and finish nails.
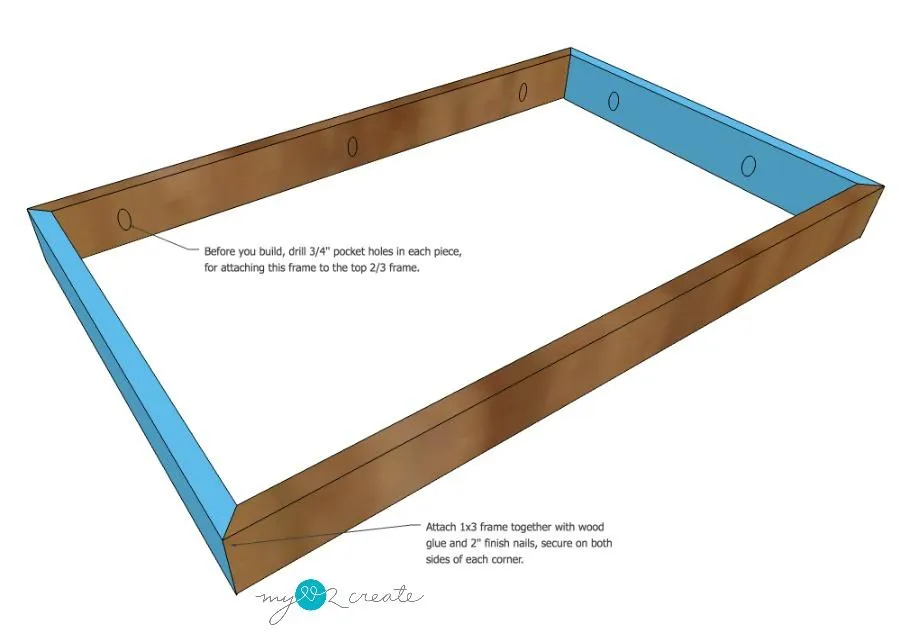
4. Build 1x3 frame
Build a 1x3 frame as shown using 45 degree bevel cuts. Attach with wood glue and 2'' finish nails.
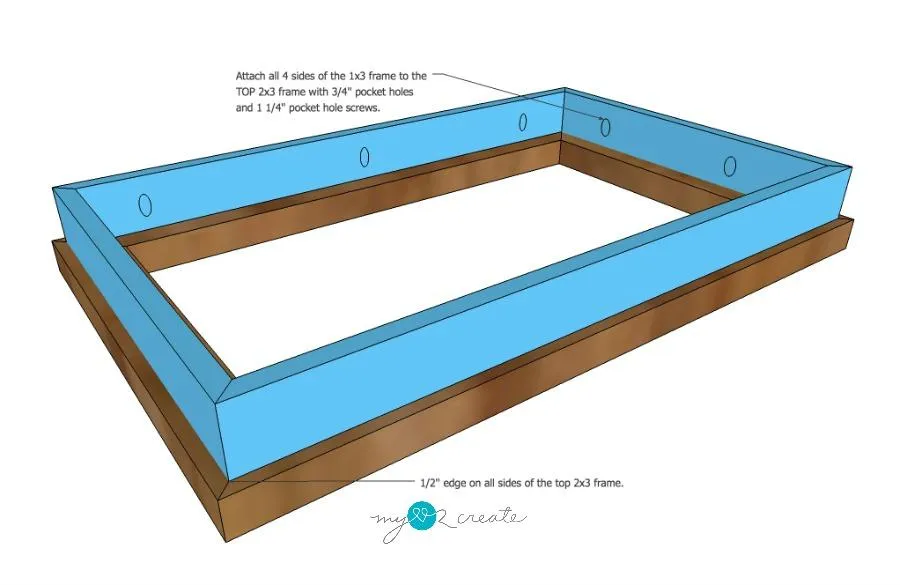
5. Attach top 2x3 frame to 1x3 frame
Using 3/4'' pocket holes and 1 1/4'' pocket hole screws attach the 1x3 frame to the 2x3 top frame as pictured.
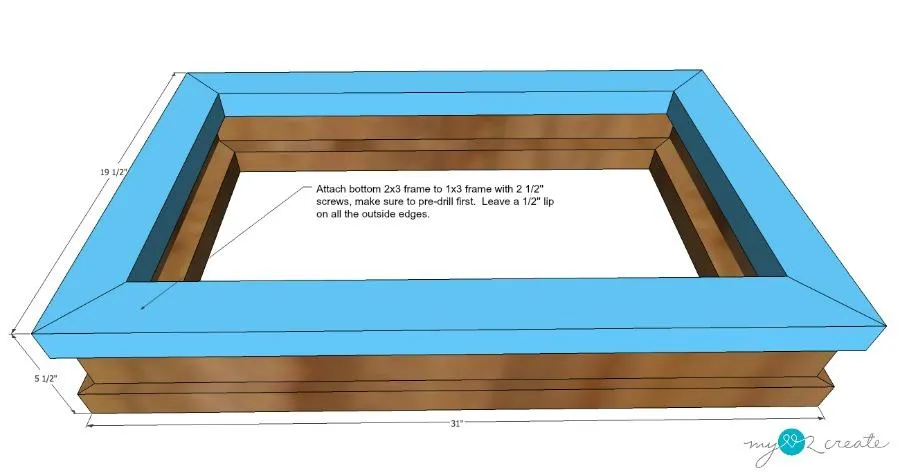
6. Attach bottom 2x3 frame
Attach the bottom 2x3 frame to the 1x3 frame with 2 1/2'' or 3'' screws, make sure to pre-drill first.
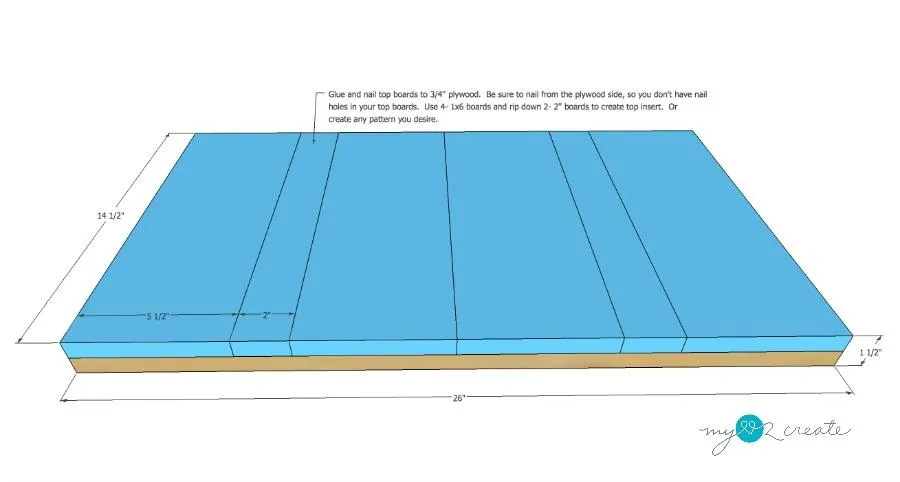
7. Build top insert piece
For the decorative top cut your plywood and attach the 3/4'' wood to the top as pictured with wood glue and finish nails, nail from bottom. You may vary the pattern as desired.
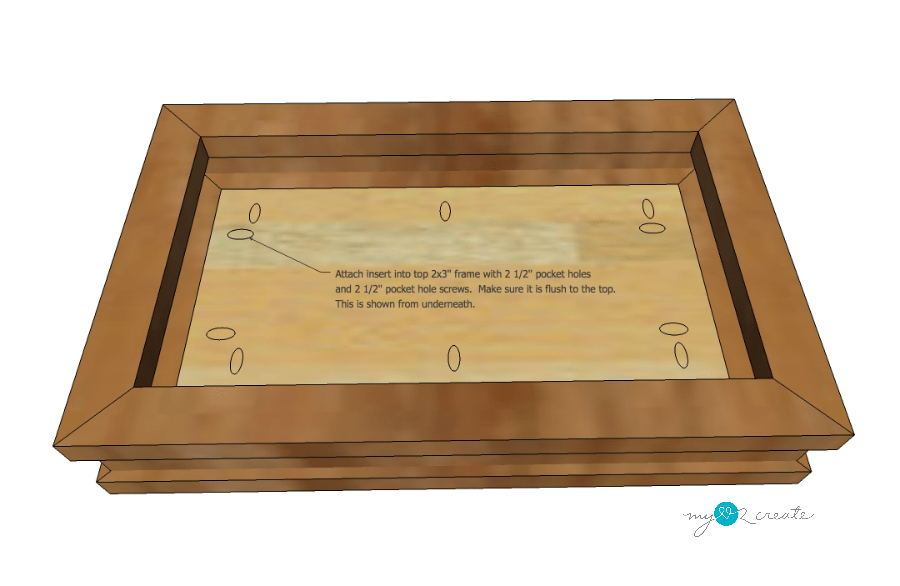
8. Add insert to the top 2x3 frame
Drill 2 1/2'' pocket holes into the plywood side of the insert and attach it inside of the top 2x3 frame.
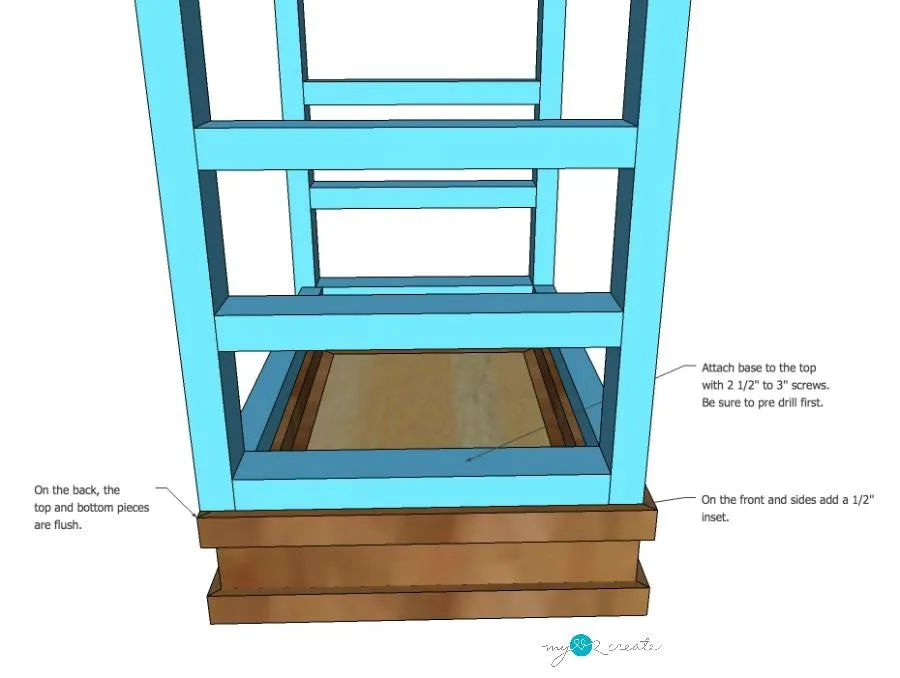
9. Attach the base to the top
- Attach the base of your vanity to the top with 3'' screws as shown.
- Cut any holes into the top of the vanity for your sink with a jigsaw. Install sink according to factory directions and enjoy!
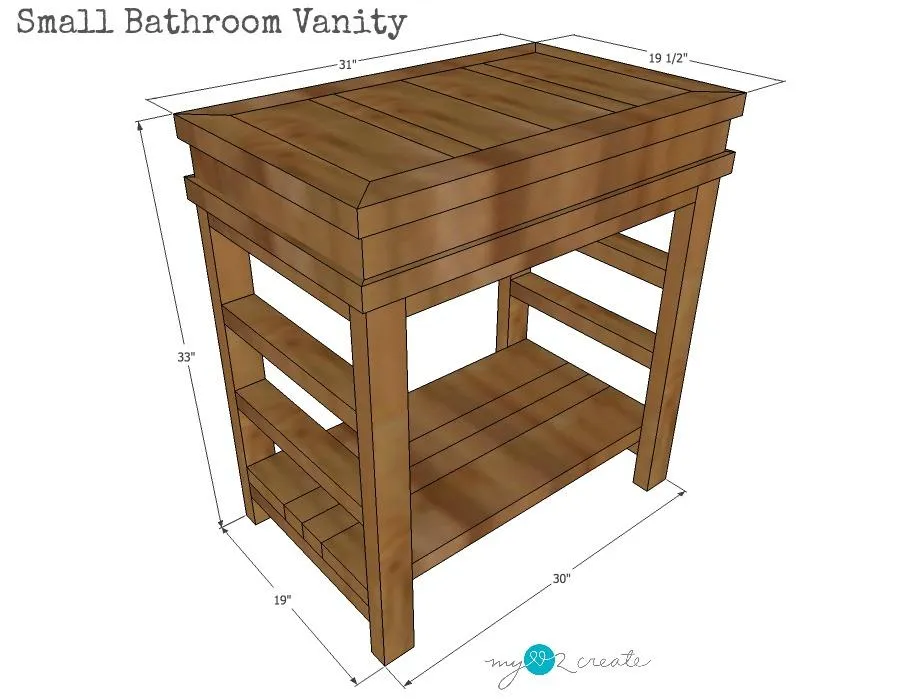
10. Finished Vanity Dimensions
Here are the finished dimensions of the small bathroom vanity.
11. Visit MyLove2Create.com
For more details and picture tutorial of this project visit, http://www.mylove2create.com/2016/09/small-bathroom-vanity.html