 Notch
Notch- Difficulty
- Intermediate
- Time
- 4.5–9 hours
- Cost
- $$$
About this build
This Small Bathroom Vanity is ideal for your extra powder room or guest bathroom. With an open modern feel, clean lines, and unique design it is sure to add beauty and character to any bathroom. Finish it rustic, or paint it for a more modern look, this weekend build is sure to impress your guests
Tools
Essential
- Brad Nailer
- Circular Saw
- Drill / Driver
- Impact Driver
- Jigsaw
- Miter Saw
- Pocket Hole Jig
- Random Orbit Sander
- Table Saw
Optional / nice to have
- Bar / Pipe Clamps
Materials
| Item | Qty |
|---|---|
| Board, 2x3 96" | 6 board |
| Board, 1x3 96" | 2 board |
| Board, 2x2 96" | 1 board |
| Board, 2x6 72" | 1 board |
| Board, 1x6 96" | 1 board |
| Plywood, 3/4" Thick Quarter Sheet | 1 board |
| Vessel type sink | 1 each |
| 2 1/2'' Pocket hole screws | 100 each |
| 3'' screws | 20 each |
| Stain or Paint for desired finish | 1 each |
| High moisture finishing sealer | 1 each |
Overall cost: $$$. Lumber prices vary by region, species, and season, so we give a band rather than a figure we would only be pretending to know.
Cut list
| Part | Qty | T × W × L |
|---|---|---|
| Legs | 4 | 1" × 2" × 27" |
| Side rails | 8 | 1" × 2" × 16" |
| Top rails | 2 | 1" × 1" × 25" |
| Bottom shelf boards | 2 | 1" × 5" × 30" |
| Bottom shelf boards | 2 | 1" × 2" × 30" |
| Top inset support plywood piece | 1 | 3/4" × 14" × 26" |
| Top inset pieces | 4 | 1" × 5" × 14" |
| Top inset pieces | 2 | 1 1/2" × 2 1/2" × 2" |
| 2x3 frame pieces | 4 | 1" × 2" × 31" |
| 2x3 frame pieces | 4 | 1" × 2" × 19" |
| 1x3 frame pieces | 2 | 3/4" × 2" × 18" |
| 1x3 frame pieces | 2 | 3/4" × 2" × 30" |
What to buy
Buy 13 boards at 8 ft.
1 1/2" × 2 1/2"
1 board
1" × 5"
2 boards
1" × 2"
6 boards
1" × 1"
1 board
3/4" × 14"
1 board
3/4" × 2"
2 boards
Assumes 8 ft stock, a 1/8" saw kerf, and buying each part at its own width. Change the board size or kerf on the full board plan →
Instructions
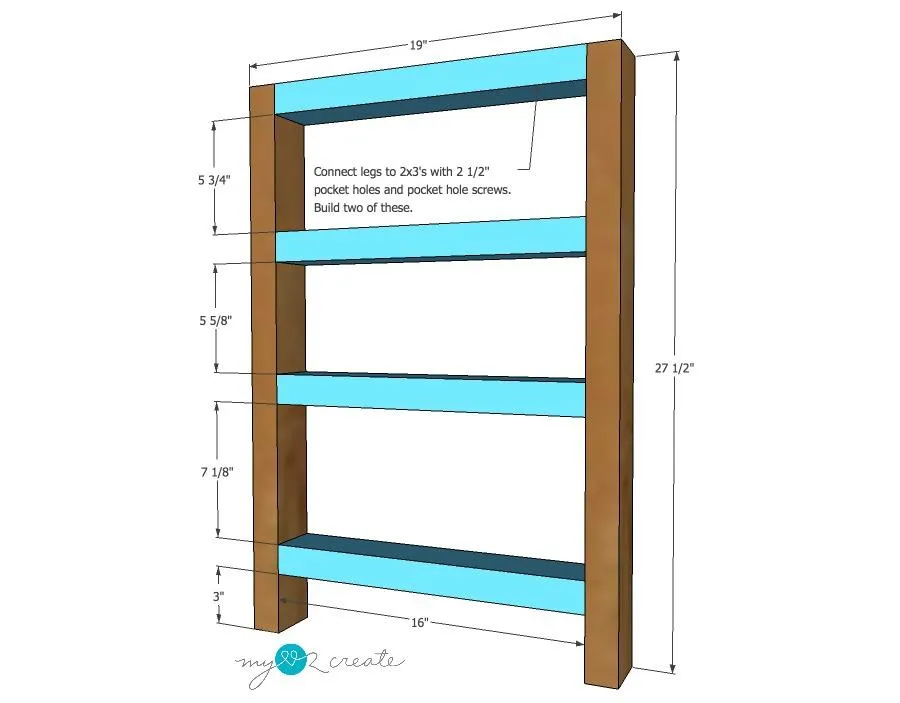
1Legs and side rails
Build two sets of legs and side rails. Attach rails to legs as shown.
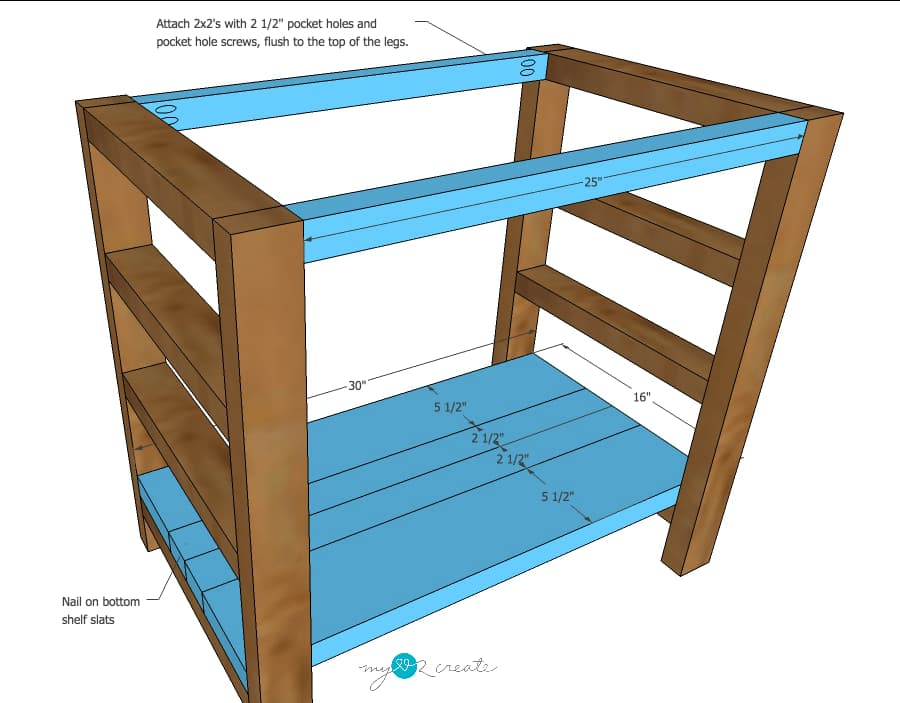
2Add top rails and shelf boards
Connect the two leg sections with the top rails. Nail on the bottom shelf boards.
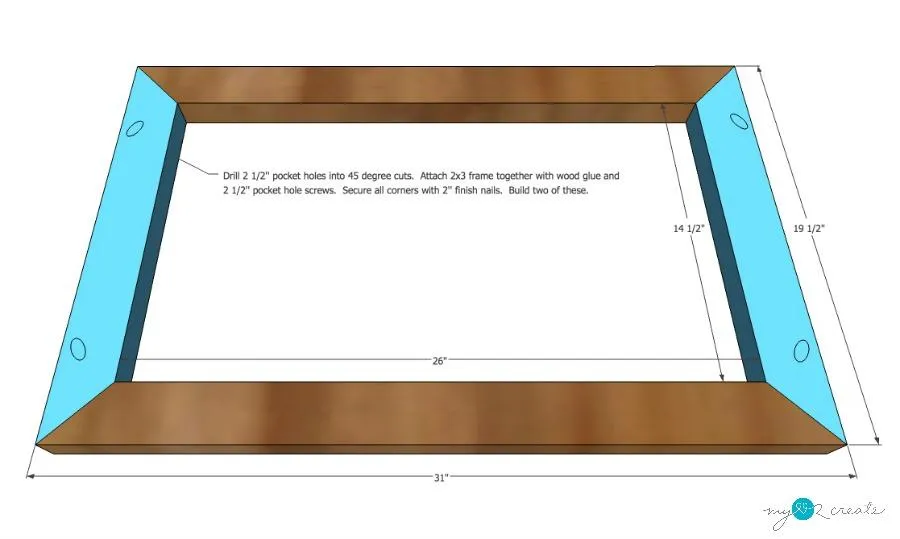
3Build two 2x3 frames
- Build two 2x3 frames as shown for top section of vanity.
- Cut corners at a 45 degree miter.
- Attach with pocket holes and finish nails.
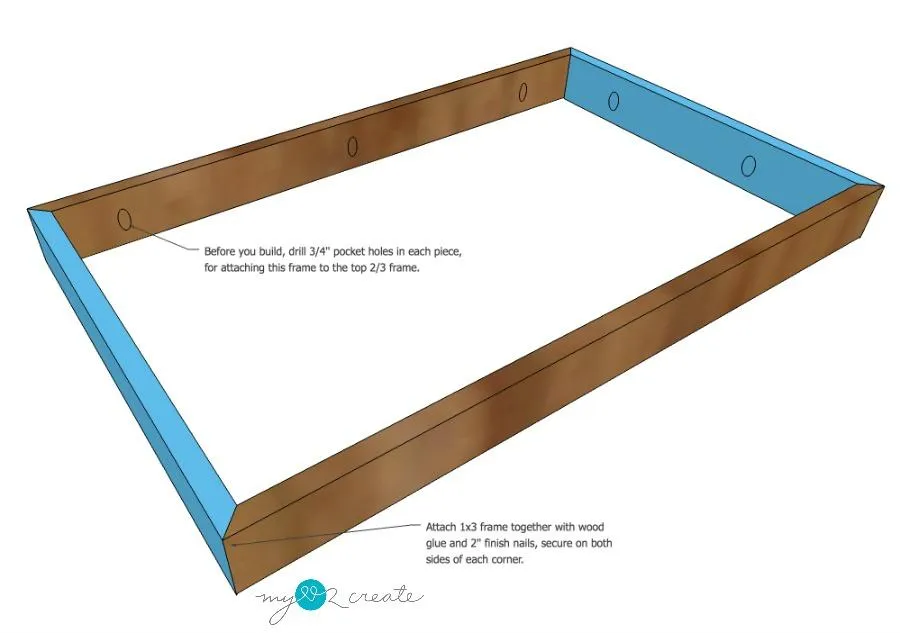
4Build 1x3 frame
Build a 1x3 frame as shown using 45 degree bevel cuts. Attach with wood glue and 2'' finish nails.
5Attach top 2x3 frame to 1x3 frame
Using 3/4'' pocket holes and 1 1/4'' pocket hole screws attach the 1x3 frame to the 2x3 top frame as pictured.
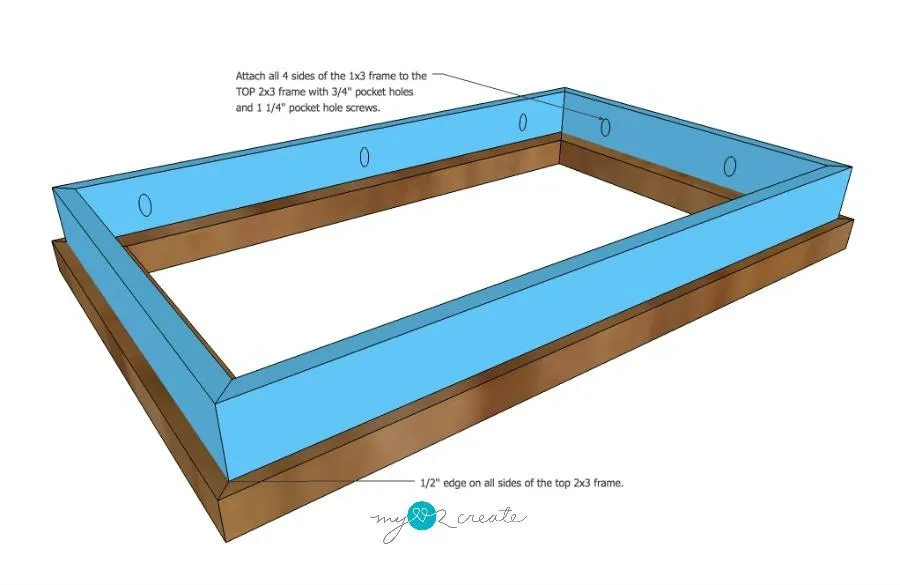
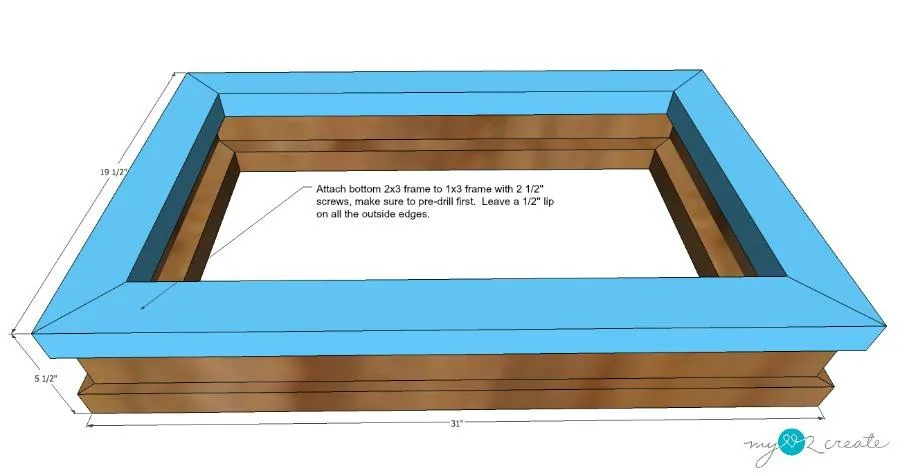
6Attach bottom 2x3 frame
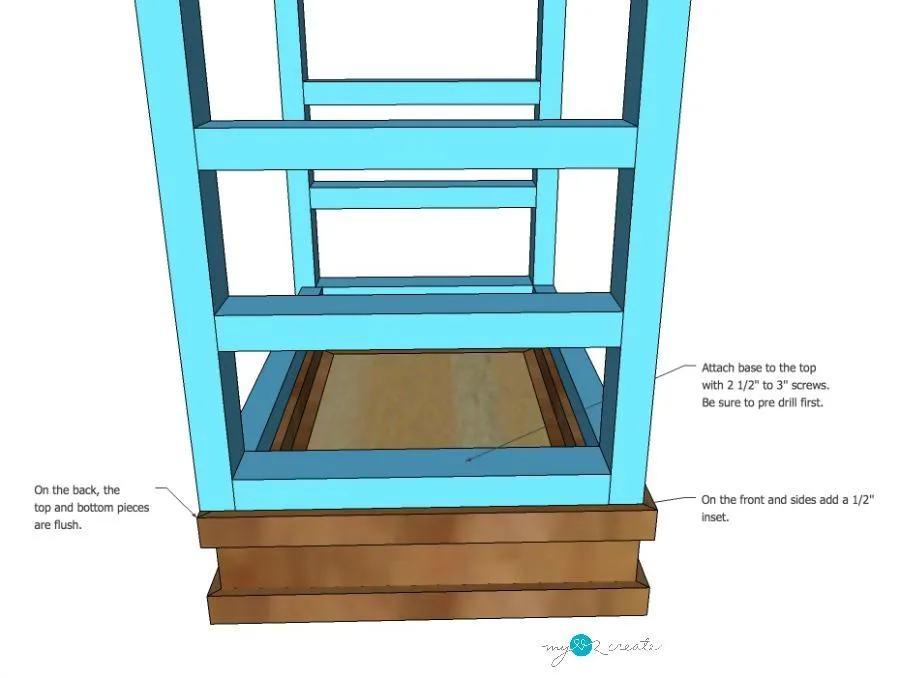
Attach the bottom 2x3 frame to the 1x3 frame with 2 1/2'' or 3'' screws, make sure to pre-drill first.
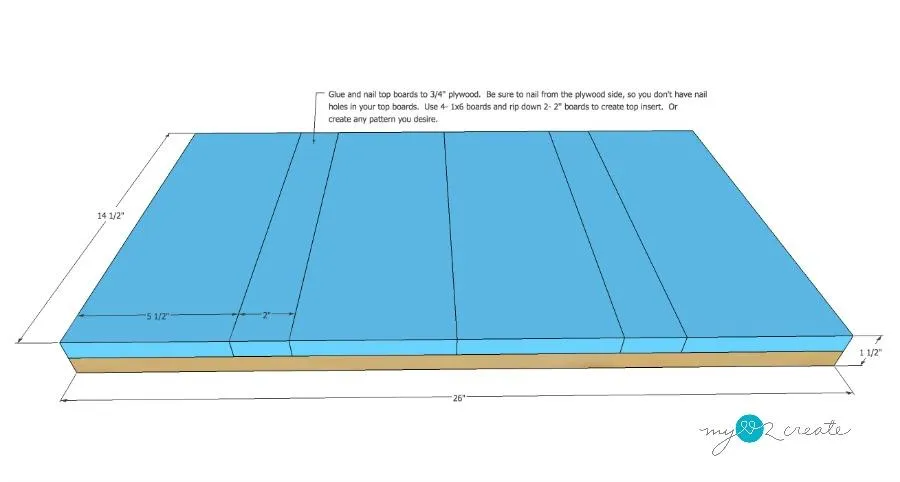
7Build top insert piece
For the decorative top cut your plywood and attach the 3/4'' wood to the top as pictured with wood glue and finish nails, nail from bottom. You may vary the pattern as desired.
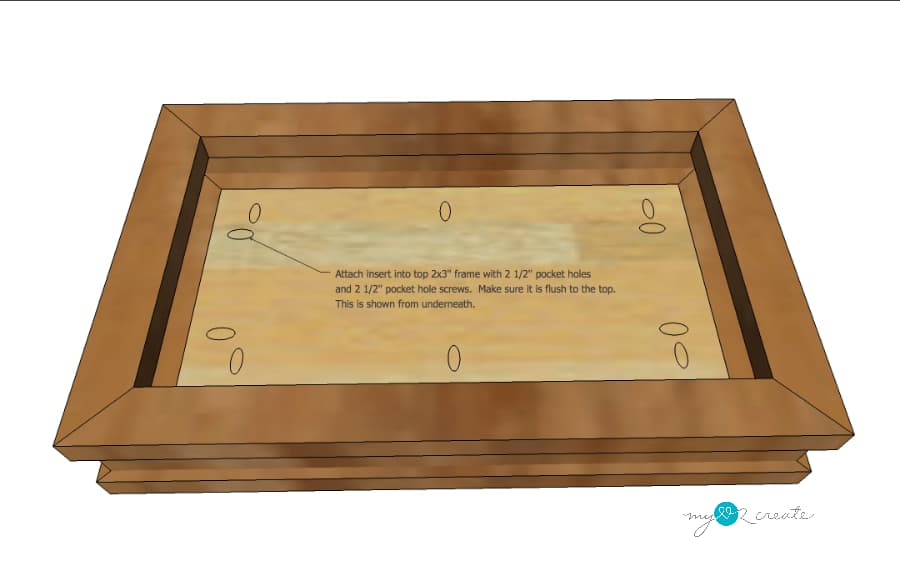
8Add insert to the top 2x3 frame
Drill 2 1/2'' pocket holes into the plywood side of the insert and attach it inside of the top 2x3 frame.
9Attach the base to the top
- Attach the base of your vanity to the top with 3'' screws as shown.
- Cut any holes into the top of the vanity for your sink with a jigsaw. Install sink according to factory directions and enjoy!
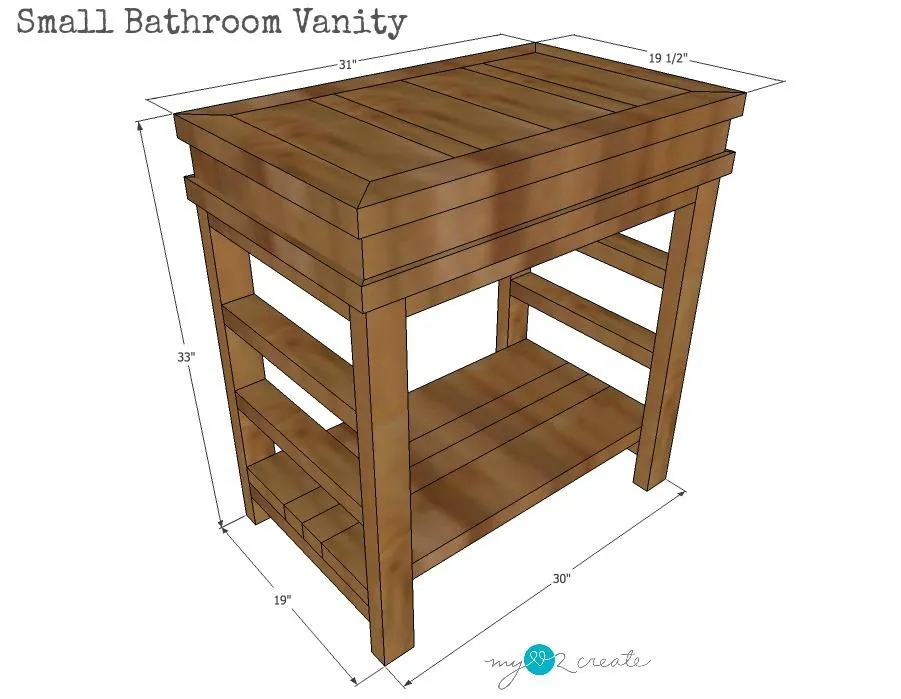
10Finished Vanity Dimensions
Here are the finished dimensions of the small bathroom vanity.
11Visit MyLove2Create.com
For more details and picture tutorial of this project visit, http://www.mylove2create.com/2016/09/small-bathroom-vanity.html
Tags
- Bathroom
- Intermediate
Reviews & builds
No reviews yet
Sign in to review this plan or share your build.
No reviews yet. Be the first to build this.