 Notch
- Difficulty
- Expert
- Time
- 7.8–15 hours
- Cost
- $$$$
About this build
A freestanding pantry cabinet perfect for storage and additional counterspace. Makes a great addition for small home with no pantry or apartment living and adds counterspace for serving or bar set up. Alternatively provides great storage for your office space, craft room or work room.
Tools
Essential
- Brad Nailer
- Circular Saw
- Drill / Driver
- Jigsaw
- Miter Saw
- Pocket Hole Jig
- Random Orbit Sander
Optional / nice to have
- Combination Square
- Tape Measure
Materials
| Item | Qty |
|---|---|
| Plywood, 3/4" Thick Full Sheet | 2 board |
| Plywood, 1/4" Thick Full Sheet | 1 board |
| Board, 1x4 96" | 1 board |
| Board, 1x8 96" | 3 board |
| Board, 1x3 96" | 3 board |
| 1 1/4" pocket hole screws | 50 each |
| 1 1/4" wood screws | 20 each |
| 3/4" wood screws | 20 each |
| 1" finish nails | 30 each |
| Cabinet hinges full wrap | 6 each |
| Hardware pulls | 2 each |
| Magnetic latches | 2 each |
| Shelf pins | 4 each |
| Wood glue | 1 each |
Overall cost: $$$$. Lumber prices vary by region, species, and season, so we give a band rather than a figure we would only be pretending to know.
Cut list
| Part | Qty | T × W × L |
|---|---|---|
| Top | 1 | 3/4" × 24" × 36" |
| Bottom | 1 | 3/4" × 23" × 34" |
| Sides | 2 | 3/4" × 14" × 35" |
| Undertop & shelves | 3 | 3/4" × 14" × 33" |
| Base trim sides | 2 | 3/4" × 3 1/2" × 36" |
| Base trim front | 1 | 3/4" × 3 1/2" × 36" |
| Backing | 1 | 1/4" × 34" × 35" |
| Sides | 4 | 3/4" × 7 1/4" × 2" |
| Top, bottom & shelves | 8 | 3/4" × 7 1/4" × 8" |
| Shelf trim | 6 | 3/4" × 2 1/2" × 8" |
| Backing | 2 | 1/4" × 17" × 31" |
| Trim sides | 4 | 3/4" × 2 1/2" × 2" |
| Trim top & bottom | 4 | 3/4" × 2 1/2" × 8" |
What to buy
Buy 11 boards at 8 ft.
3/4" × 24"
1 board
3/4" × 23"
1 board
3/4" × 14"
3 boards
3/4" × 7 1/4"
1 board
3/4" × 3 1/2"
2 boards
3/4" × 2 1/2"
1 board
1/4" × 34"
1 board
1/4" × 17"
1 board
Assumes 8 ft stock, a 1/8" saw kerf, and buying each part at its own width. Change the board size or kerf on the full board plan →
Instructions
1Dimensions
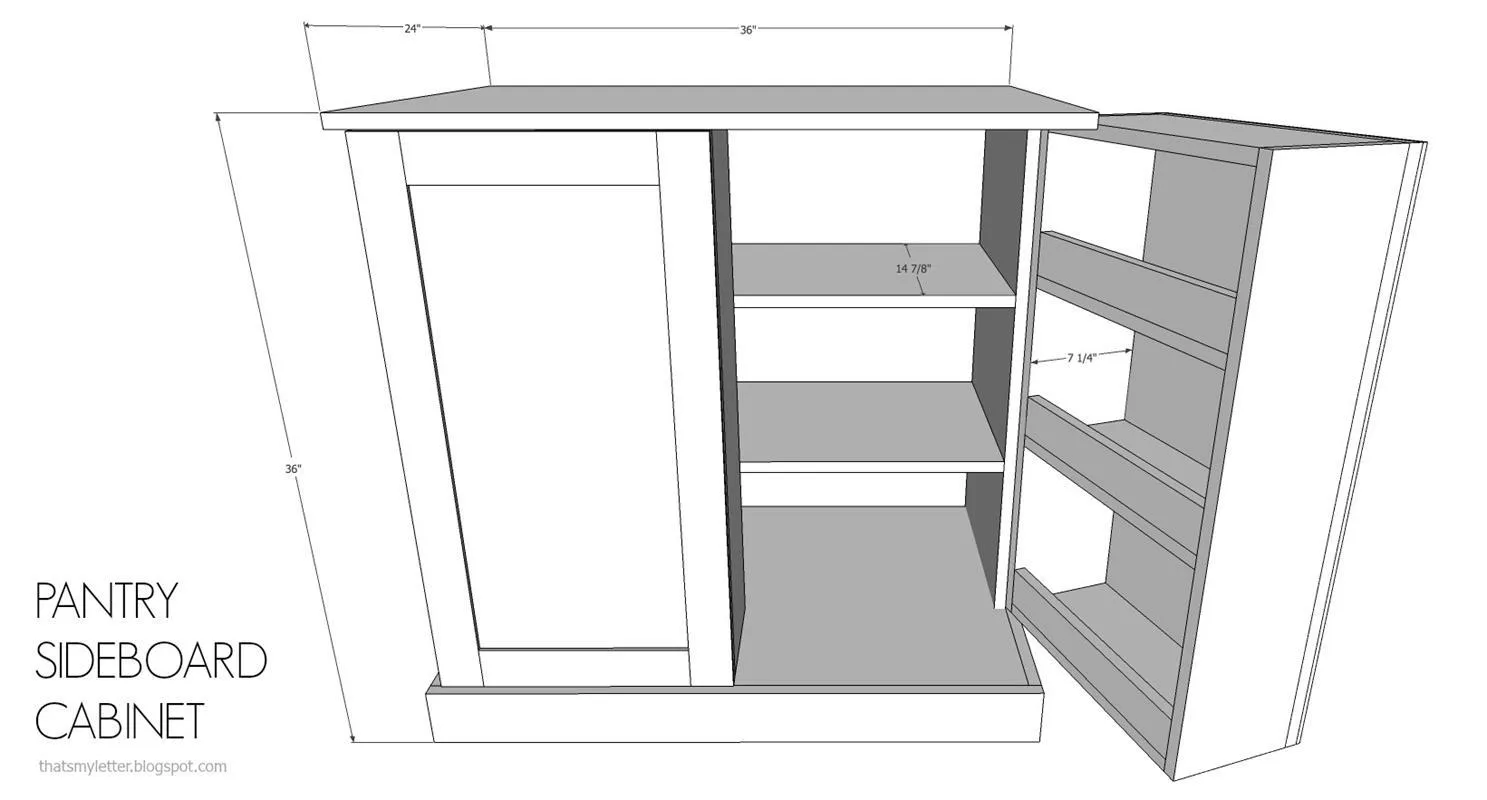
Overall dimensions: 36"w x 24"d x 36"h
2Step 1
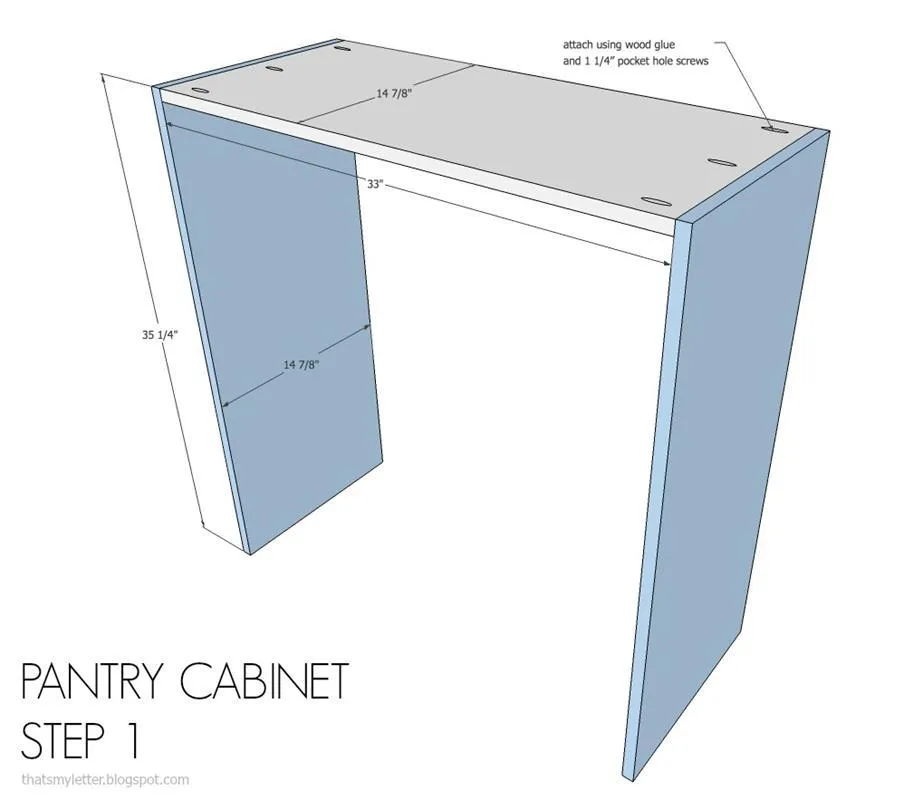
Attach sides to undertop using wood glue and 1 ¼” pocket hole screws.
3Prep for Step 2
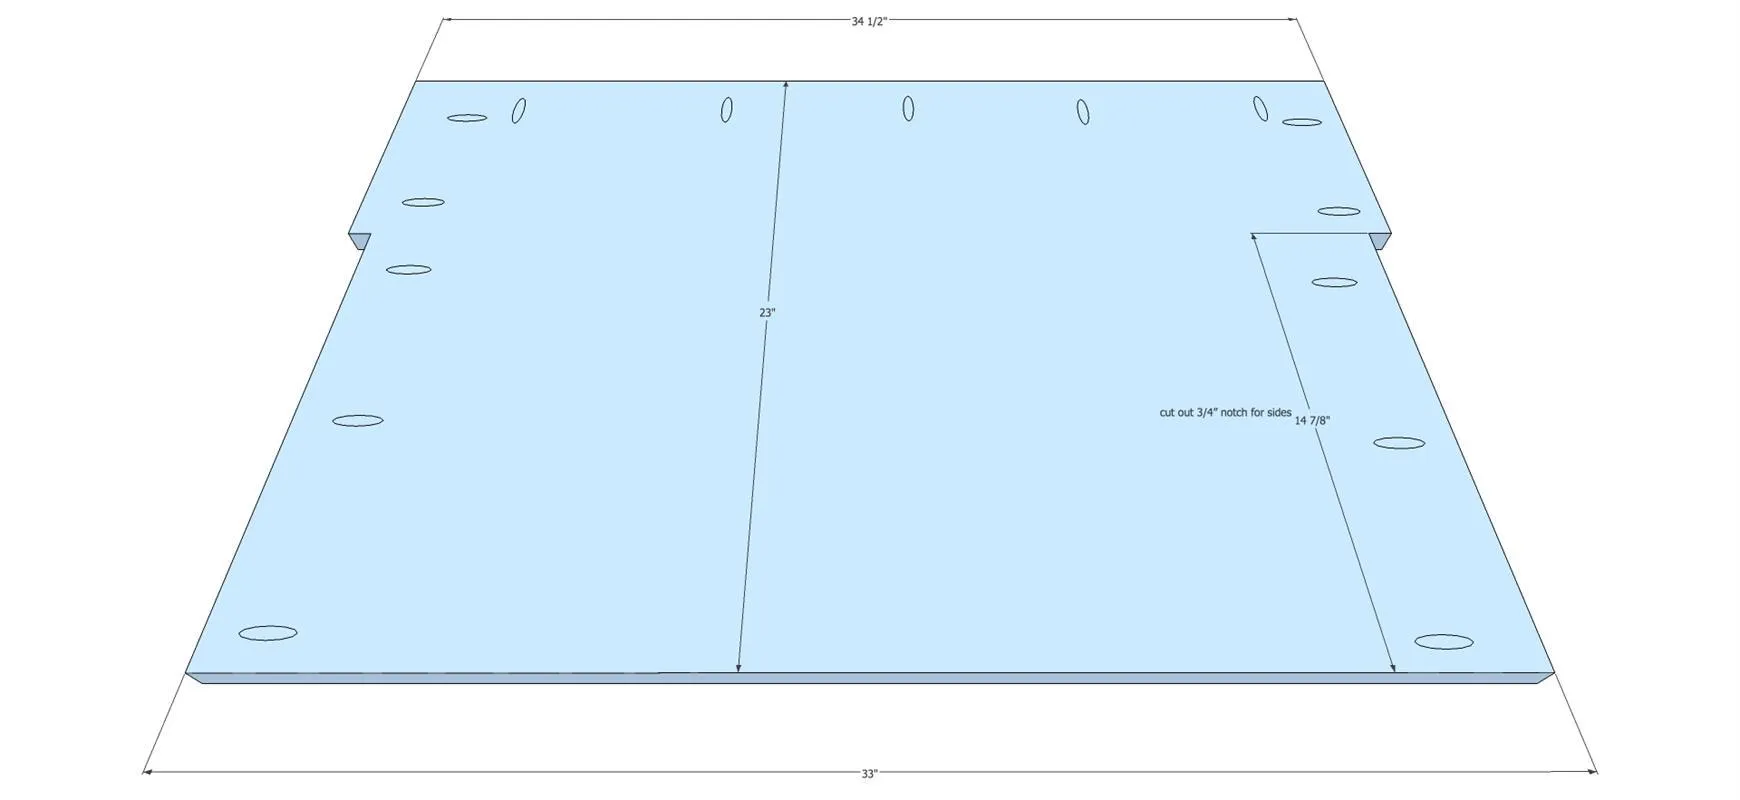
Using a jig saw notch out bottom piece at sides as per sketch above.
4Step 2
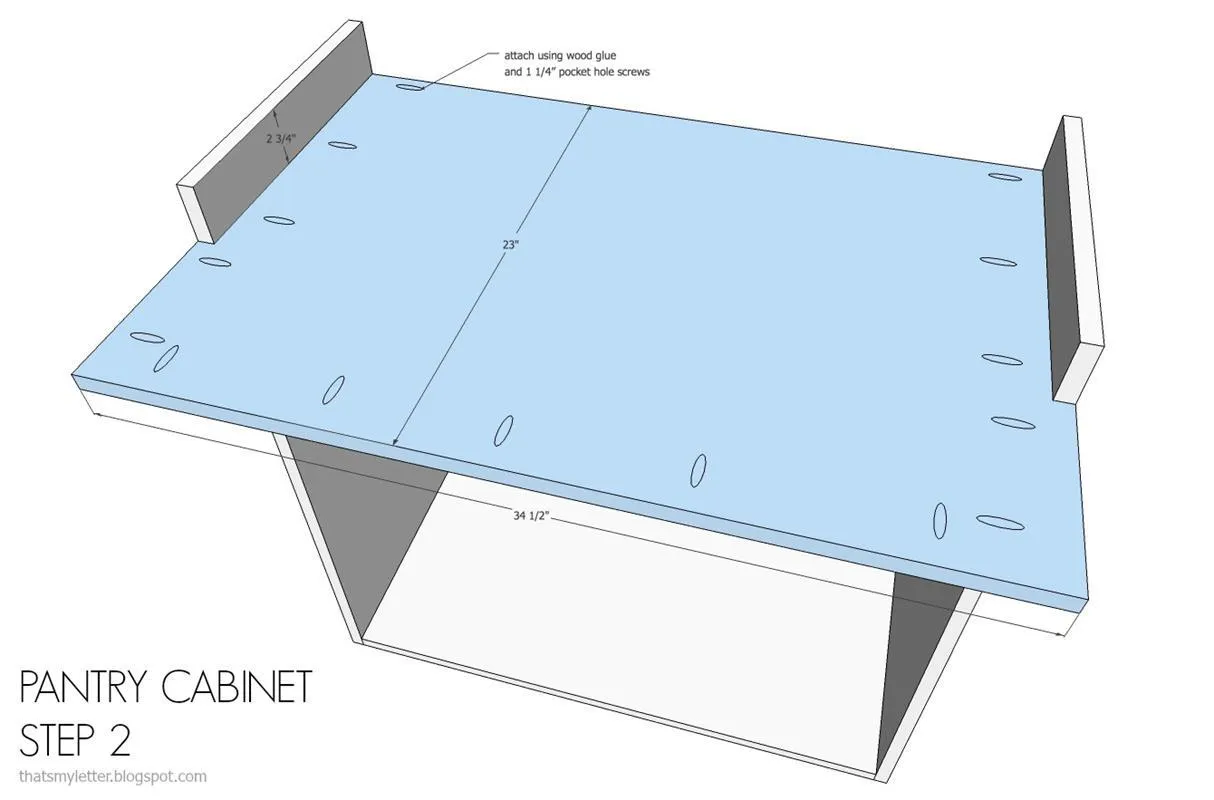
Attach bottom to sides using wood glue and 1 ¼” pocket hole screws.
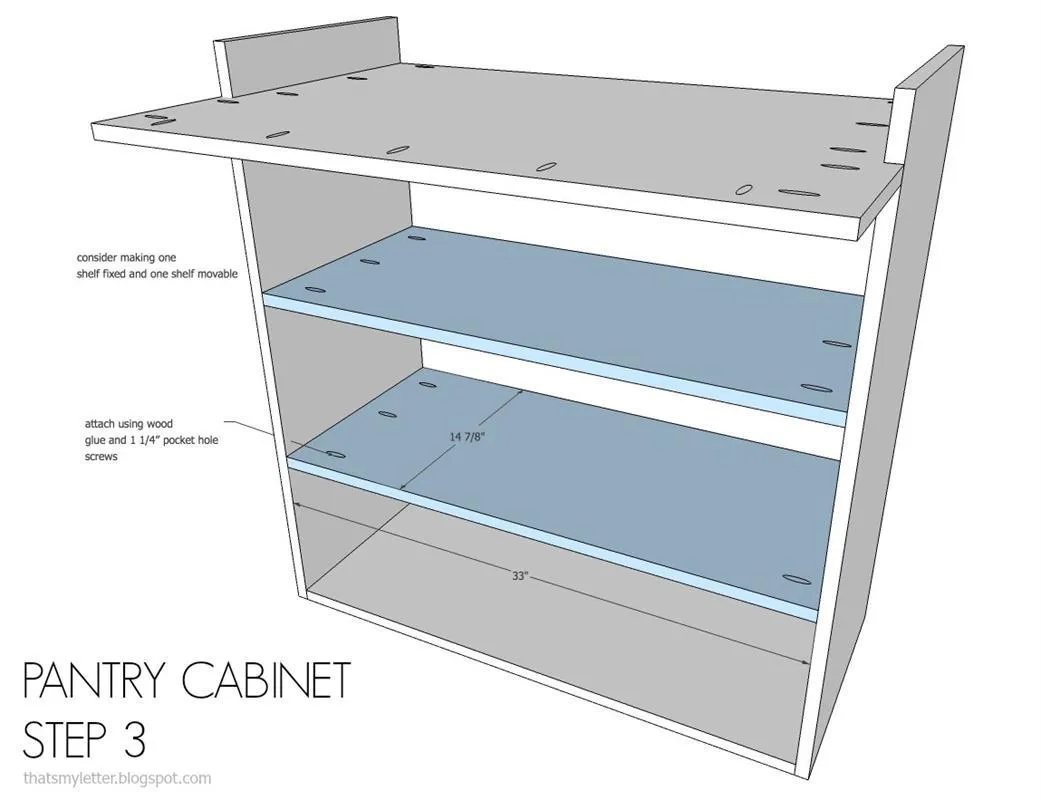
5Step 3
Attach shelves as desired. I suggest making one fixed shelf and one movable shelf. For the fixed shelf attach using wood glue and 1 ¼” pocket hole screws.
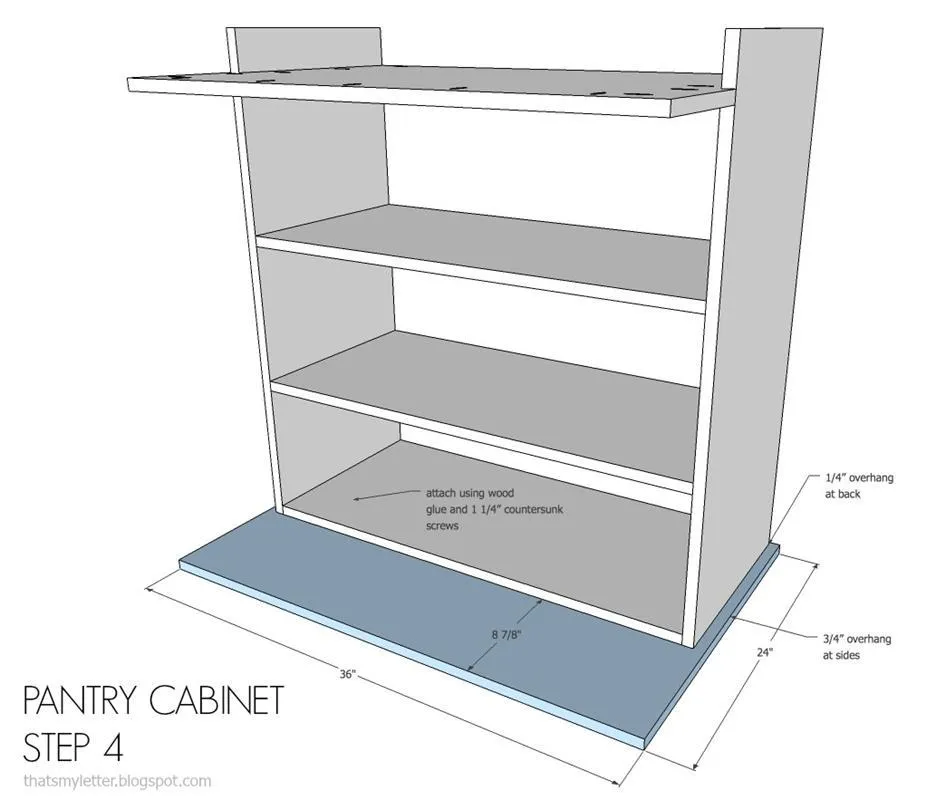
6Step 4
Attach top to undertop using wood glue and countersunk 1 ¼” wood screws. Leave ¼” overhang at back and ¾” overhang on both sides.
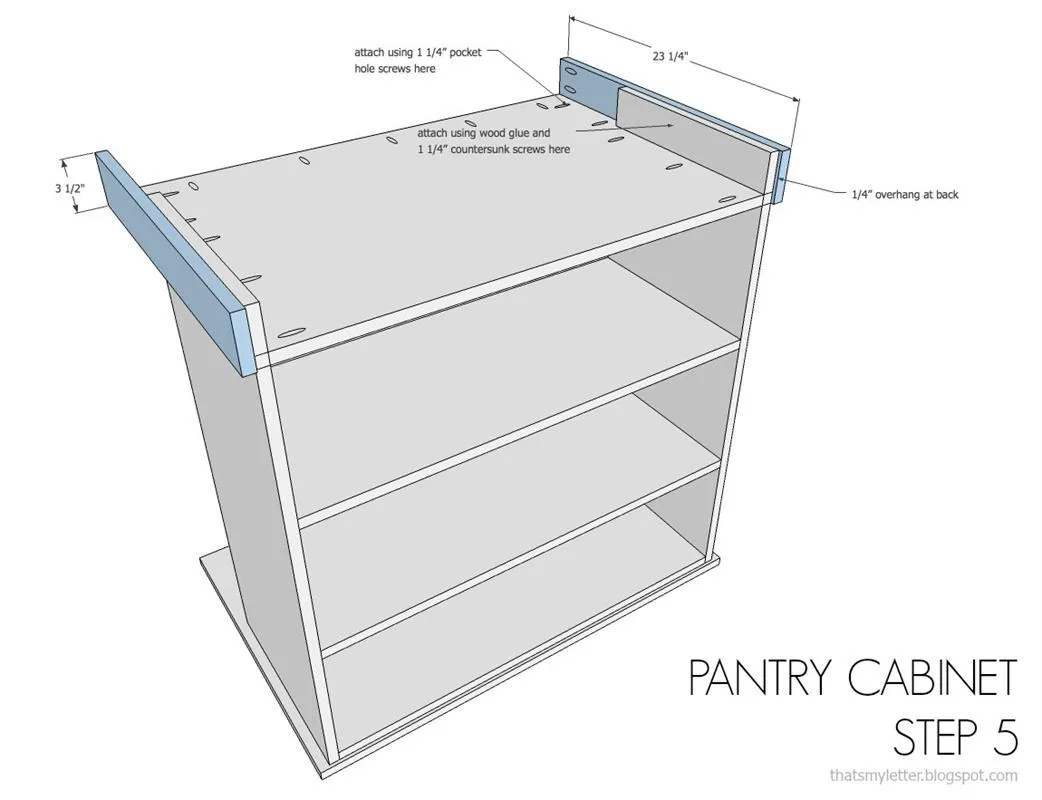
7Step 5
Attach base trim sides to carcass sides using wood glue and countersunk 1 ¼” wood screws. Attach front portion to bottom piece using 1 ¼” pocket hole screws.
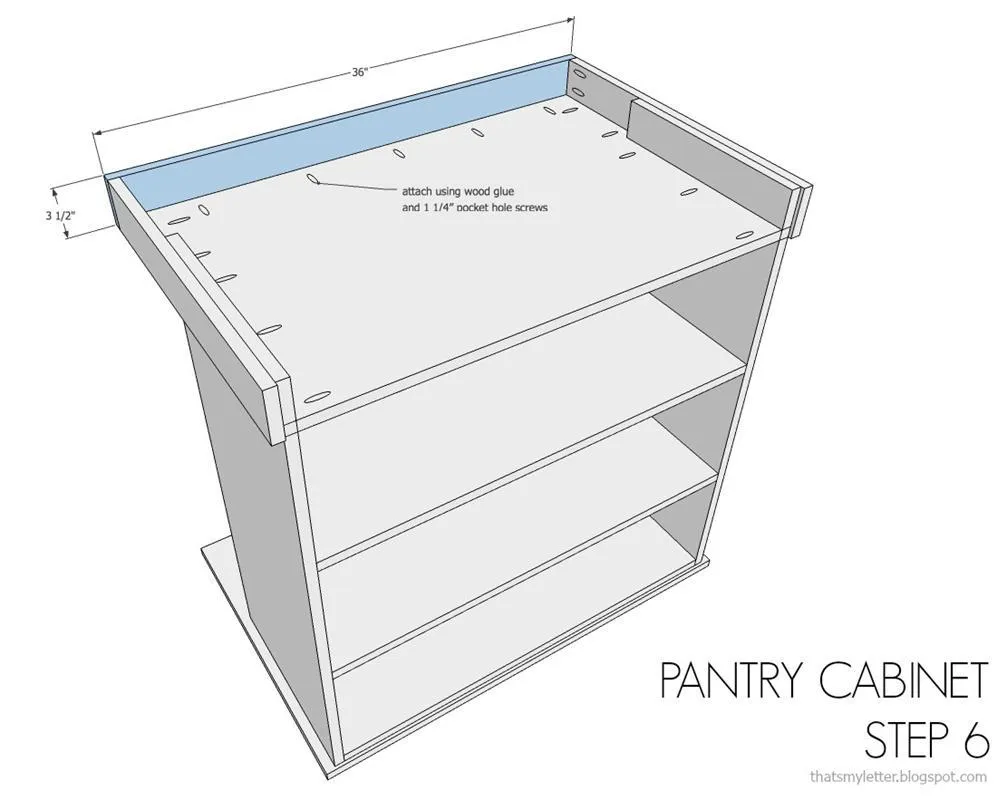
8Step 6
Attach front base trim to bottom piece using wood glue 1 ¼” pocket hole screws. Also attach to base trim side pieces using 1 ¼” pocket hole screws.
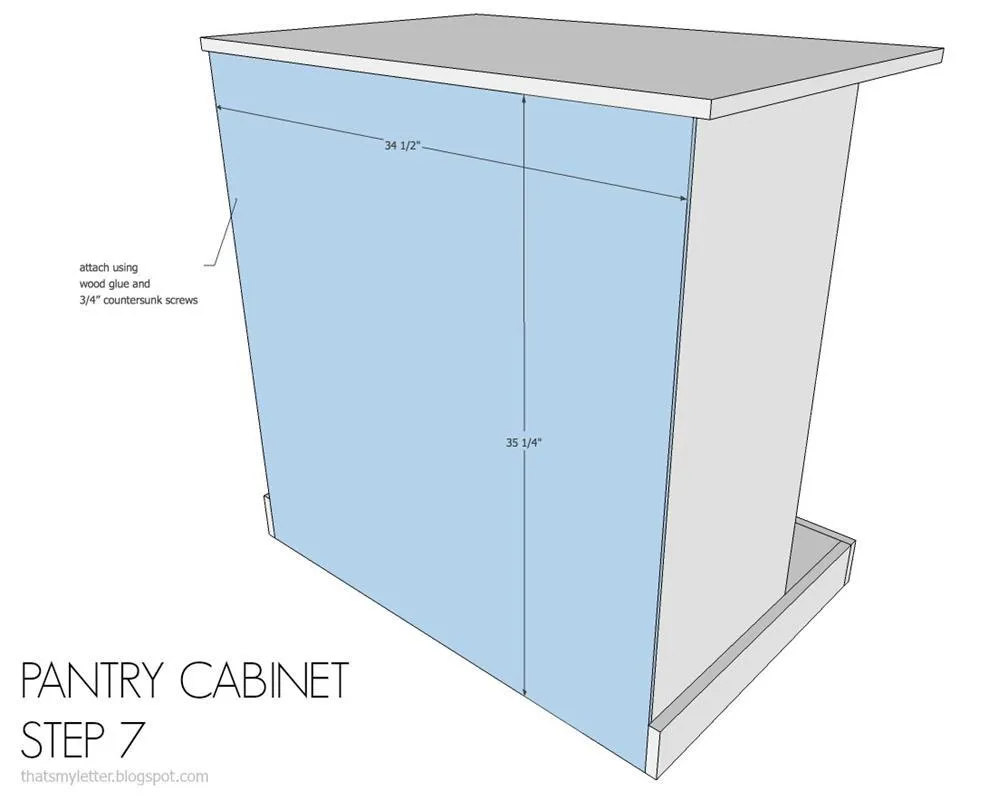
9Step 7
Attach backing to carcass using wood glue and ¾” countersunk wood screws.
10Door Dimensions
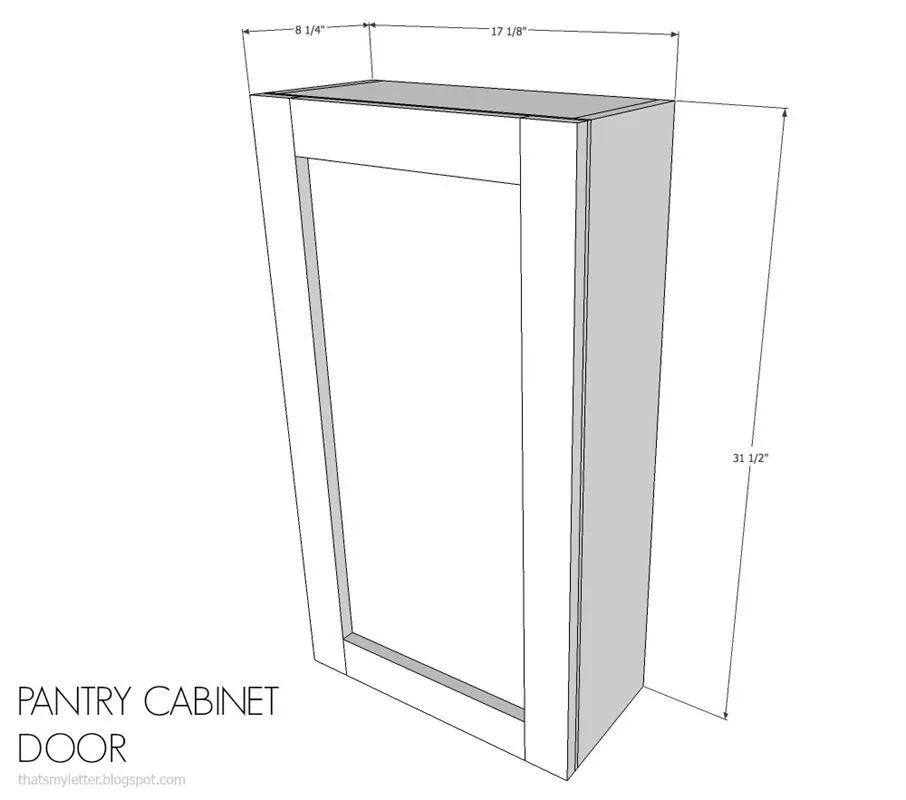
Overall door dimensions: 17 1/8"w x 31 1/2" h x 8 1/4"d
11Door Step 1
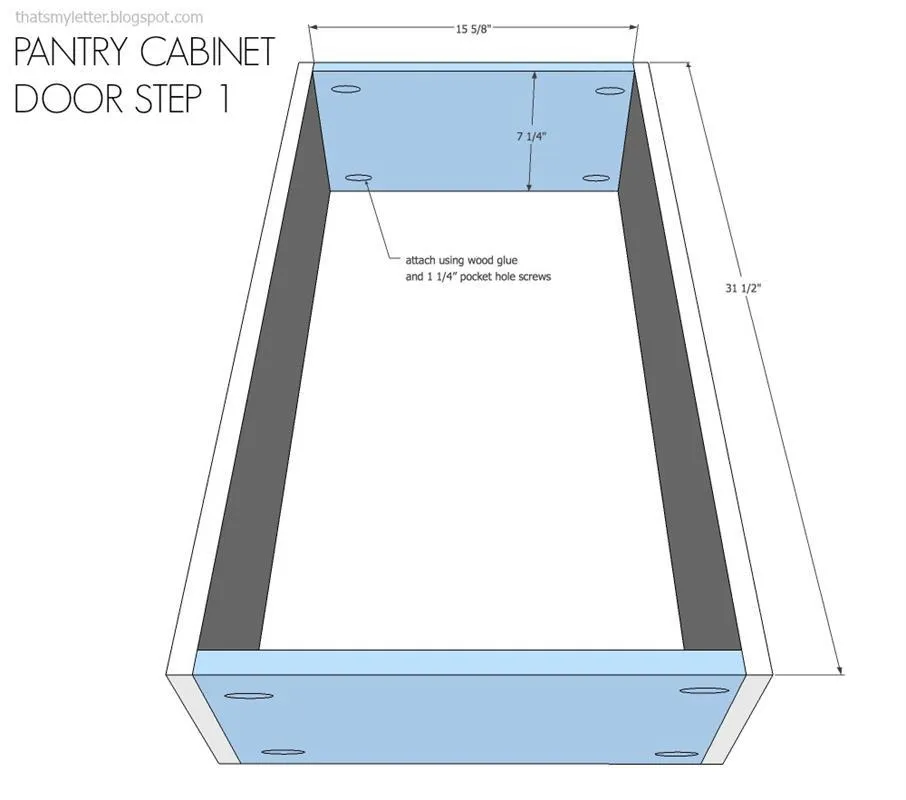
Make door frame by attaching top and bottom to sides using wood glue and 1 ¼” pocket hole screws.
12Door Step 2
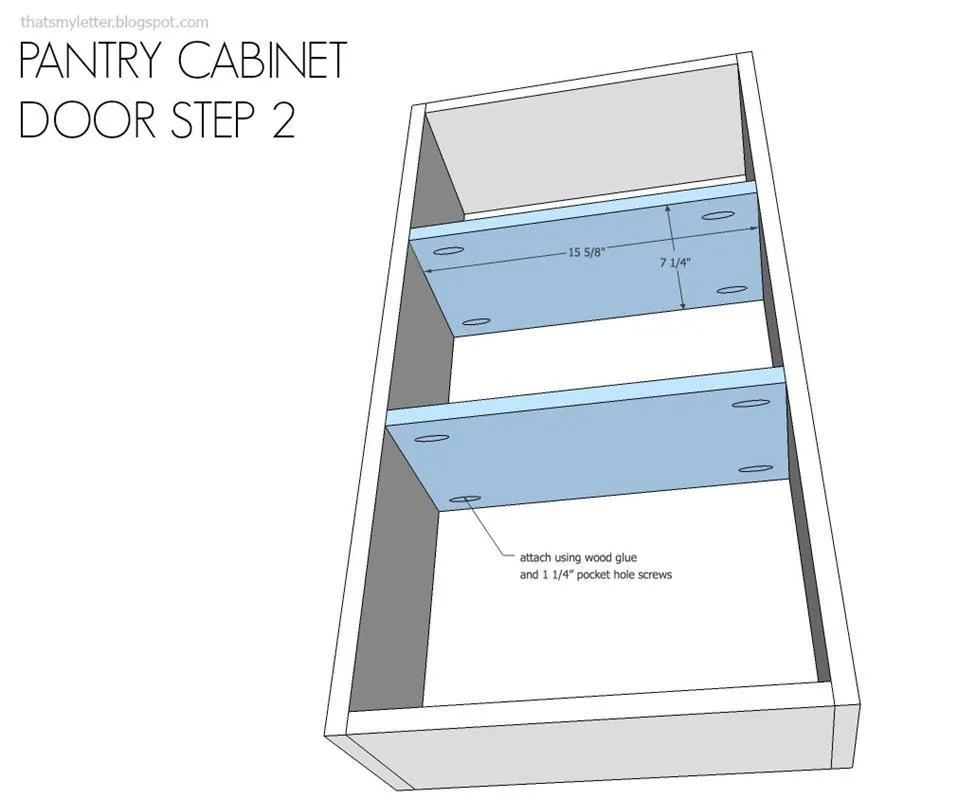
Insert shelves using wood glue and 1 ¼” pocket hole screws.
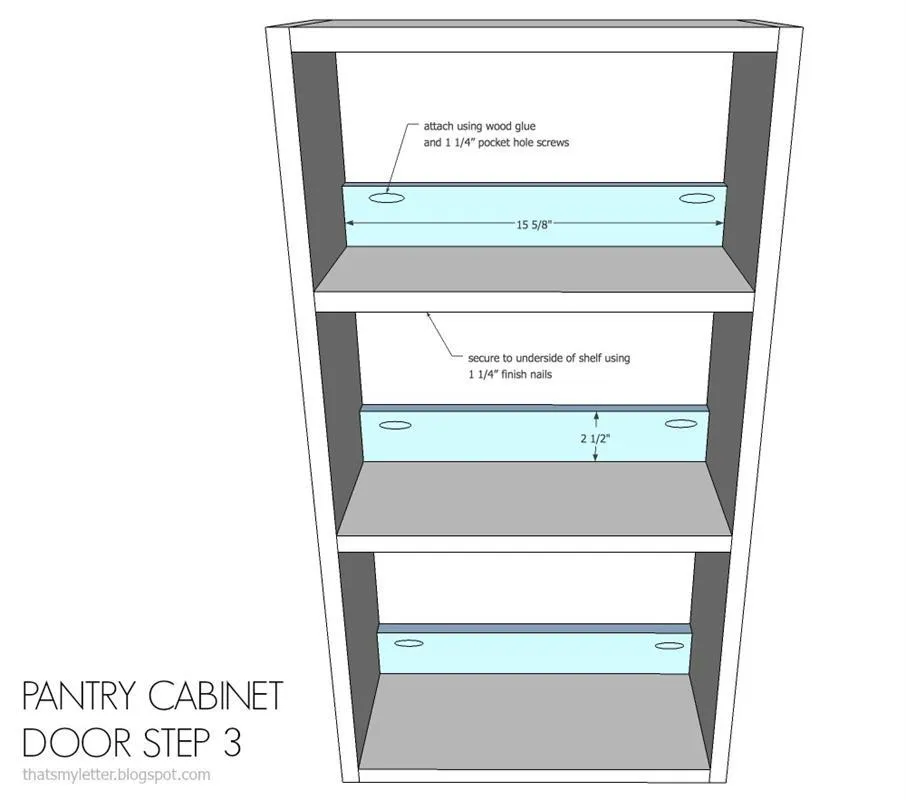
13Door Step 3
Attach shelf trim flush to front using wood glue and 1 ¼” pocket hole screws at sides and secure to shelf at underside using 1 ¼” finish nails.
14Door Step 4
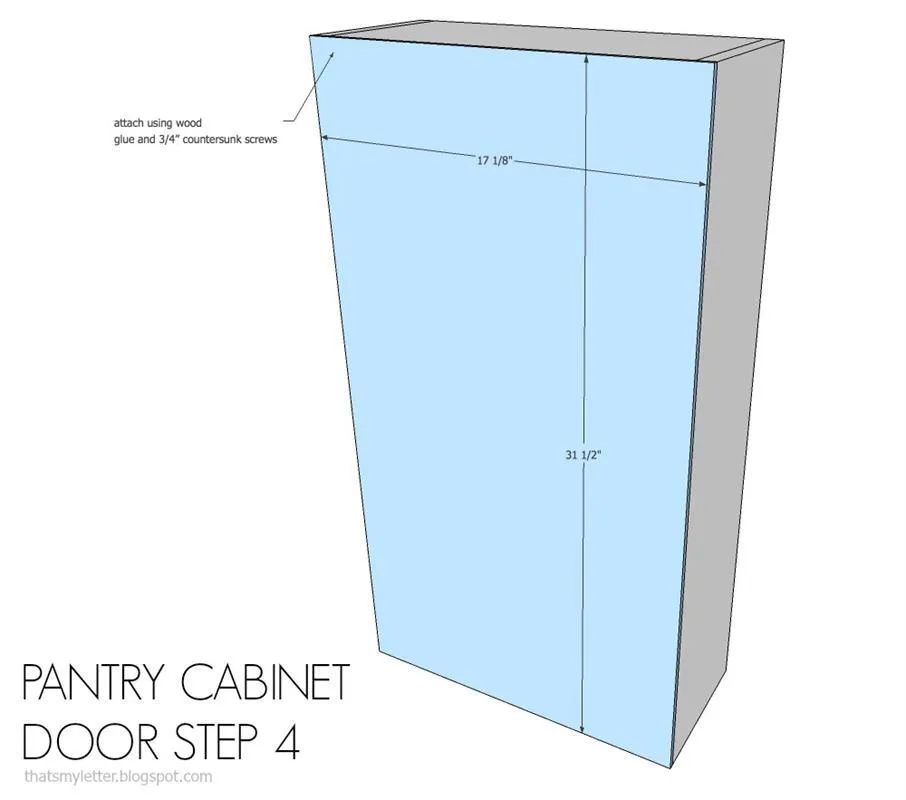
Attach backing to door frame using wood glue and countersunk 3/4” wood screws.
15Door Step 5
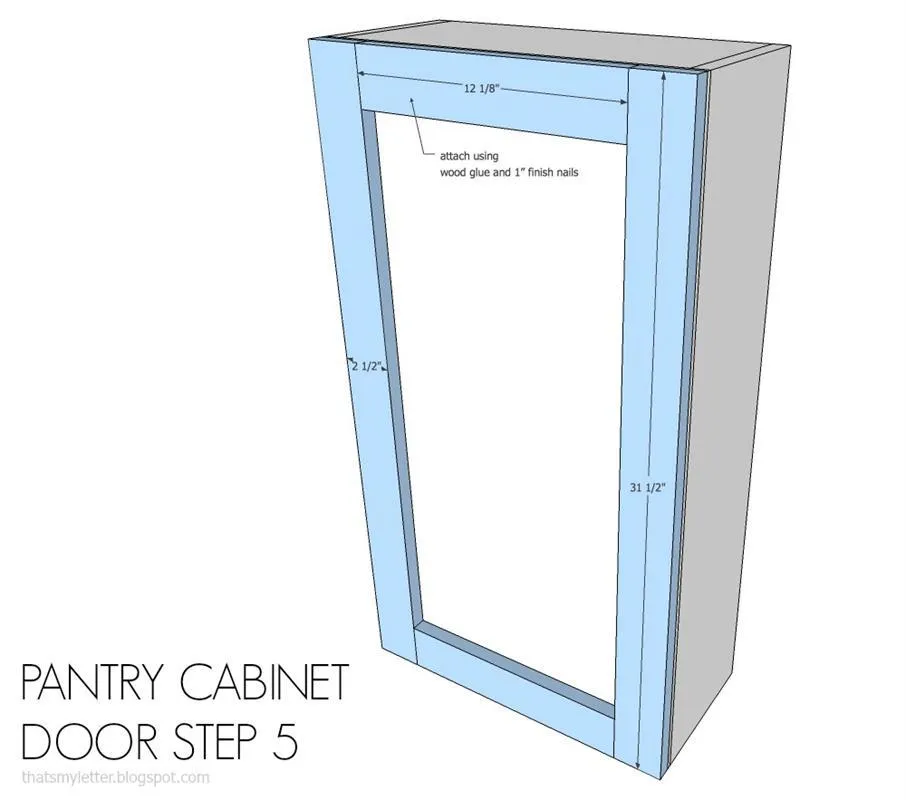
Attach trim pieces using wood glue and 1” finish nails.
Tags
- Kitchen
- Advanced
Reviews & builds
No reviews yet
Sign in to review this plan or share your build.
No reviews yet. Be the first to build this.