Notch
Use your browser's Print (Ctrl/Cmd + P) and choose Save as PDF. This page works offline once you've opened it with a signal.
DIY Small Buffet
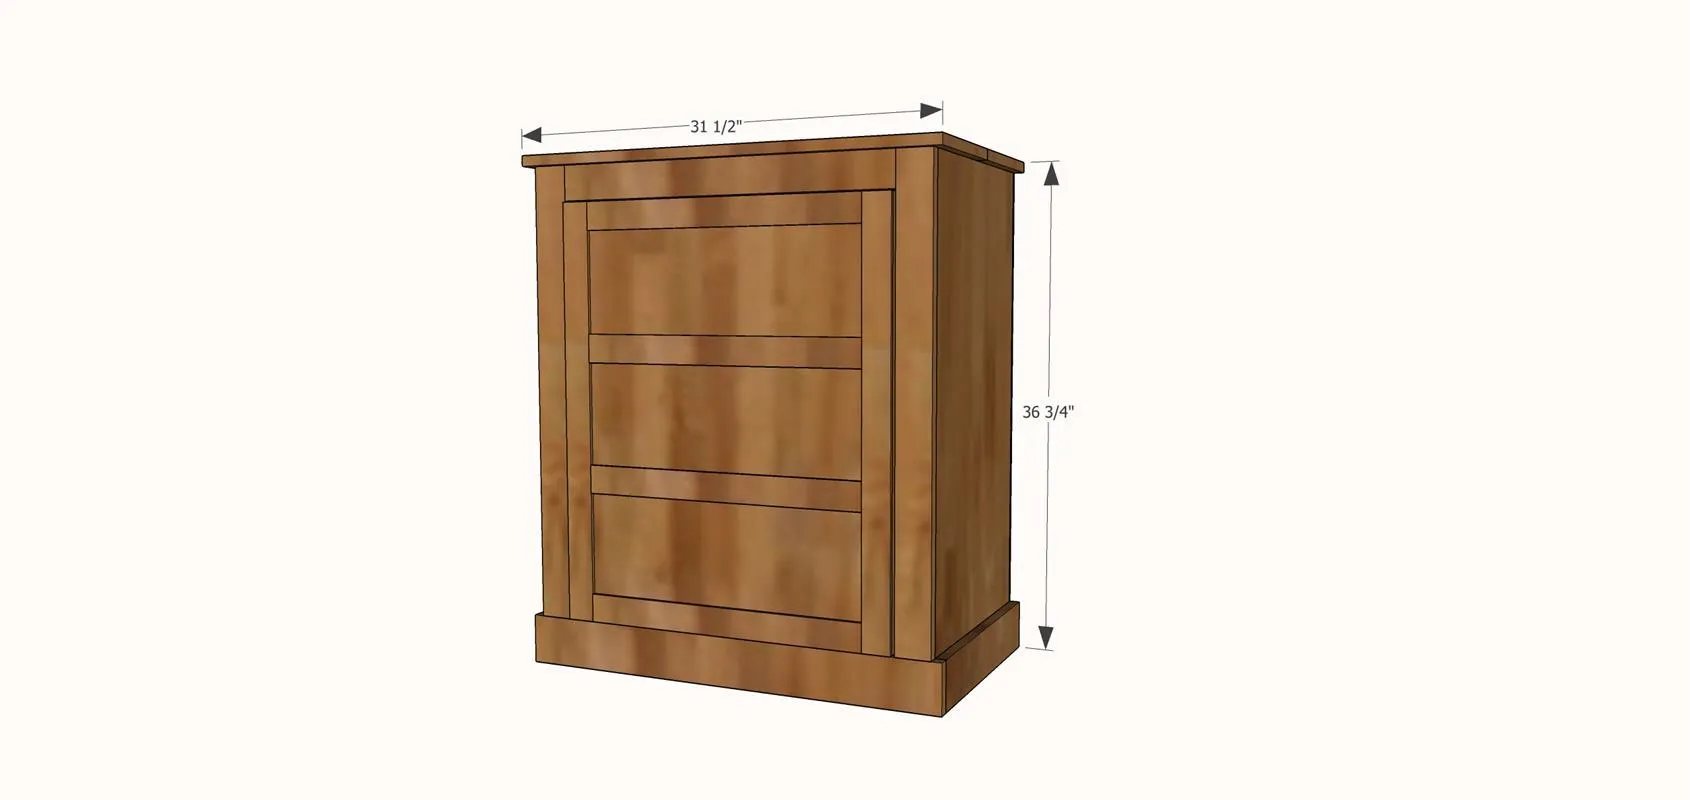
This simple and easy to build Small Kitchen Buffet is the perfect way to add storage without taking up a lot of room.
- Difficulty
- Intermediate
- Time
- 4.3–8.5 hours
- Cost
- $$$
Cut list
| Part | Qty | T × W × L | Material | ✓ |
|---|---|---|---|---|
| Side Panels | 2 | 3/4" × 17" × 36" | — | ☐ |
| Shelves | 2 | 3/4" × 17" × 28" | — | ☐ |
| Top Support Boards | 2 | 1" × 4" × 28" | — | ☐ |
| Bottom Trim Pieces | 2 | 1" × 4" × 17" | — | ☐ |
| Bottom Trim Piece | 1 | 1" × 4" × 31" | — | ☐ |
| Shelf Cleats | 2 | 1" × 2" × 17" | — | ☐ |
| Facing - Side Pieces | 2 | 1" × 4" × 32" | — | ☐ |
| Facing - Top Piece | 1 | 1" × 4" × 25" | — | ☐ |
| Back Panel | 1 | 1/4" × 30" × 36" | — | ☐ |
| Top Boards | 2 | 1" × 10" × 31" | — | ☐ |
| Door Side Trim Pieces | 2 | 1/4" × 2" × 29" | — | ☐ |
| Door Trim Pieces | 4 | 1/4" × 2" × 20" | — | ☐ |
| Door | 1 | 1/2" × 24" × 29" | — | ☐ |
Materials
| Item | Qty | ✓ |
|---|---|---|
| Board, 1x4 96" | 3 board | ☐ |
| Plywood, 3/4" Thick Full Sheet | 1 board | ☐ |
| Plywood, 1/2" Thick Half Sheet | 1 board | ☐ |
| Plywood, 1/4" Thick Half Sheet | 1 board | ☐ |
| Board, 1x2 72" | 1 board | ☐ |
| Board, 1x10 72" | 1 board | ☐ |
| Hinges | 2 each | ☐ |
| Black Barrel Bolt | 1 each | ☐ |
| 1 1/4" Fine Kreg Jig Screws | 40 each | ☐ |
| 1 1/4" Finish Nails | 150 each | ☐ |
| 1/2" Finish Nails | 20 each | ☐ |
| Wood Glue | 1 each | ☐ |
Overall cost: $$$. Lumber varies by region, species, and season, so we give a band rather than a figure.
Tools
- Brad Nailer
- Circular Saw
- Drill / Driver
- Miter Saw
- Pocket Hole Jig
- Random Orbit Sander
- Table Saw
- Bar / Pipe Clamps — optional
- Combination Square — optional
- Tape Measure — optional
Instructions
1. Step 1: Cuts and Pocket Holes
Make Cuts and create pocket holes where indicated by the red dots in the provided cut list. However, I do suggest cutting as you go in order to keep the project square.
2. Step 2: Form Box
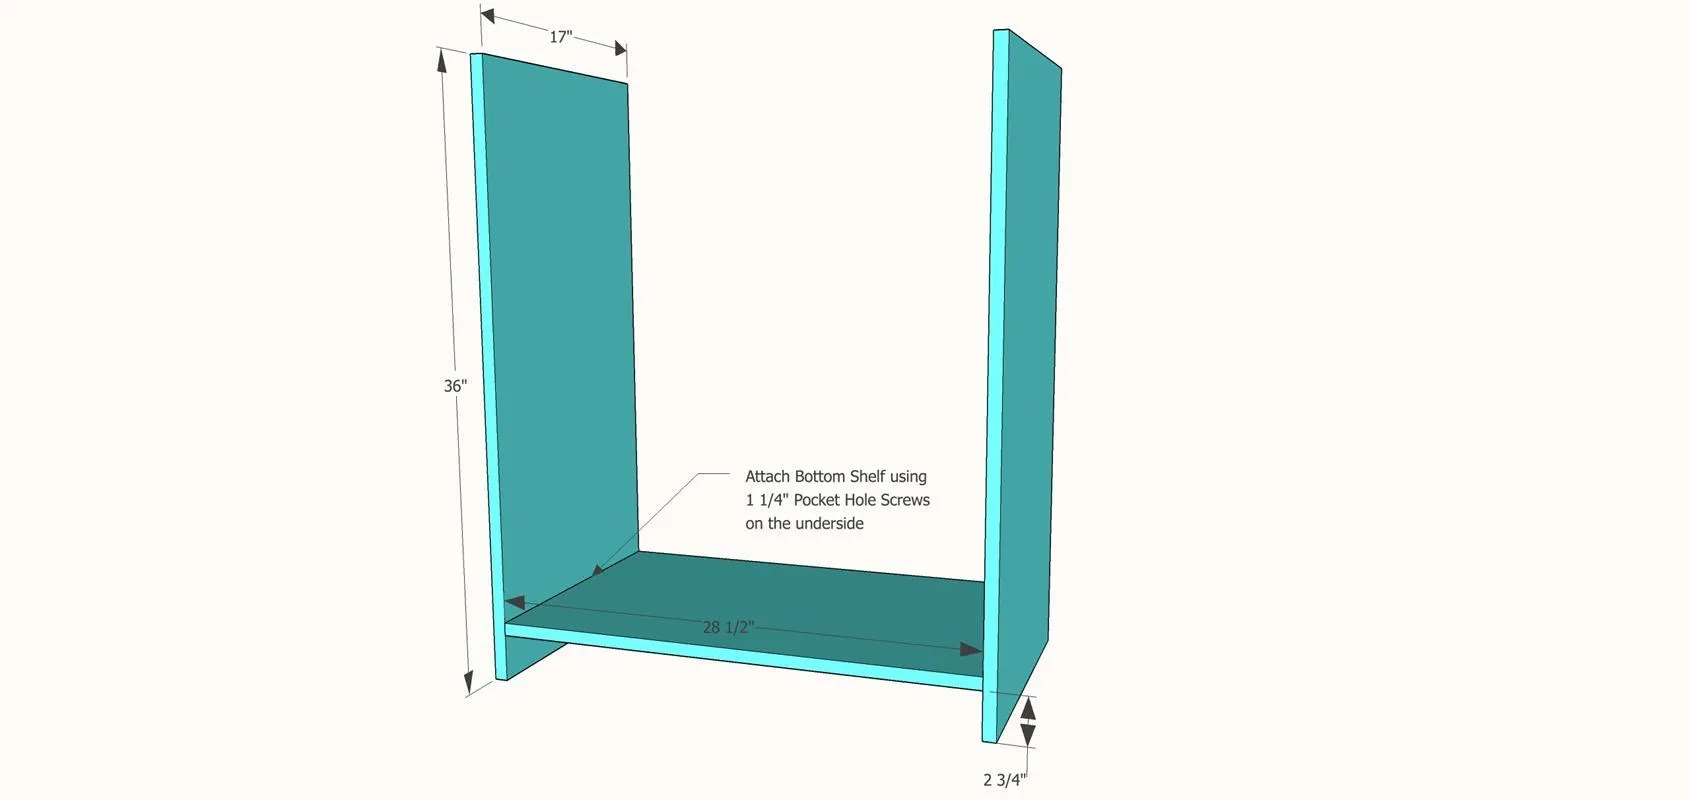
Using the 2 side panels and 1 shelf, attach the bottom shelf to the side panels with 1 1/4" pocket hole screws and wood glue.
3. Step 3: Attach Top Supports
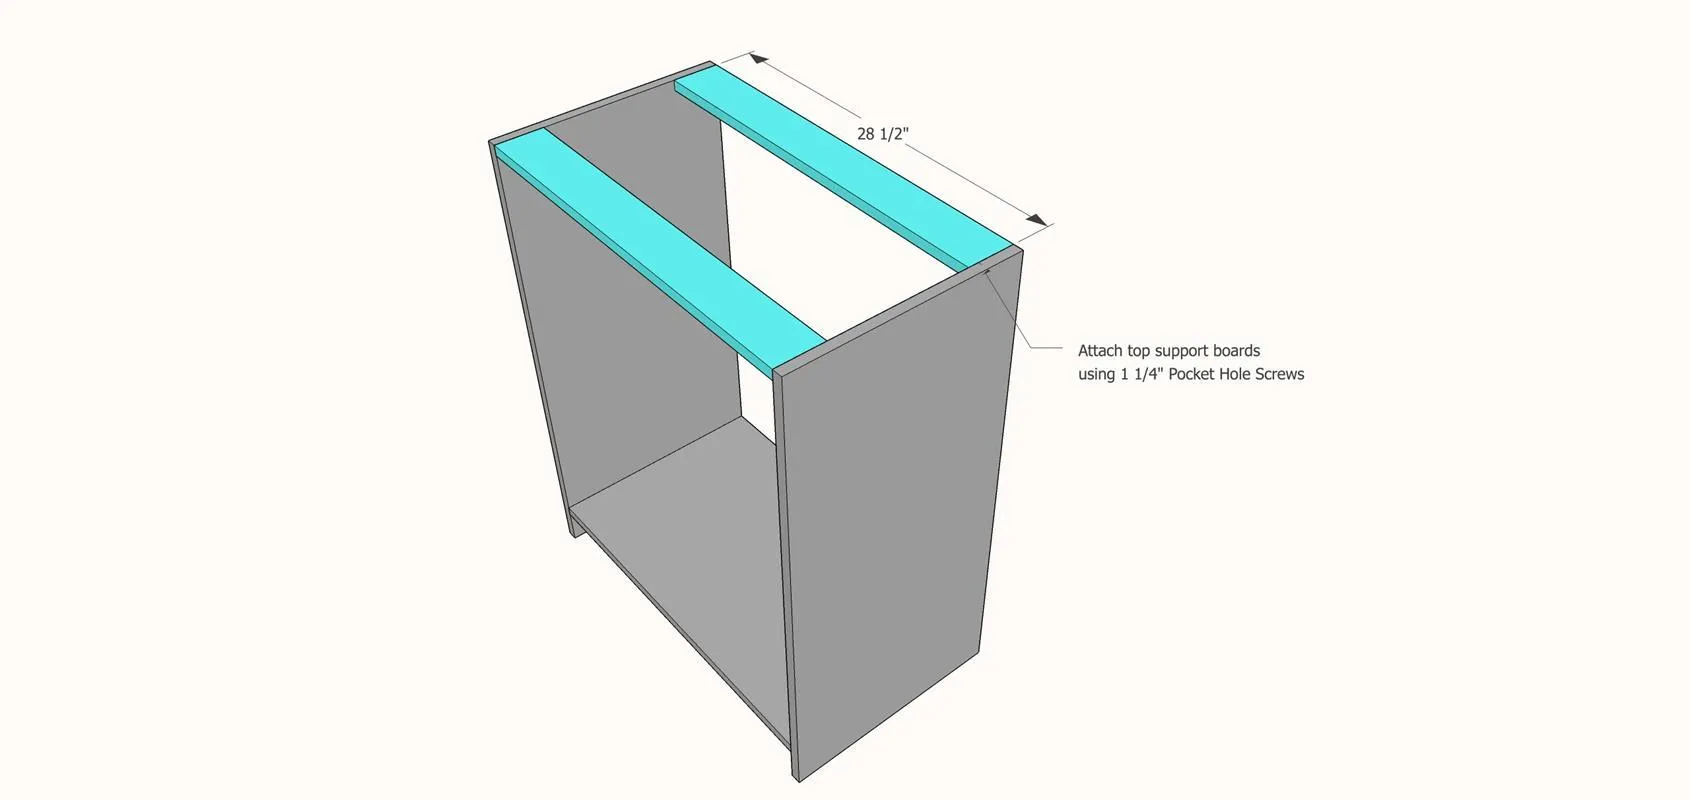
Attach top support boards to side panels using 1 1/4" Pocket Hole Screws.
4. Step 4: Add Bottom Trim
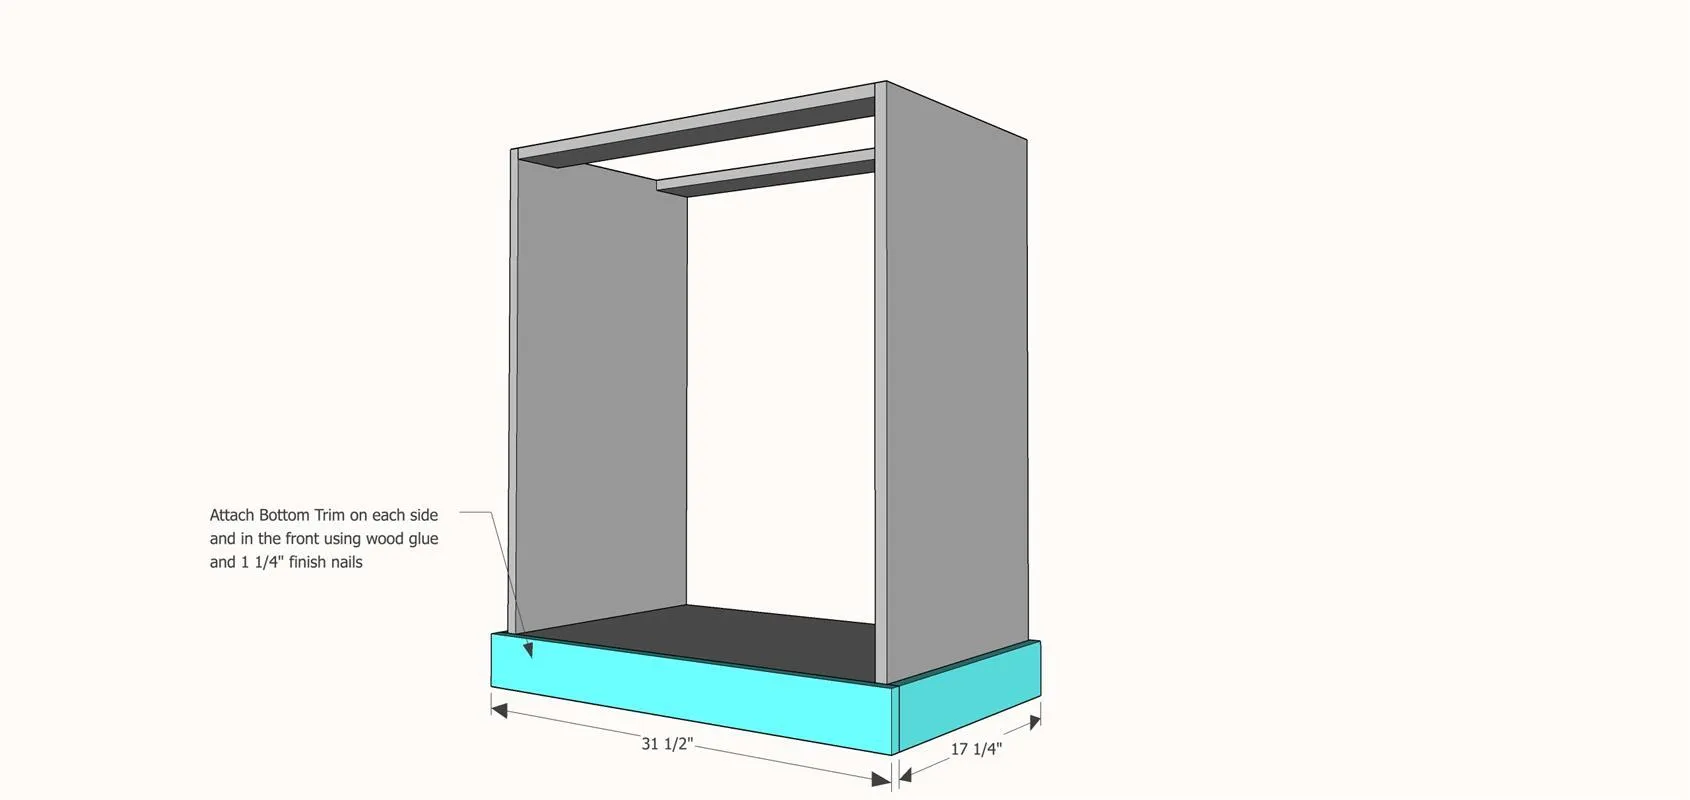
Add the bottom trim to the bottom, flush with the side panels using wood glue and 1 1/4" finish nails.
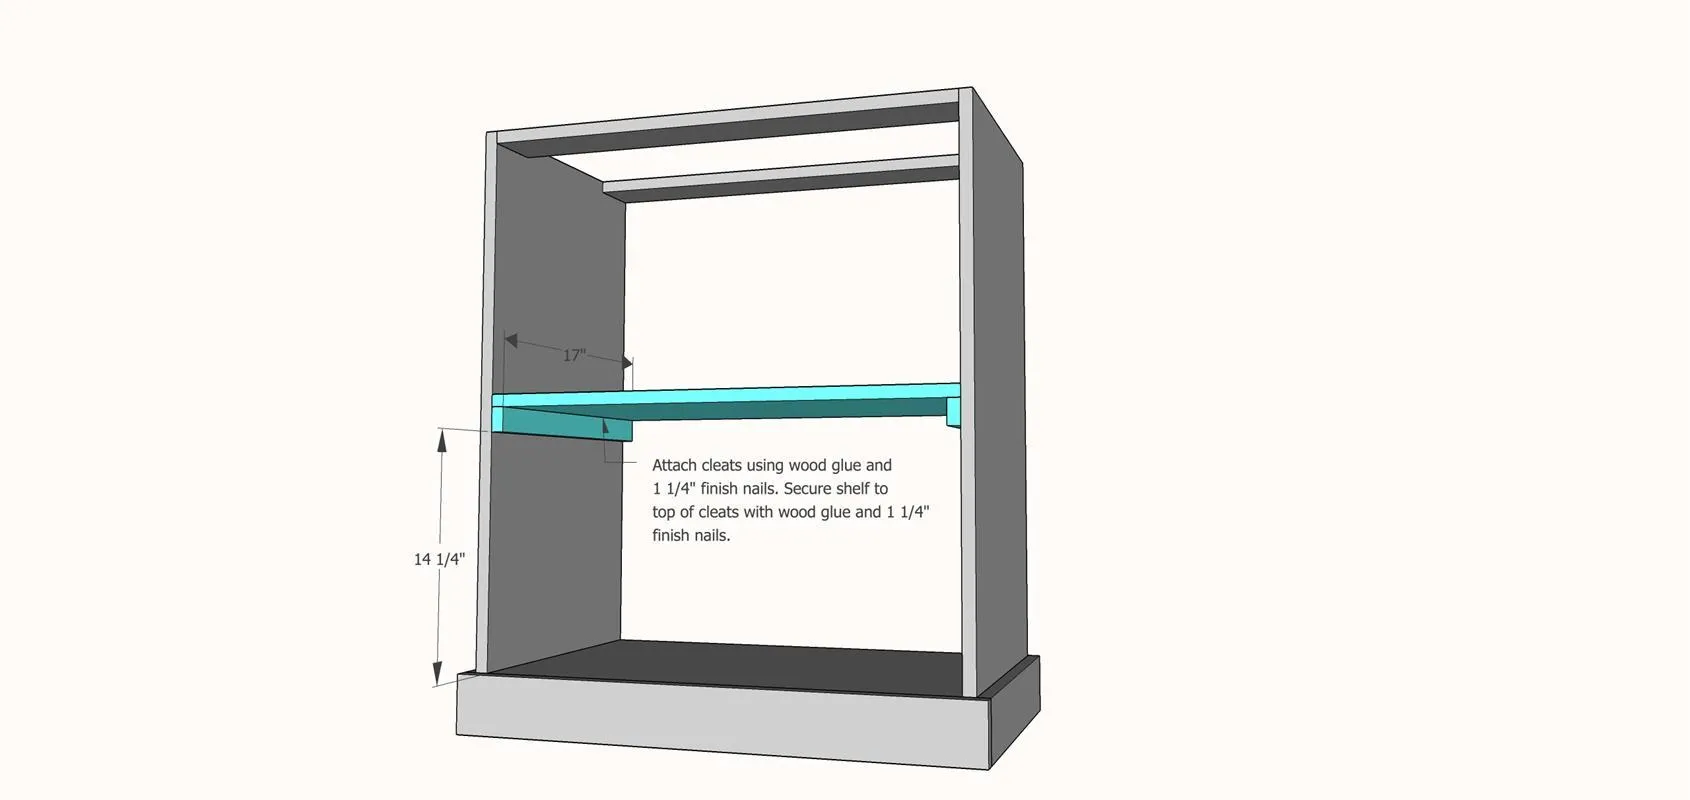
5. Step 5: Add Shelf
Attach cleats using wood glue and 1 1/4" finish nails. Secure shelf to top of cleats with wood glue and 1 1/4" finish nails.
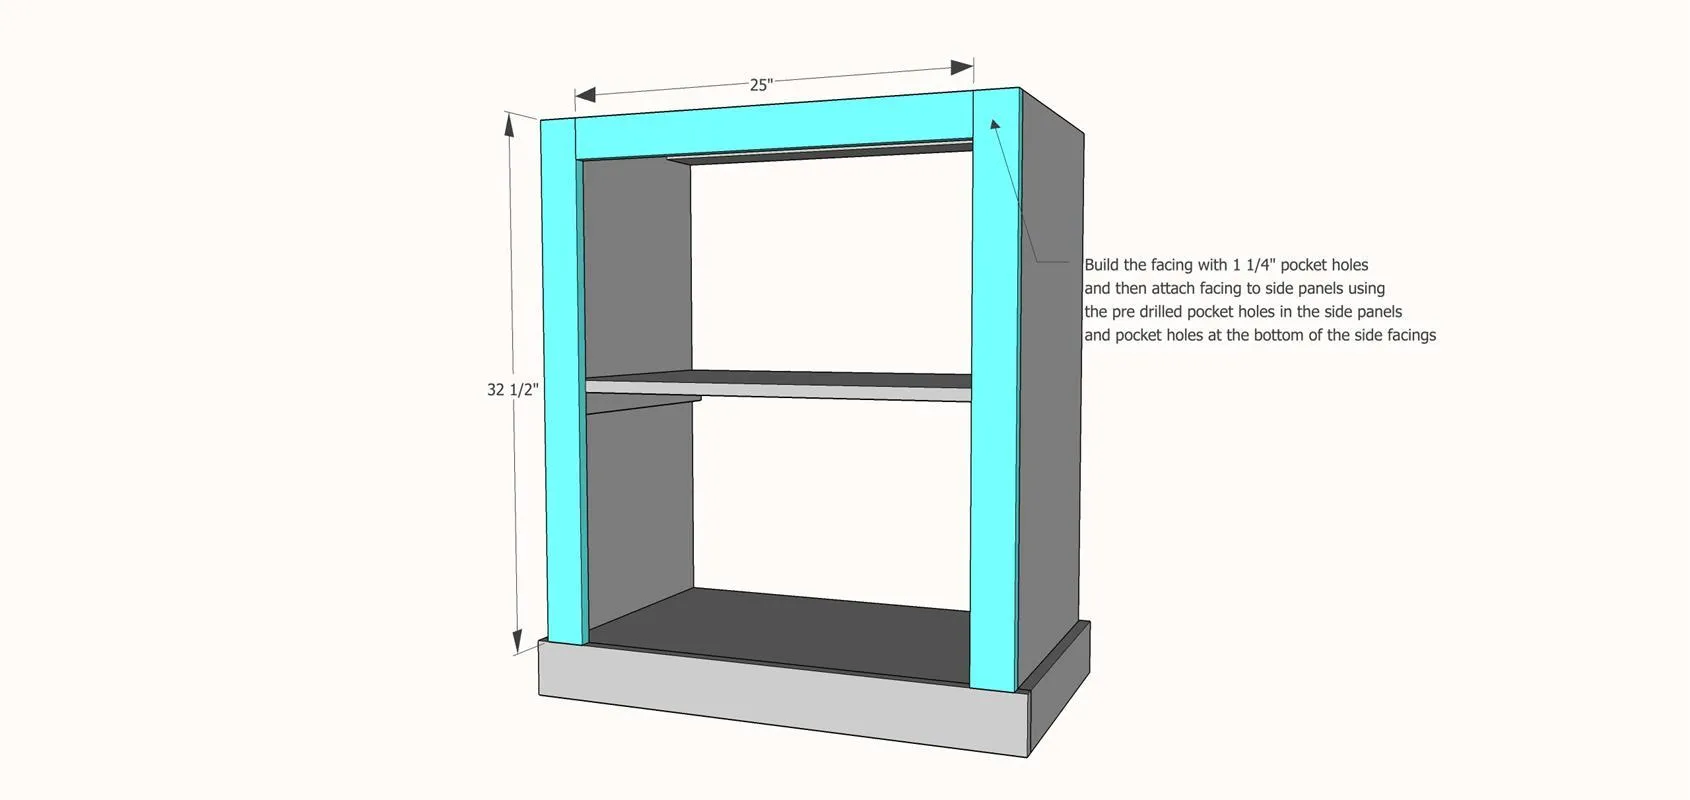
6. Step 6: Attach Facing
Build the facing with 1 1/4" pocket holes and then attach facing to side panels using the pre drilled pocket holes in the side panels and pocket holes at the bottom of the side facings.
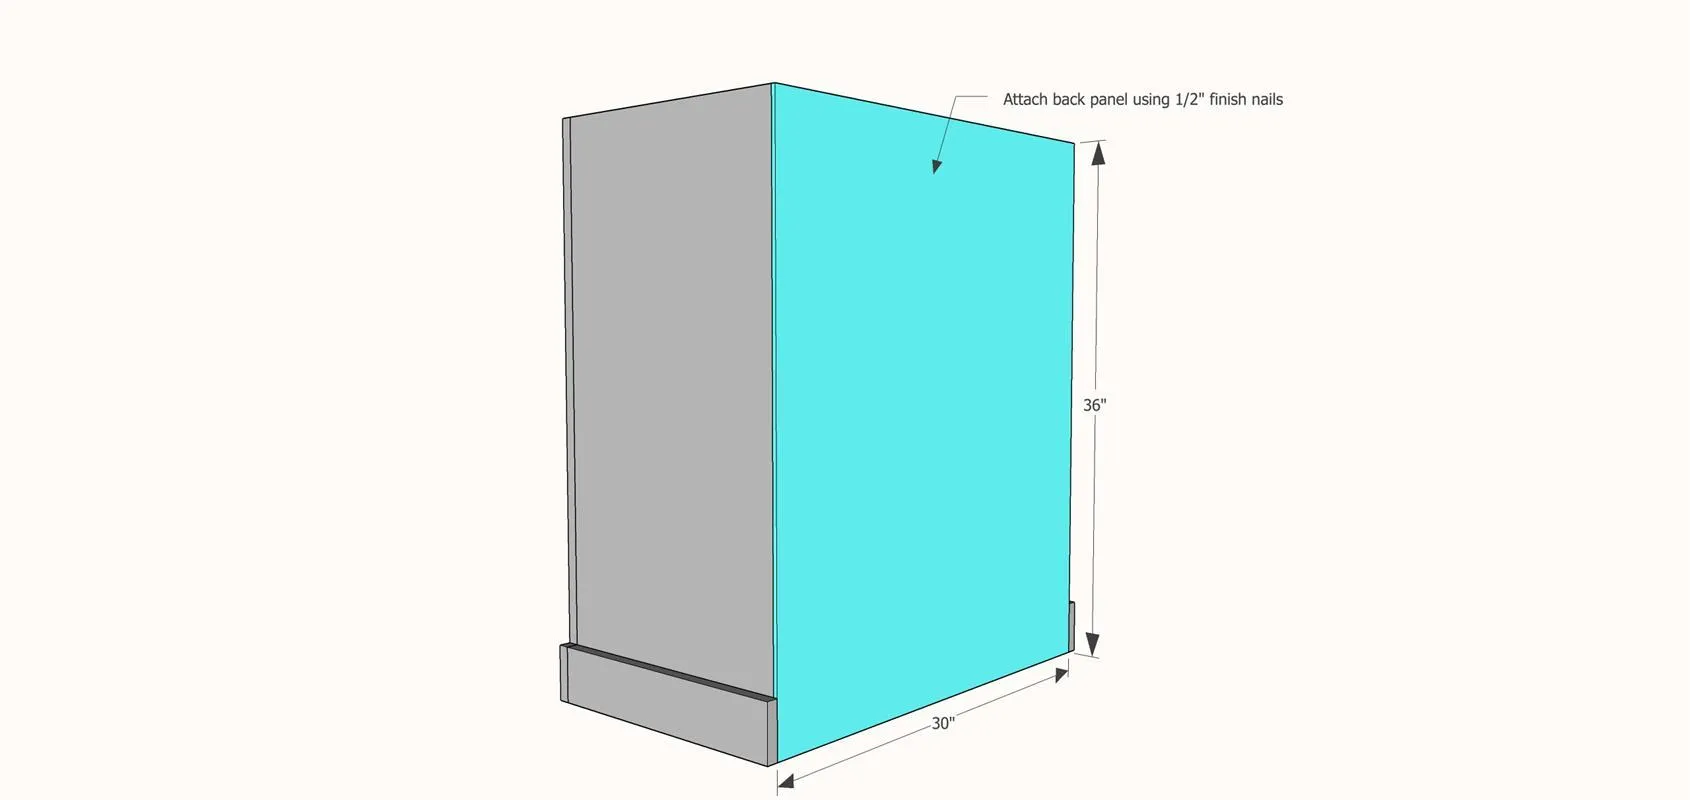
7. Step 7: Attach Back Panel
Attach Back Panel with 1/2" finish nails.
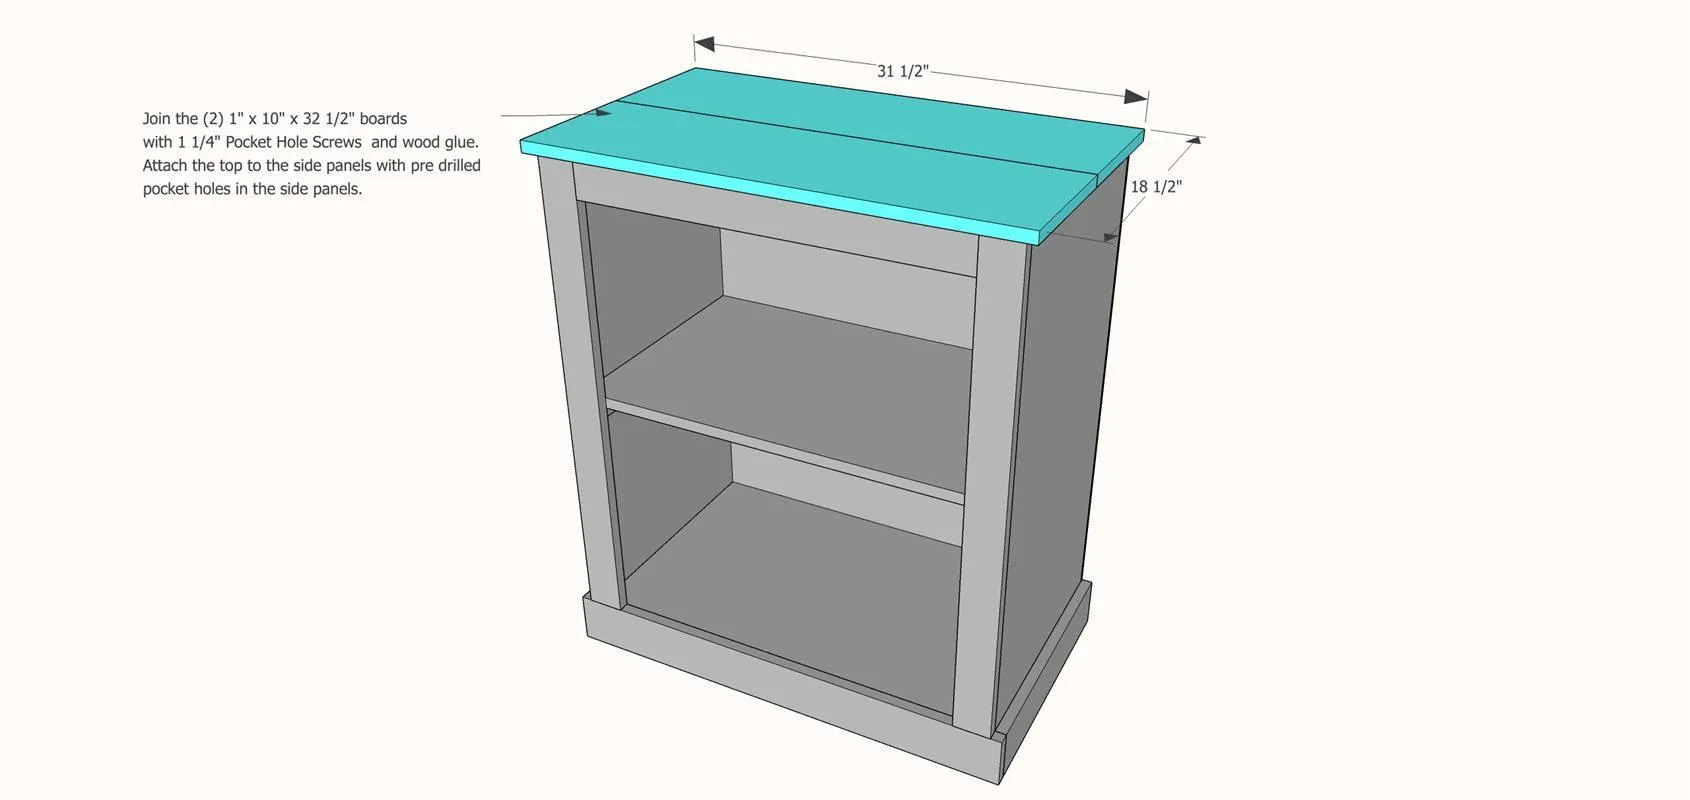
8. Step 8: Attach top
Join the (2) 1" x 10" x 32 1/2" boards with 1 1/4" Pocket Hole Screws and wood glue. Attach the top to the side panels with pre drilled pocket holes in the side panels.
9. Step 9: Build Door
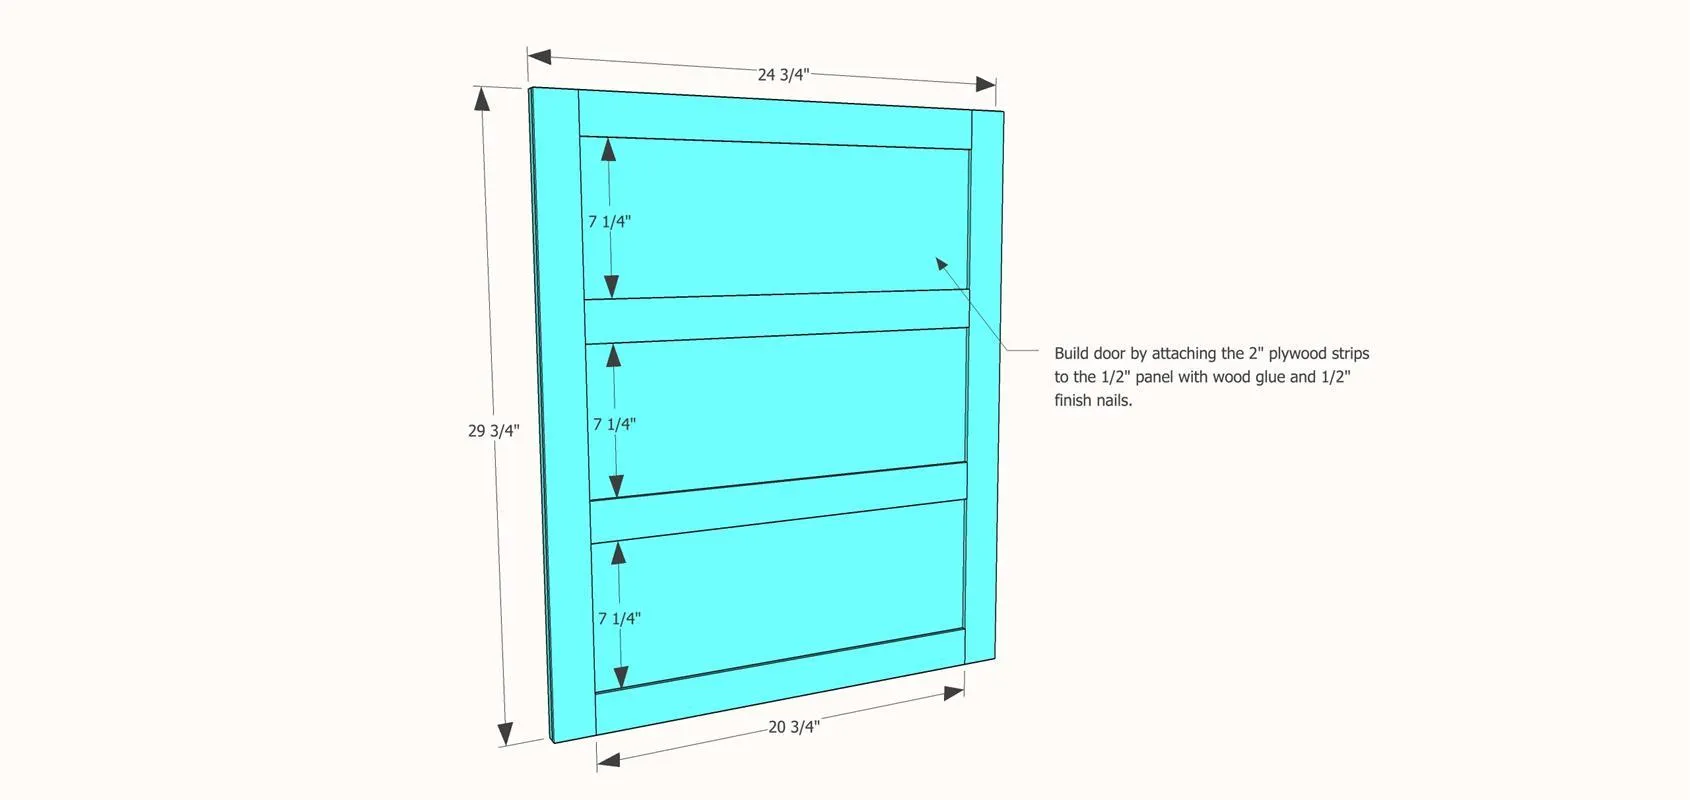
Build door by attaching the 2" plywood strips to the 1/2" panel with wood glue and 1/2" finish nails.
10. Step 10: Add Hardware
- Attach the door with your T hinges leaving an 1/8" gap around the perimeter of the door.
- Then attach the sliding barrel bolt to the door.
- Finish with your desired style and enjoy!