 Notch
- Difficulty
- Intermediate
- Time
- 2.5–5 hours
- Cost
- $$$
About this build
If you have kids then you know how important toy storage is. This wall unit now only gives you a ton of toy storage but it incorporates a book shelf for all those nighttime stories.
Tools
Essential
- Brad Nailer
- Circular Saw
- Drill / Driver
- Jigsaw
- Pocket Hole Jig
- Random Orbit Sander
- Table Saw
Optional / nice to have
- Combination Square
- Tape Measure
Materials
| Item | Qty |
|---|---|
| Plywood, 3/4" Thick Full Sheet | 2 board |
| Baseboard Trim, 3-1/4" 48" | 1 board |
| Decorative Moulding, 3/4" Thick 48" | 1 board |
| 1-1/4" Pocket Screws | 100 each |
| 1-1/4" Brad Nails | 100 each |
Overall cost: $$$. Lumber prices vary by region, species, and season, so we give a band rather than a figure we would only be pretending to know.
Cut list
| Part | Qty | T × W × L |
|---|---|---|
| Sides | 2 | 3/4" × 20" × 38" |
| Mid Panel | 1 | 3/4" × 19 1/8" × 34 1/2" |
| Top | 1 | 3/4" × 12 1/2" × 42" |
| Front | 1 | 3/4" × 10 1/2" × 40 1/2" |
| Bottom | 1 | 3/4" × 16 1/2" × 40 1/2" |
| Support | 1 | 3/4" × 2 3/4" × 16 1/2" |
| Shelf | 2 | 3/4" × 9 1/2" × 19 7/8" |
| Shelf Front | 1 | 3/4" × 2" × 40 1/2" |
| Back | 2 | 3/4" × 19 7/8" × 34 1/2" |
What to buy
Buy 9 boards at 8 ft.
3/4" × 20"
1 board
3/4" × 19 7/8"
1 board
3/4" × 19 1/8"
1 board
3/4" × 16 1/2"
1 board
3/4" × 12 1/2"
1 board
3/4" × 10 1/2"
1 board
3/4" × 9 1/2"
1 board
3/4" × 2 3/4"
1 board
3/4" × 2"
1 board
Assumes 8 ft stock, a 1/8" saw kerf, and buying each part at its own width. Change the board size or kerf on the full board plan →
Instructions
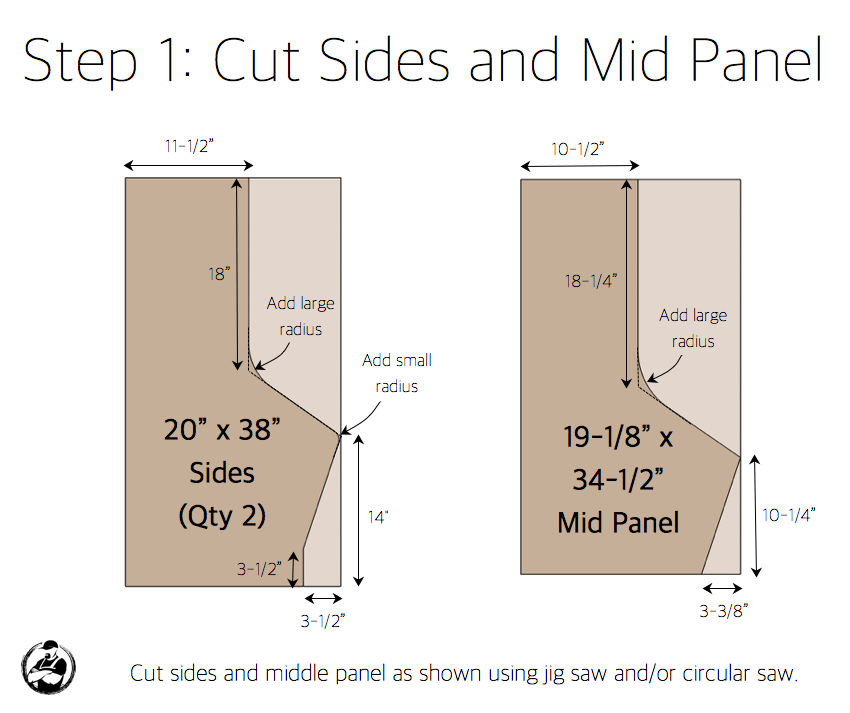
1Cut Sides and Mid Panel
Use the diagrams shown to draw two sides and one middle panel. Then cut out using a circular saw and jig saw.
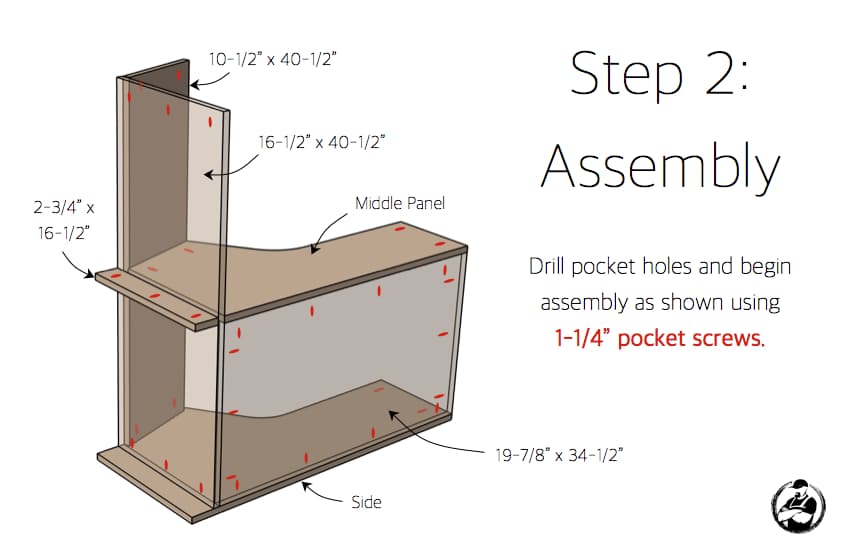
2Assembly
Drill pocket holes and begin assembly as shown using 1-1/4" pocket screws.
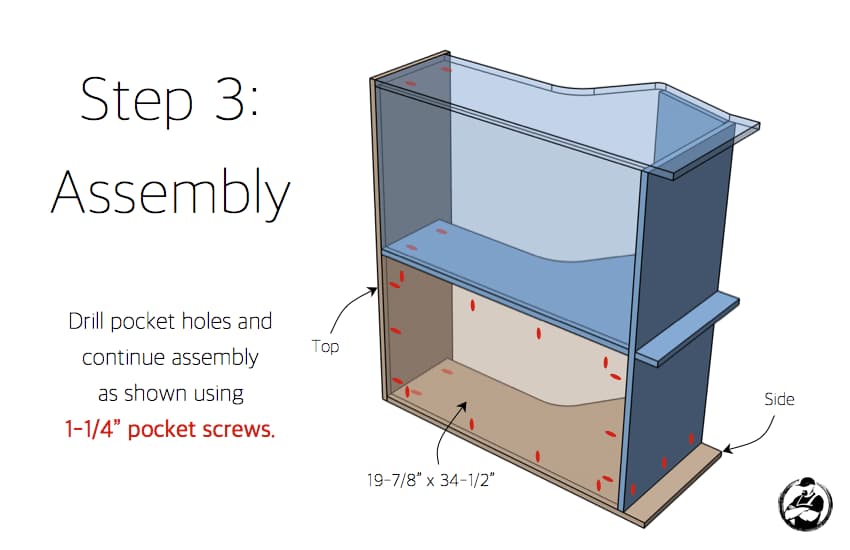
3Assembly
Drill pocket holes and continue assembly as shown using 1-1/4” pocket screws.
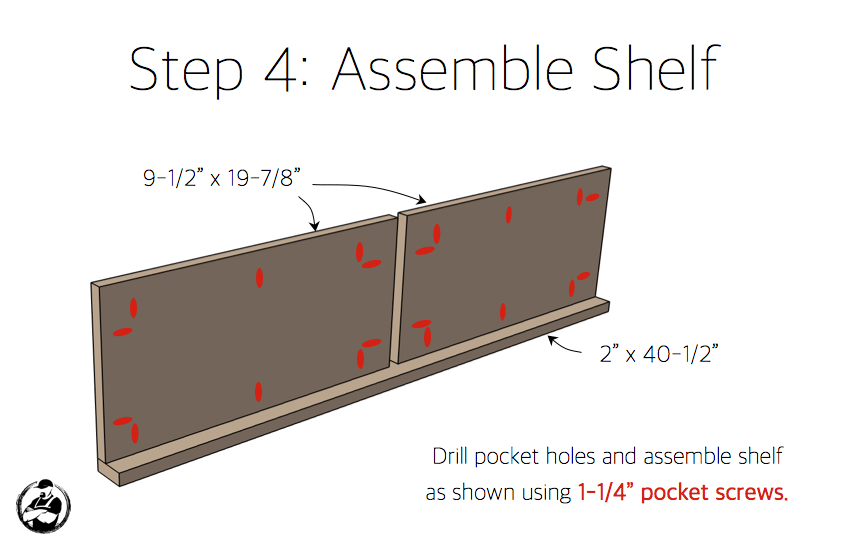
4Assemble Shelf
Drill pocket holes and assemble shelf as shown using 1-1/4” pocket screws.
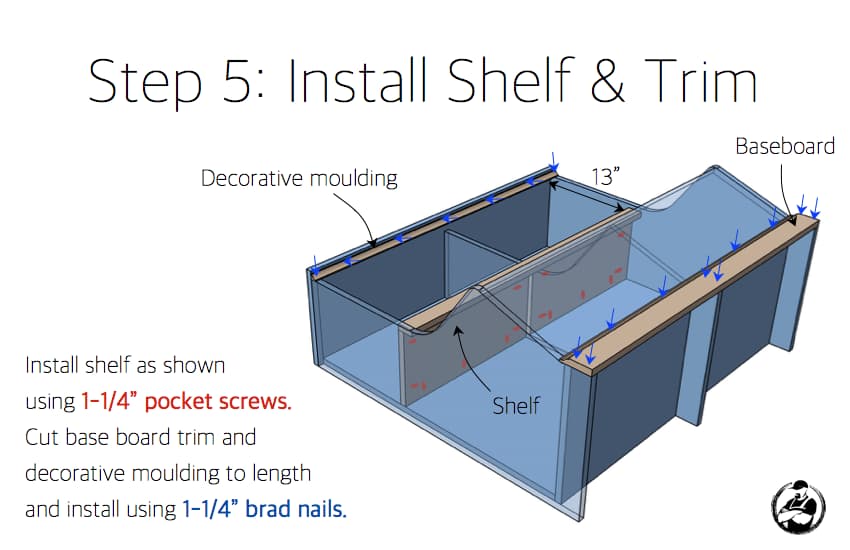
5Install Shelf and Trim
Install shelf as shown using 1-1/4” pocket screws. Cut base board trim and decorative moulding to length and install using 1-1/4” brad nails. For more plans like this be sure to visit RogueEngineer.com
Tags
- Book
- Intermediate
Reviews & builds
No reviews yet
Sign in to review this plan or share your build.
No reviews yet. Be the first to build this.