Notch
NotchUse your browser's Print (Ctrl/Cmd + P) and choose Save as PDF. This page works offline once you've opened it with a signal.
DIY Adirondack Chair – How To Build an Adirondack Chair
Just about everybody recognizes the classic lines of an Adirondack chair, and would like to have one or two somewhere in their outdoor living space.
- Difficulty
- Intermediate
- Time
- 8–15.5 hours
- Cost
- $$
Cut list
| Part | Qty | T × W × L | Material | ✓ |
|---|---|---|---|---|
| Back Leg | 2 | 3/4" × 5" × 42" | — | ☐ |
| Front Leg | 2 | 3/4" × 3" × 23" | — | ☐ |
| Front Apron | 1 | 3/4" × 5" × 26" | — | ☐ |
| Front Seat Slat | 1 | 3/4" × 2" × 26" | — | ☐ |
| Seat Slat | 8 | 3/4" × 2" × 29" | — | ☐ |
| Seat Side | 2 | 3/4" × 5" × 23" | — | ☐ |
| Upper Back Support | 1 | 3/4" × 3" × 23" | — | ☐ |
| Middle Back Support | 1 | 3/4" × 3" × 26" | — | ☐ |
| Lower Back Support | 1 | 3/4" × 5" × 26" | — | ☐ |
| Back Slat | 4 | 3/4" × 5" × 38" | — | ☐ |
| Arm Rail | 2 | 3/4" × 3" × 26" | — | ☐ |
| Arm Brace | 2 | 3/4" × 2" × 3" | — | ☐ |
| Arm | 2 | 3/4" × 5" × 34" | — | ☐ |
Materials
| Item | Qty | ✓ |
|---|---|---|
| Cedar Board, 1x6 x 96" | 5 board | ☐ |
| Cedar Board, 1x4 x 96" | 2 board | ☐ |
| Cedar Board, 1x3 x 96" | 3 board | ☐ |
| 1 1/4" Blue-Kote™ Pocket-Hole Screws | 40 each | ☐ |
| #8 x 1 1/4" exterior wood screws | 64 each | ☐ |
| 1 1/2" exterior nails | 32 each | ☐ |
| Exterior wood glue | 1 each | ☐ |
Overall cost: $$. Lumber varies by region, species, and season, so we give a band rather than a figure.
Tools
- Drill / Driver
- Jigsaw
- Miter Saw
- Pocket Hole Jig
- Random Orbit Sander
- Bar / Pipe Clamps — optional
- Tape Measure — optional
Instructions
1. Get to Know Your Materials
The first step, of course, is to get the materials for your project. We used cedar “1-by” boards, which usually have one rough face and one smooth face. So, be sure when you lay out and make your parts, that you have the rough face on the inside or underside.
2. Make the Back Legs
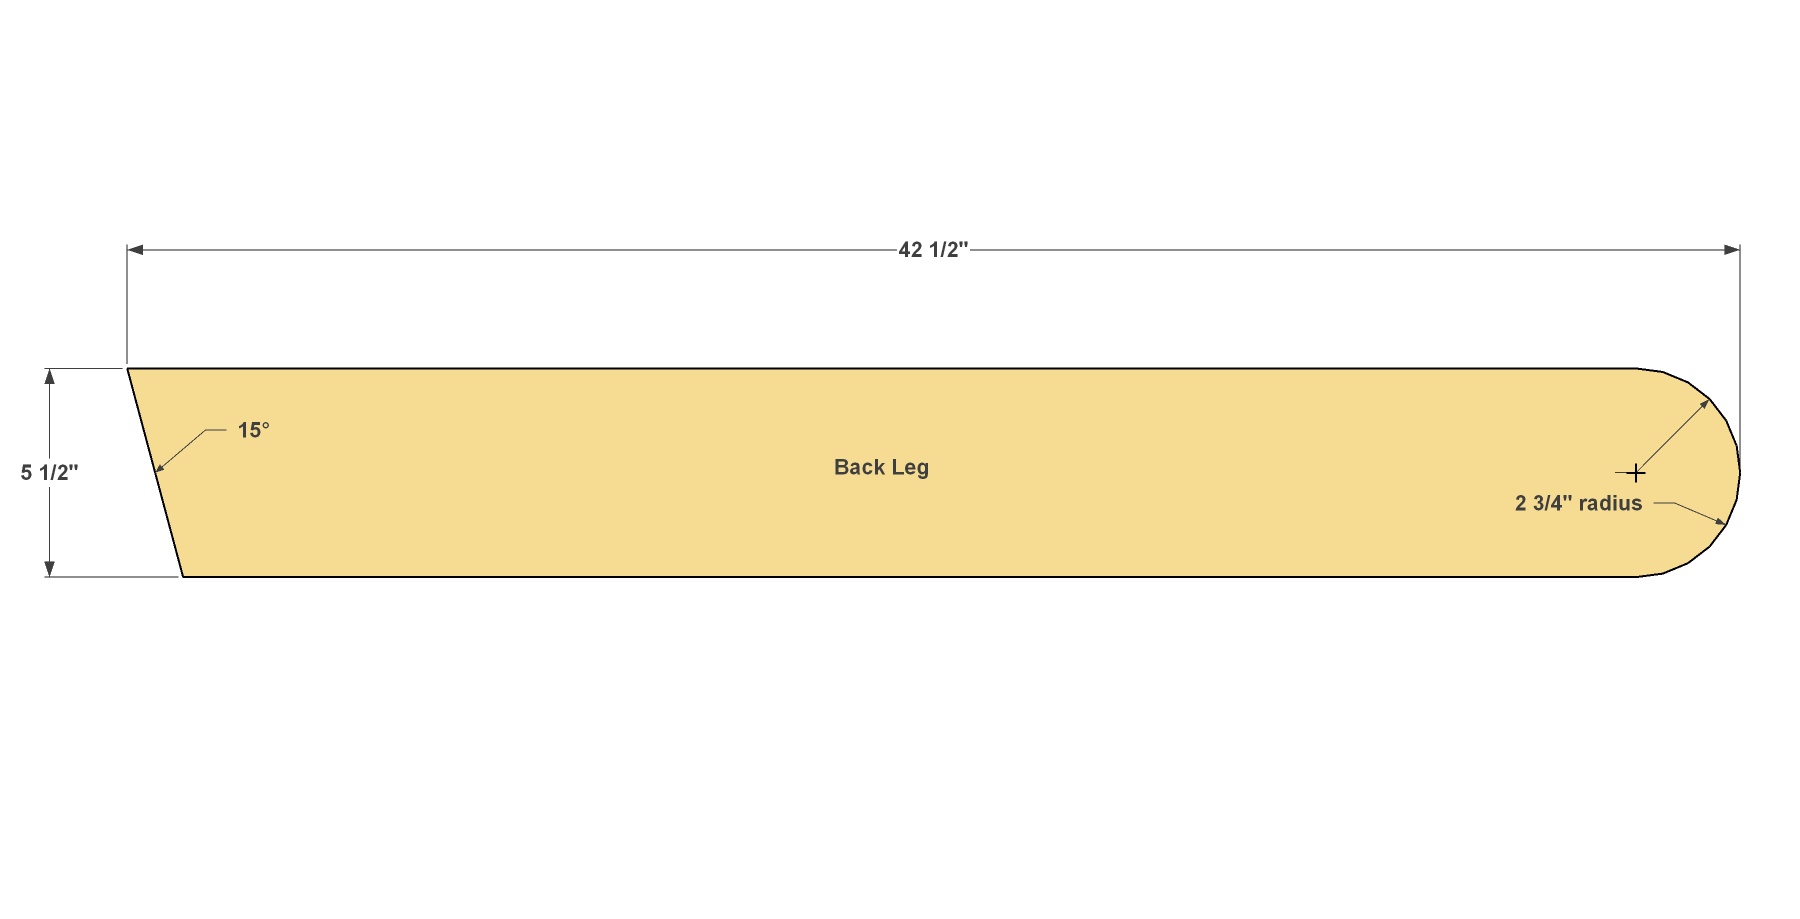
- Cut two Back Legs to length from a 1x6 board, as shown in the cutting diagram. Be sure to miter one end at 15°.
- Lay out the radius shown on each Back Leg using a compass, and then cut it with a jig saw.
- Sand the cut end smooth.
3. Make the Front Legs
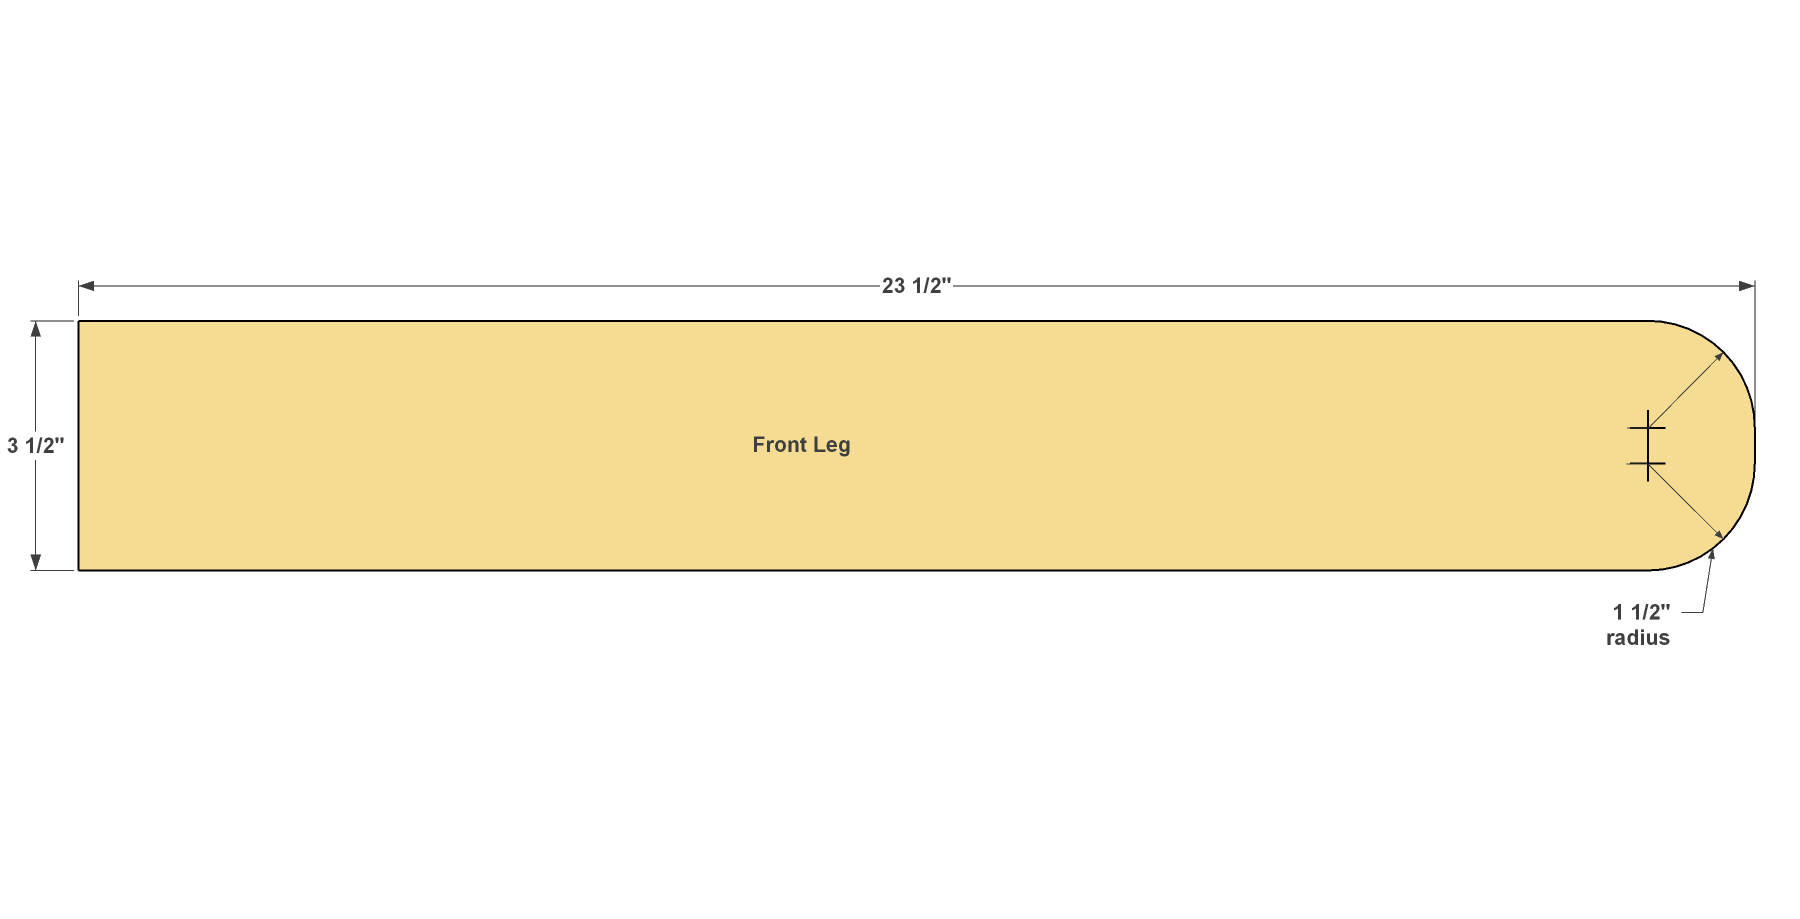
- Cut two Front Legs to length from 1x4 boards, as shown in the cutting diagram.
- Then lay out the radius shown on each Front Leg using compass and cut it with a jig saw. Notice that this end actually has two smaller radii.
- Sand the cut ends smooth.
4. Assemble the Legs
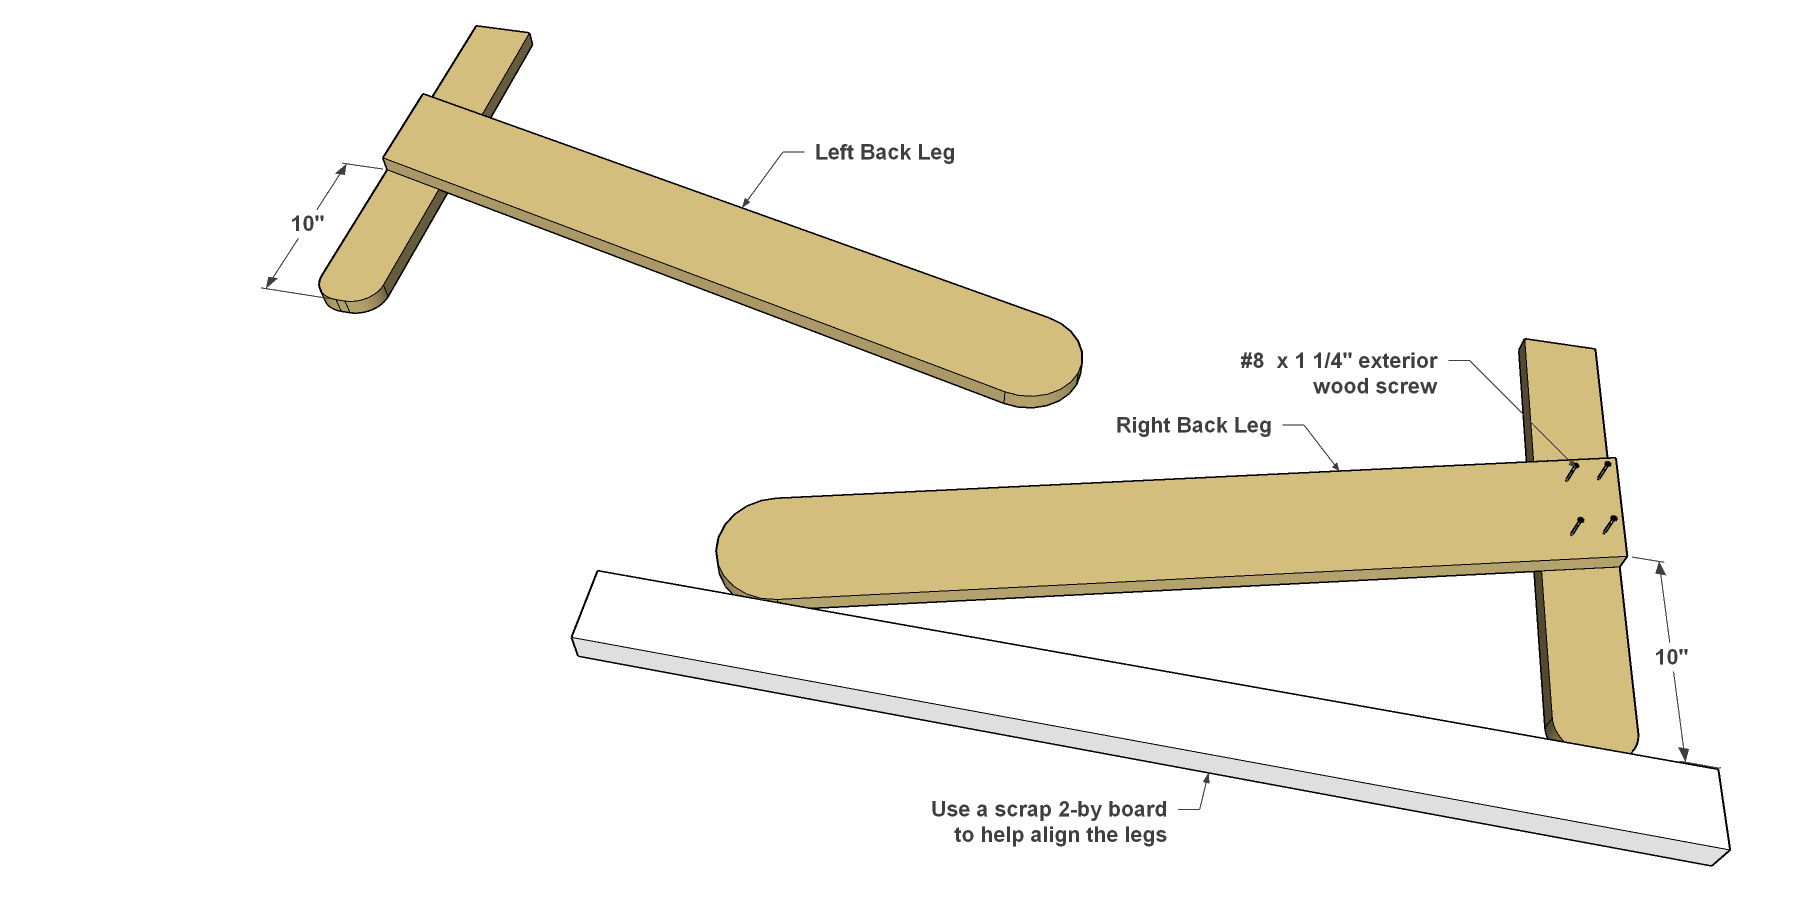
- Now you can attach the Front Legs to the Back Legs.
- First, position each Back Leg and Front Leg, as shown, with the rough face up. It helps to use a scrap board as a straightedge to align the parts.
- Once you have the Legs in position, you can attach them by using exterior waterproof glue and driving four 1 1/4" exterior screws through each Back Leg and into each Front Leg.
5. Make the Front Apron
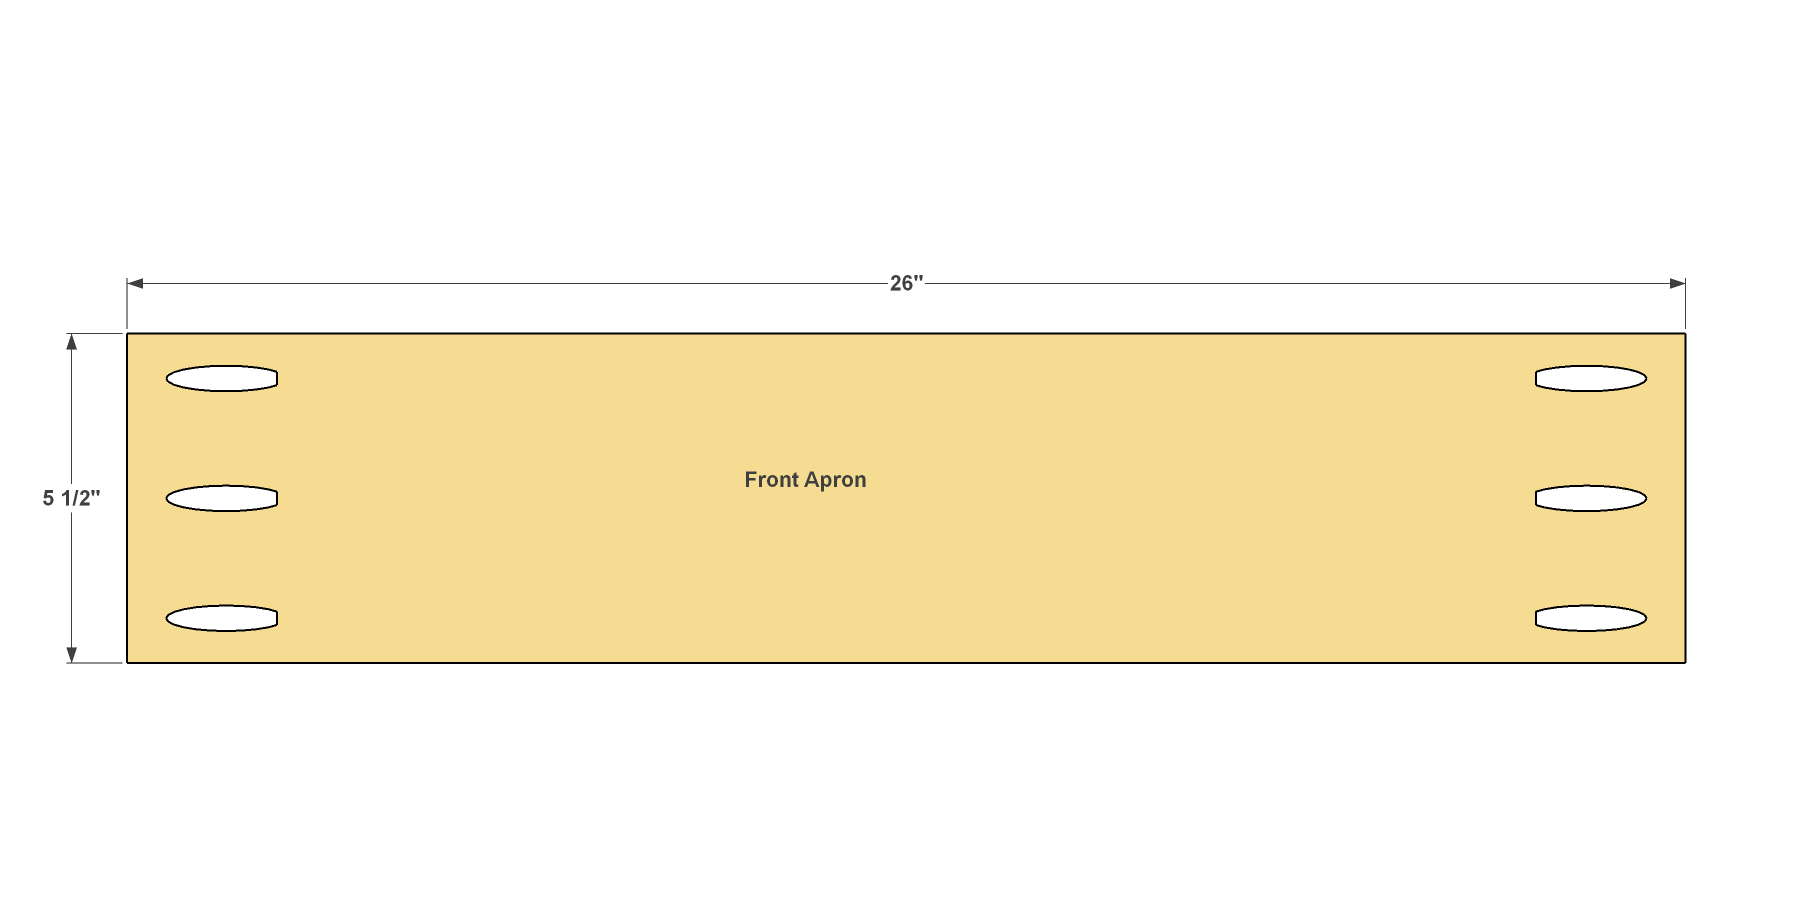
Cut one Front Apron to length from a 1x6 board, as shown in the cutting diagram. Then, with your Kreg® Pocket-Hole Jig set for 3/4" material, drill pocket holes in the rough face of the Front Apron where shown.
6. Attach the Apron
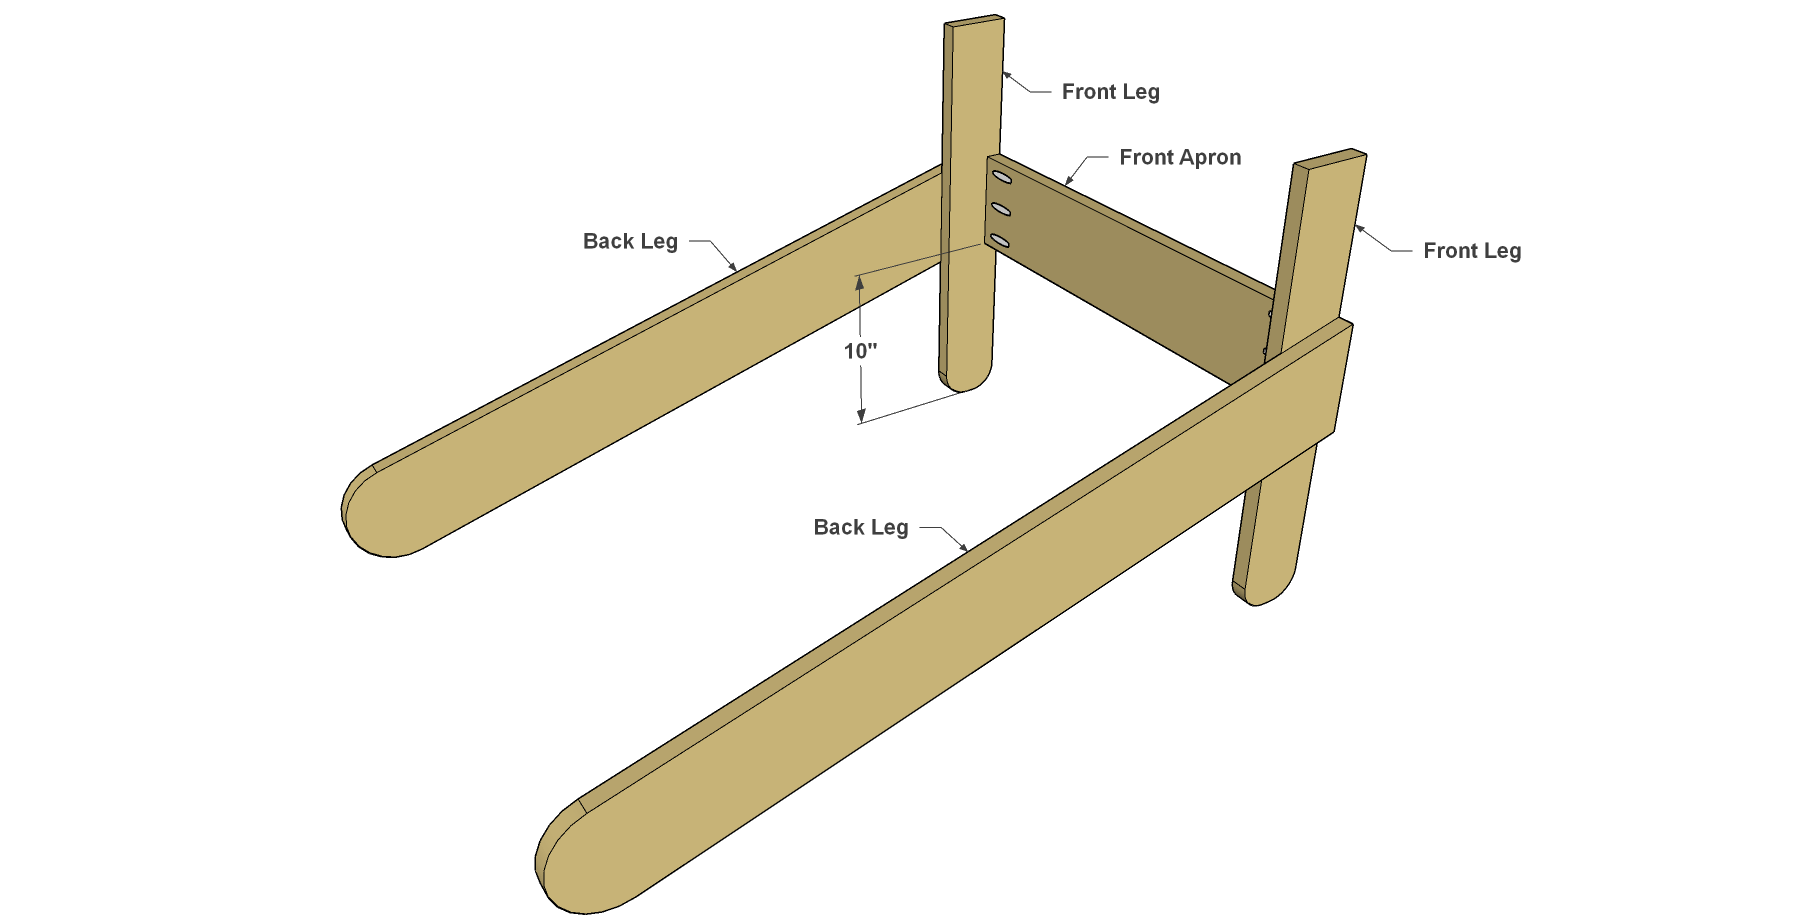
Attach the Front Apron to the leg assemblies, as shown, using 1 1/4" Kreg Blue-Kote™ Pocket-Hole Screws.
7. Make a Front Slat
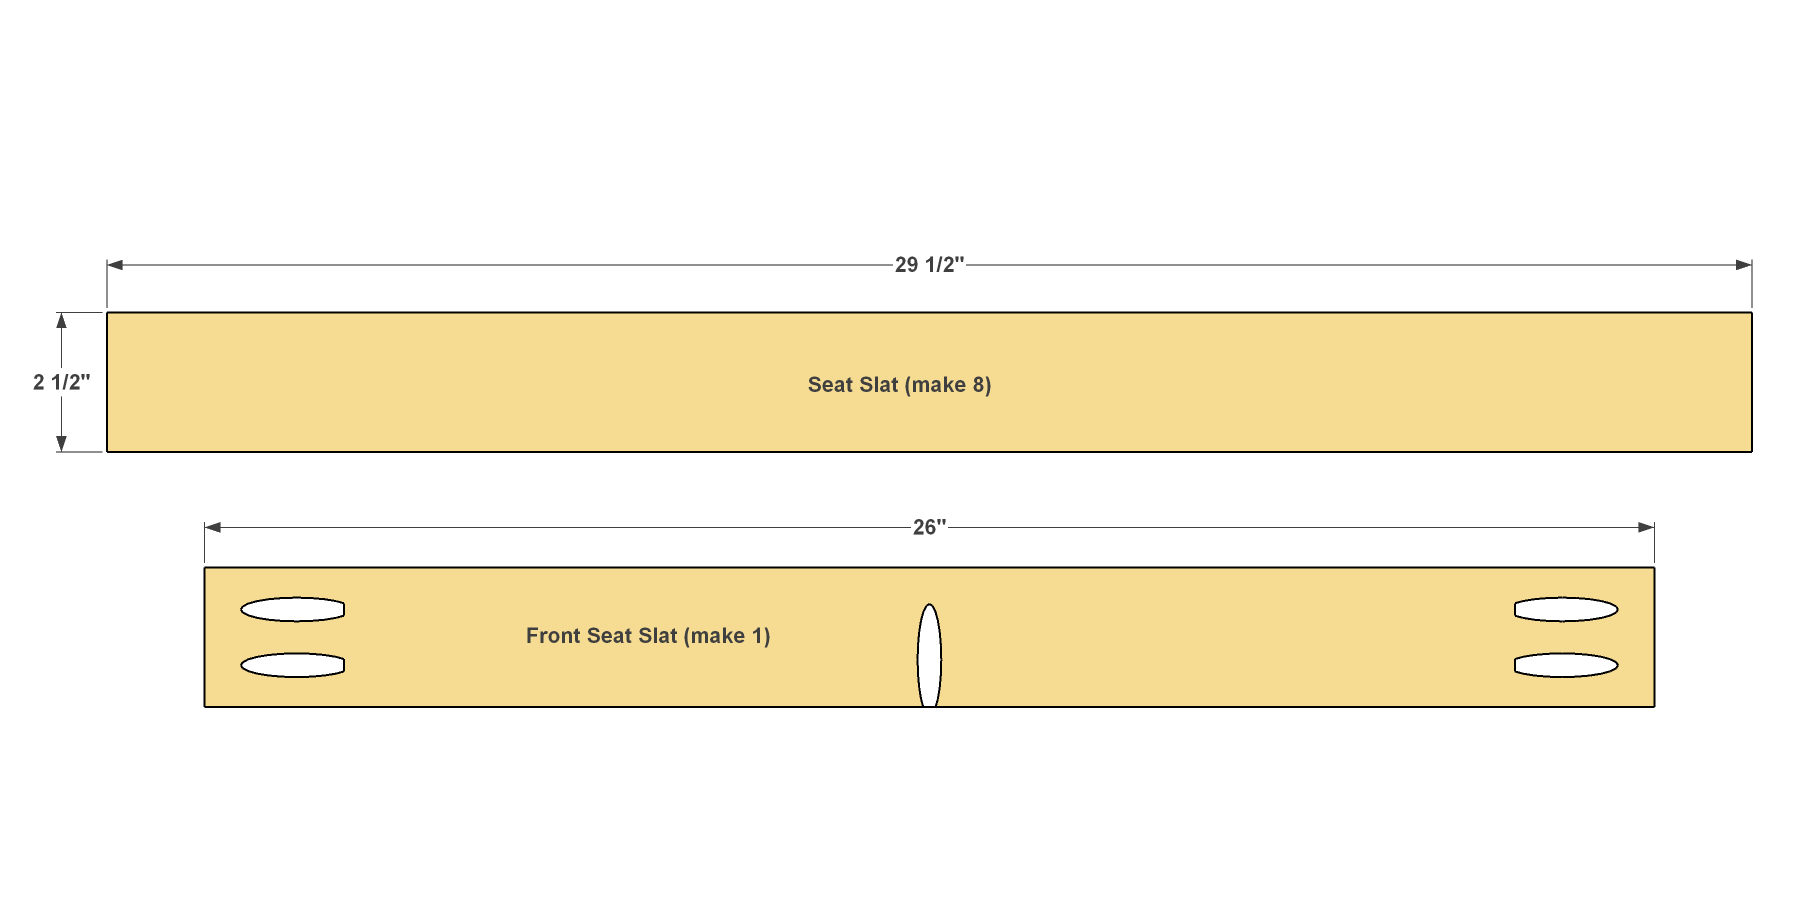
- Cut one Front Seat Slat to length from a 1x3 cedar board, as shown in the cutting diagram. While you’re at it, cut eight Seat Slats, as well. Note that the Seat Salts are Longer.
- Next you need to drill pocket holes in ONLY the Front Seat Slat where shown. Make sure to drill them in the rough surface.
8. Attach the Front Slat
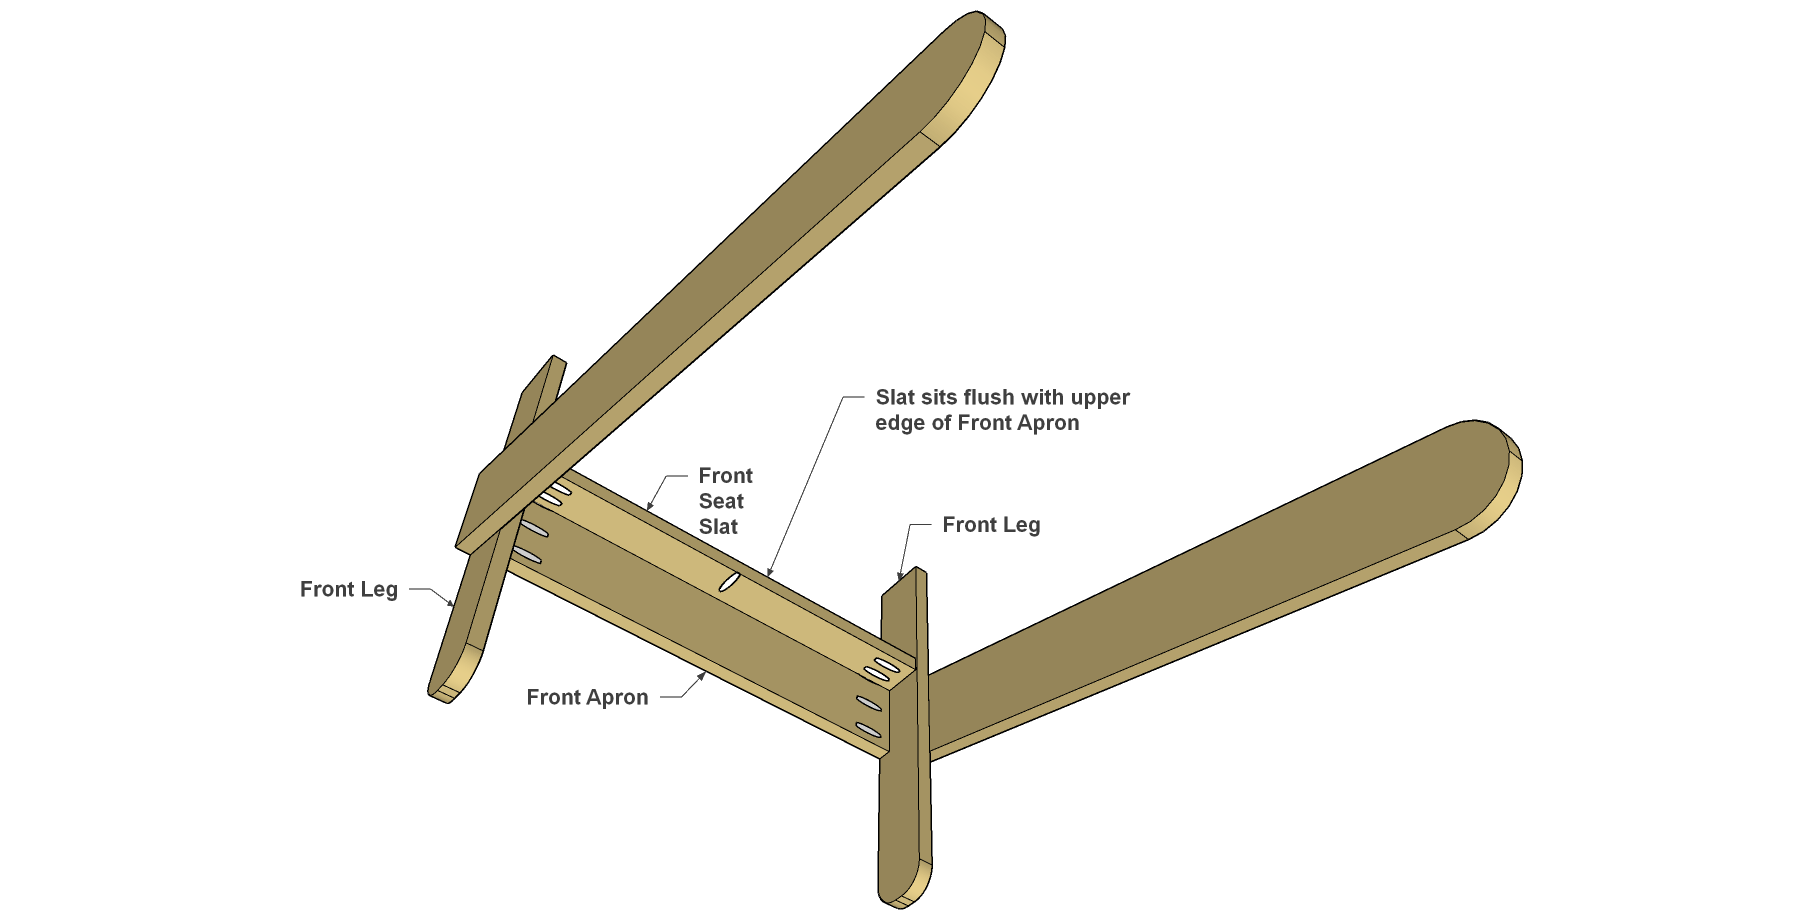
Attach the Front Seat Slat to the Front Apron and the Front Legs using 1 1/4" Blue-Kote™ Pocket-Hole Screws, as shown. The face of the Front Seat Slat should fit flush with the upper edge of the Front Apron.
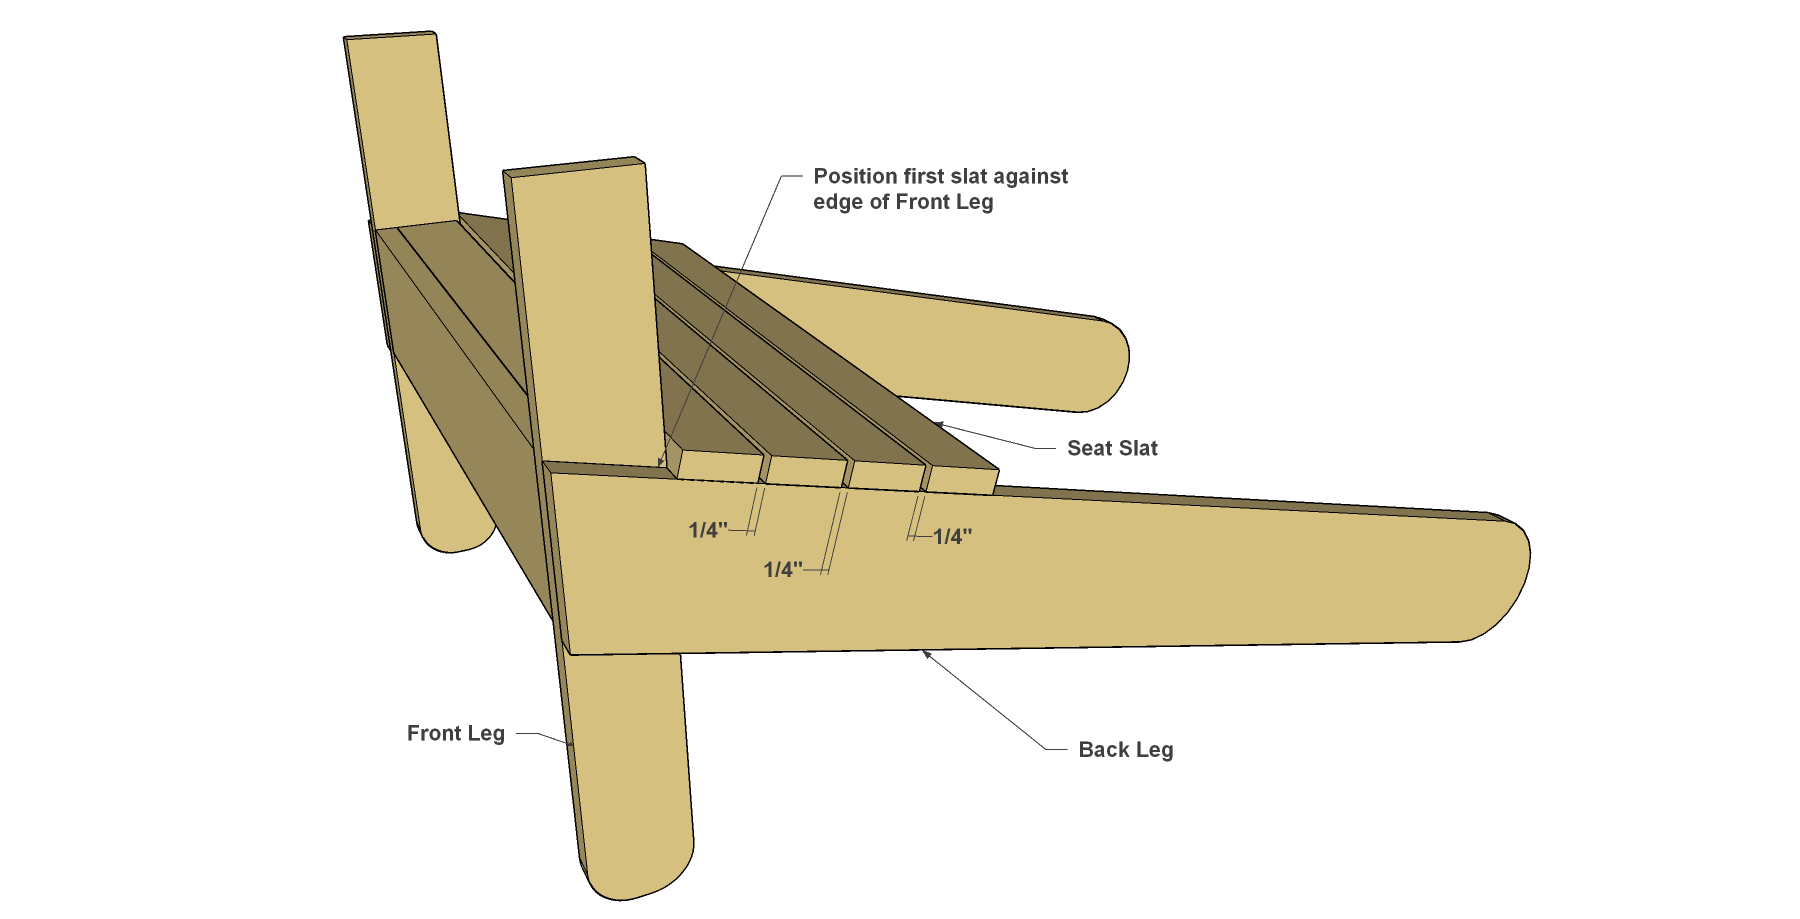
9. Add Four More Slats
- Now you can add the first four regular Seat Slats.
- Position them so one rests against the Front Leg, as shown, and the others are spaced 1/4" apart.
- Attach these Seat Slats to the Back Legs using 2" exterior nails.
10. Make the Seat Sides
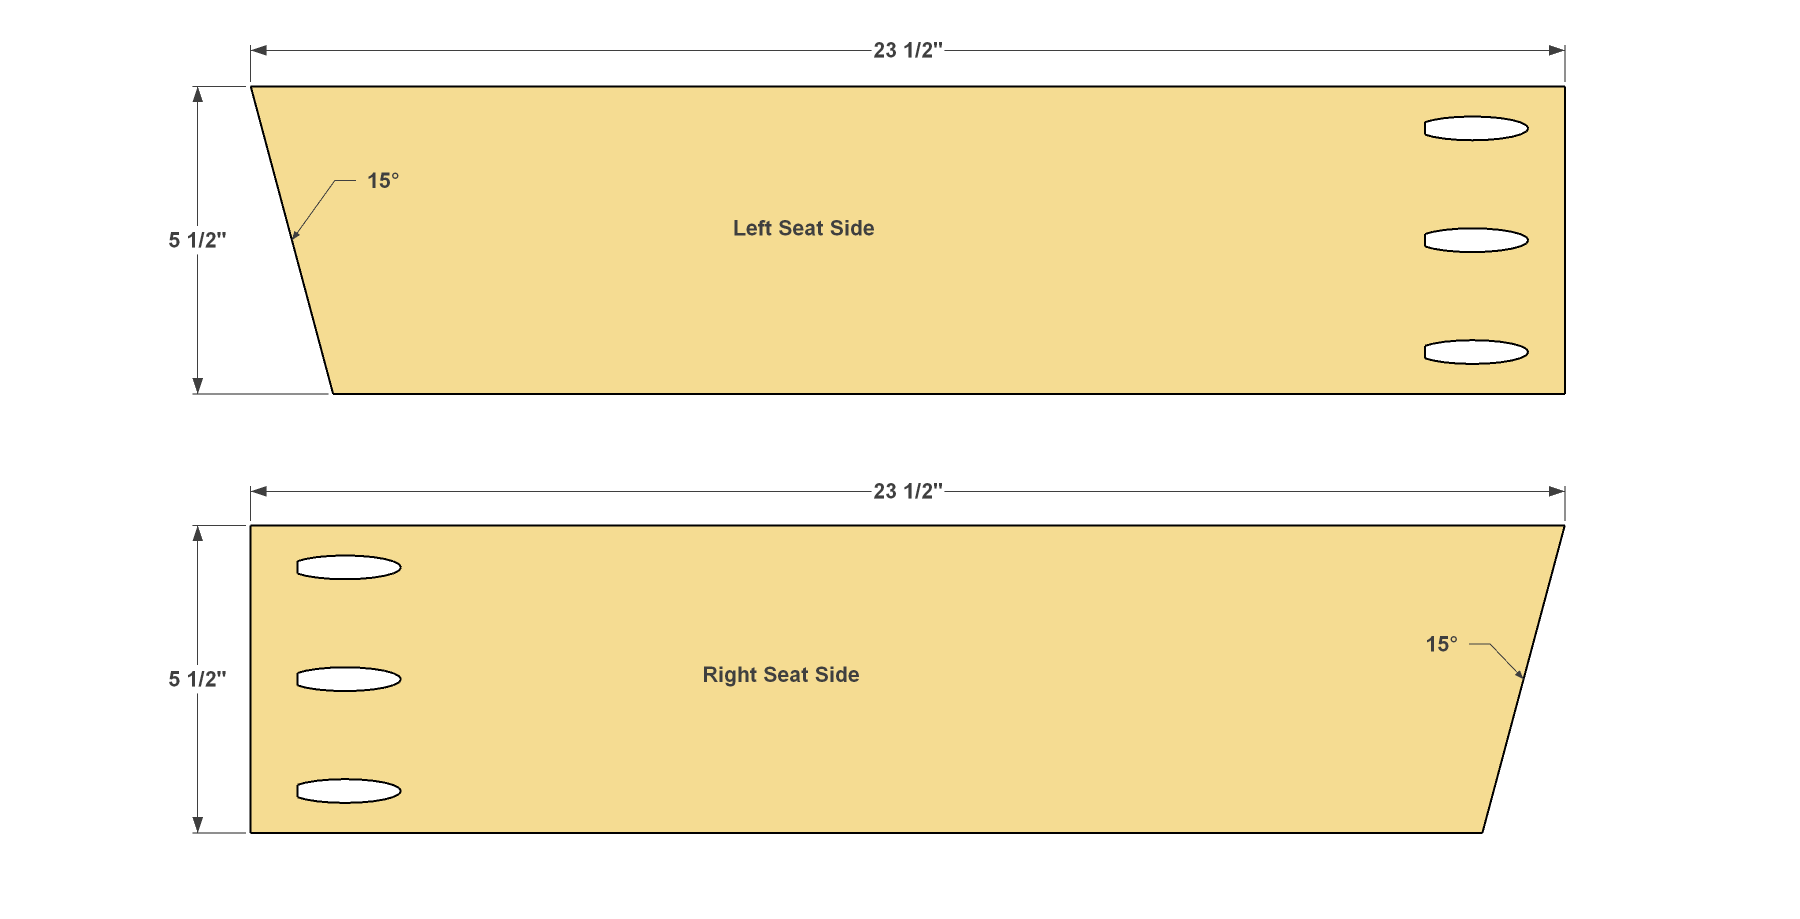
Cut two Seat Sides to length from a 1x6 board, as shown in the cutting diagram. Drill pocket holes in the rough face of each Seat Side, as shown, to make another “mirror-image” set of parts.
11. Add the Seat Sides
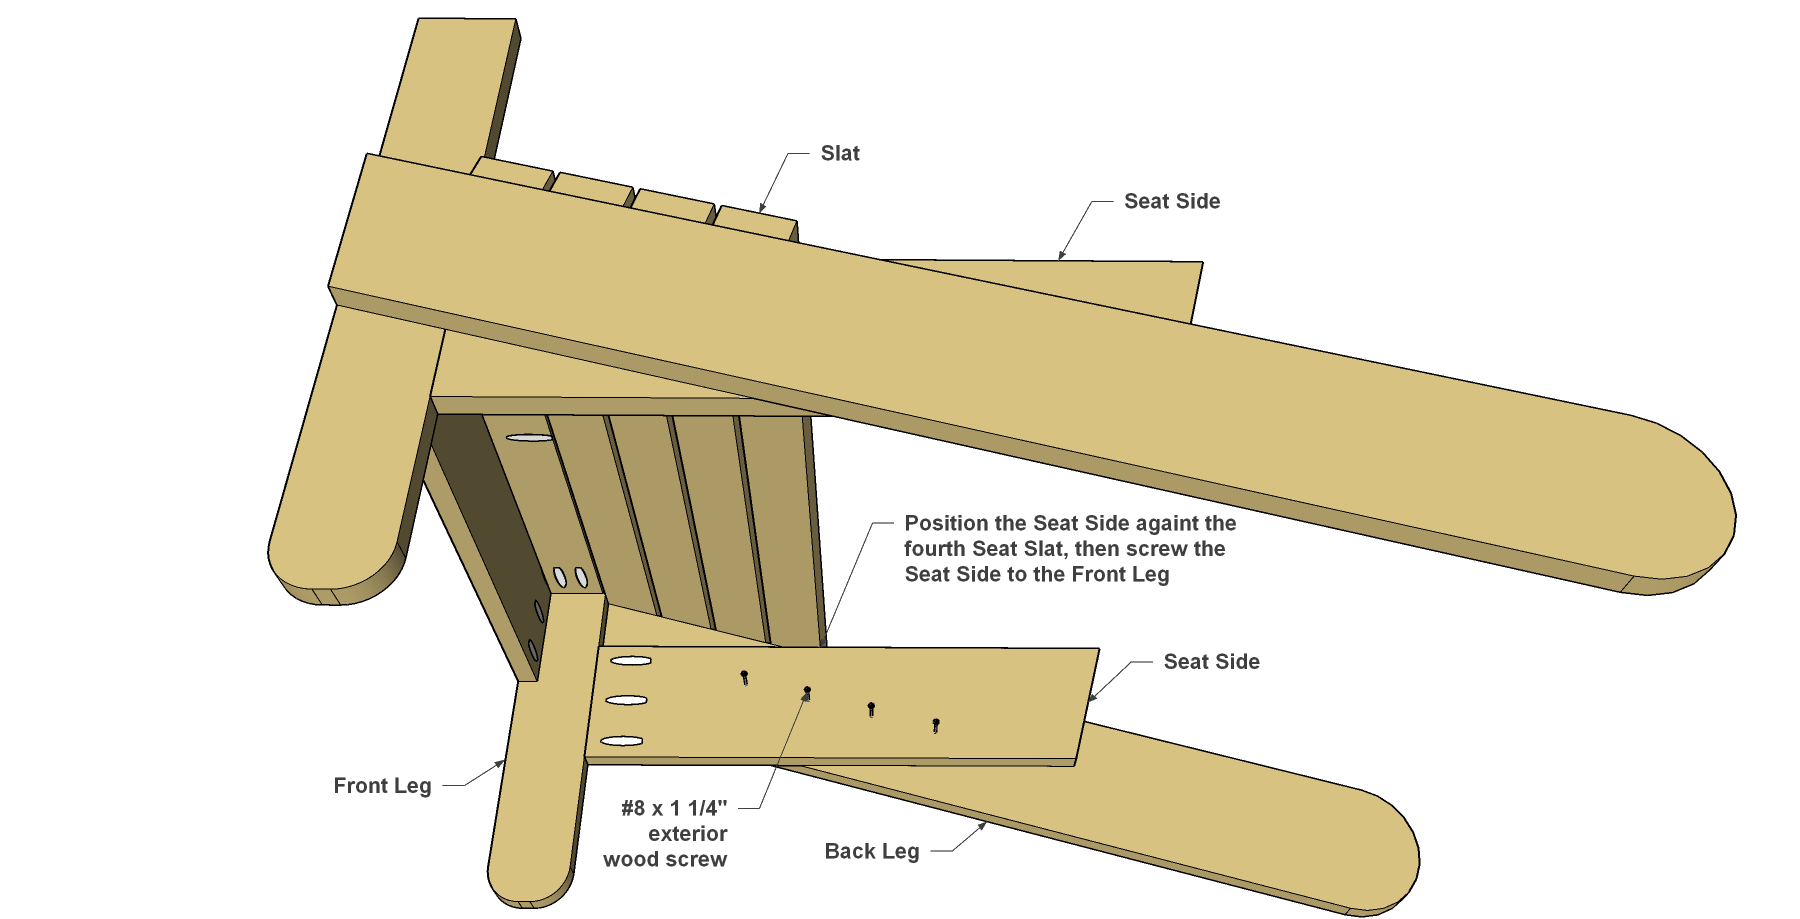
- Now you can attach the Seat Sides. The location of each Seat Side is determined by placing the square end against the Front Leg, and then moving the Seat Side up until it touches the last one of the four Seat Slats that you already installed.
- Once the Seat Side is in position, clamp it in place while you secure it to the Front Leg with 1 1/4" exterior pocket hole screws.
- Then secure it to the Back Leg using 1 1/4" exterior screws.
12. Make the Back Parts
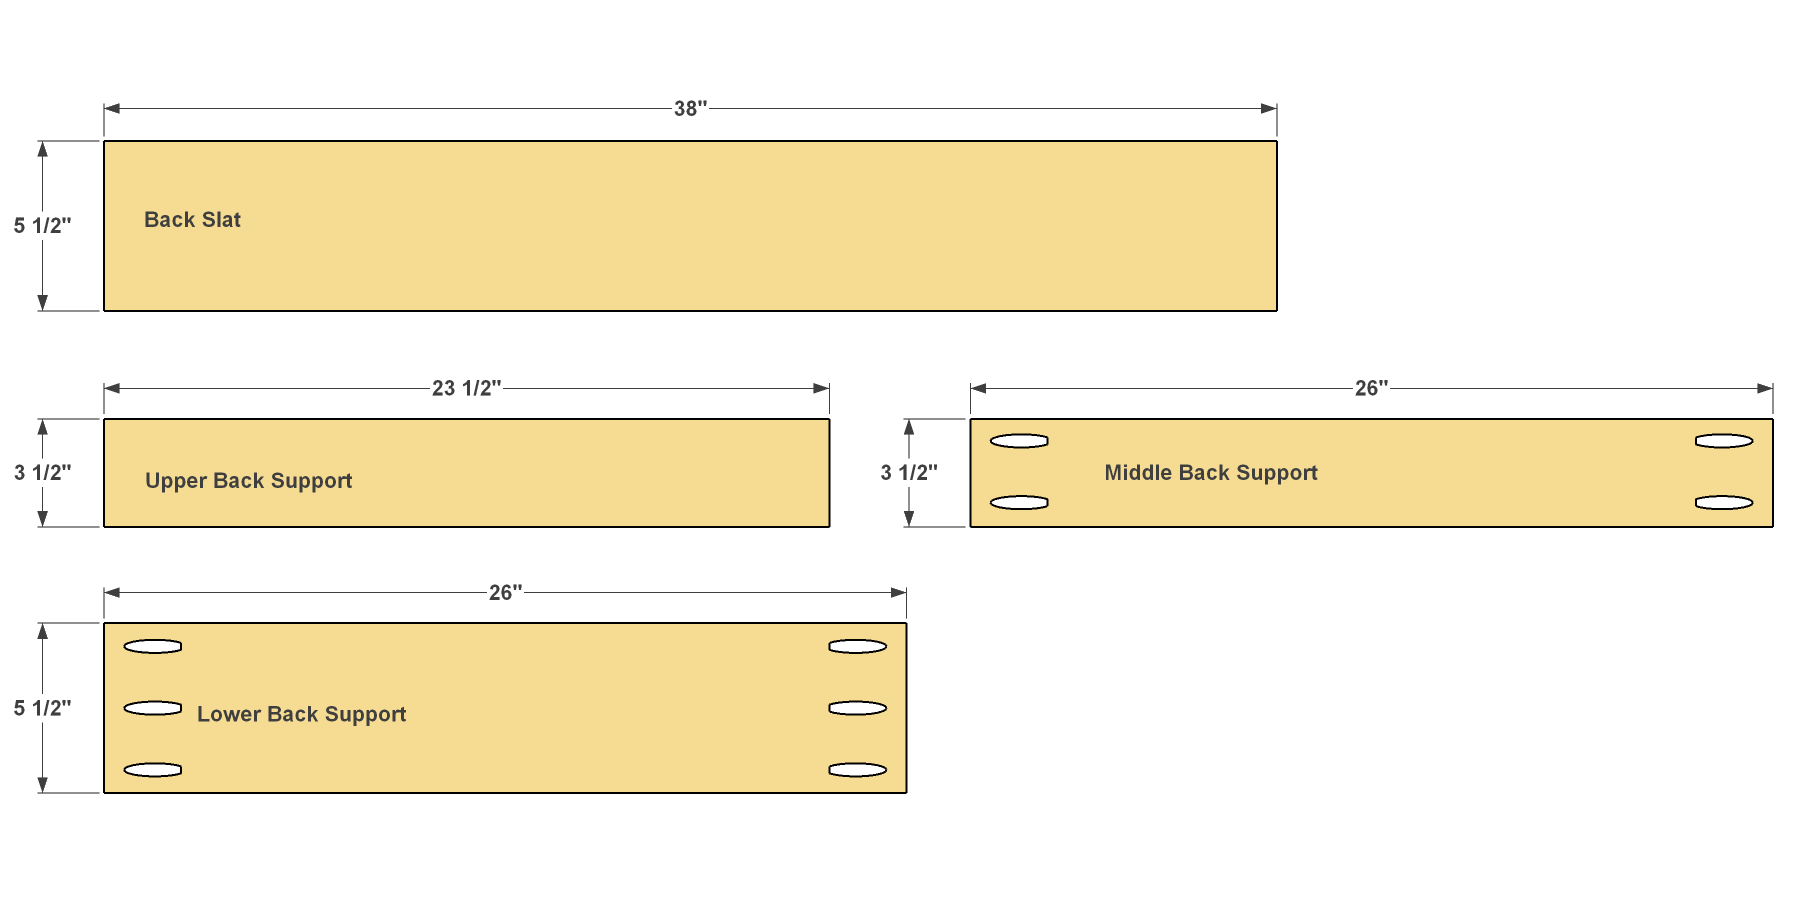
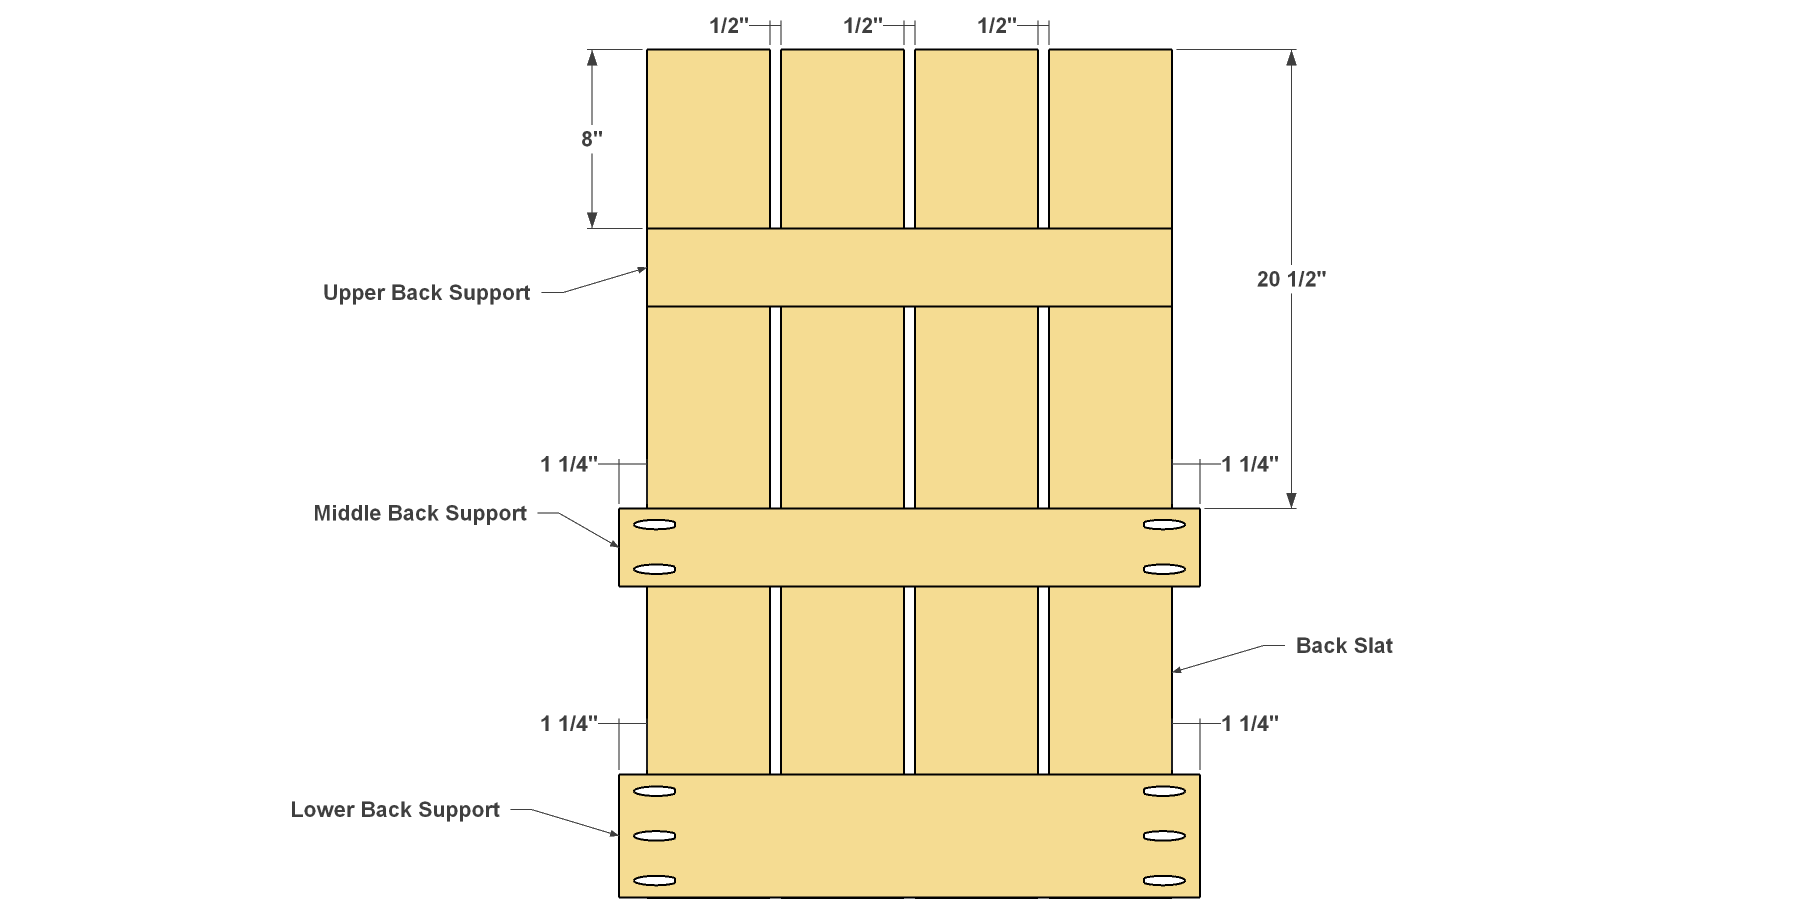
- Cut four Back Slats to length, as shown in the cutting diagram.
- Then cut the Upper, Middle, and Lower Back Supports to length, as well.
- Drill pocket holes in the rough face of the Middle Back Support and Lower Back Support, as shown.
13. Assemble the Back
Assemble the Back Slats and the Back Supports as shown using 1 1/4" exterior wood screws. Use 4 Screws at each Slat and Support location.
14. Cut the Arc on the Seat Back
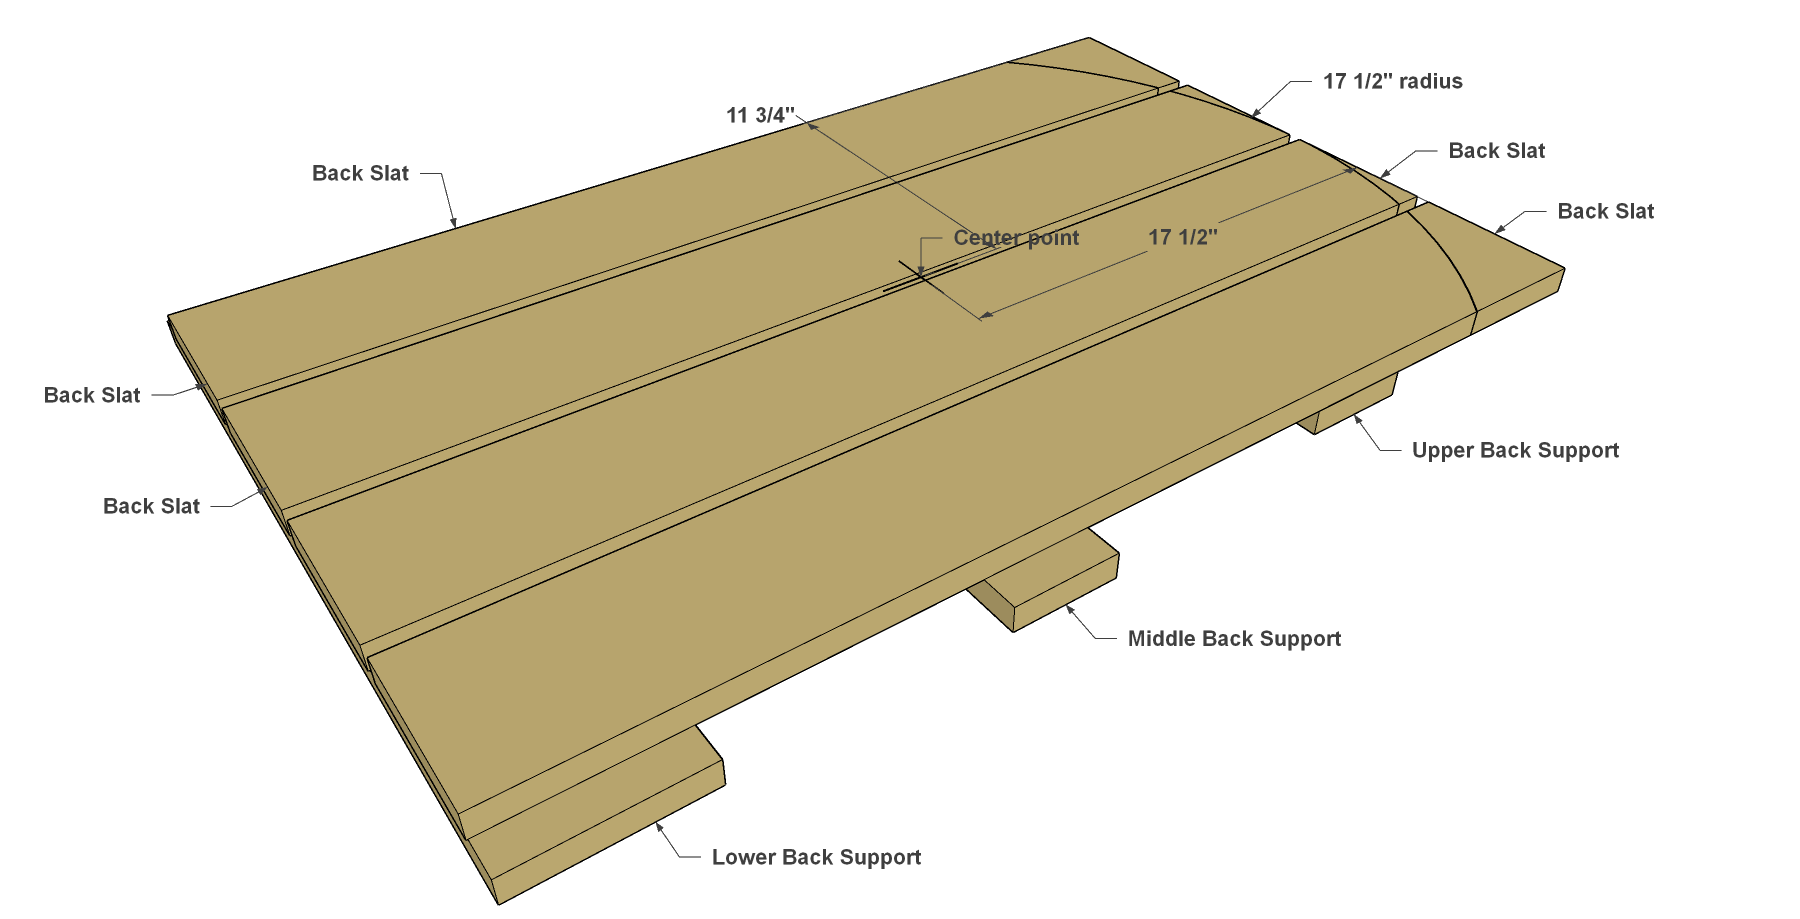
- Lay out the radius shown to cut the arched top of the back slats. You’ll notice that the center point lies right between two Back Slats. You can stick down a couple layers of masking tape, and then draw on the center point.
- Then use a string and a pencil to mark the radius on the top end of the Back Slats.
- Cut the radius using a jig saw, and then sand the cut ends smooth.
15. Install the Back
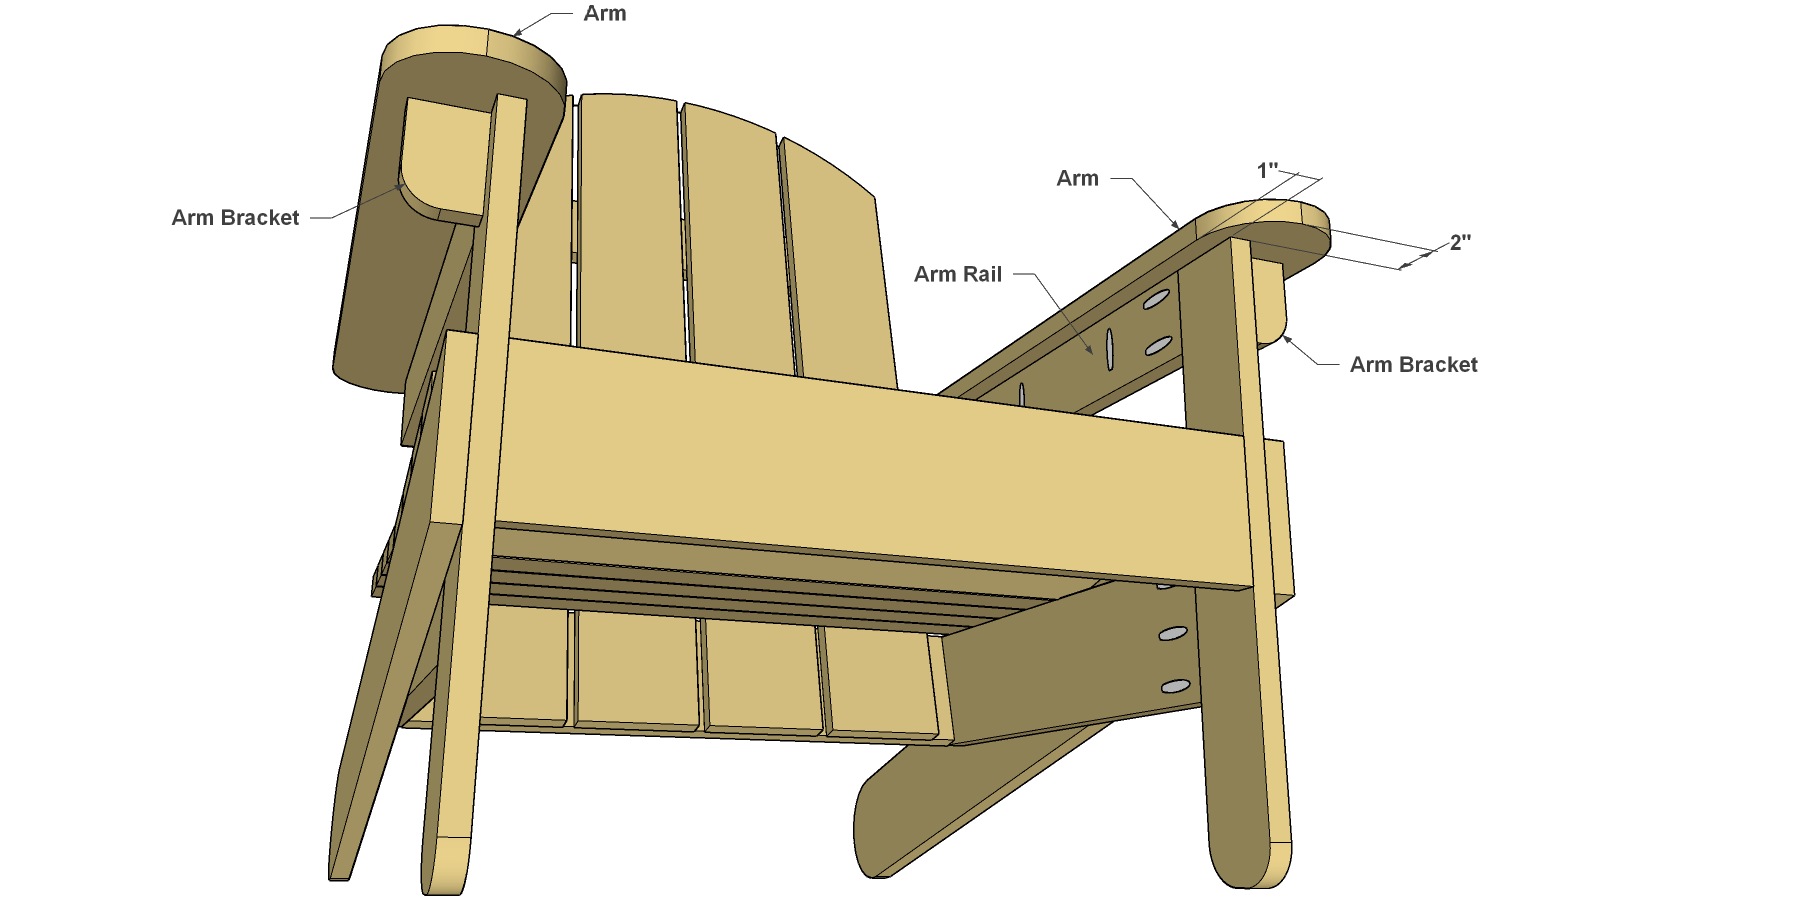
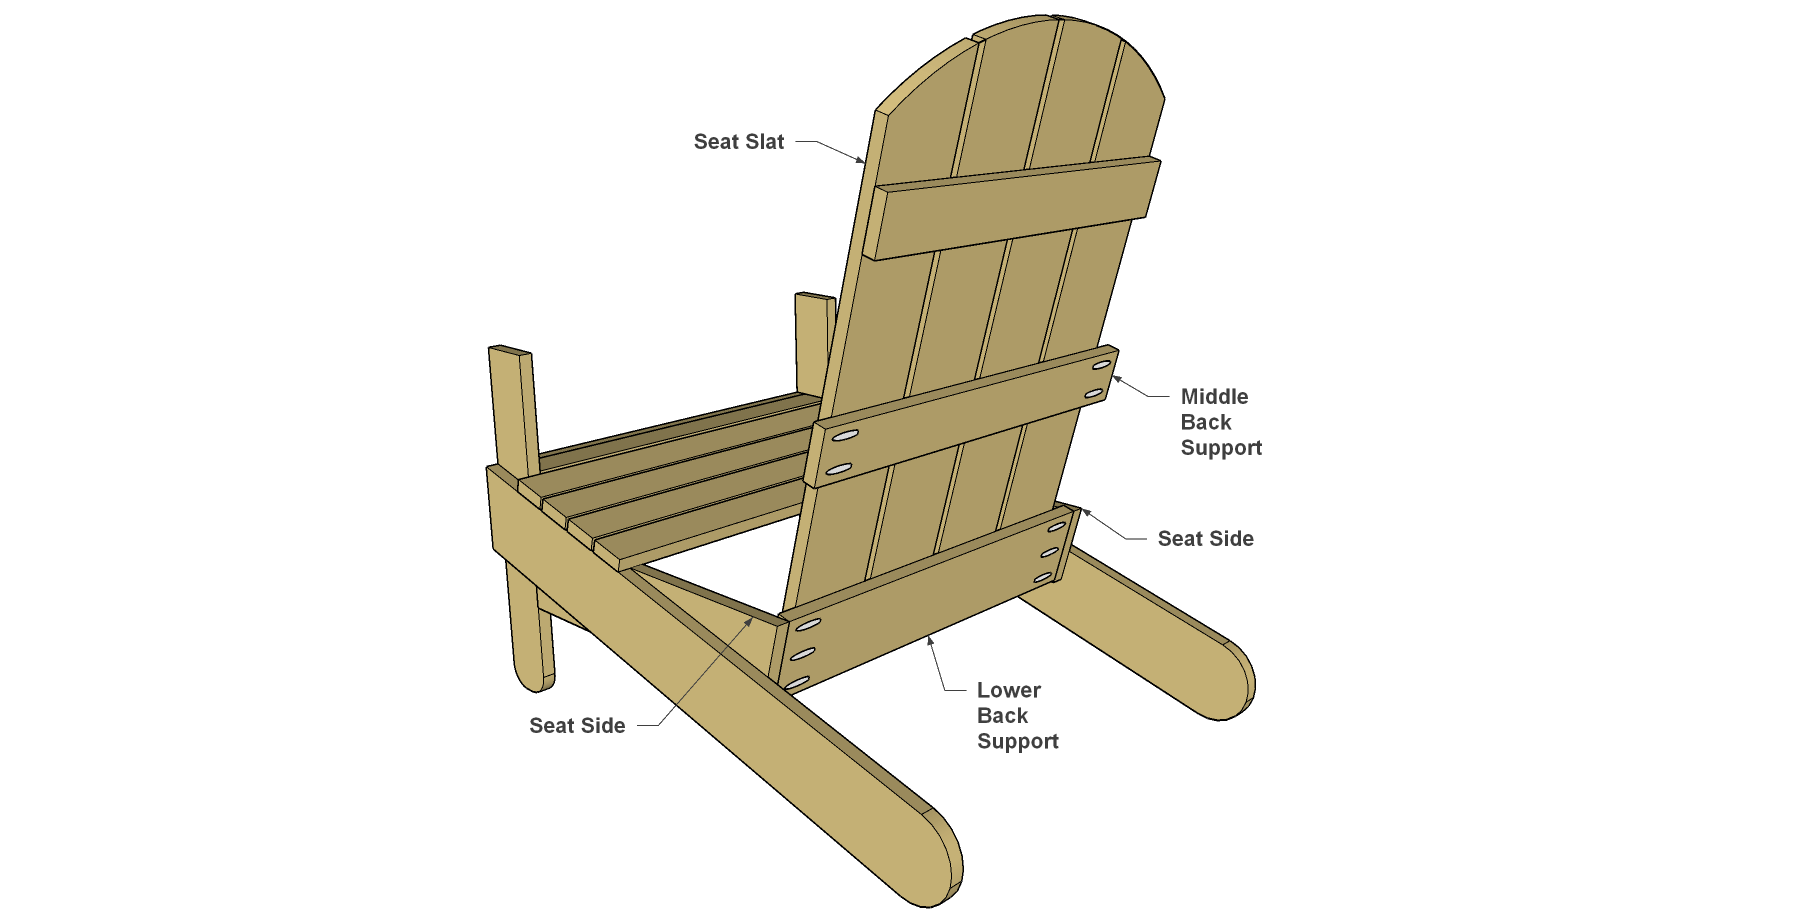
- Attach the back assembly to the Seat Sides using 1 1/4" Blue-Kote™ Pocket-Hole Screws.
- Add a clamp to help keep the back assembly in place while you screw it in place. You may find it easiest to lay the chair on it’s side and prop up the back assembly as you work on installation.
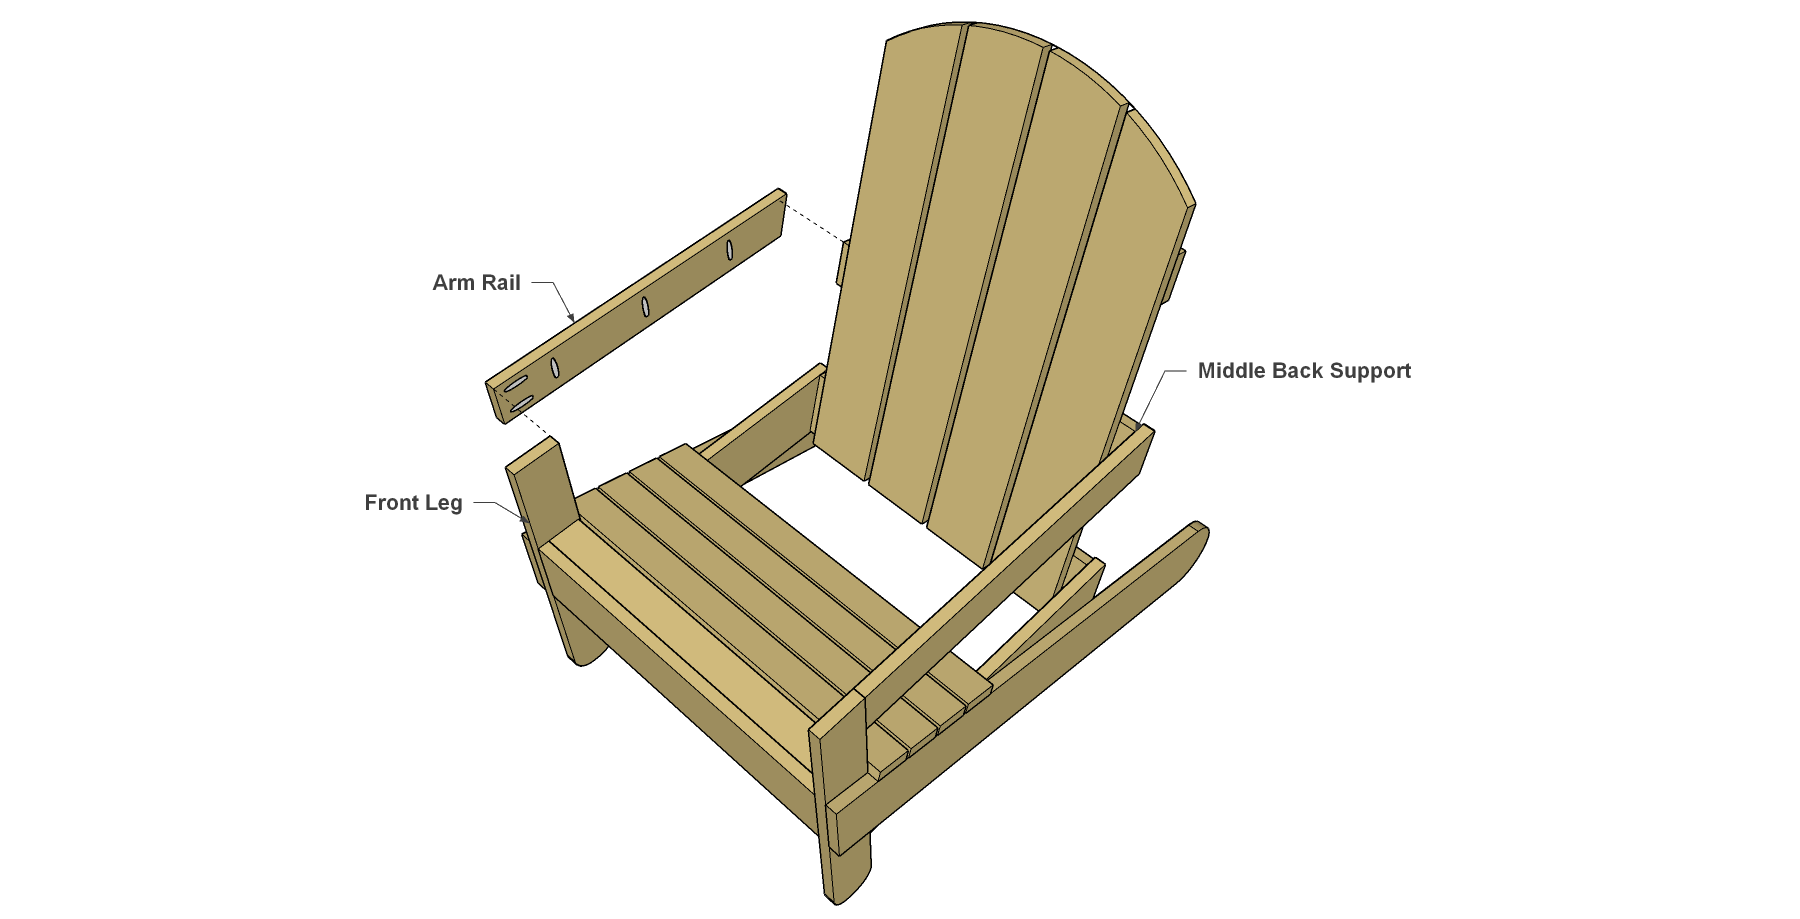
16. Make Arm Rails
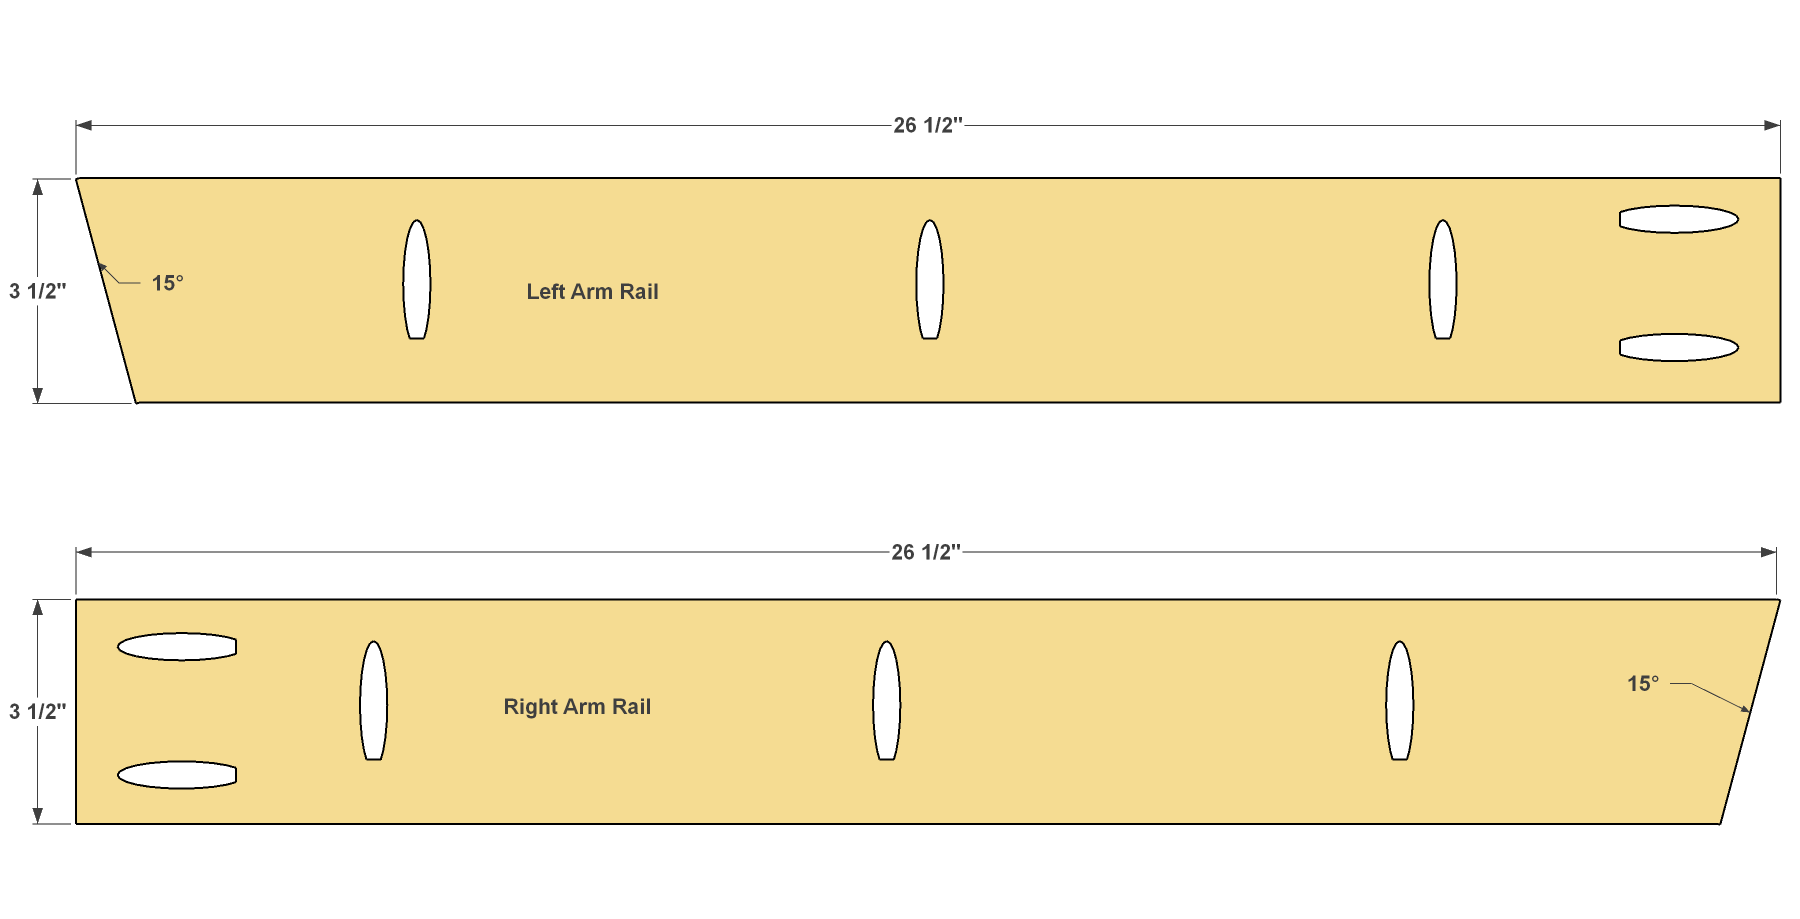
Cut two Arm Rails to length, as shown in the cutting diagram, and then drill pocket holes where shown.
17. Add the Arm Rails
Not you can secure the Arm Rails to the Front Legs and the Middle Back Support using 1 1/4" Blue-Kote™ Pocket-Hole Screws.
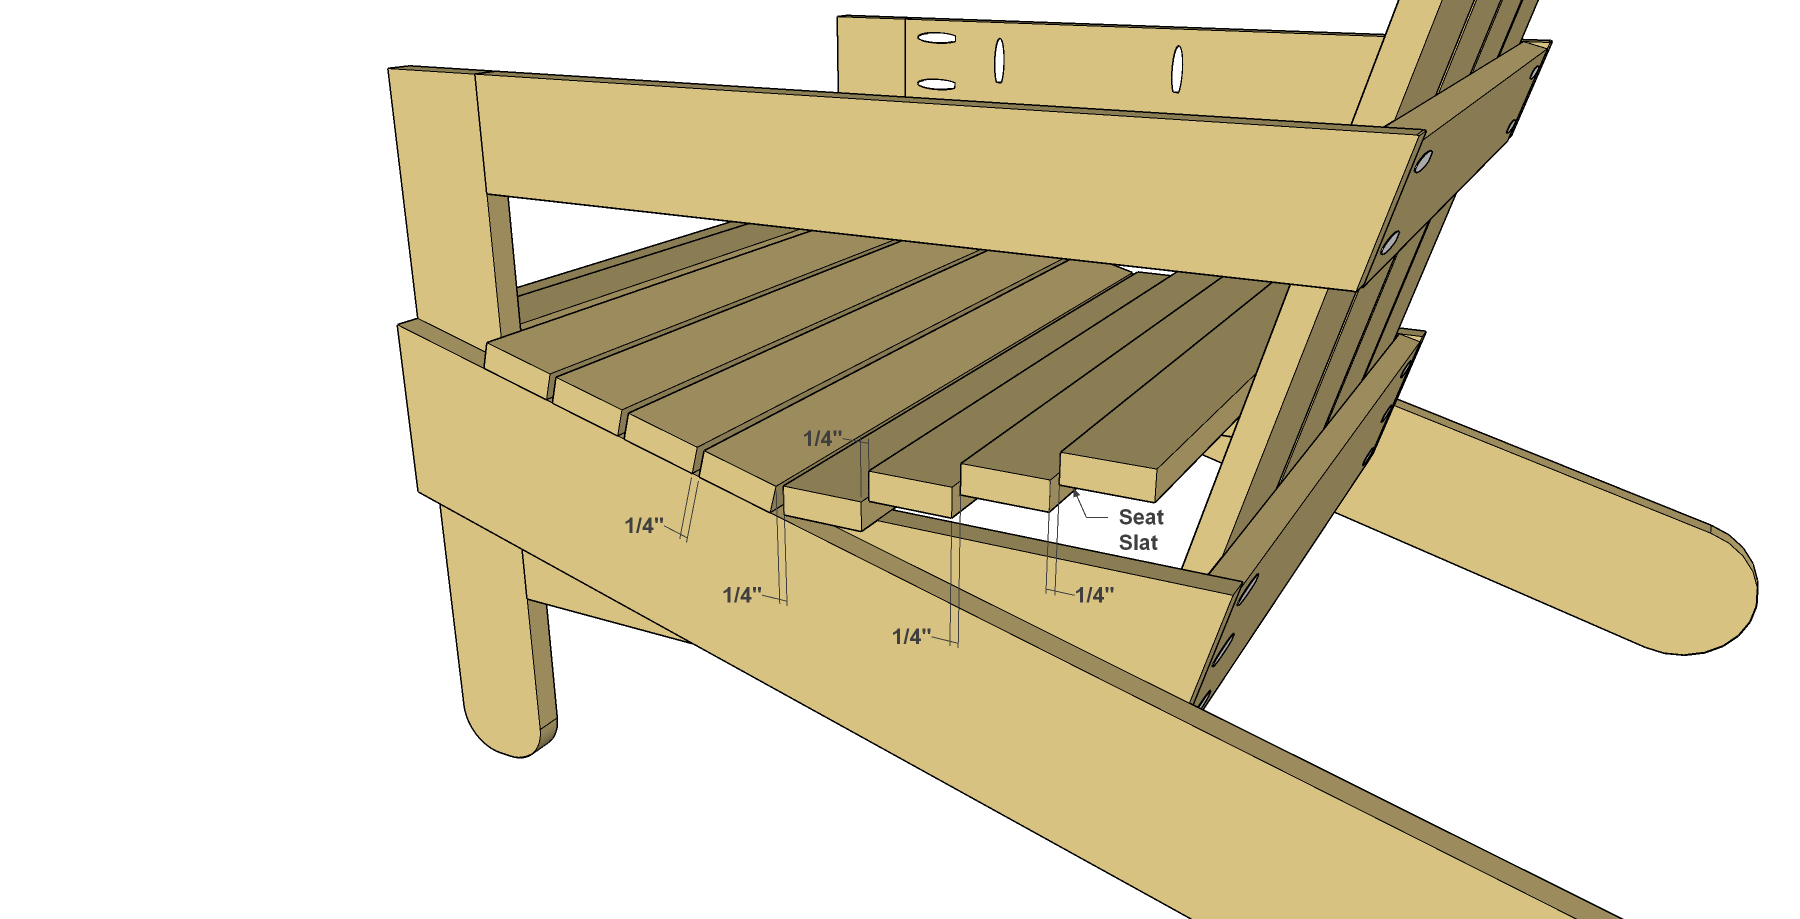
18. Add the last 4 Seat Slats
Now attach the last four Seat Slats. Space them 1/4" apart, and then nail them to the Seat Sides using 2" exterior nails.
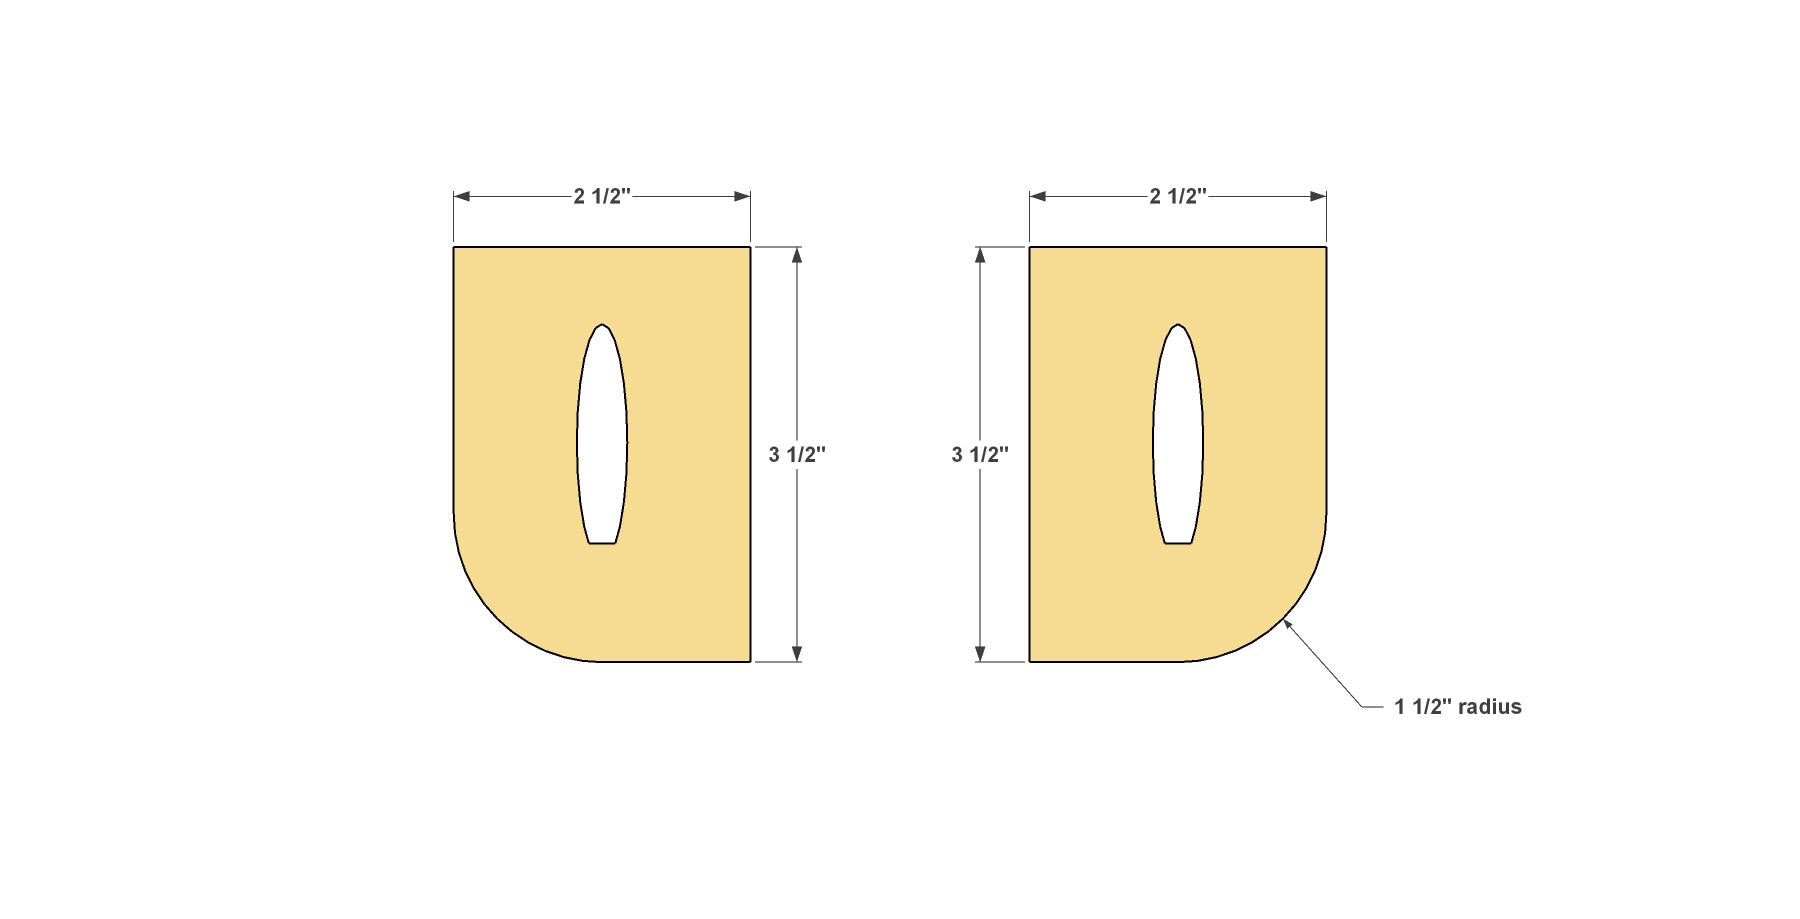
19. Arm Brace
Cut the Arm Brace to length and Cut the radius as shown. Drill a pocket hole in each Arm Brace where shown.
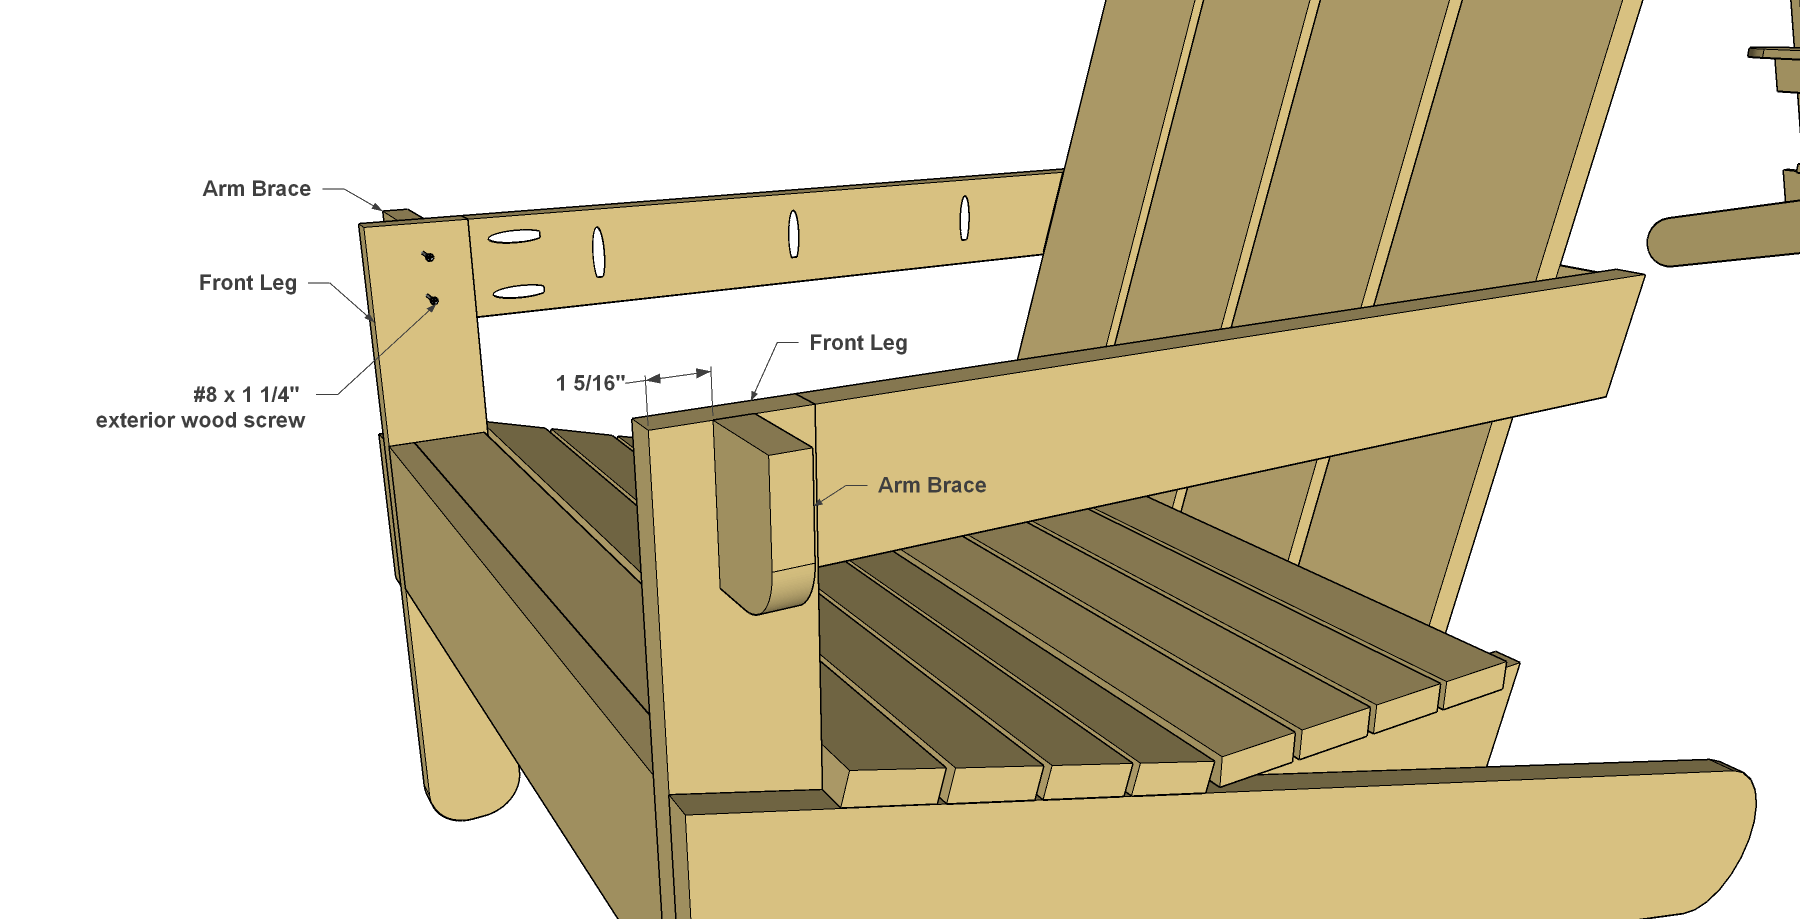
20. Install the Arm Braces
Now you can attach the Arm Braces to the Front Legs. Position the Braces, and then drive 1 1/4" exterior screws through each Front Leg and into each Brace.
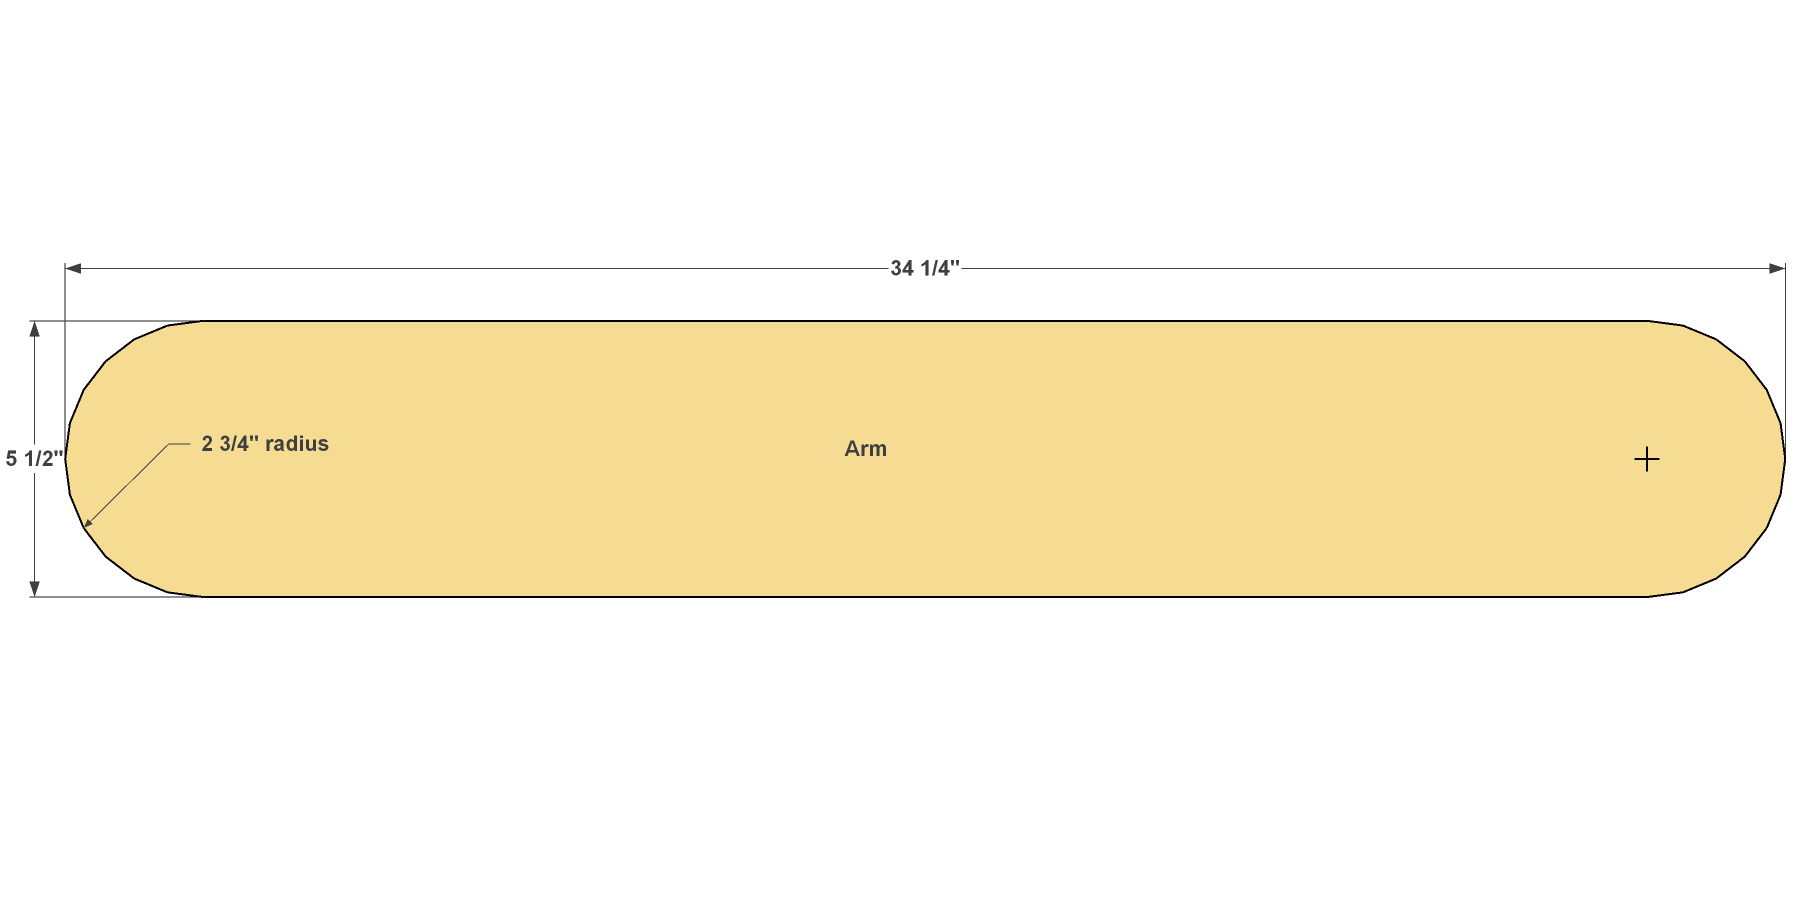
21. Make the Arms
- Cut two Arms to length, as shown in the cutting diagram.
- Lay out the radius on each end of the Arms.
- Cut the radius with a jigsaw and sand the cut ends smooth.
22. Attach the Arms
Position the Arms as shown, and then attach them using 1 1/4" pocket hole screws. With that, you can do any final sanding needed, and then stain your chair. For ours, we used a solid-color deck stain.