 Notch
- Difficulty
- Intermediate
- Time
- 4.8–9.3 hours
- Cost
- $$$
About this build
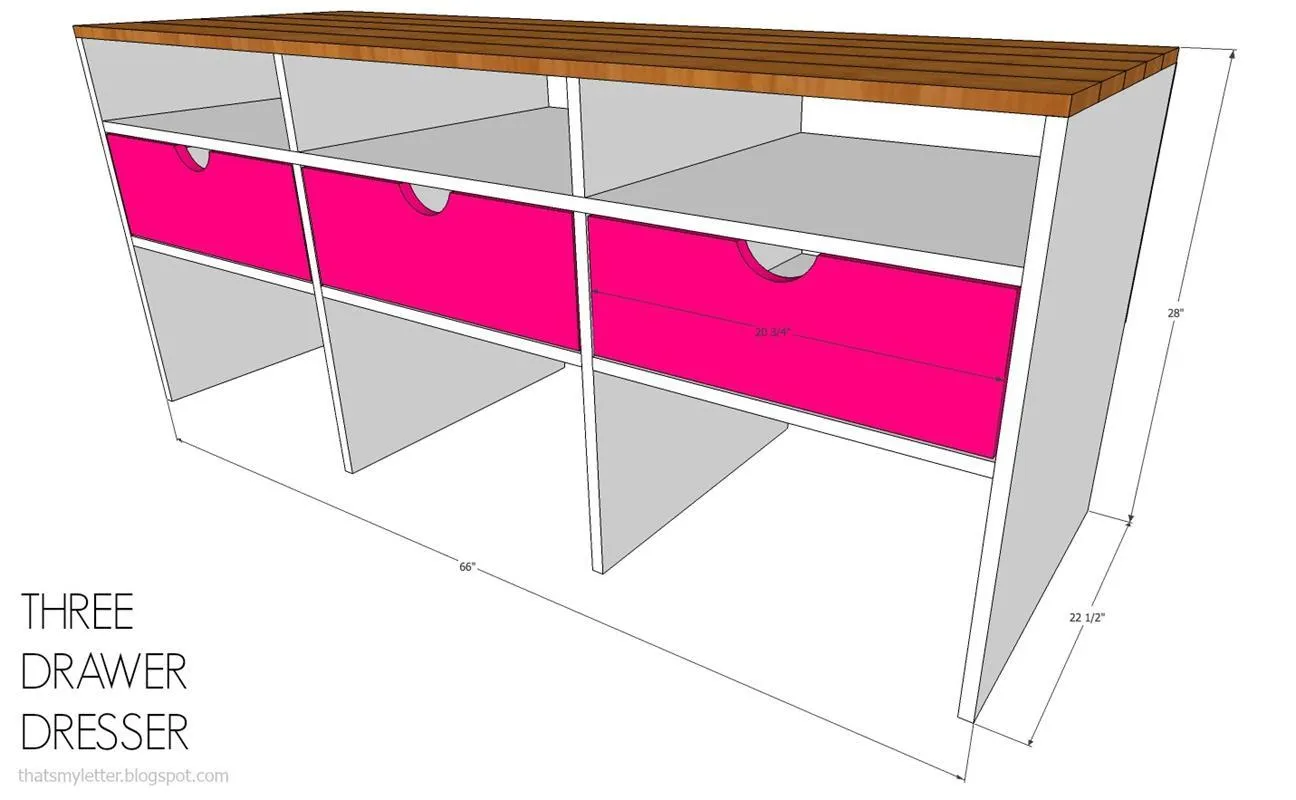
A three drawer dresser with three open cubby shelves. Intended as a large nightstand between to bed for a shared bedroom but can be used as a stand along dresser or behind a sofa, etc.
Tools
Essential
- Brad Nailer
- Circular Saw
- Drill / Driver
- Impact Driver
- Jigsaw
- Miter Saw
- Pocket Hole Jig
- Random Orbit Sander
Optional / nice to have
- Bar / Pipe Clamps
- Combination Square
- Tape Measure
Materials
| Item | Qty |
|---|---|
| Plywood, 3/4" Thick Full Sheet | 2 board |
| Board, 1x5 72" | 5 board |
| Board, 1x6 96" | 2 board |
| Board, 1x8 72" | 1 board |
| Plywood, 1/4" Thick Full Sheet | 1 board |
| Box 1 1/4" Kreg pocket hole screws | 1 each |
| 2" wood screws | 6 each |
| 1 1/4" wood screws | 36 each |
| Sleeve 2" finish nails | 1 each |
| Sleeve 3/4" finish nails | 1 each |
| 21" drawer glides | 3 each |
Overall cost: $$$. Lumber prices vary by region, species, and season, so we give a band rather than a figure we would only be pretending to know.
Cut list
| Part | Qty | T × W × L |
|---|---|---|
| Top | 5 | 3/4" × 4 1/2" × 66" |
| Cubby shelf | 1 | 3/4" × 22" × 64" |
| Sides | 2 | 3/4" × 22" × 27" |
| Dividers & drawer support | 5 | 3/4" × 21" × 22" |
| Cubby dividers | 2 | 3/4" × 5" × 22" |
| Backing | 1 | 1/4" × 14" × 66" |
| Drawer fronts | 3 | 3/4" × 7 1/4" × 4" |
| Drawer sides | 6 | 3/4" × 5 1/2" × 4" |
| Drawer fronts & backs | 6 | 3/4" × 5 1/2" × 4" |
| Drawer base | 3 | 1/4" × 19" × 21" |
What to buy
Buy 14 boards at 8 ft.
3/4" × 22"
2 boards
3/4" × 21"
2 boards
3/4" × 7 1/4"
1 board
3/4" × 5 1/2"
1 board
3/4" × 5"
1 board
3/4" × 4 1/2"
5 boards
1/4" × 19"
1 board
1/4" × 14"
1 board
Assumes 8 ft stock, a 1/8" saw kerf, and buying each part at its own width. Change the board size or kerf on the full board plan →
Instructions
1Dimensions
Overall dimensions 66"w x 22 1/2"d x 28"h
2Step 1: top
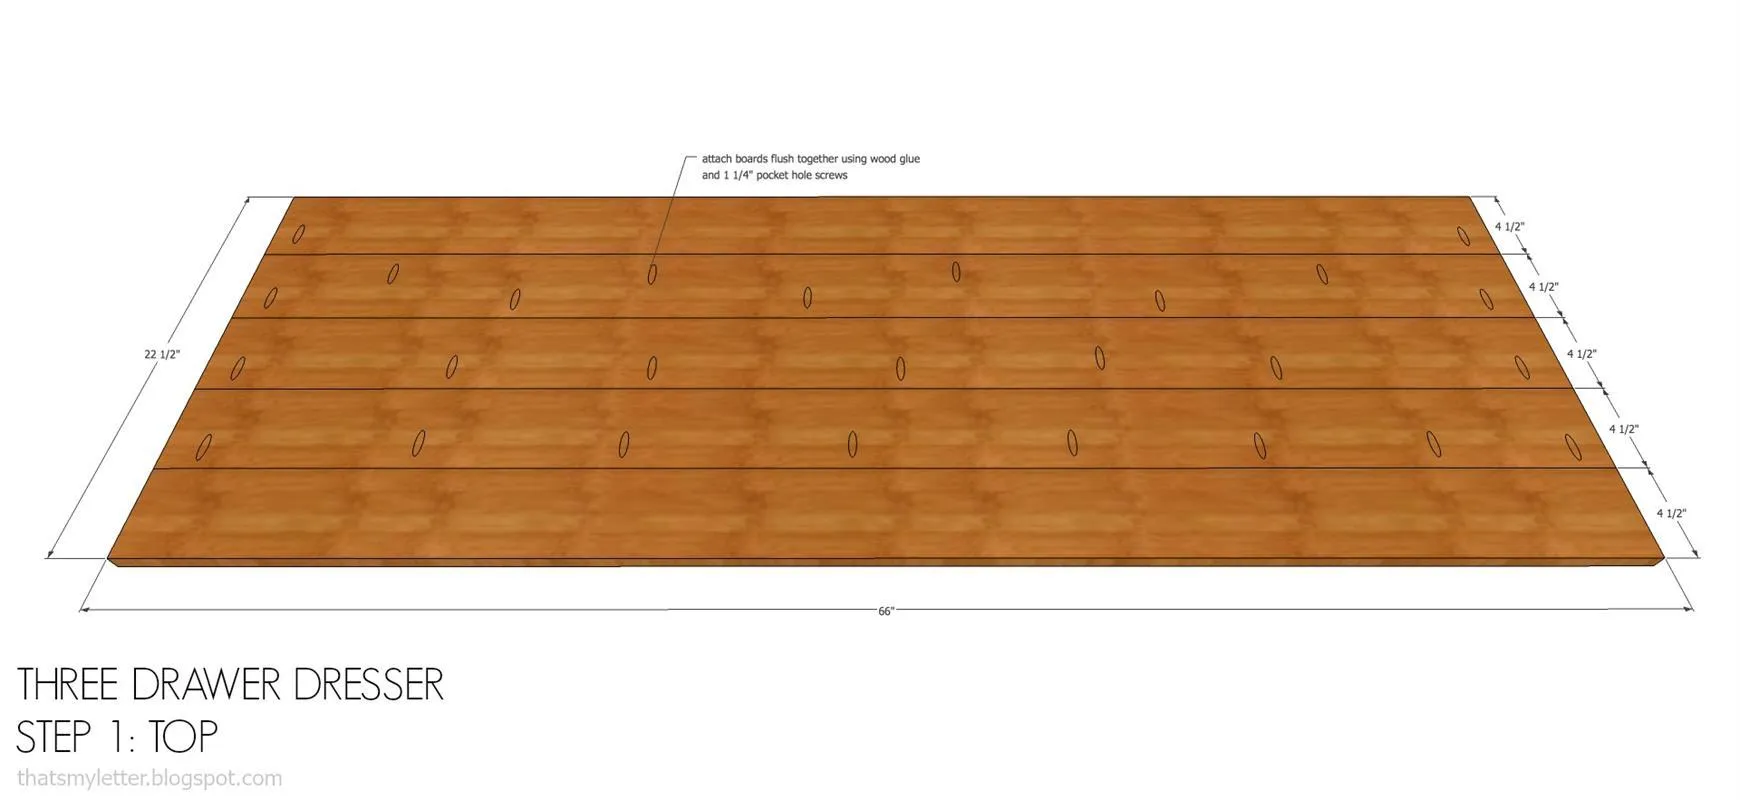
- Attach the top boards using wood glue, pocket holes and 1 1/4" pocket hole screws. Keep boards flush to form one smooth surface.
- Once all boards are attached measure the width to confirm 22 1/2" before cutting plywood sheets for remaining steps as 1x5 boards can vary in width.
3Step 2: sides
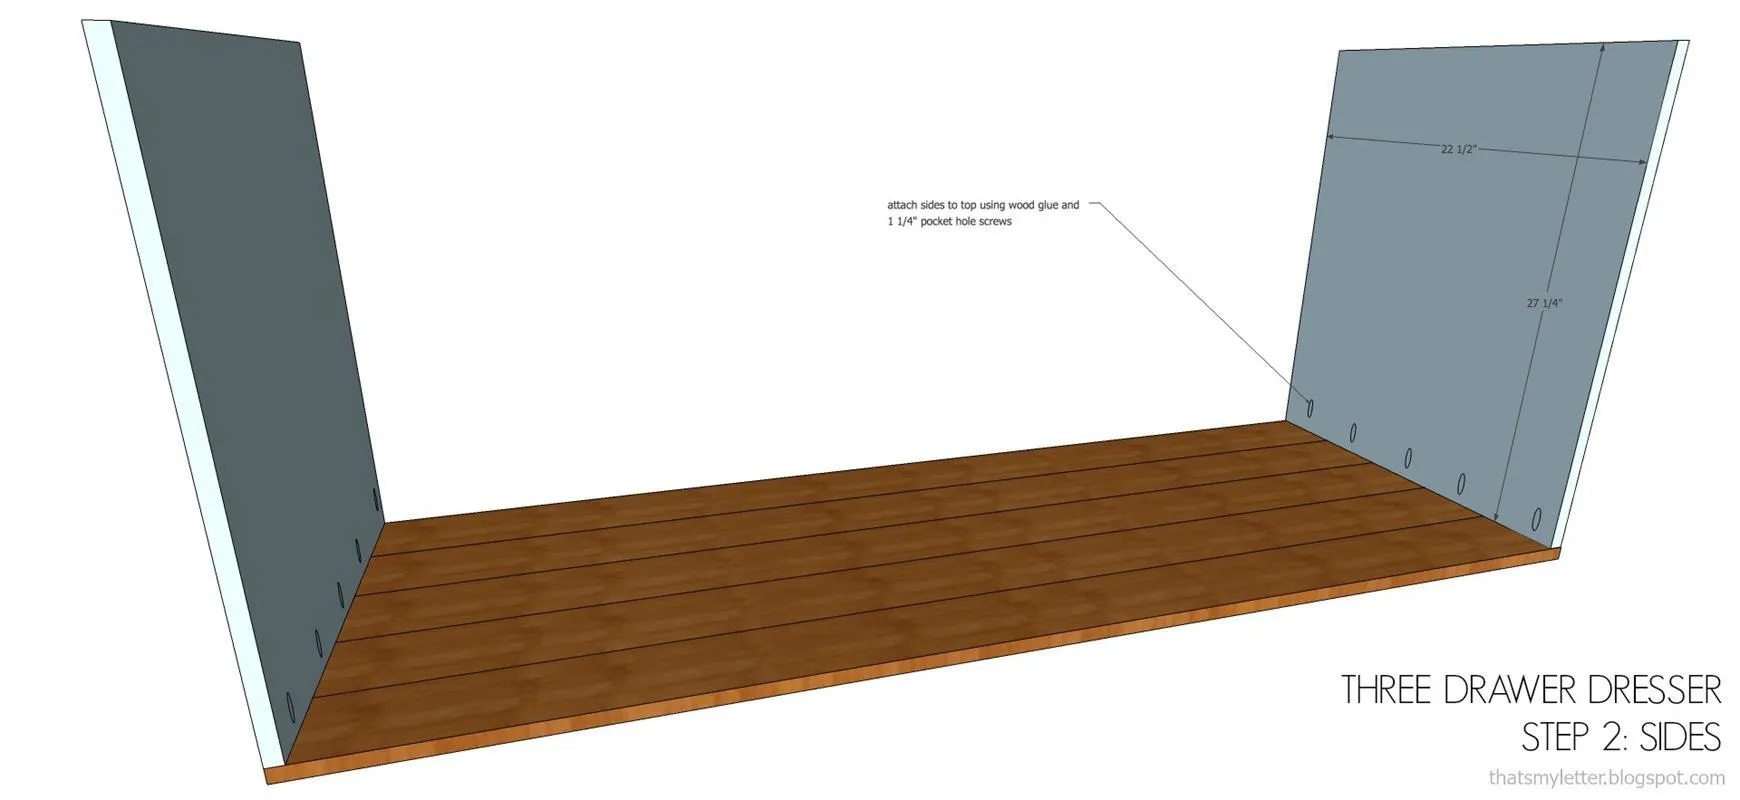
Attach sides to underside of top using wood glue, pocket holes and 1 1/4" pocket hole screws.
4Step 3: cubby shelf
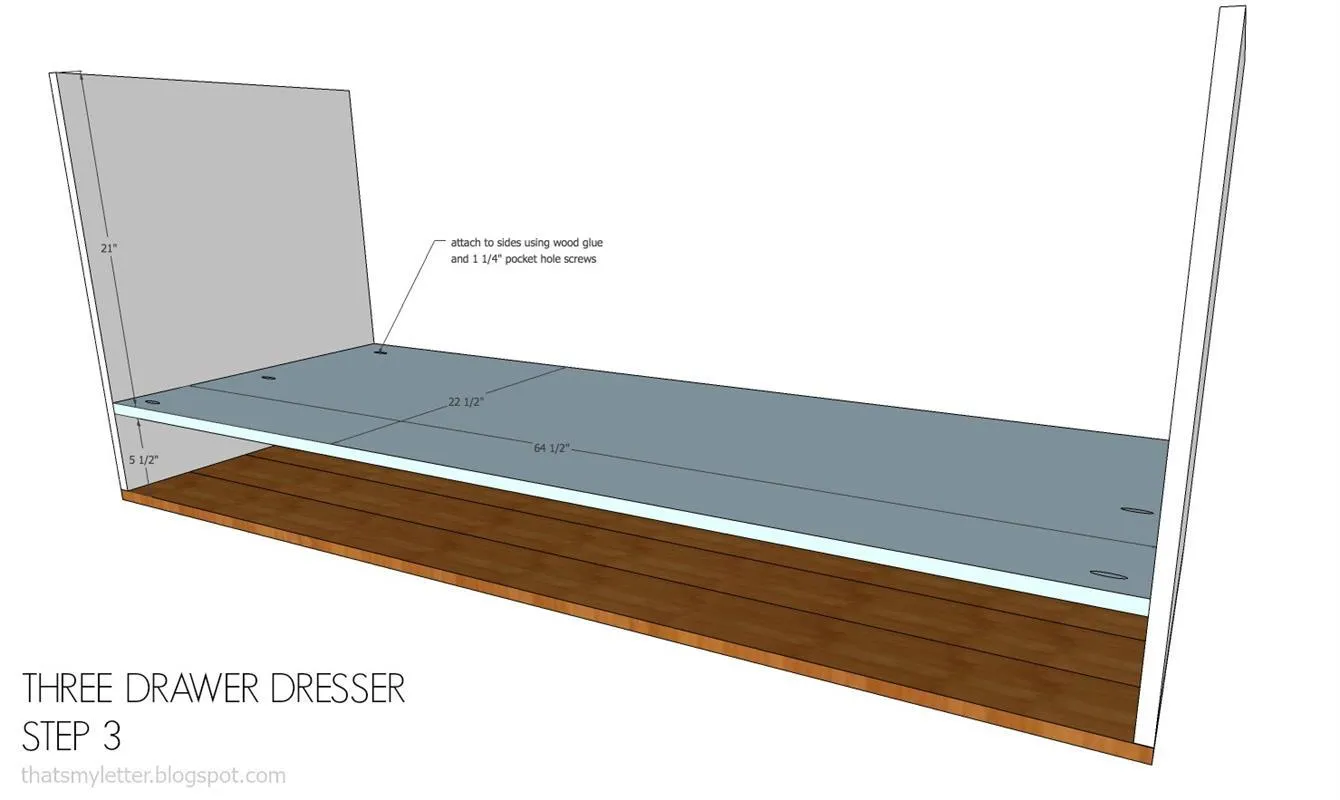
Attach cubby shelf to sides using wood glue, pocket holes and 1 1/4" pocket hole screws.
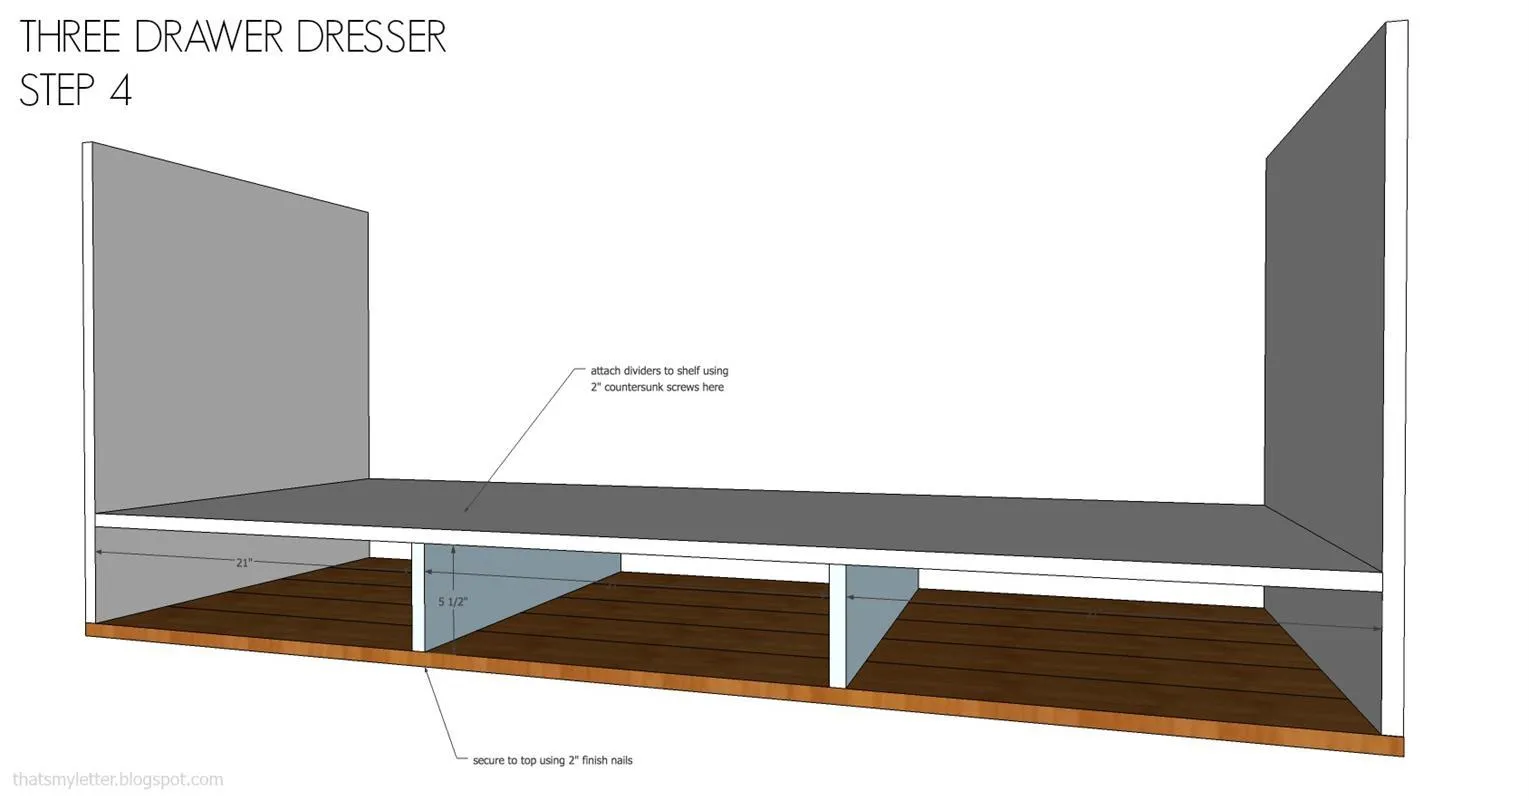
5Step 4: cubby dividers
Attach cubby dividers using countersunk 2" wood screws from underneath and 2" finish nails from the top.
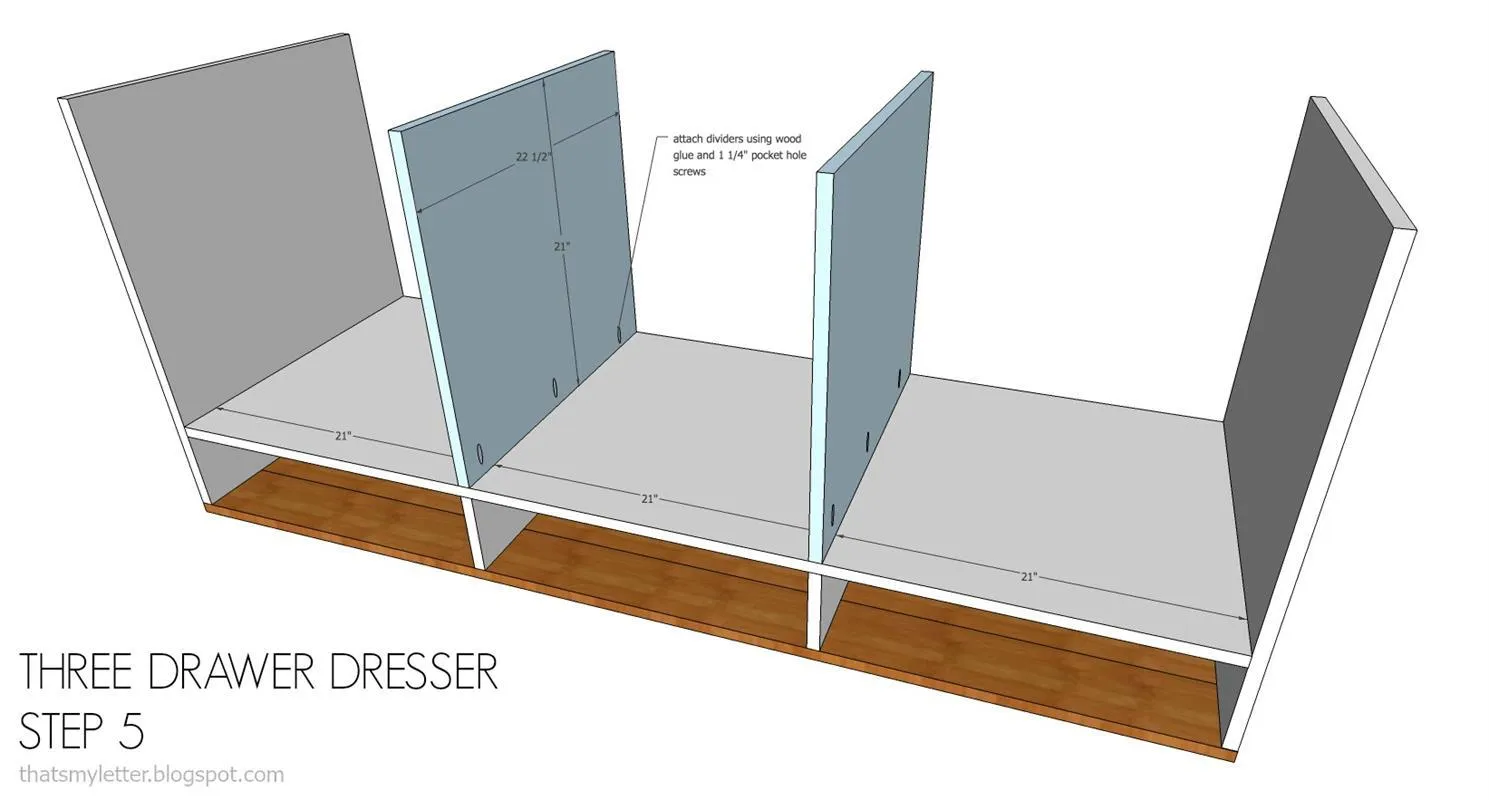
6Step 5: drawer dividers
Attach drawer dividers to shelf using wood glue, pocket holes and 1 1/4" pocket hole screws.
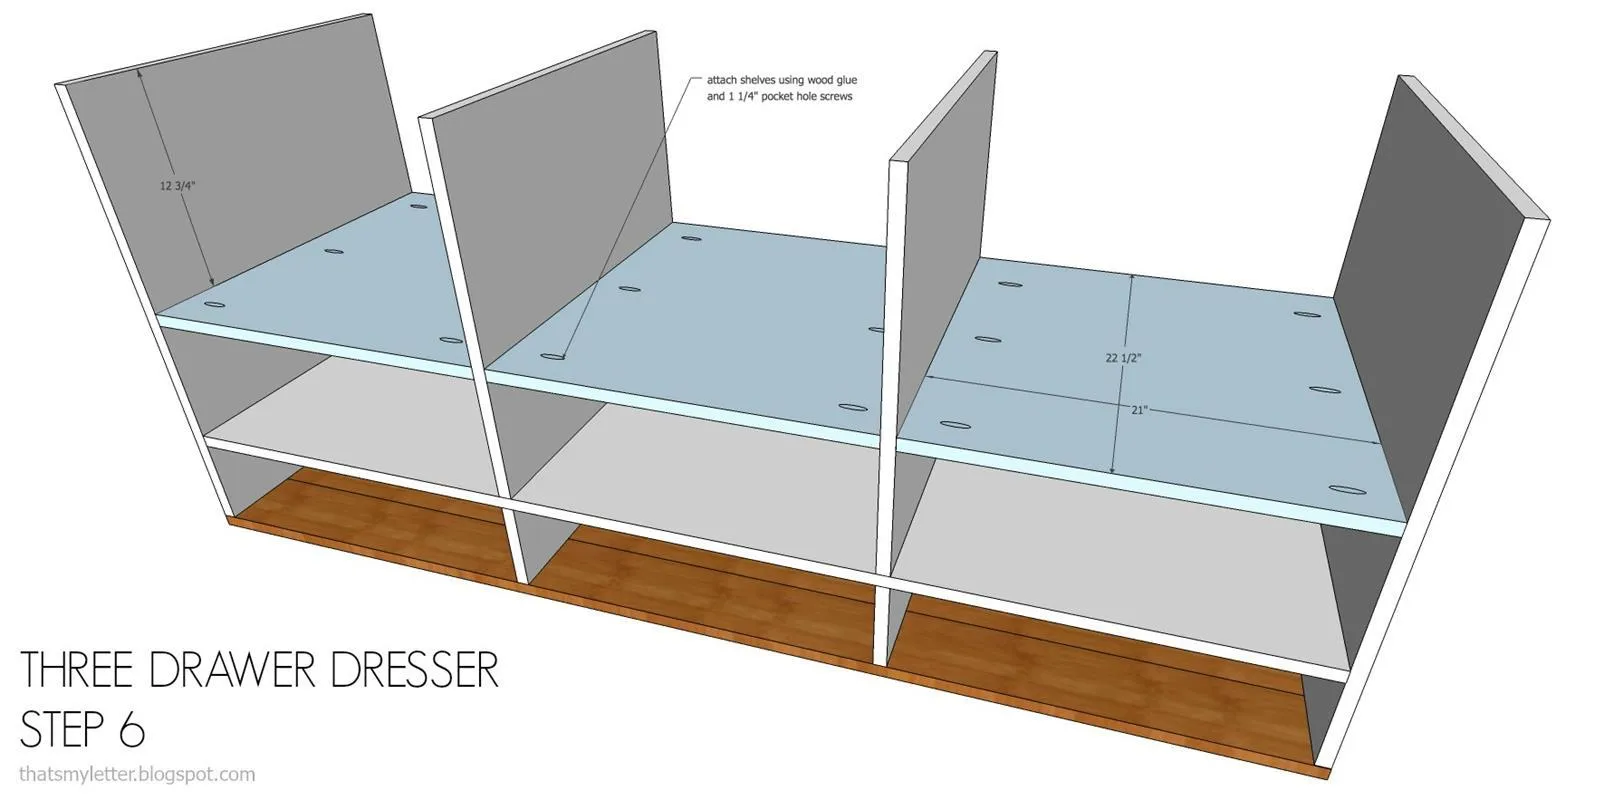
7Step 6: drawer supports
Attach drawer supports using wood glue, pocket holes and 1 1/4" pocket hole screws.
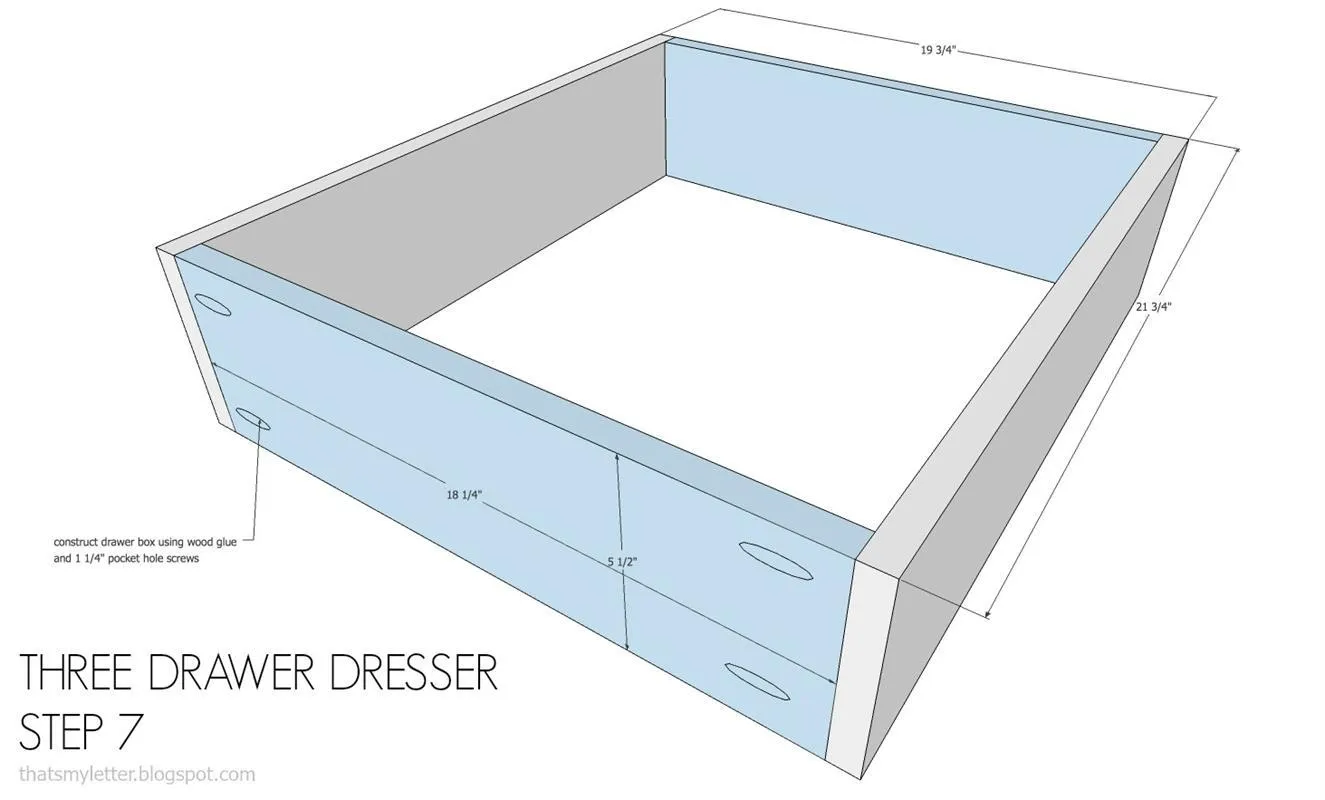
8Step 7: drawer box
Construct drawer box using wood glue, pocket holes and 1 1/4" pocket hole screws.
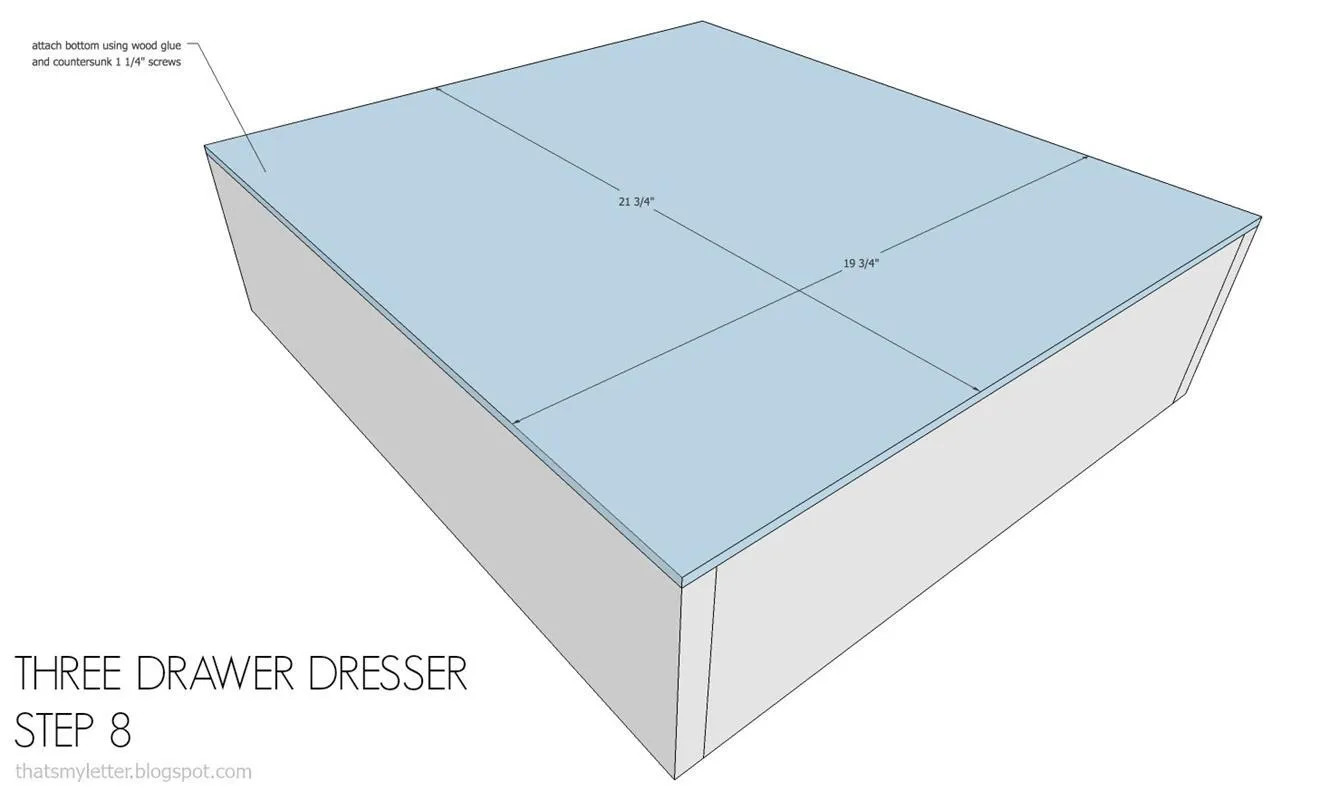
9Step 8: drawer base
Attach base to drawer using wood glue and countersunk 1 1/4" screws.
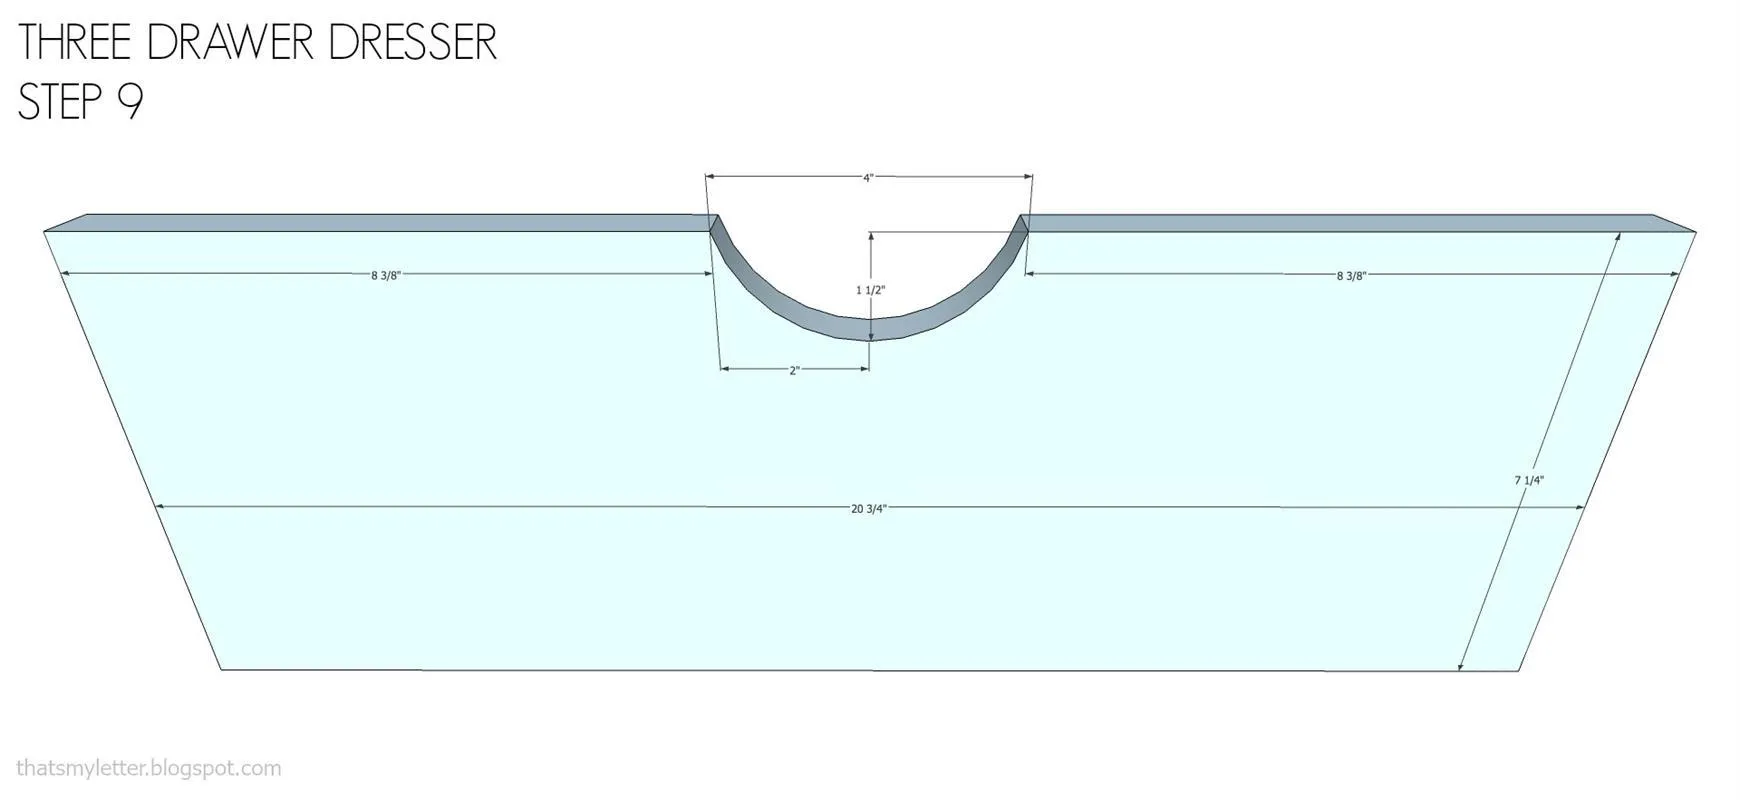
10Step 9: drawer front
Cut out drawer front handle pull as per sketch.
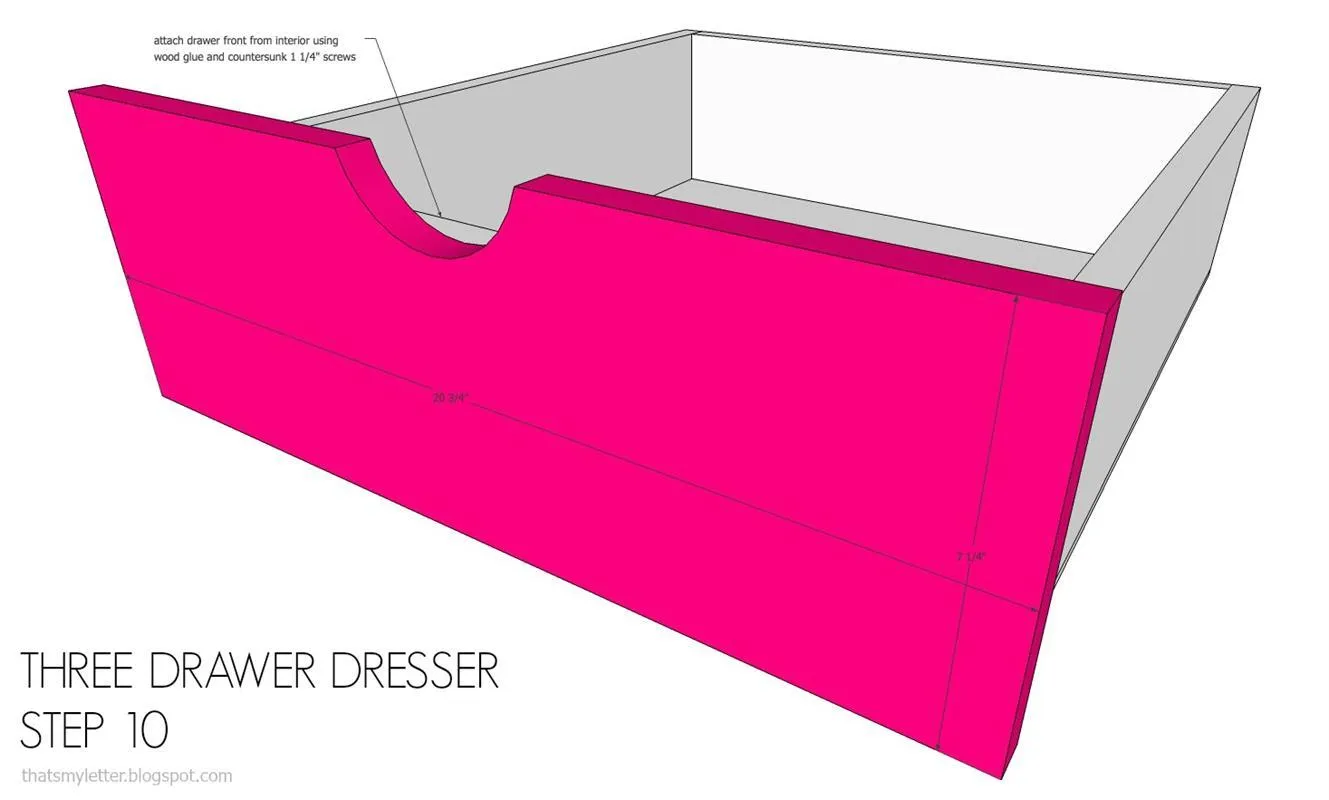
11Step 10: drawer front
Attach drawer glides as per hardware instructions. Put drawer front in place with wood glue and finish nails then remove drawer and secure front to box using countersunk 1 1/4" wood screws from interior.
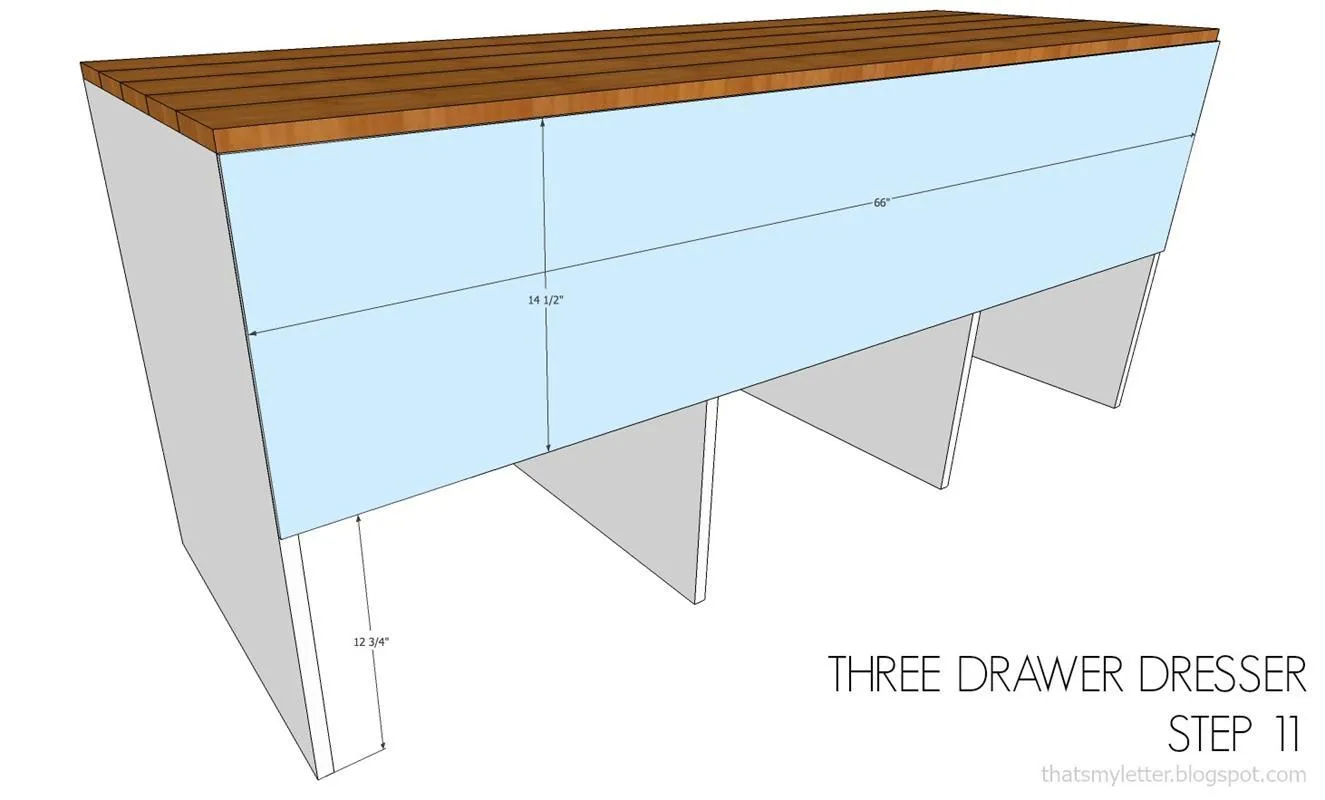
12Step 11: backing
Attach backing to unit using wood glue and 3/4" finish nails.
Tags
- Bedroom
- Intermediate
Reviews & builds
No reviews yet
Sign in to review this plan or share your build.
No reviews yet. Be the first to build this.