 Notch
Notch- Difficulty
- Intermediate
- Time
- 7–13.5 hours
- Cost
- $$$
About this build
By combining simple lines and stained-pine construction with a modern-style sink, this vanity combines rustic and contemporary for a sophisticated look. That makes it perfect whether your style leans toward farmhouse or contemporary. Plus, it offers large shelves for storage, and it’s easy to build.
Tools
Essential
- Brad Nailer
- Circular Saw
- Drill / Driver
- Jigsaw
- Pocket Hole Jig
- Random Orbit Sander
Optional / nice to have
- Bar / Pipe Clamps
- Tape Measure
Materials
| Item | Qty |
|---|---|
| Board, 4x4 96" | 2 board |
| Board, 1x4 96" | 7 board |
| Board, 1x4 x 72" | 2 board |
| Board, 1x2x96" | 2 board |
| Board, 1x2 x 72" | 1 board |
| Edge-glued panel, 3/4" x 24" x 48" | 1 board |
| Coarse-thread Kreg Pocket-Hole Screws | 84 each |
| 1 1/2" brad nails | 100 each |
| Nail-on furniture glides | 4 each |
| Bathroom sink | 1 each |
| Faucet | 1 each |
| 1 1/2" flat-head wood screw | 24 each |
Overall cost: $$$. Lumber prices vary by region, species, and season, so we give a band rather than a figure we would only be pretending to know.
Cut list
| Part | Qty | T × W × L |
|---|---|---|
| Leg | 4 | 3" × 3" × 33" |
| Short Upper Rail | 2 | 3/4" × 3" × 16" |
| Short Shelf Rail | 4 | 3/4" × 1" × 16" |
| Long Upper Rail | 2 | 3/4" × 3" × 39" |
| Long Shelf Rail | 4 | 3/4" × 1" × 39" |
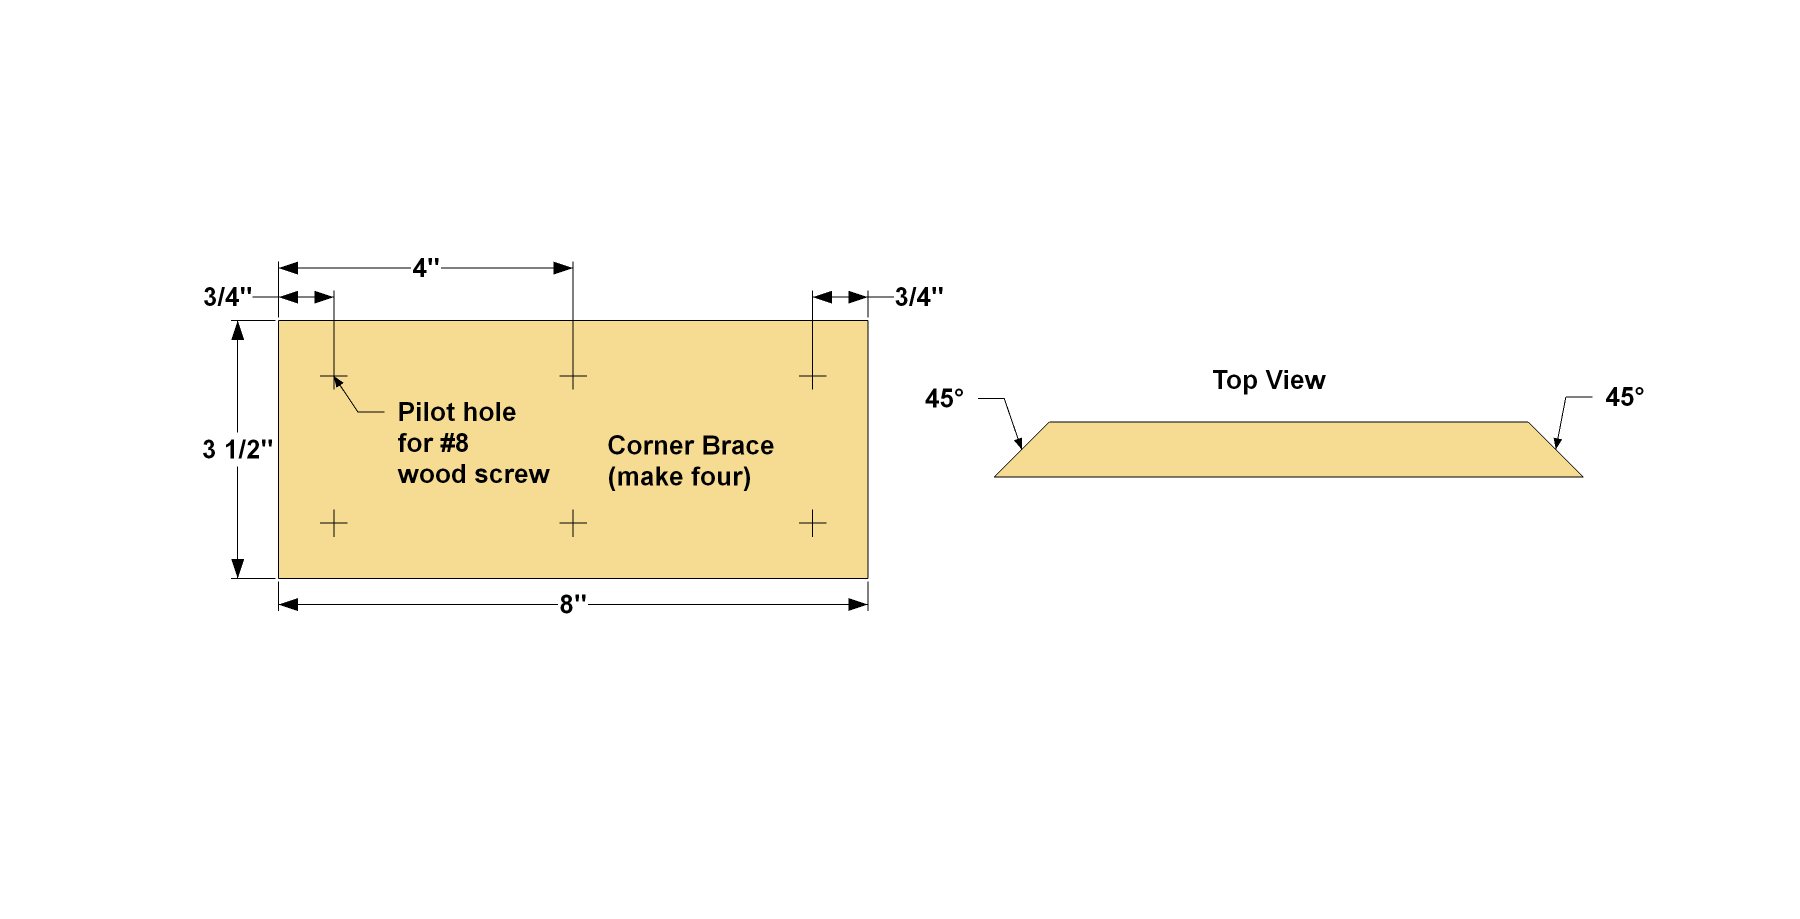
| Corner Brace | 4 | 3/4" × 3" × 8" |
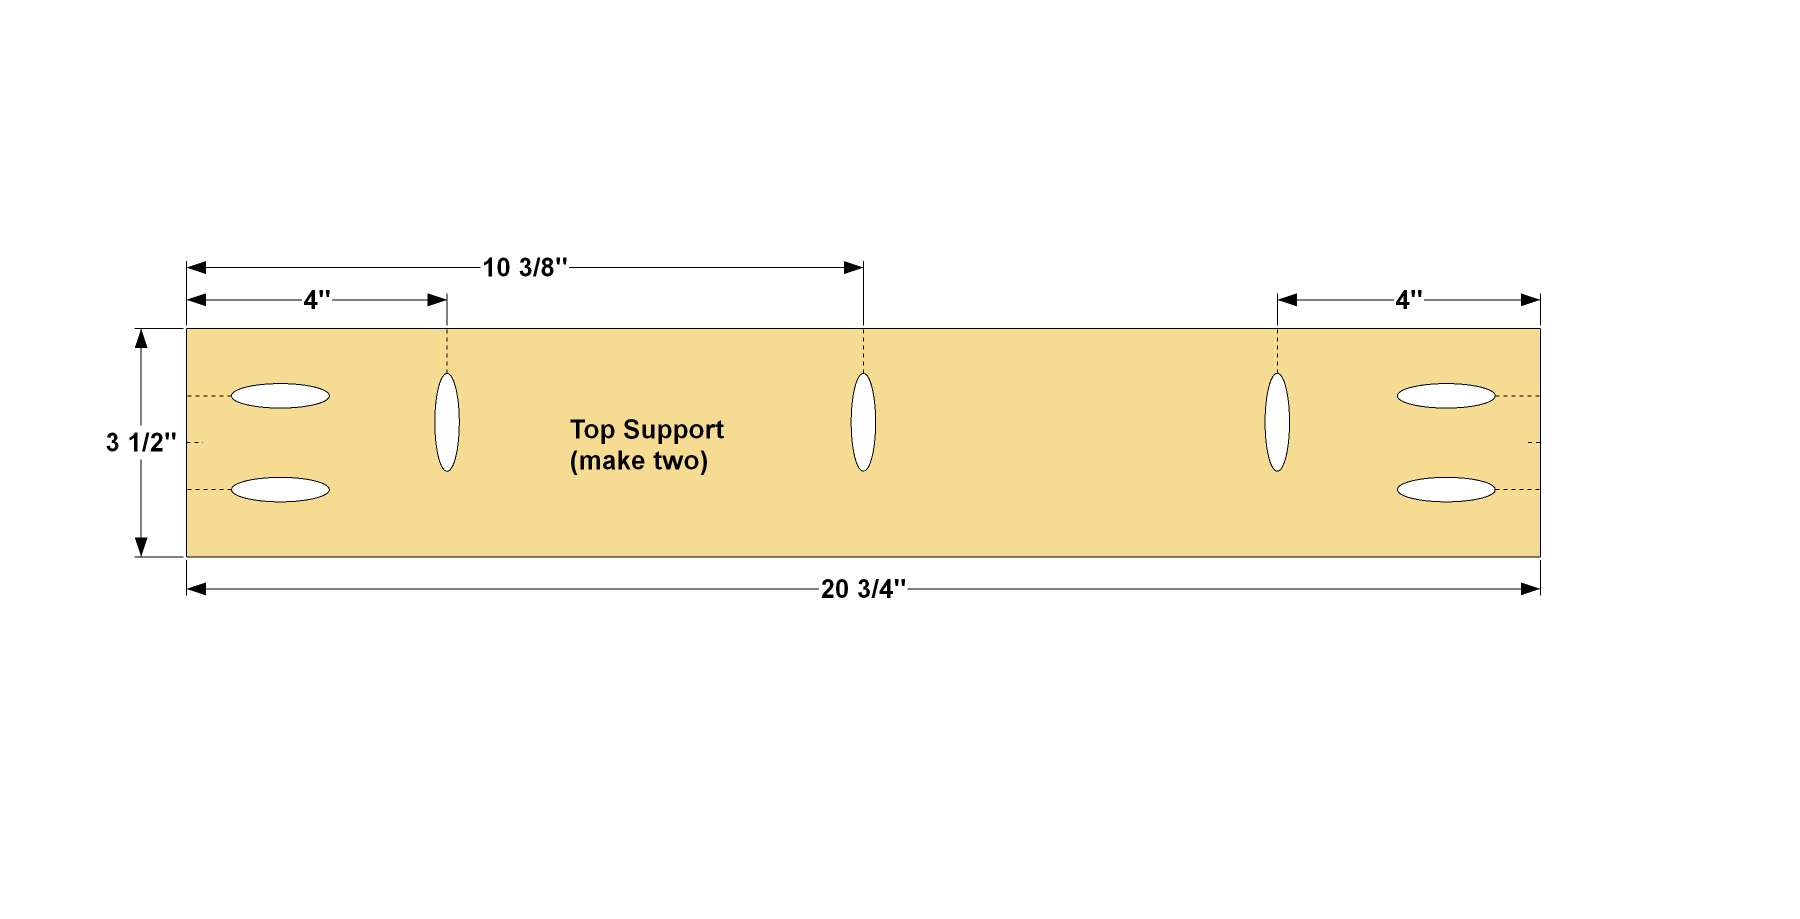
| Top Support | 2 | 3/4" × 3" × 20" |
| Short Slat | 4 | 3/4" × 3" × 16" |
| Long Slat | 20 | 3/4" × 3" × 22" |
| Backsplash | 1 | 3/4" × 3" × 48" |
| Top Panel | 1 | 3/4" × 23" × 48" |
What to buy
Buy 15 boards at 8 ft.
3" × 3"
2 boards
3/4" × 23"
1 board
3/4" × 3"
9 boards
3/4" × 1"
3 boards
Assumes 8 ft stock, a 1/8" saw kerf, and buying each part at its own width. Change the board size or kerf on the full board plan →
Instructions
1Get Your Sink and Faucet
Before you begin building, get your sink and faucet. You’ll want to have them so that you can create the sink and faucet cutouts in the Top Panel when the time comes. There are many styles to choose from, and this vanity will accommodate a surface-mount or vessel-style sink of many kinds.
2Cut Legs to Length
Cut four legs to length from 4x4 boards, as shown in the cutting diagram. Sand each Leg smooth and set them aside for now.
3Create the Upper Rails
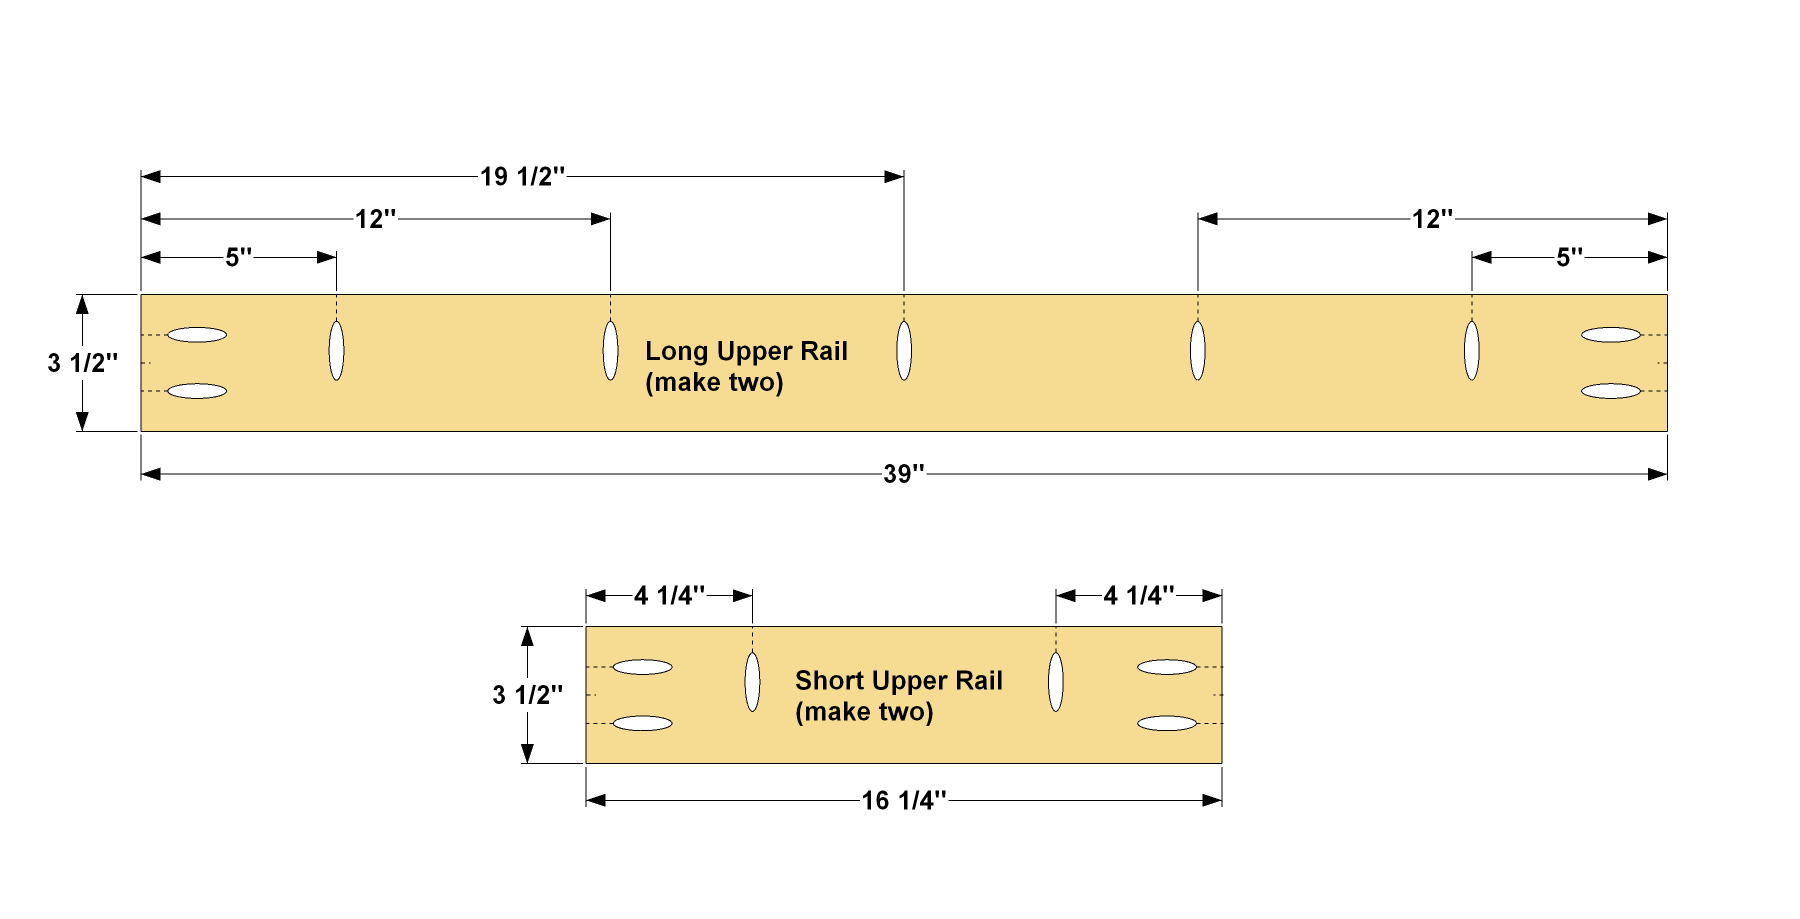
Cut two Long Upper Rails and two Short Upper Rails from 1x4 boards, as shown in the cutting diagram. Set your Kreg Pocket-Hole Jig for 3/4"-thick material, and then drill pocket holes in the Rails at the locations shown.
4Attach Upper Short Rails to Legs
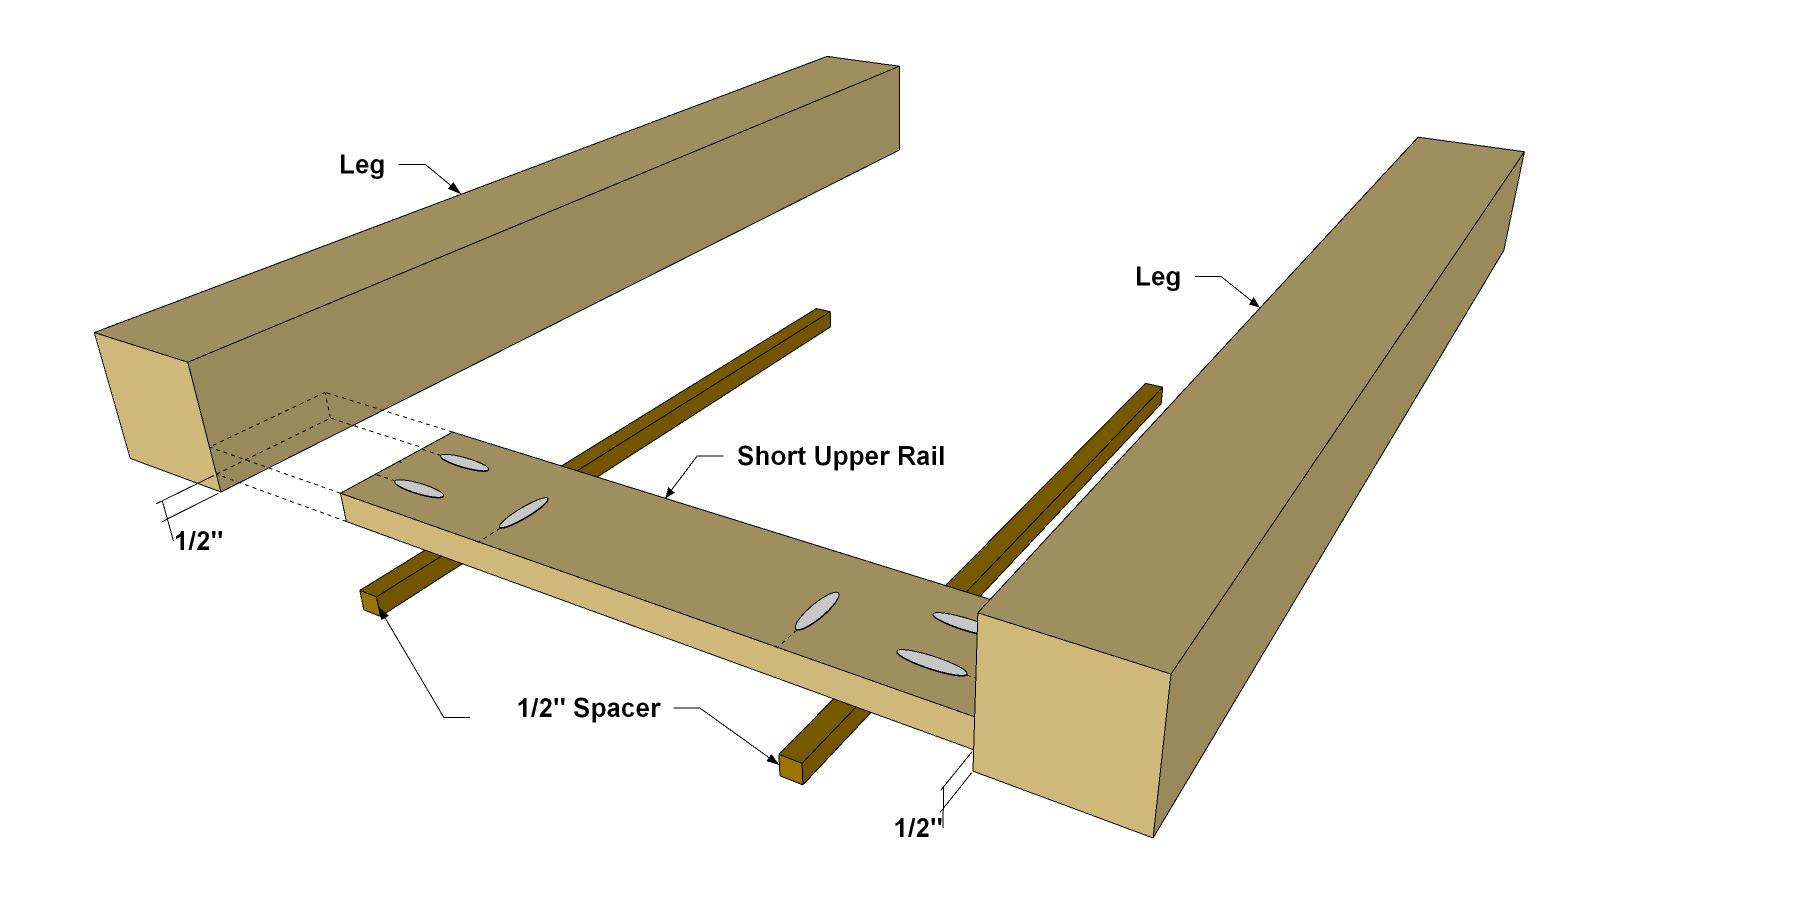
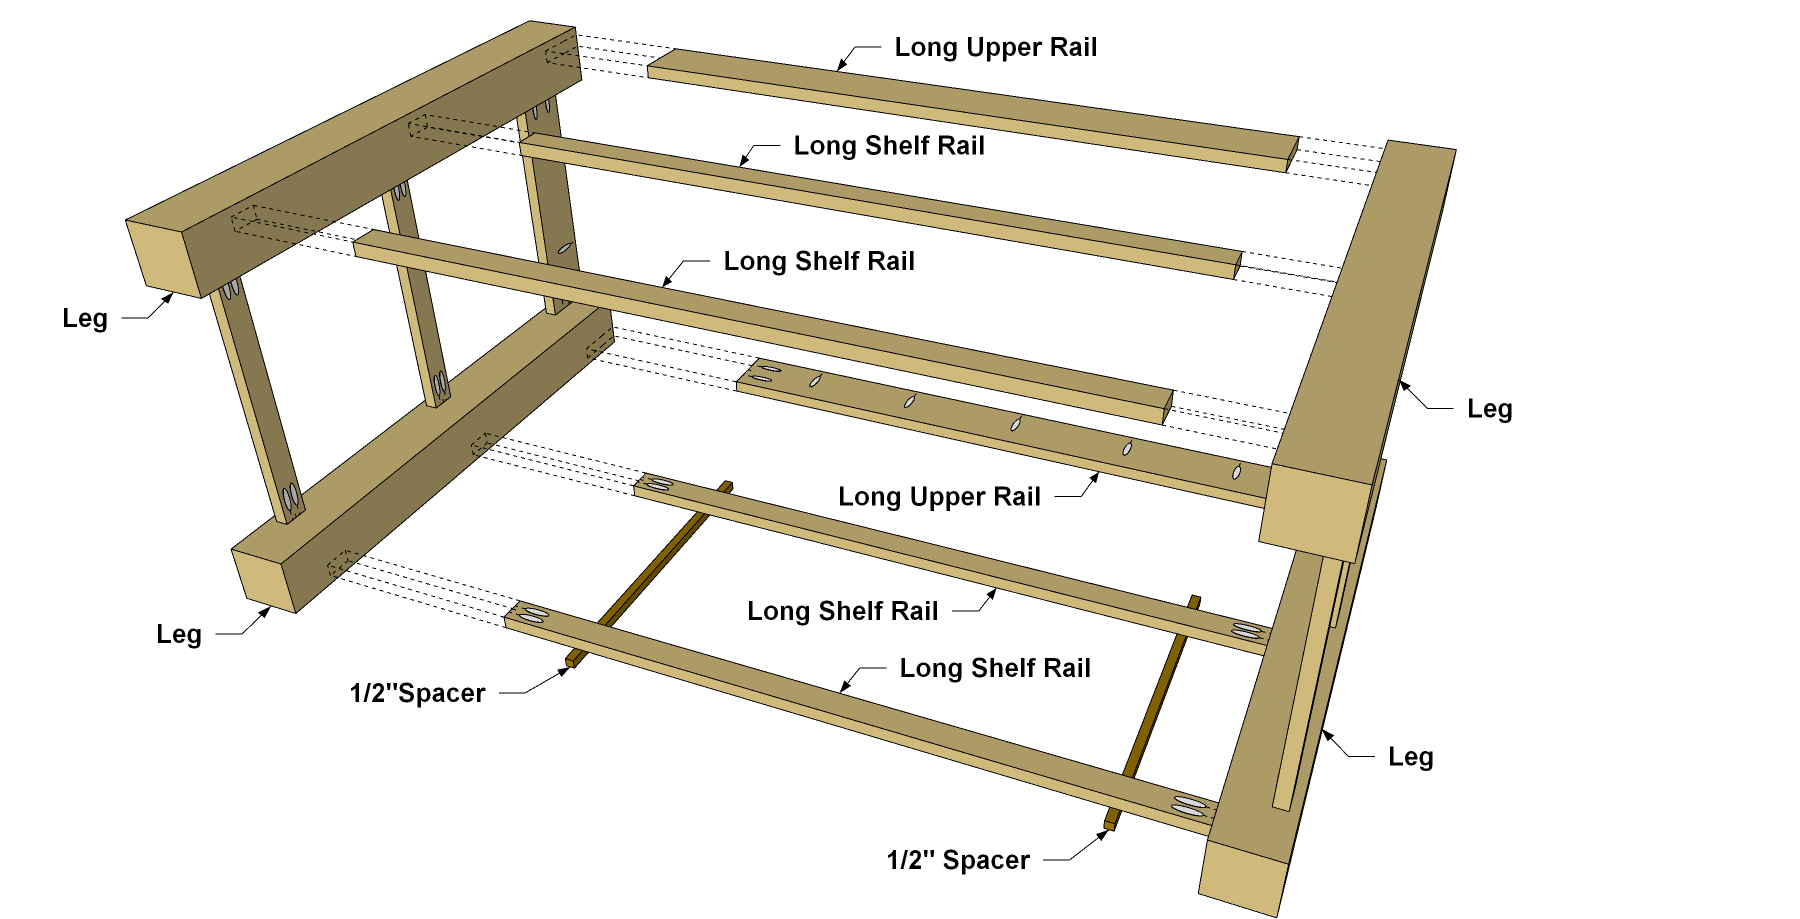
- Cut a 36"-long 1/2" dowel in half to create two spacers.
- Lay the spacers about 10" apart on a flat work surface.
- Lay one Short Upper Rail on the dowels and then bring two legs together so the top of the Legs and the top of the Short Upper Rail are ?ush.
- Clamp the assembly together and secure the Short Rail to the Legs using 1 1/4" coarse-thread Pocket-Hole Screws.
5Make the Shelf Rails
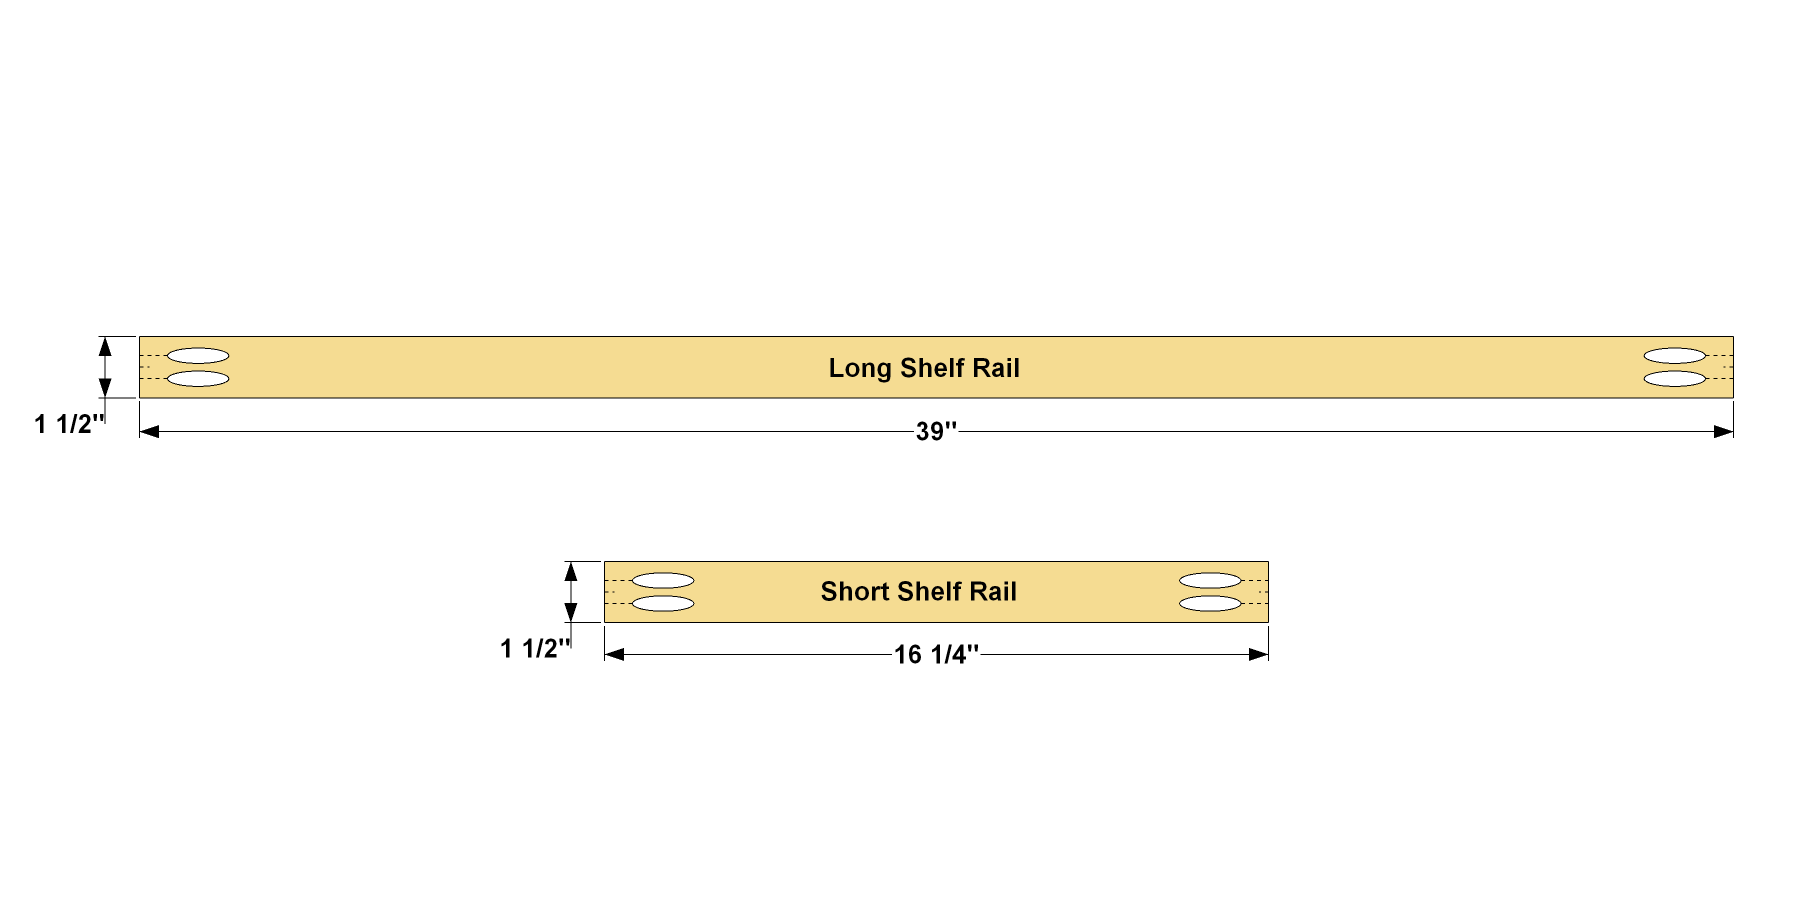
Cut four Long Shelf Rails and four Short Shelf Rails to length from 1x2 boards, as shown in the cutting diagram. Drill pocket holes at the locations shown.
6Attach the Short Shelf Rails
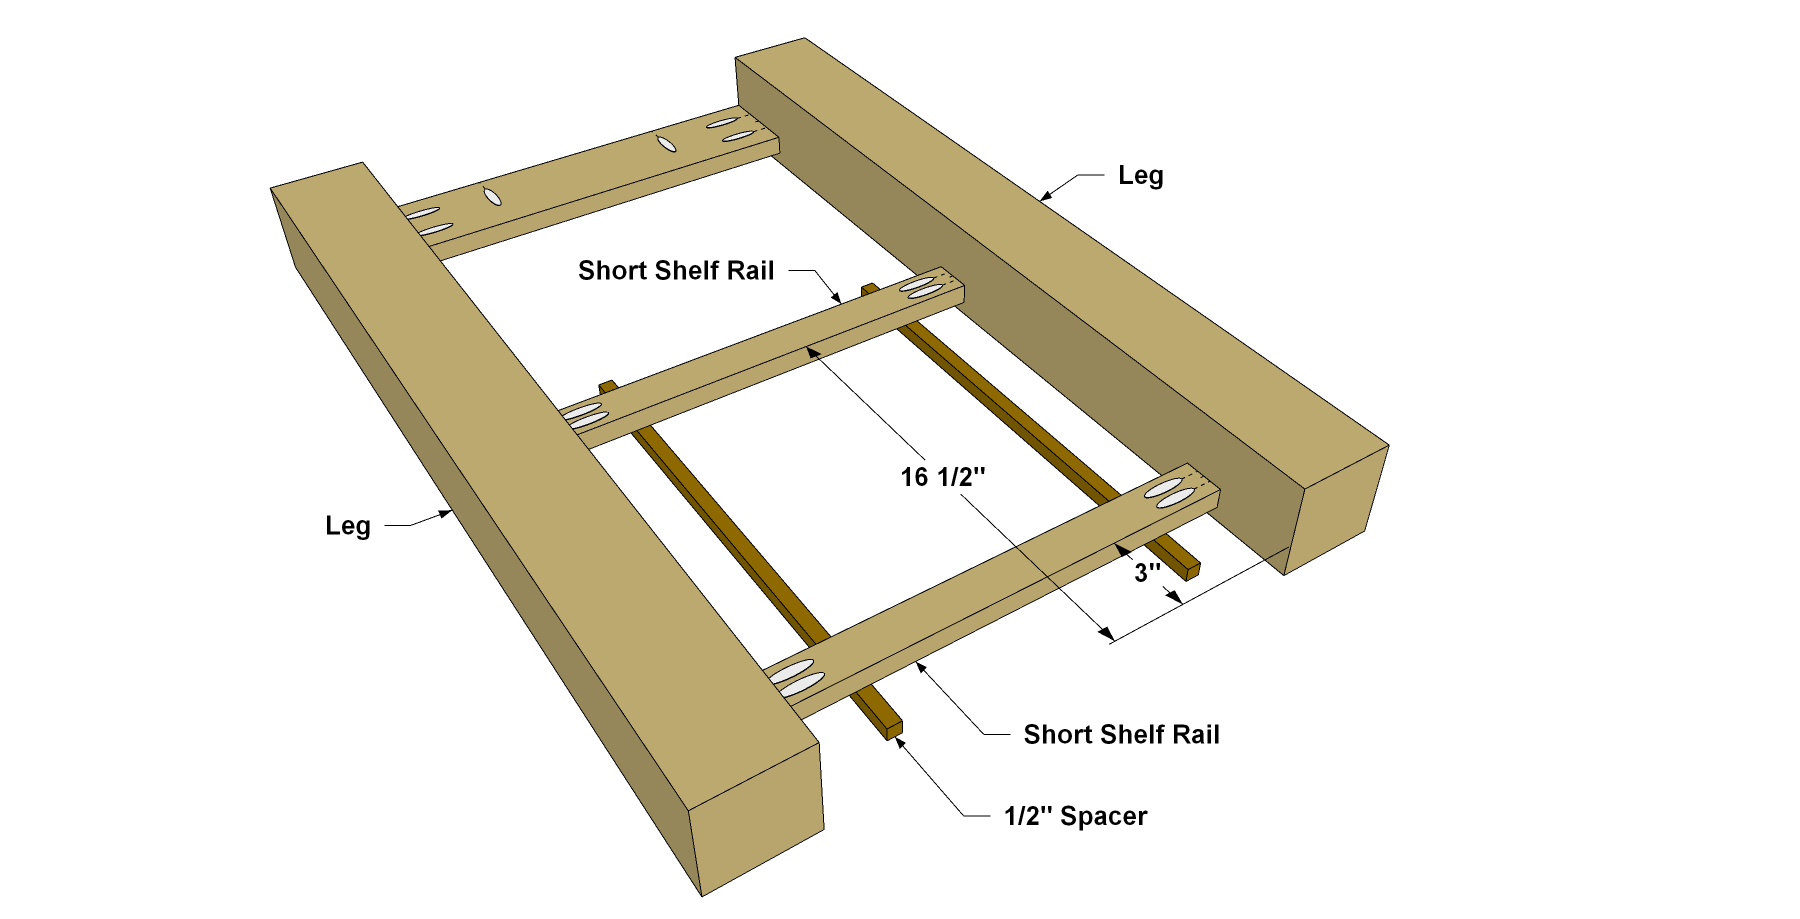
- Move the dowels to the other end of the Legs, and then position the two Short Shelf Rails in place at the locations shown.
- Clamp them in place. Secure the rails to the Legs using 1 1/4" coarse-thread Pocket-Hole Screws.
- Repeat the previous two steps to complete the other side assembly.
7Add the Long Rails
- Stand the Side assemblies on edge as shown in the diagram. Just as you did for the side assemblies, set the Long Upper Rail in place on the dowel spacers, and attach it using 1 1/4" coarse-thread Pocket-Hole Screws.
- Then position and attach the two Long Shelf Rails in the same way. Carefully tip the assembly over, and then repeat this process for the remaining two Shelf Rails and the last Long Upper Rail in order to complete the base frame. This is a good time to give all of the pieces a final sanding.
8Make Corner Braces
Cut four Corner Braces to length from 1x4 boards, as shown in the cutting diagram, beveling each end at 45. Drill pilot holes at the location shown for screws that will be used to attach the Braces.
9Install the Corner Braces
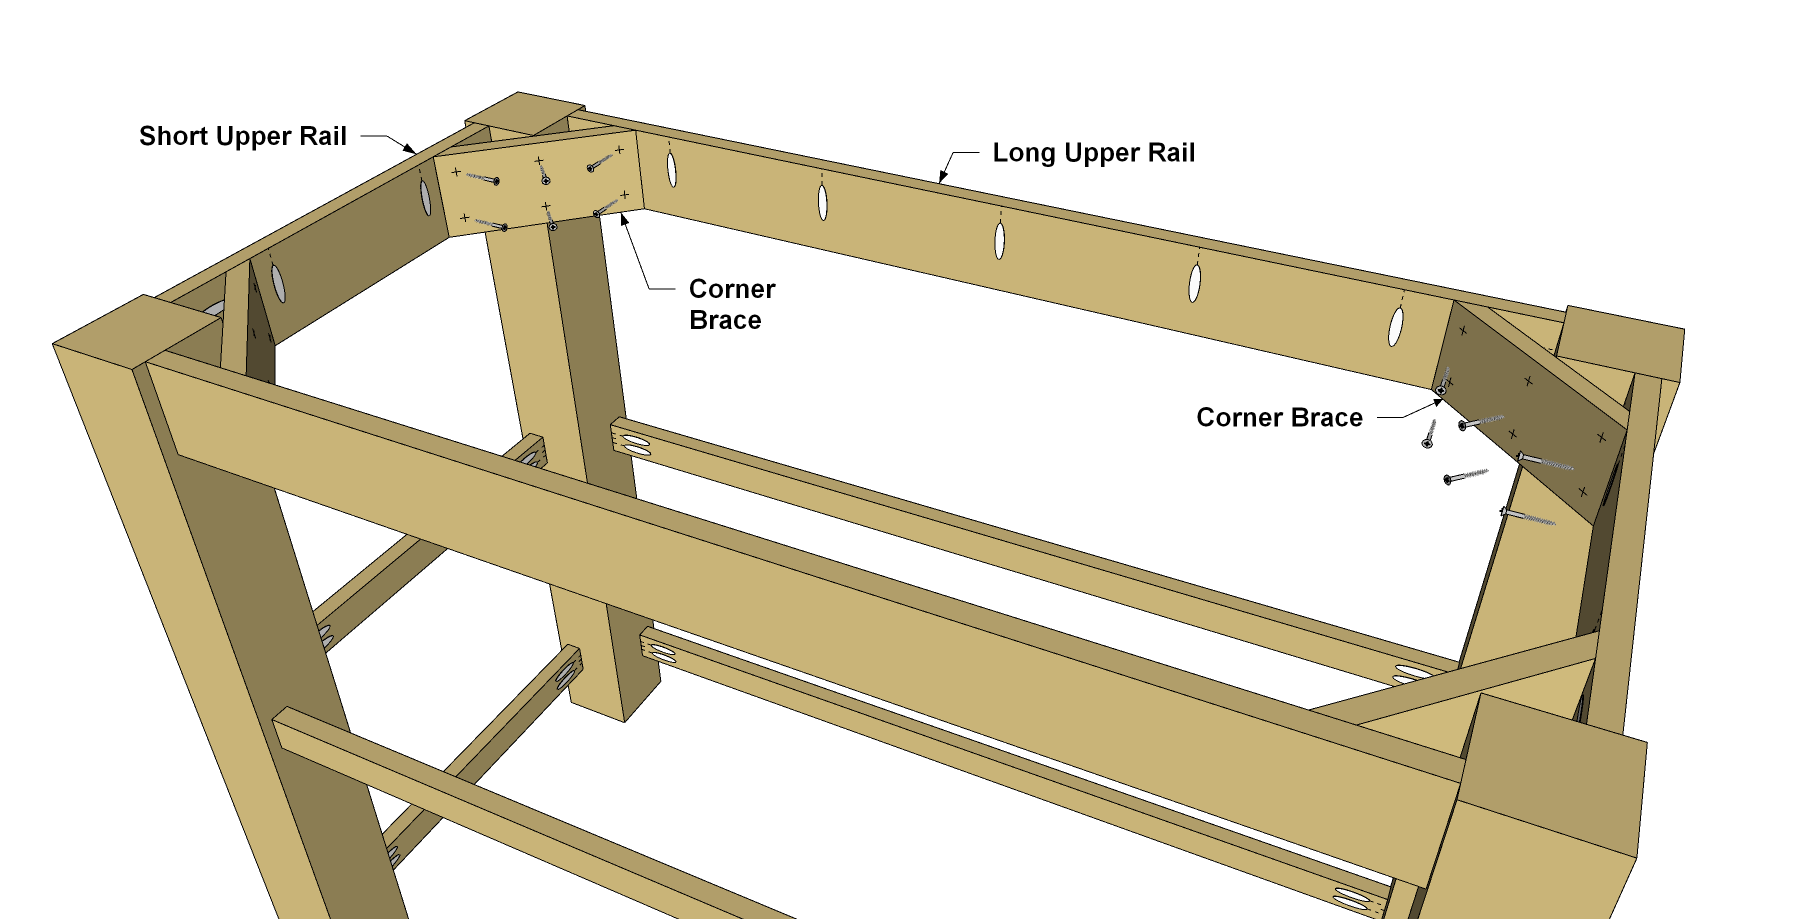
Align the upper edge of the first Corner Brace with the upper edge of the Rails, and then secure it to the Rails and the Leg as shown using 1 1/2" flat-head wood screws. Do this for the other three braces.
10Create Top Supports
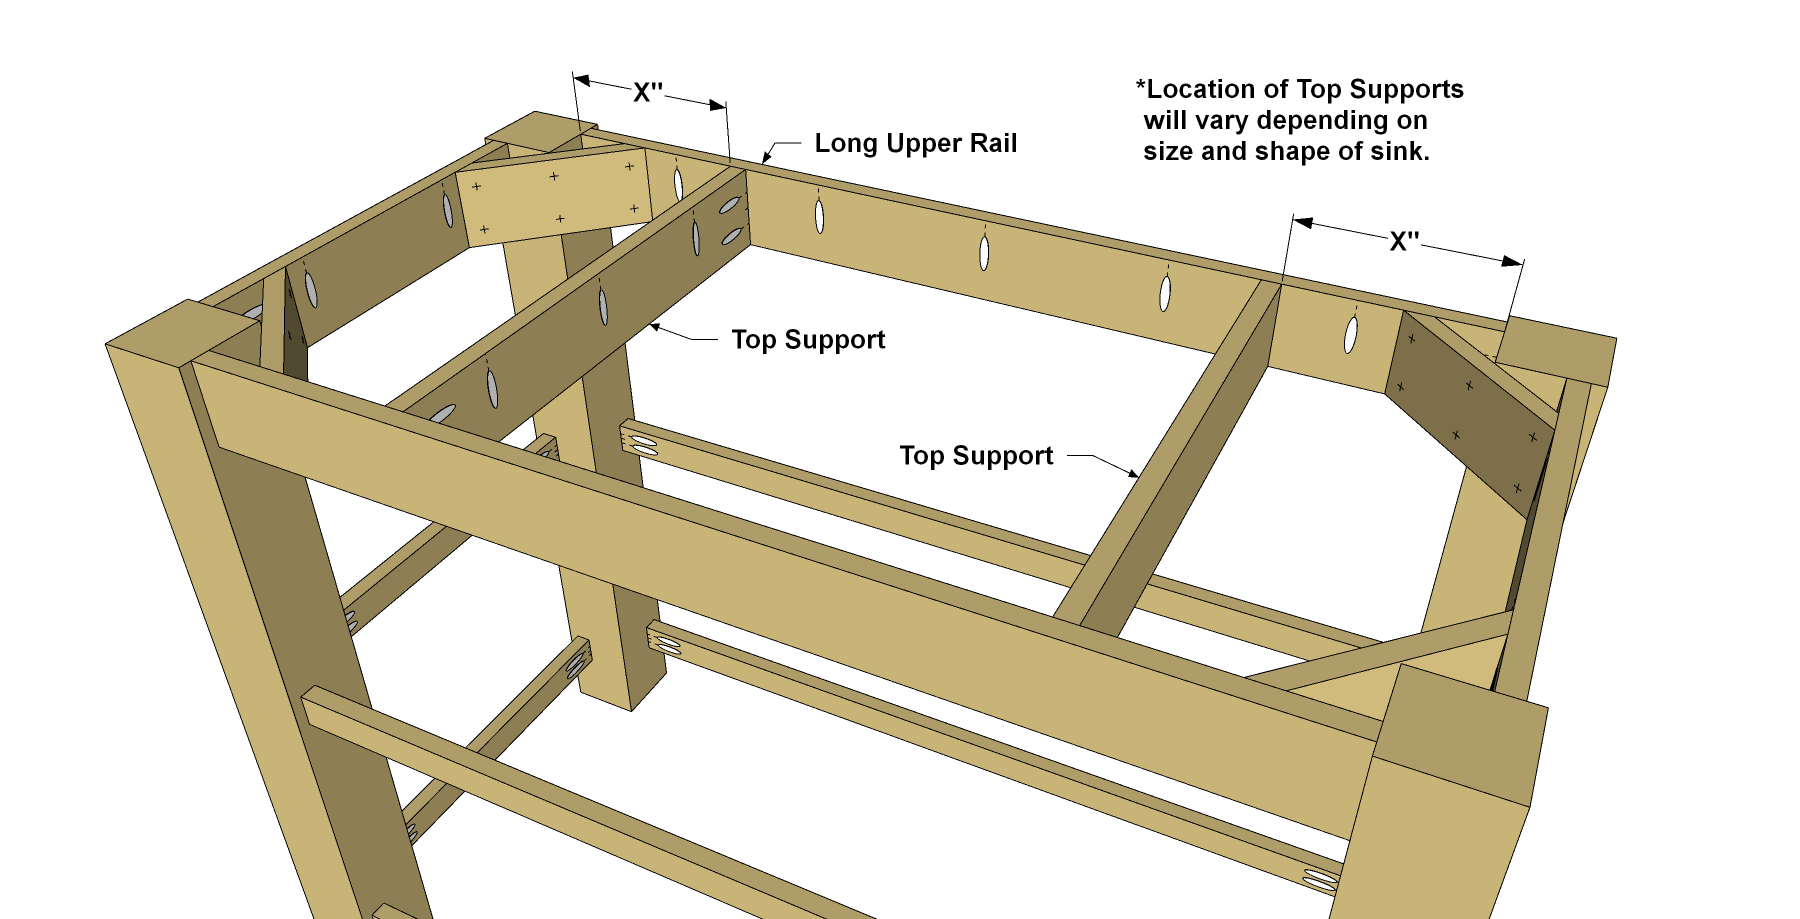
Cut two Top Supports to length from 1x4 boards, as shown in the cutting diagram. Drill pocket holes where shown.
11Install the Supports
Install the Top Supports to the Long Upper Rails with 1 1/4" coarse-thread Pocket-Hole Screws. The location of the Top Supports will depend on the size and position of the sink you choose for this project.
12Make the Short Slats
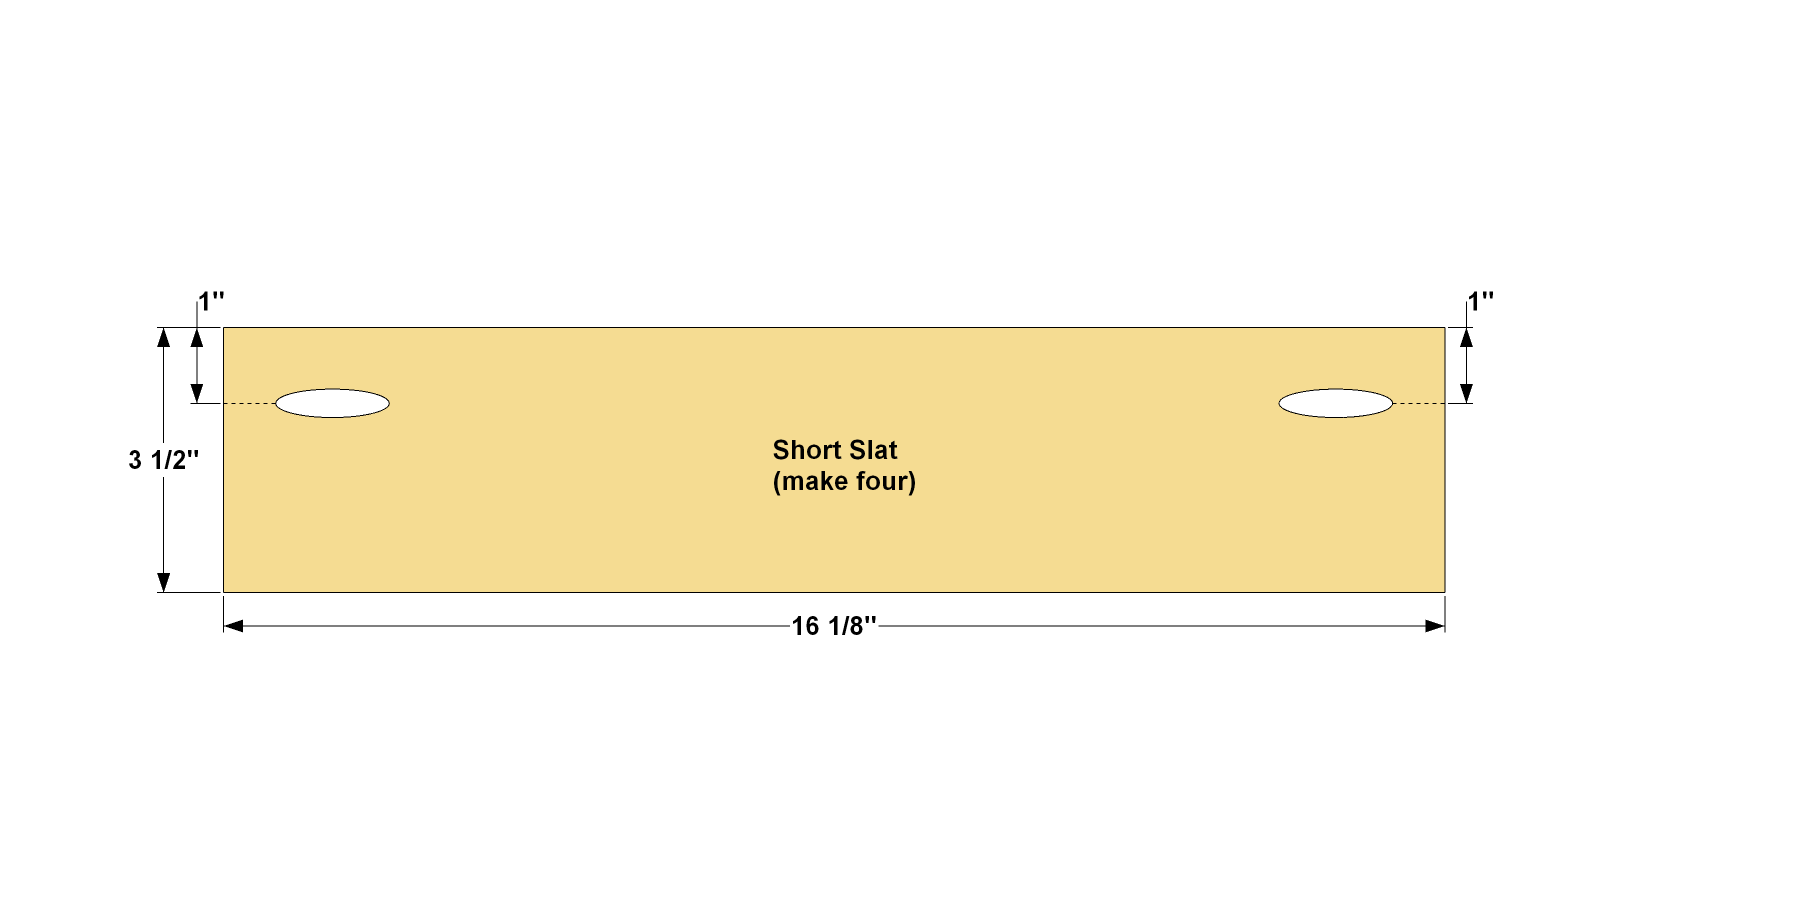
Cut four Short Slats to length from a 1x4 board as shown in the cutting diagram. Drill pocket holes at the locations shown.
13Install the Short Slats
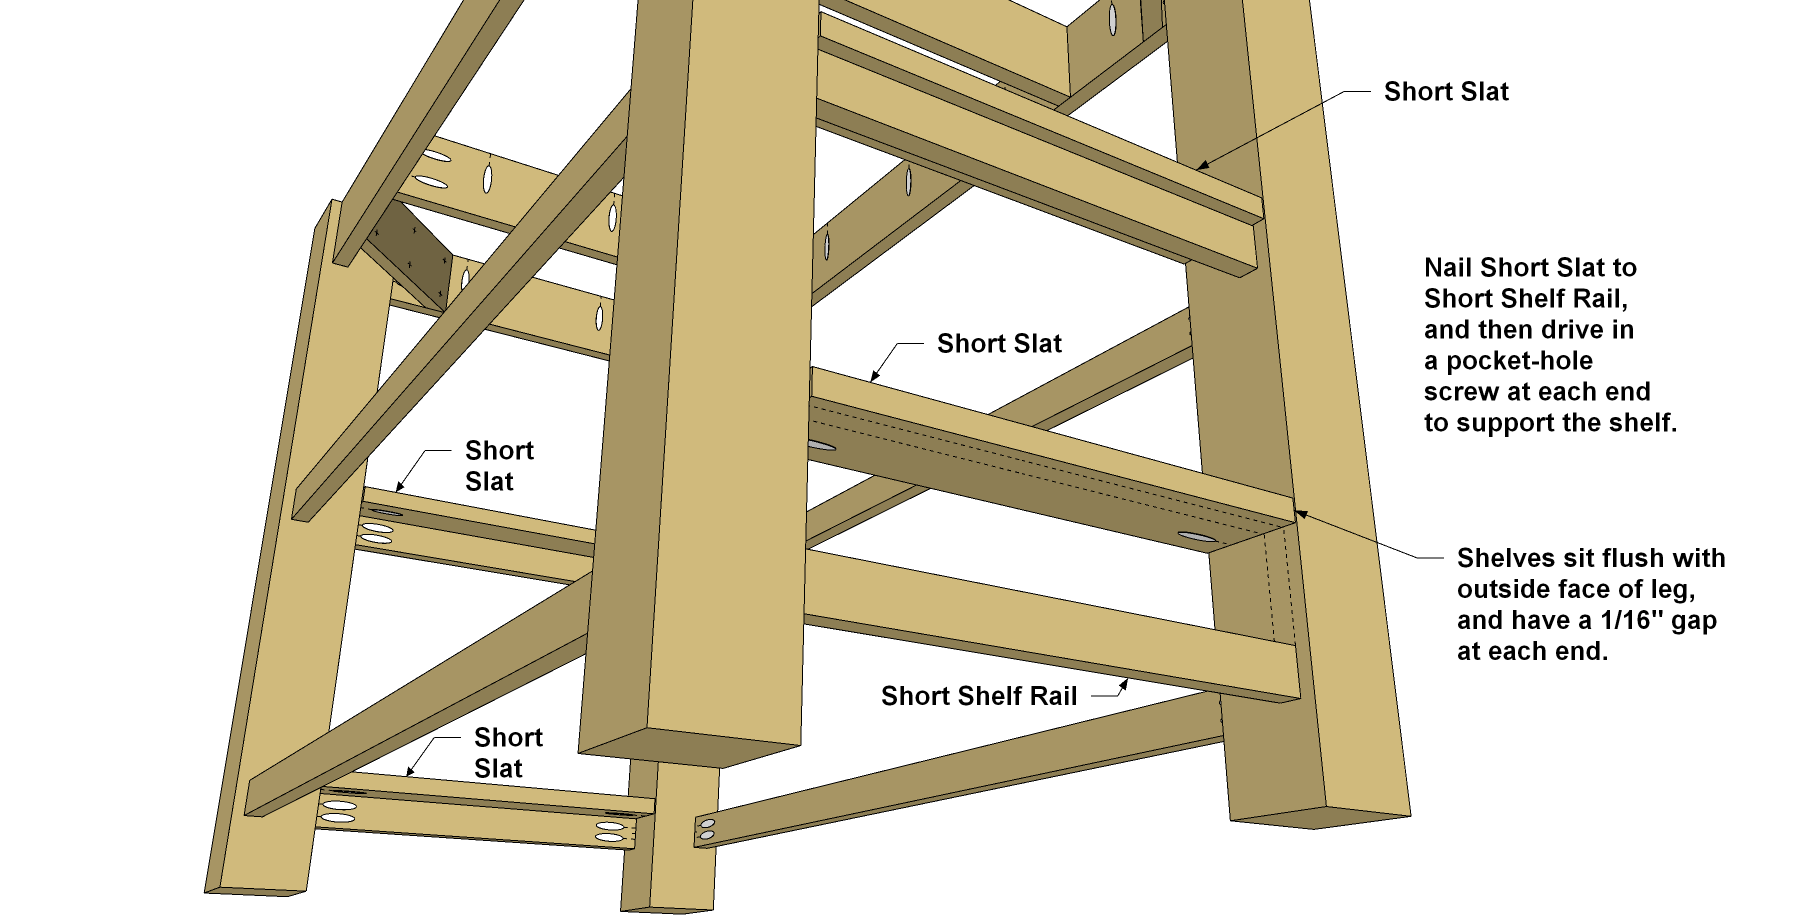
- Set the Short Slats on the Short Shelf Rails so that the outside edge of each Slat is ?ush with the outside edge of the Legs. Secure the Slats to the Legs using two 1 1/4" coarse-thread Pocket-Hole Screws.
- Then nail the Short Slats to the Short Shelf Rails using four 1 1/2" brad nails in each Slat. A brad nailer works best for this if you have access to one or can rent one. If you don’t have access to a brad nailer, you can use a hammer and standard nails.
14Make and Attach Long Slats
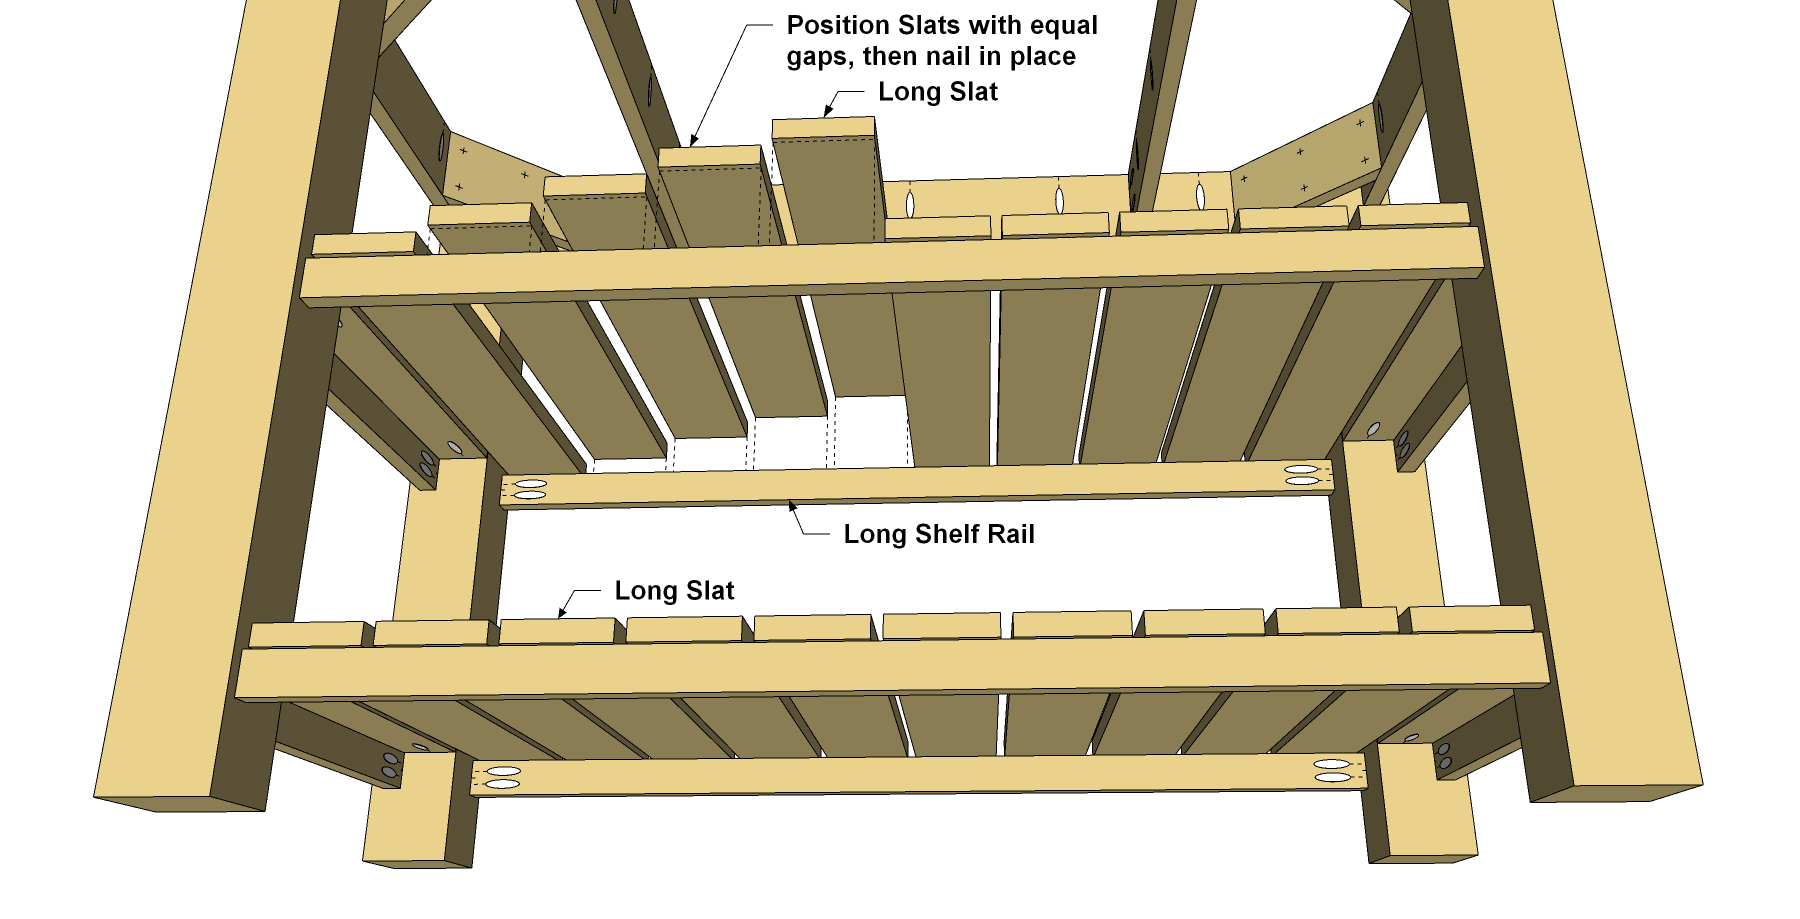
- Cut 20 Long Slats to length from 1x4 boards as shown in the cutting diagram. Due to the number of slats and the narrow gaps between each one, now would be a good time to sand and finish the Slats before installation. With that done, position the Long Slats with equal spacing in between. Each Slat should overhang the front rail by 1/4".
- Once you have the Long Slats in position, attach them by driving two nails through the slat and into the rail at each end.
15Make the Top Panel
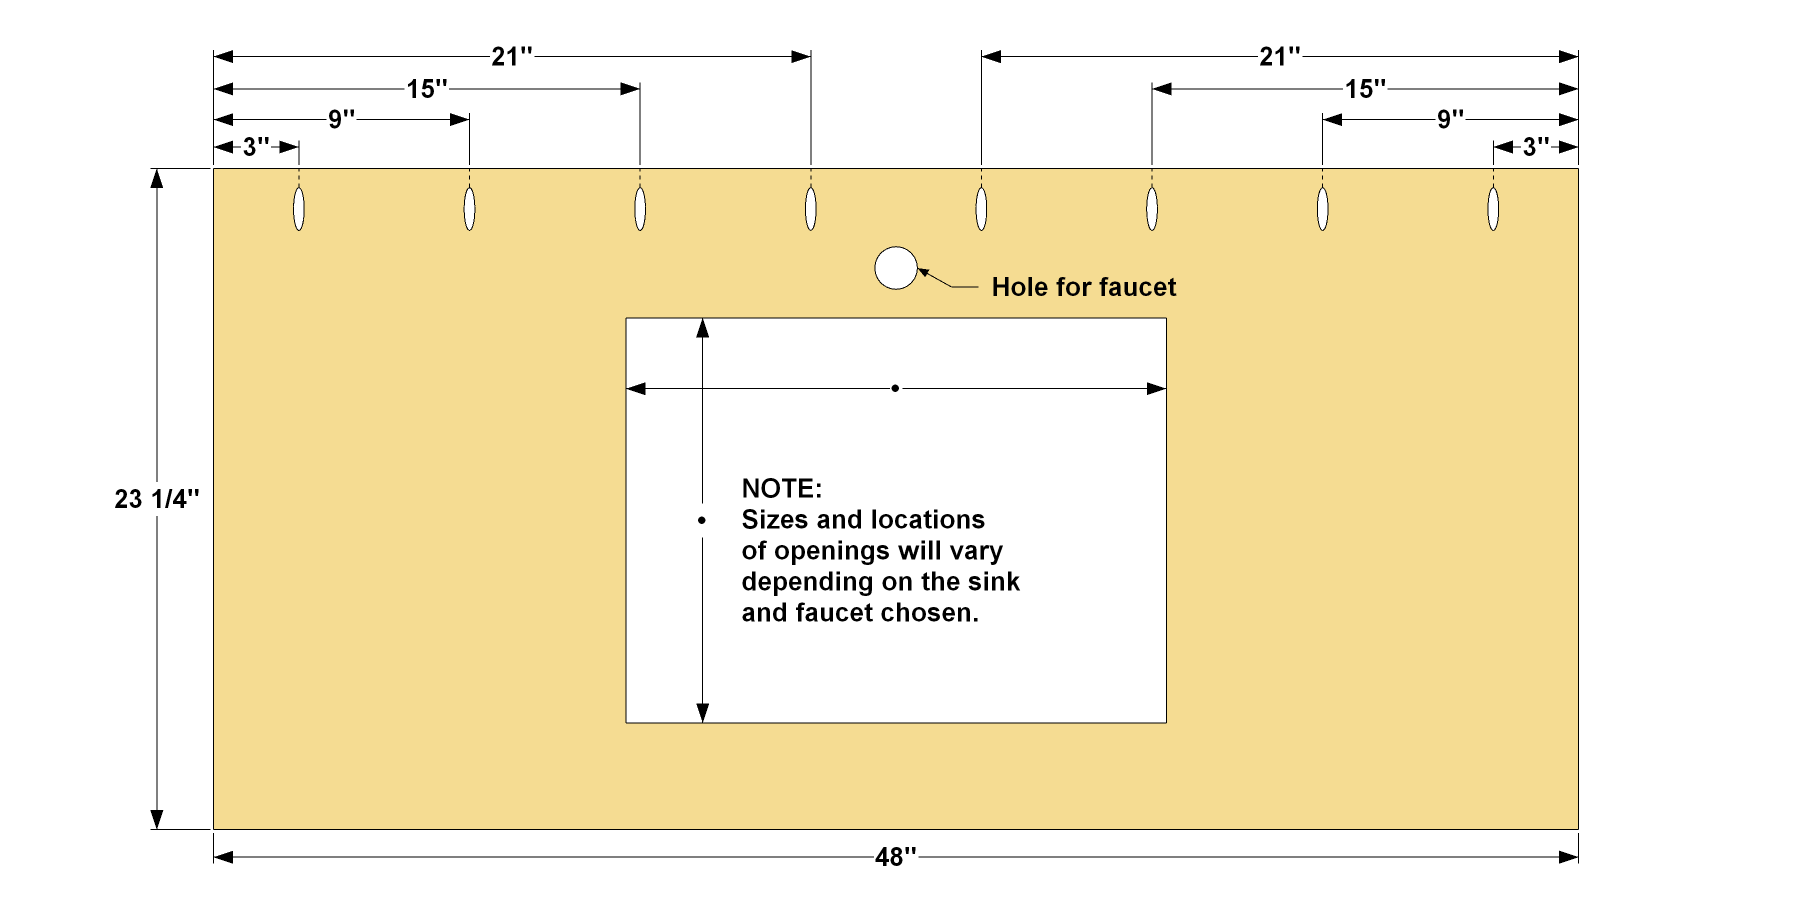
- For this project, we used an edge-glued pine project panel. It doesn’t have to be cut to size, but there are a couple of things you need to consider. The thickness may vary somewhat depending on where you purchase it.
- Check to see if the panel is thinner than 3/4". In addition, depending on the sink and faucet you use, the size and location of the holes may vary. Make sure to carefully lay out the sink and faucet locations before you cut the openings.
- Then cut the openings using a jigsaw.
- Then drill pocket holes along the rear edge, on the underside, as shown.
16Attach the Backsplash
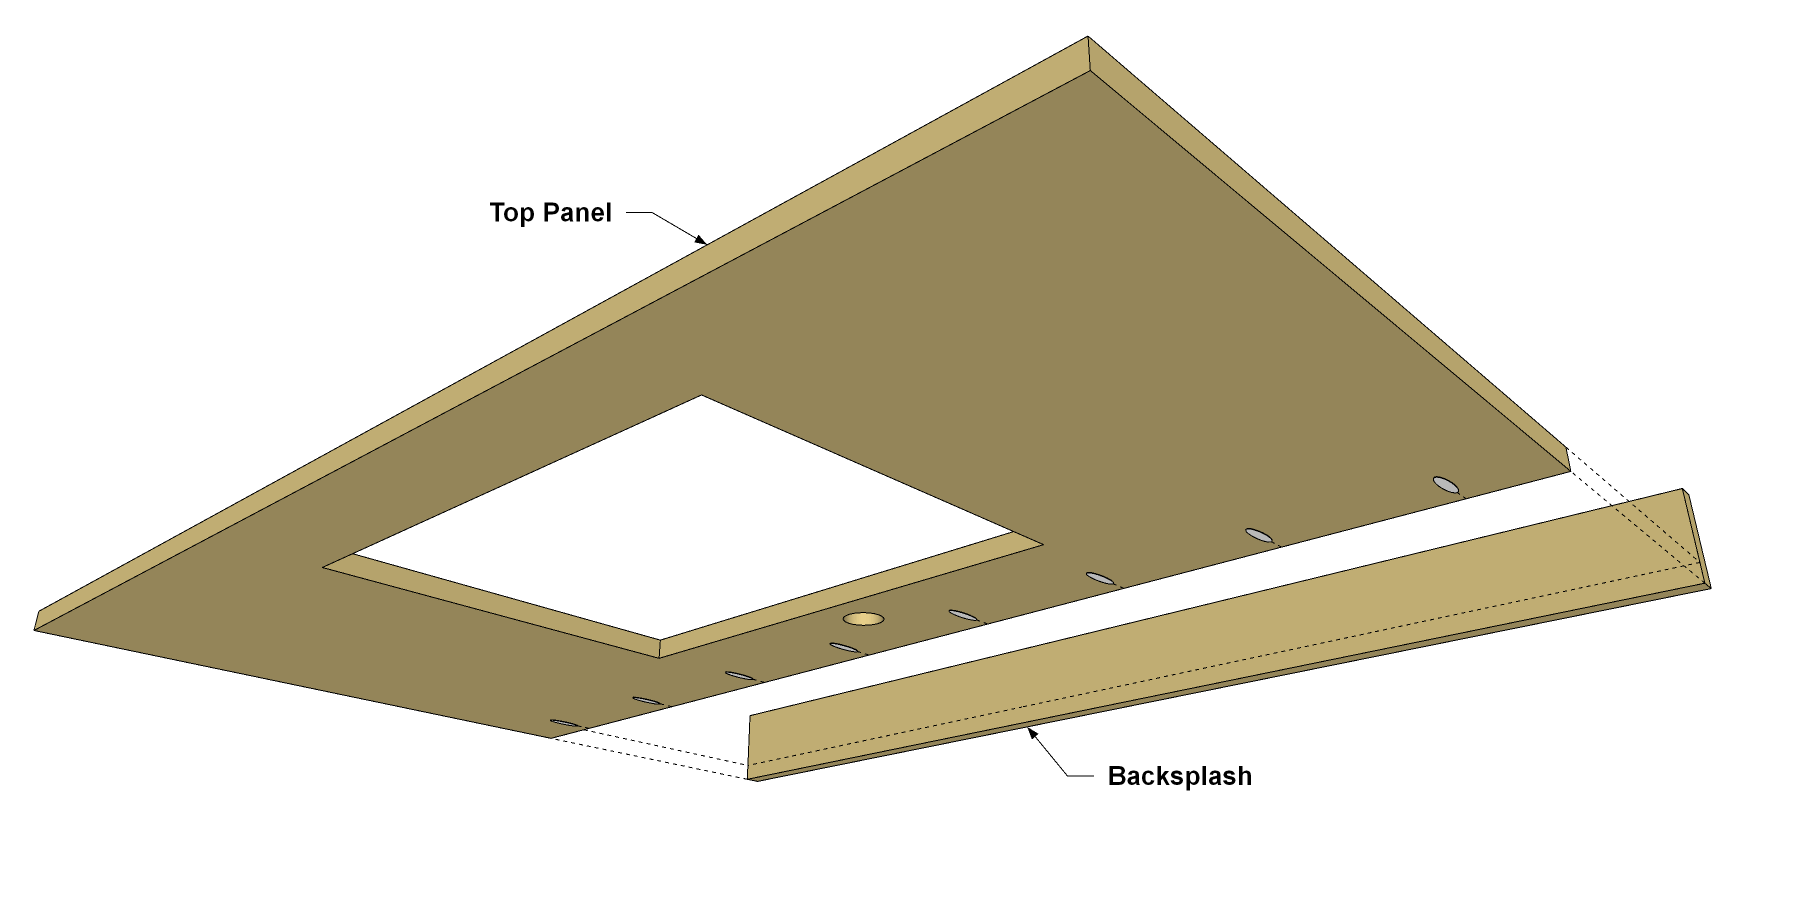
- Cut a Backsplash to length from a 1x4 board as shown in the cutting diagram.
- Spread glue on the rear edge of the Top Panel, and then position the Backsplash against the rear edge of the Top and clamp it in place. Using the holes in the Backsplash as guides, drill pilot holes into the Top Panel, and then secure the Backsplash to the Top using 1 1/2" ?at-head wood screws.
17Time for a Finish
- Sand the vanity, and then apply the stain of your choice. Because the top of the vanity is wood, it is susceptible to water damage. It’s important to take a few precautions to help prevent damage and ensure that the Top Panel will last.
- Seal all of the ends and edges, including the sink and faucet cutouts, plus the upper and lower faces, with several coats of spar varnish or exterior polyurethane. Though the vanity base won’t get wet like the Top, it’s a good idea to add a coat or two of finish to it, as well.
18Attach the Top to the Base
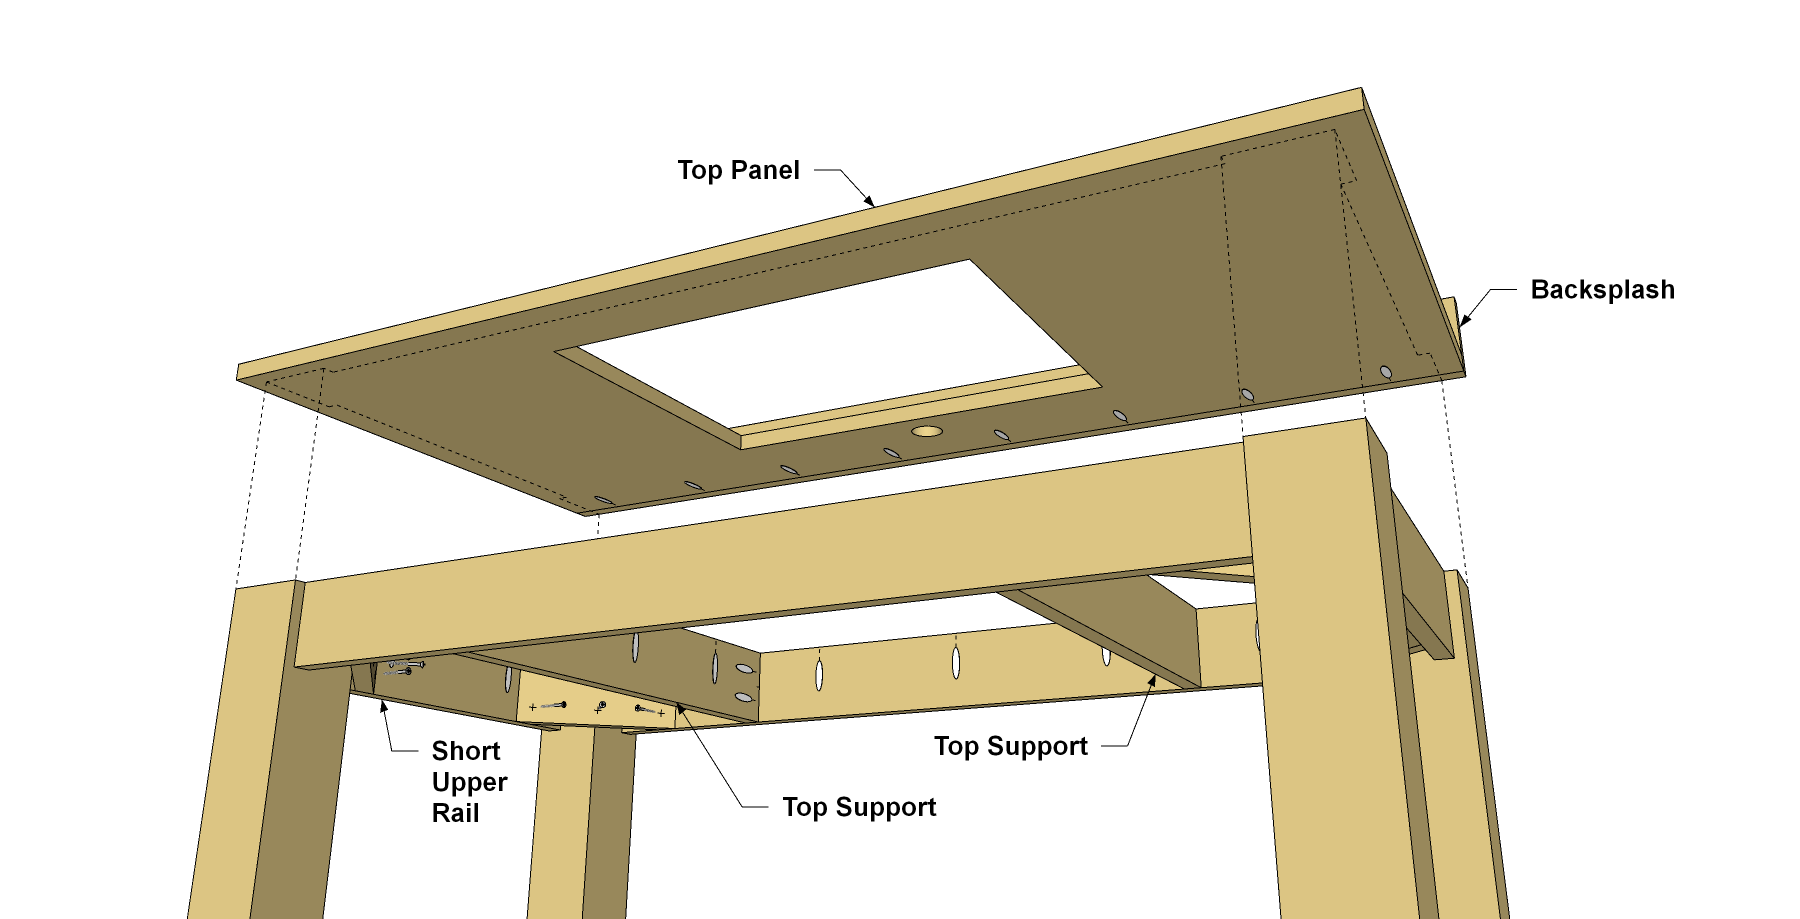
After the varnish dries completely, lay the Top on the base so the rear edge of the Backsplash is flush with the back face of the Legs. Then you can secure the Top. If your panel is 3/4"-thick or thicker, use 1 1/4" coarse-thread pocket-hole screws. If the top is less than 3/4" thick, switch instead to 1" pocket-hole screws.
19Install the Vanity
Add nail-on glides to the bottom of each Leg to protect them from water on the floor. Install a couple anchors in the wall at the height of the Long Upper Rail, and then secure the vanity to the wall with a couple of long screws to keep it from moving.
Tags
- Bathroom
- Intermediate
Reviews & builds
No reviews yet
Sign in to review this plan or share your build.
No reviews yet. Be the first to build this.