 Notch
- Difficulty
- Intermediate
- Time
- 5.5–10.8 hours
- Cost
- $$$
About this build
There’s a retro revival happening in music as people rediscover vinyl records. This cool cabinet lets you get in on this musical movement by showing off a turntable and offering storage space for your vinyl collection. Built from maple plywood and solid maple, it has a great mid-century style, too.
Tools
Essential
- Circular Saw
- Drill / Driver
- Iron for Edge Banding
- Jigsaw
- Pocket Hole Jig
- Random Orbit Sander
Optional / nice to have
- Bar / Pipe Clamps
- Tape Measure
Materials
| Item | Qty |
|---|---|
| Plywood, 3/4" Thick Full Sheet | 1 board |
| Plywood, 1/4" Thick Quarter Sheet | 1 board |
| Board, 1x2 72" | 1 board |
| Board, 1x2 96" | 1 board |
| 1 1/4" coarse-thread pocket-hole screws | 30 each |
| 1 1/4" fine-thread pocket-hole screws | 28 each |
| #8 x 3/4" pan-head wood screws | 18 each |
| 50'-roll of 3/4"maple veneer edge banding | 1 each |
| Full inset concealed hinges | 4 each |
| Cabinet door knobs | 2 each |
| 1/4" shelf pins | 4 each |
| 6" hairpin legs | 4 each |
| Wood glue | 1 each |
| 2" Forstner bit | 1 each |
Overall cost: $$$. Lumber prices vary by region, species, and season, so we give a band rather than a figure we would only be pretending to know.
Cut list
| Part | Qty | T × W × L |
|---|---|---|
| Left Top Panel | 1 | 3/4" × 13" × 14" |
| Right Top Panel | 1 | 3/4" × 13" × 14" |
| Bottom Panel | 1 | 3/4" × 14" × 45" |
| Side Edging | 4 | 3/4" × 1" × 14" |
| Top Edging | 2 | 3/4" × 1" × 14" |
| Bottom Edging | 1 | 3/4" × 1" × 48" |
| Outside Panel | 2 | 3/4" × 15" × 18" |
| Inside Panel | 2 | 3/4" × 15" × 18" |
| Fixed Cabinet Shelf | 2 | 3/4" × 12" × 14" |
| Fixed Middle Shelf | 1 | 3/4" × 15" × 19" |
| Back Panel | 1 | 1/4" × 20" × 46" |
| Adjustable Shelf | 1 | 3/4" × 13" × 18" |
| Door | 2 | 3/4" × 12" × 18" |
What to buy
Buy 7 boards at 8 ft.
3/4" × 15"
1 board
3/4" × 14"
1 board
3/4" × 13"
1 board
3/4" × 12"
1 board
3/4" × 1"
2 boards
1/4" × 20"
1 board
Assumes 8 ft stock, a 1/8" saw kerf, and buying each part at its own width. Change the board size or kerf on the full board plan →
Instructions
1Make Bottom and Top Panels
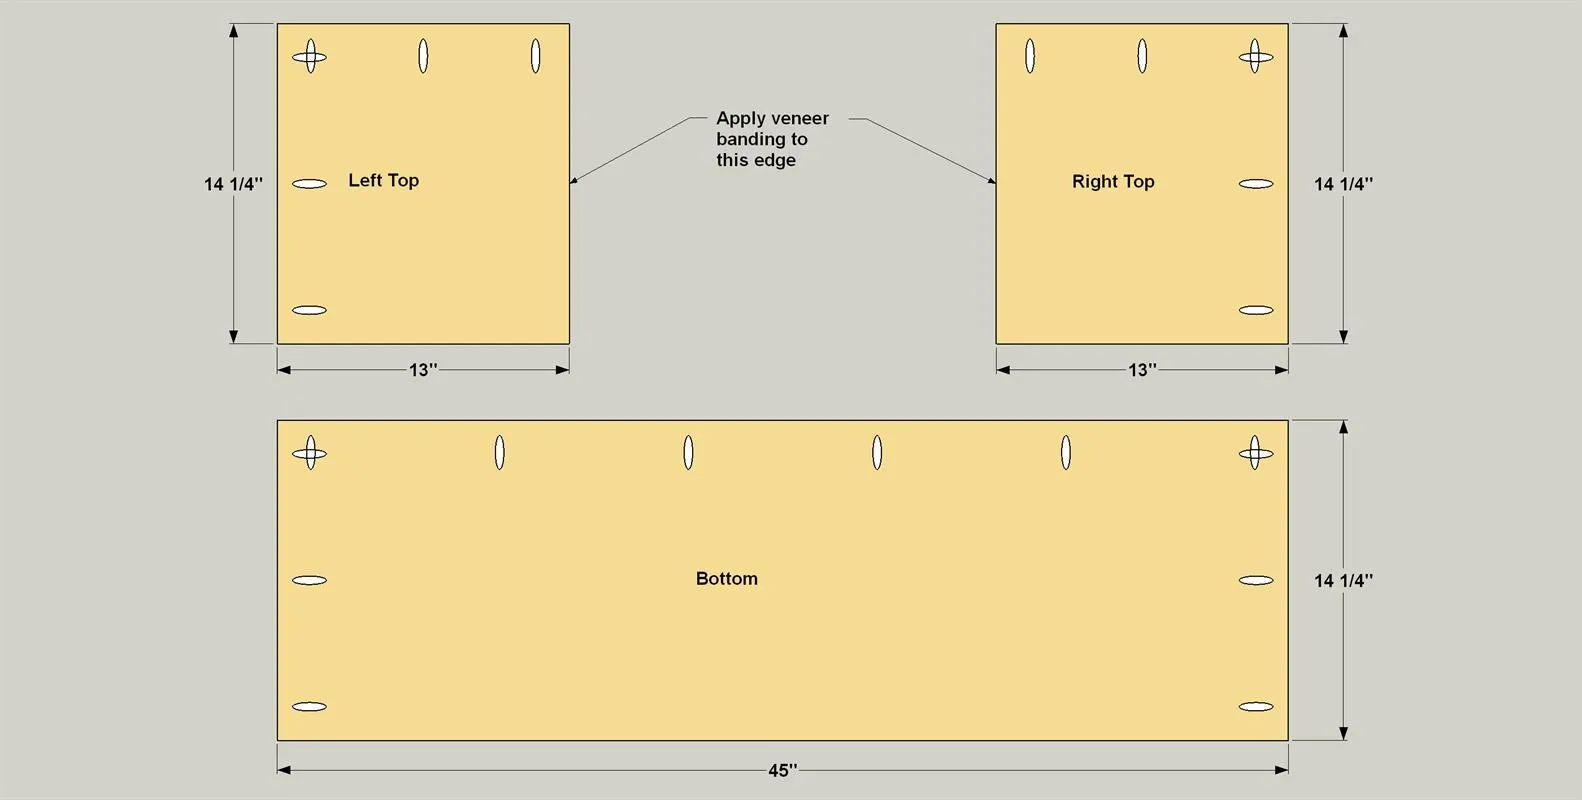
- Cut one Bottom Panel and two Top Panels from 3/4" maple plywood, as shown in the cutting diagram.
- Set your pocket-hole jig for 3/4" material, and then drill pocket holes in these panels at the locations shown. On the Top Panels, apply iron-on edge banding to one edge of each panel, as shown.
- Trim the edging flush on the ends and edges, then sand lightly to smooth the cuts.
2Create Hardwood Edging
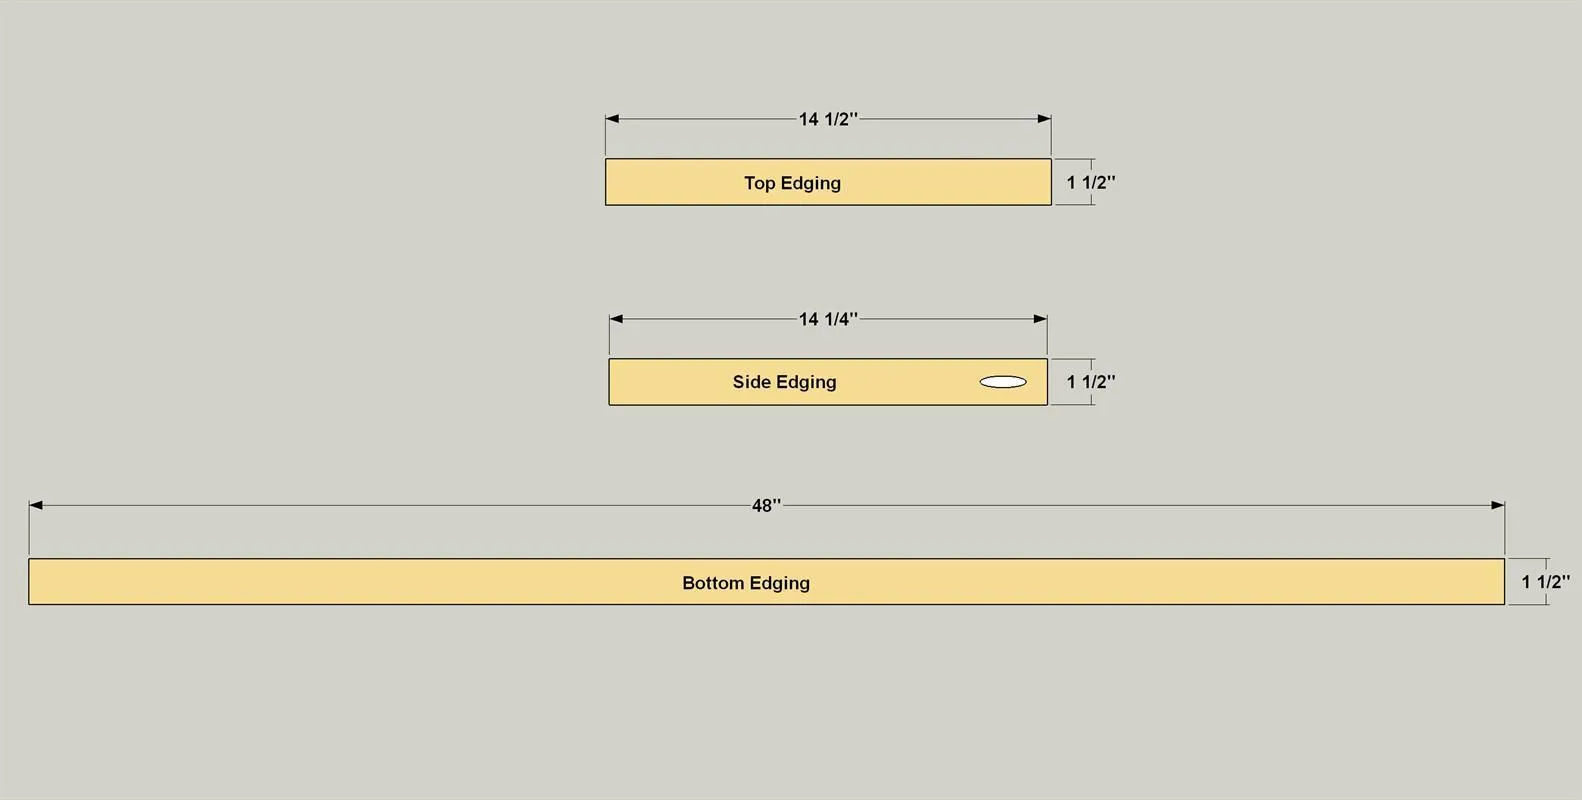
Cut four Side Edging, two Top Edging, and one Bottom Edging to length from 1x2 boards, as shown in the cutting diagram. Drill a centered pocket hole in one end of each of the Side Edging pieces.
3Attach the Edging
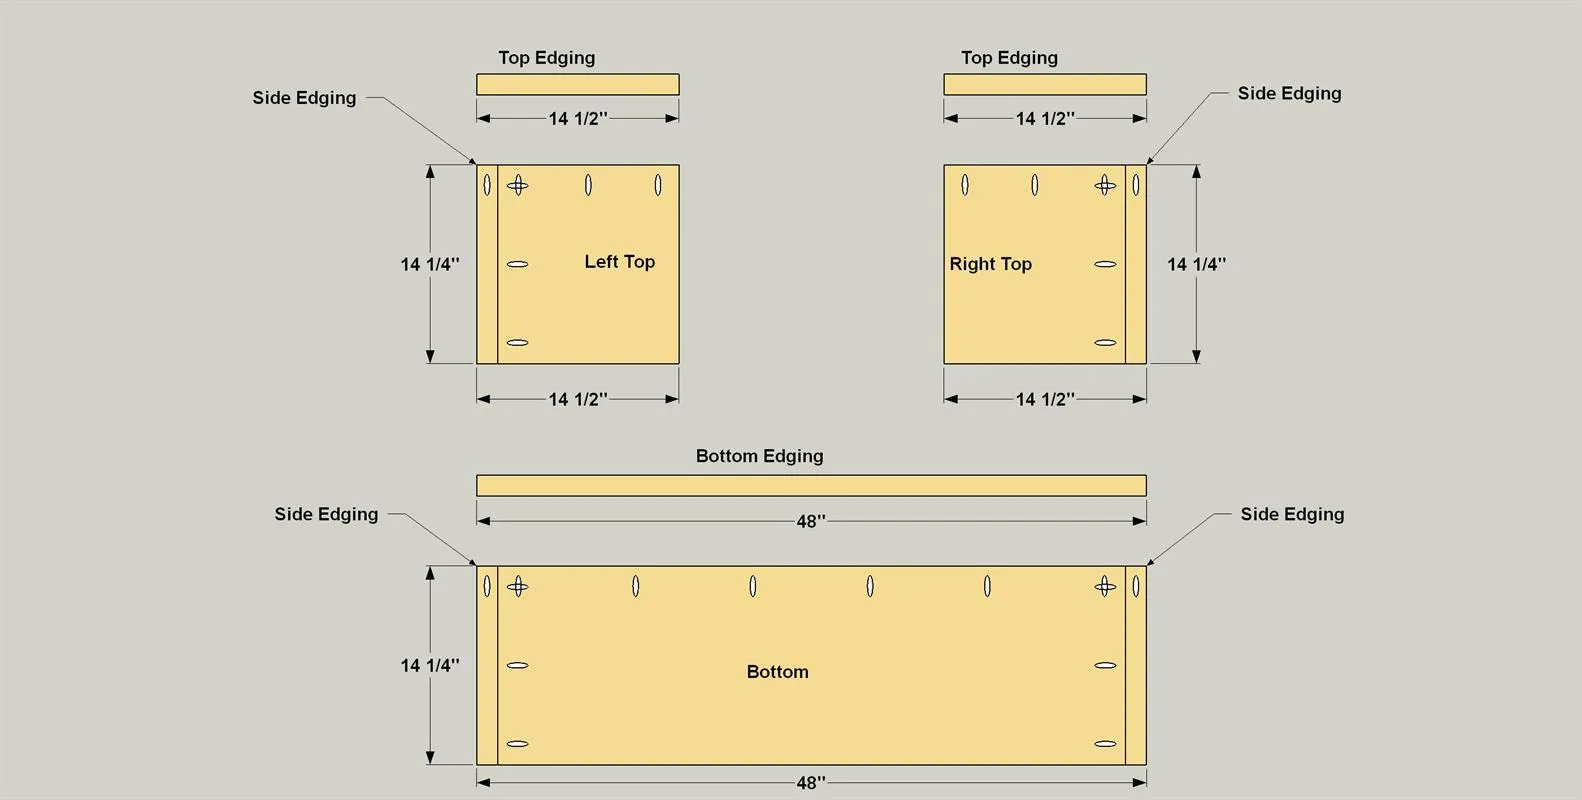
On a flat work surface, lay the Bottom and Top Panels with the pocket holes facing up. Secure the Side Edging to the Bottom and Top Panels first using 1 1/4" fine-thread pocket-hole screws. Next, attach the Top Edging and Bottom Edging using 1 1/4" fine-thread pocket-hole screws.
4Make the Outside Panels
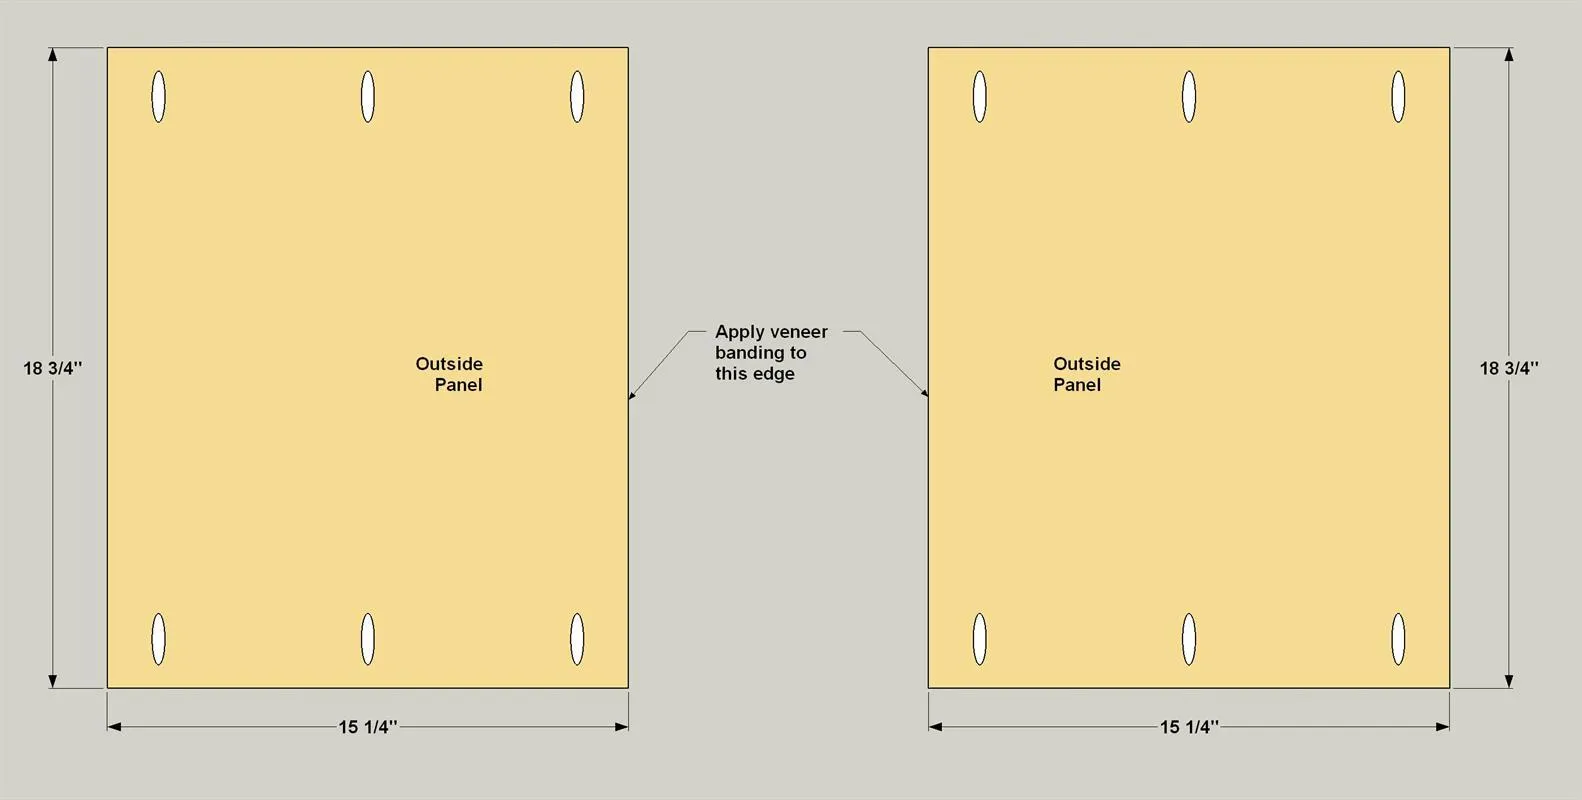
- Cut two Outside Panels to size from 3/4" plywood, as shown in the cutting diagram.
- Drill pocket holes at the locations shown. On one long edge of each panel, apply iron-on edge banding to one edge of each panel, as shown.
- Trim the edging flush on the ends and edges, then sand lightly to smooth the cuts.
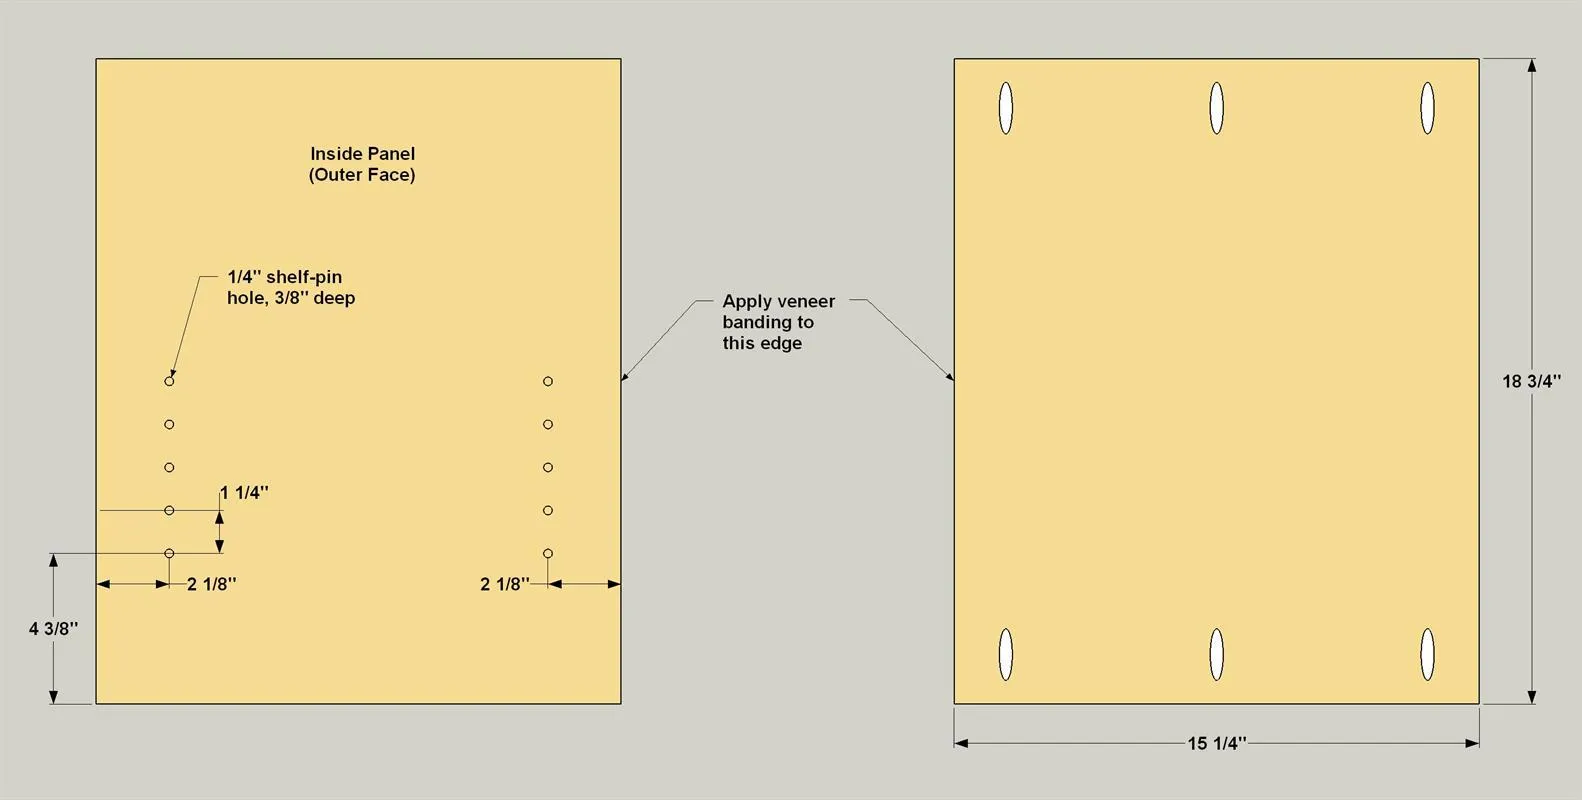
5Make the Inside Panels
- Cut two Inside Panels to size from 3/4" plywood. as shown in the cutting diagram.
- Drill pocket holes at the locations shown. On the face of each Inside Panel that does not have pocket holes, drill shelf pin holes, as shown. The easiest way to do that is to use a Kreg Shelf Pin Jig. On one long edge of each panel, apply iron-on edge banding to one edge of each panel, as shown.
- Trim the edging flush on the ends and edges, then sand lightly to smooth the cuts. NOTE: The setback spacing (distance from the edge to the shelf-pin holes) shown matches the first-generation Kreg Shelf Pin Jig. The second generation model, released in March 2022, has different setback spacing. The vertical distance between the pin holes, though, matches the dimensions shown here—1 1/4". You can create the shelf-pin holes accurately using either the first- or second-generation jig.
6Attach the Side Panels to the Tops
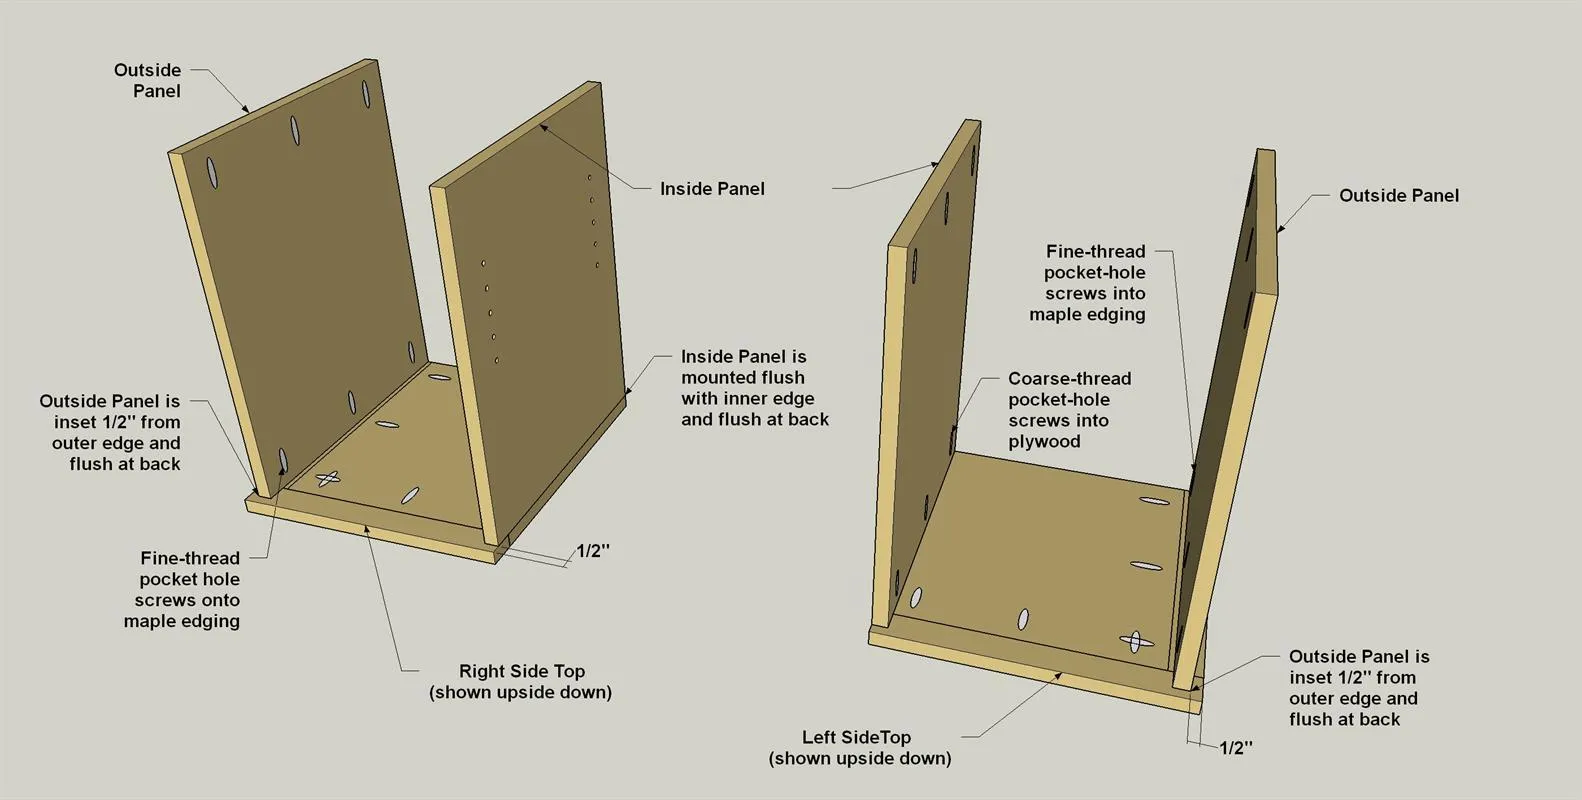
- Now you can attach the Inside and Outside Panels to the Tops.
- Lay the Left and Right Top panel out, as shown.
- Then Position each Inside Panel on each Top Panel, as shown. Make sure that the shelf pin holes face outward and the outside face is flush with the outside edge of the Top and flush at the back, as shown. Secure it in place with 1 1/4" coarse-thread pocket-hole screws.
- Next, Position each Outside Panel on each Top with the pocket holes facing in. Inset the panel 1/2" in from the outside edge of the Top and flush at the back edge as shown. Secure it to the Top with 1 1/4" fine-thread pocket-hole screws—the fine-thread screws are the right choice here since they’re being driven into the hardwood edging instead of into the plywood.
7Attach Side Cases to the Bottom
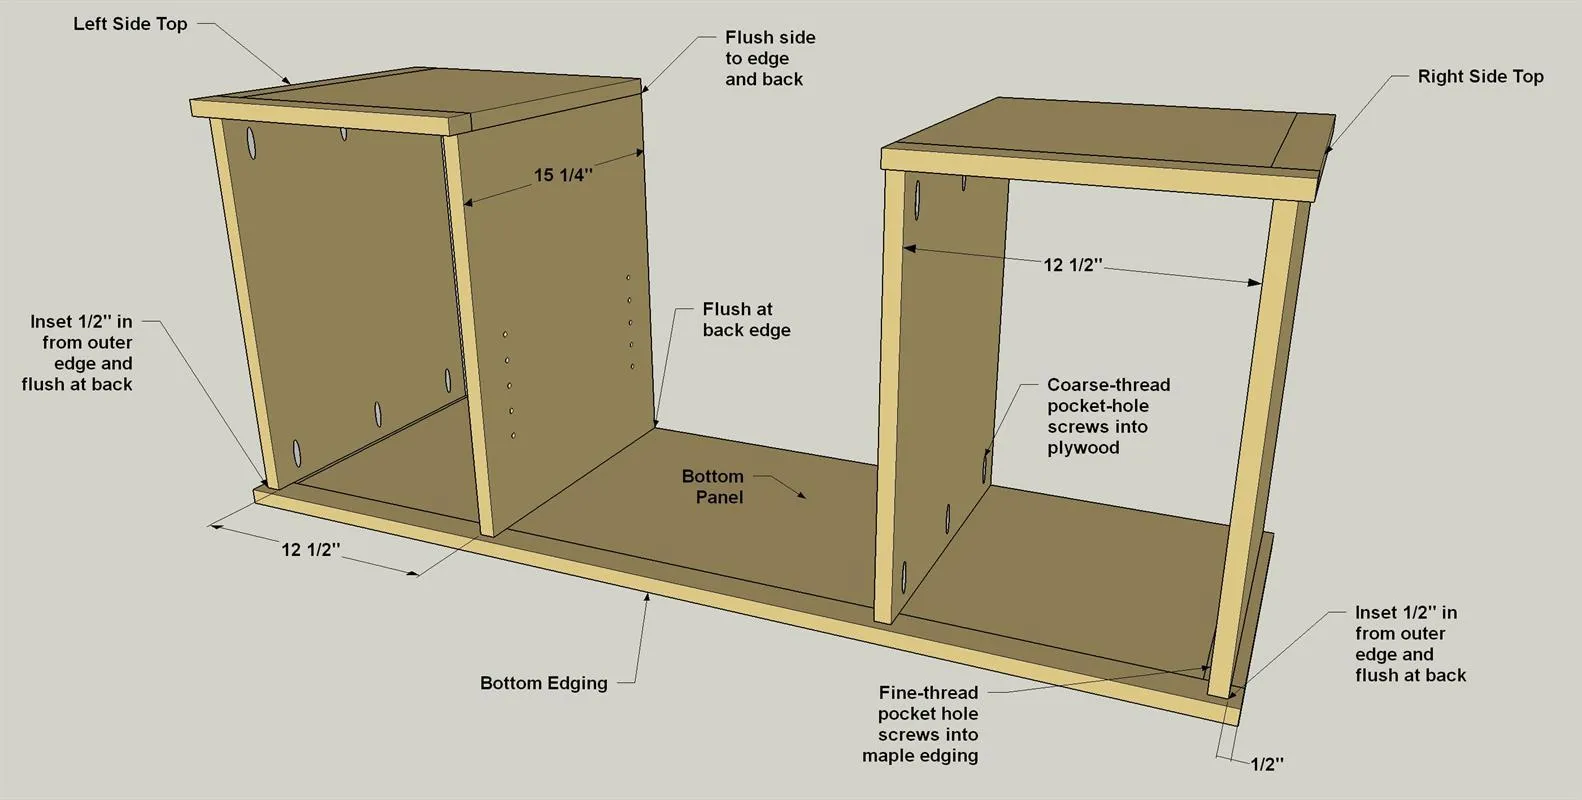
- Lay the Bottom Panel on a work surface with the pocket holes facing down.
- Position each side case assembly on the Bottom Panel making sure the assembly is located with the proper insets, as shown. Secure the Outside Panel to the Side Edging on the Bottom using 1 1/4" fine-thread pocket-hole screws.
- Then secure the Inside Panel to the plywood Bottom using 1 1/4" coarse-thread pocket-hole screws.
8Make the Fixed Shelves
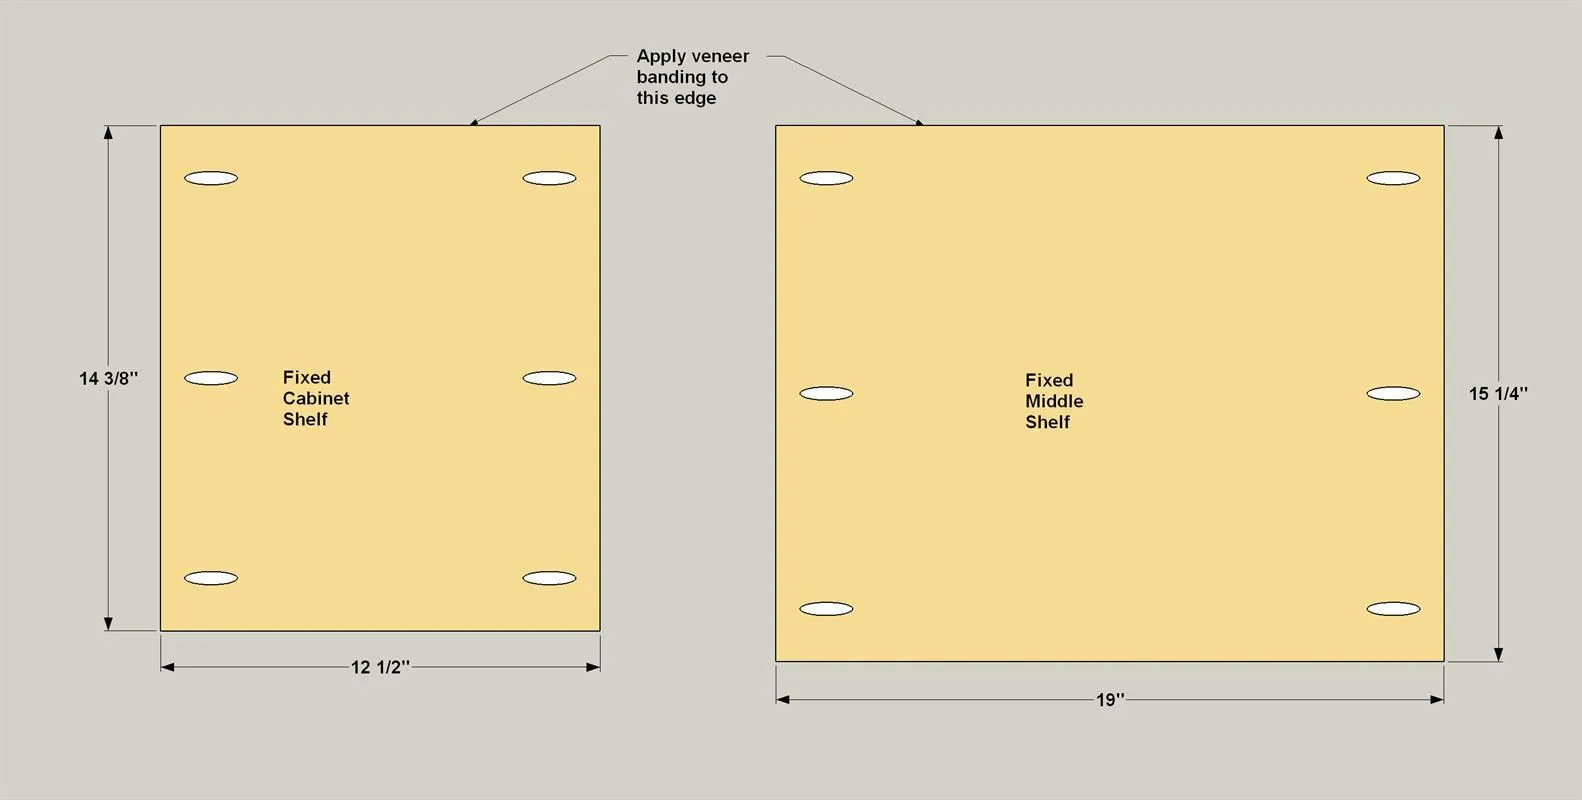
Cut two Fixed Cabinet Shelves and one Fixed Middle Shelf to size as shown in the cutting diagram. At the locations shown, apply iron-on edge banding, and then trim and sand it.
9Attach the Fixed Shelves
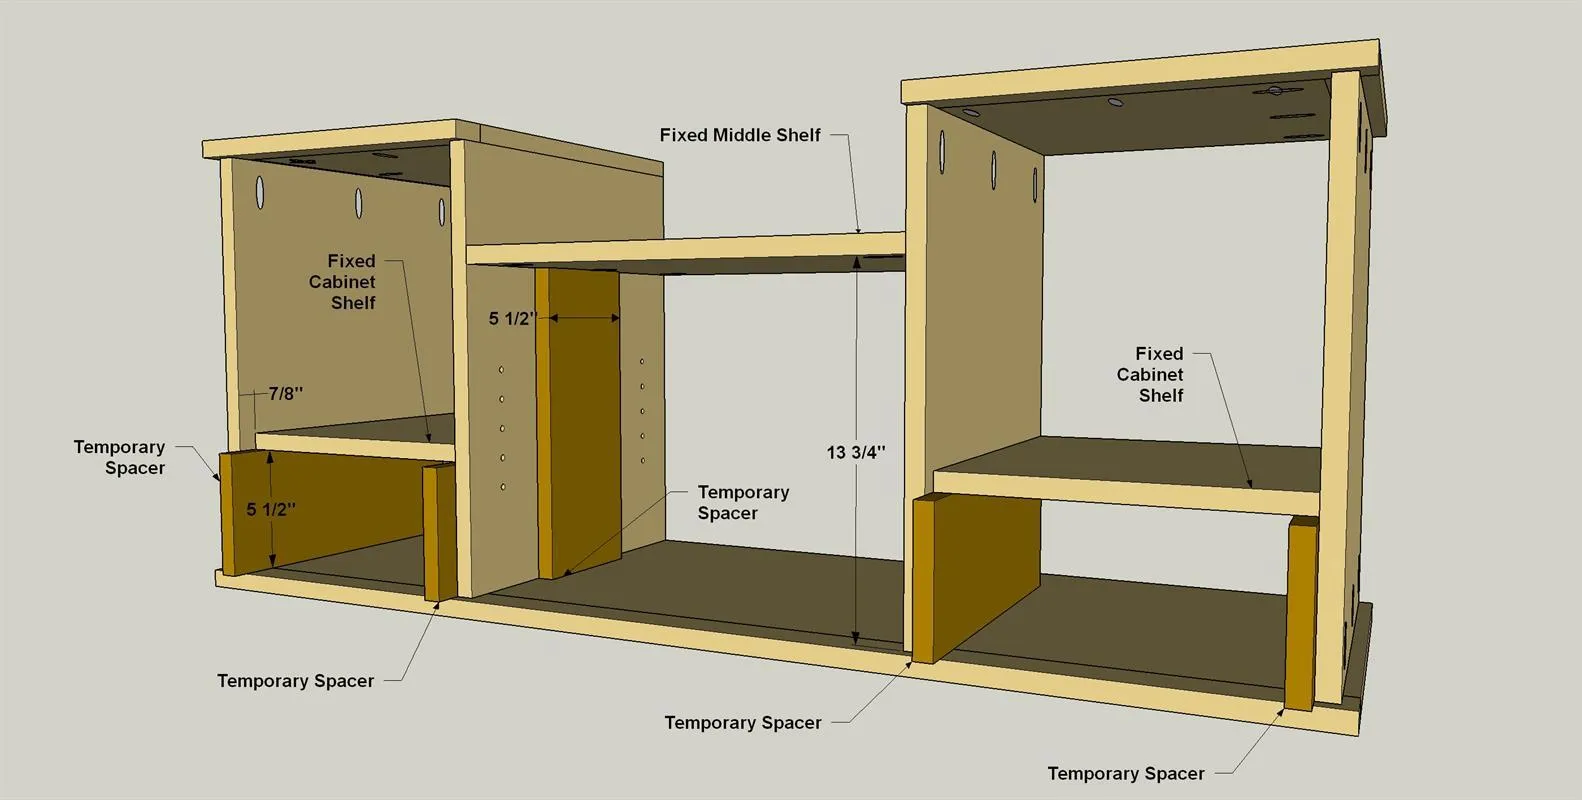
Using some scrap pieces of 1x6 as spacers, set the Shelves in position as shown. Secure the Shelves to the Sides using 1 1/4" coarse-thread pocket-hole screws.
10Make the Back Panel
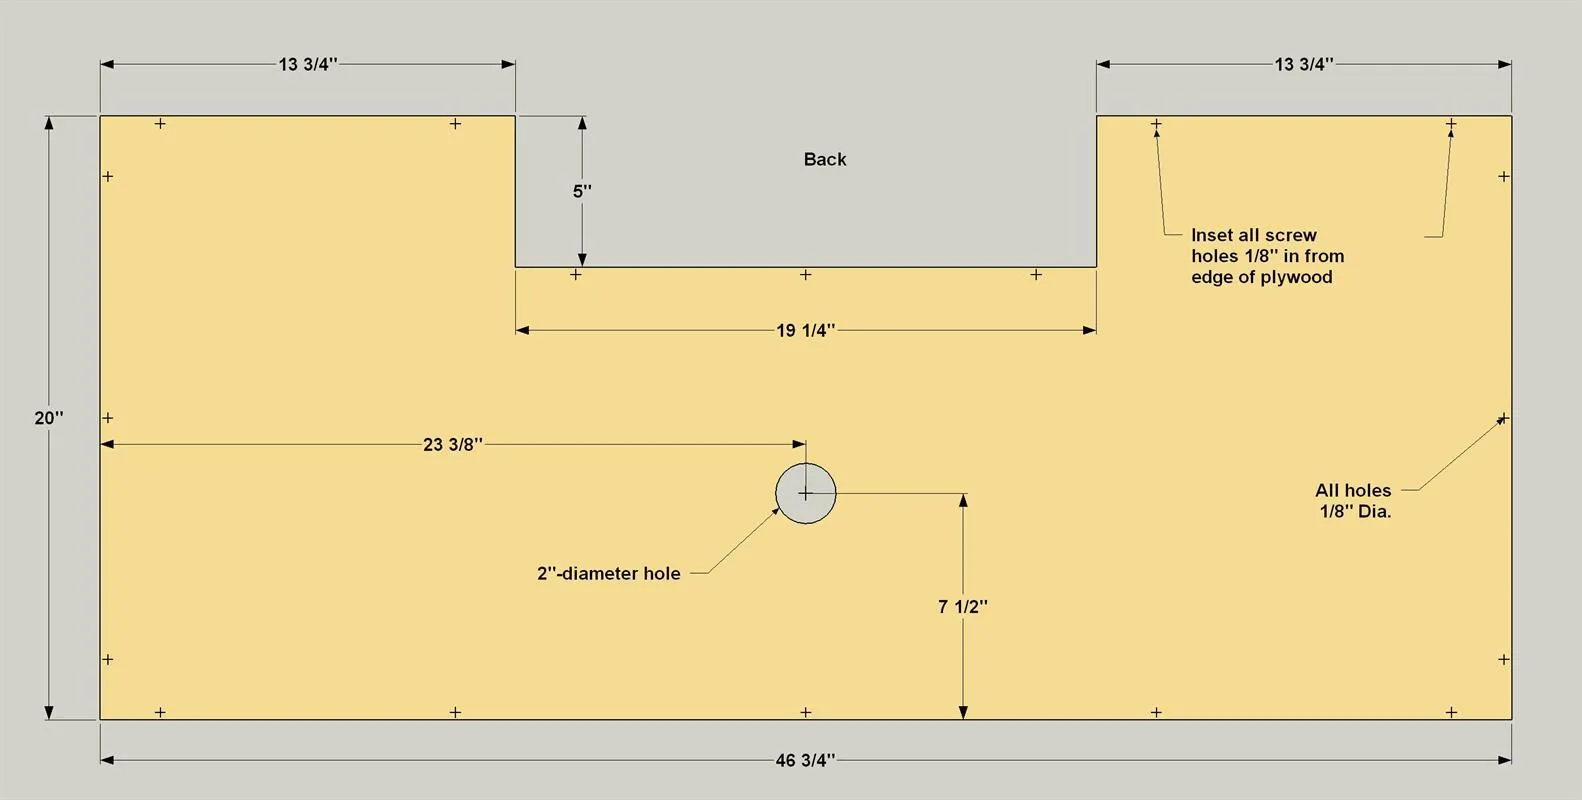
From 1/4" thick plywood, cut the Back Panel to size and shape as shown in the cutting diagram. Locate and drill the cable hole with a 2" Forstner bit. Lay out the holes for attaching the Back to the Case, and drill 1/8" pilot holes at those locations.
11Attach the Back
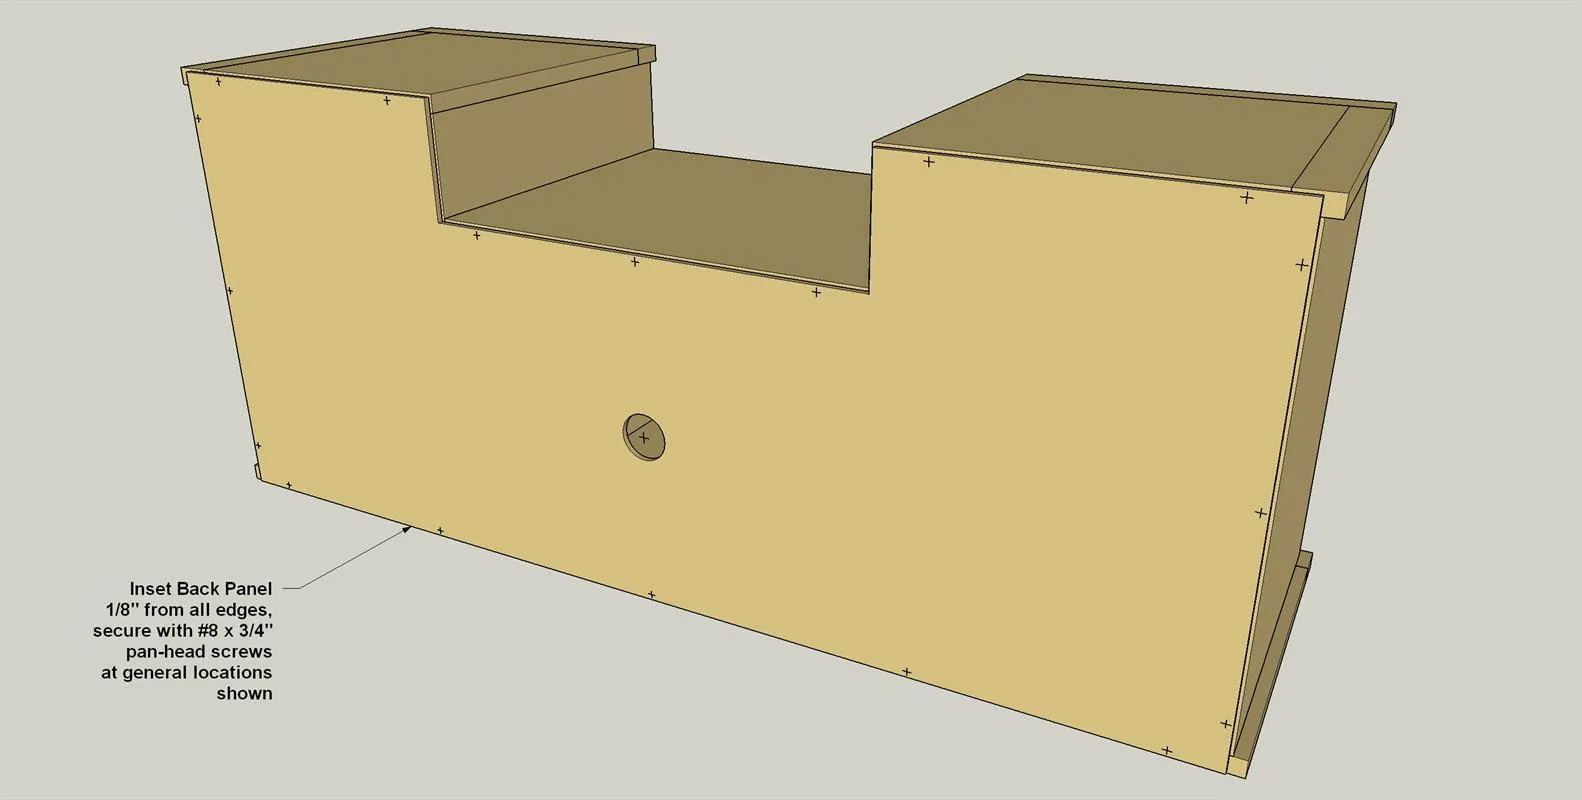
Clamp the Back to the case making sure there is a 1/8" space on each side, and then secure the Back to the main assembly using #8 x 3/4" pan-head wood screws.
12Make Doors and an Adjustable Shelf
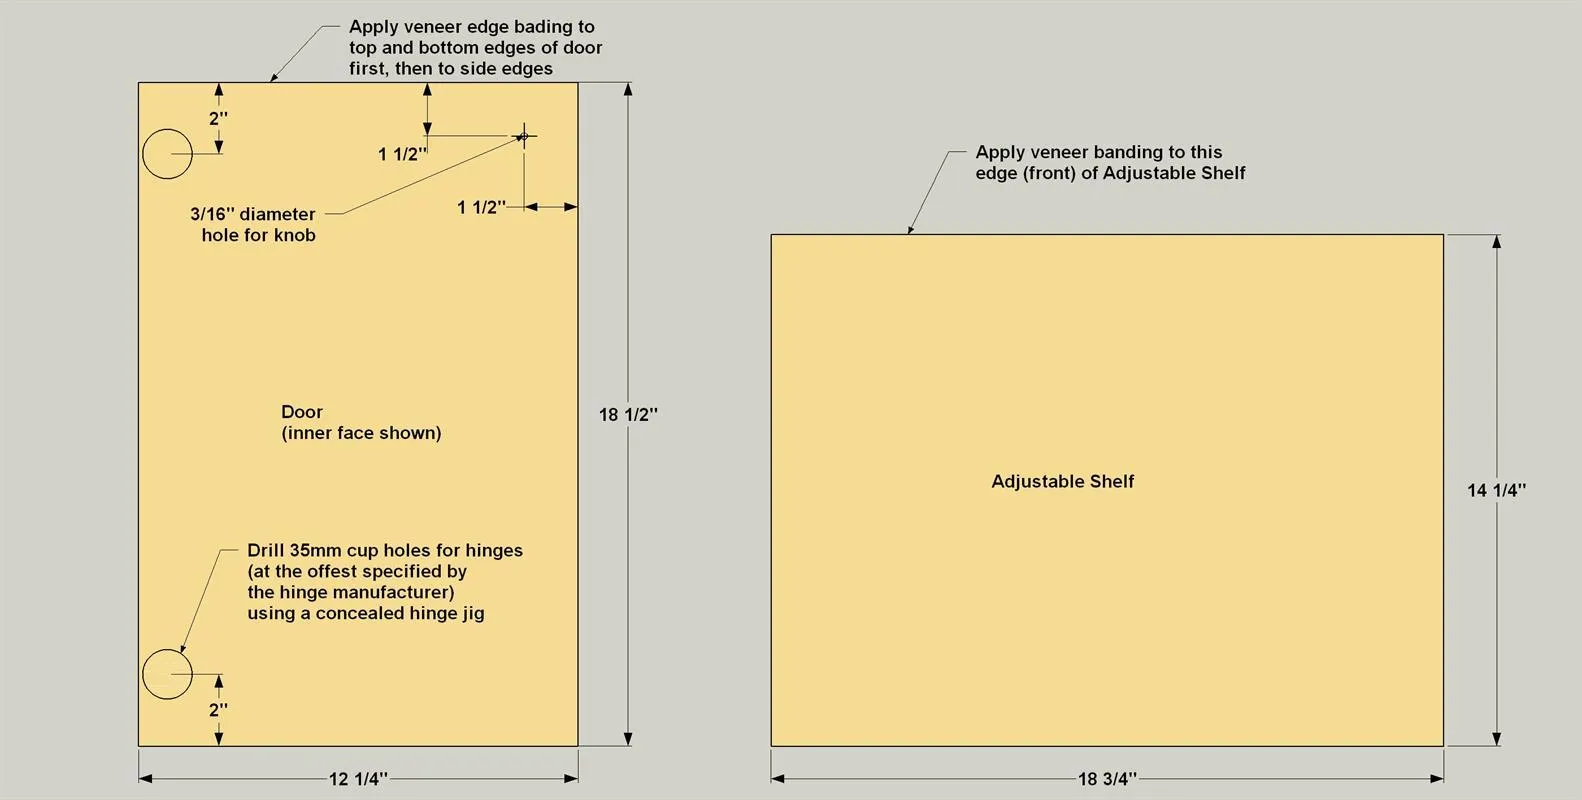
- Cut one Adjustable Shelf to size, as shown in the cutting diagram.
- Then apply iron-on veneer edge banding to the forward edge, as shown.
- Next, cut two Doors to size, as shown in the cutting diagram.
- Apply iron-on veneer edge banding to all four edges of the Doors, as shown.
- Lay out the location for the door knobs and drill 3/16" pilot holes in each door.
- Next, Lay out and drill hinge-cup holes for the full-inset concealed hinges. To do this, you’ll need the instructions that come with the hinges. It’s also much easier to do this using a jig, such as the Kreg Concealed Hinge Jig. Mount the Hinges to the Doors.
13Mount the Doors
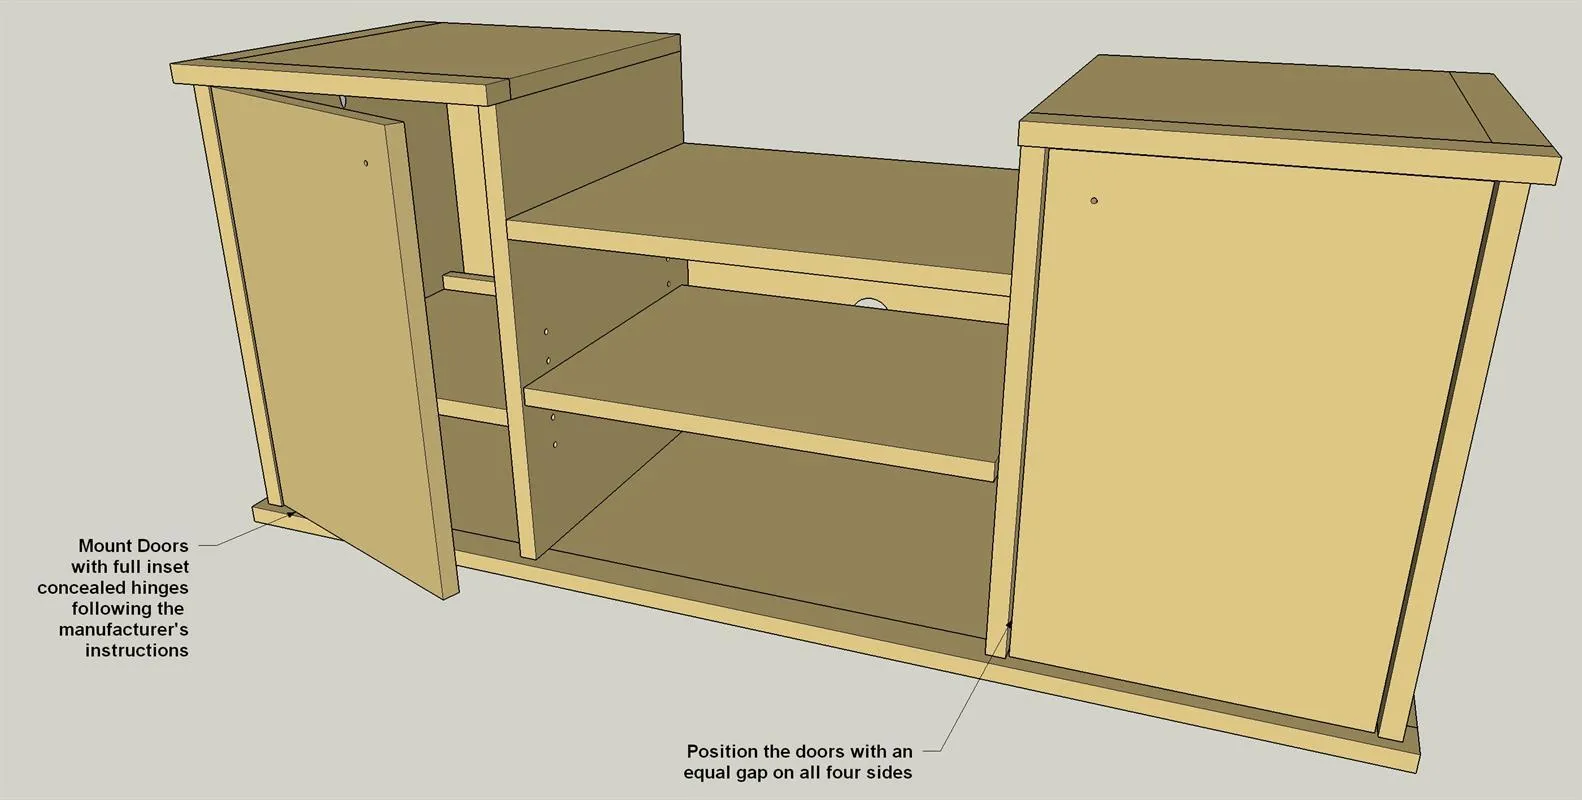
- Mount the doors to the cabinet, as shown, using the manufacturer's instructions. Make sure the doors have equal spacing at the top and bottom.
- Adjust the hinges using their built-in adjustment screws to even out the side gaps.
- Once the finish dries, you can install knobs on the drawers, and then attach the legs
14Finish and Add Final Hardware
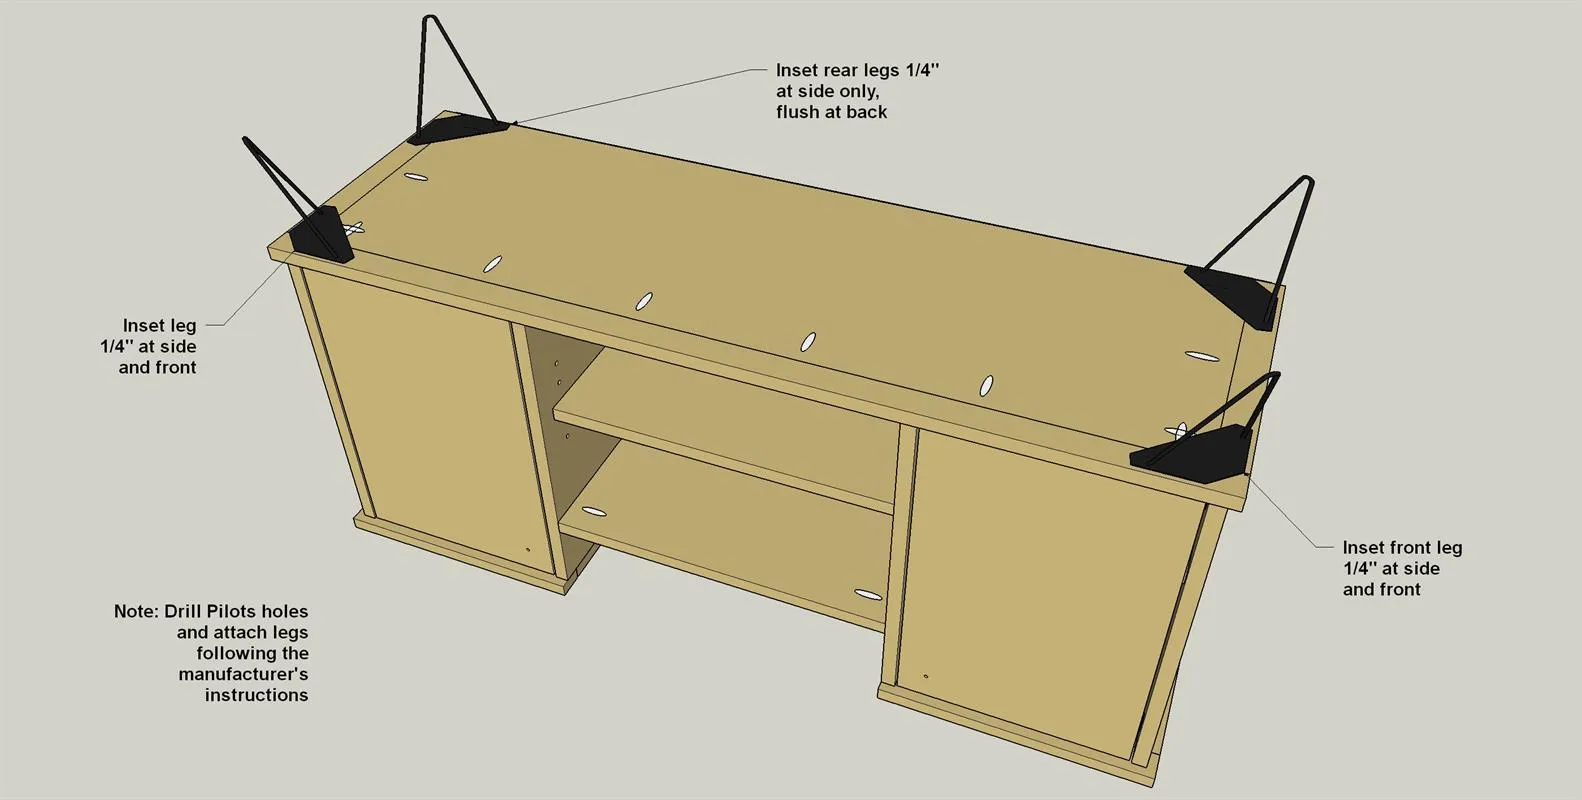
- With assembly mostly done, you can do any final sanding that’s needed, and then apply a finish to your record player stand. We rubbed on three coats of a natural oil finish to complete the mid-century look.
- Once the finish dries, you can install knobs on the drawers, and then attach the legs as shown.
- Insert shelf pins, and finally drop in the Adjustable Shelf.
Tags
- Built Ins and Cabinets
- Intermediate
Reviews & builds
No reviews yet
Sign in to review this plan or share your build.
No reviews yet. Be the first to build this.