 Notch
Use your browser's Print (Ctrl/Cmd + P) and choose Save as PDF. This page works offline once you've opened it with a signal.
Pedestal Vanity
A pedestal sink is common in a half bath, but it doesn't offer you much in terms of storage or counter space.
- Difficulty
- Intermediate
- Time
- 3.8–7.5 hours
- Cost
- $$$
Cut list
| Part | Qty | T × W × L | Material | ✓ |
|---|---|---|---|---|
| Top | 1 | 1" × 20" × 30" | — | ☐ |
| Sides | 2 | 3/4" × 18" × 29" | — | ☐ |
| Base | 1 | 3/4" × 17" × 26" | — | ☐ |
| Top and bottom face | 2 | 3/4" × 2" × 26" | — | ☐ |
| Side face | 2 | 3/4" × 2" × 14" | — | ☐ |
| Doors | 2 | 1/2" × 13" × 17" | — | ☐ |
| Drawer faces | 2 | 3/4" × 5" × 26" | — | ☐ |
| Drawer sides | 4 | 3/4" × 4" × 17" | — | ☐ |
| Drawer tops | 2 | 3/4" × 17" × 25" | — | ☐ |
| Caster bases | 8 | 3/4" × 4" × 4" | — | ☐ |
Materials
| Item | Qty | ✓ |
|---|---|---|
| Sheet of plywood, 4' x 8' x 3/4" | 1 board | ☐ |
| Sheet of plywood, 2' x 4' x 1/2" | 1 board | ☐ |
| Butcher block (or 3/4" plywood double stack), 20" x 30" x 1 1/2" | 1 board | ☐ |
| Box of 1¼” pocket-hole screws (see tool list) | 1 each | ☐ |
| Box of 1 1/2" brad nails | 1 each | ☐ |
| Wood glue | 1 each | ☐ |
| 12" drawer slides | 4 each | ☐ |
| 2 1/2" casters | 4 each | ☐ |
| 12" hinges | 2 each | ☐ |
| Drawer pulls | 2 each | ☐ |
| Cabinet knobs | 2 each | ☐ |
| Peel and stick wall paper or contact paper (optional) | 1 each | ☐ |
| Stain or paint | 1 each | ☐ |
| Butcher block oil | 1 each | ☐ |
Overall cost: $$$. Lumber varies by region, species, and season, so we give a band rather than a figure.
Tools
- Brad Nailer
- Drill / Driver
- Jigsaw
- Pocket Hole Jig
- Random Orbit Sander
Instructions
1. Build frame
- Drill three pocket holes along the short, top edge of the two Sides. - Drill three pocket holes along each short edge of the Base. - Attach the Base to the two Sides 11" from the bottom edge of the Sides and flush along the back edge, using wood glue and pocket screws.
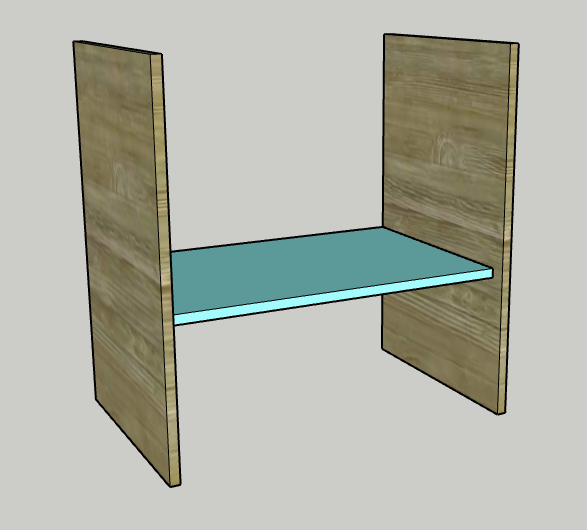
2. Attach face frame
- Drill two pocket holes on each short end of the two Side Face pieces. - Drill one pocket hole on each short end of the two Top and Bottom Face pieces. - Attach the two Side Face pieces flush on the end of the long edges of the Top and Bottom Face pieces, using wood glue and pocket screws. - Attach the face frame to the inside of the two Sides, using wood glue and pocket screws. - Attach the face frame so that the top is flush with the tops of the Sides and along the front edge of the Base.
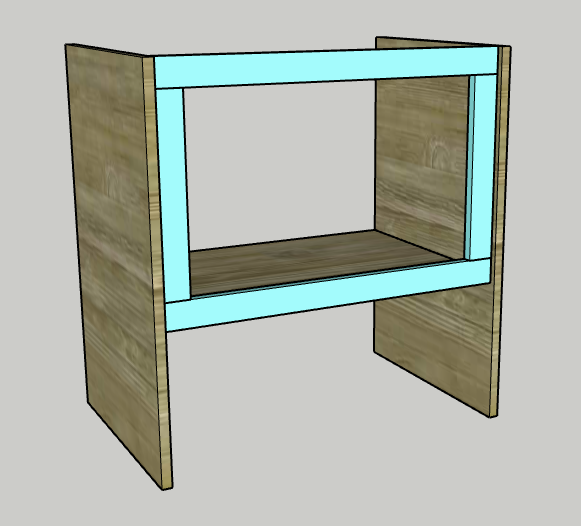
3. Build drawers
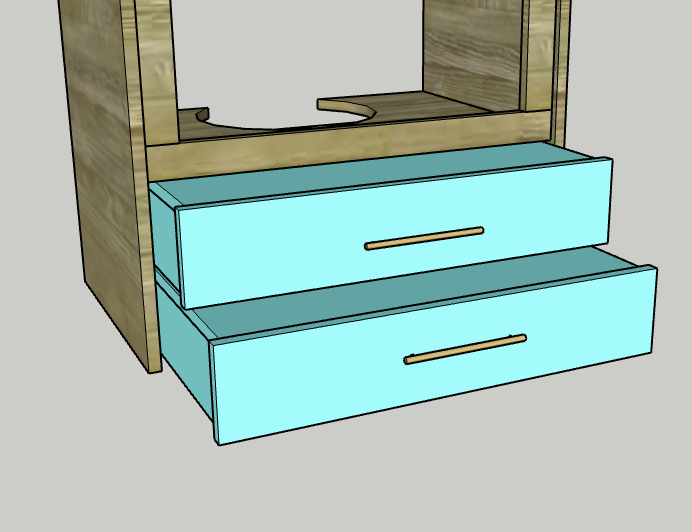
- Drill two pocket holes on one short edge of each of the Drawer Sides. - Attach the Drawer Top to the Drawer Sides, using wood glue and brad nails. - Attach the Drawer Face to the Drawer Top and Sides, using wood glue and pocket screws. Center the Face along the front. - In each of the two front corners of each drawer, use wood glue and brad nails to attach two Caster Bases.
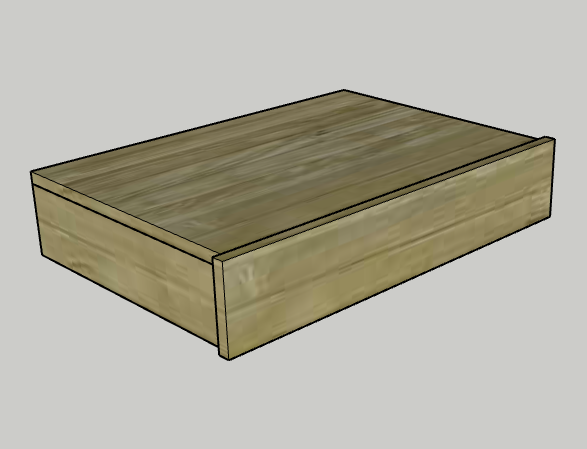
4. Cut pedestal notches
- Trace and cut a notch for the pedestal sink basin in the butcher block Top. - Trace and cut a notch for the pedestal sink stand in the Base and each Drawer Top. - The best answer for how to do this is to make measurements of the sink and stand and trace those on a piece of cardboard. - When it seems like those are close, trace that on to a piece of 1/4" or 1/2" scrap plywood and make sure the hole is accurate. - Once it is certain, trace that onto the butcher block Top, Base and Drawer Top pieces. - Use a jigsaw to cut out each notch and then sand smooth.
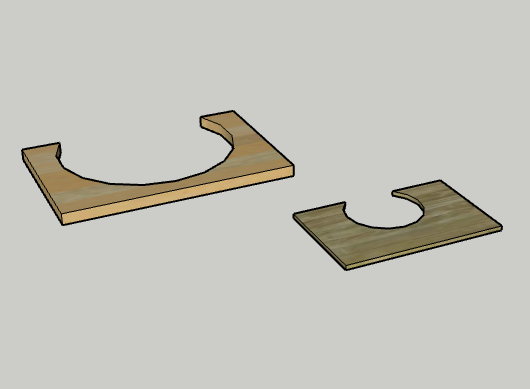
5. Add finish
- Stain or paint the frame, drawers and doors to fit your decor. - Oil the butcher block top. - Add textured contact paper to doors if desired.
6. Attach drawers
- Add a drawer pull to each of the drawers. - Attach a caster in each corner of the underside of the drawer on the Caster Bases. - Attach the two drawers underneath the Base piece, using drawer slides.
7. Attach top in place
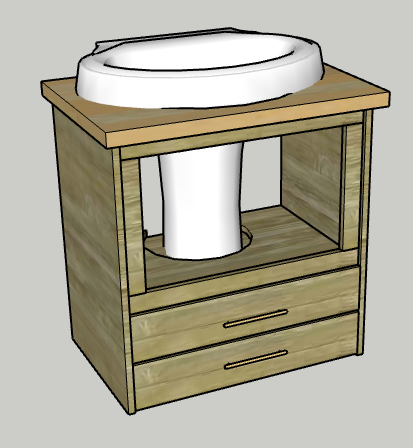
- With a friend, slide the butcher block Top up and into place and then slide the base unit underneath it. - Center the base cabinet on the Top and then attach with pocket screws.
8. Attach doors
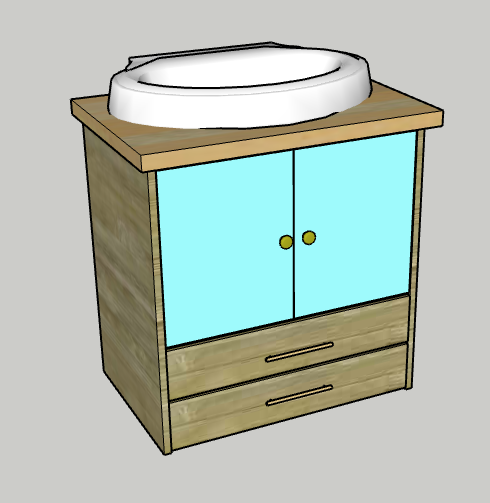
- Attach a hinge to each Door. - Attach each Door hinge to the Sides, right in front of the face frame. - Add one cabinet knob to each Door.
9. Enjoy!
Enjoy your handiwork and tag @CharlestonCrafted on Instagram with a picture!