 Notch
NotchUse your browser's Print (Ctrl/Cmd + P) and choose Save as PDF. This page works offline once you've opened it with a signal.
Nightstand with Drawer
Add style and storage in your bedroom with this great-looking nightstand.
- Difficulty
- Intermediate
- Time
- 6–11.5 hours
- Cost
- $$$
Cut list
| Part | Qty | T × W × L | Material | ✓ |
|---|---|---|---|---|
| Leg | 8 | 3/4" × 1" × 20" | — | ☐ |
| Side Rail | 2 | 3/4" × 5" × 13" | — | ☐ |
| Back Rail | 2 | 3/4" × 5" × 13" | — | ☐ |
| Drawer Front | 1 | 3/4" × 5" × 12" | — | ☐ |
| Drawer Slide Spacer | 2 | 1/2" × 2" × 13" | — | ☐ |
| Top Board | 3 | 3/4" × 5" × 17" | — | ☐ |
| Drawer Box Front/Back | 2 | 1/2" × 3" × 11" | — | ☐ |
| Drawer Box Side | 2 | 1/2" × 3" × 12" | — | ☐ |
| Drawer Bottom | 1 | 3/4" × 11" × 11" | — | ☐ |
Materials
| Item | Qty | ✓ |
|---|---|---|
| Board, 1/2" x 4" 24" | 2 board | ☐ |
| Board, 1/2" x 3" 36" | 1 board | ☐ |
| Board, 1x6 72" | 2 board | ☐ |
| Board, 1x2 96" | 2 board | ☐ |
| Plywood, 3/4" Thick 24" x 24" | 1 board | ☐ |
| Square Dowel (optional), 1/4" x 1/4" 36" | 1 board | ☐ |
| 1 1/4" fine-thread pocket-hole screws | 27 each | ☐ |
| 1" coarse-thread pocket-hole screws | 8 each | ☐ |
| 1" brad nails | 20 each | ☐ |
| 1" flat-head wood screws | 2 each | ☐ |
| Pair 12" full-extension drawer slides | 1 each | ☐ |
| Quart Tried and True oil finish | 1 each | ☐ |
| 1" Forstner bit | 1 each | ☐ |
| Wood glue | 1 each | ☐ |
| Double-faced carpet tape | 1 each | ☐ |
| Kreg Rip-Cut | 1 each | ☐ |
Overall cost: $$$. Lumber varies by region, species, and season, so we give a band rather than a figure.
Tools
- Brad Nailer
- Circular Saw
- Drill / Driver
- Hammer
- Jigsaw
- Miter Saw
- Pocket Hole Jig
- Random Orbit Sander
- Bar / Pipe Clamps — optional
- Combination Square — optional
- Tape Measure — optional
Instructions
1. Cut the Leg Parts
Cut the eight Legs to rough length from 1x2 Cherry boards, as shown in the cutting diagram. Note that these pieces are initially cut extra-long. They’ll get glued together in pairs to form four thicker leg assemblies, and then cut to final length.
2. Create Side and Back Rails
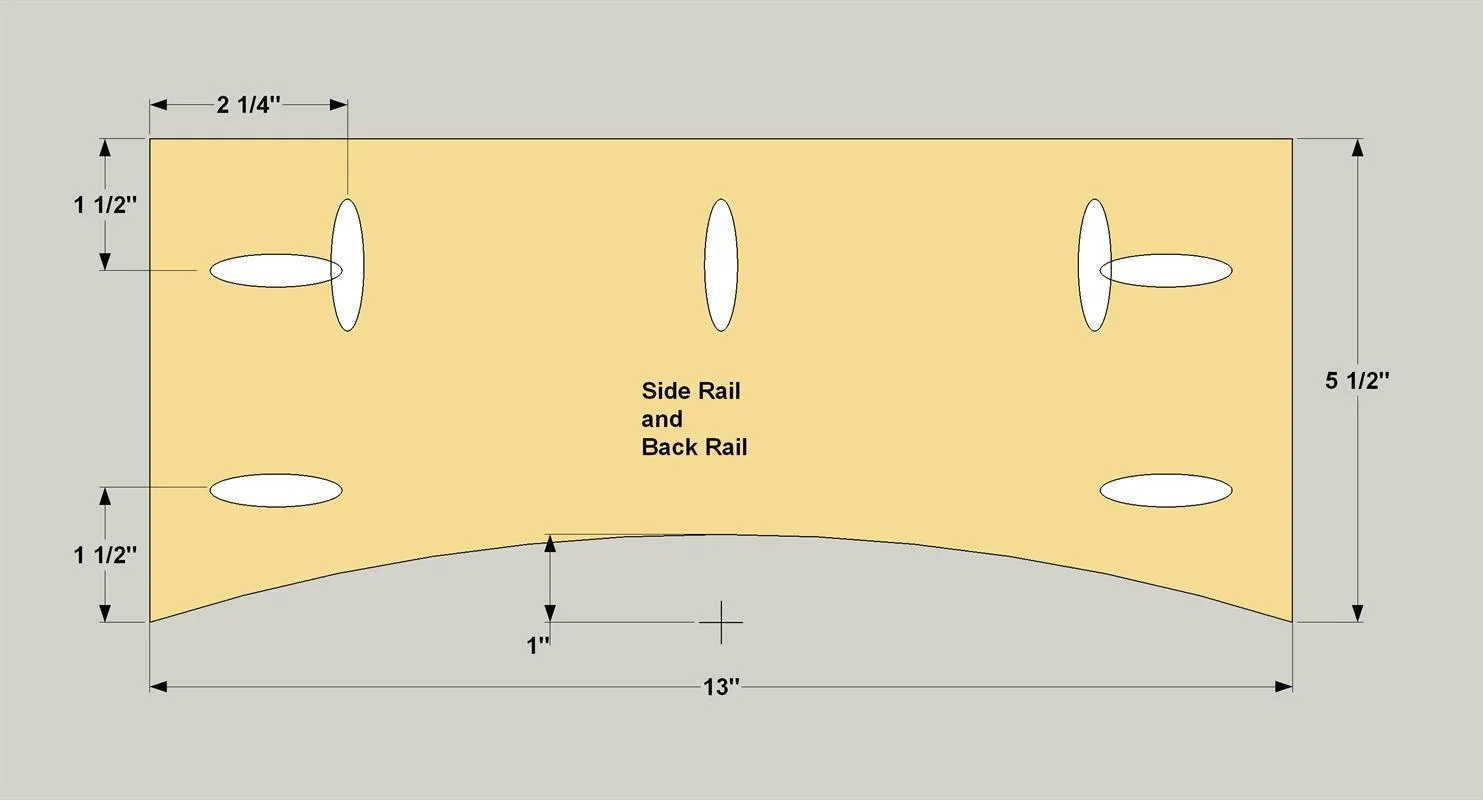
Cut two Sides Rails and one Back Rail to length from a 1x6 cherry board, as shown in the cutting diagram. With your pocket-hole jig set up for 3/4"-thick material, drill pocket holes in the Rails where shown. With that done, you can lay out and cut the arch on the bottom of each Rail. See the tip below for more information.
- Tip: Easy Arch Layout To cut a smooth, consistent arch, first clamp a scrap block of wood to each end of the board as shown.
- Next, bend a flexible ruler (or a thin piece of wood) between the blocks so it evenly flexes.
- Mark the arch with a pencil.
- Then use a jigsaw with a fine tooth blade to carefully cut out the arch, staying just on the waste side of the layout line. After that, you can sand the arch smooth. If you have multiple pieces to lay out and cut this way, skip the ruler part for the rest—just use the first piece you made as a pattern for the others.
3. Create the Drawer Front
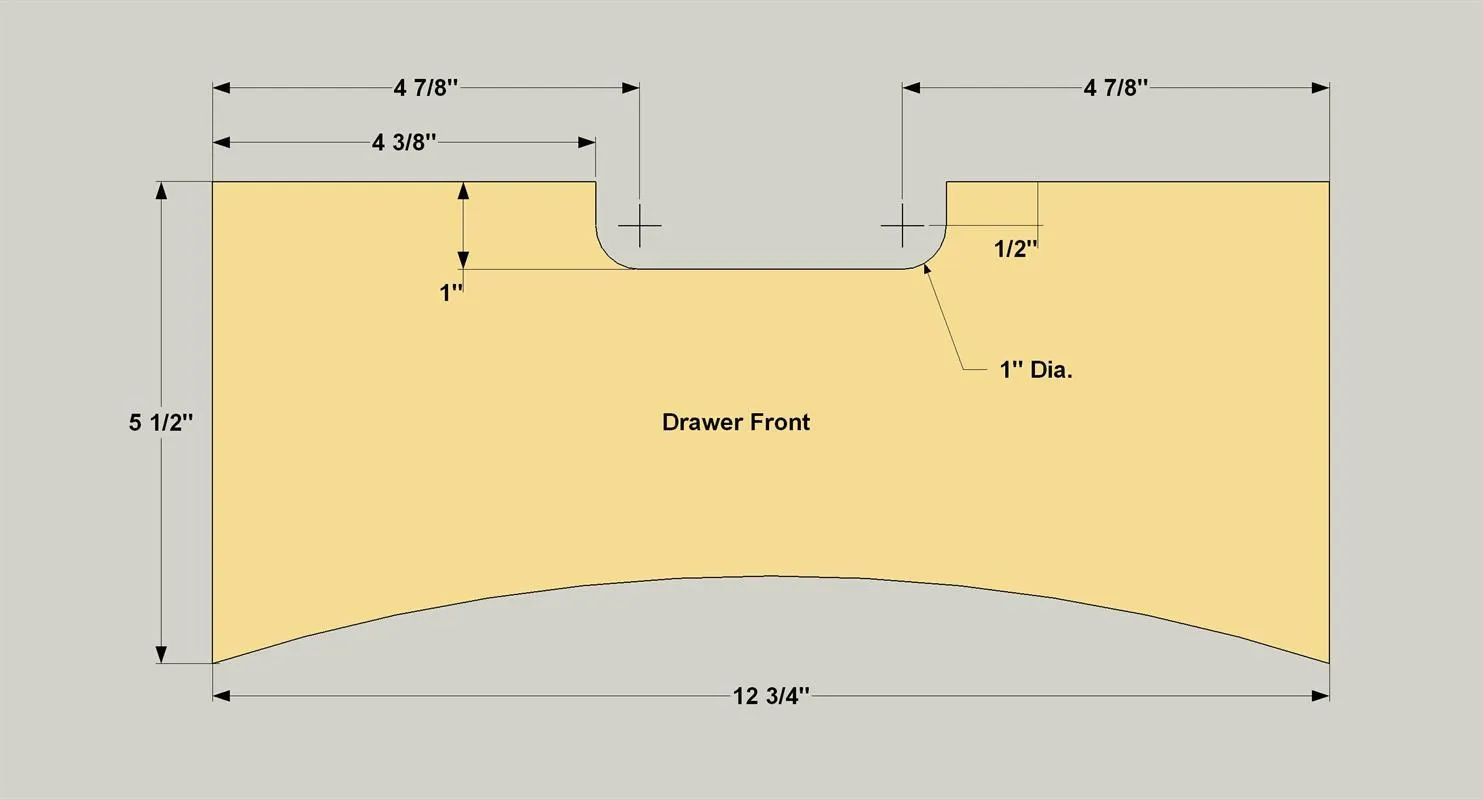
- Cut the Drawer Front to length from a 1x6 cherry board, as shown in the cutting diagram.
- Lay out the arch on the bottom of each Rail and then cut it out using a jig saw.
- Next, lay out the location of the handle cutout holes as shown.
- Drill the two holes with a 1"-diameter Forstner bit.
- Now draw perpendicular lines from the outside of the holes to the top edge of the Drawer Front, and draw a line parallel to the top edge of the board and connect the bottoms of the two holes.
- Cut along these lines with a jigsaw to create the Drawer handle.
- Sand the opening smooth and set the Drawer Front aside for now.
4. Begin Base Assembly
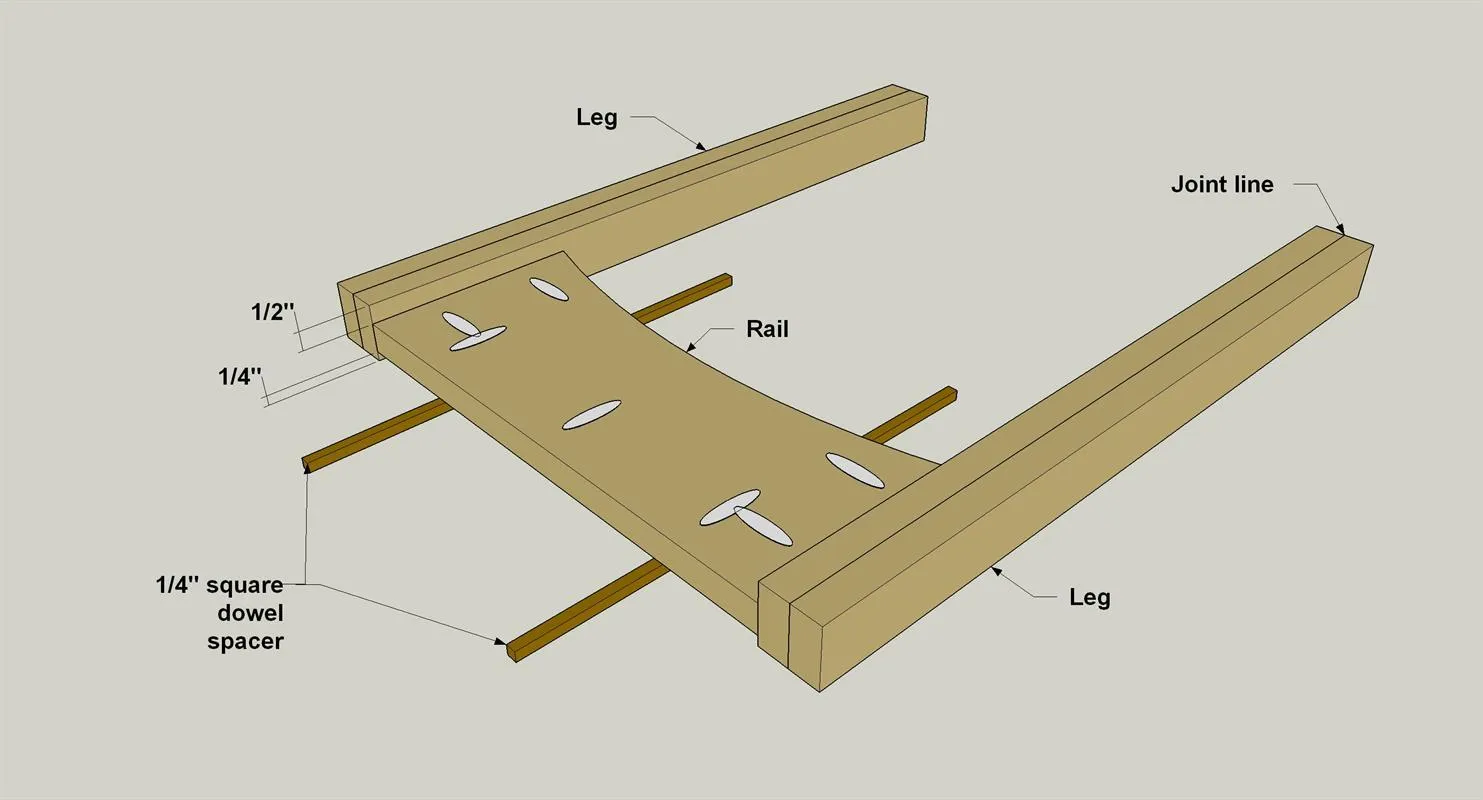
- Lay two leg assemblies on a flat surface with the glue joint facing up.
- Lay two 1/4"-thick spacers between the Legs (we used short pieces of square dowel).
- Set one of the Side Rails on top of the dowels with the pocket holes facing up. Make sure the upper edge of the Side Rail is flush with the upper end of the leg assembly.
- Then attach the Side Rail to the leg assembly using 1 1/4" fine-thread pocket-hole screws.
- Repeat this procedure with the other Side Rail.
5. Complete the Base
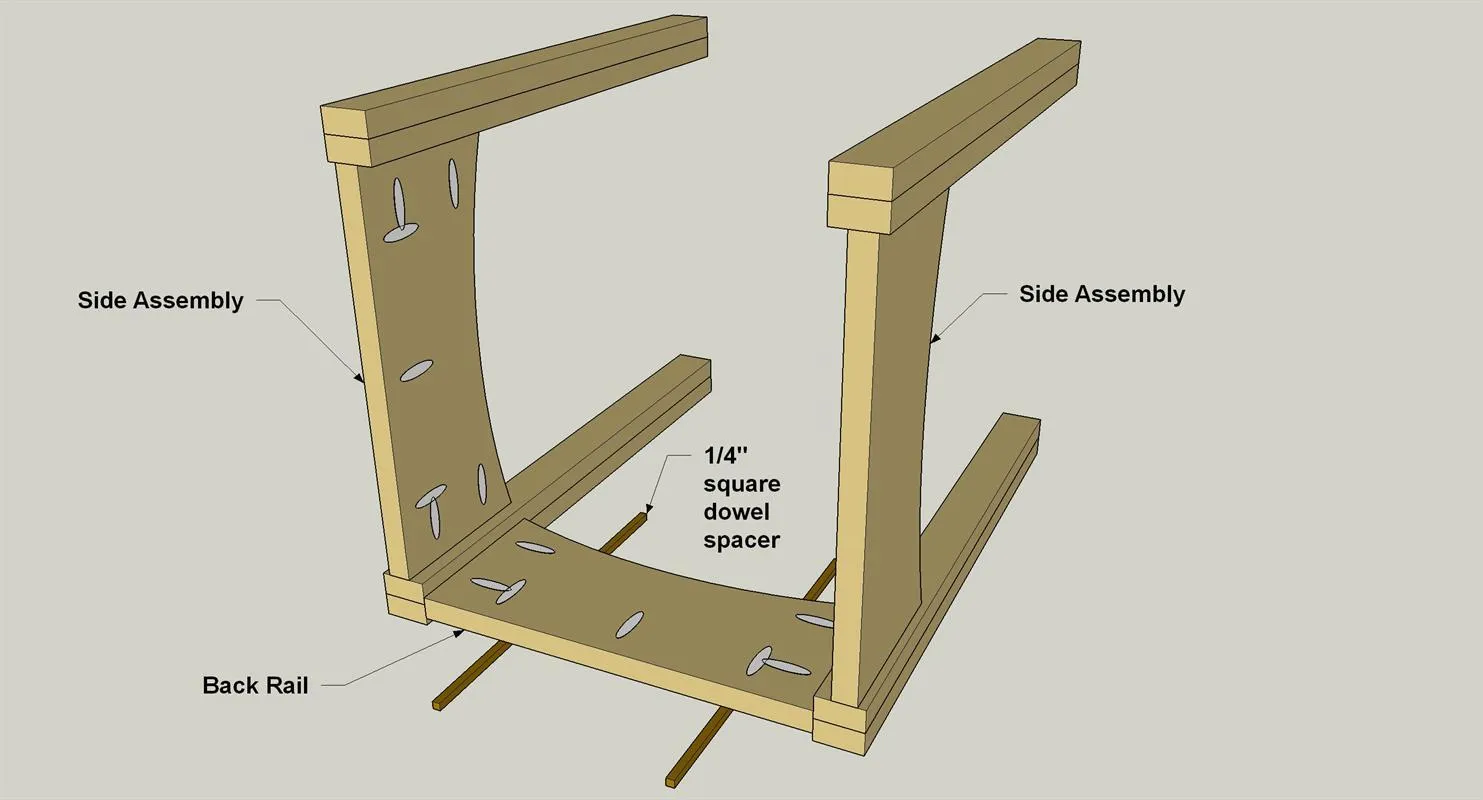
Lay the Back Rail on 1/4" spacers, and then position the base assemblies you just made, as shown. Attach the Back Rail between the two assemblies using 1 1/4" fine-thread pocket-hole screws as shown.
6. Make the Top Boards
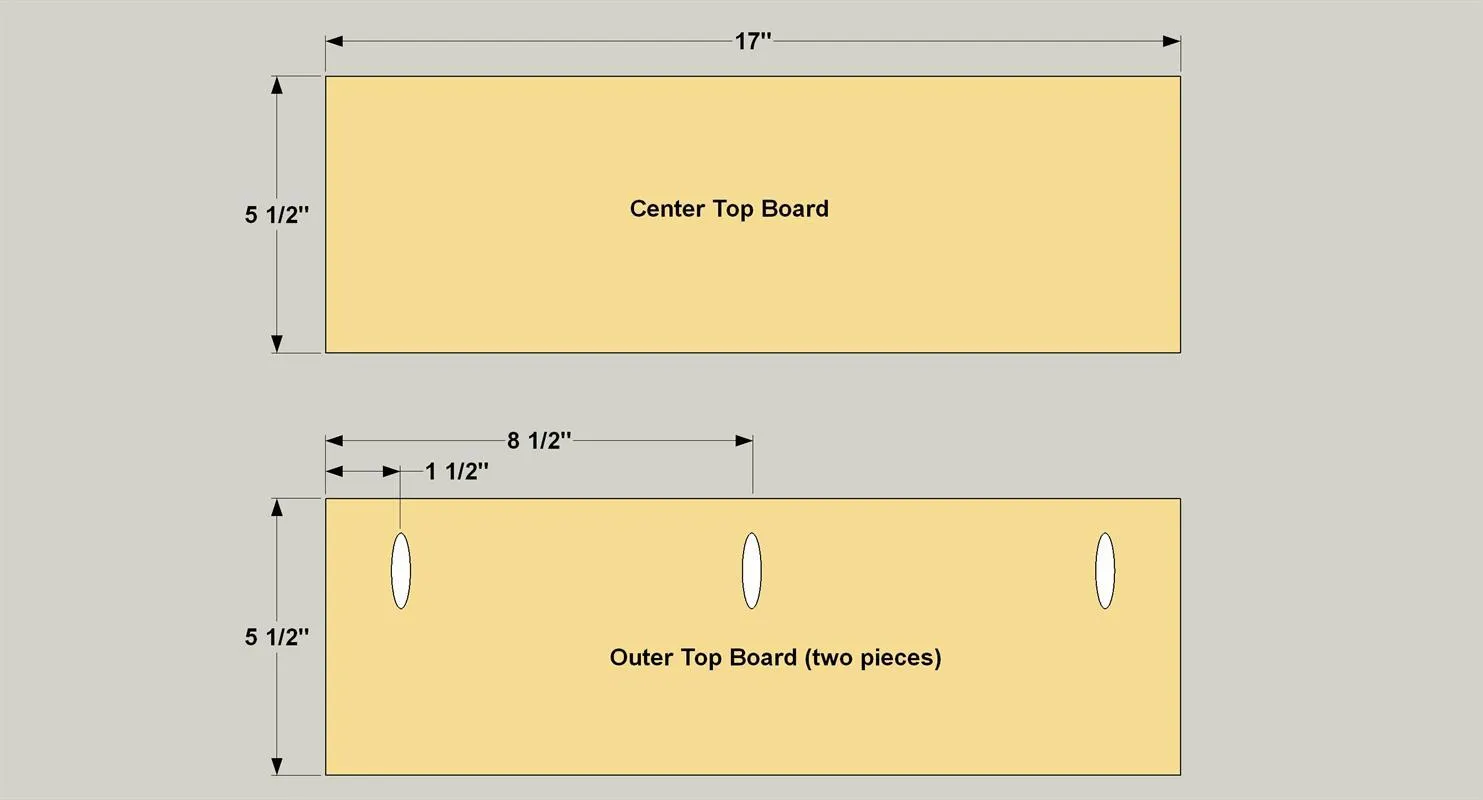
Cut the three Top Boards to length from 1x6 cherry, as shown in the cutting diagram. Drill pocket holes at the location shown in the two outside boards only.
7. Assemble the Top
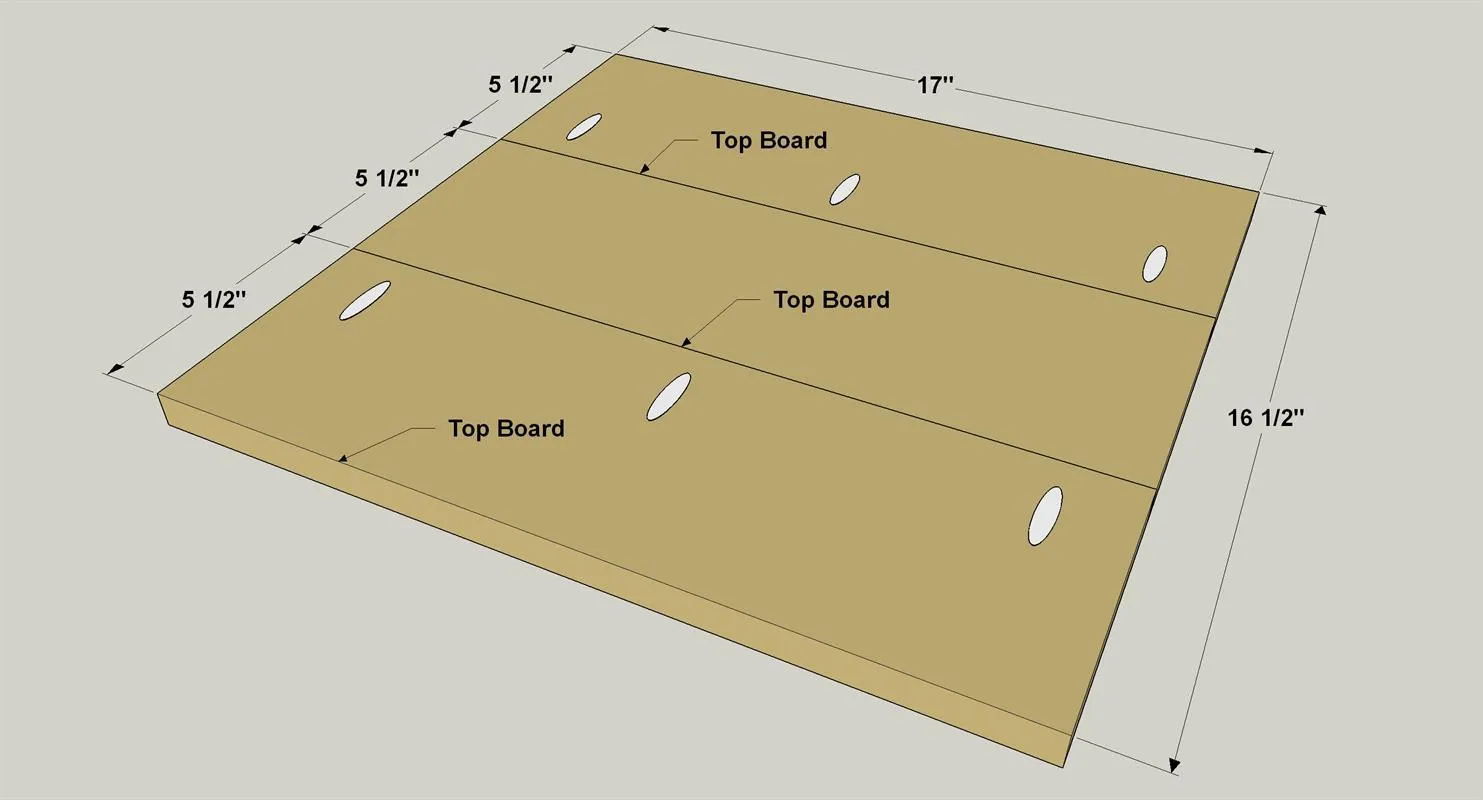
Assemble the Top boards using wood glue and 1-1/4" fine-thread pocket-hole screws as shown.
8. Attach the Top to the Base
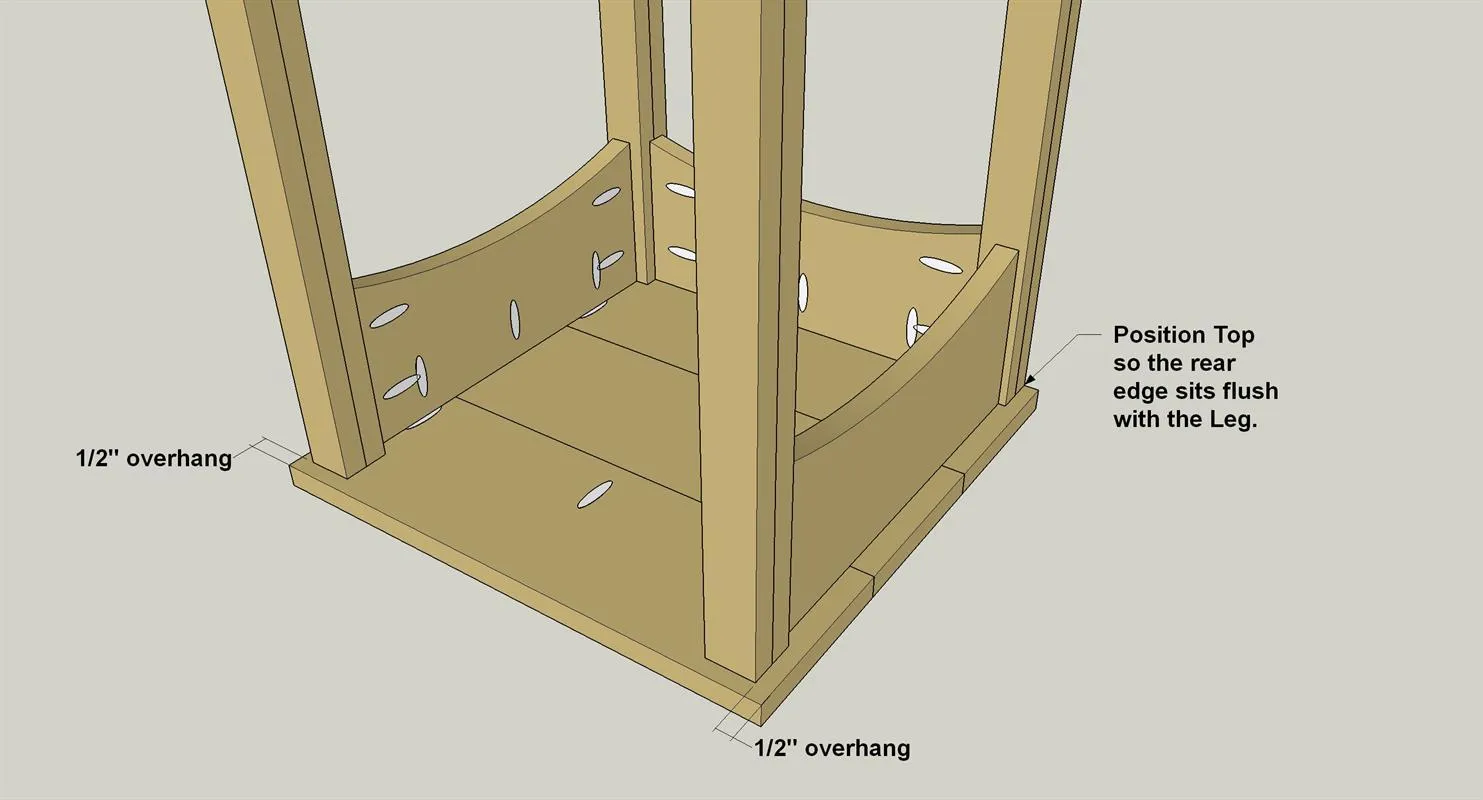
- Lay the assembled Top on a flat work surface with the pocket screws facing up.
- Lay the Base Assembly onto the top as shown. Note the rear edges of the Legs will be flush with the rear edge of the Top. Secure the Top to the Base using 1-1/4" fine-thread pocket-hole screws.
9. Create the Leg Assemblies
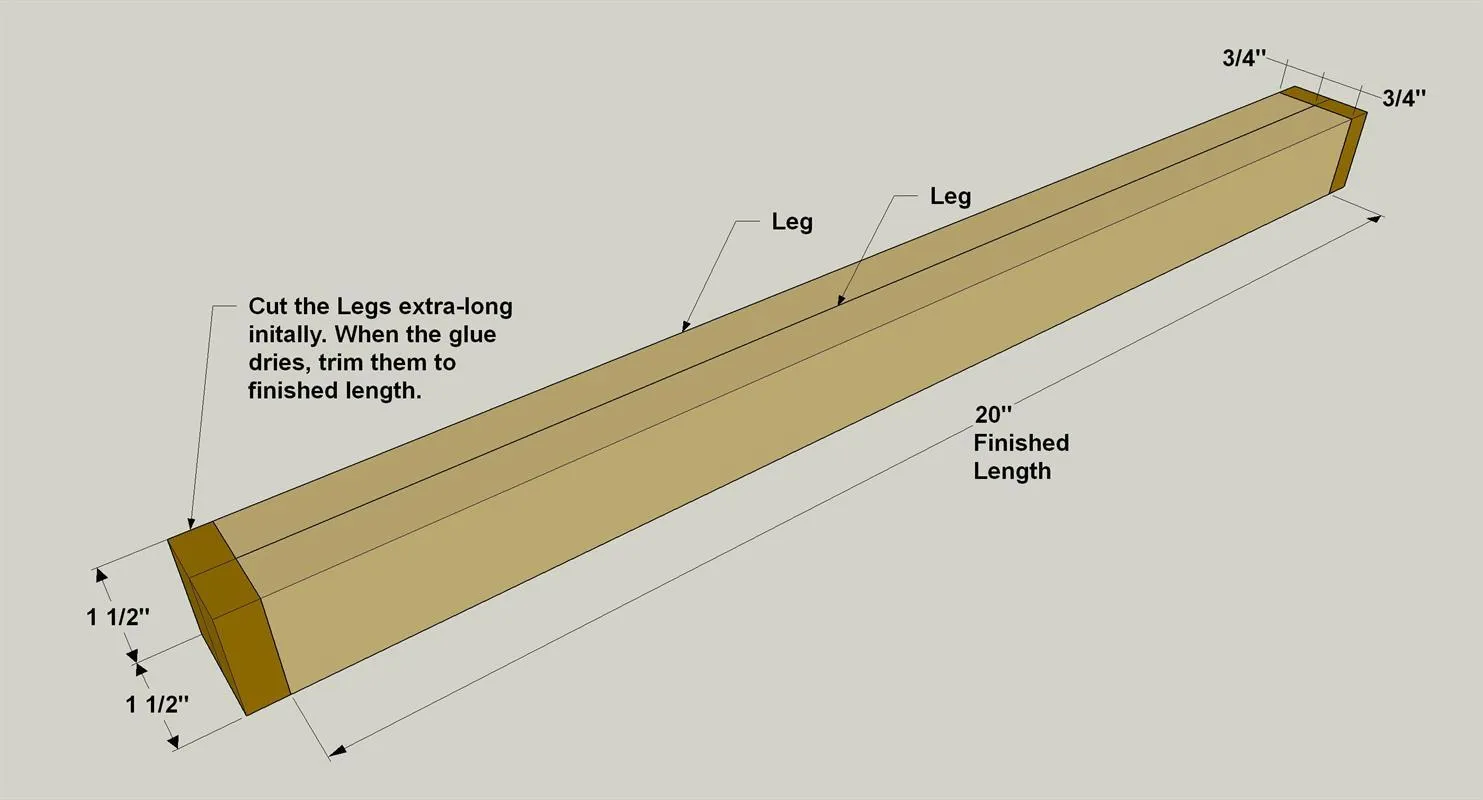
- Apply glue to the faces of two Leg pieces and attach them face to face making sure the edges are flush with one another. Use clamps to hold the pieces together or wrap them tightly with masking tape as the glue dries. Do the same for the other three legs. When the glue dries, scrape off any squeezed-out glue, sand the edges smooth, and then cut the leg assemblies to their final length.
- Set them aside for now.
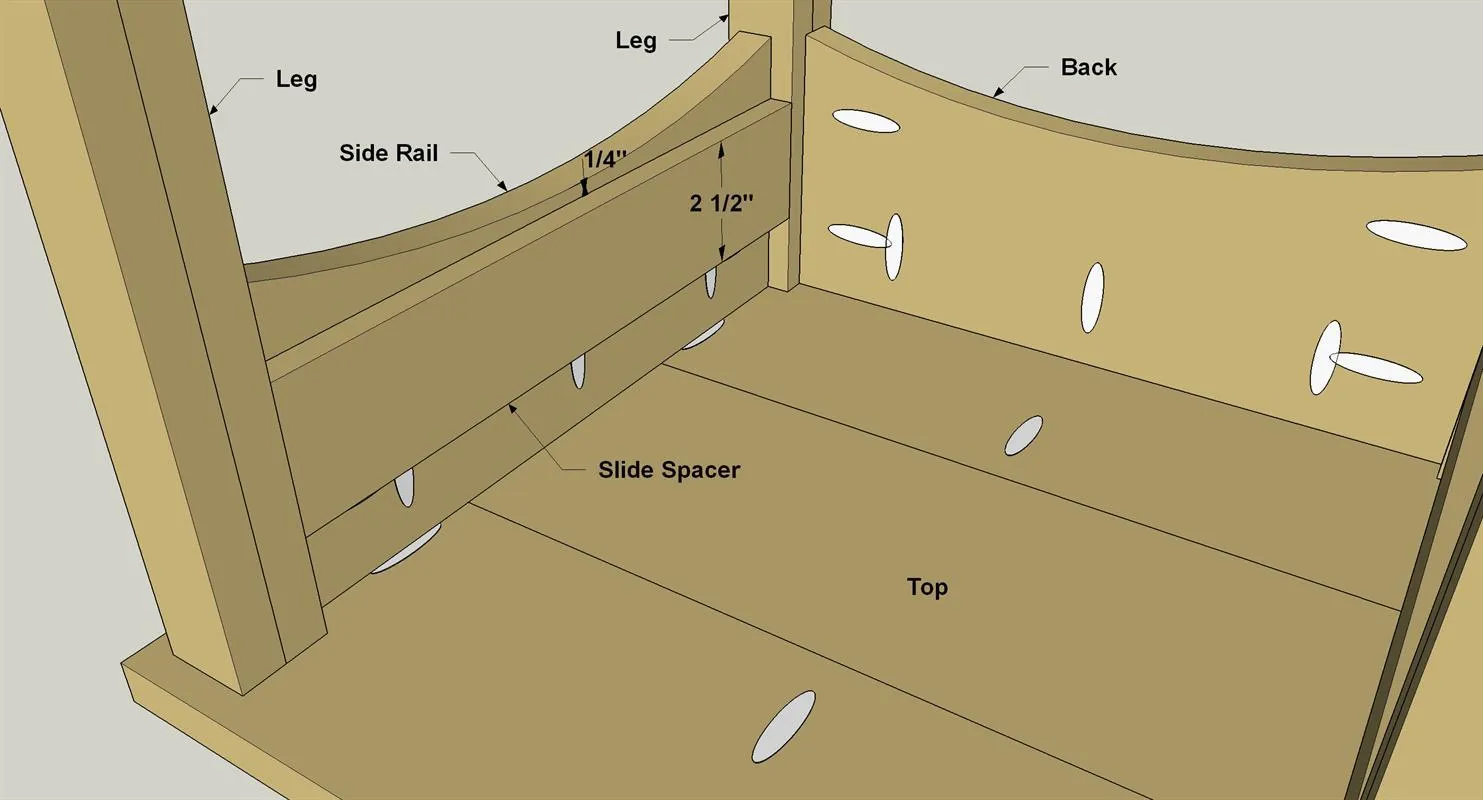
10. Add a Pair of Drawer Slide Spacers
- Cut two Drawer Slide Spacers to length from a 1/2" x 3" pine board, as shown in the cutting diagram.
- Attach the Drawer Slide Spacers to the inside face of the Side Rails with glue and 1" brad nails as shown. Note the 1/4" space between the lower edge of the Spacer and the center of the Rail arch.
11. Make the Drawer Box
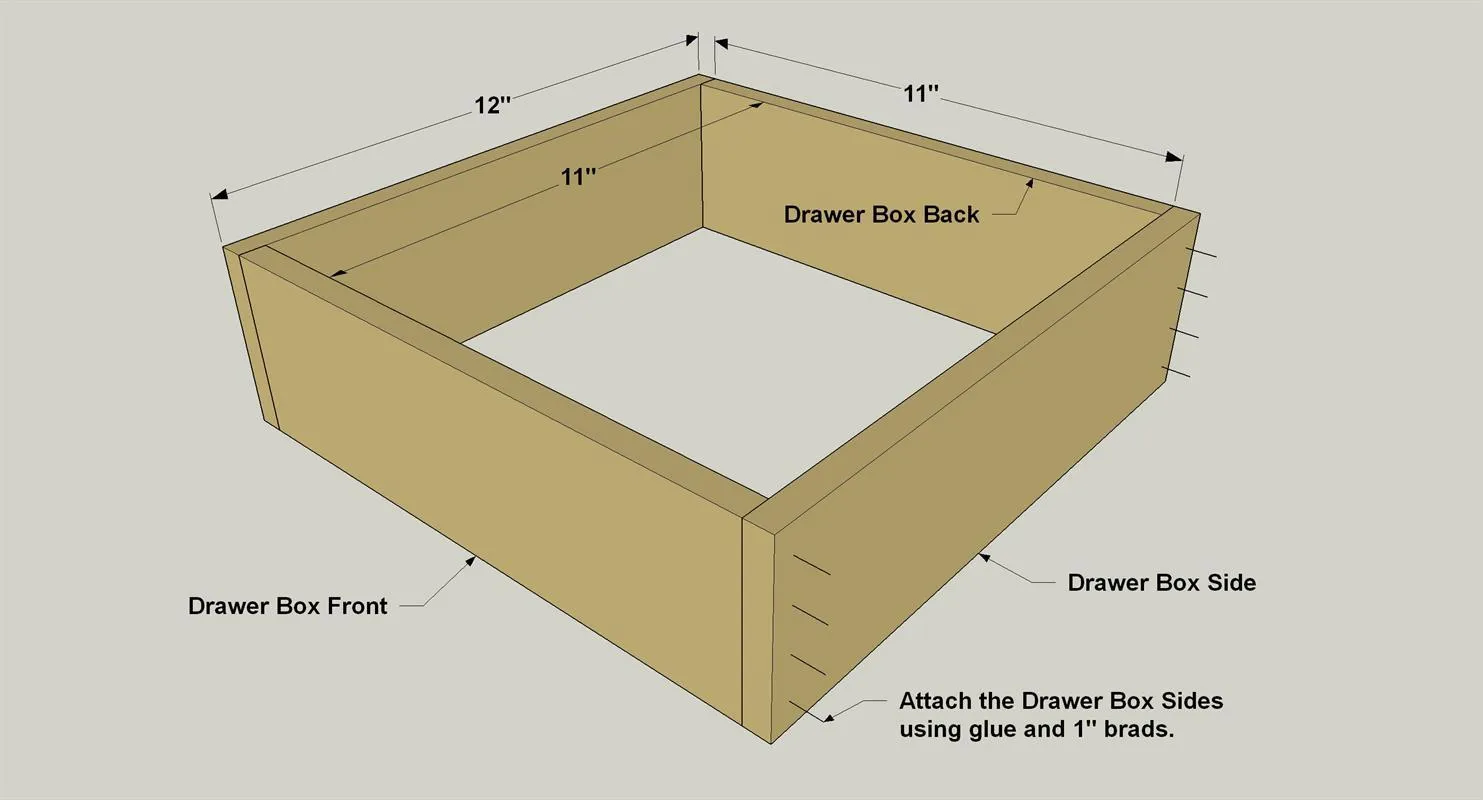
- Cut a Drawer Box Front, Drawer Box Back, and two Drawer Box Sides to length from a 1/2" x 4" pine board, as shown in the cutting diagram.
- Position the Drawer Box Front and Drawer Box Back between the Drawer Box Sides, as shown.
- Then assemble the Drawer Box using wood glue and 1" brad nails as shown. If you have access to a brad nailer, this makes the process easier. If not, clamp the assembly, drill pilot holes, and then drive in the nails.
12. Make a Drawer Bottom
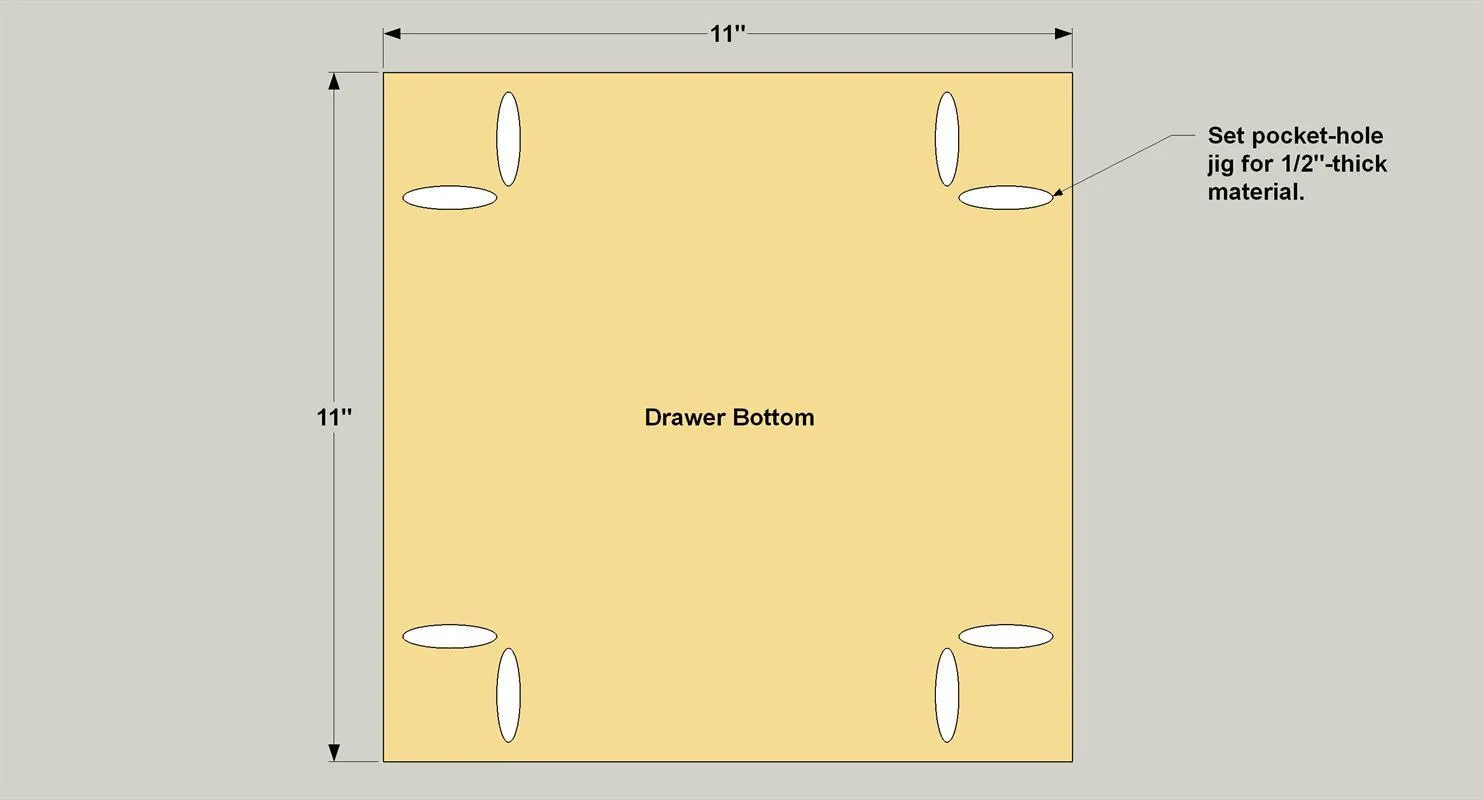
Cut a Drawer Bottom to size from 3/4" plywood as shown in the cutting diagram. Set your pocket-hole jig and bit for 1/2"-thick material, and then drill pocket holes at the locations shown.
13. Attach the Drawer Bottom
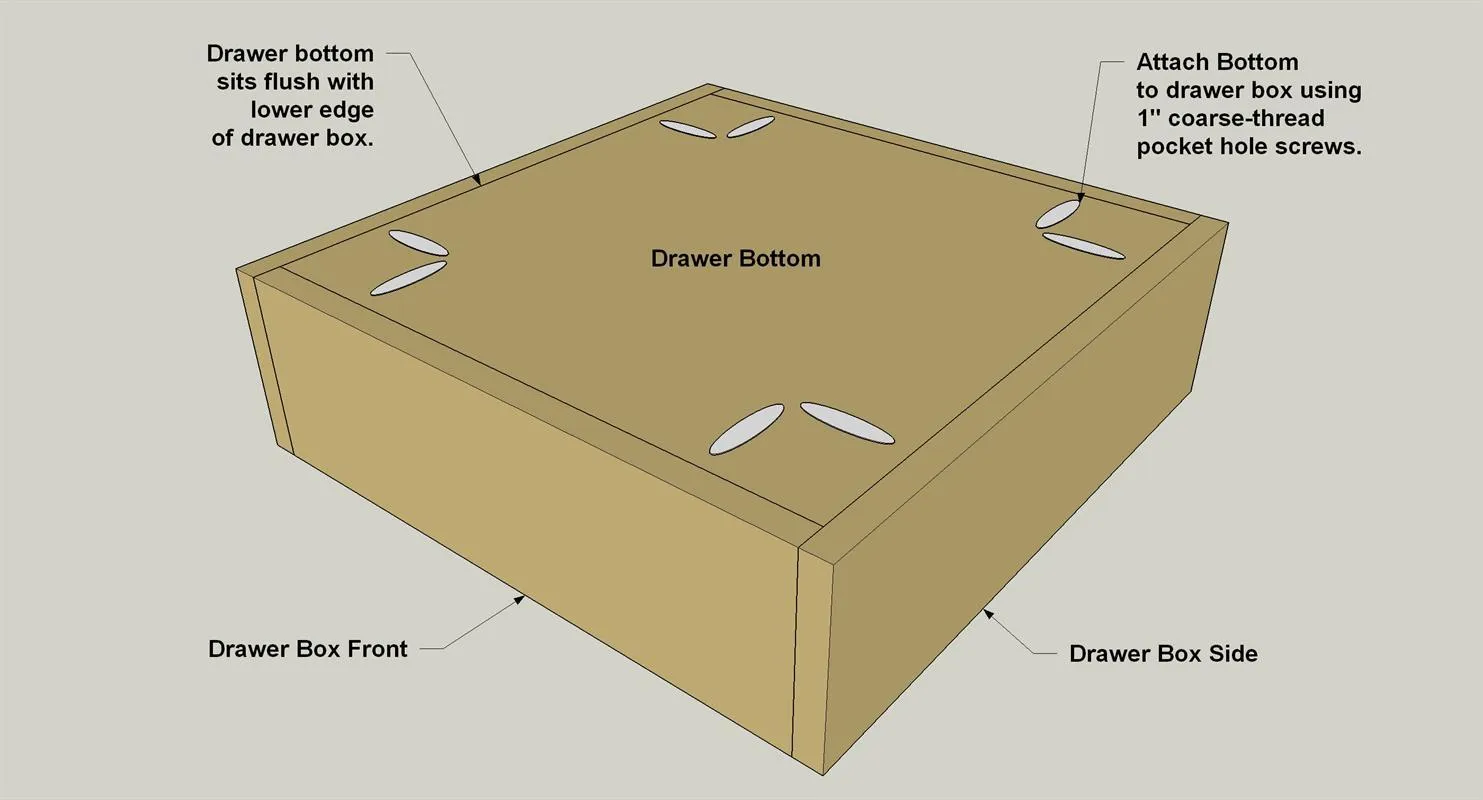
Attach the Drawer Bottom to the Drawer Box with 1" coarse-thread pocket-hole screws.
14. Install the Drawer Slides
Attach the Drawer Slides to the Slide Supports and to the drawer box following the slide manufacturer’s instructions.
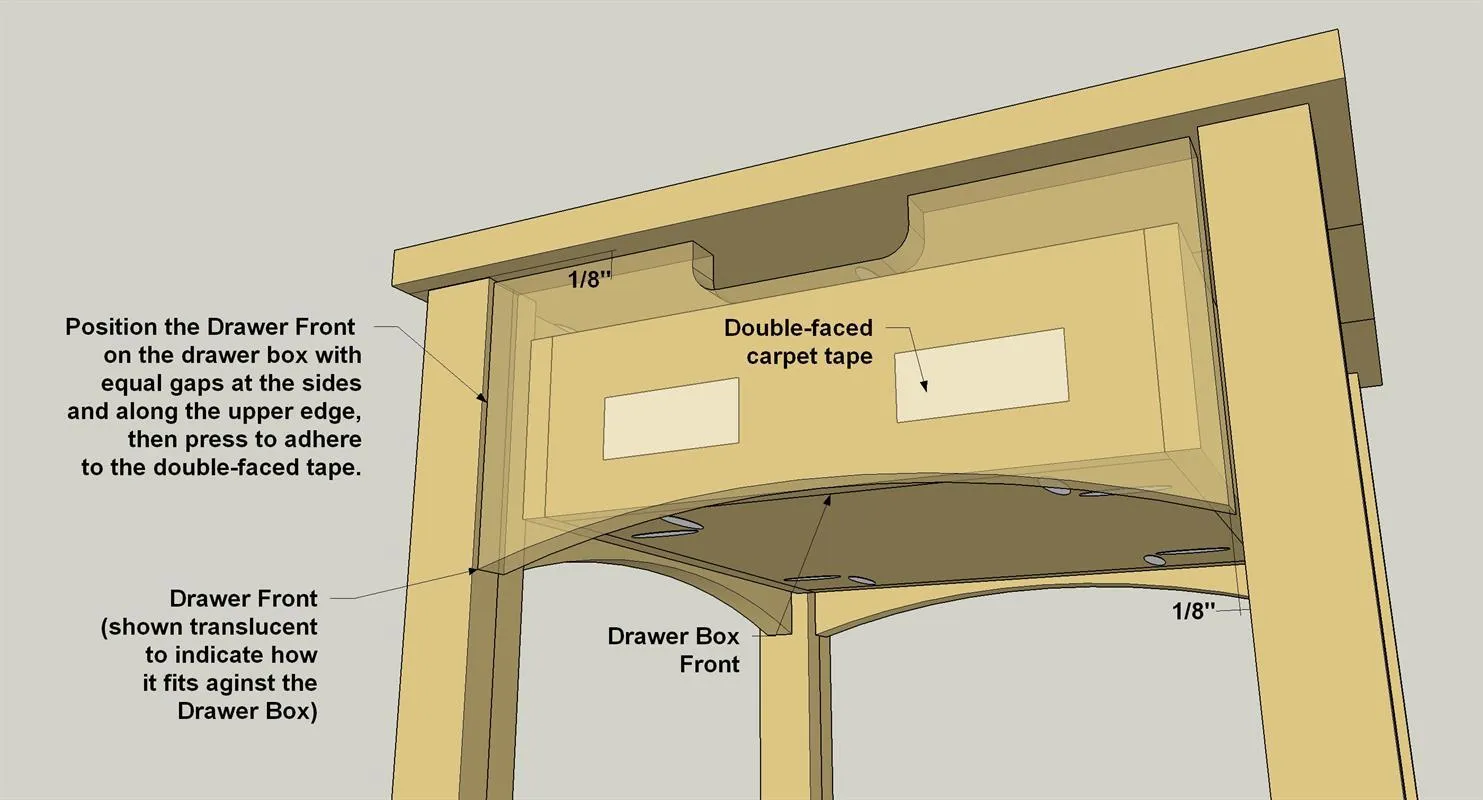
15. Attach the Drawer Front
- Slide the drawer box to its fully closed position in the table.
- Then apply a couple of pieces of double-faced carpet tape to the front of the Drawer Box and peel away the protective paper on the second sticky side.
- Position the Drawer Face as shown, making sure the spacing is equal on the top and the sides. Press the Drawer Front firmly against the tape, and then gently open the drawer.
- Add a couple small clamps to secure the Face to the Drawer.
- Drill two pilot holes from inside the drawer box, and secure the Drawer Face to the Box with 1" flat-head wood screws.
16. Apply a Finish
Sand the table as needed to prepare for a final finish, then wipe away all dust. With that done, you can apply the finish or stain of your choice. We wiped on a couple of coats of Tried and True oil finish to highlight the natural color of the cherry.