 Notch
- Difficulty
- Easy
- Time
- 1.5–3 hours
- Cost
- $$
About this build
This DIY planter is made out of 3/4" plywood and coated with cement. There is a hole in the top that allows a plant to grow through while hiding an ugly plastic container.
Tools
Essential
- Circular Saw
- Drill / Driver
- Jigsaw
- Pocket Hole Jig
Optional / nice to have
- Bar / Pipe Clamps
Materials
| Item | Qty |
|---|---|
| Sheet 3/4" sanded pine plywood | 1 board |
| Box of 1 1/4" pocket-hole screws (see tools list) | 1 each |
| Sandpaper, various grits | 1 each |
| Bag of feather finish concrete mix | 1 each |
| Drywall sanding mesh, 120 grit | 1 each |
Overall cost: $$. Lumber prices vary by region, species, and season, so we give a band rather than a figure we would only be pretending to know.
Cut list
| Part | Qty | T × W × L |
|---|---|---|
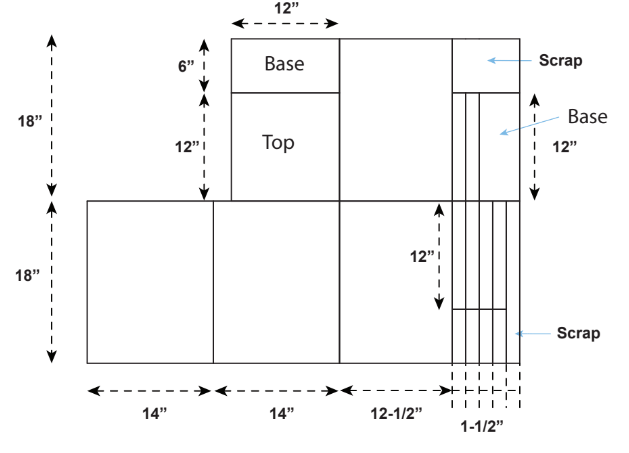
| Side panels | 2 | 3/4" × 14" × 18" |
| Side panels | 2 | 3/4" × 12" × 18" |
| Top | 1 | 3/4" × 12" × 12" |
| Base | 1 | 3/4" × 6" × 12" |
| Base | 1 | 3/4" × 4" × 12" |
| Strips | 6 | 3/4" × 1" × 12" |
| Strips | 4 | 3/4" × 1" × 6" |
What to buy
Buy 6 boards at 8 ft.
3/4" × 14"
1 board
3/4" × 12"
1 board
3/4" × 6"
1 board
3/4" × 4"
1 board
3/4" × 1"
2 boards
Assumes 8 ft stock, a 1/8" saw kerf, and buying each part at its own width. Change the board size or kerf on the full board plan →
Instructions
1Cut the plywood
Cut the basic pieces with a circular saw guided by the Kreg Straight Edge Guide.
2Cut the top
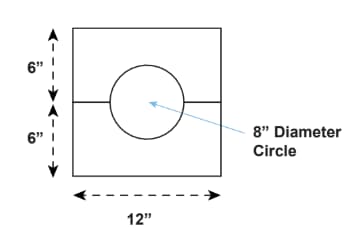
Cut a circle in the top with a jig saw, then cut it in half to get two panels that can go around the plant.
3Assemble and apply concrete
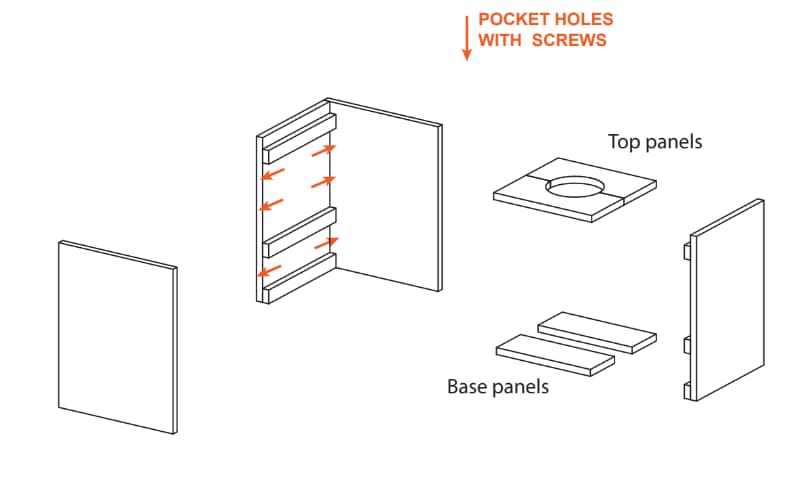
Screw the 1-1/2" wide strips to the narrow side panels to make ledges for the top and base plates. Use pocket holes to attach the side panels to make a square plywood tube. Coat the entire outside with feather finish concrete mix.
Tags
- Outdoor Living
- Beginner
Reviews & builds
No reviews yet
Sign in to review this plan or share your build.
No reviews yet. Be the first to build this.