 Notch
Notch- Difficulty
- Easy
- Time
- 2.5–4.8 hours
- Cost
- $$$$
About this build
This kids' craft table has a bucket in the center to store art supplies and two secret cubbies underneath for books or small toys. Using store-bought turned legs, this farmhouse-style table is the perfect little workspace for your wee ones to create their masterpieces or ace that pop quiz!
Tools
Essential
- Brad Nailer
- Circular Saw
- Drill / Driver
- Jigsaw
- Pocket Hole Jig
- Random Orbit Sander
Optional / nice to have
- Bar / Pipe Clamps
- Combination Square
- Tape Measure
Materials
| Item | Qty |
|---|---|
| Part #1240, Osborne Wood Farm End Table Legs 21" x 2-1/2" | 4 board |
| Board, 1x4 96" | 1 board |
| Board, 1x3 96" | 1 board |
| Plywood, 3/4" Thick Half Sheet | 1 board |
| Board, 1x2 96" | 2 board |
| 1-1/4" Pocket Hole Screws | 1 each |
| 1-1/4" Brad Nails | 1 each |
| Wood Glue | 1 each |
Overall cost: $$$$. Lumber prices vary by region, species, and season, so we give a band rather than a figure we would only be pretending to know.
Cut list
| Part | Qty | T × W × L |
|---|---|---|
| Long Aprons | 2 | 3/4" × 3 1/2" × 41" |
| Turned Legs | 4 | 2 1/2" × 2 1/2" × 21" |
| Short Aprons | 2 | 3/4" × 2 1/2" × 17" |
| Cubby Bottoms | 2 | 3/4" × 8" × 19" |
| Top | 1 | 3/4" × 24" × 48" |
| Table Top Trim | 2 | 3/4" × 1 1/2" × 49 1/2" |
| Table Top Trim | 2 | 3/4" × 1 1/2" × 25 1/2" |
| Cubby Backs | 2 | 3/4" × 2 1/2" × 19" |
What to buy
Buy 7 boards at 8 ft.
2 1/2" × 2 1/2"
1 board
3/4" × 24"
1 board
3/4" × 8"
1 board
3/4" × 3 1/2"
1 board
3/4" × 2 1/2"
1 board
3/4" × 1 1/2"
2 boards
Assumes 8 ft stock, a 1/8" saw kerf, and buying each part at its own width. Change the board size or kerf on the full board plan →
Instructions
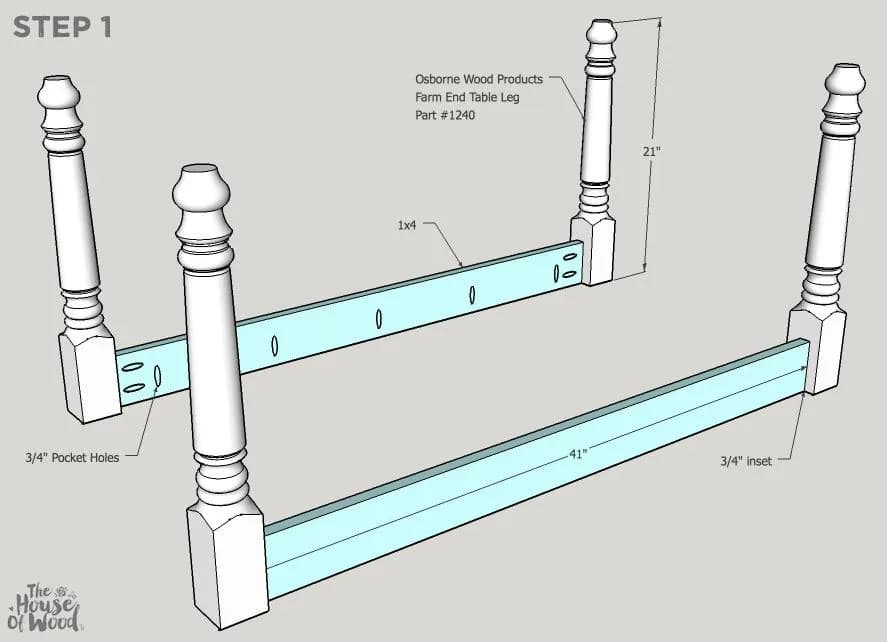
1Attach the Long Aprons
- Drill 3/4" pocket holes facing up and out into the long aprons.
- Space pocket holes approximately 6"-8" apart.
- Attach the long aprons to the turned legs with 1-1/4" pocket hole screws and wood glue. The aprons should be 3/4" inset from the outside of the legs. The upward-facing pocket holes in long aprons will be to attach the table top in later steps.
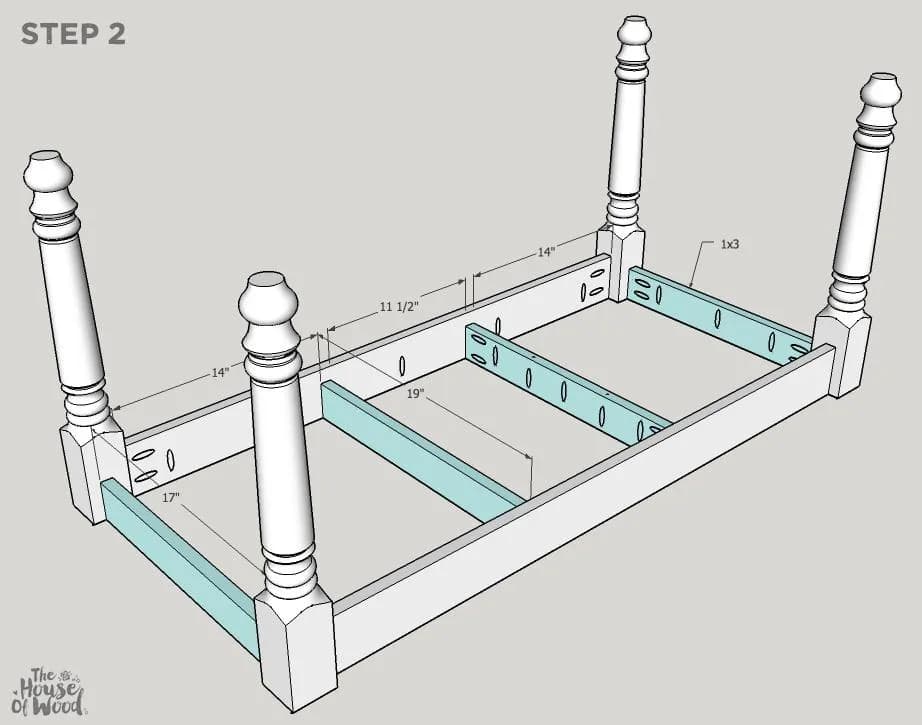
2Assemble the Carcass
Drill 3/4" pocket holes into the 1x3 boards as shown. Notice that the two middle 1x3 boards have pocket holes drilled facing both up and down. The downward-facing pocket holes will be to attach the secret cubby shelf in the next step. Use 1-1/4" pocket hole screws and wood glue.
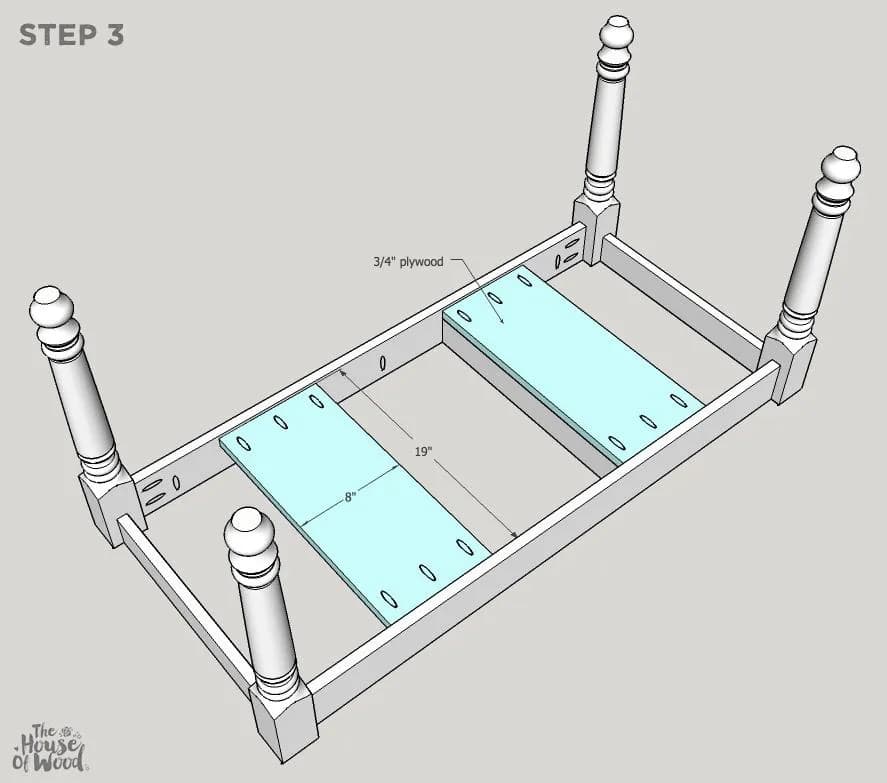
3Attach the Secret Shelves
Drill 3/4" pocket holes into the 3/4" plywood shelves as shown and attach it to the long aprons with 1-1/4" pocket hole screws and wood glue. Attach the 1x3 boards to the shelf with 1-1/4" pocket hole screws as well. *Tip: use a scrap 1x3 piece to keep the shelf level while you're attaching it.
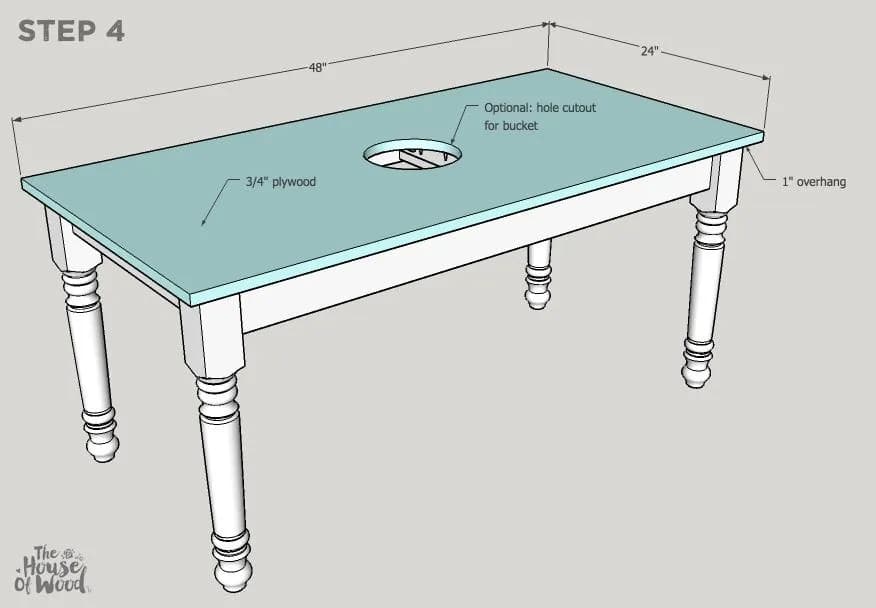
4Attach the Top
- Center the top over the base and attach it by screwing 1-1/4" pocket hole screws from the aprons to the table top. Allow for a 1" overhang on all four corners.
- Measure your bucket and use a jigsaw to cut the hole accordingly so that you can drop the bucket in place to store art supplies.
5Add Trim
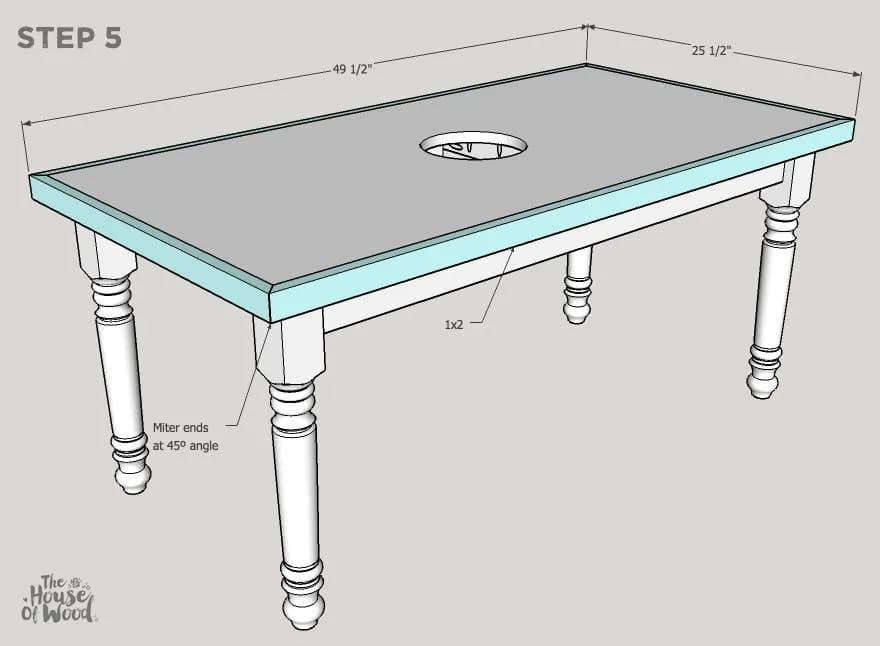
Measure and miter cut the ends of the 1x2 trim at 45º angle. Use wood glue and 1-1/4" brad nails to attach it to the perimeter of the table top.
6Visit www.JenWoodhouse.com
Visit www.JenWoodhouse.com for more free building plans and project tutorials.
Tags
- Arts and Crafts
- Beginner
Reviews & builds
No reviews yet
Sign in to review this plan or share your build.
No reviews yet. Be the first to build this.