 Notch
Notch- Difficulty
- Intermediate
- Time
- 6–12 hours
- Cost
- $$$
About this build
Game On! You can pack a lot of fun in a small space by building this multipurpose game table. It features a chess/checker board and a backgammon board on a two-sided insert, plus storage underneath that you can customize to hold game pieces. A shelf underneath holds board-game boxes.
Tools
Essential
- Brad Nailer
- Circular Saw
- Drill / Driver
- Hammer
- Jigsaw
- Miter Saw
- Pocket Hole Jig
- Random Orbit Sander
Optional / nice to have
- Bar / Pipe Clamps
- Combination Square
- Tape Measure
Materials
| Item | Qty |
|---|---|
| Board, 3x3 36" | 2 board |
| Board, 1x6 96" | 2 board |
| Square Dowel, 3/4" x 3/4" 36" | 1 board |
| Board, 1/2" x 2 (1 1/2" actual) 48" | 3 board |
| Plywood, 3/4" Thick 24" x 24" | 3 board |
| Square Dowel, 1/2" x 1/2" 36" | 1 board |
| Square Dowel *Quantity varies*, 1/2" x 1/2" 36" | 2 board |
| 100-count box of 1 1/4" coarse-thread Kreg pocket-hole screws | 1 each |
| Wood glue | 1 each |
| Roll painter’s tape | 1 each |
| Can spray lacquer | 1 each |
| Package 1 1/4" wire nails | 1 each |
| Set checkers/backgammon pieces | 1 each |
| Set wood chess pieces | 1 each |
Overall cost: $$$. Lumber prices vary by region, species, and season, so we give a band rather than a figure we would only be pretending to know.
Cut list
| Part | Qty | T × W × L |
|---|---|---|
| Leg | 4 | 2" × 2" × 15" |
| Rail | 4 | 3/4" × 5" × 21" |
| Short Top | 2 | 3/4" × 5" × 17" |
| Long Top | 2 | 3/4" × 5" × 28" |
| Cleat Spacer | 2 | 3/4" × 3/4" × 17" |
| Cleat | 2 | 1/2" × 1" × 17" |
| Bottom | 1 | 3/4" × 24" × 24" |
| Shelf | 1 | 3/4" × 24" × 24" |
| Game Board | 1 | 3/4" × 16" × 16" |
| Short Edging | 2 | 1/2" × 1" × 16" |
| Long Edging | 2 | 1/2" × 1" × 17" |
| Center Bar | 1 | 1/2" × 1/2" × 16" |
What to buy
Buy 9 boards at 8 ft.
2" × 2"
1 board
3/4" × 24"
1 board
3/4" × 16"
1 board
3/4" × 5"
2 boards
3/4" × 3/4"
1 board
1/2" × 1"
2 boards
1/2" × 1/2"
1 board
Assumes 8 ft stock, a 1/8" saw kerf, and buying each part at its own width. Change the board size or kerf on the full board plan →
Instructions
1Make the Legs
Start by cutting four Legs to length from 3x3 poplar boards, as shown in the cutting diagram. Sand the edges and ends of the Legs smooth.
2Make the Rails
- From 1x6 material, cut the four Rails to length, as shown in the cut diagram.
- Set your Kreg pocket hole jig for 3/4" thick material and drill pocket holes in each Rail at the locations shown.
- Sand the Rails smooth.
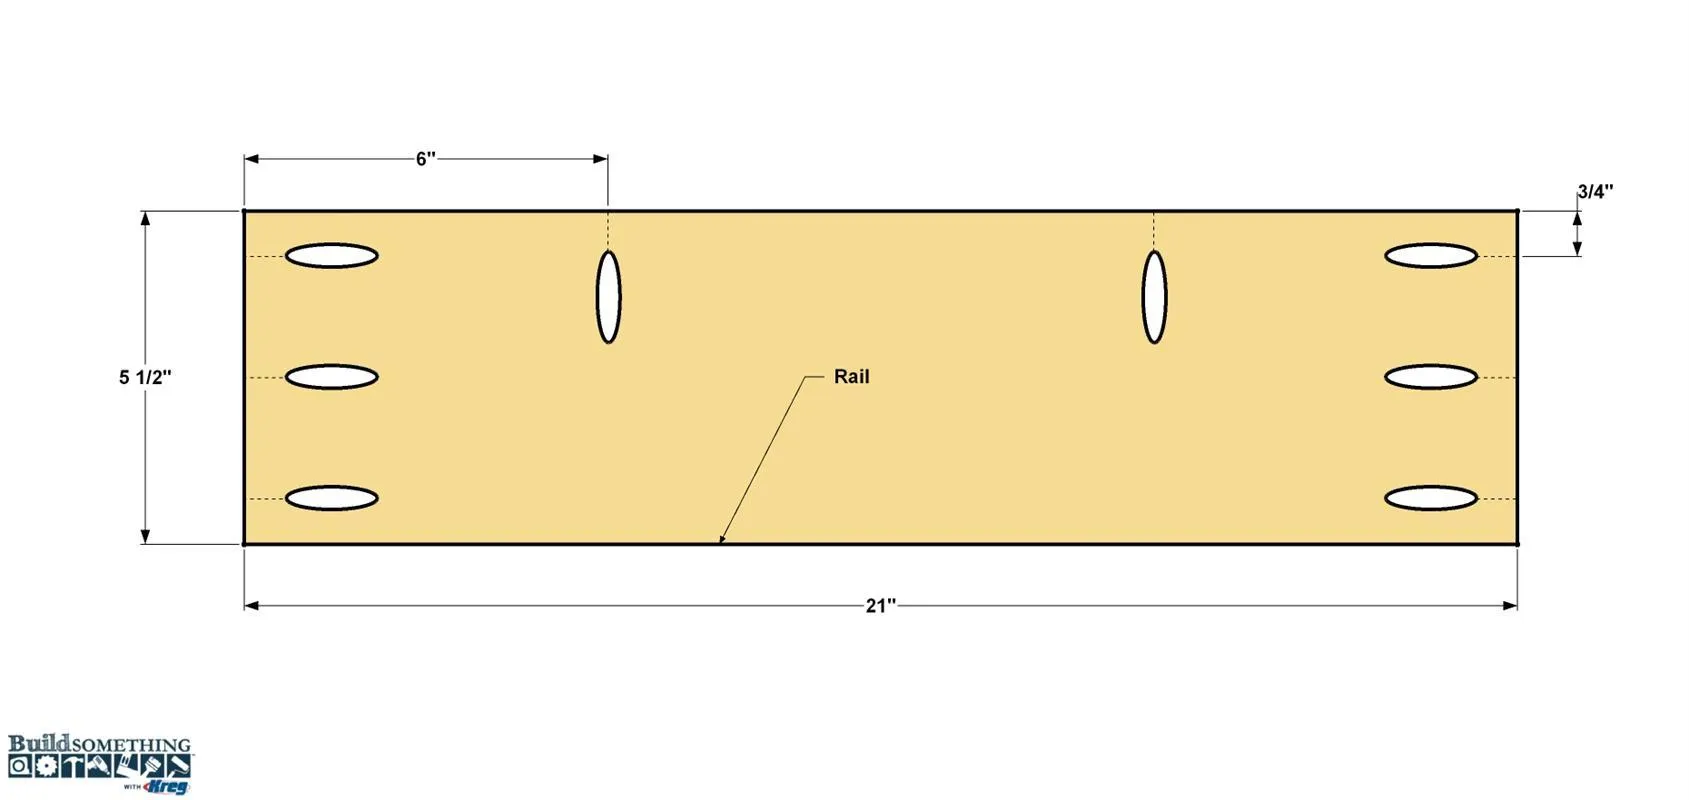
3Assemble the Table Base
- To assemble the table base, first position one Rail between two Legs, as shown. Note that the Rail is inset 1/4" from the outside face of the Legs. You can use a spacer to help hold the Rail in position as you attach the Rail to the Legs using 1 1/4" coarse-thread Kreg Screws.
- Repeat the same process to attach another Rail to the second pair of Legs.
- Then, bring the two assemblies together with the last two Rails as shown.
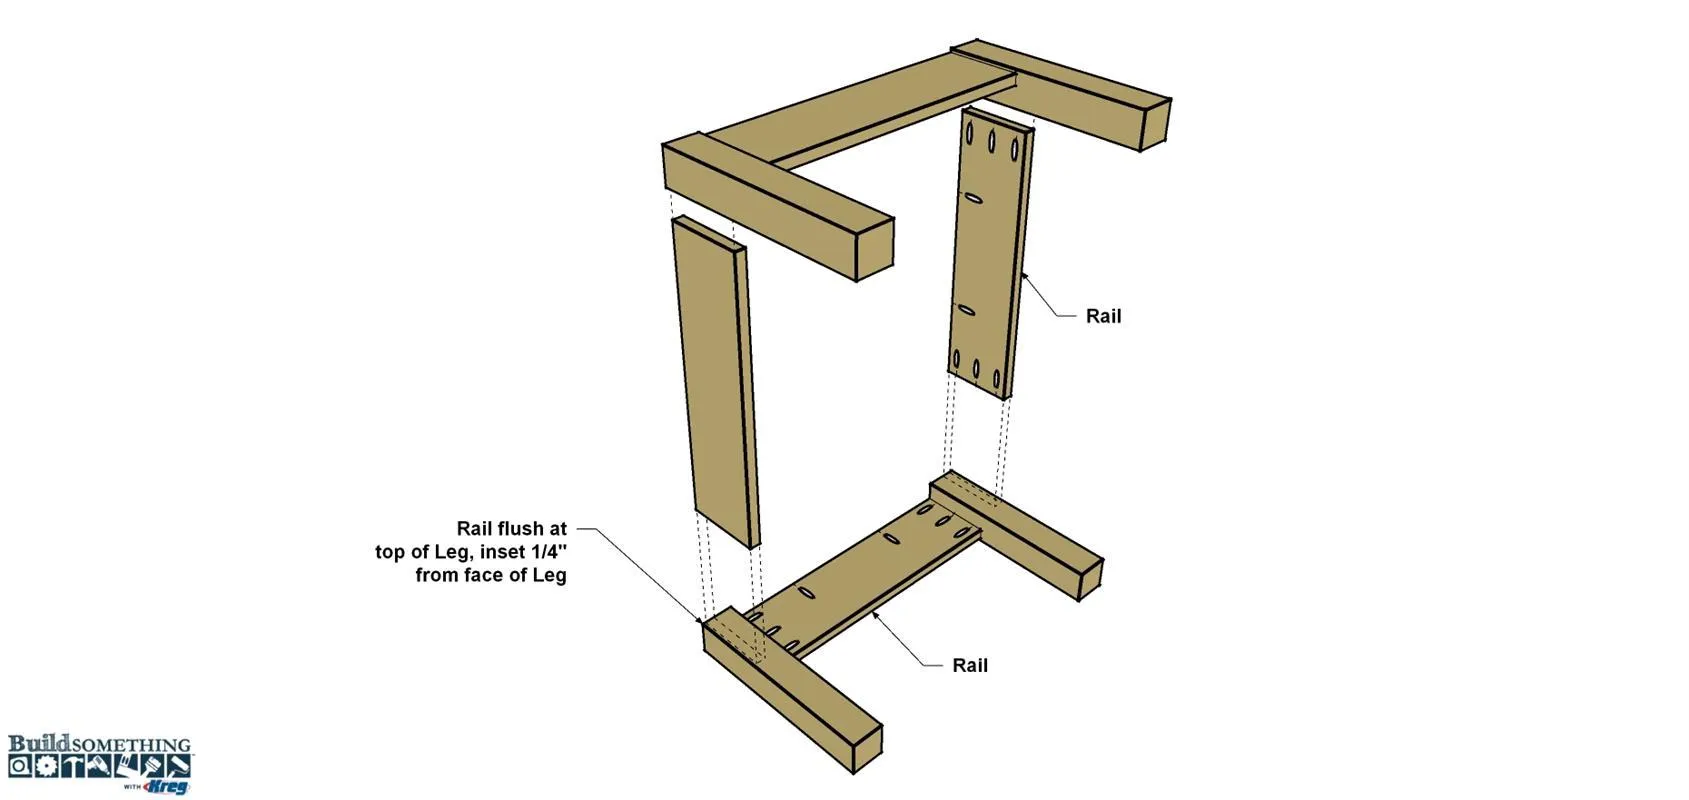
4Make the Top Boards
- From a 1x6 board, cut two Long Top boards and two Short Top boards to length, as shown in the cut diagram.
- Set the Long Top boards aside for the moment.
- Now you can complete the Short Top boards.
- Set your Kreg Jig for 3/4"-thick material and drill pocket holes in each Rail at the locations shown. On one of the Short Top boards, cut a small 3/4" wide notch out of the center of one board using a jigsaw. When the game table is complete, this notch will allow you to insert a finger and remove the game board, so you can flip it over or access the storage area underneath. When done, sand the faces and edges smooth.
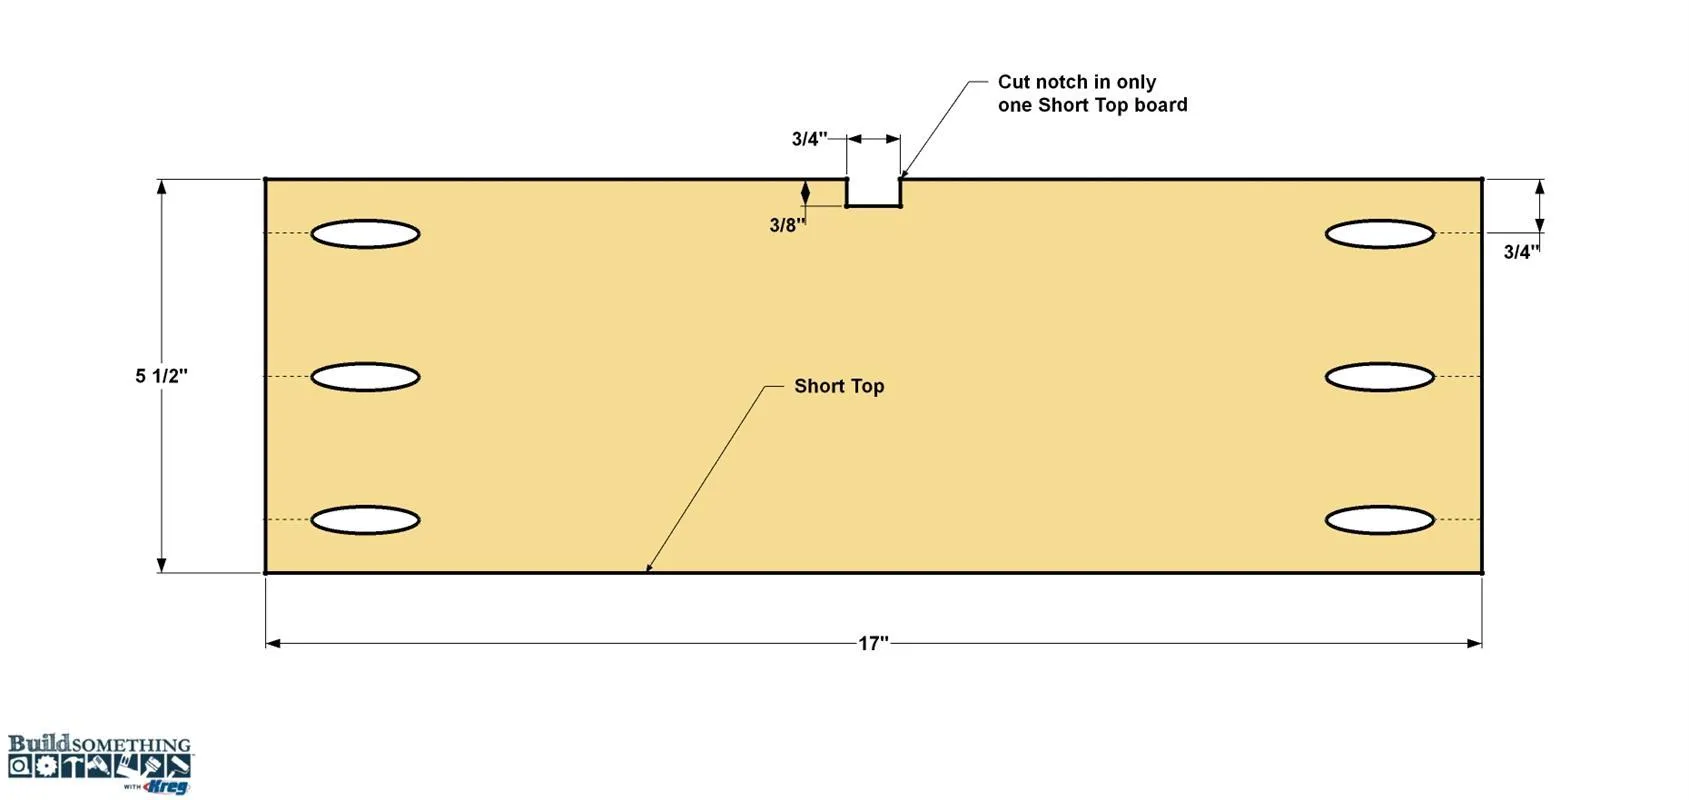
5Assemble the Top
To assemble the table top, position the Short Top and Long Top boards as shown. Secure them using 1 1/4" coarse-thread Kreg Screws. Once assembled, sand the outside edge of the top as needed.
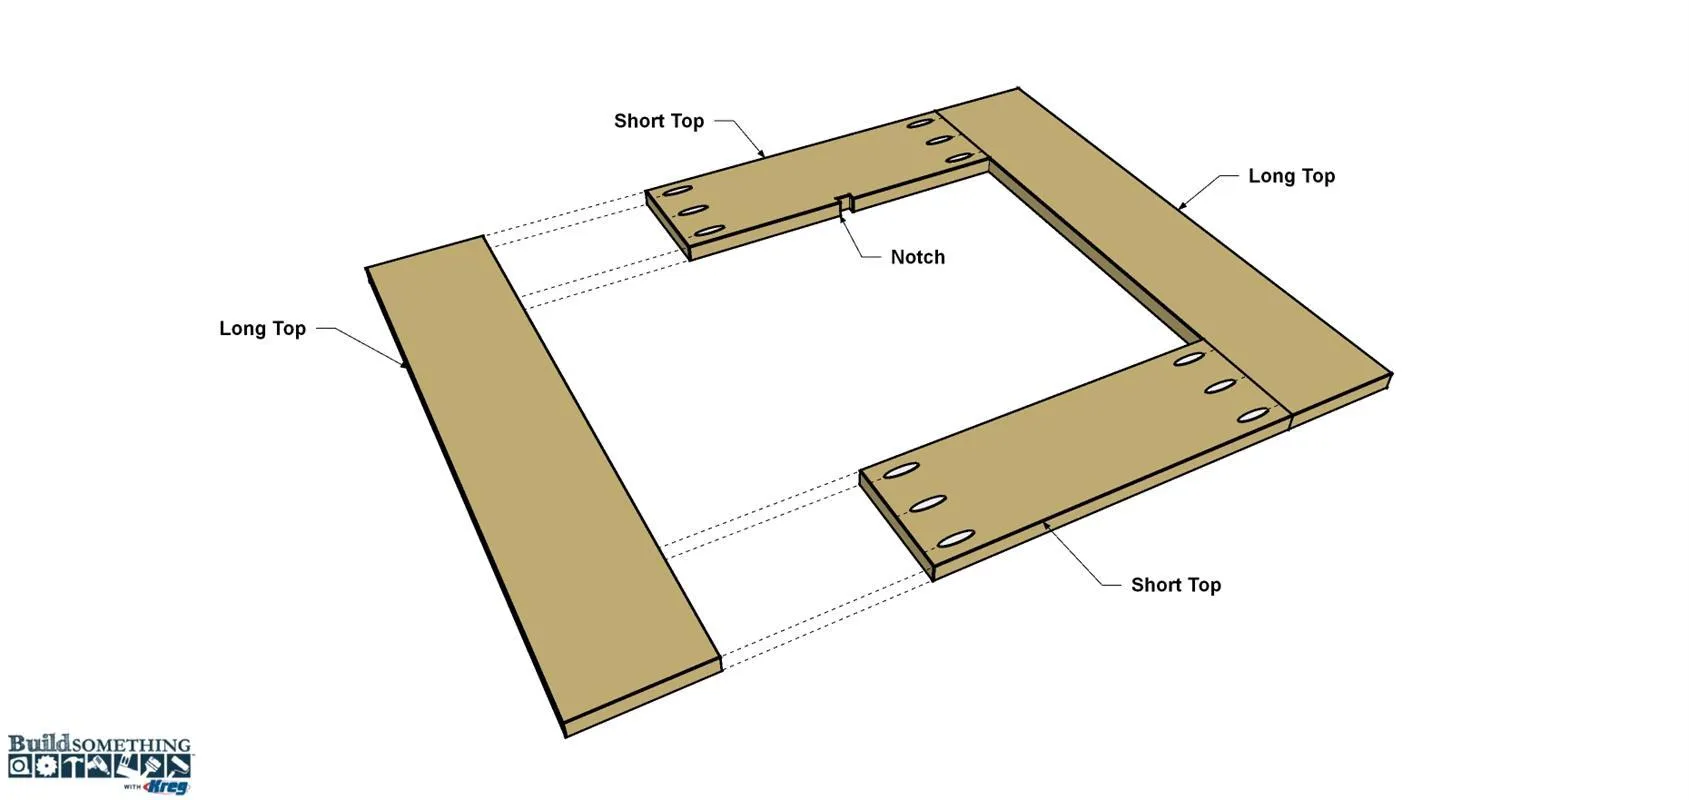
6Cut the Game Board Cleats
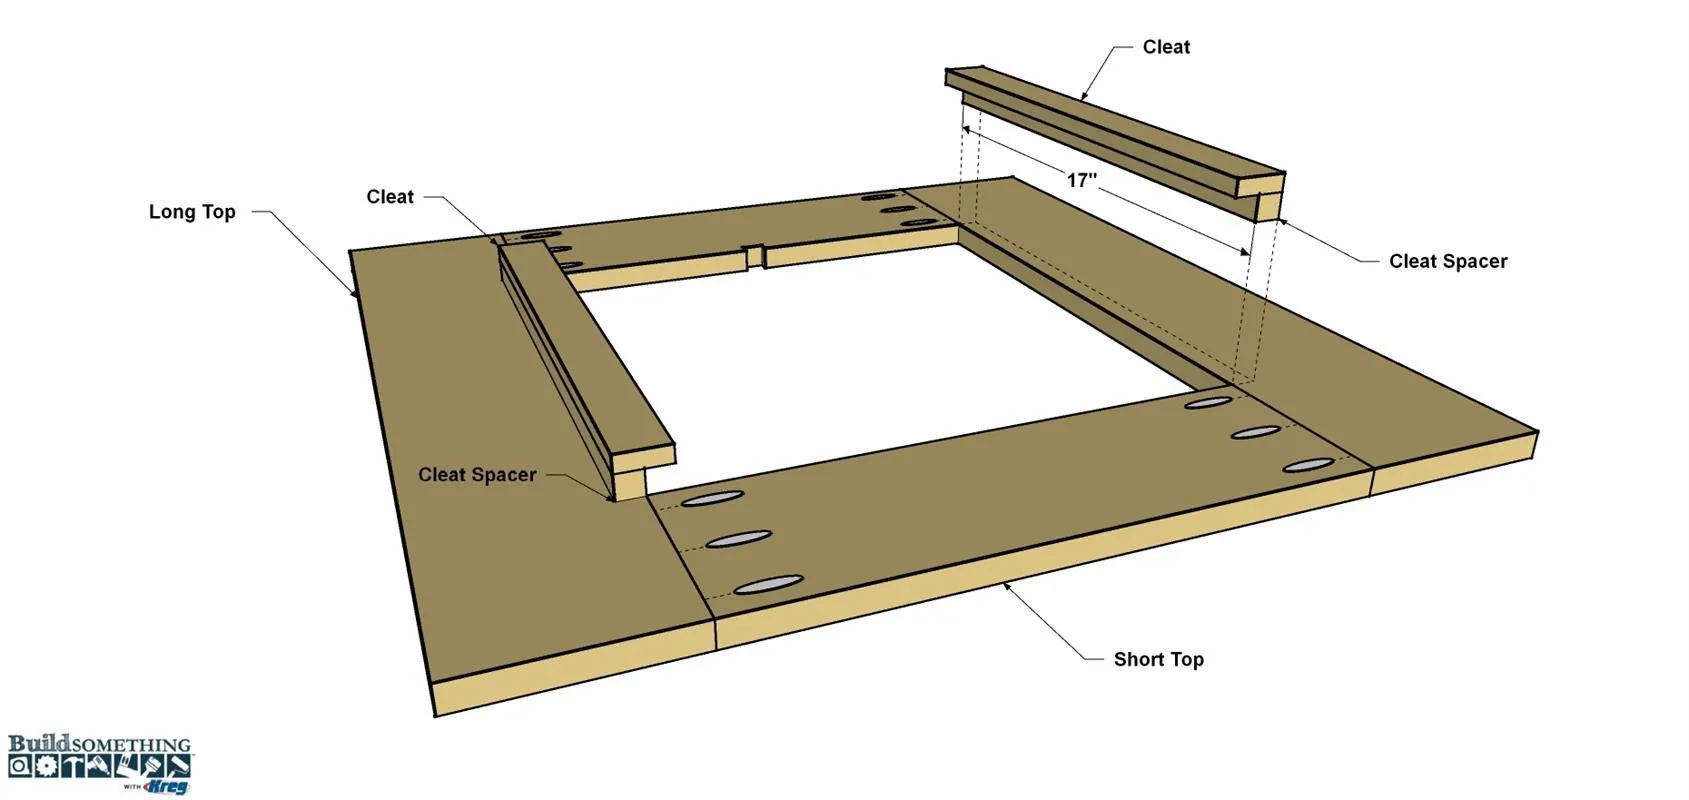
- The game board will rest on a pair of cleats that get attached to the underside of the table top. Each cleat is made from two pieces.
- First, cut two Cleat Spacers to length from a 3/4" square dowel, as shown in the cutting diagram.
- Next, cut two Cleats to the same length from a 1/2" x 2 board (1 1/2" actual width), as shown in the cutting diagram.
7Attach the Game Board Cleats
- To attach the Spacers and Cleats, you’ll use glue and nails. If you have a brad nailer, you can use it. If not, use standard “wire nails” (see the “Materials” tab). To avoid splitting the Spacers and Cleats, chuck one of the nails in your drill, and use it to drill three or four evenly spaced pilot holes in each piece. They can be centered on the width of the Spacers. On the cleats, they should be in a line about 1/4" from one edge.
- Sand the Spacers and Cleats, if needed.
- Spread glue on one edge of each spacer, clamp it to the underside of the top, as shown, and drive in the nails to secure it.
- Add glue to the exposed edge of the Spacer, and then clamp the Cleat in position and nail it on. Do this for both sides.
8Make the Bottom and the Shelf
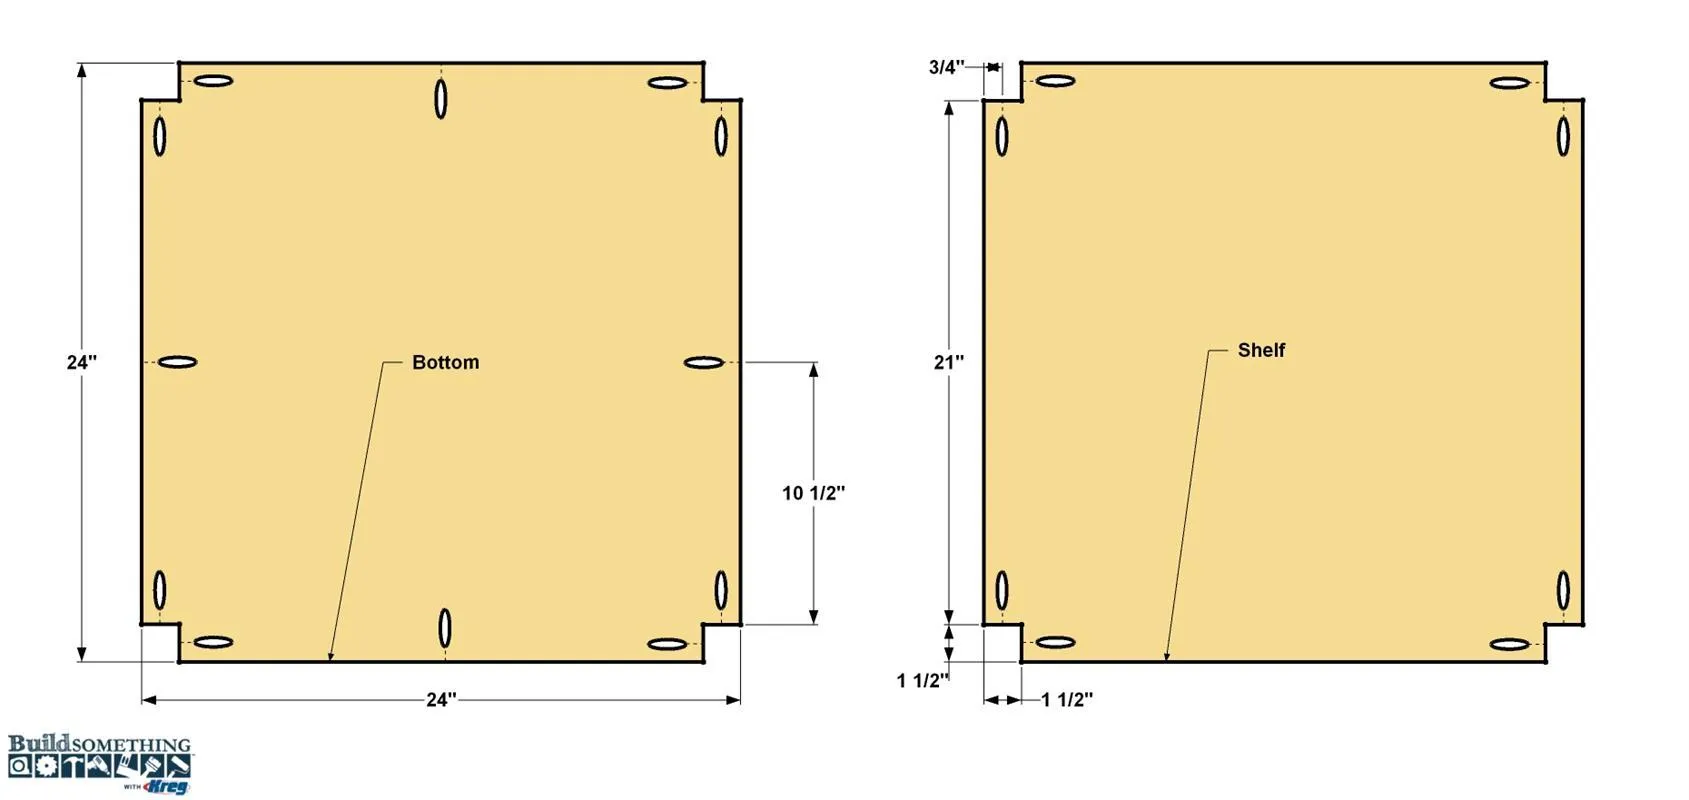
- From 3/4" thick plywood, cut one Bottom panel and one Shelf panel to size, as shown in the cut diagram.
- Next, cut the four corner notches in each panel using a jigsaw.
- Finally, Drill pocket holes at the notches in both pieces, as shown. In just the Bottom panel, drill four additional pocket holes centered on each long edge. These will allow you to secure the Bottom at the center of each Rail for added strength.
- Sand the faces of the Bottom and Shelf smooth.
9Paint Before Assembly
Before moving farther with assembly, this is a great time to paint or stain the table base and the top, since you can get to the inside and outside easily. We used a simple white paint, but you can paint or stain to suit your tastes.
10Attach the Top
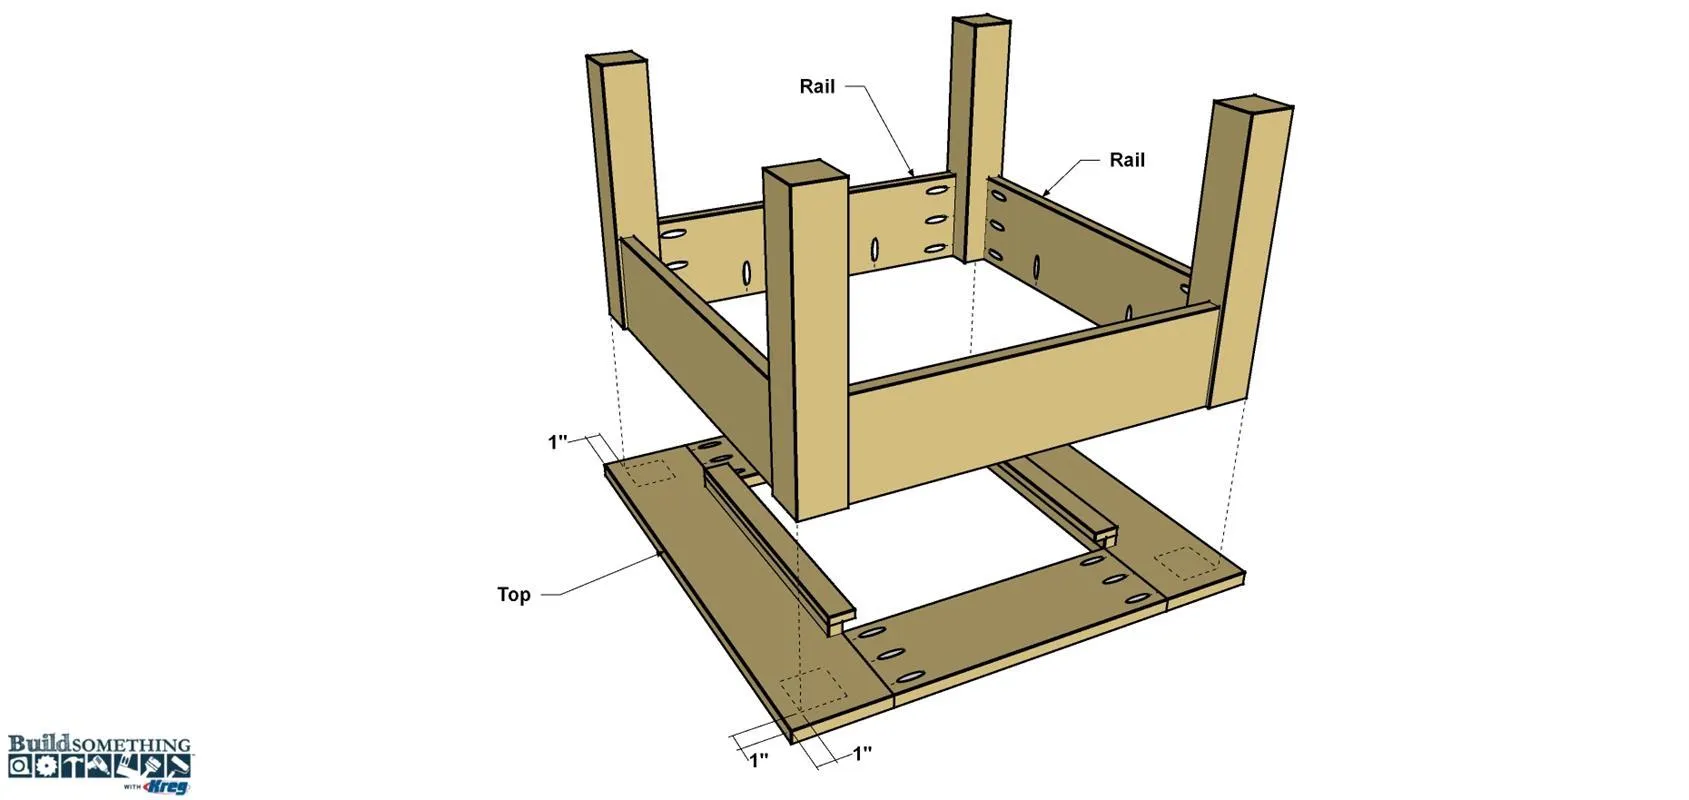
After the paint dries, lay the table top face down (so the cleats are facing up). And then position the table bas on the top, as shown. Make sure the top overhangs the base equally on all sides by measuring at the Legs, as shown. Secure the Top to the Base using 1 1/4" coarse-thread Kreg Screws.
11Attach the Bottom and the Shelf
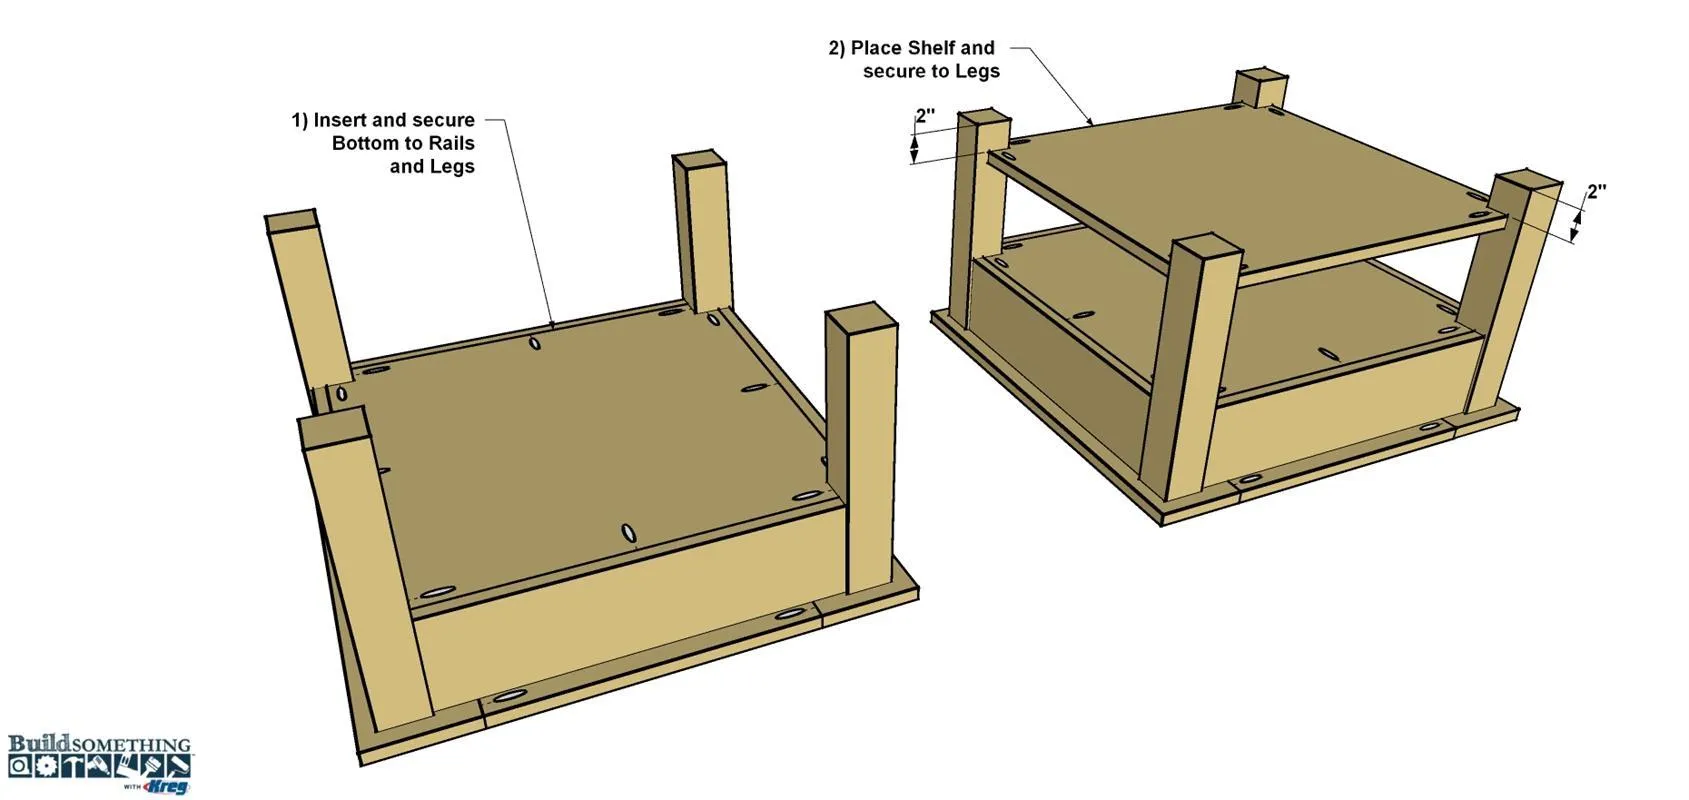
With the table still upside down, position the Bottom panel so it sits flush with the bottom edges of the Rails, as shown. Secure it using 1 1/4" coarse-thread Kreg Screws. Next, position the base at the location shown, and the secure it to the Legs in the same manner.
12Begin the Game Board
- Cut one Game Board to size from 3/4" plywood, as shown in the cut diagram.
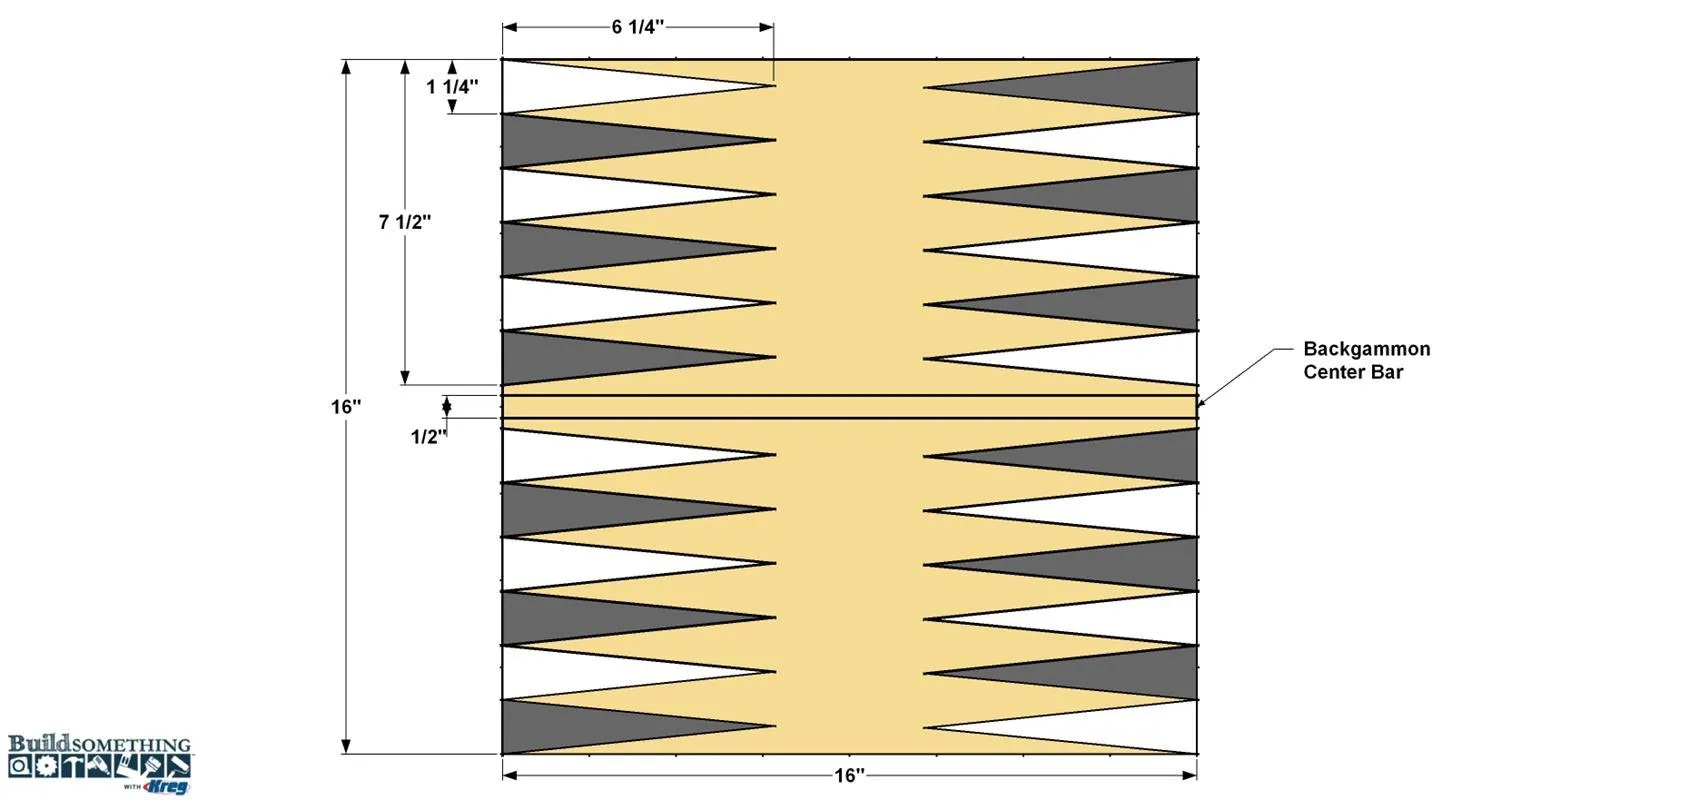
- Then sand the surfaces smooth. On one face—the one that will be the backgammon board—we applied a clear finish. The finish needs to be paintable so that you can add the backgammon board markings. You could use polyurethane, but we chose spray lacquer (see the “Materials” tab). Spray lacquer is easy to apply, and dries quickly, so you can apply a few coats in the space of a half hour or so.
13Paint the Backgammon Pattern
- Once the finish has dried, you can create the game patterns. You can find We started with the backgammon pattern first.
- Lay out the pattern, as shown, on the panel face you applied finish to. You’ll paint with two colors—one lighter and one darker. Mask off one set and apply that color.
- Once it dries, remove the tape and then mask off for the second color, and then apply it. and paint it with a light and dark color of your choice. When the paint is dry flip the board over and mask and paint the checkers/chess pattern on the other side.
14Paint the Chess/Checkers Pattern
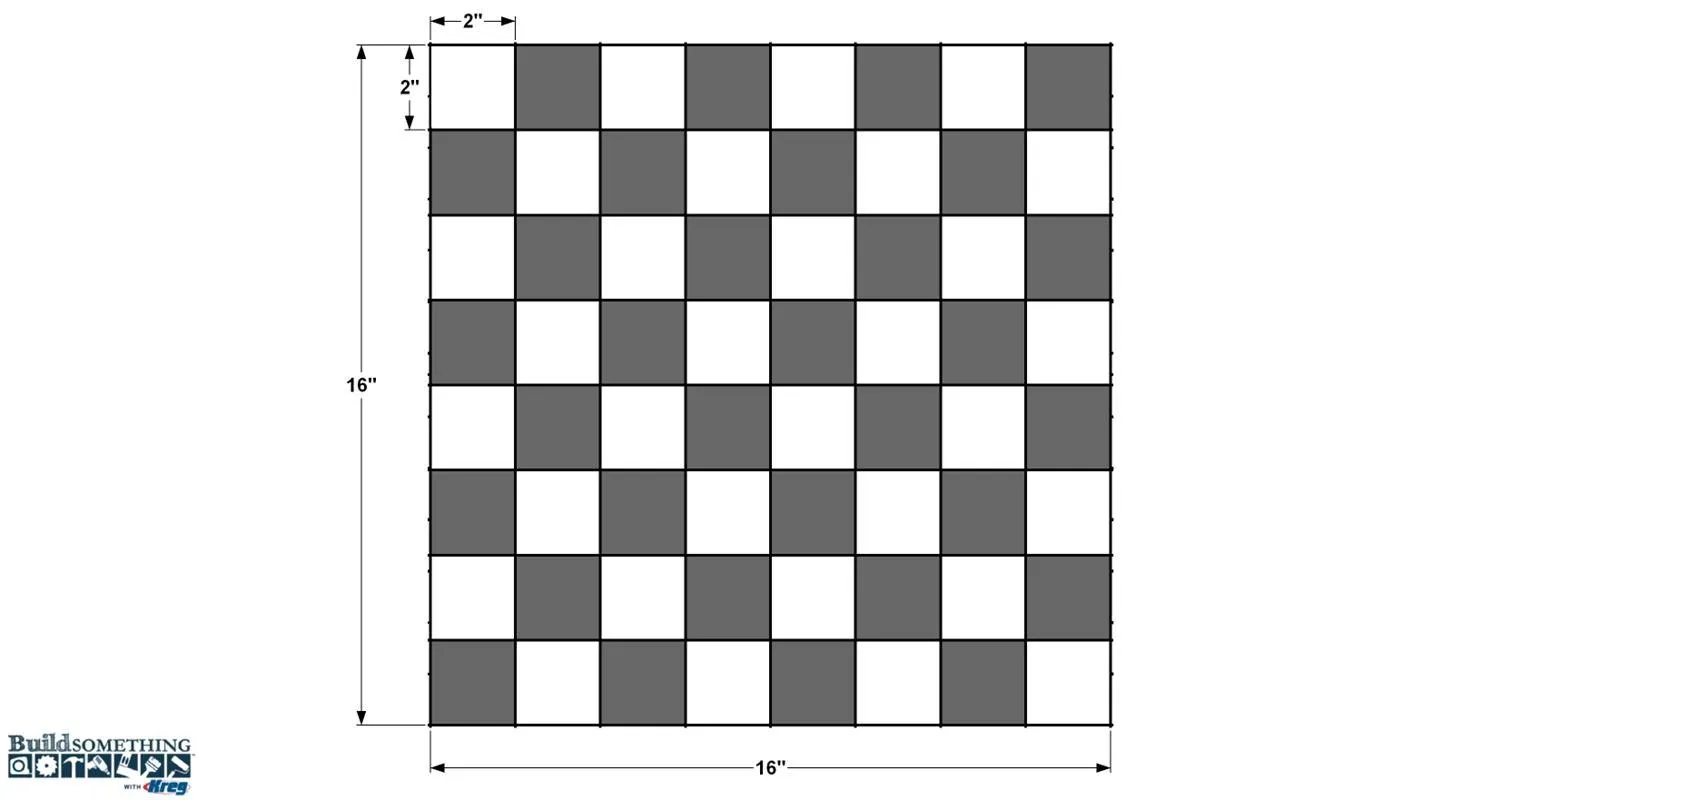
- When the backgammon face is dry, flip the board over and create the checkers/chess board.
- Lay out all the squares, as shown.
- Then mask off and paint the first color. When it dries, remove the tape and then mask off and apply the second color.
15Add the Edging and Center Bar
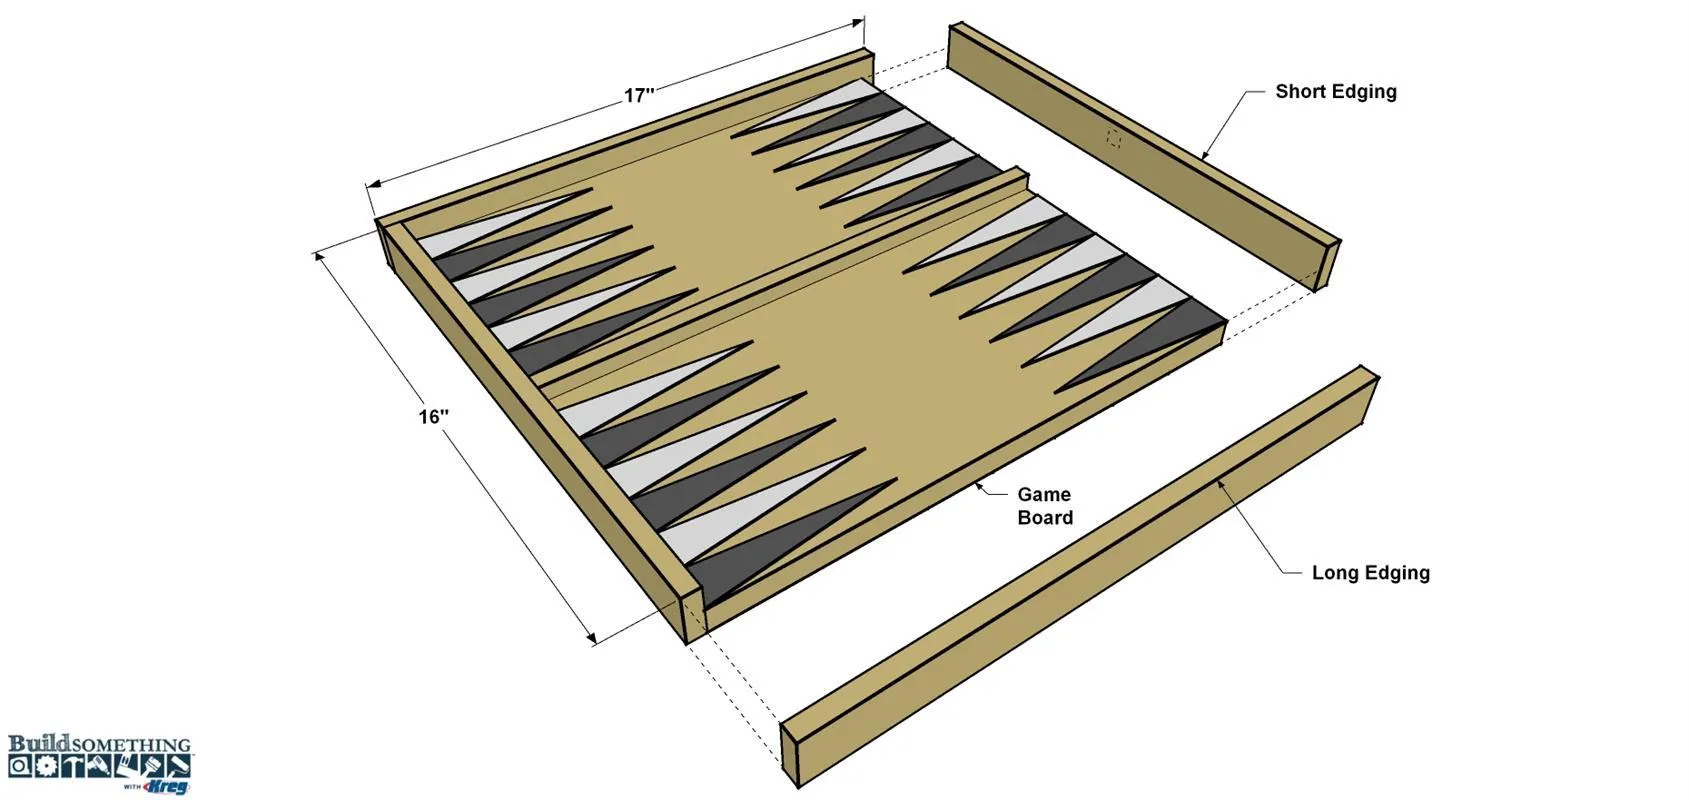
- Cut two Short Edging and two Long Edging from 1/2" x 2 boards, as shown in the cutting diagram. If you’re using standard nails, drill a few pilot holes in each of these, locating them about 1/4" away from one edge.
- Cut the Center Bar to length from a 1/2" x 1/2" square dowel, as well. It won’t need pocket holes.
- Sand the Edging and Center Bar, and then paint them to match your table.
- Once the paint dries, set the Game Board with the backgammon side facing up.
- Spread glue on the two edges of the Game Board that will receive the Short Edging, and then glue and nail them in place.
- Spread glue on the other two edges of the Game Board, and on the ends of the Short Edging.
- Align everything, and then glue and nail the Long Edges on.
16Optional: Add Game Piece Storage
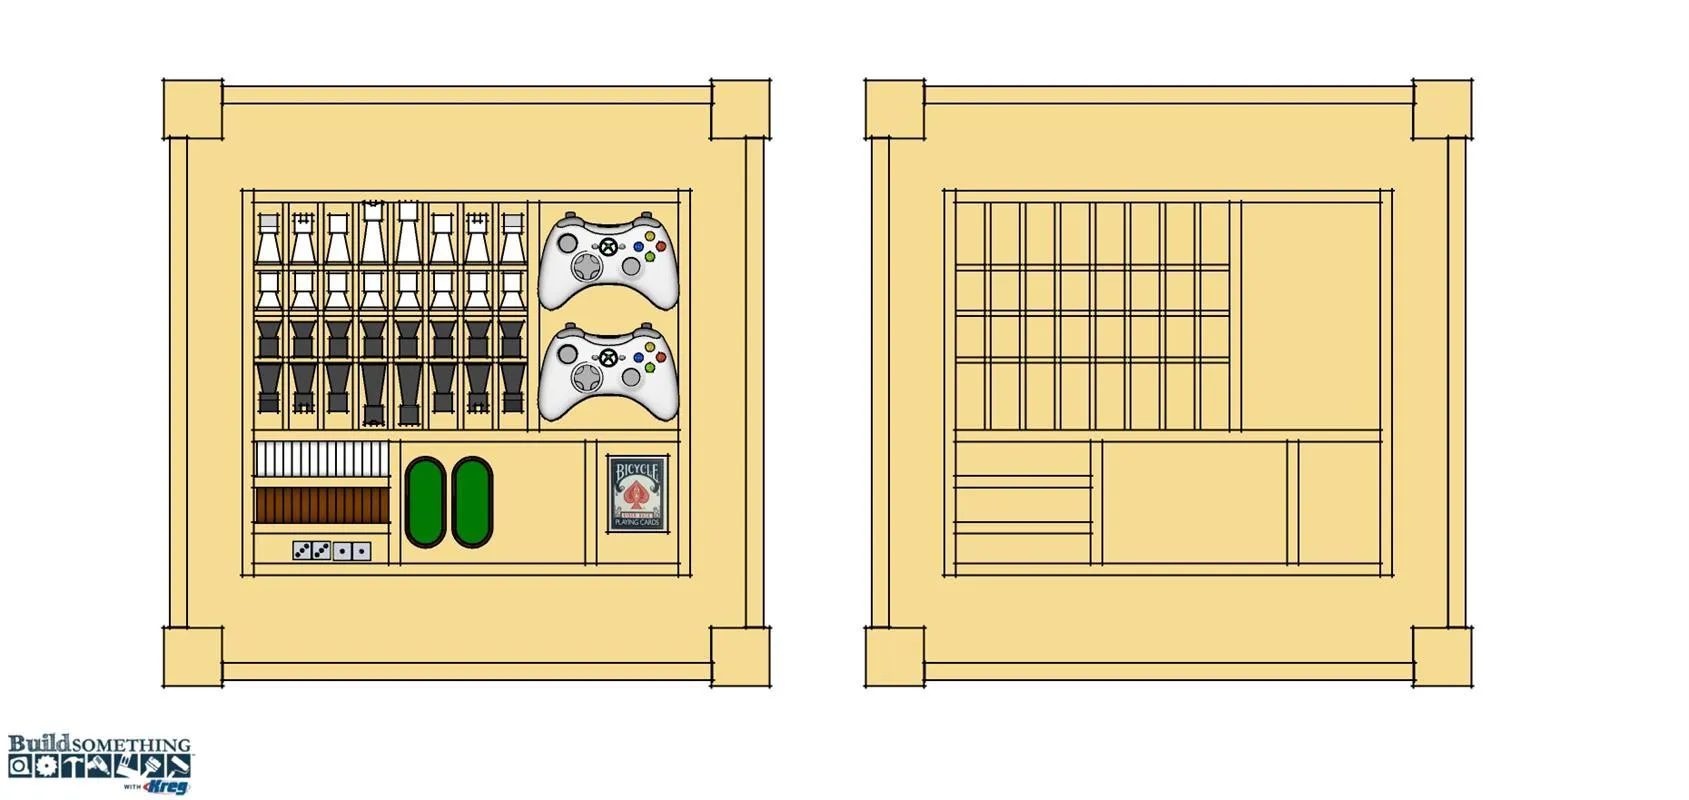
For our game table, we decided to create some storage on the inside to hold the chess and checkers/backgammon pieces, as well as for other game essentials like cards. To do this, we cut 1/2" x 1/2" square dowel to the lengths we needed, and then glued them to the Bottom panel inside the table. If you choose to do this, you’ll need to figure out a layout that works for your game pieces.
Tags
- Coffee Tables
- Intermediate
Reviews & builds
No reviews yet
Sign in to review this plan or share your build.
No reviews yet. Be the first to build this.