 Notch
NotchUse your browser's Print (Ctrl/Cmd + P) and choose Save as PDF. This page works offline once you've opened it with a signal.
Folding Picnic Table
Enjoy eating outside, even if you don’t have space for a full time outdoor table.
- Difficulty
- Intermediate
- Time
- 3.5–6.5 hours
- Cost
- $$$
Cut list
| Part | Qty | T × W × L | Material | ✓ |
|---|---|---|---|---|
| Top edges | 4 | 1" × 1" × 55" | — | ☐ |
| Top center slats | 18 | 1" × 5" × 12" | — | ☐ |
| Leg tops | 4 | 1" × 3" × 24" | — | ☐ |
| Legs | 4 | 1" × 3" × 38" | — | ☐ |
Materials
| Item | Qty | ✓ |
|---|---|---|
| Boards, 2" x 2" 6' long | 4 board | ☐ |
| Boards, 2" x 6" 8' long | 3 board | ☐ |
| Boards, 2" x 4" 8' long | 3 board | ☐ |
| 2 ½” pocket hole screws | 85 each | ☐ |
| 2 ½” long ⅜” hex bolts | 6 each | ☐ |
| ⅜” nuts | 6 each | ☐ |
| ⅜” washers | 6 each | ☐ |
| Wood glue | 1 each | ☐ |
Overall cost: $$$. Lumber varies by region, species, and season, so we give a band rather than a figure.
Tools
- Drill / Driver
- Impact Driver
- Miter Saw
- Pocket Hole Jig
- Bar / Pipe Clamps — optional
Instructions
1. Start assembling the table top pieces
- Cut out all the pieces for the table top according to the cut list.
- Set your pocket hole jig for 1 ½” thick material and drill pocket holes on both edges of the Top Center Slats.
- Attach one side of the slats to one of the Top Edge boards. The side Top Center Slats should be flush with the ends of the Top Edge boards then space the remaining boards so there is a ¾” gap between them. Secure with wood glue and 2 ½” pocket hole screws.
- Repeat for the second top piece.
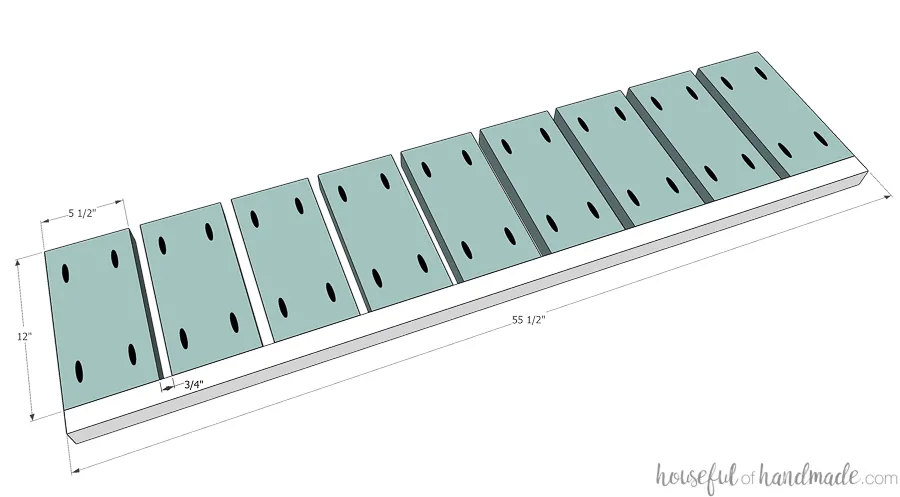
2. Finish the table tops
- Add wood glue to the open ends of the Top Center Slats and attach them to a second Top Edge board. Make sure to line up the ends and leave the ¾” gap between the boards. Secure with wood glue and 2 ½” pocket hole screws.
- Repeat for the second top piece.
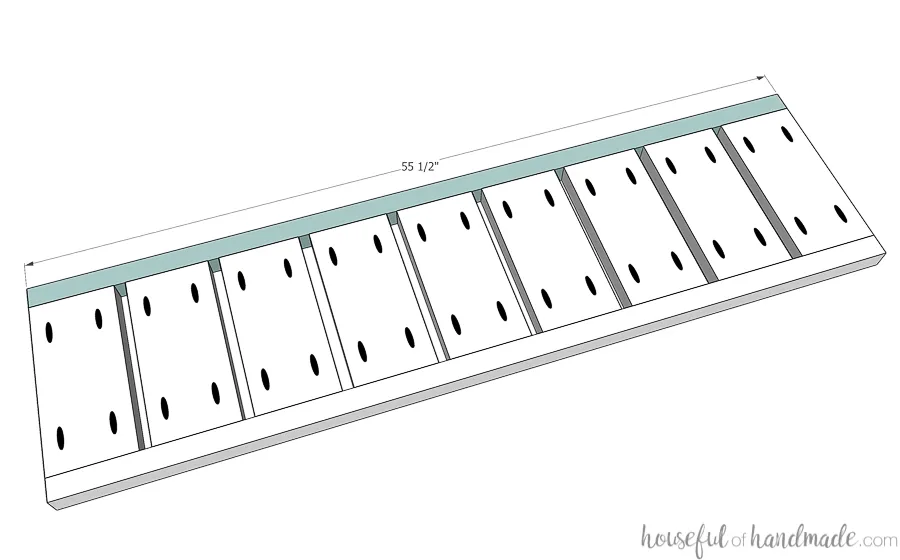
3. Cut leg pieces
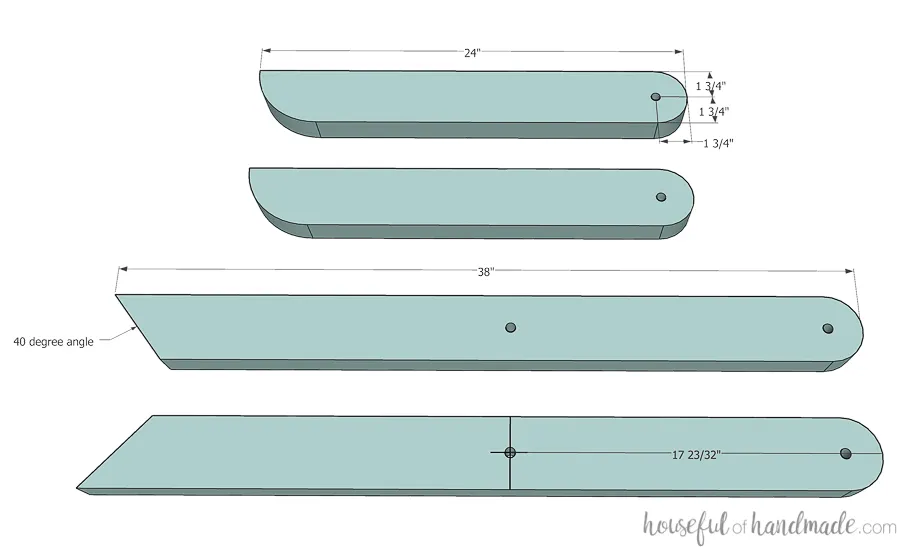
Cut the Leg and Leg Top pieces according to the cut list. For the Leg pieces, cut one end at a 40 degree angle. On one end of the Leg Top pieces, curve the end so it curves from the top to 3 ½” away from the side. On the other end and the non-angled end of the Leg pieces, curve the entire end so it is rounded over.
4. Drill holes in legs
- Measure and mark on the rounded edge of all the leg boards 1 ¾” in from the end.
- Drill a ⅜” hole at this point centered on the board. Use a drill press, guide or jig to make sure the holes are at 90 degree angles to the boards. For the leg boards, also drill a hole 17 23/32” away front the rounded edge in the center of the board.
5. Drill holes for nuts and bolts
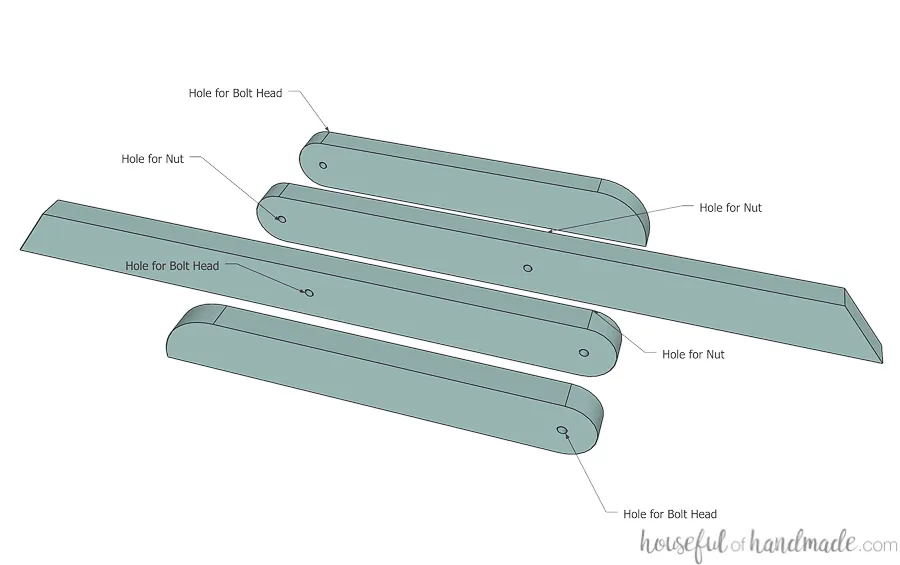
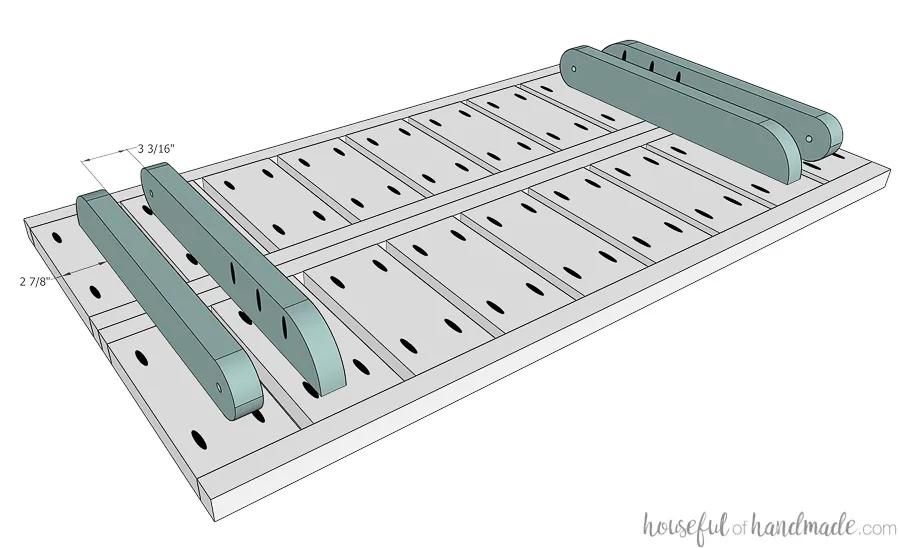
- Lay out the leg pieces according to the diagram. Make sure to pay attention to the direction of the angle on the Leg pieces and the direction of the Leg Top pieces.
- Mark where the bolt heads and nuts will go. You will be bolting the top rounded edges of the Leg Top pieces to the top rounded edge of the Leg pieces and the two Leg pieces together in the center.
- Drill a 1” wide hole ½” deep on top of the other hole to house the bolt head and nut. The bolt is only 2 ½” long and the two boards are 3” thick together, but you need the bolt head and nut totally hidden inside the legs pieces or they will get stuck when you fold and unfold your table. I used 3” bolts and need to replace them with the shorter bolts and deeper holes.
6. Attach leg tops
- Drill pocket holes set for 1 ½” thick material on the inside of the Leg Top pieces. Only drill pocket holes on the half of the board with the curved section without the hole (not the fully rounded end).
- Line up the assembled table top pieces then Attach the Leg Tops to them according to the diagram. The measurements listed account for the washer being 1/16” thick so adjust if your washers are a different size. Each board will only be attached to one of the top pieces.
7. Finish assembling the legs
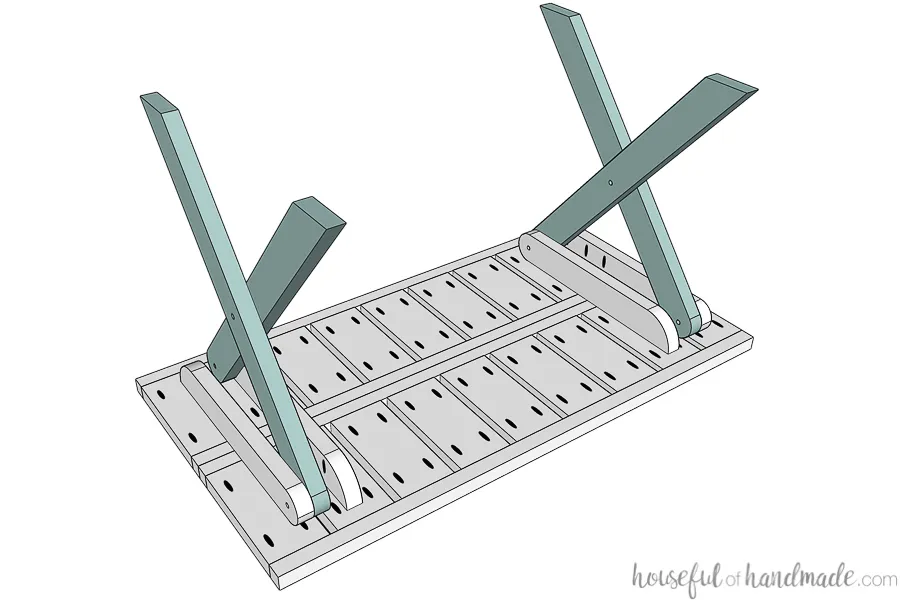
- Place the Leg pieces inside the attached Leg Top pieces. Make sure the table top pieces are still lined up. Bolt the two Leg pieces together at the center hole with a washer between the boards.
- Then bolt the rounded edges to the attached Leg Top pieces with a washer between the boards. The legs will stand up properly once bolted.
- Repeat for the other leg assembly then flip your table over and it is done!
8. Fold the table
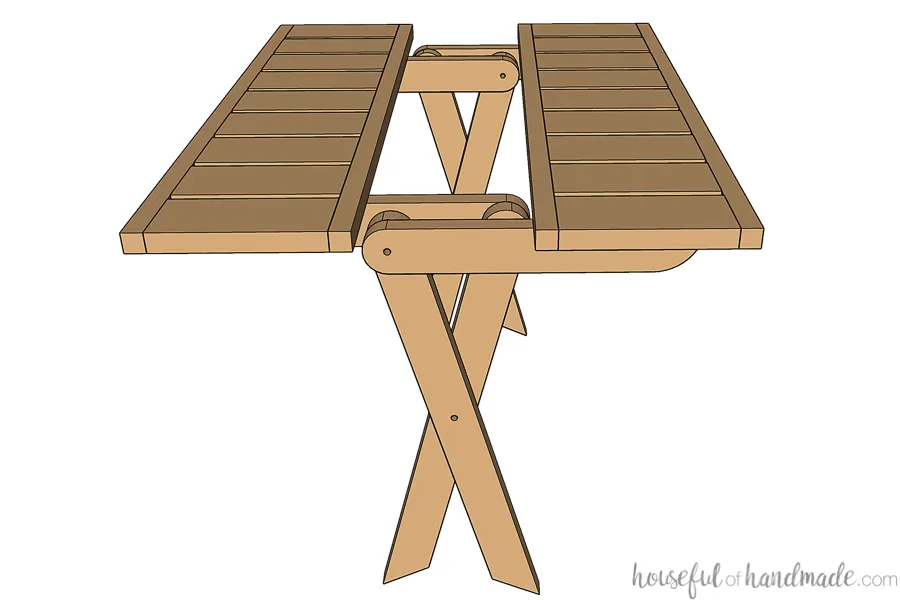
- To fold the table, pull the two sides of the table top apart until the rounded edges of the leg assembly are visible.
- Then let the table top pieces fall flat to the sides and press all the leg pieces flat together between them. To reassemble, lift the table top pieces up and tuck the rounded edges under the table top pieces.
- Then press the table top pieces together and let them settle on top of the legs.
9. Enjoy!
Now you can sand and seal your picnic table before using. And make sure to visit me at Housefulofhandmade.com for more amazing DIYs for the home!