 Notch
Notch- Difficulty
- Intermediate
- Time
- 11.3–22.3 hours
- Cost
- $$$$
About this build
Whether you’re working on craft projects, sewing, or pursuing another hobby, this craft table offers a large work surface that can be expanded when you need even more room. Plus this table has storage for all of your supplies. Build one for yourself, and you’ll be set to get your craft on!
Tools
Essential
- Brad Nailer
- Circular Saw
- Drill / Driver
- Jigsaw
- Miter Saw
- Pocket Hole Jig
- Random Orbit Sander
Optional / nice to have
- Bar / Pipe Clamps
- Combination Square
- Tape Measure
Materials
| Item | Qty |
|---|---|
| MDF, 3/4" Thick Half Sheet | 1 board |
| Plywood, 3/4" Thick Full Sheet | 1 board |
| Plywood, 3/4" Thick Half Sheet | 1 board |
| Plywood, 1/4" Thick Quarter Sheet | 1 board |
| Square Dowel, 1/4" x 1/4" 36" | 6 board |
| Craft Board, 3/8" x 3" (2 1/2" actual width) 36" | 1 board |
| Board, 1x2 72" | 1 board |
| Board, 1x2 48" | 1 board |
| Board, 1/2" x 3" (2 1/2" actual width) 48" | 2 board |
| Board, 1x6 24" | 1 board |
| Board, 2x2 96" | 2 board |
| Board, 2x2 72" | 1 board |
| 1 1/4" coarse-thread pocket hole screws | 140 each |
| 3/4" 18-gauge brad nails | 72 each |
| 1 1/4" 18-gauge brad nails | 28 each |
| 1 1/2" 18-gauge brad nails | 20 each |
| #8 x 1 1/4" flathead wood screws | 4 each |
| Pair 14" ball-bearing side-mount drawer glides | 2 each |
| 3" door hinges | 4 each |
| 1 1/2" x 12" Continuous Hinge | 2 each |
| Right-Angle Drill Attachment | 1 each |
Overall cost: $$$$. Lumber prices vary by region, species, and season, so we give a band rather than a figure we would only be pretending to know.
Cut list
| Part | Qty | T × W × L |
|---|---|---|
| Long Cubby Divider | 1 | 3" × 18" × 46" |
| Long Cubby Shelf | 2 | 3" × 5" × 46" |
| Long Cubby Bottom | 1 | 3" × 10" × 46" |
| Craft Center Back | 1 | 3" × 18" × 46" |
| Long Cubby Back | 1 | 3" × 18" × 46" |
| Leg | 4 | 1" × 1" × 29" |
| Outside Panel | 2 | 3" × 14" × 18" |
| Drawer Slide Filler | 2 | 3/8" × 2" × 14" |
| Left Inside Panel | 1 | 3" × 15" × 18" |
| Right Inside Panel | 1 | 3" × 15" × 18" |
| Open Cubby Bottom | 1 | 3" × 9" × 15" |
| Divider Cubby Bottom | 1 | 3" × 9" × 15" |
| Divider Cubby Top | 1 | 3" × 9" × 14" |
| Divider Guides | 12 | 1/4" × 1/4" × 14" |
| Craft Center Top | 1 | 3" × 29" × 48" |
| Craft Center Wing | 1 | 3" × 18" × 48" |
| Hinge Leg | 2 | 1" × 1" × 27" |
| Wing Leg | 2 | 1" × 1" × 29" |
| Wing Stretcher | 6 | 3/4" × 1" × 17" |
| Wing Stop Block | 2 | 3/4" × 1" × 1" |
| Cubby Divider | 3 | 1" × 12" × 15" |
| Drawer False Front | 2 | 3/4" × 5" × 9" |
| Drawer Box Side | 4 | 1/2" × 2" × 14" |
| Drawer Box Front | 2 | 1/2" × 2" × 8" |
| Drawer Box Back | 2 | 1/2" × 2" × 8" |
| Drawer Bottom | 2 | 1" × 8" × 14" |
What to buy
Buy 20 boards at 8 ft.
3" × 29"
1 board
3" × 18"
2 boards
3" × 15"
1 board
3" × 14"
1 board
3" × 10"
1 board
3" × 9"
1 board
3" × 5"
1 board
1" × 12"
1 board
1" × 8"
1 board
1" × 1"
3 boards
3/4" × 5"
1 board
3/4" × 1"
2 boards
1/2" × 2"
1 board
3/8" × 2"
1 board
1/4" × 1/4"
2 boards
Assumes 8 ft stock, a 1/8" saw kerf, and buying each part at its own width. Change the board size or kerf on the full board plan →
Instructions
1Start with Long Cubby Parts
- The Craft Table has a lot of parts, but it’s not hard to manage if you break the project down into smaller assemblies, and then join them together. Before you start cutting up parts, read through these steps completely to familiarize yourself with the processes. The best place to start is with the parts that make up the long-cubby area that spans the back of the craft table.
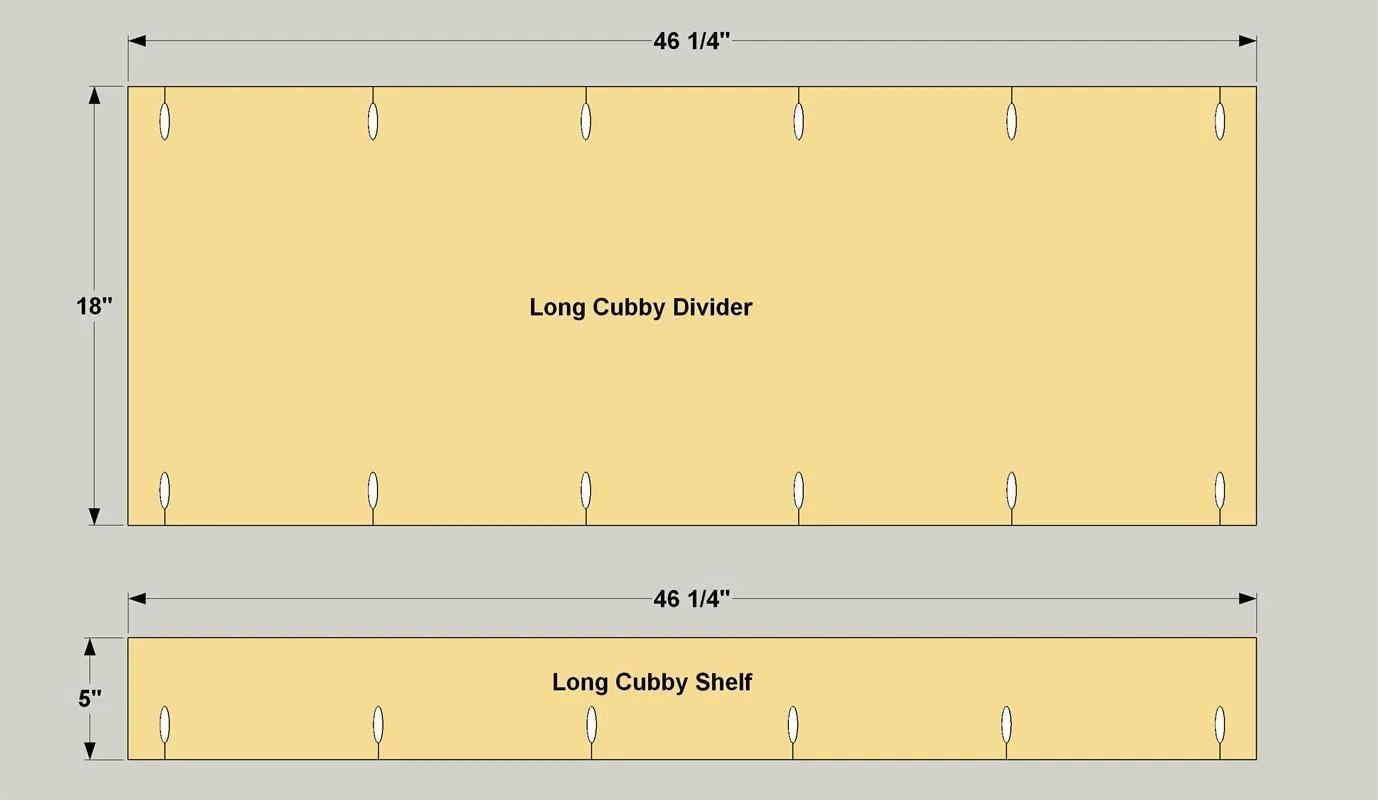
- Cut one Long Cubby Divider and two Long Cubby Shelves from 3/4" plywood, as shown in the cutting diagram.
- Set your pocket-hole jig for 3/4" thick material, and then drill pocket holes in these pieces where shown.
2Attach the Long Cubby Shelves
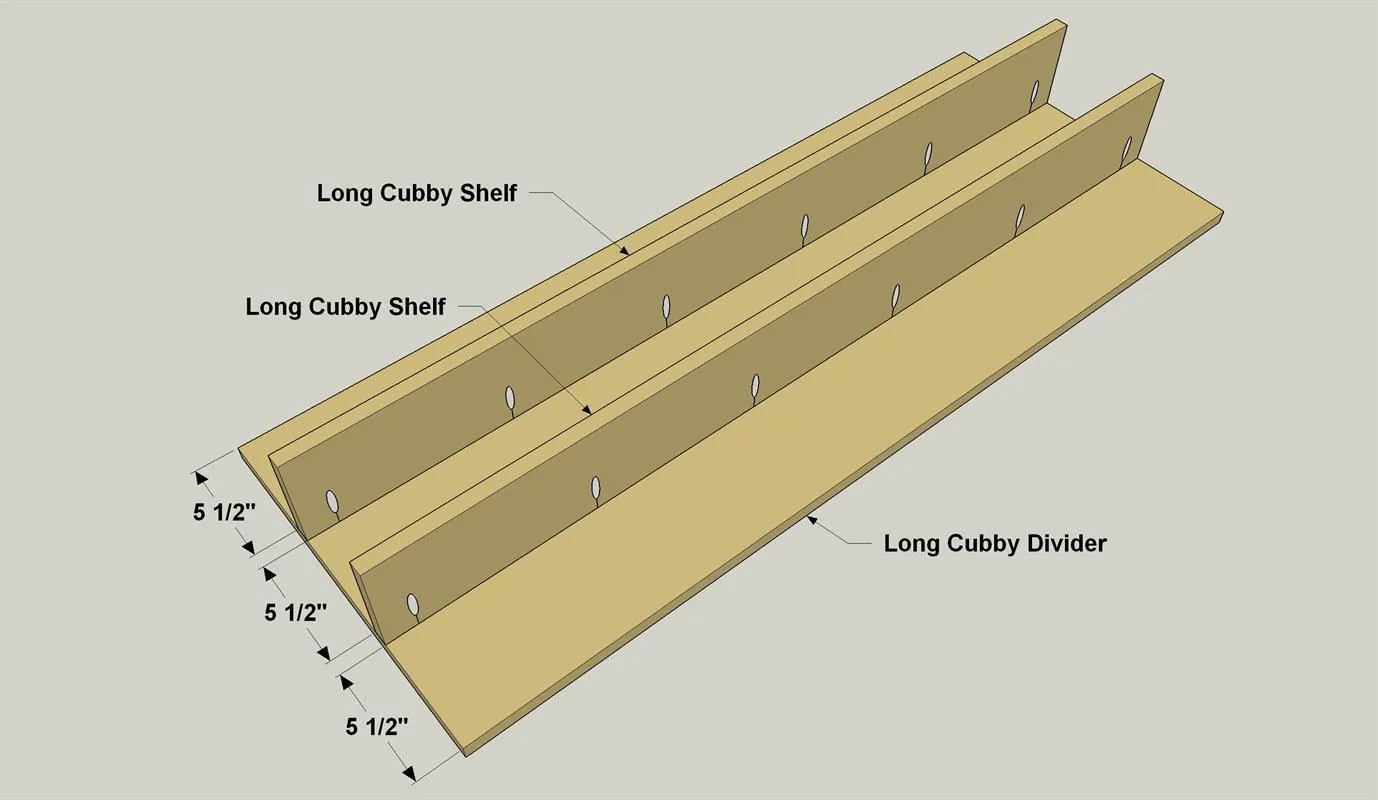
Lay the Long Cubby Divider with the pocket holes facing down. Attach the Long Cubby Shelves to the Divider where shown using 1 1/4" coarse-thread pocket hole screws.
3Make the Long Cubby Bottom
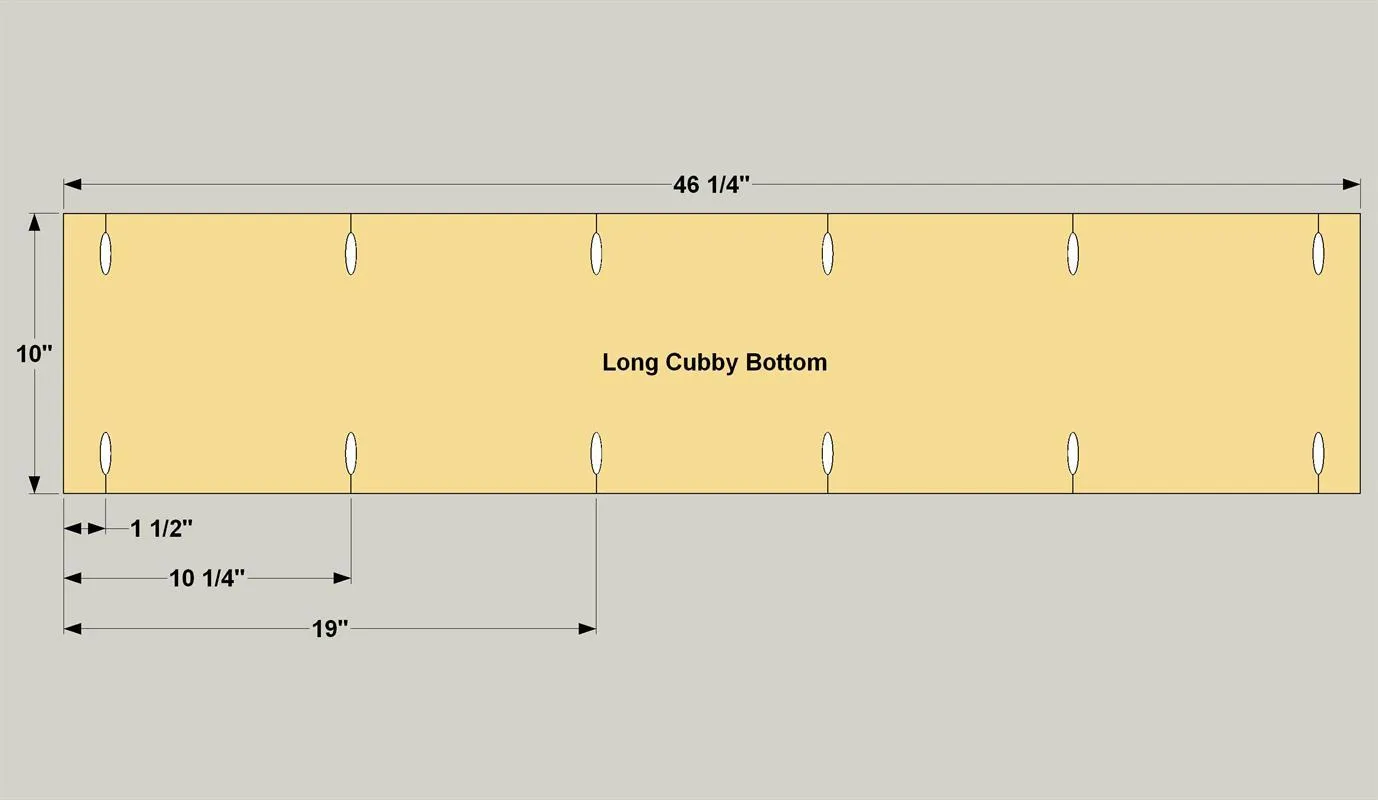
Cut the Long Cubby Bottom to size from 3/4" plywood. Then drill pocket holes where shown.
4Attach the Long Cubby Bottom
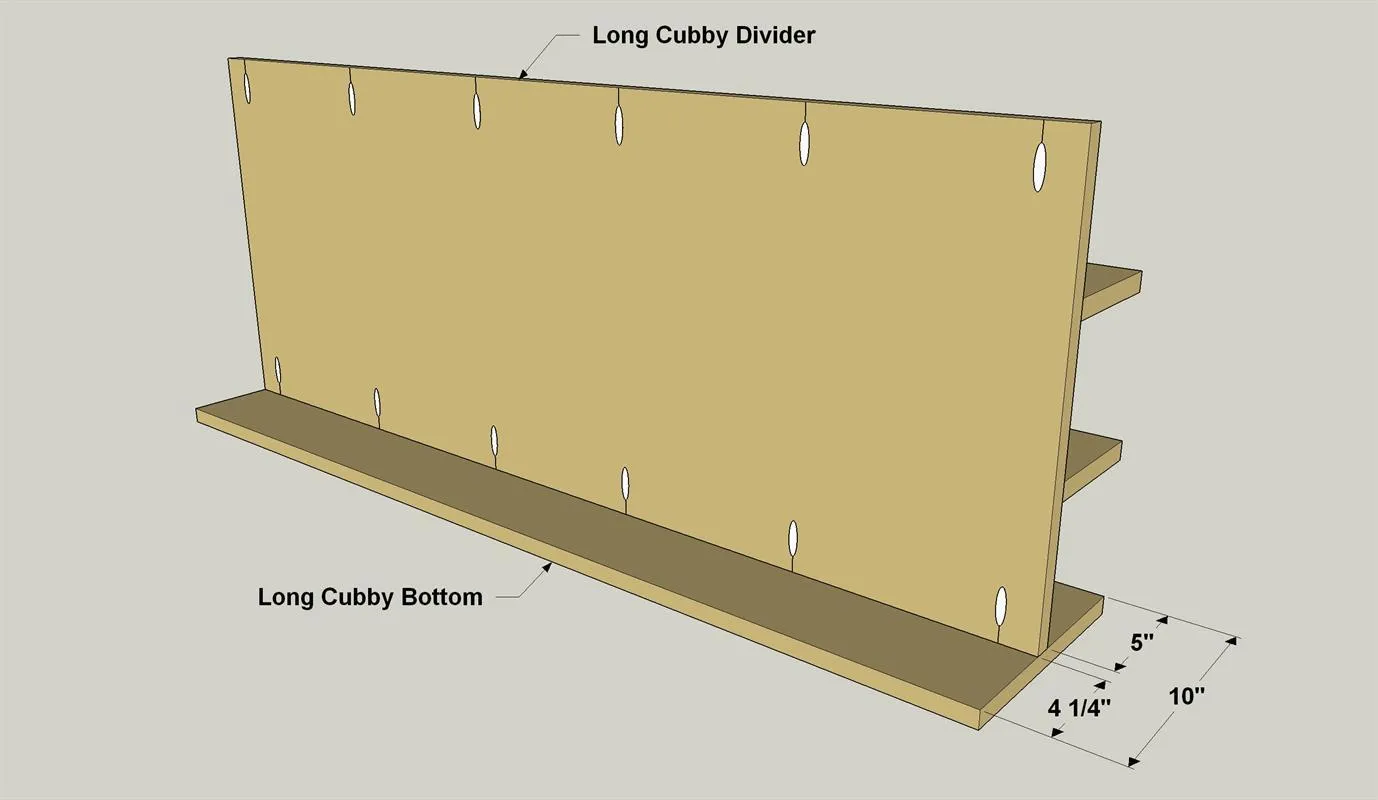
Lay the Cubby Bottom with the pocket holes facing down. Now attach the Cubby Shelf Assembly to the Cubby Bottom where shown using 1 1/4" coarse-thread pocket hole screws.
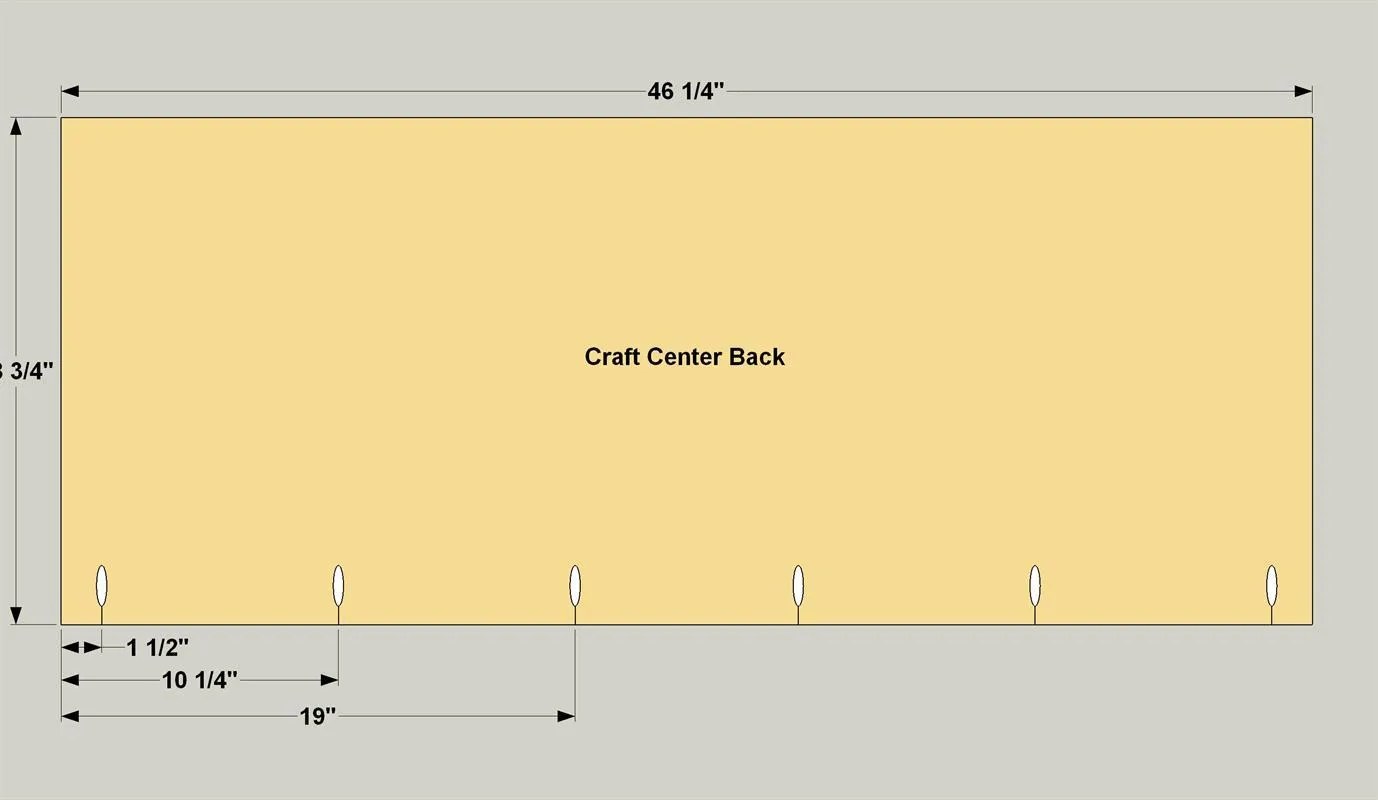
5Make the Craft Center Back
Cut the Craft Center Back from 3/4" plywood, as shown in the cutting diagram, and then drill pocket holes where shown.
6Attach the Craft Center Back
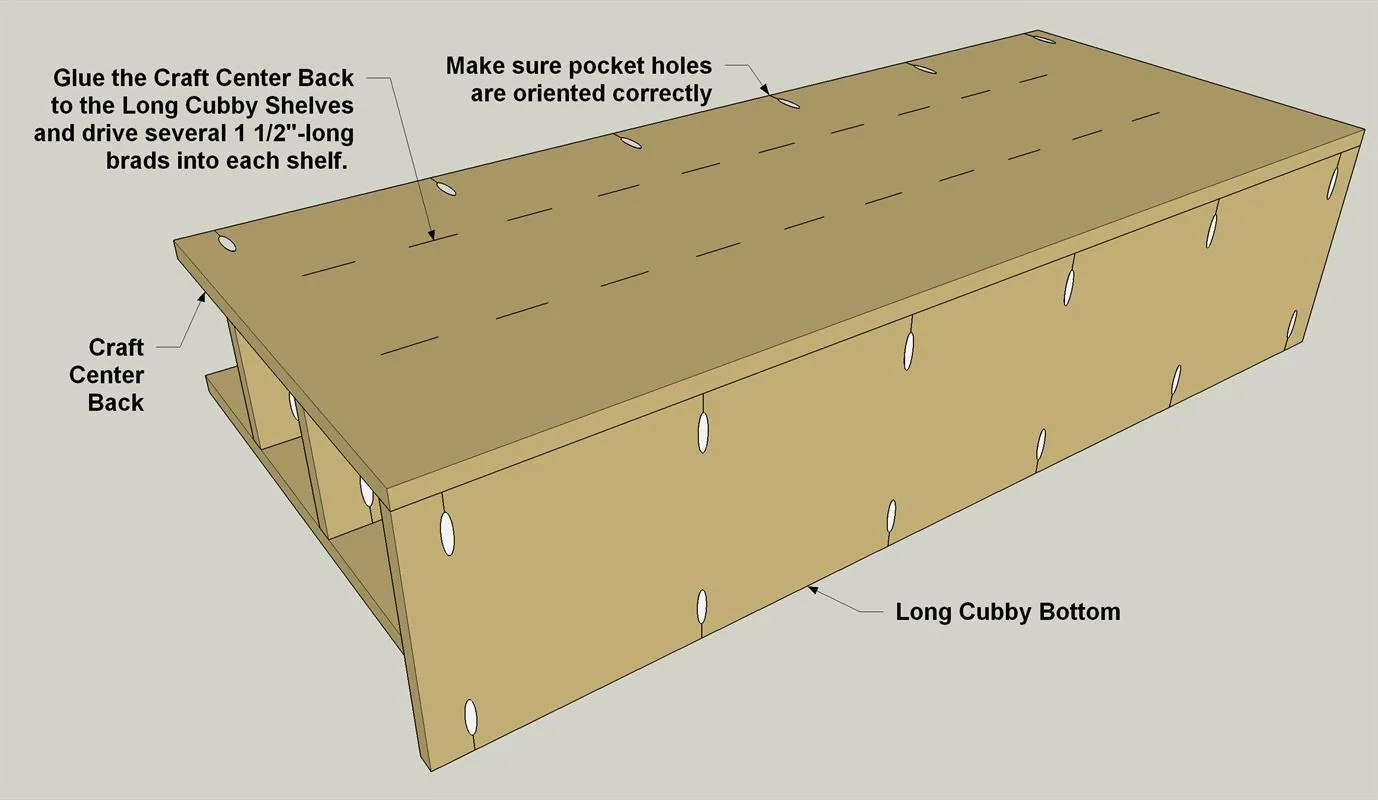
- Set the long-cubby assembly on your work surface with the Long Cubby Bottom hanging over the surface edge.
- Spread glue on the exposed edges of the Long Cubby Shelves and the Long Cubby Bottom, and then lay the Craft Center Back on the assembly with its pocket holes facing away from the Cubby Bottom, as shown.
- Clamp the assembly together, and then secure the Craft Center Back to the Long Cubby Bottom using 1 1/4" coarse-thread pocket hole screws. Secure the Back to each Shelf using 6-10 1 1/2" brads.
7Cut Legs and a Cubby Back
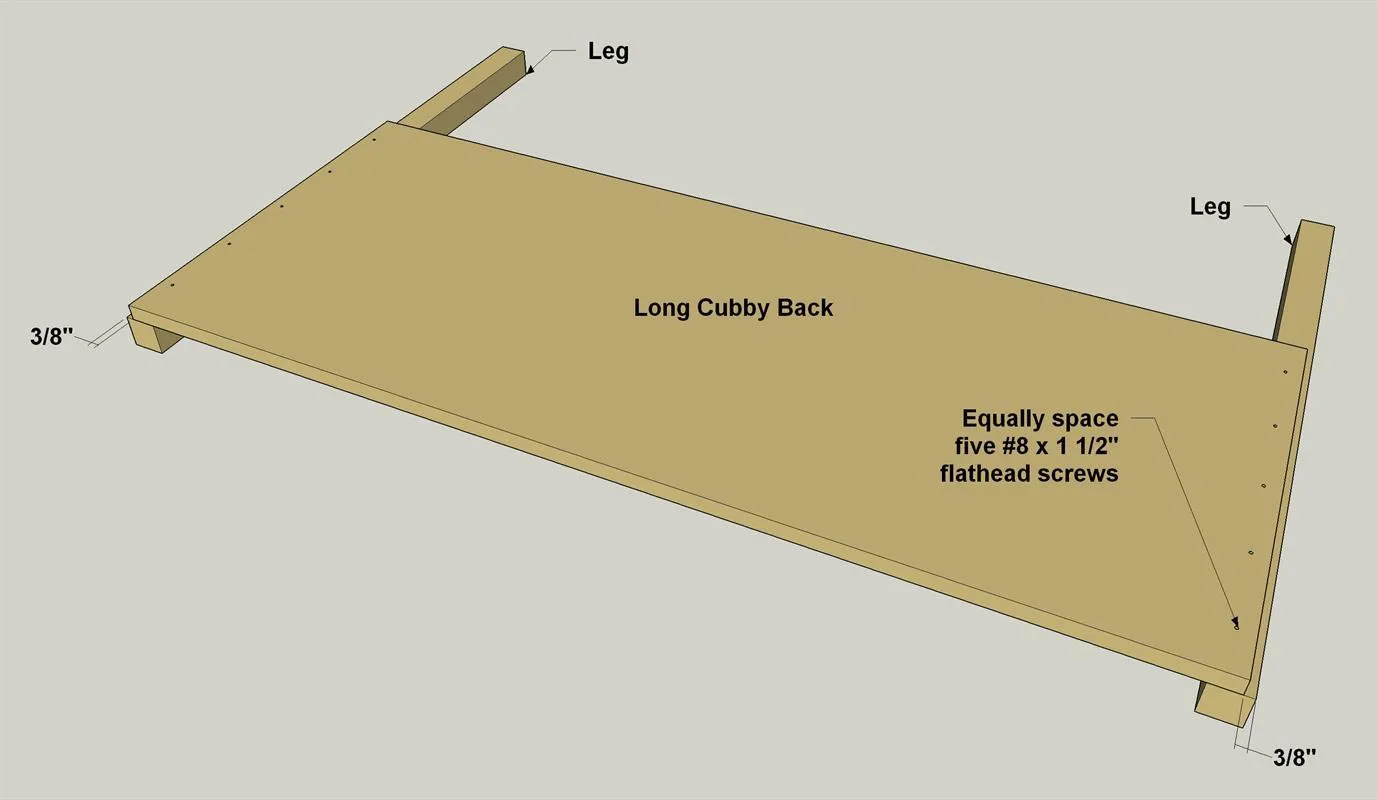
Cut four Legs to length from 2x2 boards, as shown in the cutting diagram. Also cut one Long Cubby Back to size from 3/4" plywood, as shown.
8Attach Legs to the Cubby Back
- Position the Cubby Back on two of the Legs, as shown, so that the upper ends of the Legs are flush with the top of the Cubby Back, and the Legs are set 3/8" out from the Cubby Back.
- Glue and clamp the Legs in place, and then drill pilot holes for #8 x 1 1/2" screws. Drive in the screws to secure the Cubby Back to the Legs.
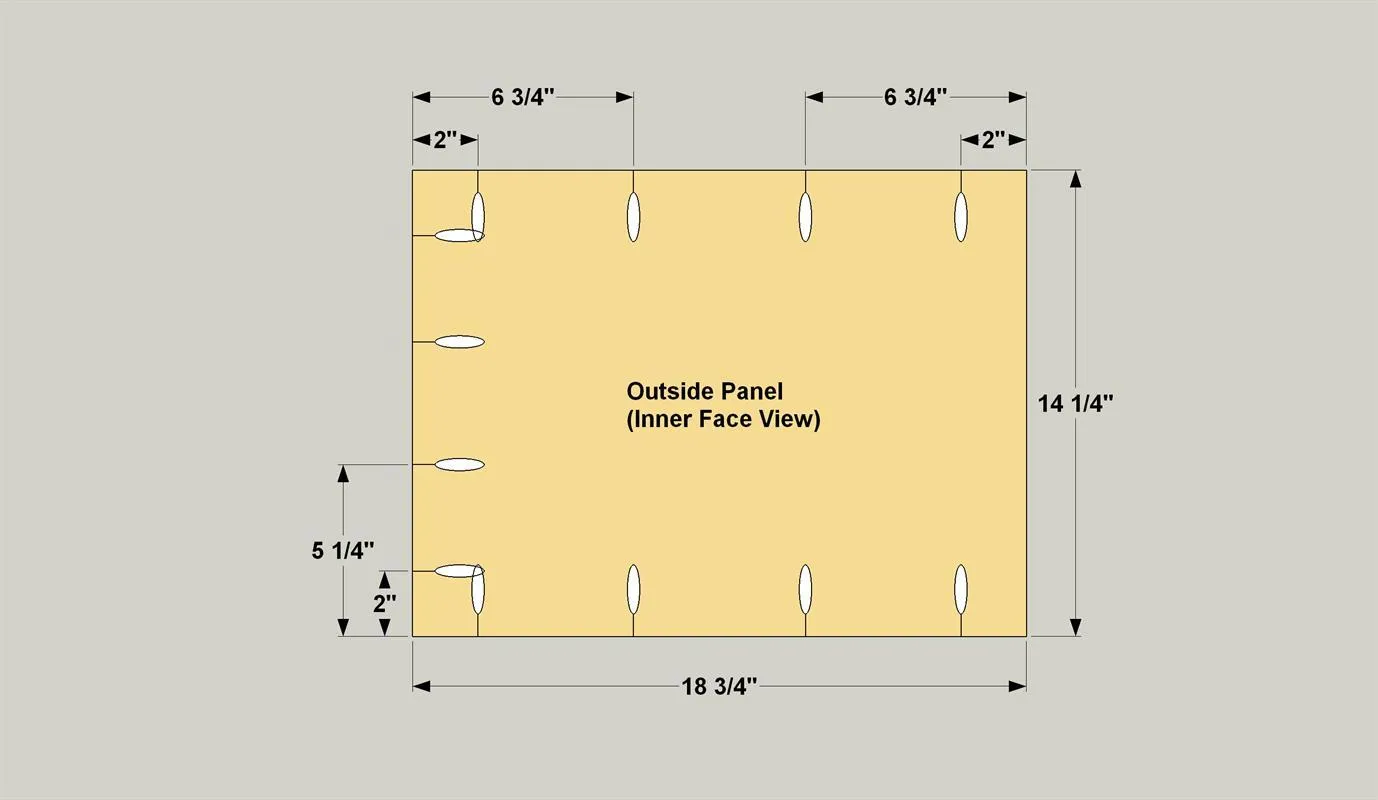
9Make the Outside Panels
Cut two Outside Panels from 3/4" plywood. Then drill pocket holes where shown.
10Make the Drawer Slide Fillers
Cut two Drawer Slide Fillers to length from a 3/8"-thick board, as shown in the cutting diagram. Home centers often sell these thin boards as “hobby boards” or “craft boards.”
11Make a Left Leg Assembly
- Position one Outside Panel on a Leg, as shown, making sure the upper edge of the Outside Panel is flush with the upper end of the Leg, and that the Outside Panel is centered on the width of the Leg.
- Then attach the Outside Panel to the Leg using 1 1/4" coarse-thread pocket hole screws. After that, attach a Drawer Slide Filler using glue and 3/4" brad nails as shown.
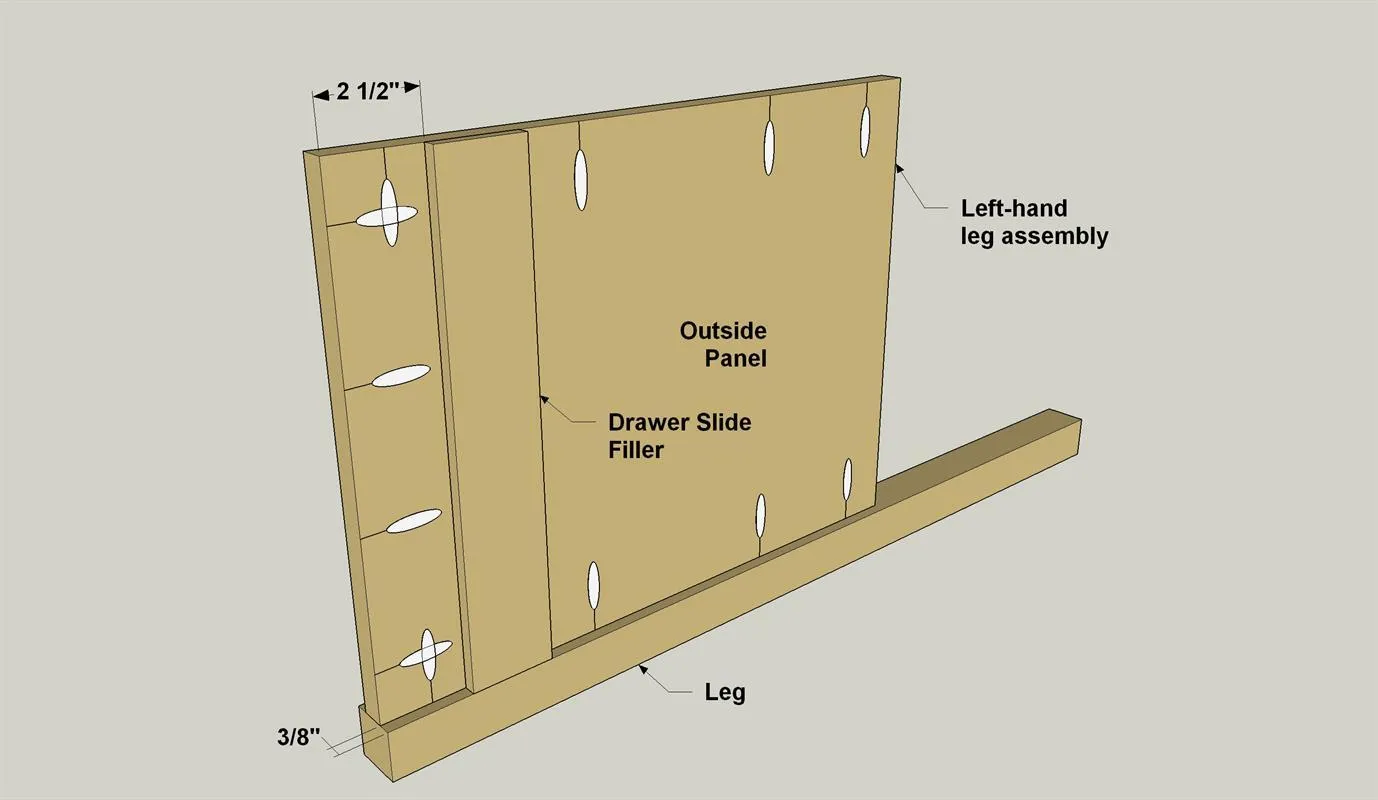
12Make a Right Leg Assembly
- Position the other Outside Panel on another Leg, as shown, making sure the upper edge of the Outside Panel is flush with the upper end of the Leg, and that the Outside Panel is centered on the width of the Leg.
- Then attach the Outside Panel to the Leg using 1 1/4" coarse-thread pocket hole screws. After that, attach a Drawer Slide Filler using glue and 3/4" brad nails as shown.
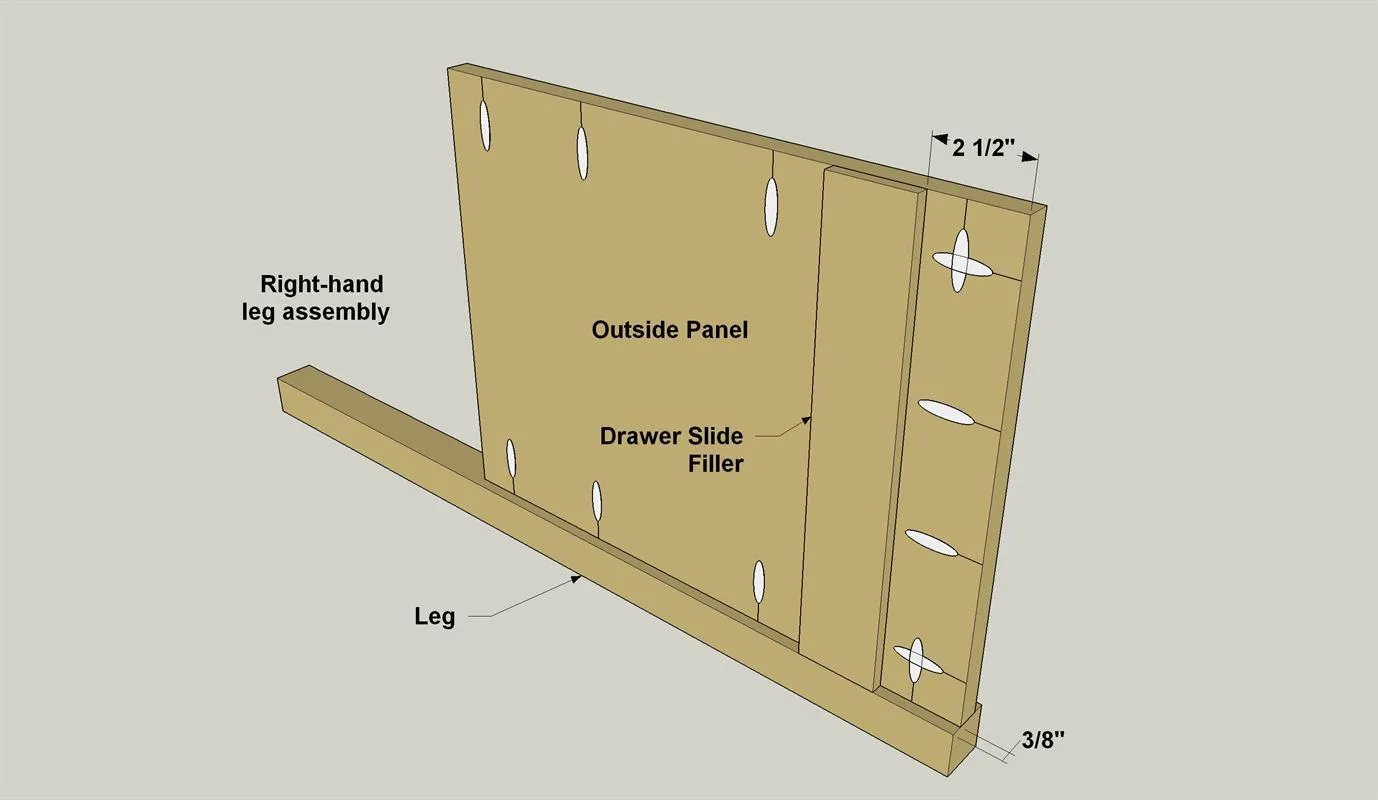
13Create the Inside Panels
Cut one Left Inside Panel and one Right Inside Panel from 3/4" plywood, as shown in the cutting diagram. Next, drill pocket holes in these parts where shown.
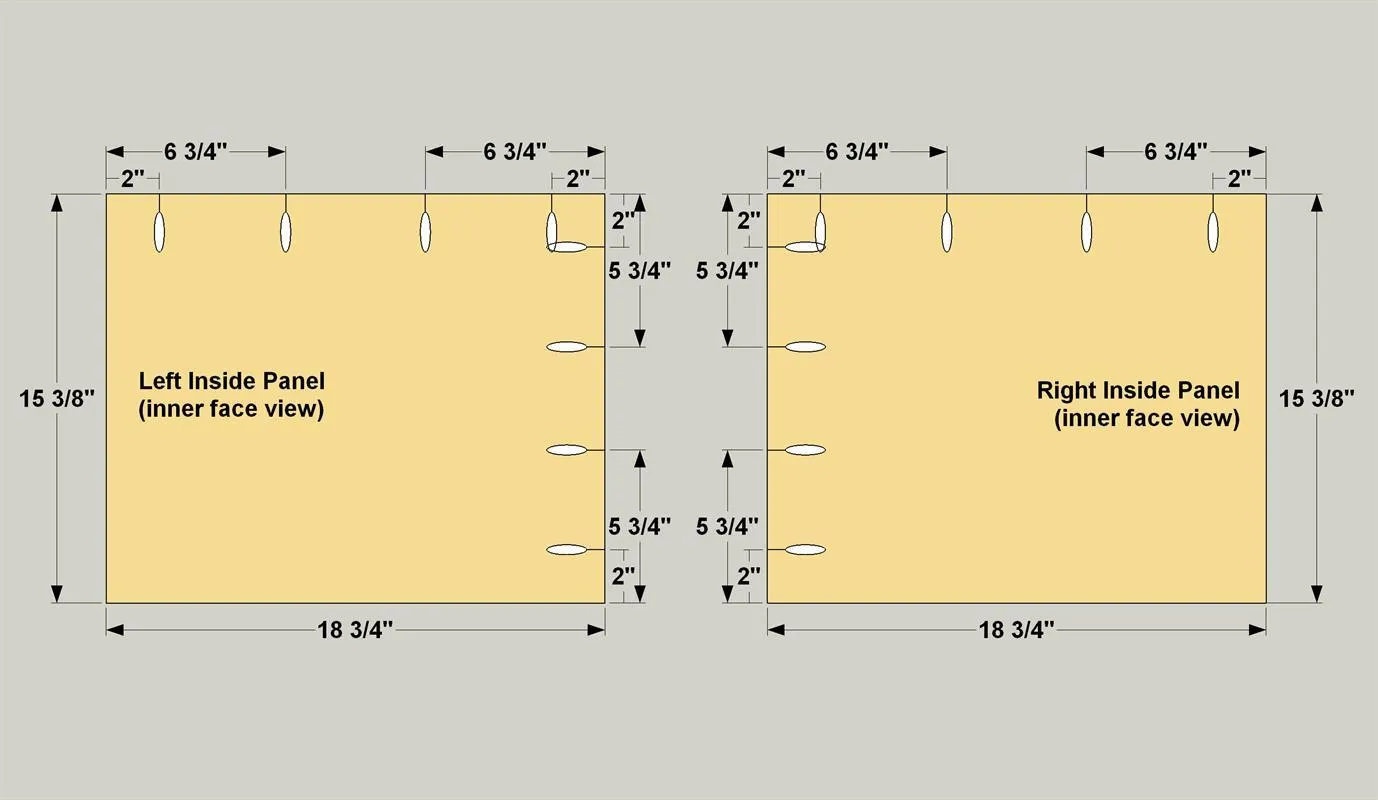
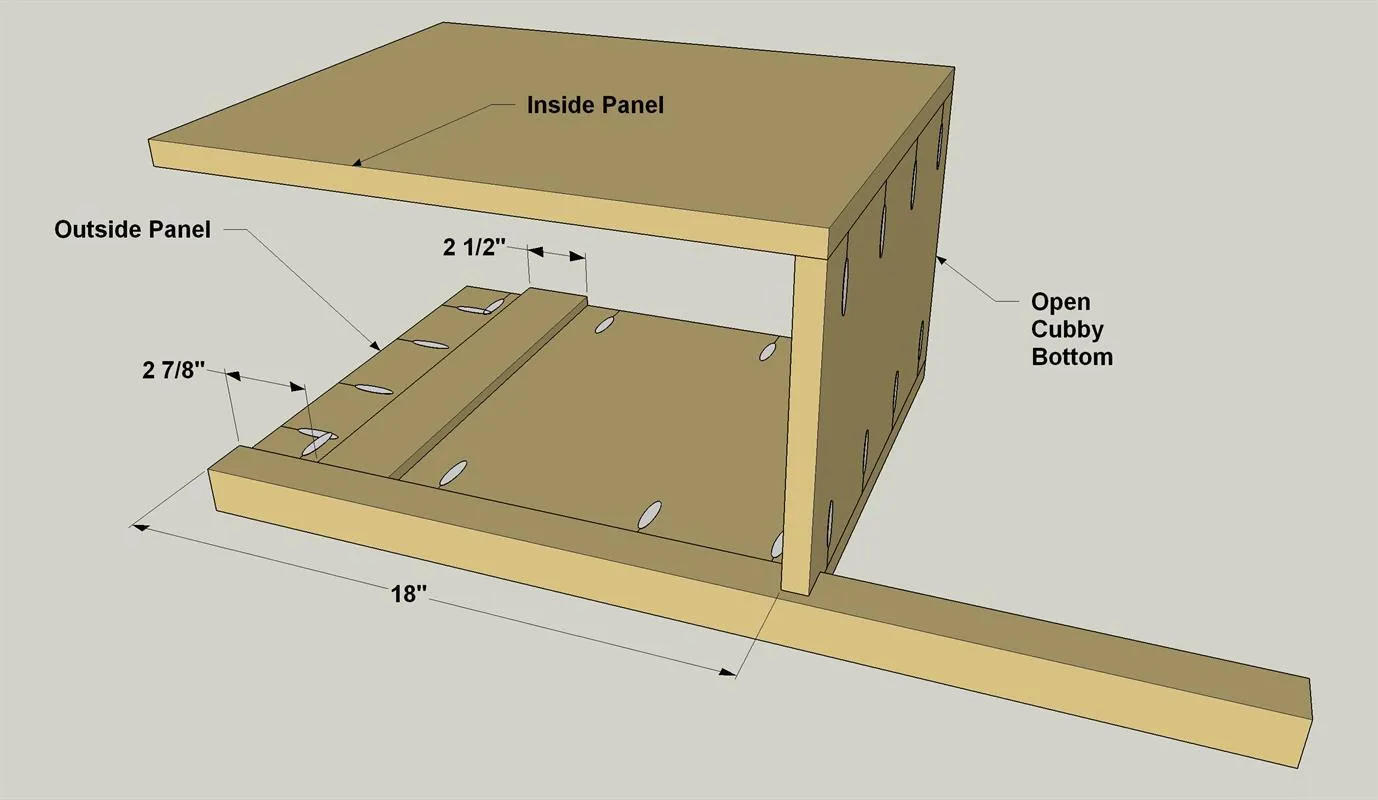
14Make the Open Cubby Bottom
- Cut one Open Cubby Bottom to size from 3/4" plywood, as shown in the cutting diagram. Using a jigsaw, notch out one corner of this panel, as shown.
- Then drill pocket holes where shown.
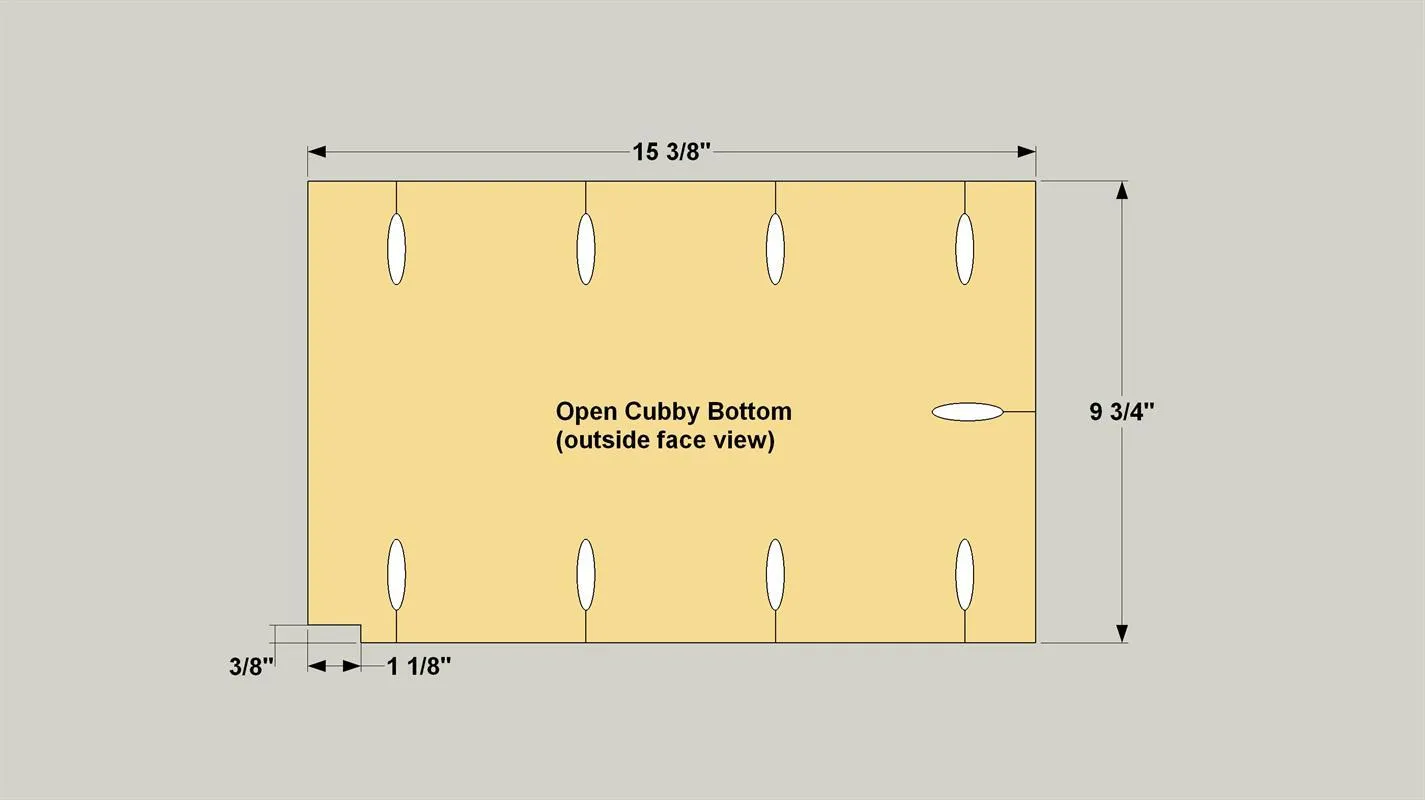
15Assemble the Open Cubby
- Attach the Open Cubby Bottom to the Left-hand leg assembly using 1 1/4" coarse-thread pocket hole screws as shown.
- Position the Left Inside Panel on the assembly, as shown, so that the pocket holes are facing inward, and that the end of the Left Inside Panel that has pocket holes is facing toward the top of the assembly.
- Attach this panel using 1 1/4" coarse-thread pocket hole screws.
16Make the Divider Cubby Parts
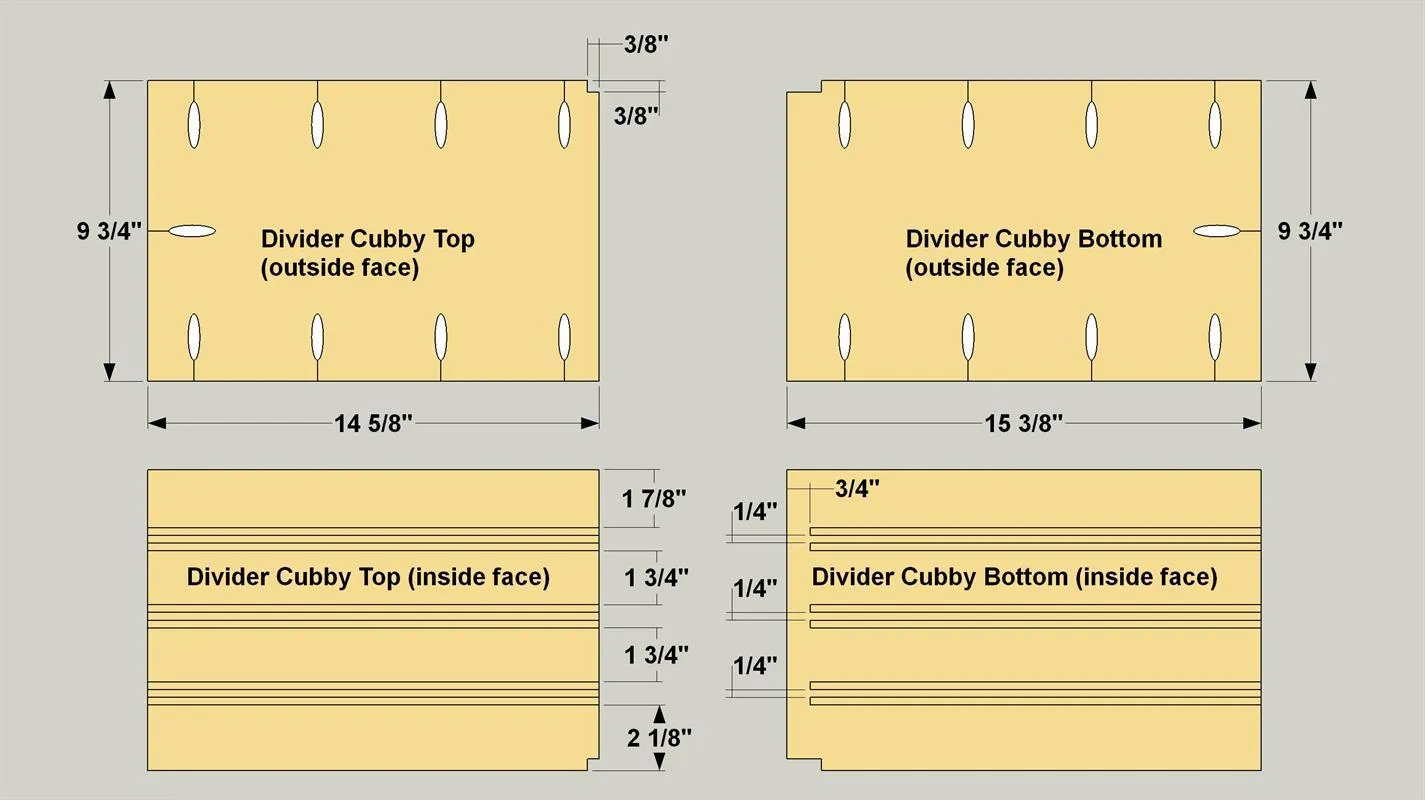
- Cut one Divider Cubby Top and one Divider Cubby Bottom to size from 3/4" plywood, as shown in the cutting diagram. Using a jigsaw, notch out one corner on each of these pieces, as shown.
- Then drill pocket holes where shown.
- Cut the Divider Guides from 1/4" square dowels.
- Attach the Divider Guides where shown using glue and 3/4" brad nails.
17Assemble the Divider Cubby
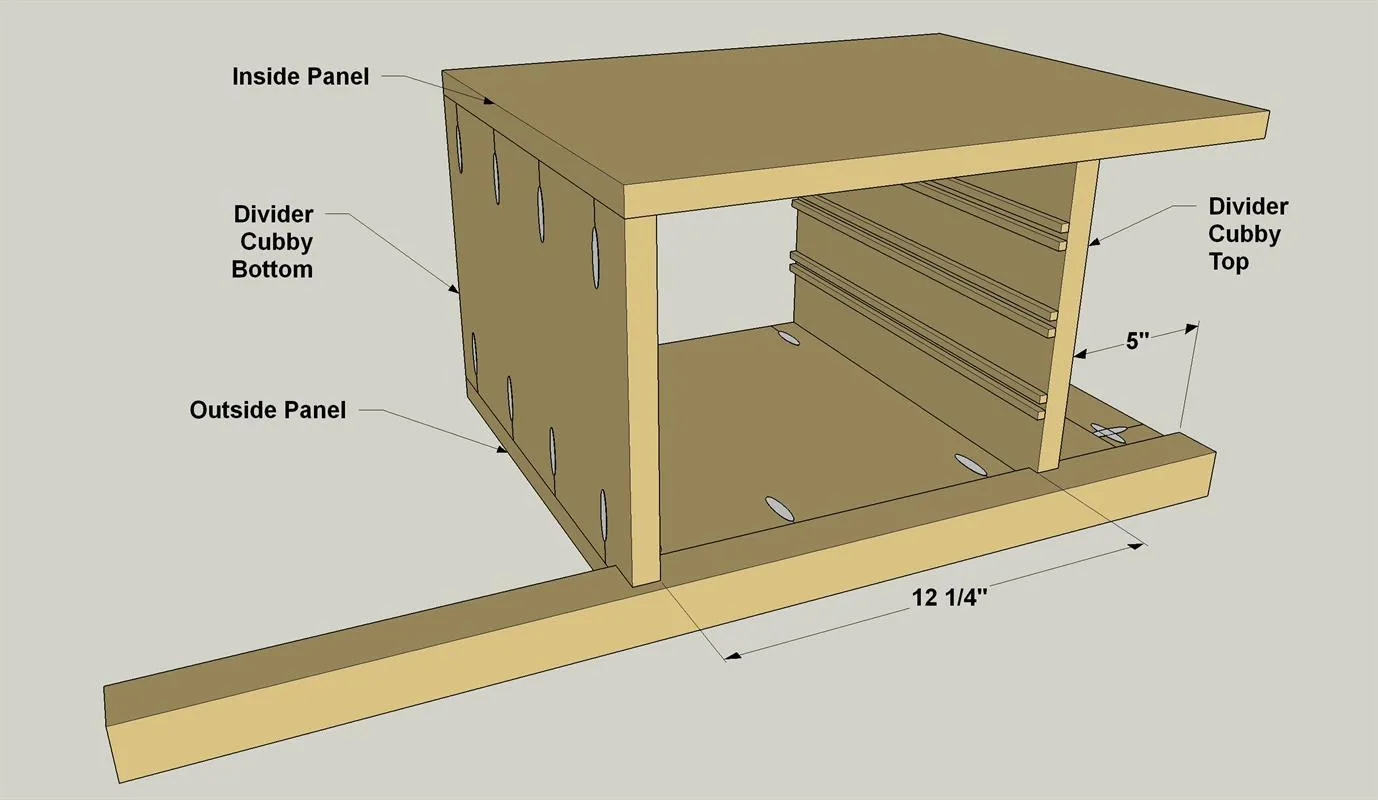
Attach the Divider Cubby Top and Bottom to the right-hand leg assembly using 1 1/4" coarse-thread pocket hole screws. Orient the pocket holes as you did on the other cubby assembly. Note that the Divider Cubby Top sits against the Drawer Slide Filler on the Outside Panel.
18Cut the Top and Wing
Cut one Craft Center Top and one Craft Center Wing to size from 3/4" MDF, as shown in the cutting diagram.
19Attach the Long Cubby Assembly
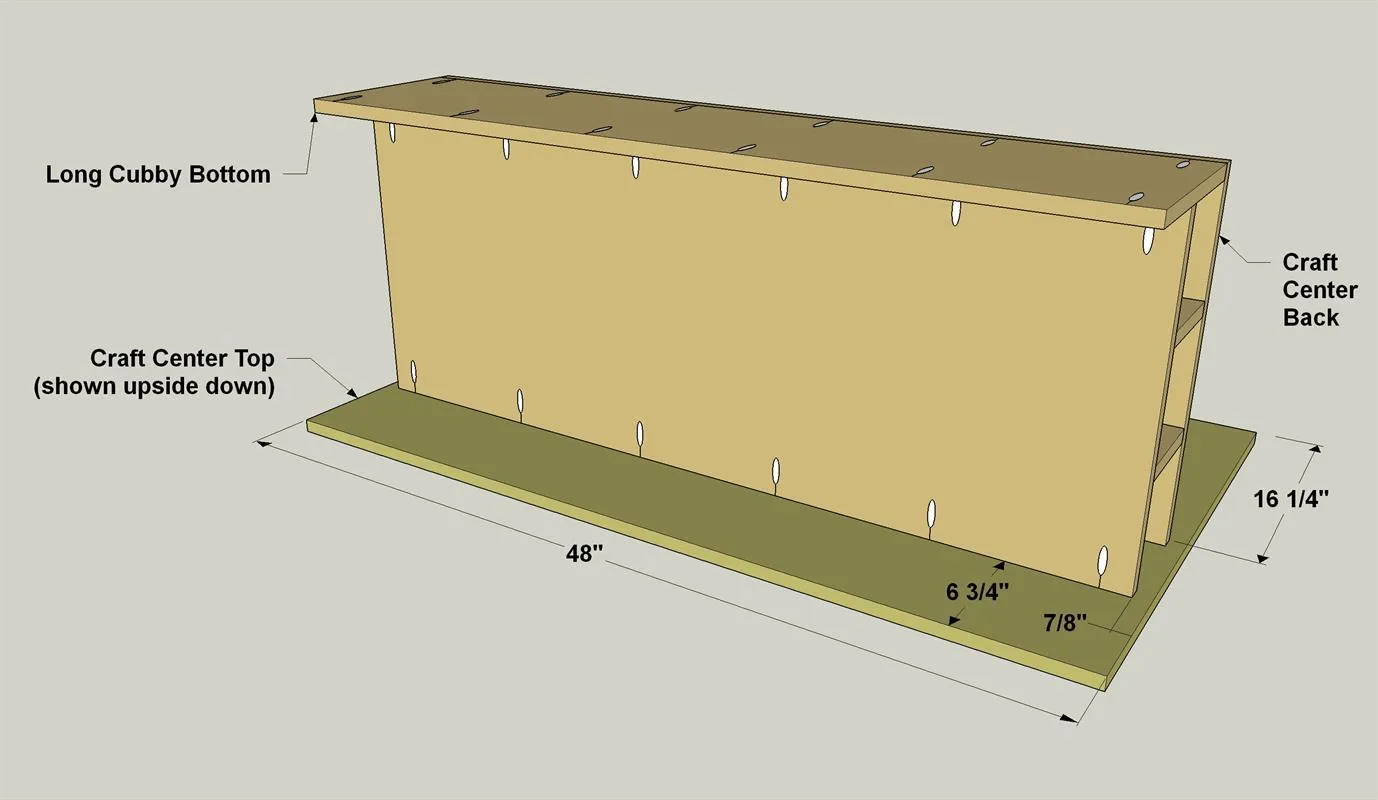
- Lay the Craft Center Top face down on a flat surface.
- Set the Long Cubby assembly on the Desktop as shown.
- Attach the assembly to the Top using 1 1/4" coarse-thread pocket hole screws.
20Attach the Back Leg Assembly
Attach the Back Leg assembly (that you assembled in Step 8) using 1 1/4" coarse-thread pocket screws as shown.
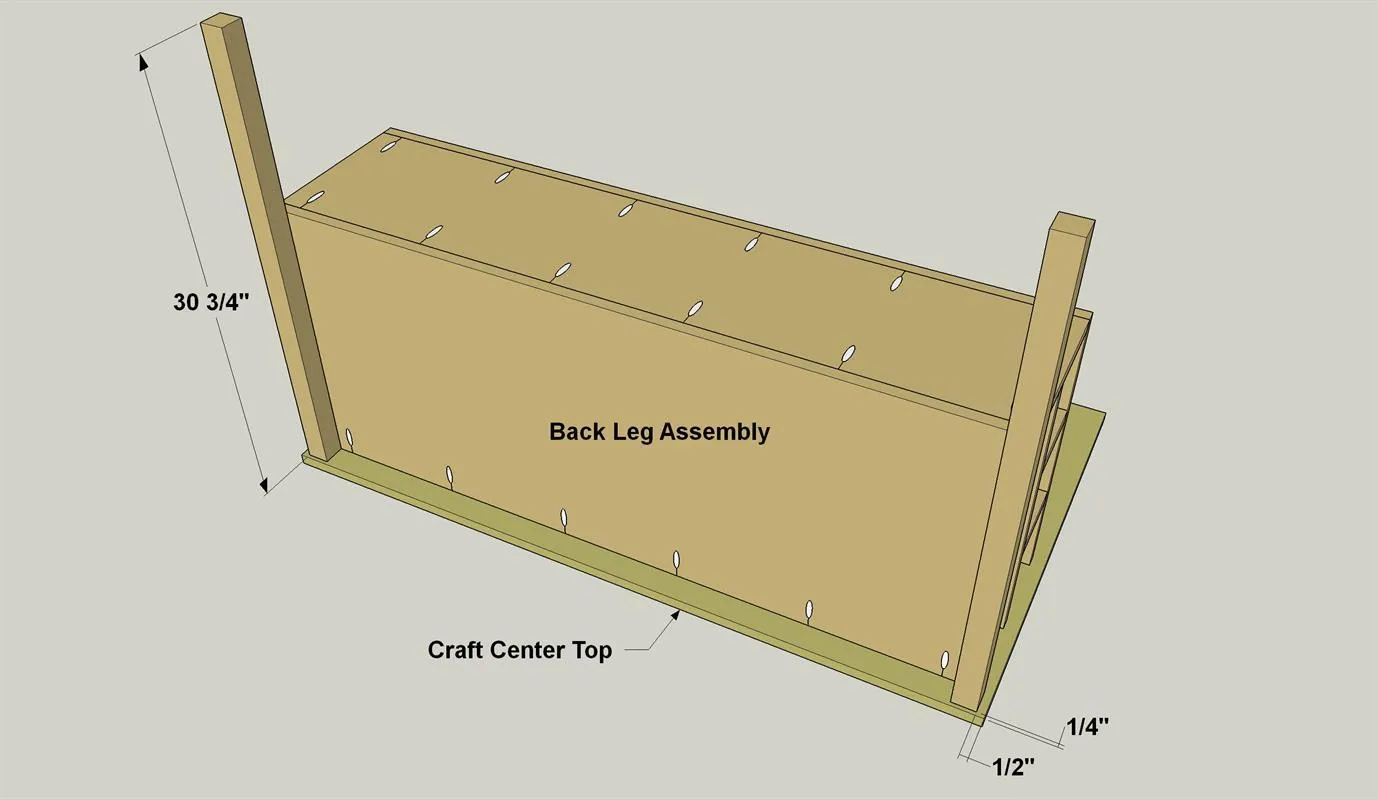
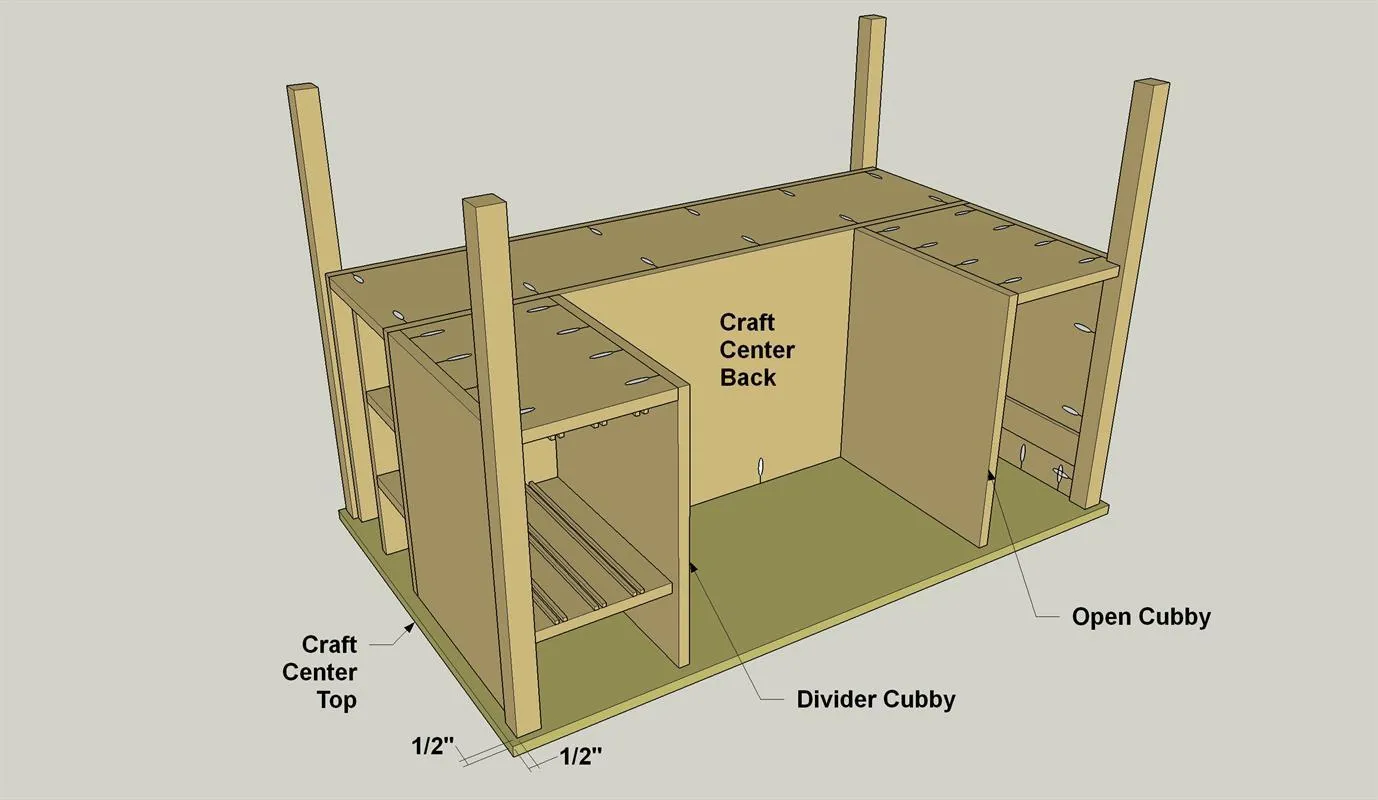
21Attach Front Cubby Assemblies
Next, attach the Open Cubby assembly and the Divider Cubby assembly using 1 1/4" coarse-thread pocket hole screws, as shown. A small right-angle attachment for your drill, along with a short square-drive bit, will make it possible to drive screws in the tight spaces. Make sure that the Inside Panel on the Open Cubby assembly sits straight and parallel to the Leg.
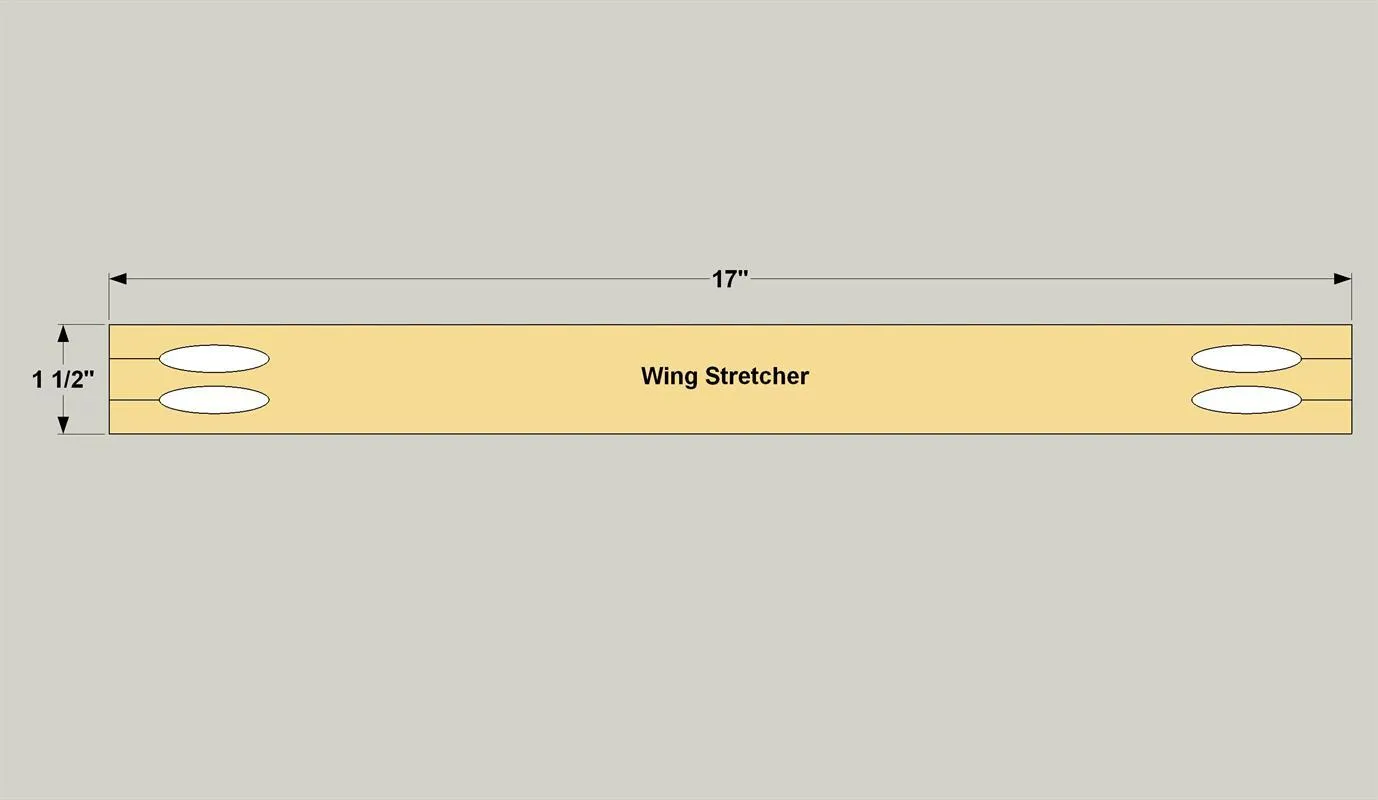
22Make Wing Legs and Stretchers
- Cut two Wing Legs and two Hinge Legs to length from 2x2 boards, as shown in the cutting diagram.
- Then cut six Wing Stretchers from 1x2 boards, as shown in the cutting diagram.
- Drill pocket holes in the ends of the Wing Stretchers, as shown.
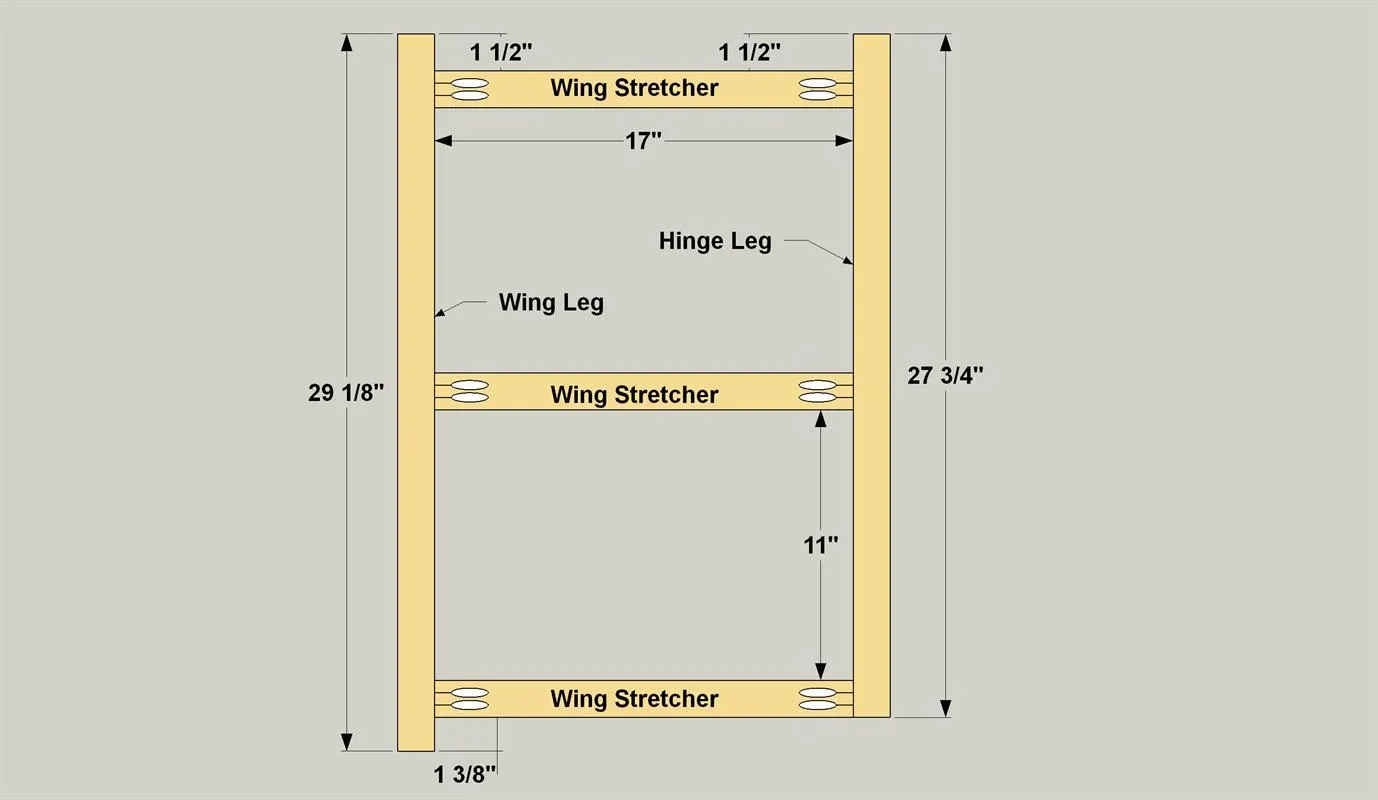
23Assemble the Wing Supports
- Position the Wing Stretchers on the Legs as shown, making sure that the stretchers are centered on the width of the Legs.
- Then attach the Stretchers using 1 1/4" coarse-thread pocket hole screws.
- Repeat with other Wing Assembly
24Attach the Wing Supports
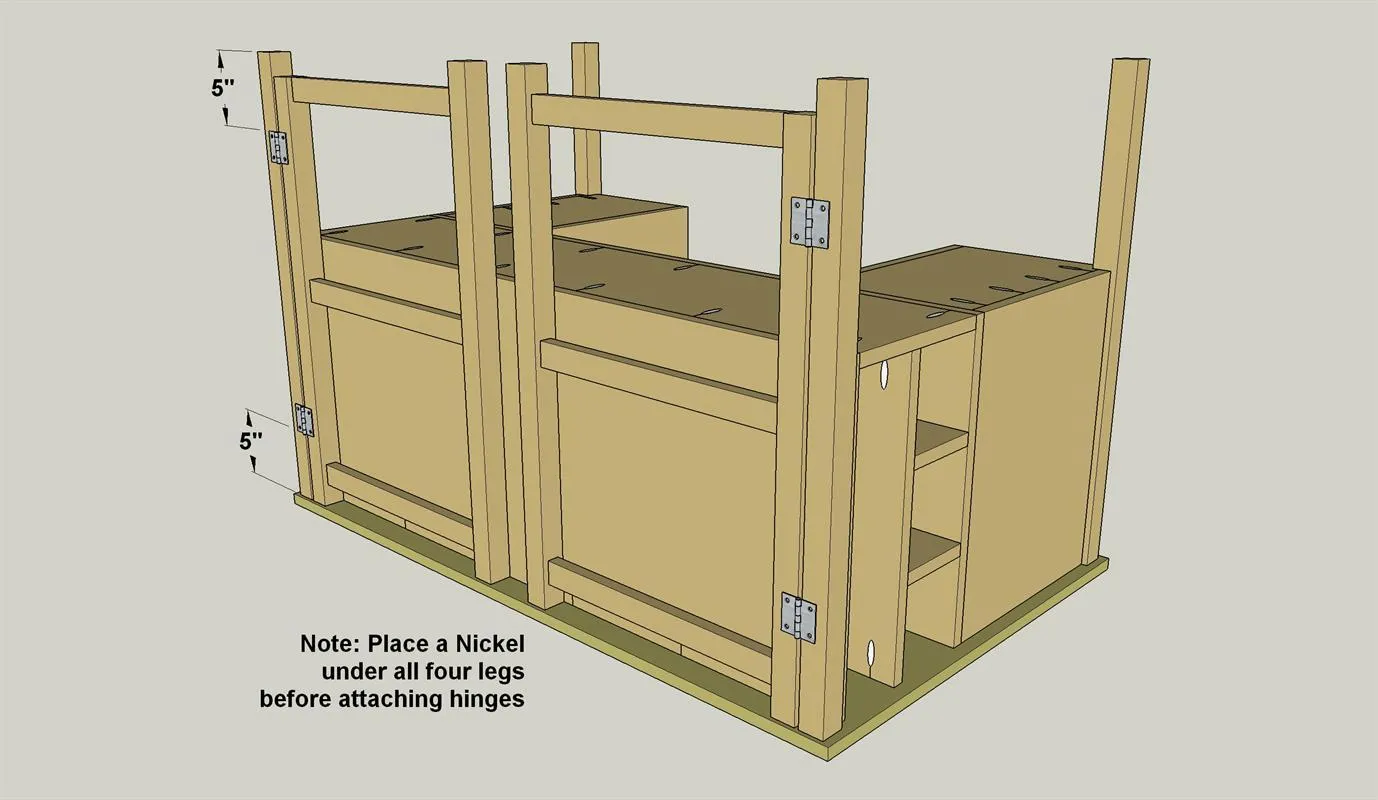
Position the wing support assemblies you just made against the Long Cubby Back, and rest the legs on nickels. This creates a slight gap that will allow the supports to swing freely. Using two pairs of 3" hinges, attach the Hinge Legs to the Craft Center Legs, as shown.
25Attach the Wing
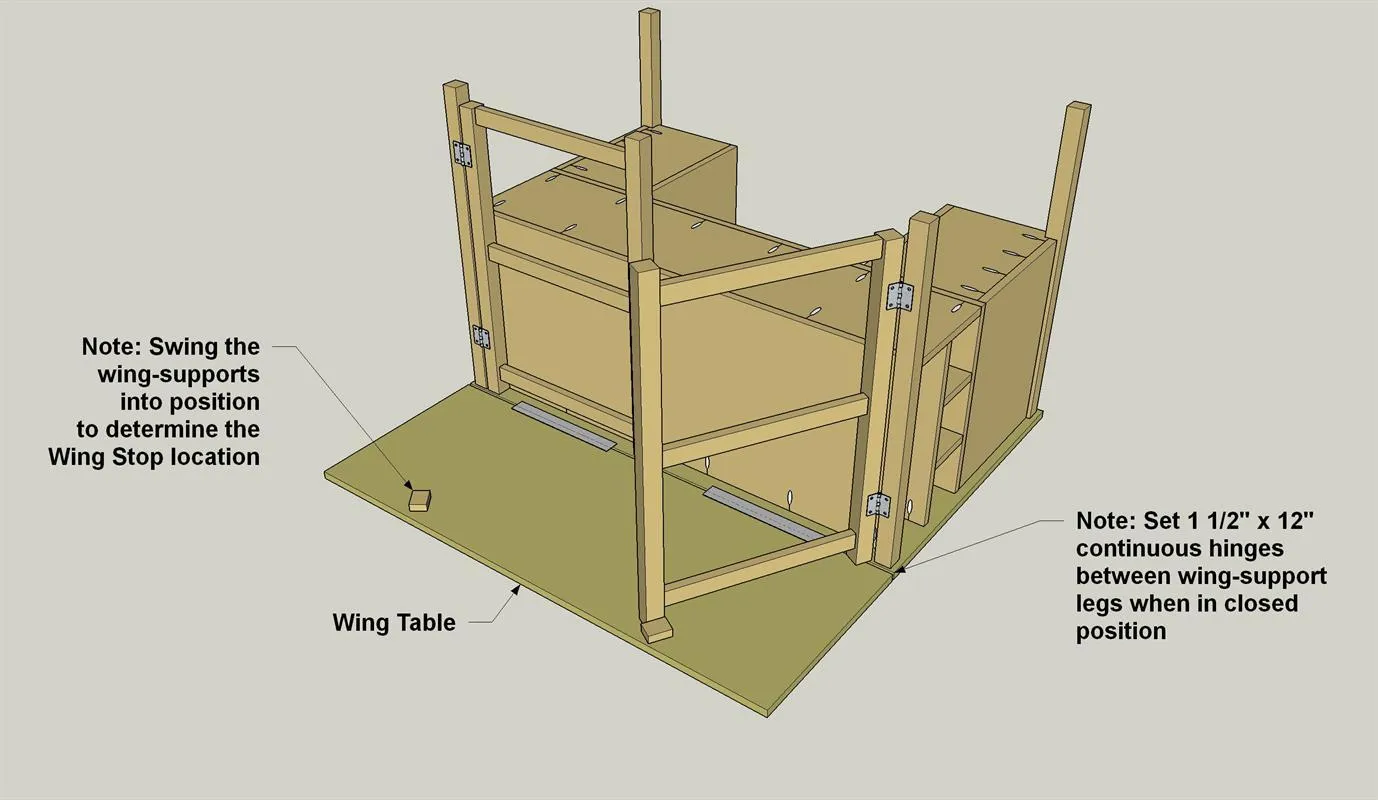
- Position the Craft Center Wing, leaving a slight gap between it and the Craft Center Top—a couple of nickels work great here, once again.
- Attach the Craft Center Wing to the Craft Center Top using a pair of 1 1/2" x 12" continuous hinges.
- Now cut two Wing Blocks from a 1x2 board, as shown in the cutting diagram. Swing the wing supports open, as shown, and then position and attach the Wing Blocks using glue and 1 1/4" brads.
26Make Cubby Dividers
Cut three Cubby Dividers from 1/4" plywood, as shown. Then test fit the Dividers by sliding them in place between the Divider Guides.
27Make the Drawer Parts
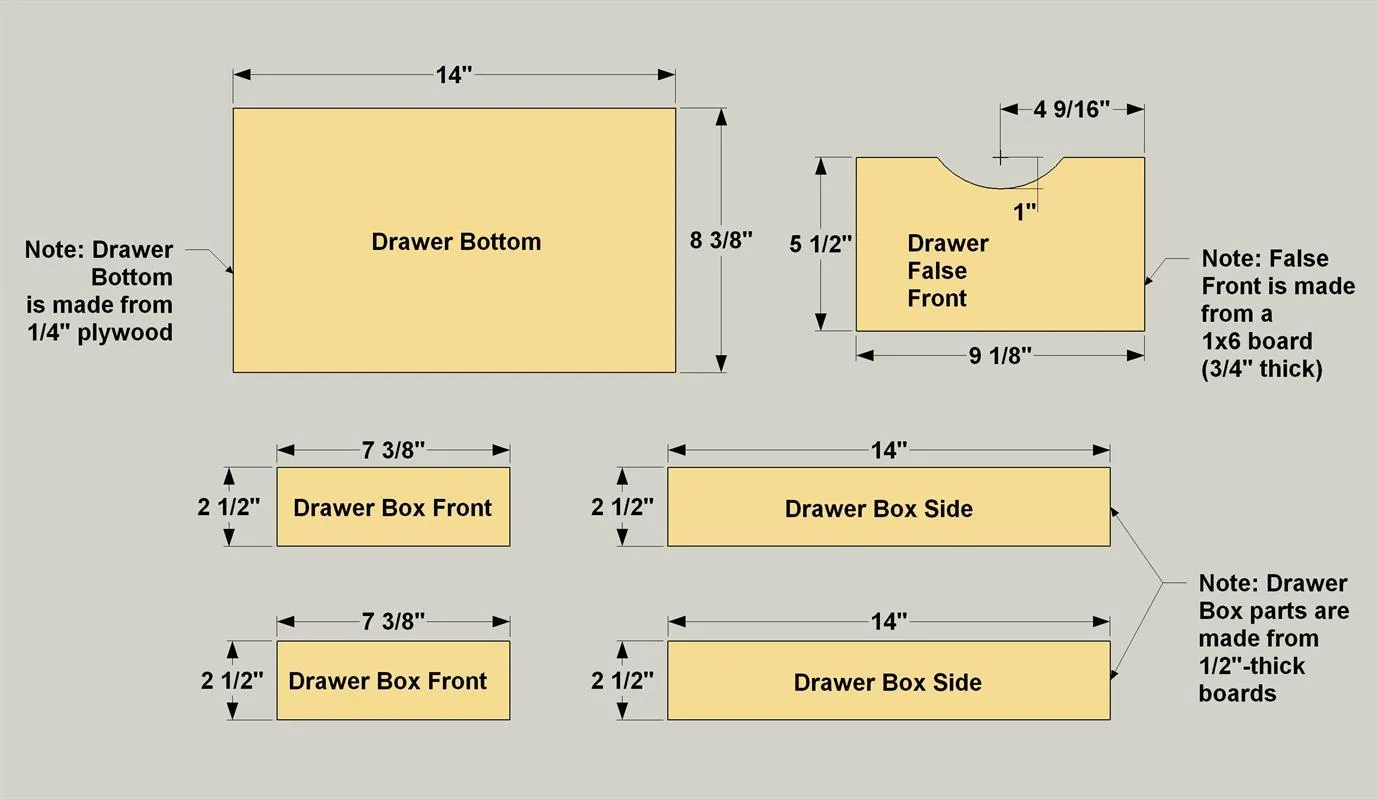
- Cut four Drawer Box Sides, two Drawer Box Fronts and two Drawer Box Backs to length from 1x4 boards, as shown in the cutting diagram.
- Cut two Drawer Bottoms from 1/4" plywood.
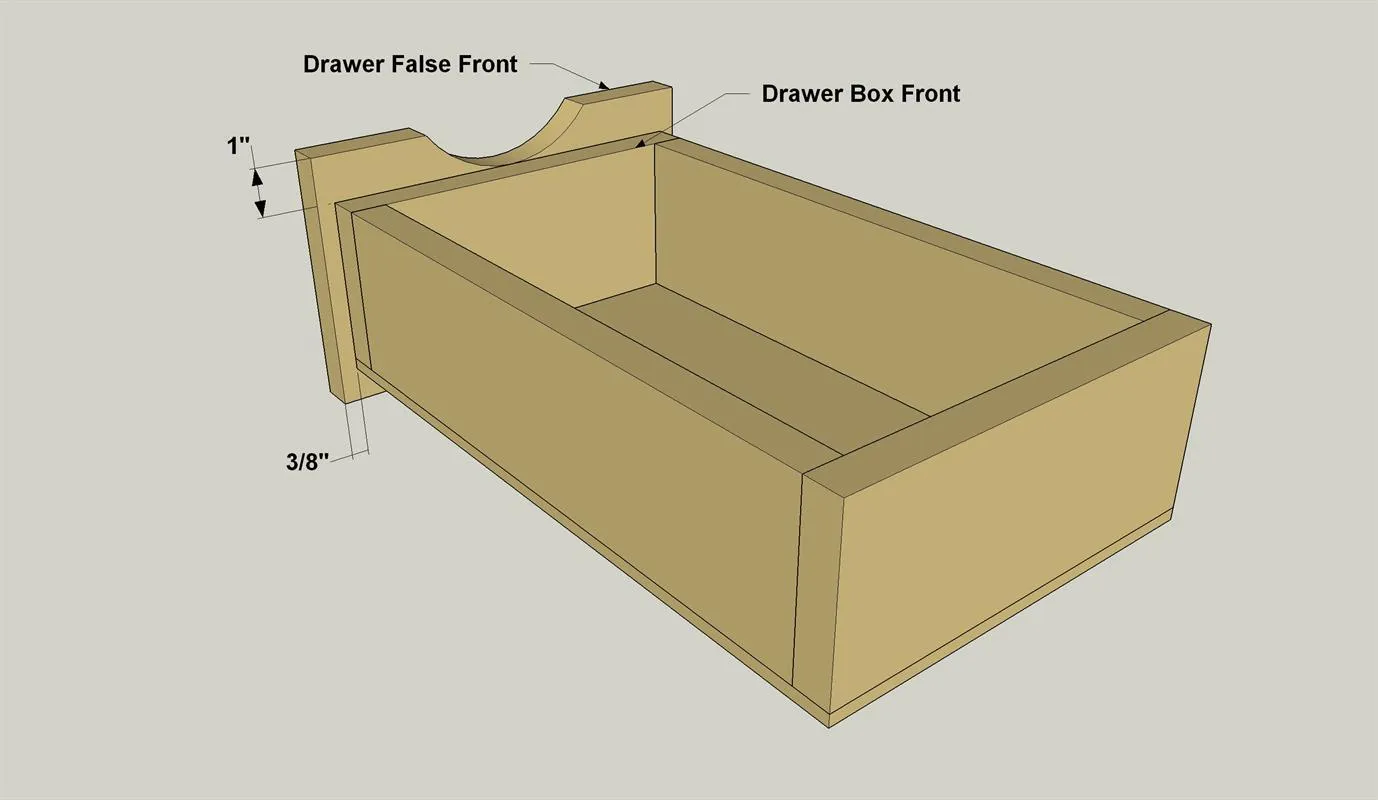
- Also cut two Drawer False Fronts from a 1x6 board. To cut the drawer handle, simply use something like a quart paint can to draw the shape, and then cut it out with a jigsaw.
28Assemble the Drawer Boxes
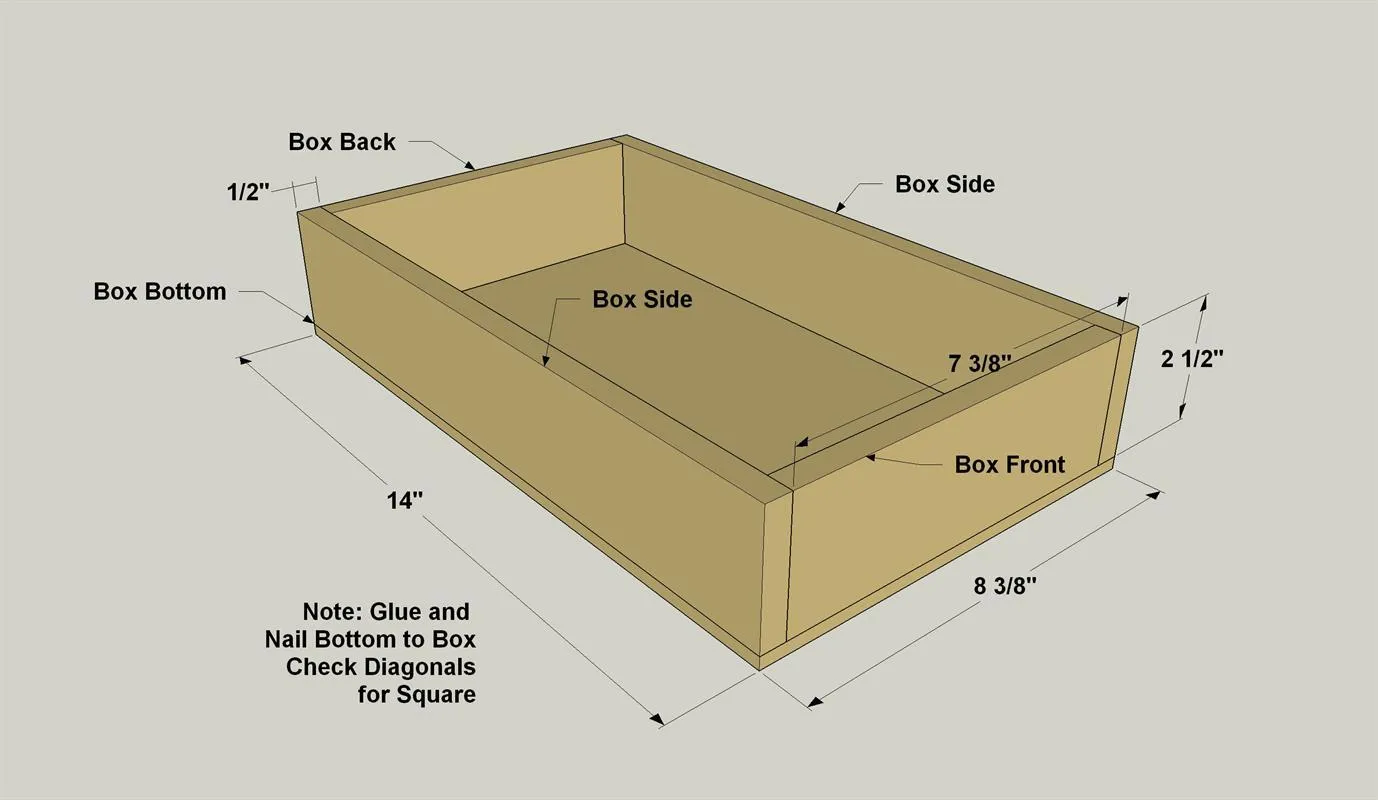
First attach the Drawer Box Front & Back to the Drawer Box Sides, as shown, using glue and 1 1/4" brad nails. Attach the Drawer Box Bottoms to the drawer boxes using glue and 3/4" brad nails.
29Attach the Drawer Fronts
- Align the Drawer False Fronts with the drawer boxes, as shown, and then clamp them in place.
- Drill two pilot holes from inside the drawer box into the False Fronts making sure you don’t pierce the Drawer Front.
- Attach with glue and 1 1/4" wood screws.
30Add a Finish and Drawer Slides
- With everything almost done, you can sand your craft table as needed—especially the exposed edges.
- Then apply the paint or stain of your choice. We decided to simple apply a clear oil finish, leaving the plywood edges exposed.
- Once the finish or paint dries, you can install a pair of 14" drawer slides on each drawer following the manufacturer’s instructions. After that, you’re ready to get your craft on!
Tags
- Craft Area
- Intermediate
Reviews & builds
No reviews yet
Sign in to review this plan or share your build.
No reviews yet. Be the first to build this.