 Notch
NotchUse your browser's Print (Ctrl/Cmd + P) and choose Save as PDF. This page works offline once you've opened it with a signal.
Entryway Bench
If you’d like a way to keep your mudroom or entryway organized, but you’re short on space, this bench is a perfect solution.
- Difficulty
- Intermediate
- Time
- 5.3–10.3 hours
- Cost
- $$$
Cut list
| Part | Qty | T × W × L | Material | ✓ |
|---|---|---|---|---|
| Seat Panel | 1 | 3" × 18" × 36" | — | ☐ |
| Bottom Panel | 1 | 3" × 18" × 36" | — | ☐ |
| Upright | 3 | 3" × 11" × 16" | — | ☐ |
| Back | 2 | 3" × 11" × 16" | — | ☐ |
| Rear Rail | 1 | 3/4" × 3" × 33" | — | ☐ |
| Side Rail | 2 | 3/4" × 3" × 16" | — | ☐ |
| Front Skirt | 1 | 3/4" × 3" × 34" | — | ☐ |
| Side Skirt | 2 | 3/4" × 3" × 16" | — | ☐ |
| Rear Skirt | 1 | 3/4" × 3" × 33" | — | ☐ |
Materials
| Item | Qty | ✓ |
|---|---|---|
| Board, 1x4 96" | 2 board | ☐ |
| Board, 1x4 48" | 1 board | ☐ |
| Plywood, 3/4" Thick Full Sheet | 1 board | ☐ |
| 1 1/4" fine-thread pocket-hole screws | 12 each | ☐ |
| 1 3/4" flathead wood screws | 2 each | ☐ |
| Feet iron-on edge banding | 15 each | ☐ |
| Wood glue | 1 each | ☐ |
| 1 1/4" coarse-thread pocket-hole screws | 55 each | ☐ |
Overall cost: $$$. Lumber varies by region, species, and season, so we give a band rather than a figure.
Tools
- Circular Saw
- Drill / Driver
- Iron for Edge Banding
- Jigsaw
- Miter Saw
- Pocket Hole Jig
- Random Orbit Sander
Instructions
1. Cut the Plywood Parts
Using the cutting diagram as a guide, cut the plywood parts to size. You’ll need one Seat Panel, one Bottom Panel, three Uprights, and two Backs.
Tip: Make Better Plywood Cuts When cutting plywood with a circular saw, use an edge guide to help keep your saw straight and on your cut line. To support the sheet, lay it on a sheet of 2"-thick rigid foam insulation. To get the cleanest cuts, swap your saw blade for a “plywood” or “fine cutting” blade. Finally, place the best looking face of the plywood down, so that your saw is on the other face as you cut.
2. Prep the Seat and Bottom Panels
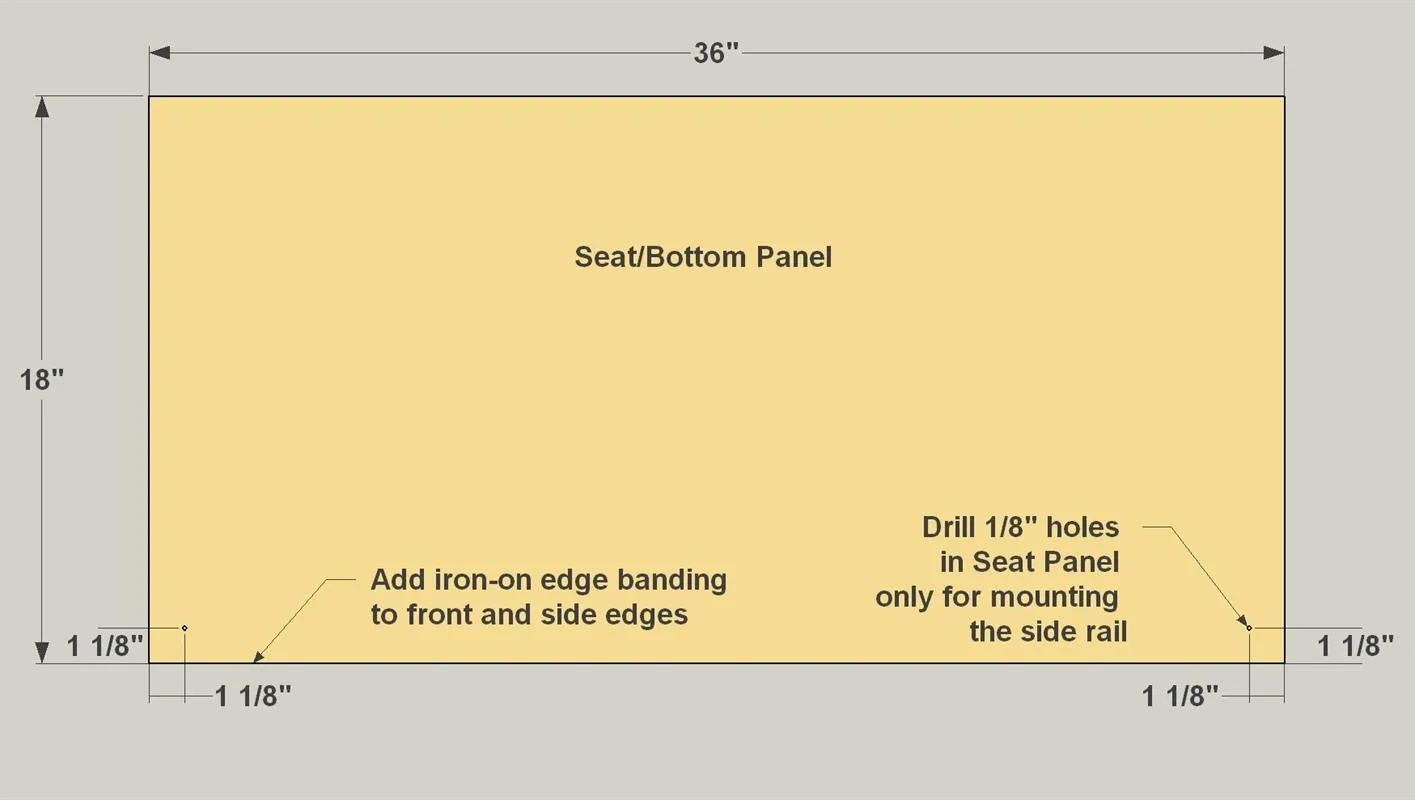
- To hide the exposed plywood edges, use iron-on edge banding. It’s easy to work with.
- Apply edge banding to front and side edges of the Seat Panel and Bottom Panel before assembly.
- Also drill two holes through the Seat Panel near the front corners. These will be used to attach the Side Rails later.
3. Complete Three Uprights
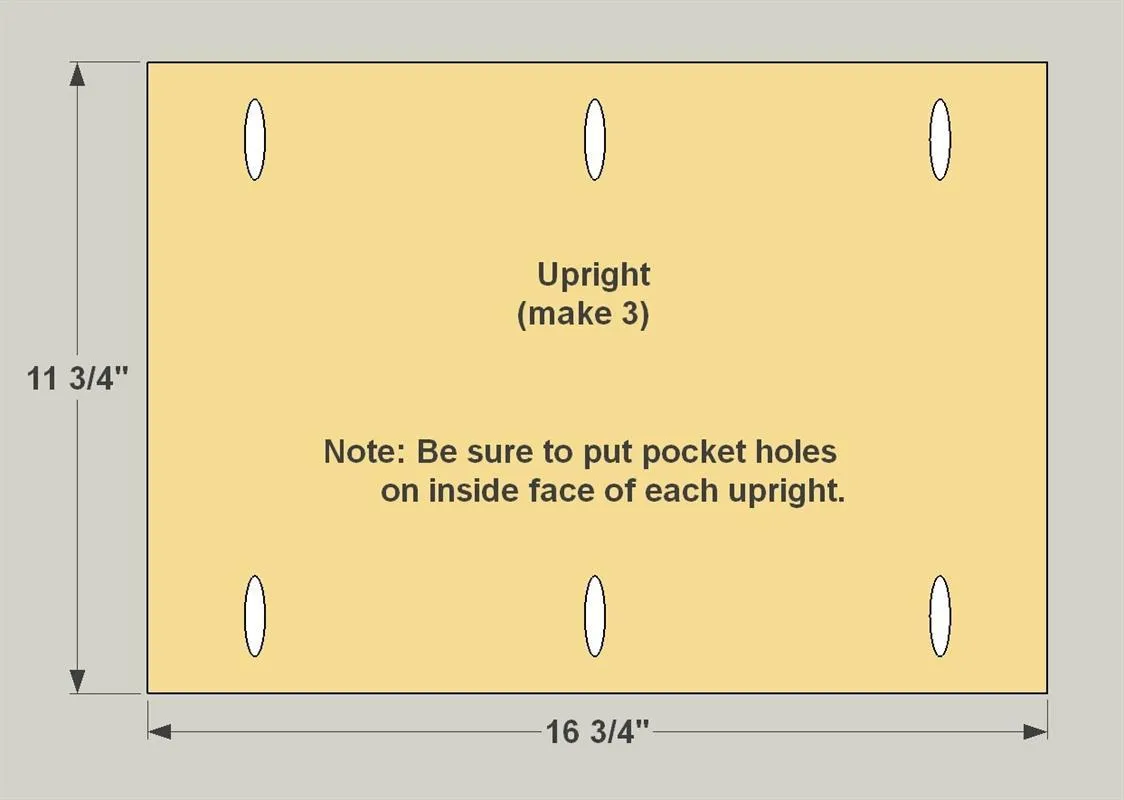
- Decide which will be the outside (most-visible) face of your Uprights. For the center one, it doesn’t really matter.
- Then, with your pocket-hole jig set up for 3/4" material, drill pocket holes in the back face of each Upright, as shown.
- Then apply edge banding to the front edge of each Upright.
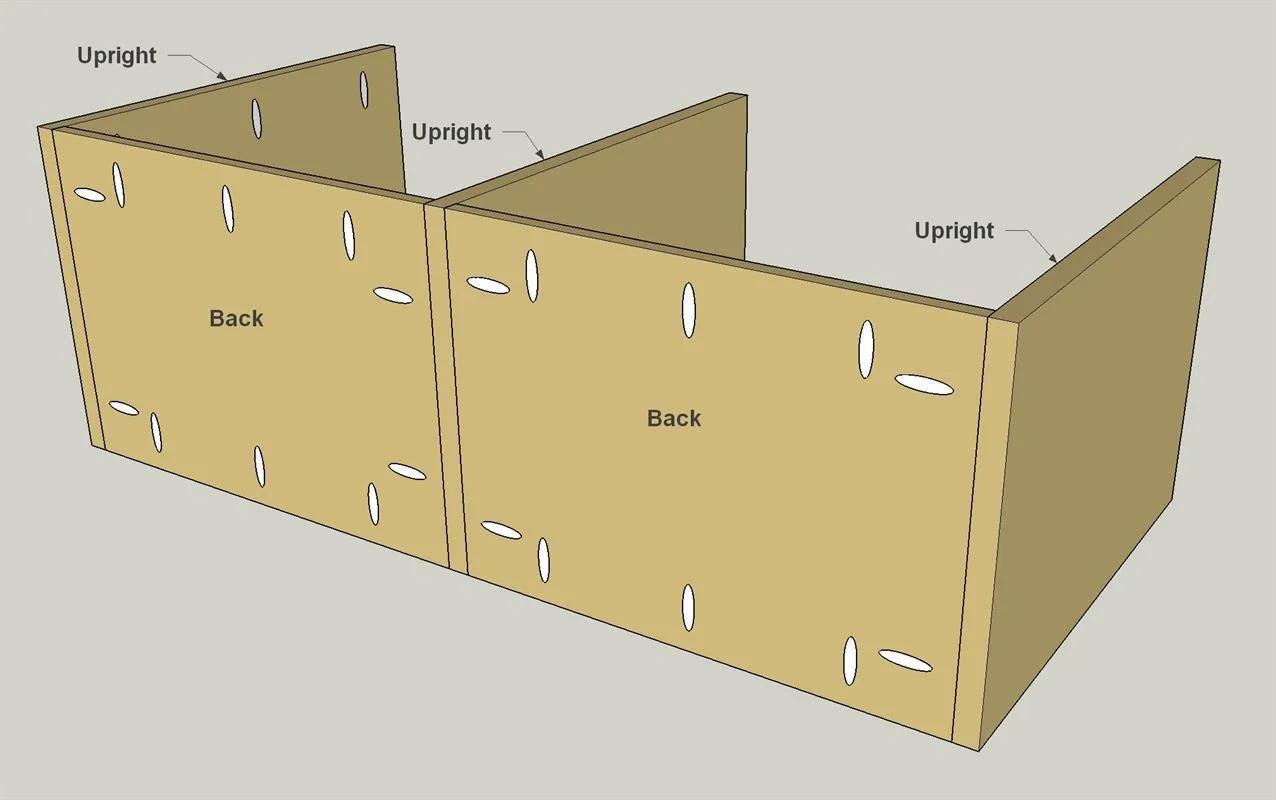
4. Add a Pair of Backs
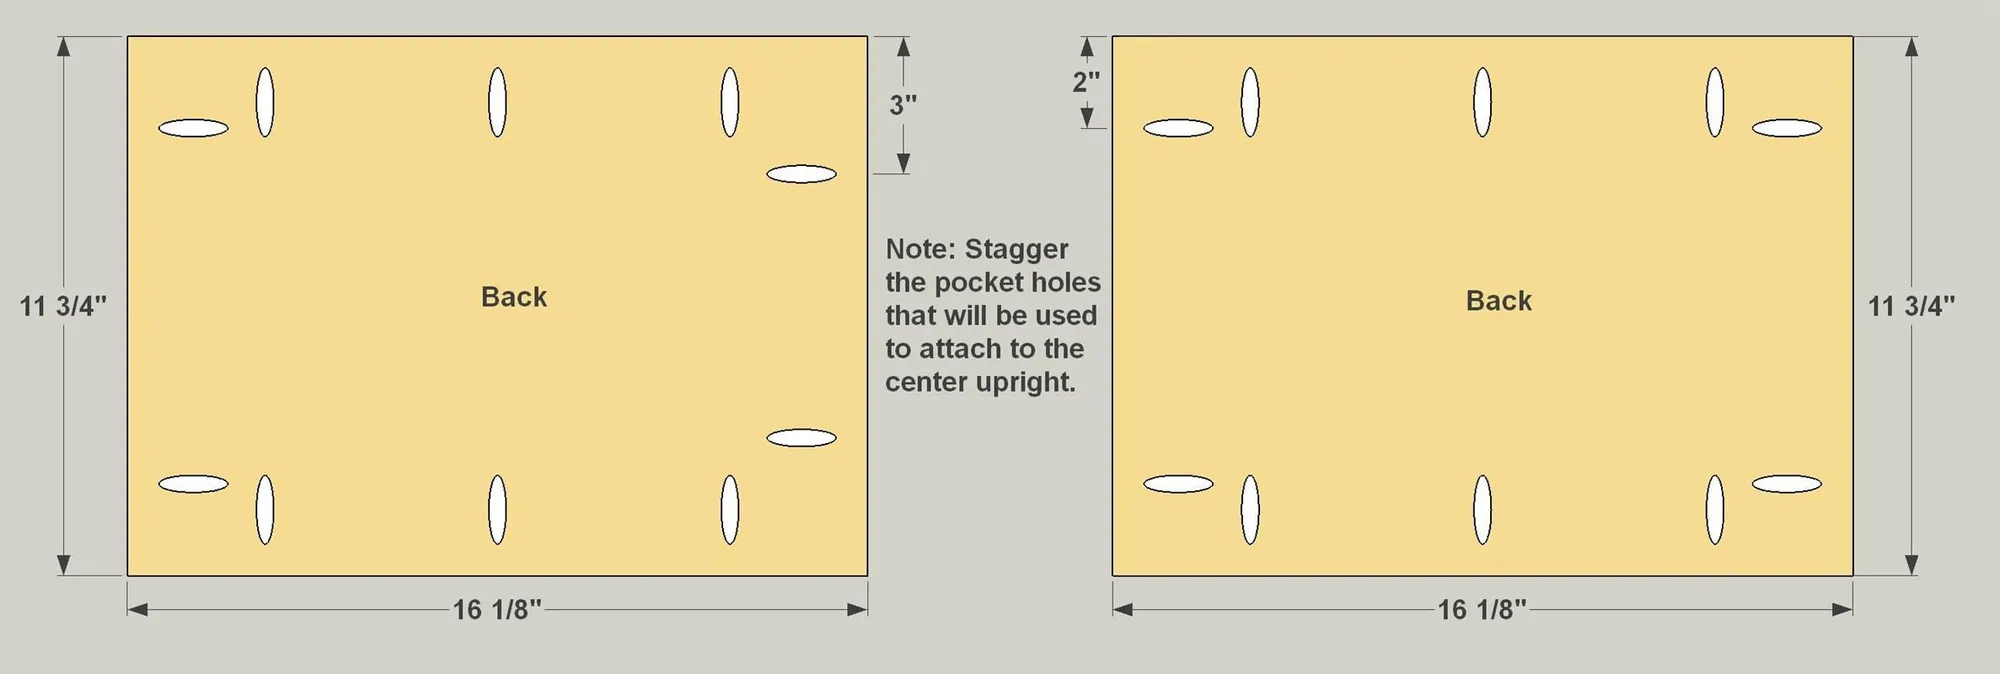
With your pocket-hole jig, set up for 3/4" material, drill pocket holes in the back face of each Back, as shown. Note that where the Backs attach to the center Upright, the pocket holes need to be staggered so the screws won’t hit one another during assembly.
5. Create the Rear Rail
Cut a Rear Rail to length from a 1x4 board, as shown in the cutting diagram. Then, with your pocket hole jig set up for 3/4" material, drill pocket holes in the back face of the Rear Rail, as shown.

6. Add Side Rails
- Cut two Side Rails to length from a 1x4 board, as shown in the cutting diagram. Use a compass to lay out the curved front corners, as shown.
- Cut the curves with a jig saw, and then sand them smooth.

7. Front Skirt Comes Next
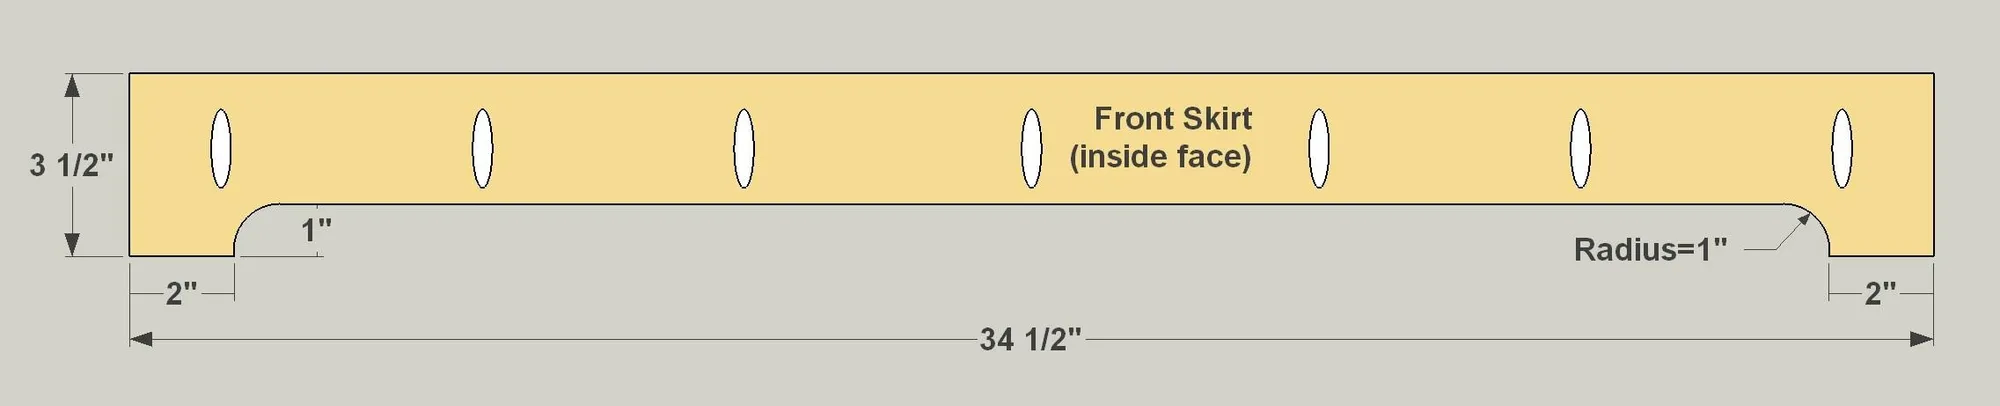
- Cut one Front Skirt to length from a 1x4 board, as shown in the cutting diagram. Use a compass to lay out the ends of the curved lower edge, then draw a straight line between them.
- Cut the shape with a jig saw, and then sand it smooth.
- Then, with your pocket-hole jig set up for 3/4" material, drill pocket holes in the inside face of the Front Skirt, as shown.
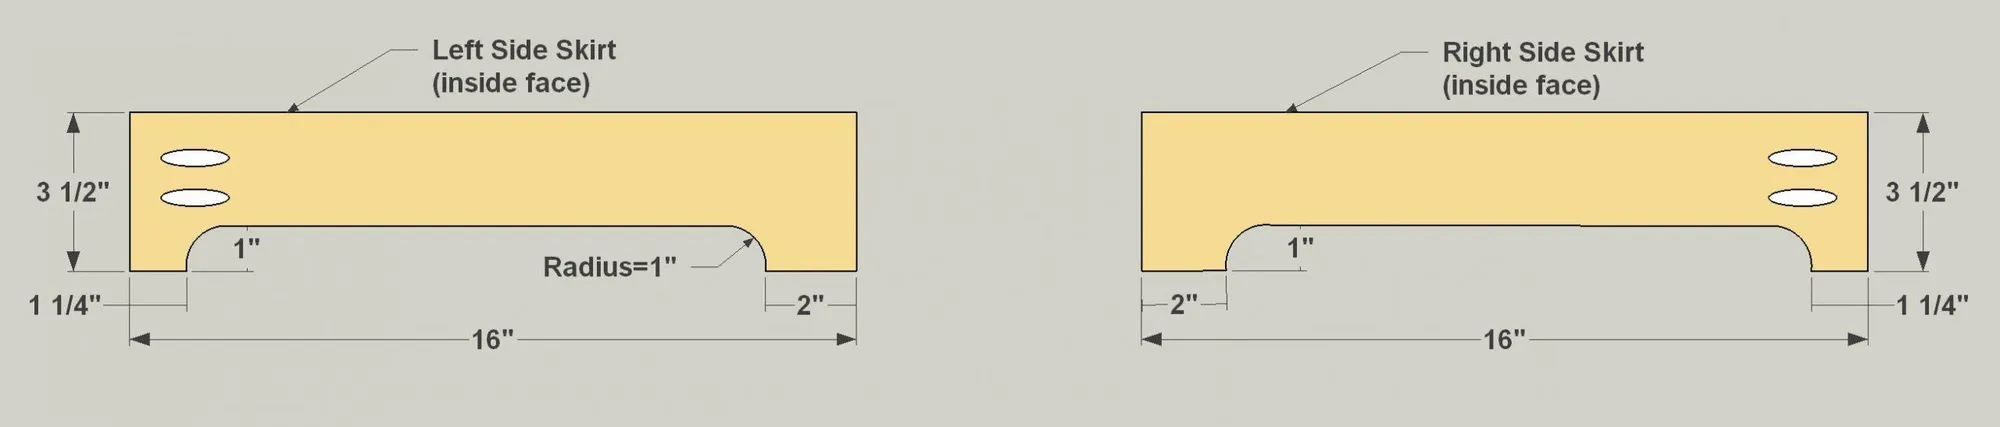
8. Add the Side Skirts
- Cut two Side Skirts to length from a 1x4 board, as shown in the cutting diagram. Use a compass to lay out the ends of the curved lower edge, then draw a straight line between them.
- Cut the shape with a jig saw, and then sand it smooth. Note that the curves are offset, and that you’ll be creating two “mirror-image” rails.
- Then, with your pocket-hole jig set up for 3/4" material, drill pocket holes in the inside face of each Side Skirt, as shown.
9. Finish Up Parts with a Rear Skirt
Cut one Rear Skirt to length from a 1x4 board, as shown in the cutting diagram. Then, with your pocket-hole jig set up for ¾” material, drill pocket holes in the inside face of the Rear Skirt, as shown.

10. Attach the Uprights and Back
Attach the Uprights to the Back using 1 1/4" coarse-thread pocket hole screws. Make sure that the finished edges of the Uprights are oriented correctly as you do this.
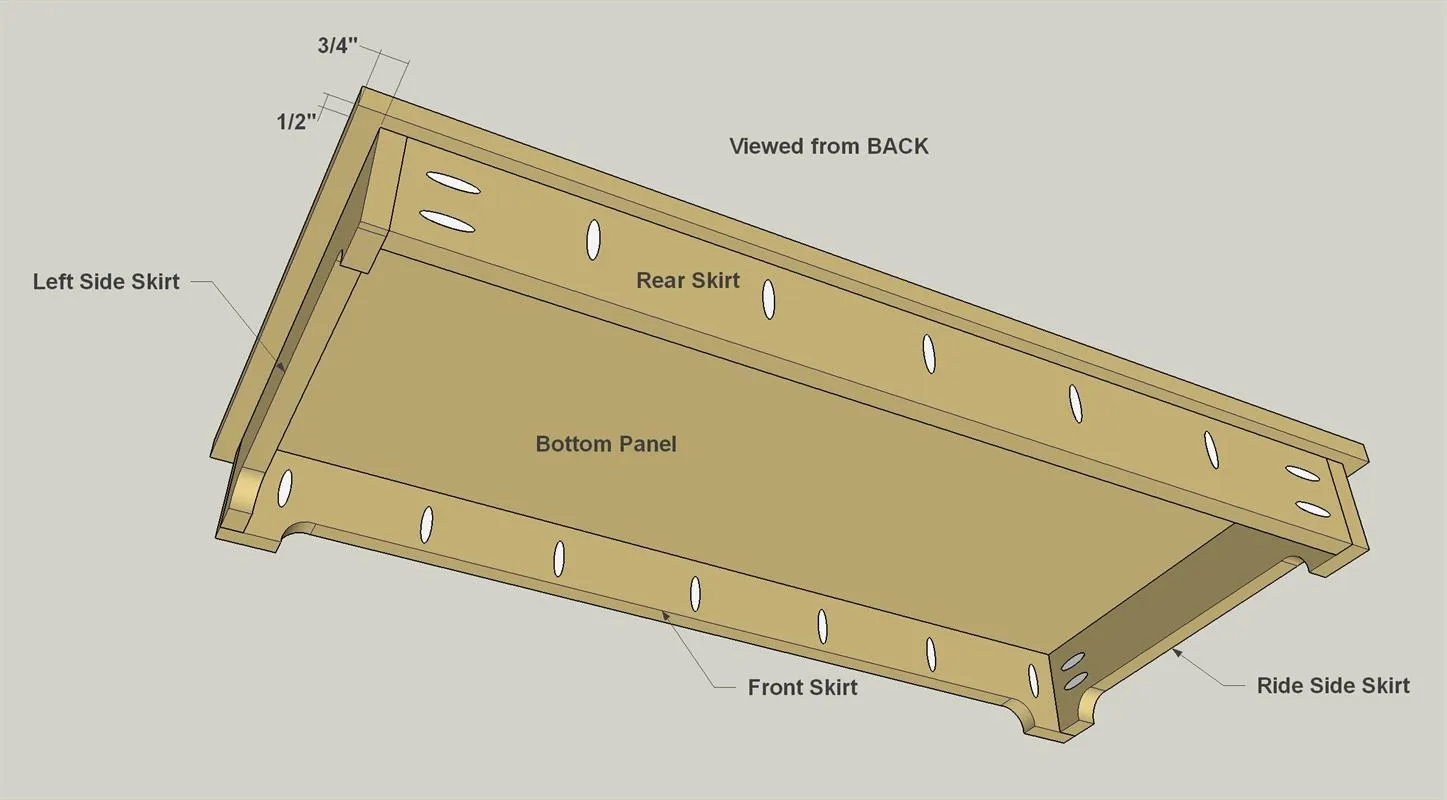
11. Assemble the Base and Skirts
- Assemble the Skirts using 1 1/4" fine-thread pocket hole screws.
- Then attach the skirt assembly to the Bottom Panel using 1 1/4" coarse-thread pocket hole screws, as shown. Note that the Bottom Panel overhangs by 3/4" on each end, and overhangs just 1/2" at the back.
12. Assemble the Rails and Seat
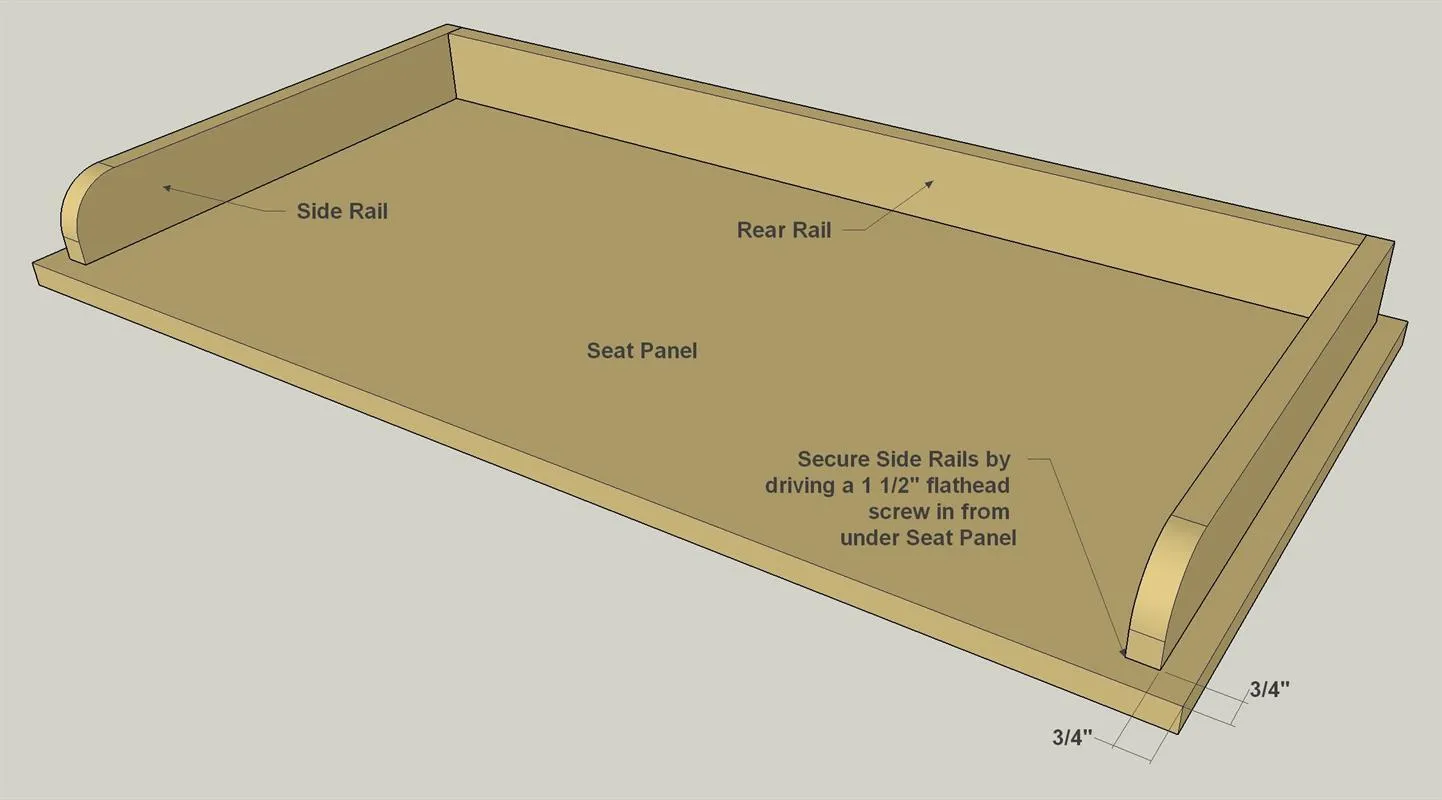
- Assemble the Rear Rail and Side Rails using 1 1/4" fine-thread pocket-hole screws.
- Position the rail assembly on the Seat Panel, and then drive 1 1/4" coarse-thread pocket-hole screws into the Seat Panel to attach the Rear Rail. At the front of each Side Rail, make sure the Rail is positioned correctly, and then drill a pilot hole into the rail using the hole in the seat panel to guide you.
- Then attach the Side Rails by driving 1 3/4" flat-head wood screws from underneath, as shown.
13. Wrap Up the Assembly
Now you can attach the base assembly and the seat assembly to the Uprights and Backs using 1 1/4" coarse-thread pocket-hole screws. If the square-drive bit that came with your pocket-hole jig is too long to let your drill fit inside the cubbies and drive the screws, pick up a shorter (3") #2 square-drive bit.
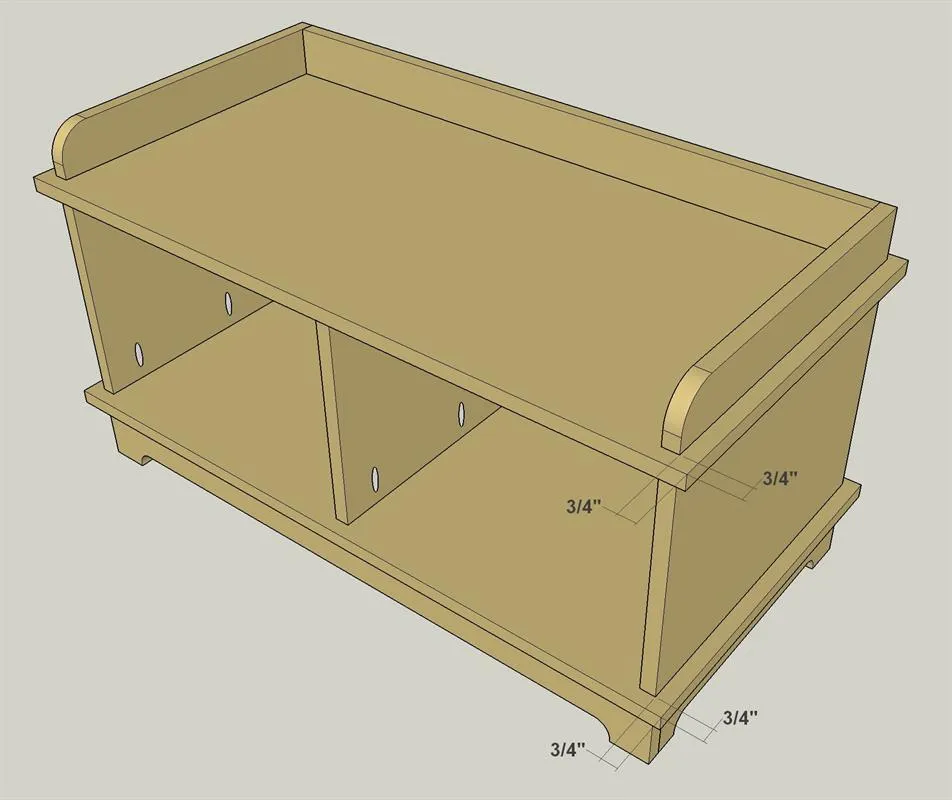
14. Sand and Add a Finish
With your bench assembled, do any touch-up sanding that’s needed, and then apply the finish, stain, or paint of your choice. Once it’s dry, your bench is ready to help organize your entryway.