 Notch
NotchUse your browser's Print (Ctrl/Cmd + P) and choose Save as PDF. This page works offline once you've opened it with a signal.
Drop-Front Desk
Create a work space almost anywhere with this drop-front desk.
- Difficulty
- Intermediate
- Time
- 4–7.5 hours
- Cost
- $$
Cut list
| Part | Qty | T × W × L | Material | ✓ |
|---|---|---|---|---|
| Side | 2 | 3" × 12" × 20" | — | ☐ |
| Desktop | 1 | 3" × 13" × 23" | — | ☐ |
| Bottom | 1 | 3" × 11" × 23" | — | ☐ |
| Mid Shelf | 1 | 3" × 8" × 23" | — | ☐ |
| Top Shelf | 1 | 3" × 5" × 23" | — | ☐ |
| Hanging Cleat | 1 | 3" × 23" × 23" | — | ☐ |
Materials
| Item | Qty | ✓ |
|---|---|---|
| Plywood, 3/4" Thick Half Sheet | 1 board | ☐ |
| 1 1/4" coarse-thread pocket-hole screws | 24 each | ☐ |
| 3/4" x 25' veneer edge banding | 1 each | ☐ |
| Adjustable lid supports | 2 each | ☐ |
| 18" (200-lb. capacity) Hangman heavy-duty picture hanger | 1 each | ☐ |
| Pair “sewing machine” hinges | 1 each | ☐ |
| 1 1/4" Forstner drill bit | 1 each | ☐ |
| Self-centering drill bit for #6 screws | 1 each | ☐ |
Overall cost: $$. Lumber varies by region, species, and season, so we give a band rather than a figure.
Tools
- Circular Saw
- Drill / Driver
- Iron for Edge Banding
- Jigsaw
- Pocket Hole Jig
- Random Orbit Sander
- Bar / Pipe Clamps — optional
- Combination Square — optional
- Tape Measure — optional
Instructions
1. Cut the Sides
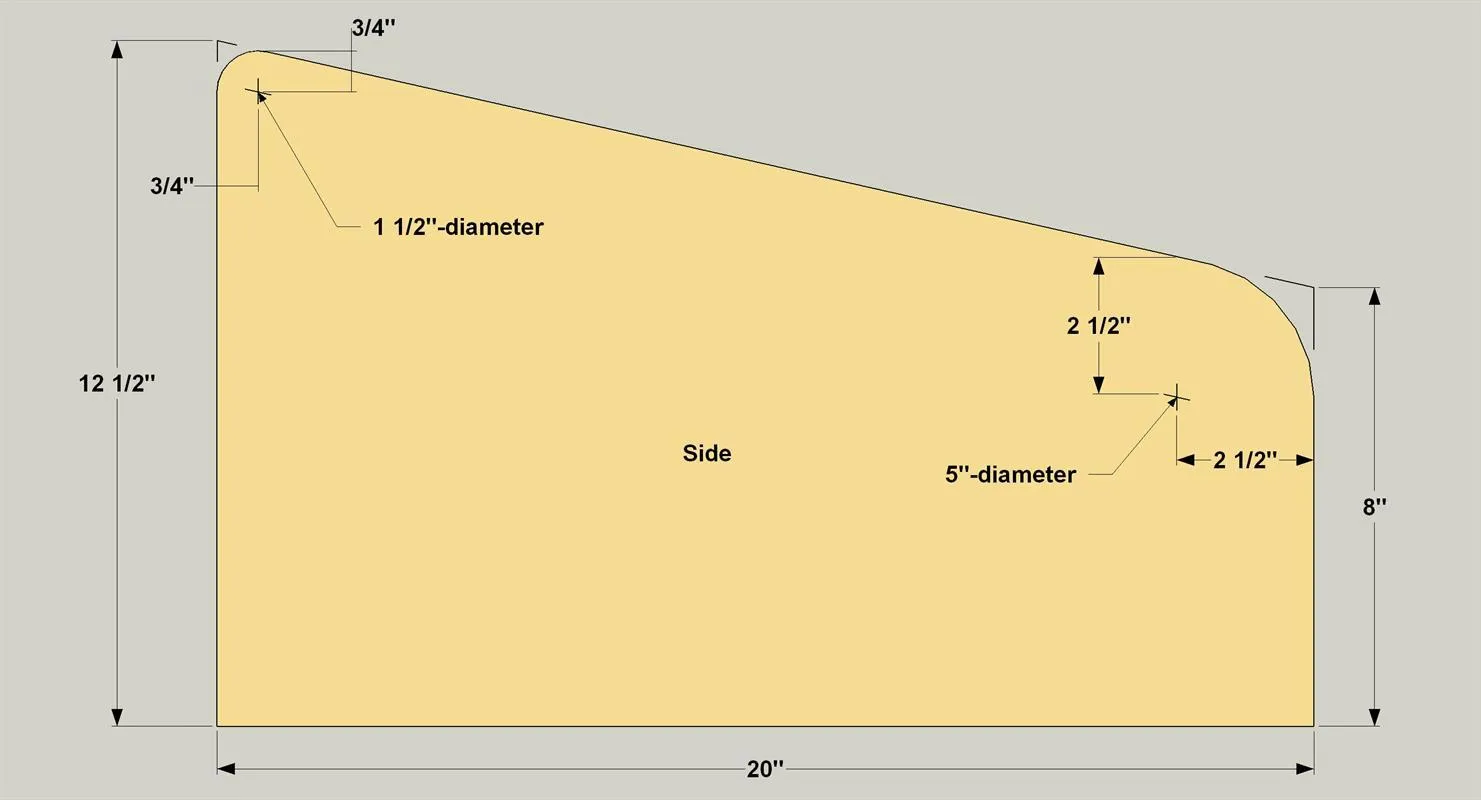
- Cut two Sides to size from 3/4" plywood, as shown in the cut diagram.
- Cut the Sides to shape with a jigsaw and sand the edges and the curves sooth. Make sure that both sides are as identical in shape as possible.
- Next, cut an oversized length of veneer edge banding for each Side, apply it using an iron to adhere it in place.
- Then trim the edging flush using a veneer trimmer and sand the edges smooth.
Tip: Use Common Objects to Lay Out Curve For a quick guide to laying out rounded edges, use objects around your shop or garage. A small vacuum attachment is about 1 1/2" in diameter for the small corner, and a 5" sanding disk works great for the larger corner. Quart cans work well too.
2. Cut the Shelves and Cleat
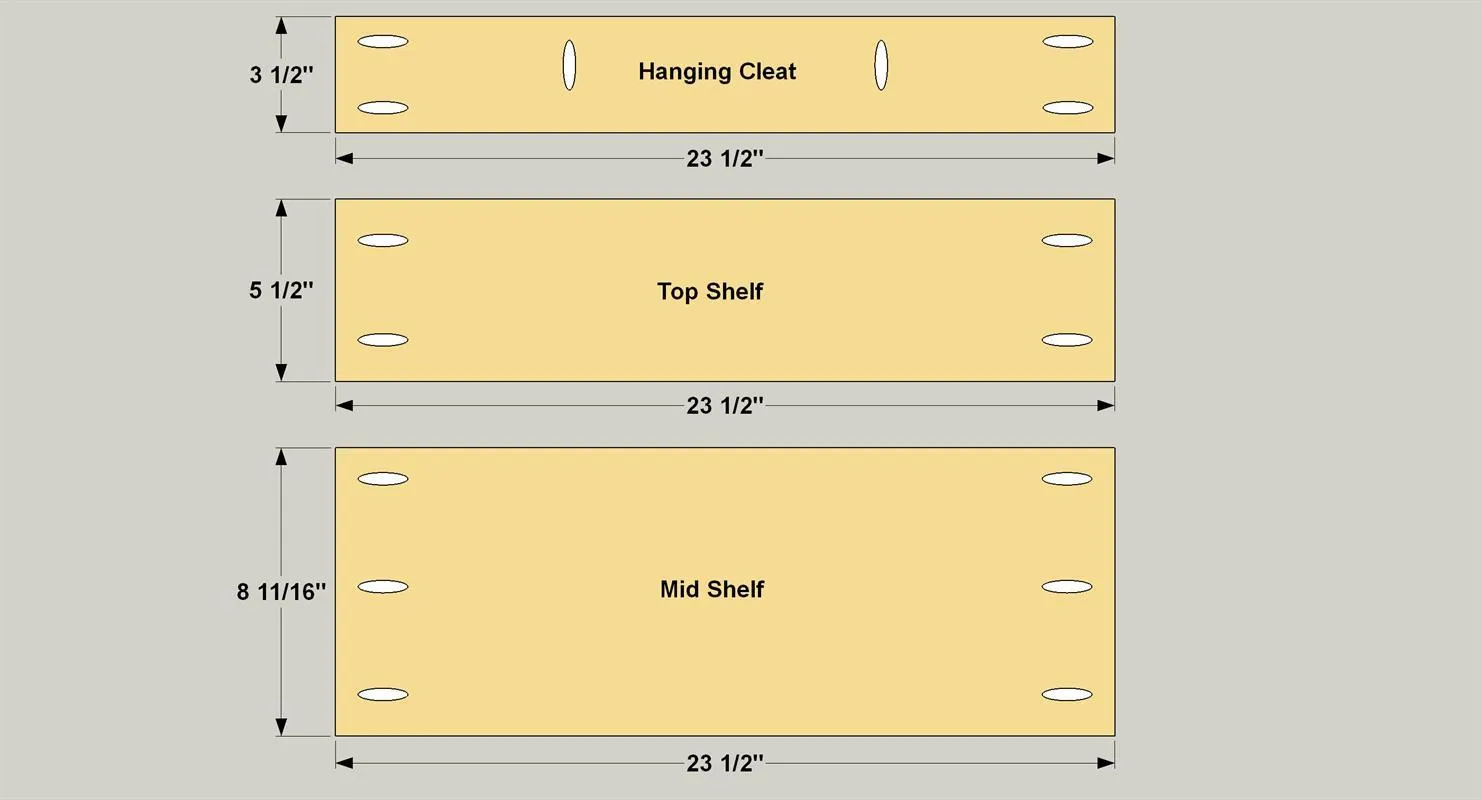
- Cut the Top Shelf, Mid Shelf, and the Hanging Cleat to size from 3/4" plywood, as shown in the cut diagram.
- Set your pocket-hole jig for 3/4"-thick material, and then drill pocket holes at the locations shown.
- Cut an oversize length of veneer edge banding for the front edge of Top Shelf and Mid Shelf, apply it, and then trim the edging flush and sand it smooth.
3. Cut the Bottom
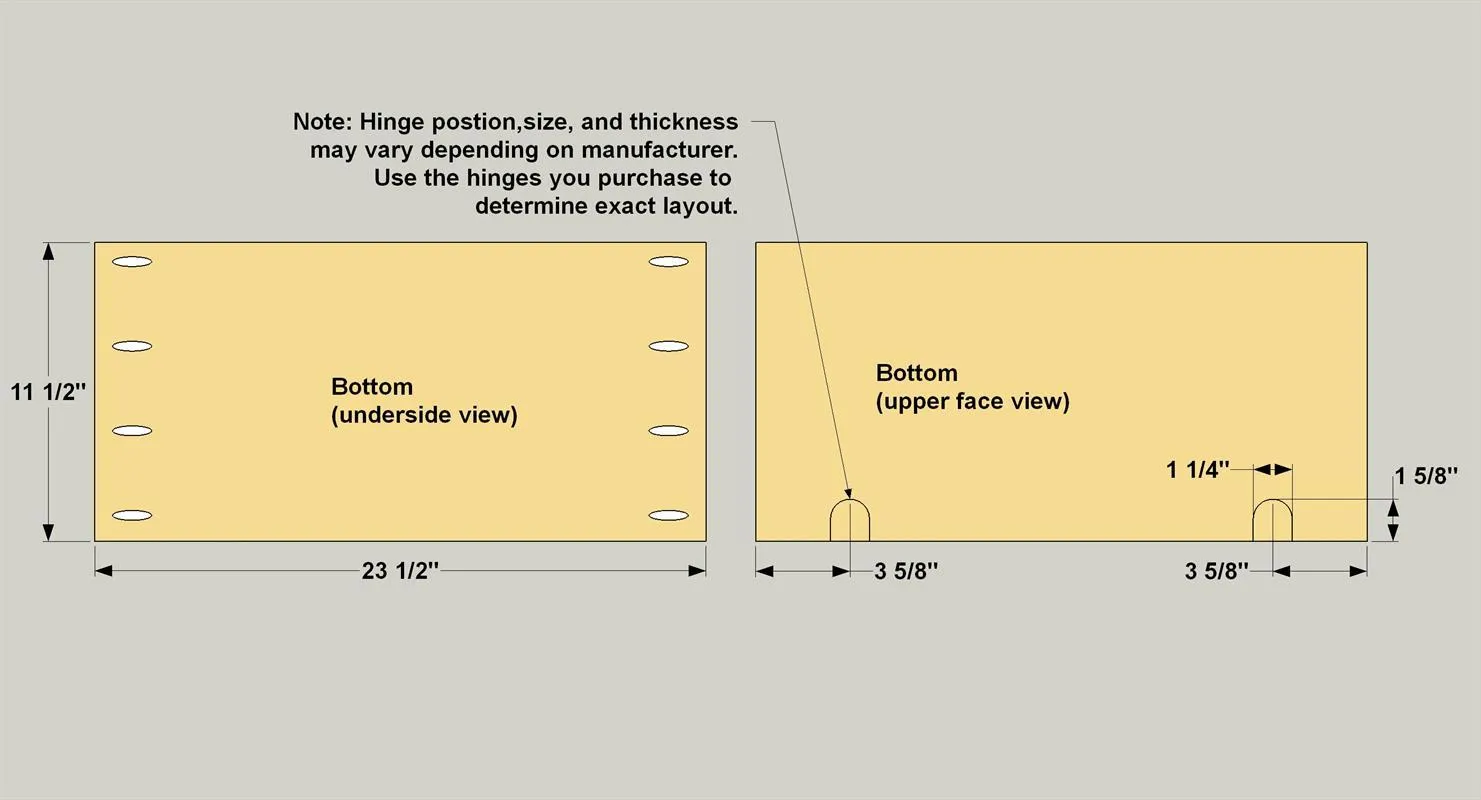
- Cut the Bottom to size from 3/4" plywood, as shown in the cut diagram.
- Drill pocket holes at the locations shown.
- Cut an oversized length of veneer edge banding for the front edges.
- Apply the edging, and then set the Bottom aside for now. You’ll lay out the hinge locations later.
4. Make the Desktop
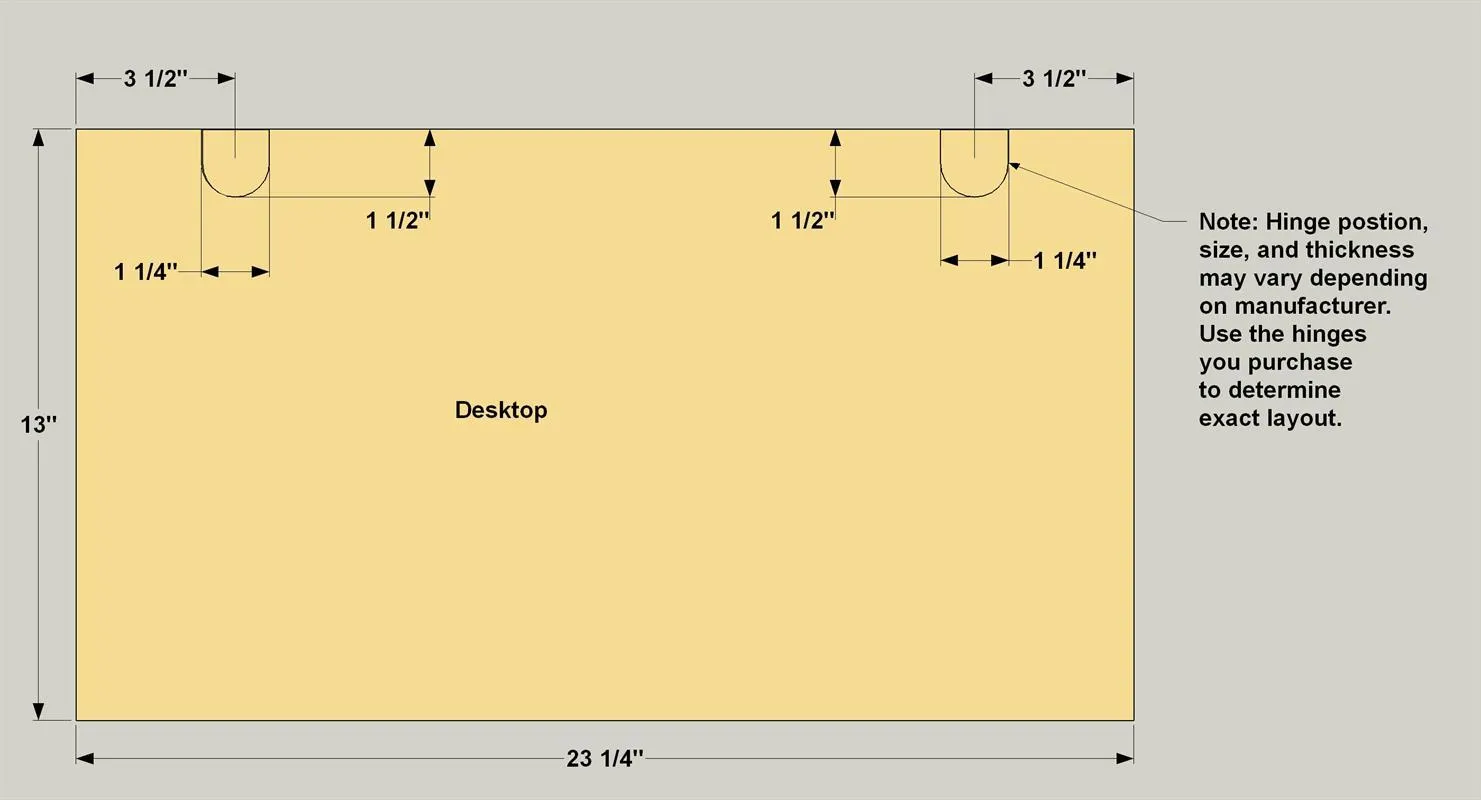
- Cut the Desktop to size from 3/4" plywood, as shown.
- Apply edging to all four edges, starting with the two short edges first. Using a pencil and an adjustable square, lay out the hinge locations. The hinge knuckle should just hang over the edge.
- Drill a hole that matches the radius and thickness of the hinge (in our case we used a 1 1/4" Forstner bit and drilled about 1/16" deep).
- Next, mark two lines on the outside of each hole with a square. Using a utility knife, carefully trim the excess material to the same depth as the hole.
- Check the fit of the hinges and then, with each hinge in place, drill the hinge screw holes using a #6 self-centering drill bit. Install the screws to temporarily secure the hinges to the Desktop.
Tip: Practice Drilling & Shim if Needed Practice drilling the shallow hinge holes to the proper depth on a scrap piece of plywood first. Drill the holes deep enough so the hinge is flush with top face of the plywood. If you should drill your actual hinge holes too deep, use masking tape or even leftover veneer edging underneath the hinge to raise it to the proper position.
5. Lay Out the Hinge on the Bottom
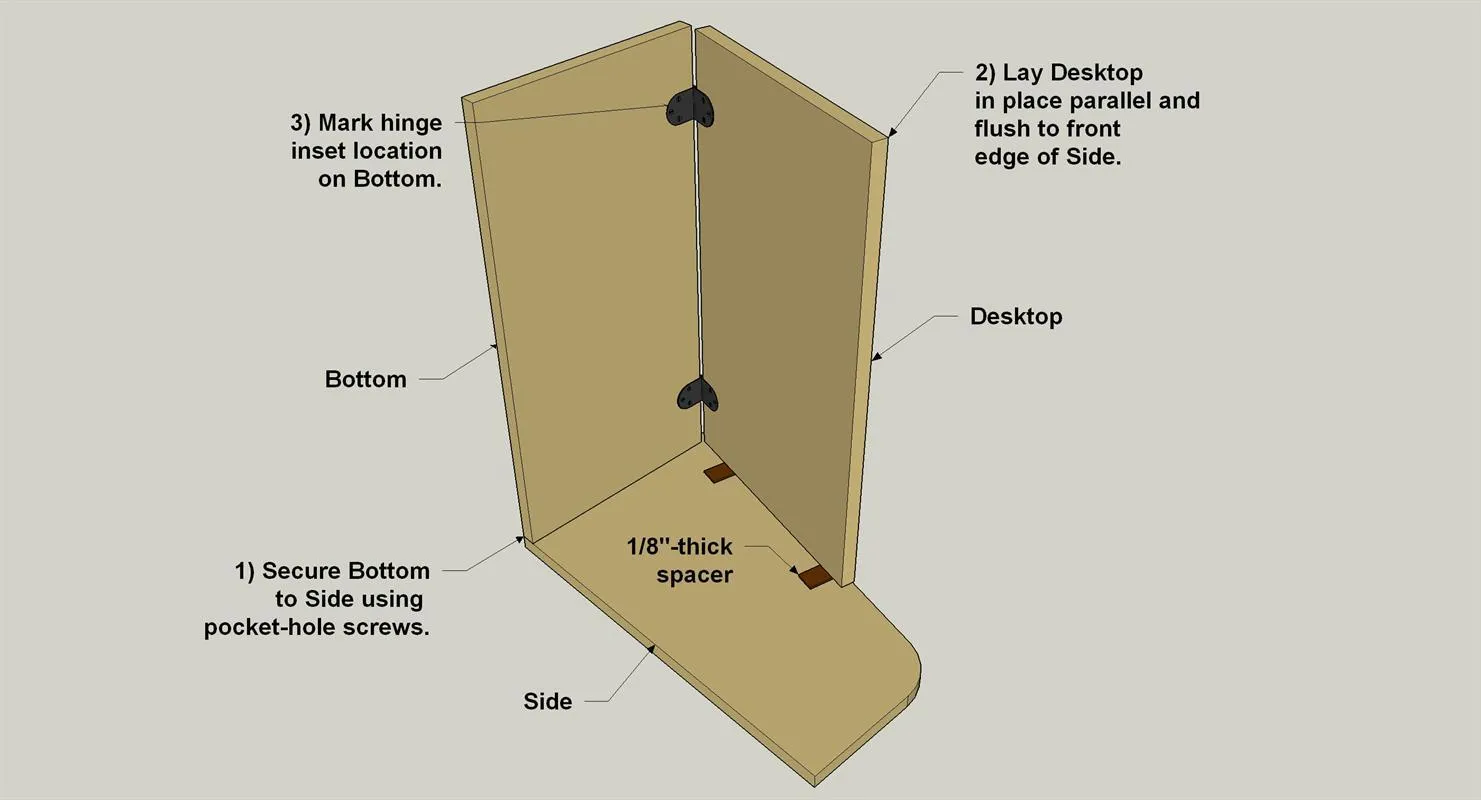
- The hinge location on the Bottom is critical so that when the Desktop is closed it rests parallel to and flush with the front edge of the Side. To accomplish this first temporarily attach the Bottom to one Side using 1 1/4" pocket-hole screws.
- Next, lay the Desktop, with the hinges installed, in place so it is parallel and flush with the front angled edge of the Side. Rest the Desktop on 1/8-thick shims.
- Clamp the Desktop in position or have someone help hold it.
- Then carefully trace around the hinge leaves to mark the hinge location on the desk Bottom.
6. Install the Hinges
- Once you have the hinge location marked on the Bottom, detach it from the Side.
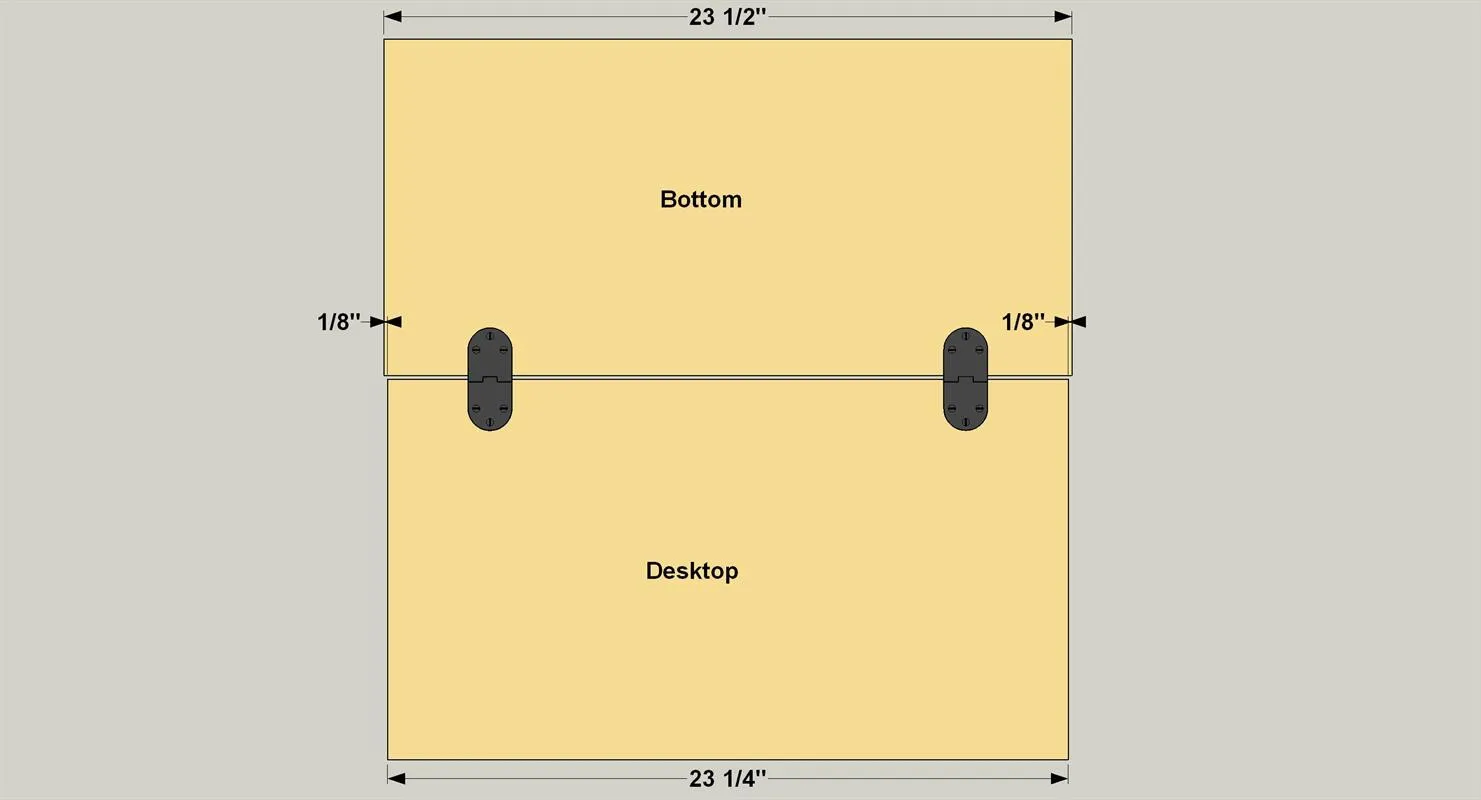
- Lay the Desktop and the Bottom on a flat work surface so the hinge locations face one another, and center them to one another so there is an equal gap on each side of the Desktop.
- Flip the loose hinge leaf onto the Bottom and double check your layout lines.
- Then drill and trim the hinge recess in the Bottom, just as you did in the Desktop.
- Drill the mounting holes, and then install hinges the hinges.
- Now you can remove the hinges from the Bottom and the Desktop. You’ll reinstall them later when the desk is complete.
7. Sand and Stain before Assembly
Sometimes it’s easier to finish individual parts than an assembled project. This is one of those times. So, before you start final assembly, sand all of the parts, and then apply the stain or finish of your choice. We used a black stain that creates a dramatic color while still allowing the grain to show. When it dried, we added a couple of coats of water-based polyurethane.
8. Start Final Assembly
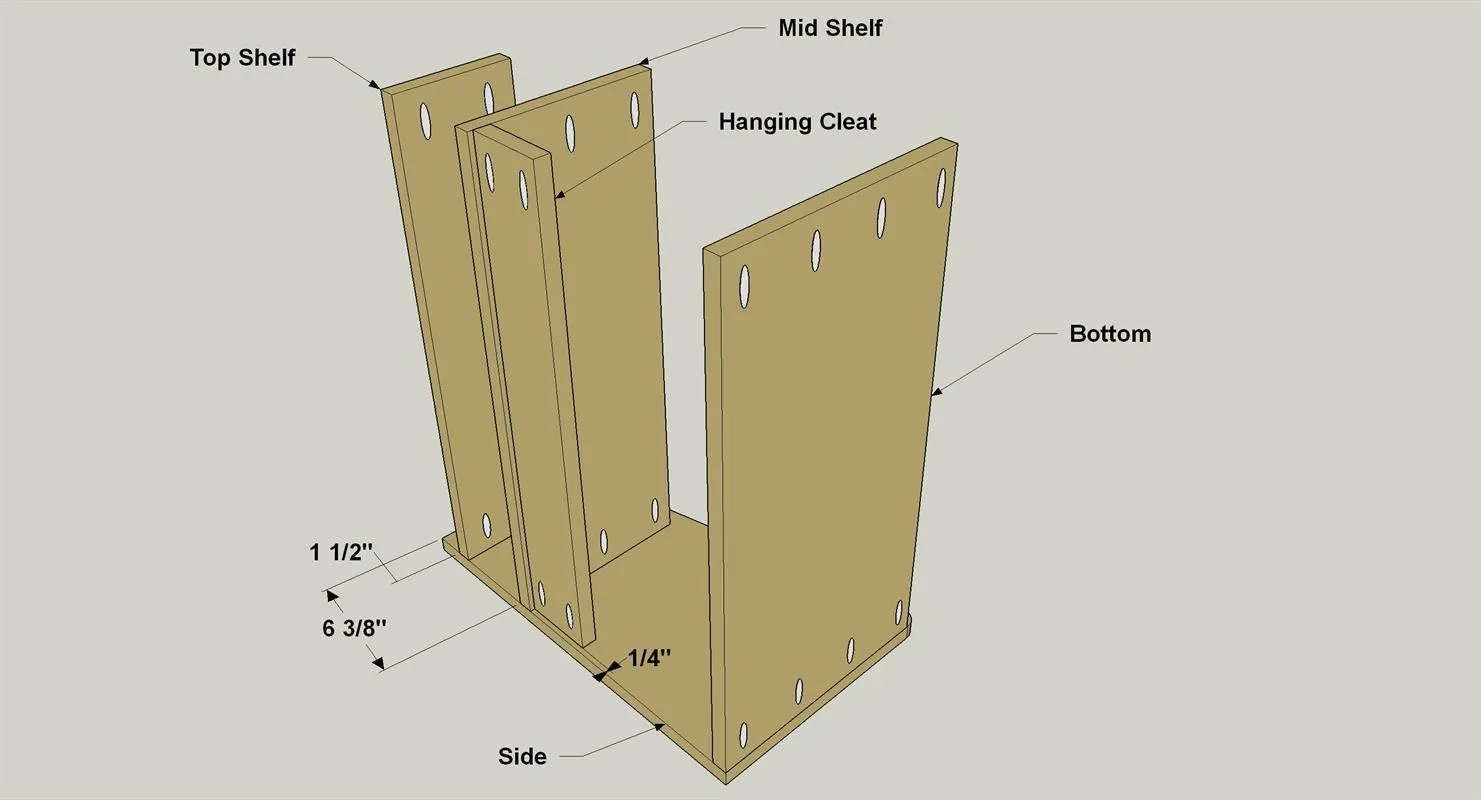
Once the finish is dry, attach the Bottom, Mid Shelf, Top Shelf, and the Cleat to one Side as shown using 1 1/4" coarse-thread pocket-hole screws.
9. Attach the Second Side
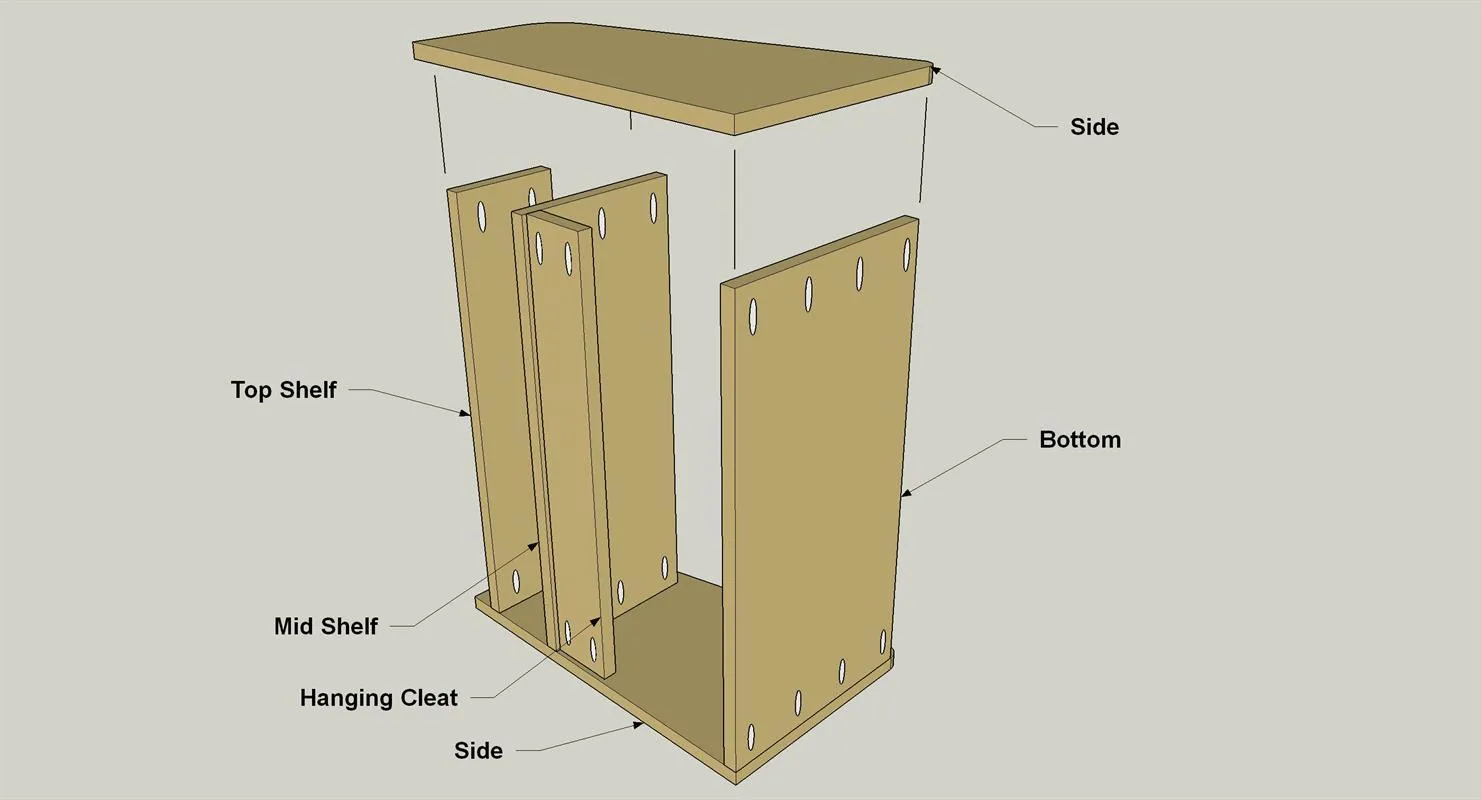
Flip the assembly over onto the second Side and attach this side, as well using 1 1/4" coarse-thread pocket-hole screws.
10. Install the Supports and Hanger
- Now your desk is almost complete. The next step is to install the lid supports. These are important to hold the desktop in position, and to prevent it from falling open too quickly. The supports we used cost a bit more than some versions, but they accomplish both tasks extremely well. Follow the manufacturer’s instructions to install and adjust the supports.
- Then you can install the hardware to hang your desk. We used an 18" “Hangman” hanger. Just follow the manufacturer’s instructions for mounting the hanger to the Cleat and to the wall.