 Notch
NotchUse your browser's Print (Ctrl/Cmd + P) and choose Save as PDF. This page works offline once you've opened it with a signal.
Doll House
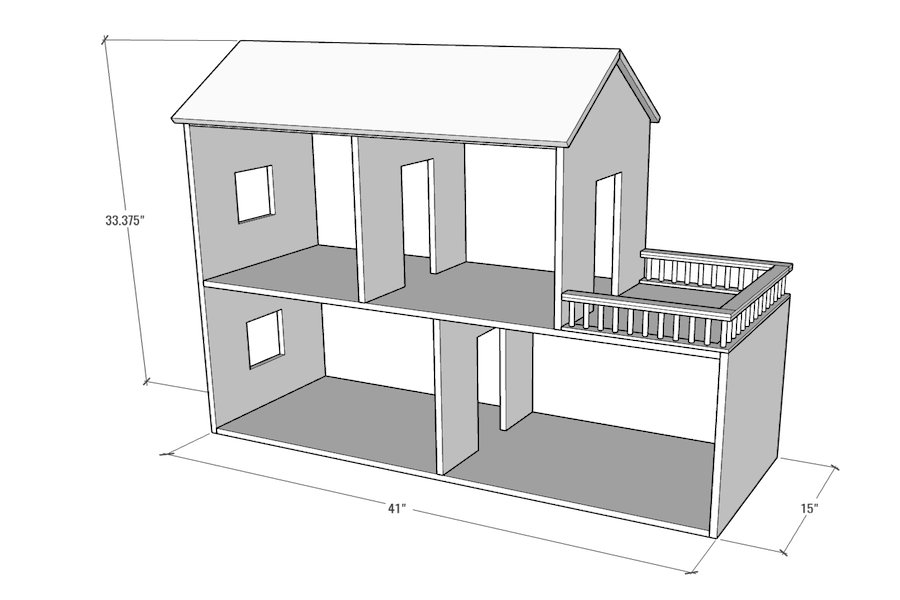
This doll house design can be used as the base for endless creativity and fun!
- Difficulty
- Advanced
- Time
- 5.5–10.8 hours
- Cost
- $$$$
Cut list
| Part | Qty | T × W × L | Material | ✓ |
|---|---|---|---|---|
| Back | 1 | 1/2" × 26" × 40" | — | ☐ |
| Bottom | 1 | 1/2" × 15" × 40" | — | ☐ |
| Mid-Shelf | 1 | 1/2" × 14" × 40" | — | ☐ |
| Top | 1 | 1" × 15" × 29" | — | ☐ |
| Roof Panels (cut with 35° beveled angle on one long side of each board) | 2 | 1/2" × 10" × 31" | — | ☐ |
| Interior Walls | 2 | 1/2" × 13" × 14 1/2" | — | ☐ |
| Right Lower Wall | 1 | 1/2" × 14" × 15" | — | ☐ |
| Top Right Wall | 1 | 1/2" × 15" × 18 3/4" | — | ☐ |
| Left Wall | 1 | 1/2" × 15" × 32 3/4" | — | ☐ |
| Moulding for railing (or custom cut) | 6 | 1/4" × 1/2" × 11" | — | ☐ |
| Moulding for railing (or custom cut) | 3 | 1/4" × 1/2" × 13" | — | ☐ |
Materials
| Item | Qty | ✓ |
|---|---|---|
| Plywood, 1/2” x 4’ x 8’ | 1 board | ☐ |
| Plywood, 1/2" x 2’ x 4’ | 1 board | ☐ |
| Moulding for railing (or custom cut), 1/4" x 1/2" x 48” | 3 board | ☐ |
| Wood dowels for railing, 5/16” | 35 board | ☐ |
| Box of 1" Kreg Pocket hole Hardware Screws (see tools list) | 1 each | ☐ |
| Box of 1-1/4" brad nails | 1 each | ☐ |
| Pencil | 1 each | ☐ |
| Wood glue | 1 each | ☐ |
| Super glue | 1 each | ☐ |
| Pack of various sandpaper grits | 1 each | ☐ |
Overall cost: $$$$. Lumber varies by region, species, and season, so we give a band rather than a figure.
Tools
- Brad Nailer
- Circular Saw
- Drill / Driver
- Jigsaw
- Pocket Hole Jig
- Random Orbit Sander
- Table Saw
- Bar / Pipe Clamps — optional
- Tape Measure — optional
Instructions
1. Step One
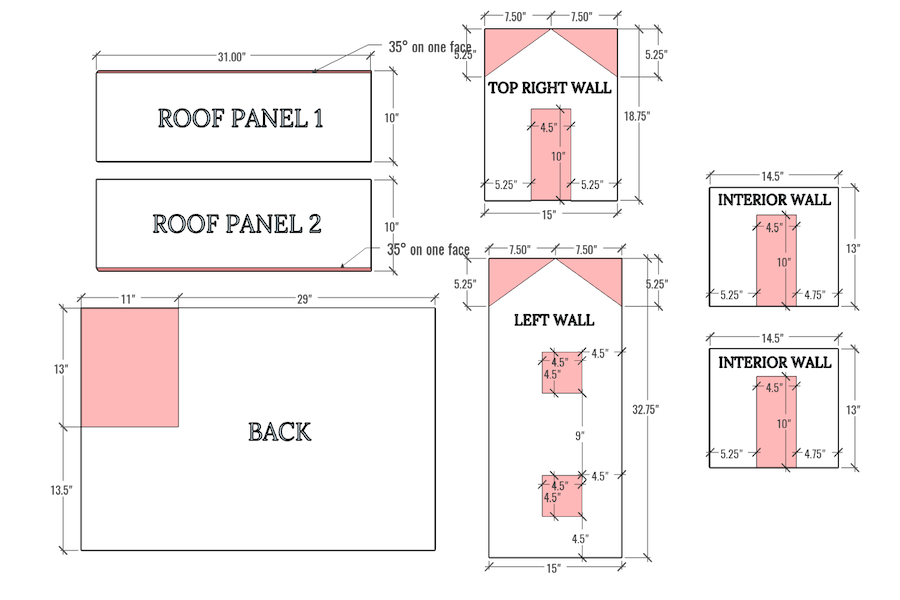
- Cut all parts to size as per the CUT LIST/DIAGRAM to get the base pieces. To ensure you keep the correct orientations, mark each piece with name and dimensions on each side and edge.
- Then follow the cut locations indicated the image with a jig saw to create the cutouts for the doors and windows.
- Cut the portion of the BACK as shown.
- Cut a 35° bevel angle on one of the long ends of each of the ROOF PANELS
2. Step Two
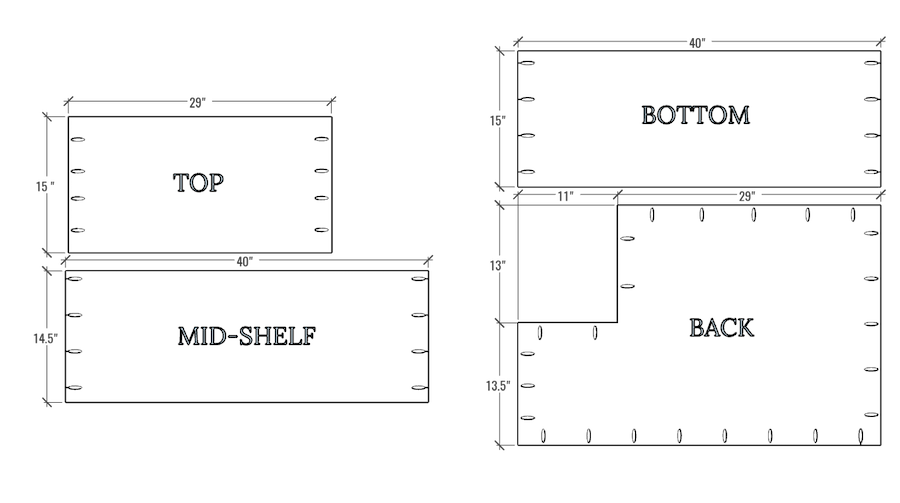
Drill pocket holes in the locations shown using the 1/2" setting on your drill bit collar. Your Kreg 720PRO will automatically adjust for the thickness of the wood. Again, mark all pieces accordingly
3. Step Three
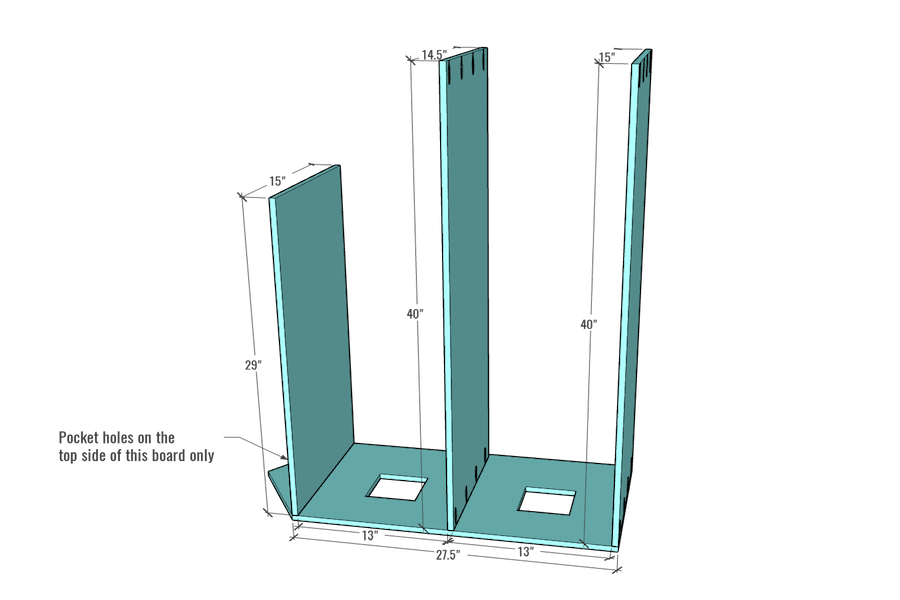
- Lay the LEFT WALL down flat on your work surface and attach the TOP SHELF, MID SHELF and BOTTOM in the locations shown using wood glue and 1” pocket-hole screws. Note that the pocket holes on the TOP SHELF should face upwards.
- Also, the MID-SHELF is 14-1/2" wide versus the other two boards which are 15”. Make sure the MID-SHELF is aligned with the front of the LEFT WALL.
4. Step Four
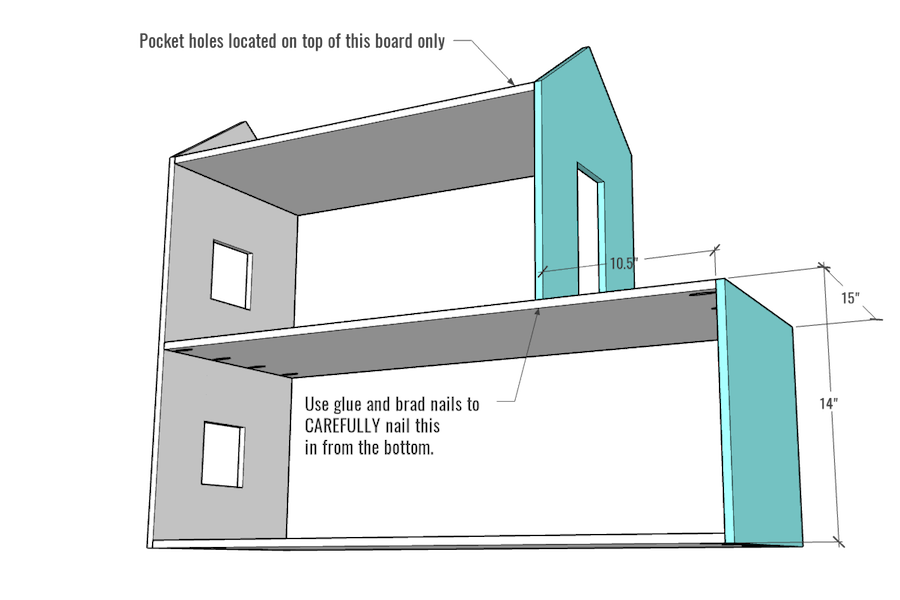
Attach the RIGHT BOTTOM WALL and RIGHT TOP WALL as shown using wood glue and 1” pocket hole screws. The bottom of the RIGHT TOP WALL should be attached using glue and 1-1/4" brad nails very carefully from the underside of the MID-SHELF.
5. Step Five
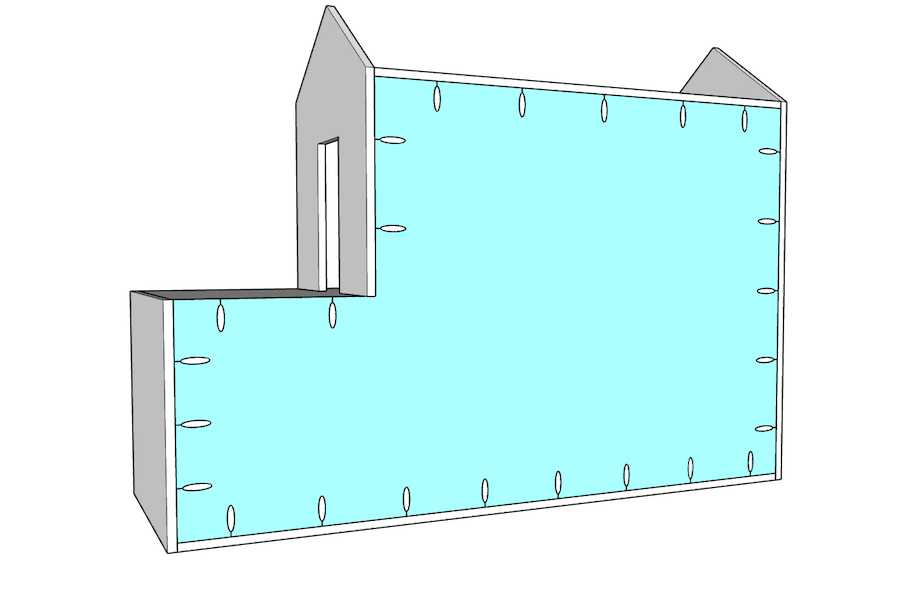
Insert the BACK into the open space and attach with 1" pocket hole screws around the perimeter.
6. Step Six
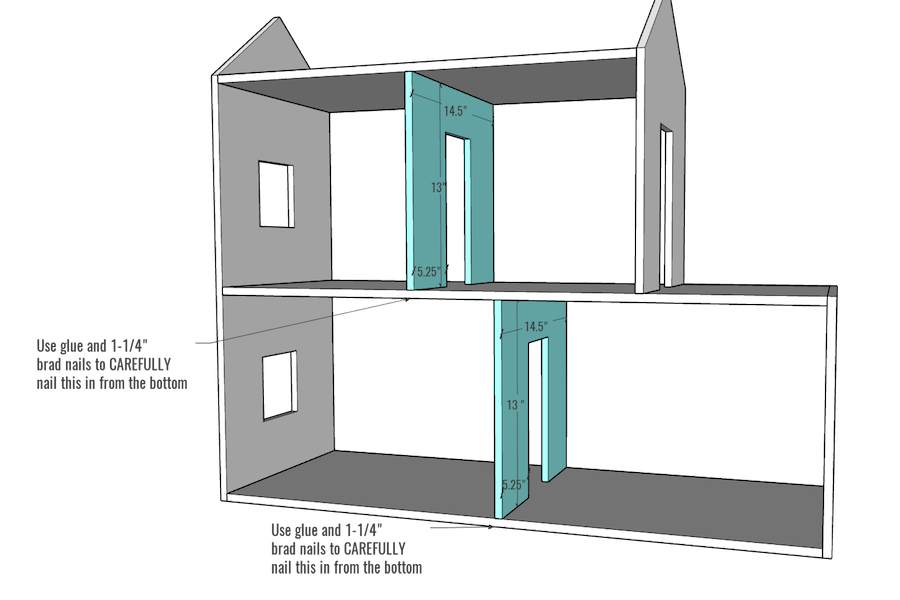
Insert the INTERIOR WALLS at any location you wish to divide up the rooms. We chose to place ours in the middle of each open are to have equal rooms on each side, but you can customize this to your liking as long as they offset each other. Carefully attach in place from the top and bottom of each with wood glue and 1-1/4" brad nails.
7. Step Seven
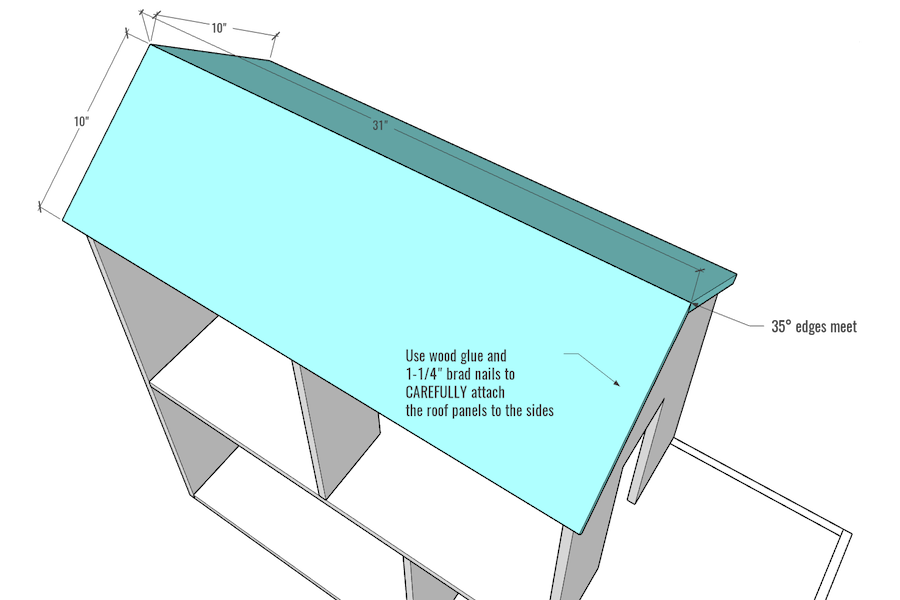
Attach the ROOF PANELS 1 & 2 with the 35° bevel angles meeting at the peak of the roof. Use wood glue and 1-1/4" brad nails along the side walls to secure in place.
8. Step Eight
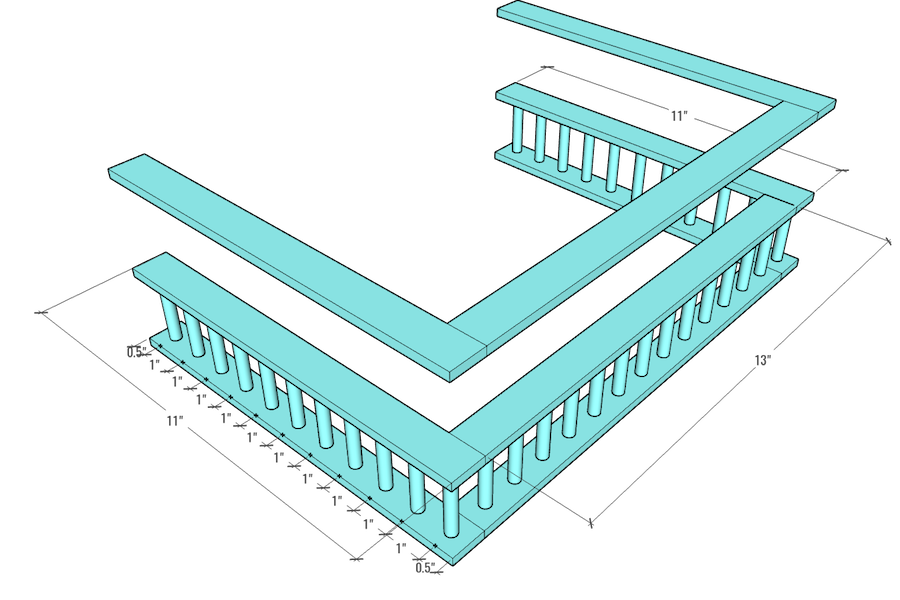
The railing is optional and can be customized. We used 5/16” dowels as the balusters and 1/4" x 1/2" moulding pieces to create this. We cut the moulding pieces to length and then drilled 5/16” holes in the locations shown (follow the same measurement pattern for each side) using the Kreg Drilling Guide. It’s ok if you drill right through the pieces. Use super glue or wood glue to secure the dowels in the holes. Add another layer of moulding for the top of the railing to hide the holes you may have drilled through and secure it with super glue or wood glue.
9. Step Nine
Super glue / wood glue the railing in place.
10. Step Ten
You can customize in many different ways. You’ll notice we used cedar shakes we purchased online for the roofing, but you can simply use paint. We used popsicle sticks for the flooring and simply glued them on and stained them, but you could use some shelf liner. We added some crown moulding, baseboard, custom build a kitchen and fireplace.The ideas are endless. You could purchase or build your own furniture. For how we finished our doll house and more great ideas, follow the link in the extras!