 Notch
Notch- Difficulty
- Intermediate
- Time
- 6.5–12.8 hours
- Cost
- $$$
About this build
Create a great-looking home for your television with this stylish TV stand. It accommodates up to 60″ screens, and offers space for components and a few decor pieces. Holes make it easy to run cords in back out of view. You can build it from a single sheet of plywood and a few other supplies.
Tools
Essential
- Circular Saw
- Drill / Driver
- Jigsaw
- Miter Saw
- Pocket Hole Jig
- Random Orbit Sander
Optional / nice to have
- Bar / Pipe Clamps
- Combination Square
- Tape Measure
Materials
| Item | Qty |
|---|---|
| Plywood, 3/4" Thick Full Sheet | 1 board |
| 1 1/4" coarse-thread pocket hole screws | 36 each |
| #10 x 1" panhead screws | 24 each |
| 2" x 36" 1/8"-thick aluminum angle | 2 each |
| 25' roll iron-on oak edge banding | 1 each |
| Pint black gel stain | 1 each |
| Quart clear top-coat finish | 1 each |
| 2" Forstner bit | 1 each |
| Right-angle drill attachment | 1 each |
| Roll painter's tape | 1 each |
| “Final Stripping” finishing pad | 1 each |
| “Between Coats” finishing pad | 1 each |
| “Final Finish” finishing pad | 1 each |
| Veneer edge trimmer | 1 each |
| Wood glue | 1 each |
Overall cost: $$$. Lumber prices vary by region, species, and season, so we give a band rather than a figure we would only be pretending to know.
Cut list
| Part | Qty | T × W × L |
|---|---|---|
| Top Panel | 1 | 3" × 15" × 60" |
| Middle Panel | 1 | 3" × 15" × 60" |
| Bottom Panel | 1 | 3" × 15" × 60" |
| Side | 2 | 3" × 5" × 12" |
| Side Filler | 2 | 3" × 5" × 12" |
| Top Support | 1 | 3" × 5" × 30" |
| Divider | 2 | 3" × 5" × 15" |
| Back Center | 1 | 3" × 5" × 19" |
| Back Side | 2 | 3" × 5" × 18" |
| Leg | 4 | 1/8" × 2" × 17" |
What to buy
Buy 6 boards at 8 ft.
3" × 15"
3 boards
3" × 5"
2 boards
1/8" × 2"
1 board
Assumes 8 ft stock, a 1/8" saw kerf, and buying each part at its own width. Change the board size or kerf on the full board plan →
Instructions
1Review the Procedures
- The assembly of this project is a little different than we normally use. For this one, it’s best to make all of the parts first, and then do an initial assembly. That way, you can position and align the legs. When everything fits just right, disassemble the stand and mark the locations of the parts so they go back in the same place.
- Then sand, clean, and finish all of the parts while you can get to all of the surfaces easily. After that, you can put everything back together to complete the project.
- Also, this project is made from plywood (we used oak).
- Check out the Tip below to make sure your plywood looks its best.
Tip: Put the Best Face Forward Plywood typically has two different grades of veneer faces. One face uses a better looking veneer. The other side has veneer that is usually less attractive. Obviously, you want the best-looking side to be the ones that show. So, as you make your project parts, be sure to note which are the “show” faces. That way, you’ll end up with a project that has consistent-looking panels and the best appearance.
2Start at the Top, Middle & Bottom
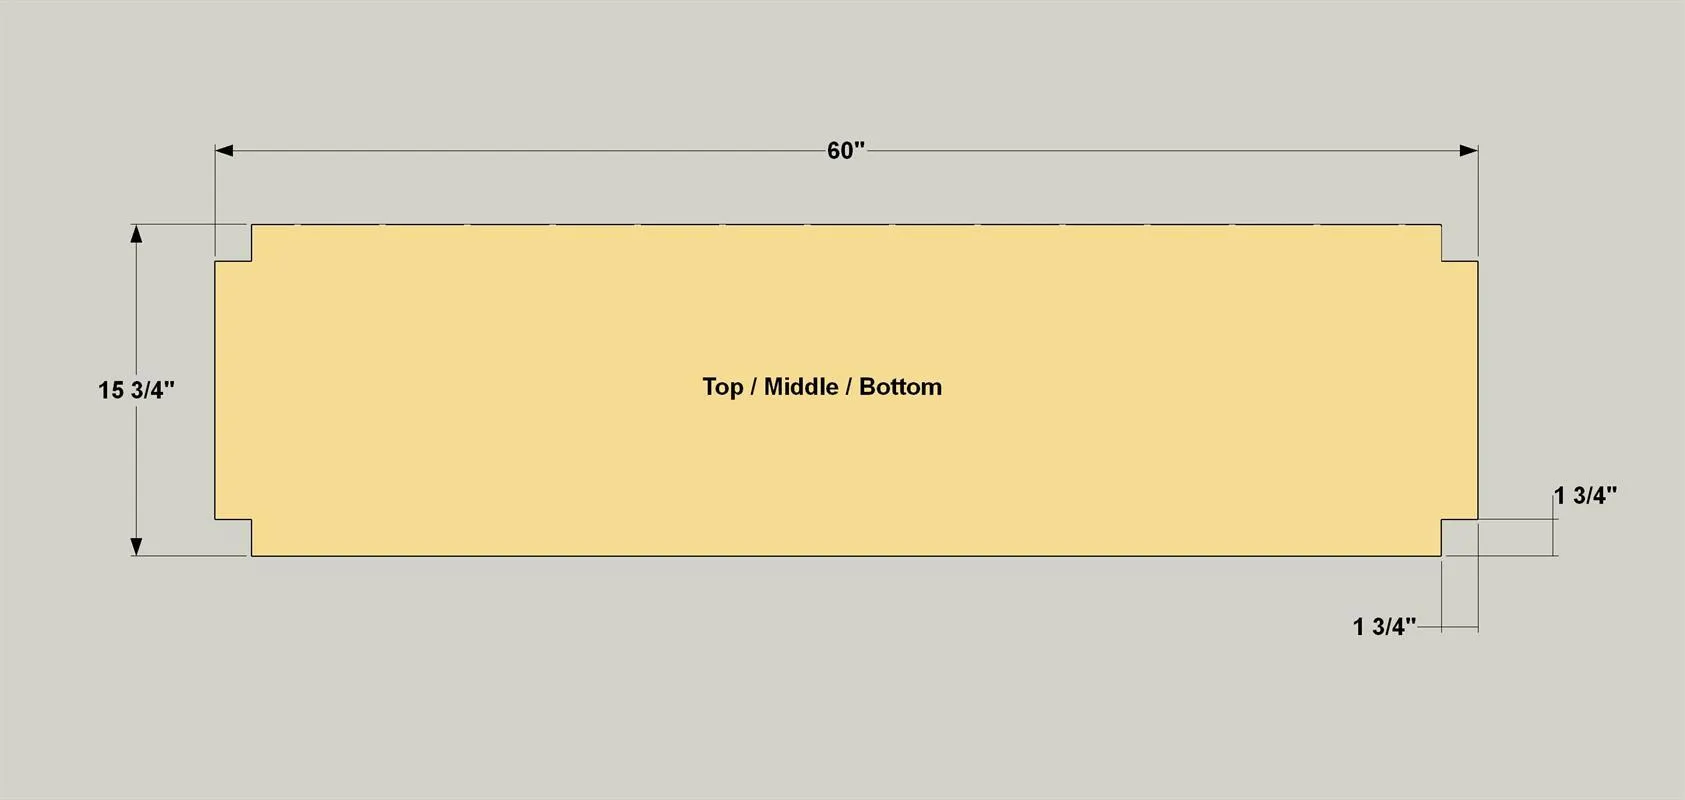
Cut the Top, Middle, and Bottom Panel to size from 3/4" oak veneer plywood as shown in the cutting diagram. These panels are all exactly the same, so make sure your cuts are consistent. To get good-quality cuts, check out the Tip below. Choose which Panel you’ll use as the Top Panel, and mark it. A great way to do that without leaving marks on your wood is to apply masking tape and write on the tape.
Tip: How to Get Great Cuts in Plywood Want to get smooth, straight, and accurate cuts in plywood using a circular saw? Follow the advice in this video.
3Cut the Notches
Now you need to cut the notches at all four corners of the Top, Middle, and Bottom Panels. The Tip below offers a couple of great ways to ensure clean, accurate cuts. One great way to make sure all of the notches are the same is to stack the panels and cut the notches in all three at the same time. Be sure to align the panel edges and ends, and clamp them together securely.
- Tip: Strategies for Clean Jigsaw Cuts Cutting plywood with a jigsaw can easily tear up the fragile face veneer, but there are a few simple things you can do to prevent it.
- First, be sure to use a blade designed for “clean” or “fine” cuts. These blades have a lot of small teeth, so each one takes a small “bite” as you cut. You can also cover the plywood with masking tape. It helps hold the fragile veneer fibers in place. Plus, you can mark layout lines on the tape so they’re easy to see. To ensure straight cuts, clamp a board in place to guide the saw.
- Finally, cut slowly so that the blade can do its job without forcing the cut, and without deflecting.
4Veneer the Panel Edges
From a roll of iron on veneer edge banding, cut six side pieces and three front pieces for the Top, Middle, and Bottom Panels. Make the pieces slightly long. Apply the edge banding with a hot iron. After the edging cools, trim the veneer tape flush. Use a sharp utility to trim the ends. For the edges, you can use the knife, or use a veneer edge trimmer, as shown in the Tip below. Lightly sand the cut edges so they’re smooth and flush with the surrounding surfaces.
Tip: Trim Edge Banding Easily A utility knife will do the job of cutting iron-on veneer edge banding, but it can be tedious. For around $10 at a home center, you can pick up a veneer edge trimmer that does the job quickly and easily. It simply slides along the plywood, trimming the edging almost perfectly flush.
5Make Side Panels and Side Fillers
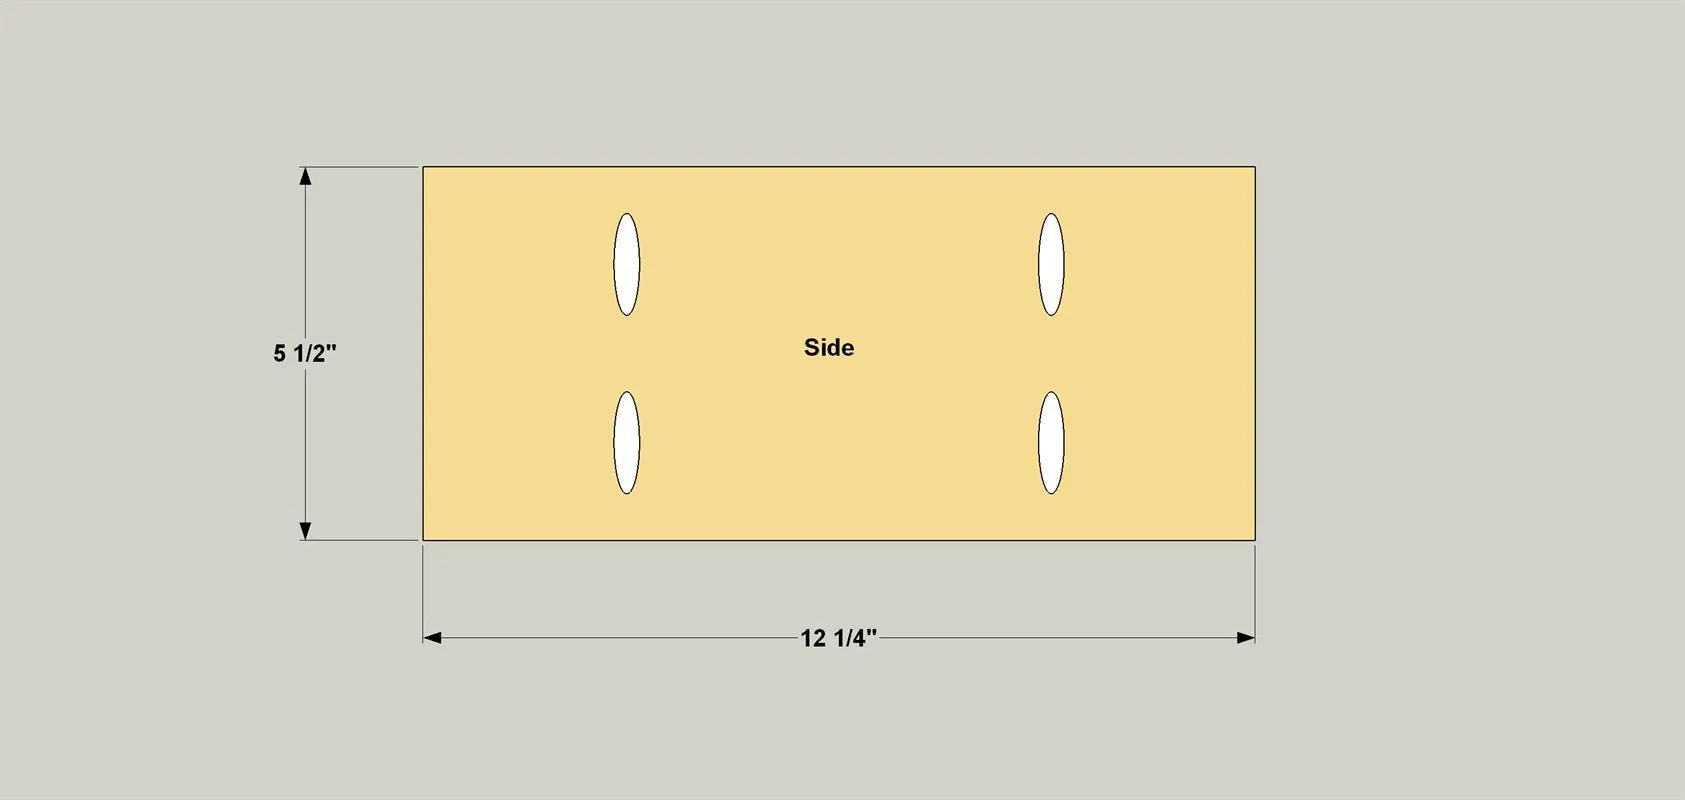
- Cut two Sides and two Side Fillers to size as shown in the cutting diagram. You’ll see that these, as well as the rest of the plywood parts are all 5 1/2" wide. A great way to make these pieces is to cut a series of 5 1/2"-wide strips from your plywood.
- Then crosscut the pieces all to length at the miter saw.
- Once you’ve cut your Sides and Side Fillers, set your pocket hole jig for 3/4" thick material, and then drill pocket holes in the two Sides, as shown. The Side Fillers don’t need pocket holes. They’ll simply get glued in during final assembly in Step 18.
6Create the Dividers
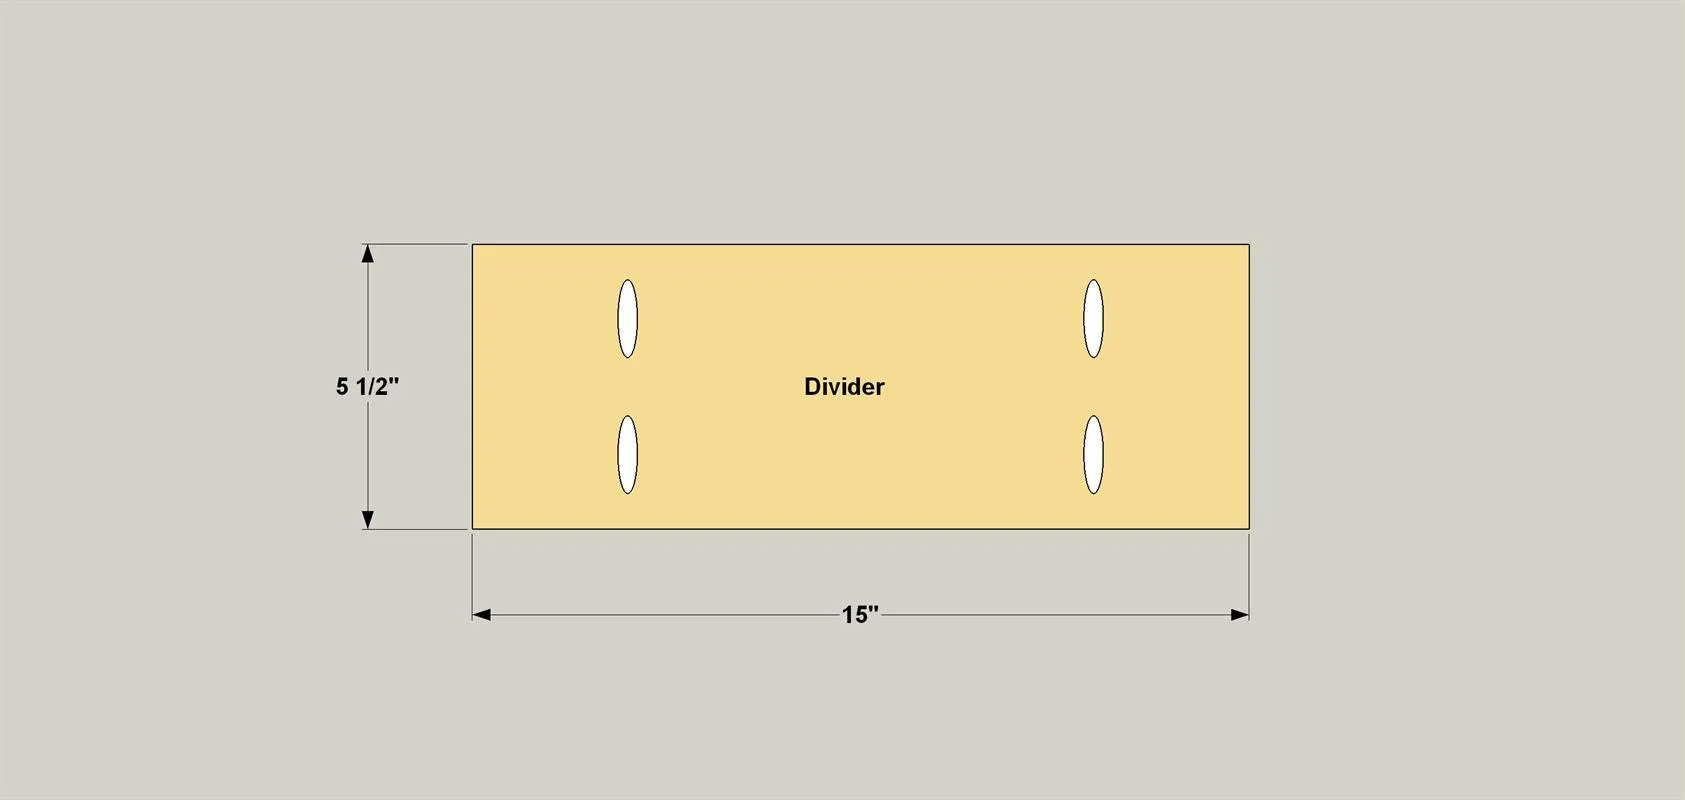
- Cut two dividers to size as shown in the cutting diagram, and drill pocket holes where shown.
- Cut two pieces of veneer edge banding long enough to cover one short edge on each of the Dividers.
- Apply the edge banding, and then trim it flush.
7Make a Top Support
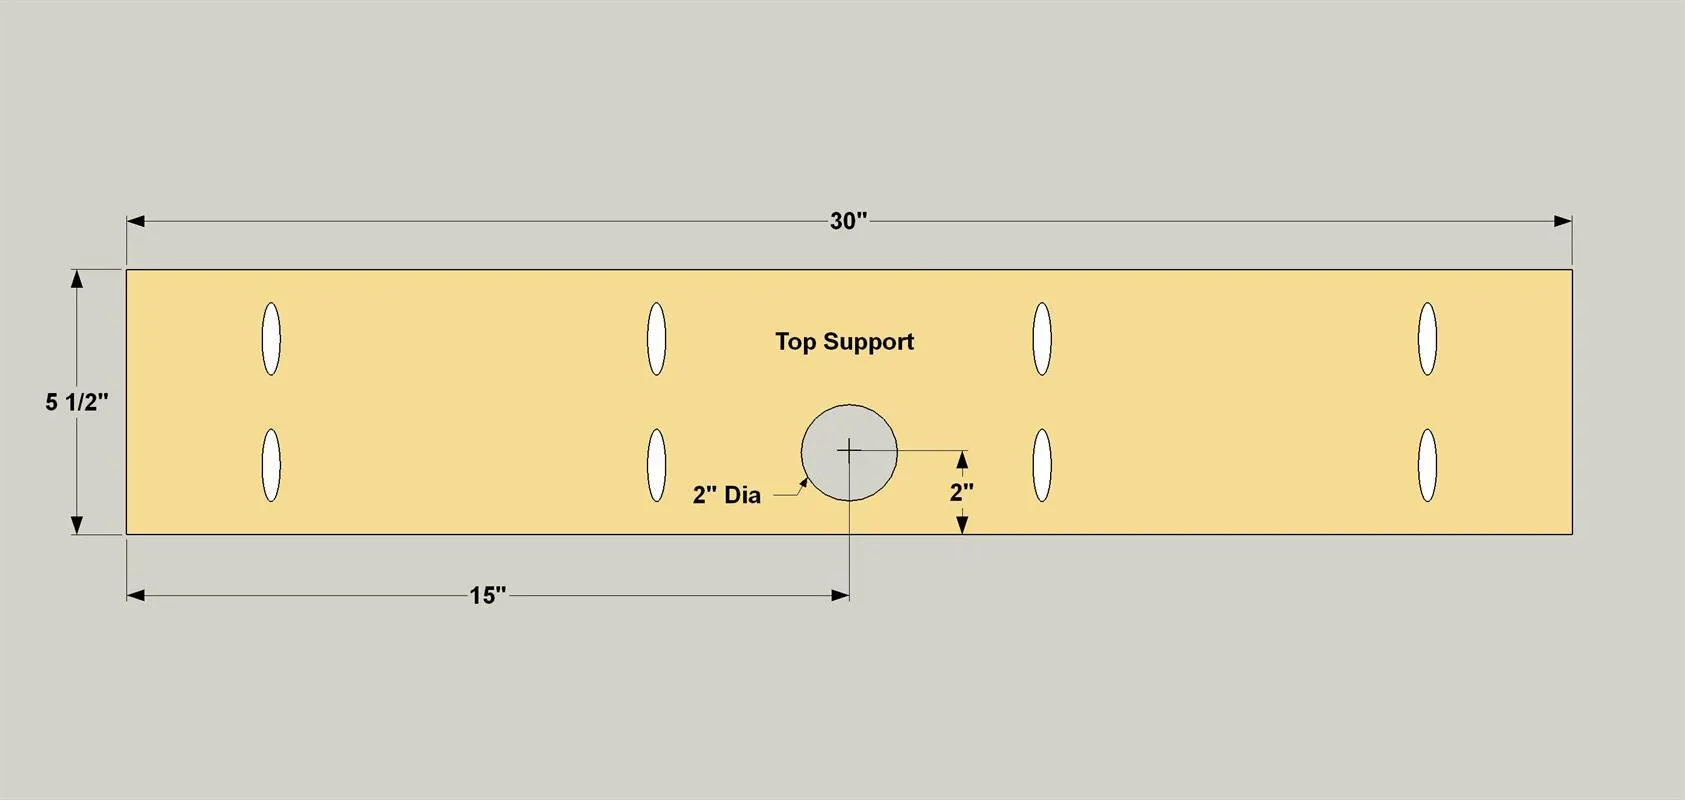
- Cut the Top Support to size, as shown in the cutting diagram. With the "A" side facing up, lightly mark the location where the access hole is to be drilled.
- Then you need to drill a 2-diameter hole through the Top Support. This is done with a Forstner-style bit.
- Start by using a nail or the tip of a screw to make an indentation in the Top Support at the hole’s center point location. This will help keep the drill bit from moving when you start drilling the hole. Secure the Top Support to a work surface with a scrap piece of wood beneath it and drill the hole.
- Set your drill to its slowest speed and take care to hold the pit perpendicular to the surface as you drill.
8Make the Back Panels
- Cut the two Back Sides and one Back Center to size as shown in the cutting diagram.
- Then drill pocket screw holes where shown.
- Mark the locations for the cord holes, and then drill those large holes through the Backs using the same process as in the previous step.
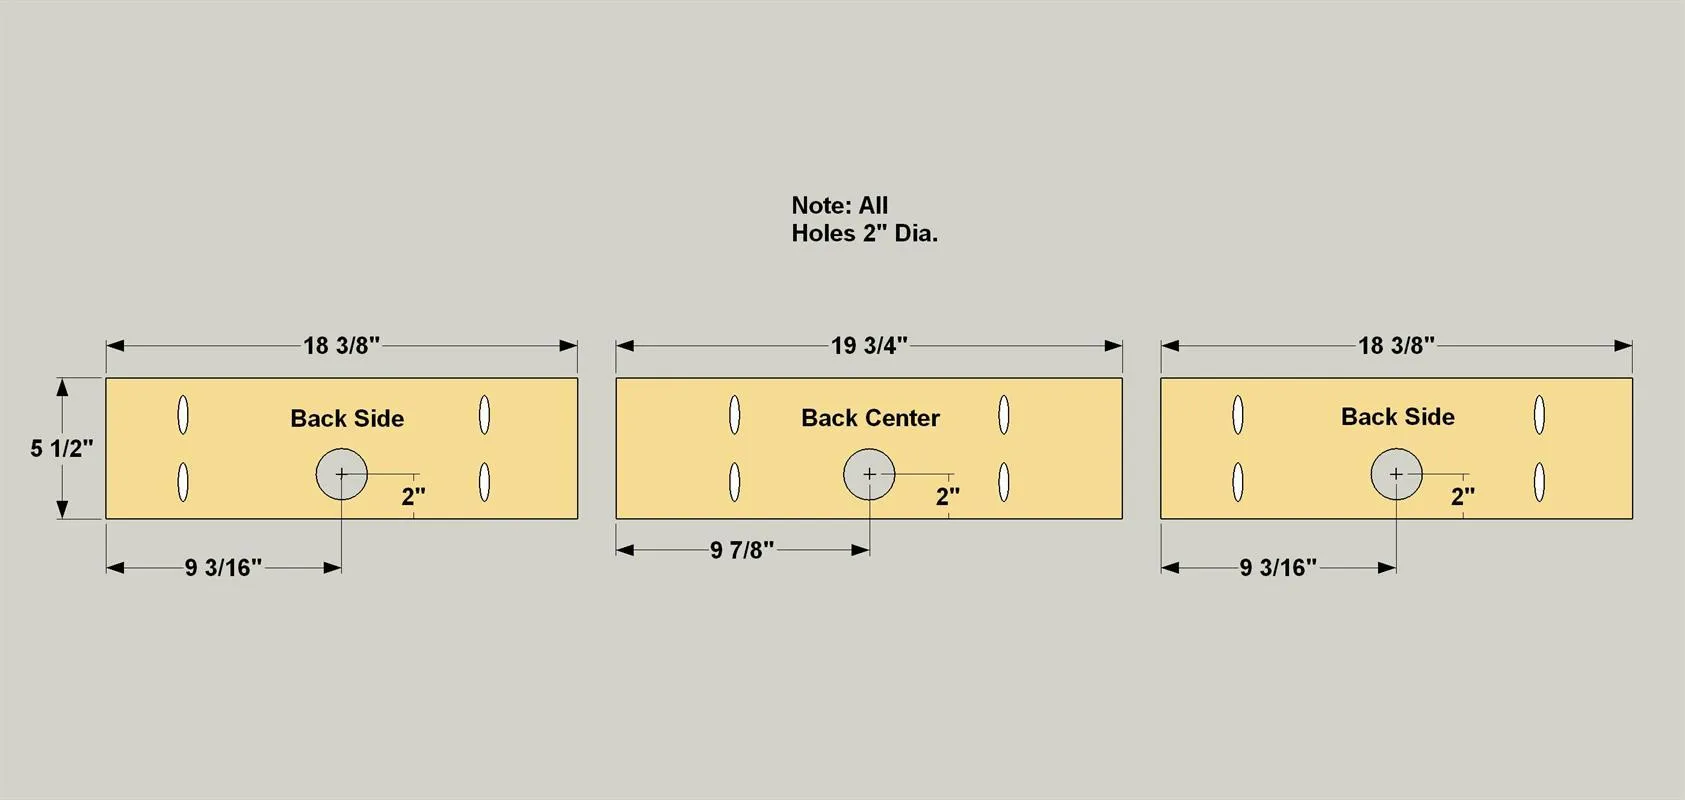
9Cut the Legs
Cut four legs to length from 1/8" x 2" Aluminum angle. You can use a hacksaw, but that’s slow and inaccurate, Believe it or not, you can cut aluminum with a regular saw, such as your miter saw, as explained in the Tip.
Tip: An Easy Way to Cut Aluminum When most of us think of cutting metal, we envision specialized saws, a lot of tedious work with a hacksaw or making a noisy mess with a jigsaw. For cutting aluminum, though, a miter saw works just fine. Aluminum is a soft, non-ferrous metal, so a standard carbide-tipped blade made for cutting wood goes right through it. Just make sure to cut slowly, and wear safety safety glasses (of course!). Never try to cut ferrous metals, such as steel or iron this way, though!
10Start the Preliminary Assembly
Now you can start the initial assembly, as discussed in Step 1. First, attach the Top Support to the Top with 1 1/4" coarse-thread pocket hole screws at the location shown.
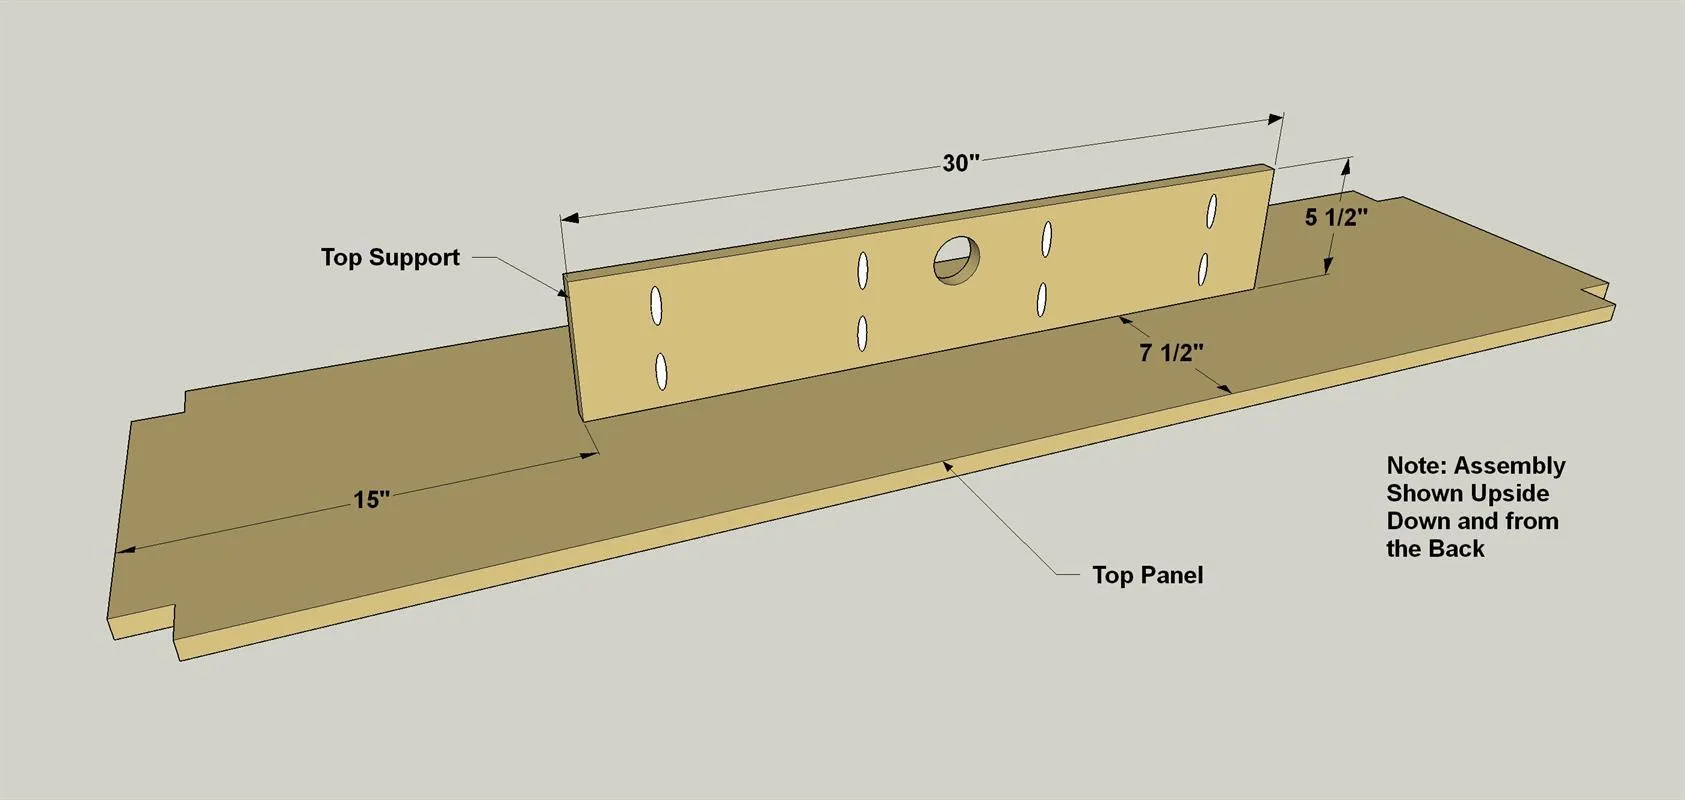
11Assemble the Lower Box
- Position the two Sides and the two Dividers on the Bottom Panel at the locations shown, and then attach them with 1 1/4" coarse-thread pocket hole screws.
- Then position the Middle Panel on this assembly, and clamp it in place. The space between is too tight fit a drill and standard square-drive bit. So, use a right angle attachment (shown in the tool list, and a short square drive bit to drive in 1 1/4" coarse-thread pocket hole screws that attach the Middle Panel to the Sides and Dividers
Tip: Drive Right When Space is Tight When space is tight, it can be difficult or impossible to position a drill and a long square-drive bit for driving pocket screws. For less than $25, though, you can pick up a right angle attachment that works with any drill. Combine a right angle attachment with a 3" square-drive bit, and you can drive pocket screws almost anywhere.
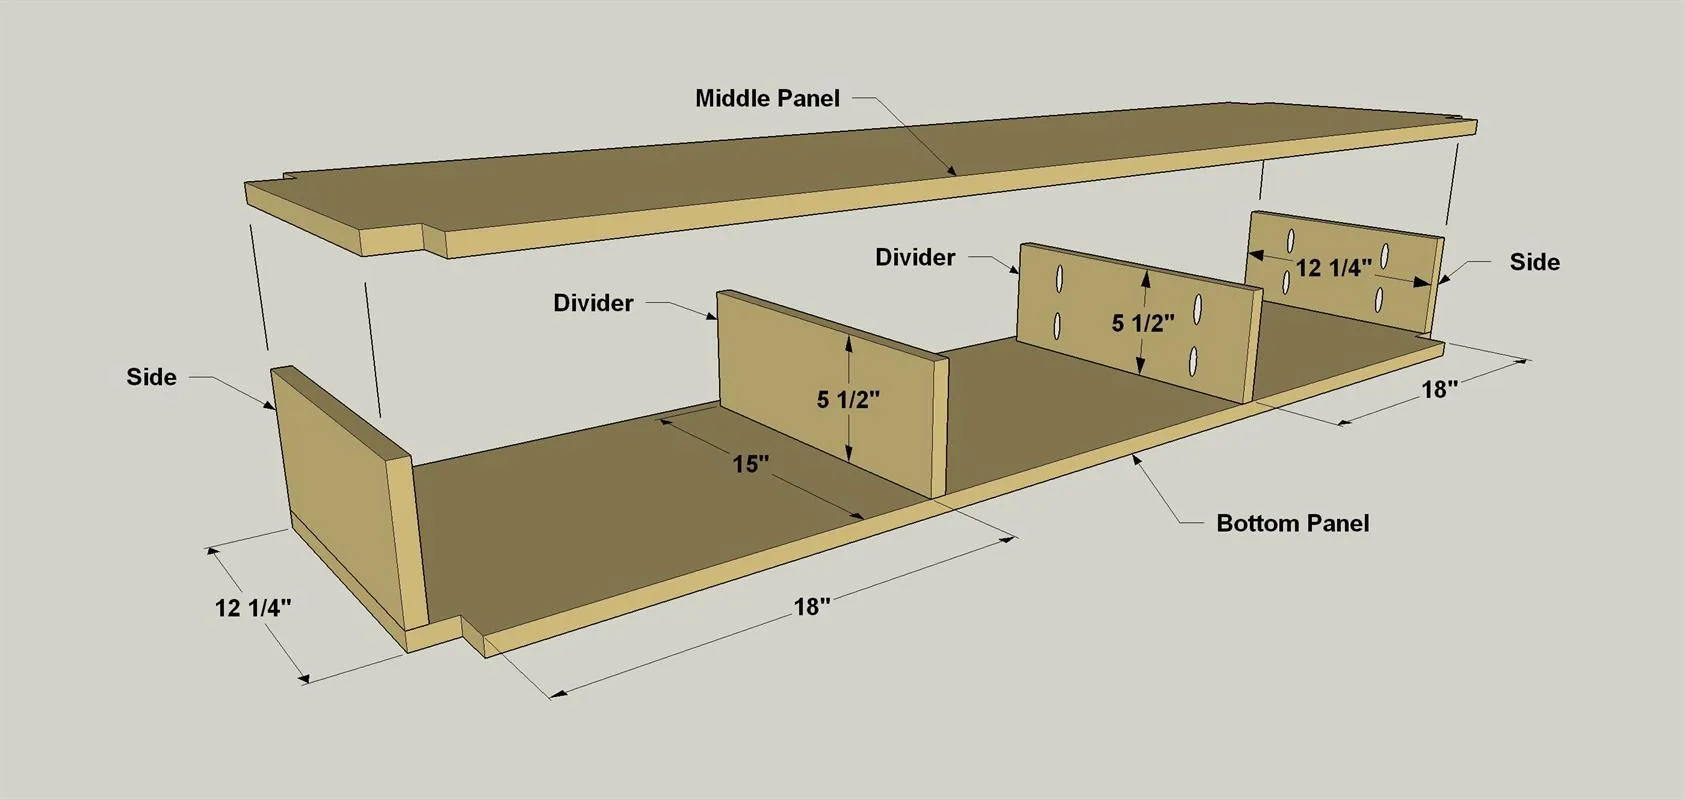
12Attach the Top to the Bottom
- Set the Top Support/Top Panel assembly on the Middle Panel at the location shown. Support this assembly on a couple of your 5 1/2"-wide plywood cutoffs, and make sure that the ends and edges of all the panels align. A good way to do this is to temporarily clamp the aluminum Legs in place.
- Then attach the Top Support to the Middle Panel with 1 1/4" coarse-thread pocket hole screws. Again, you’ll need to use the right-angle attachment on your drill.
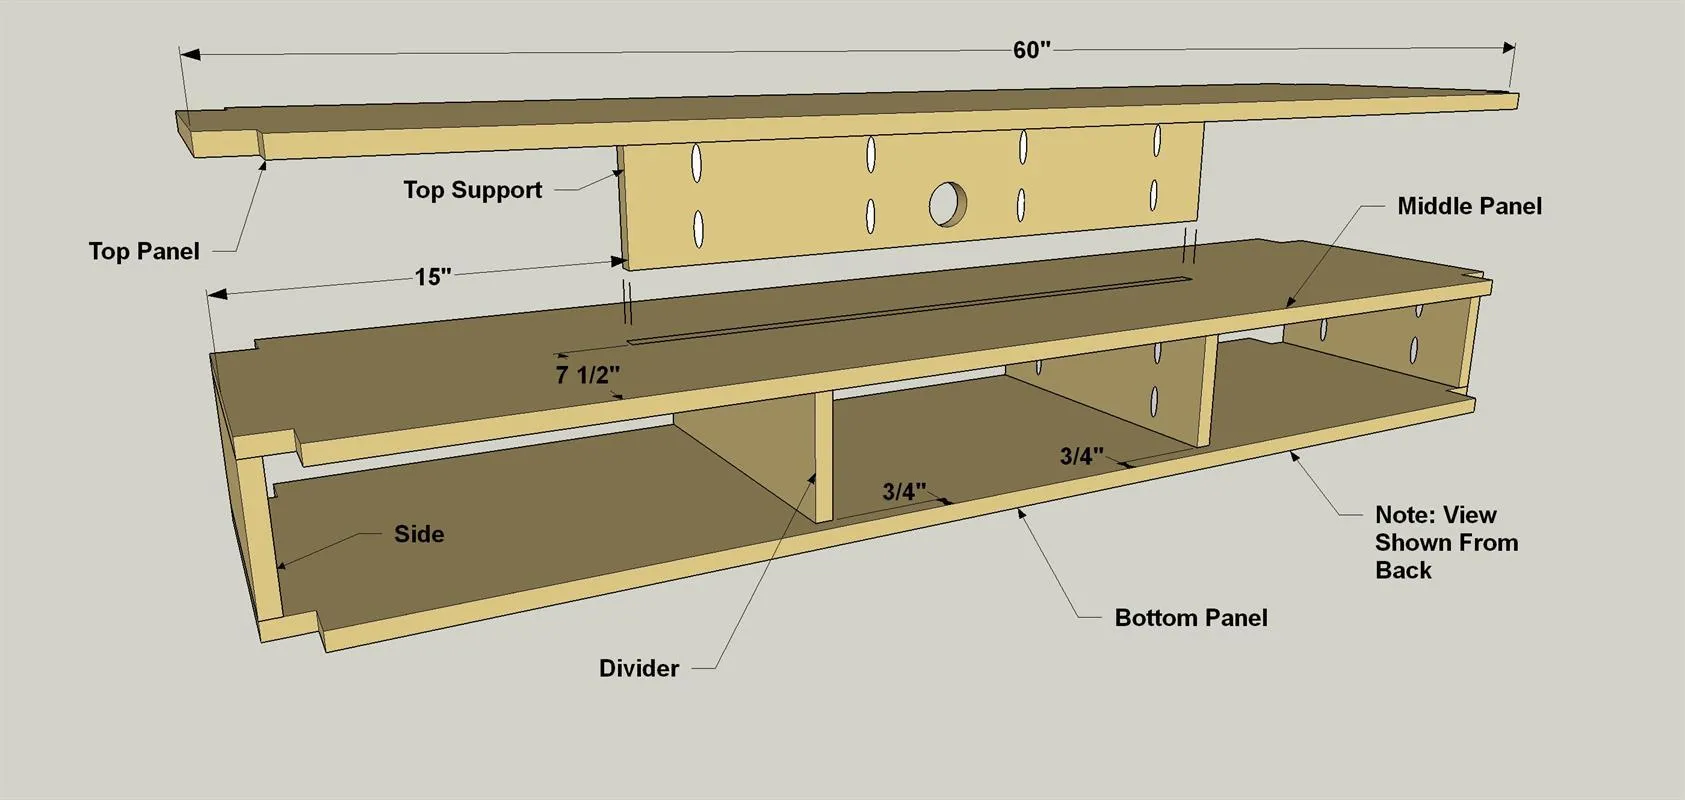
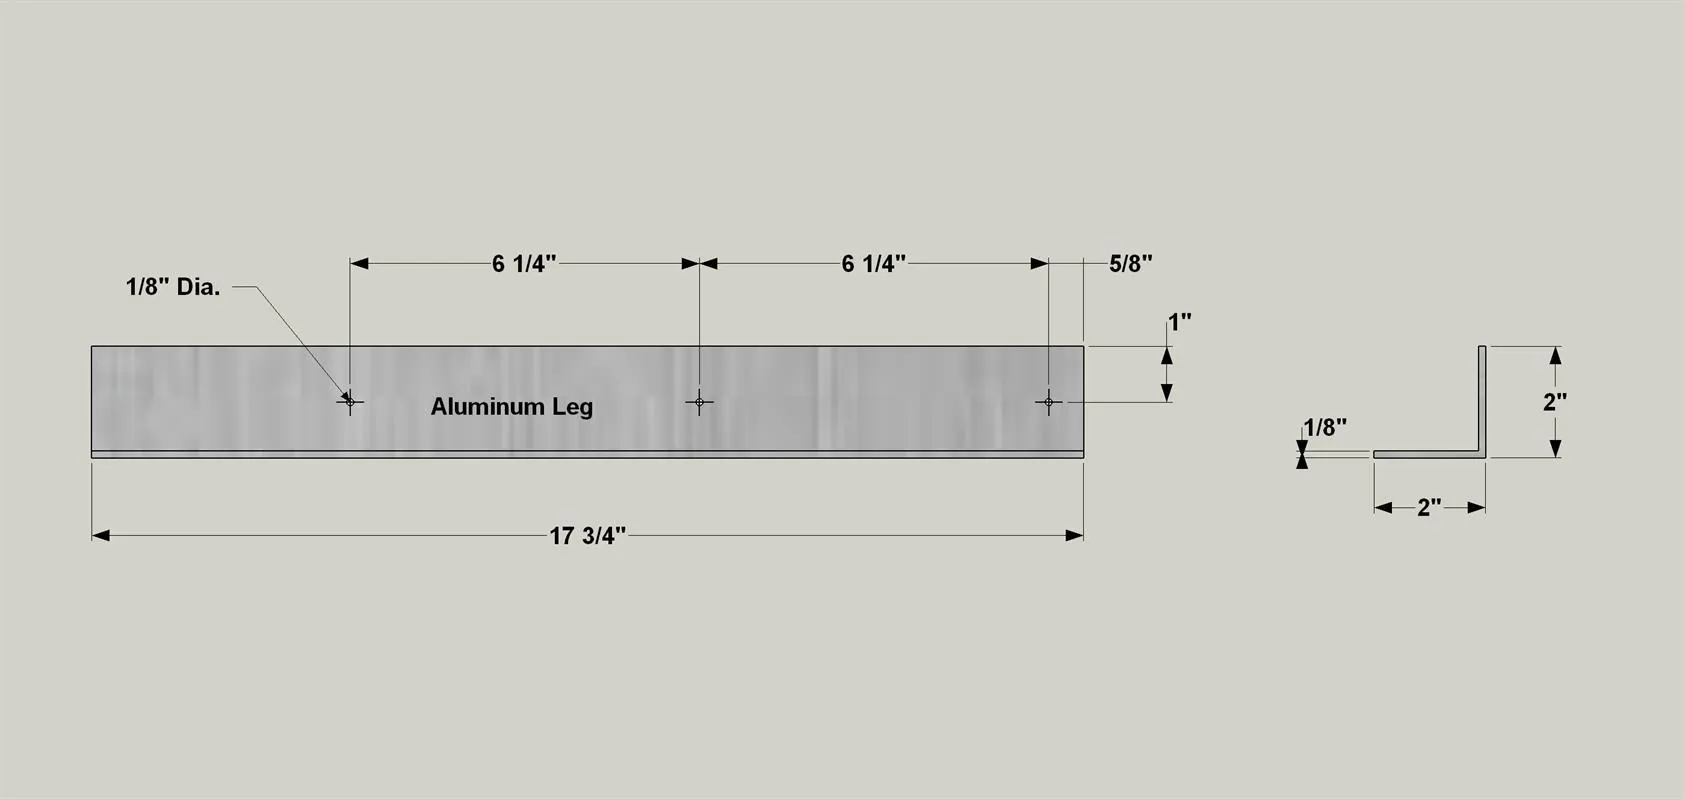
13Drill Holes in the Legs
Measure and mark the locations of the holes on each leg. With a nail, make an indentation at the hole location, this will keep the drill bit from wandering as you start drilling. Secure each leg on a scrap board and drill all of the holes with a 1/8" drill bit.
14Position the Legs
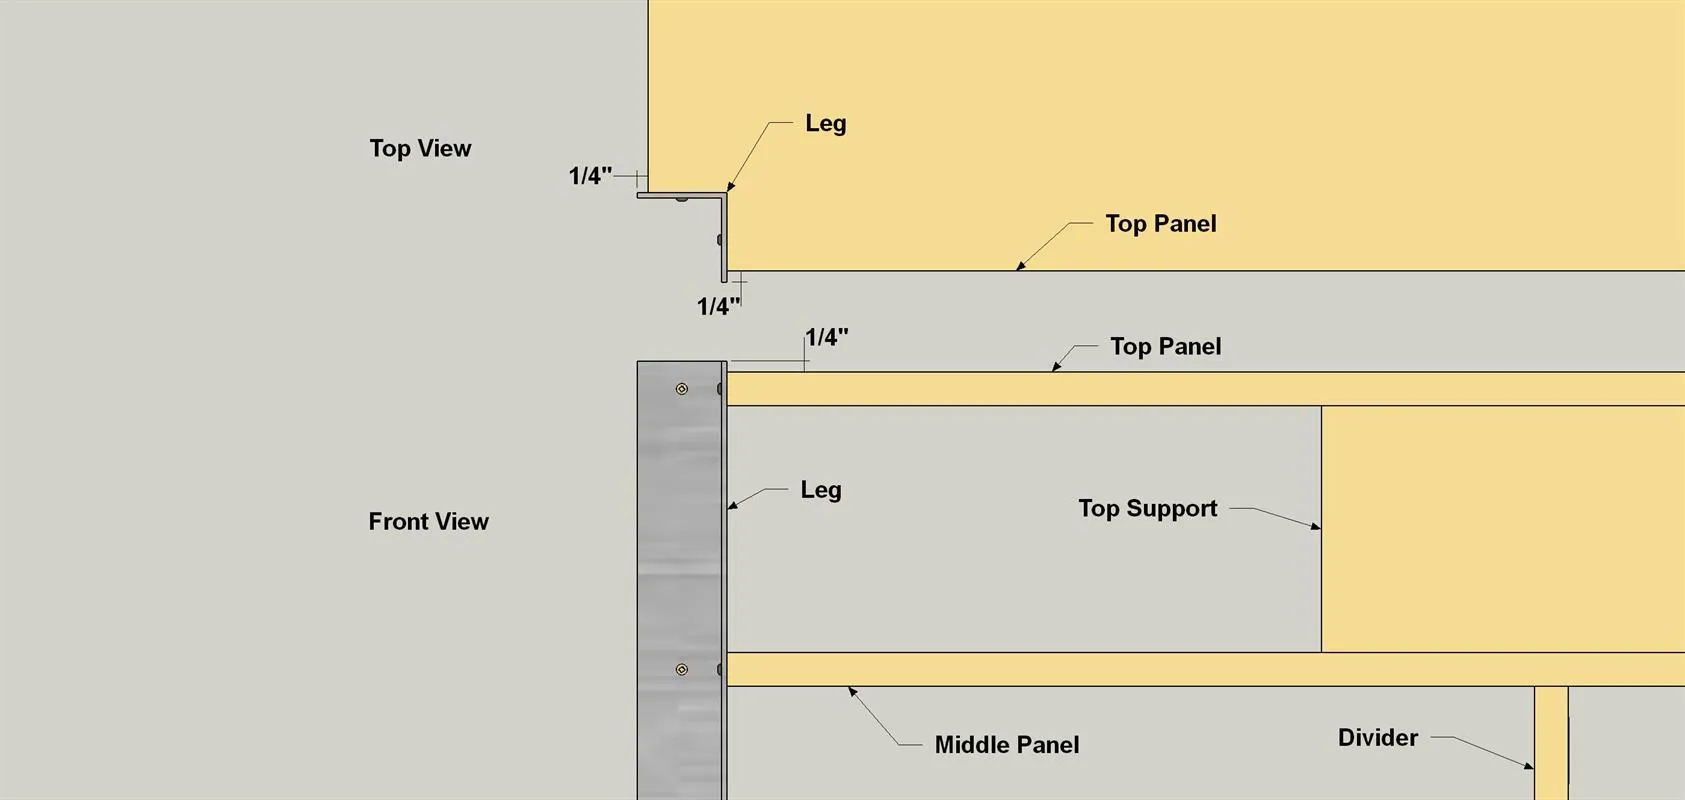
- Now that the case is together, it’s time to set the final location for the legs.
- Clamp the first leg in place on your stand assembly so that the end of the Leg sticks up 1/4" above the Top Panel, as shown. Make sure the Leg fits tightly, then drill a pilot hole through the leg hole into the plywood. Do this for each hole on the Leg.
- Then secure the Leg with #10 x 1" pan-head wood screws.
- Now work your way around the stand, positioning and temporarily attaching each Leg in the same way.
15Add the Back
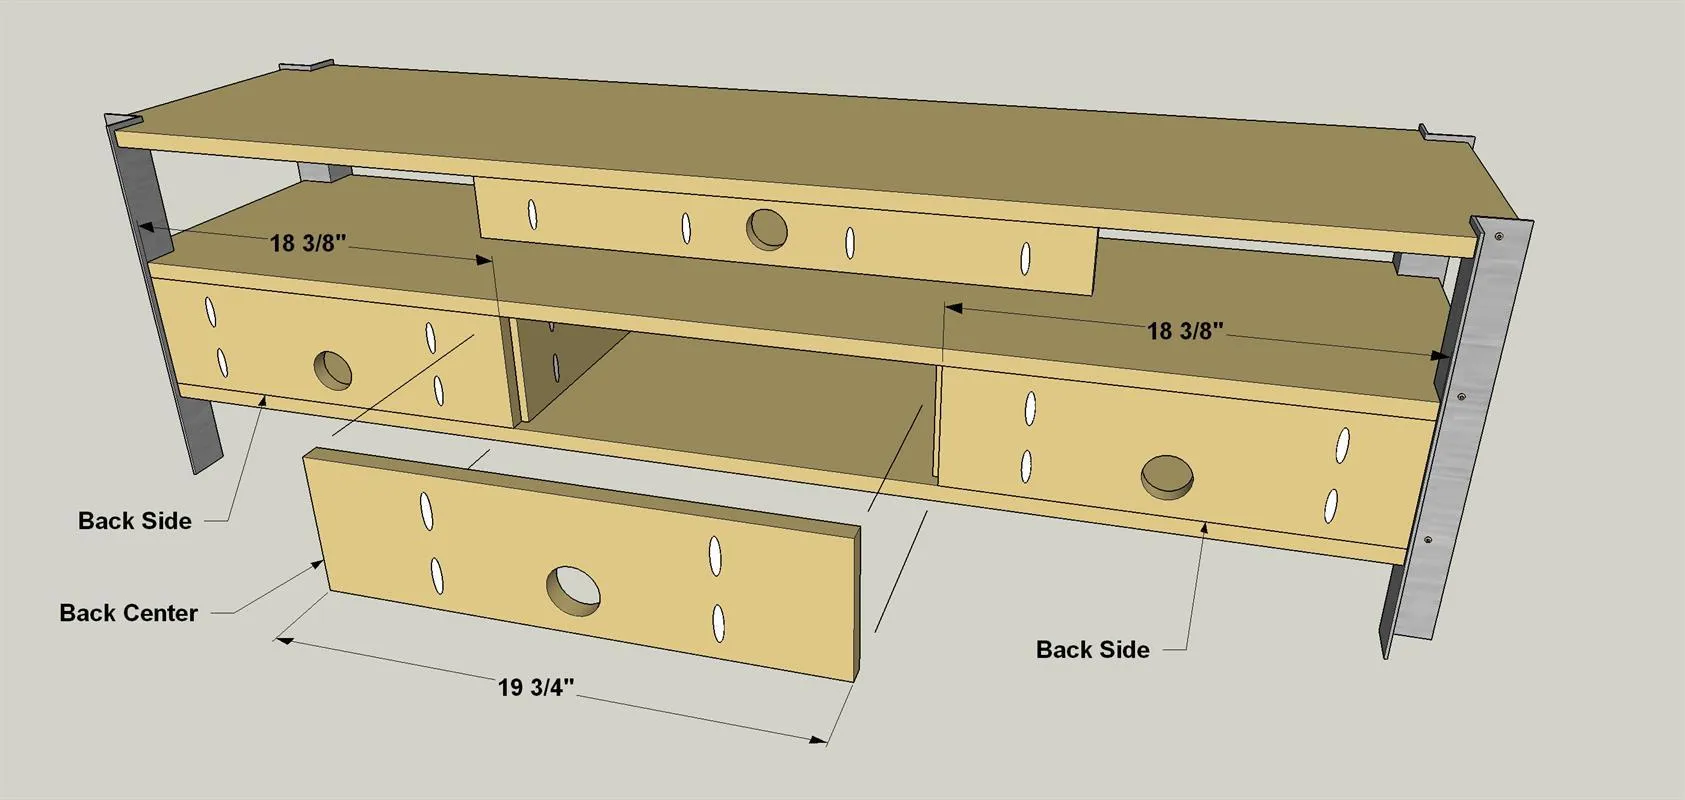
Place each Back Side panel in place so it is flush with the back edge of the Middle and Bottom Panels, and then secure the Back Side panels and with 1 1/4" coarse-thread pocket hole screws. Next, set the Back Middle panel in place, and secure it with 1 1/4" coarse-thread pocket hole screws.
16Take it all Apart
With the Legs set, it’s time to finish the TV stand. As crazy as it sounds, the best way to do that is to take the whole thing back apart. That’s part of the beauty of pocket hole construction, though. Just remove he screws, and you can pull it all apart. Then you can reassemble it all later just as easily. With everything apart, you can sand all of the pieces and polish the Legs. Sure, this requires extra work, bit with clear access to all the surfaces, you’ll get a much better quality finish.
17Polish the Legs, Apply Stain
- To clean up the Legs, first use a flat metal file or sandpaper to take off any burs around the holes and to slightly ease the top and bottom edges.
- Now use finishing pads to smooth and polish all of the Leg surfaces.
- Start with a coarse pad and go over all four legs.
- Then progress to medium and fine pads, until all of the surfaces have a consistent finish.
- Also stain or finish the plywood parts to suit your taste. Be sure to stain the Side Fillers while you’re at it. We wiped on black gel stain, and buffed a lot of it off with rags while still wet, then added two coats of water-based finish.
18Put It All Back Together
- When the finish is dry, re-assemble the TV Stand in the same order as the original assembly.
- Also add the Side Fillers by gluing them in place against the Sides. The fillers hide the pocket holes that might be visible.
- Then load up your TV and components, and relax with a favorite movie or show. You’ve earned it!
Tags
- Built Ins and Cabinets
- Intermediate
Reviews & builds
No reviews yet
Sign in to review this plan or share your build.
No reviews yet. Be the first to build this.