 Notch
NotchUse your browser's Print (Ctrl/Cmd + P) and choose Save as PDF. This page works offline once you've opened it with a signal.
Dining Room Buffet with Hutch
Add tons of storage to your dining room with this beautiful rustic buffet with hutch.
- Difficulty
- Expert
- Time
- 11.5–22.8 hours
- Cost
- $$$$
Cut list
| Part | Qty | T × W × L | Material | ✓ |
|---|---|---|---|---|
| Buffet legs (1x3) | 4 | 3/4" × 2" × 34" | — | ☐ |
| Buffet legs (1x2) | 4 | 3/4" × 1" × 34" | — | ☐ |
| Buffet sides | 2 | 3/4" × 10" × 27" | — | ☐ |
| Buffet side details | 2 | 3/4" × 1" × 10" | — | ☐ |
| Buffet face frame rails | 3 | 3/4" × 1" × 42" | — | ☐ |
| Buffet face frame stile | 1 | 3/4" × 1" × 18" | — | ☐ |
| Buffet shelves | 2 | 3/4" × 13" × 45" | — | ☐ |
| Buffet back | 1 | 3/4" × 28" × 42" | — | ☐ |
| Buffet top | 3 | 3/4" × 5" × 48" | — | ☐ |
| Buffet door rails | 4 | 3/4" × 2" × 15" | — | ☐ |
| Buffet door stiles | 4 | 3/4" × 2" × 17" | — | ☐ |
| Buffet door panel | 2 | 1/4" × 13" × 15" | — | ☐ |
| Hutch sides | 2 | 3/4" × 12" × 40" | — | ☐ |
| Hutch top & shelf | 2 | 3/4" × 11" × 44" | — | ☐ |
| Hutch separators | 2 | 3/4" × 11" × 21" | — | ☐ |
| Hutch bottom support | 1 | 3/4" × 2" × 44" | — | ☐ |
| Hutch face frame top | 1 | 3/4" × 2" × 46" | — | ☐ |
| Hutch face frame center stiles | 2 | 3/4" × 1" × 20" | — | ☐ |
| Hutch face frame sides | 2 | 3/4" × 1" × 37" | — | ☐ |
| Hutch face frame rail | 1 | 3/4" × 1" × 43" | — | ☐ |
| Hutch back | 1 | 3/4" × 40" × 44" | — | ☐ |
| Hutch door rails | 4 | 3/4" × 2" × 8" | — | ☐ |
| Hutch door stiles | 4 | 3/4" × 2" × 19" | — | ☐ |
| Hutch door center panel (plexiglass) | 2 | 1/8" × 9" × 15" | — | ☐ |
| Hutch door trim | 4 | 1/4" × 3/4" × 16" | — | ☐ |
| Hutch door trim | 4 | 1/4" × 3/4" × 10" | — | ☐ |
Materials
| Item | Qty | ✓ |
|---|---|---|
| Board, 1x3 96" | 5 board | ☐ |
| Board, 1x2 96" | 6 board | ☐ |
| Board, 1x6 48" | 3 board | ☐ |
| Plywood, 3/4" Thick Full Sheet | 2 board | ☐ |
| Plywood, 1/4" Thick Quarter Sheet | 1 board | ☐ |
| Board, 1/4" x 3/4" trim 48" | 3 board | ☐ |
| 18" x 24" 0.093 thick plexiglass | 1 each | ☐ |
| 1 1/4" pocket hole screws | 250 each | ☐ |
| 1 1/4" finish nails | 50 each | ☐ |
| 5/8" brad nails | 50 each | ☐ |
| Shelf pins | 20 each | ☐ |
| Cabinet pulls | 4 each | ☐ |
| Inset face-frame door hinges | 8 each | ☐ |
| 5" mending plates | 2 each | ☐ |
| 5/8" wood screws | 8 each | ☐ |
| 1" corner braces with screws | 8 each | ☐ |
Overall cost: $$$$. Lumber varies by region, species, and season, so we give a band rather than a figure.
Tools
- Brad Nailer
- Circular Saw
- Drill / Driver
- Impact Driver
- Miter Saw
- Pocket Hole Jig
- Random Orbit Sander
- Router
- Router Table
- Bar / Pipe Clamps — optional
- Combination Square — optional
- Tape Measure — optional
Instructions
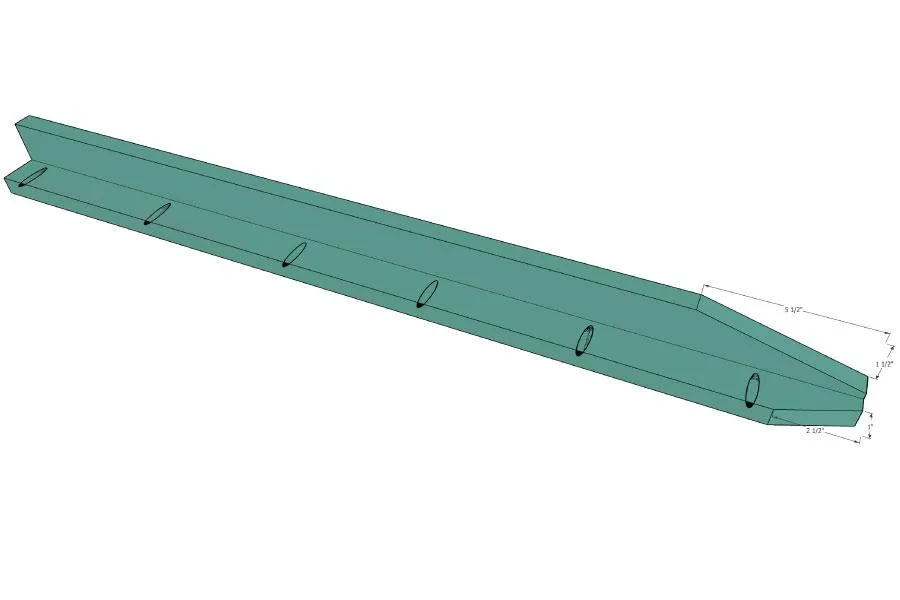
1. Build the buffet legs
- On the 1x3 buffet legs, measure up 5 1/2" from the bottom and 1 1/2" in from bottom edge and draw an angled line. On the 1x2 buffet legs, measure up 2 1/2" from the bottom and 1" in from the bottom edge and draw an angled lined.
- Cut along the lines to create a taper on the bottom of the legs.
- Repeat for all leg pieces.
- Drill pocket holes set for 3/4" thick material to the long edge of the 1x2 buffet leg pieces.
- Attach them to the edge of the 1x3 buffet legs with wood glue and 1 1/4" pocket hole screws. Make sure the legs mirror each other so they will fit together properly.
2. Build the buffet sides
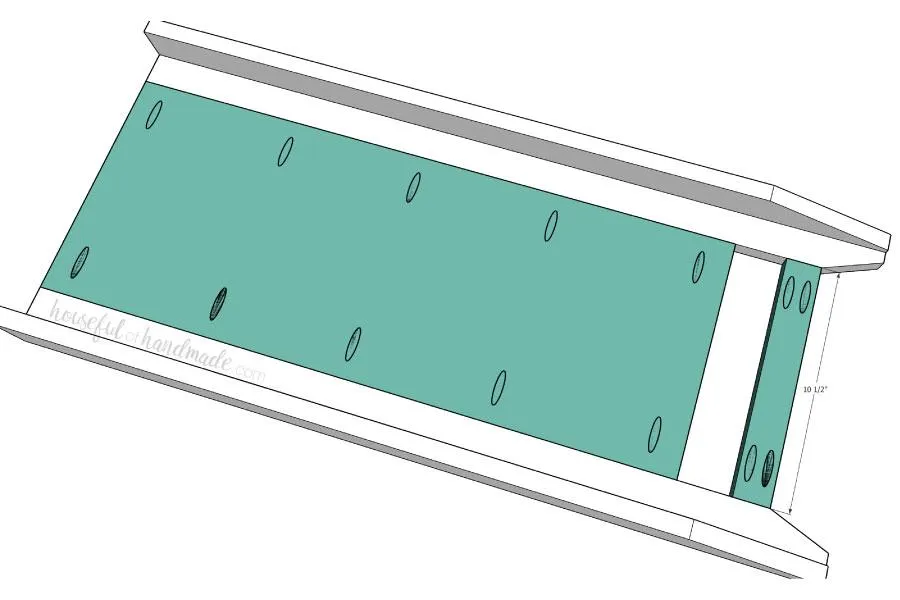
Attach the plywood buffet side and buffet side detail pieces between 2 finished leg pieces so they are flush to the top. Secure with wood glue and 1 1/4" pocket hole screws.
3. Attach the buffet face frame
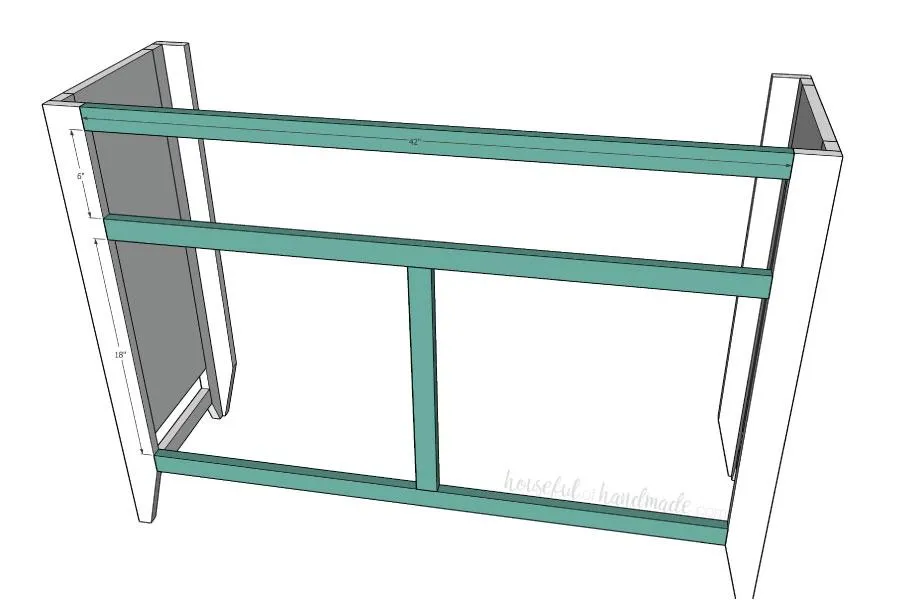
- Drill 2 pocket holes set for 3/4" material in both ends of the buffet face frame rails and stile.
- Attach the rails so the top one is flush with the top of the legs and the bottom one is flush with the top of the taper on the front of the leg.
- Attach the stile so that it is centered on the bottom rail then attach the last rail on top of it ensuring it is level across the buffet.
4. Add the buffet shelves
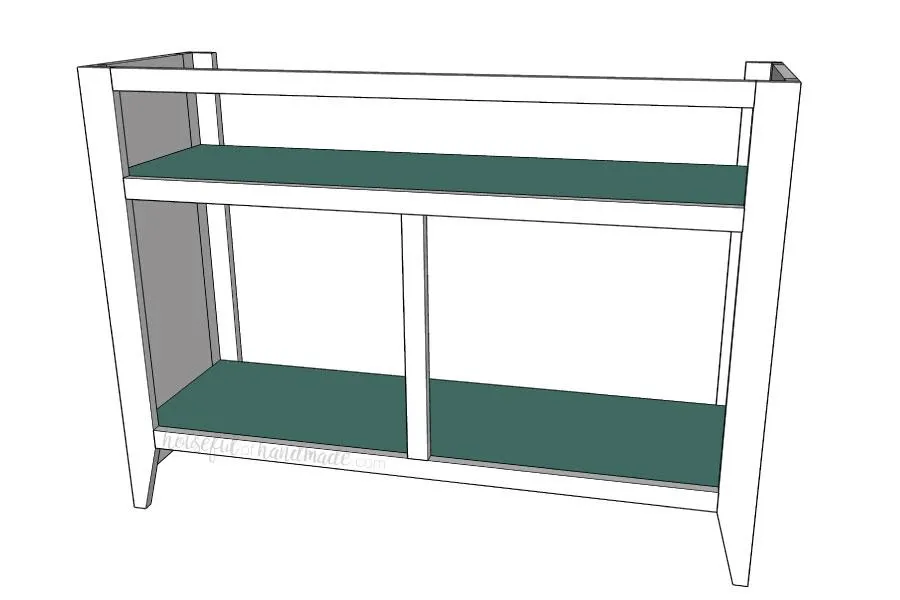
Drill pocket holes for 3/4" material in the bottom of the buffet shelves on each side and along the front (to attach to the face frame). Attach the shelves to the buffet so they are flush with the top of the lower face frame rails with wood glue and 1 1/4" pocket hole screws.
5. Attach the buffet back
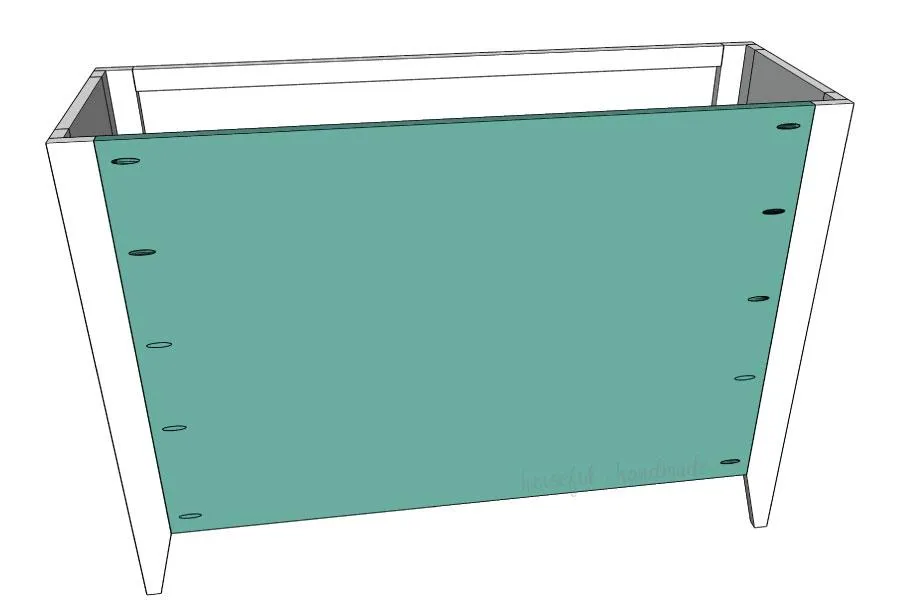
Drill pocket holes in the sides of the buffet back. Attach it to the back legs with wood glue and 1 1/4" pocket hole screws.
6. Build the buffet top
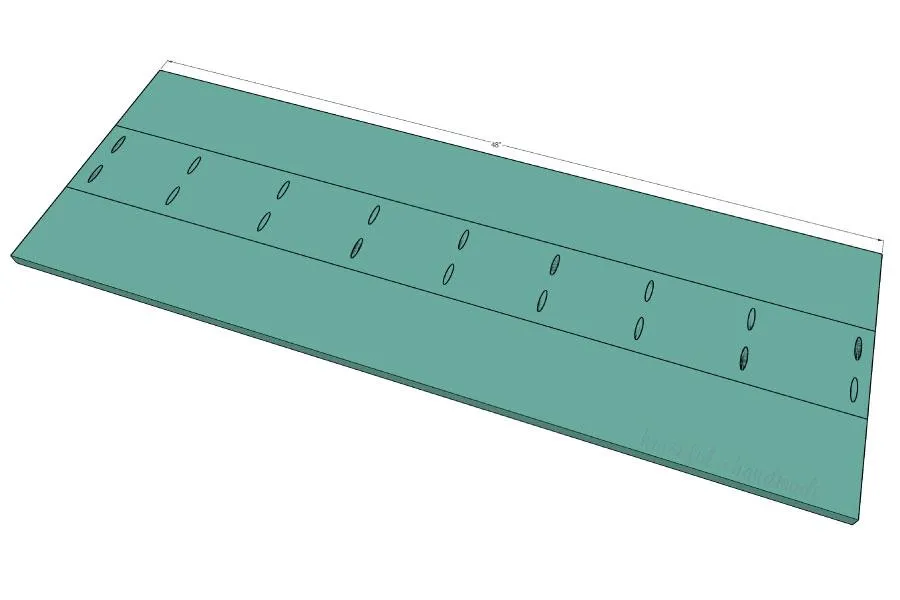
- Drill pocket holes in either side of one of the buffet top boards every 6 inches.
- Attach the other buffet top boards on either side of it with wood glue and pocket hole screws. Use clamps to ensure the top of all the boards stay flush as you secure them.
7. Attach the buffet top
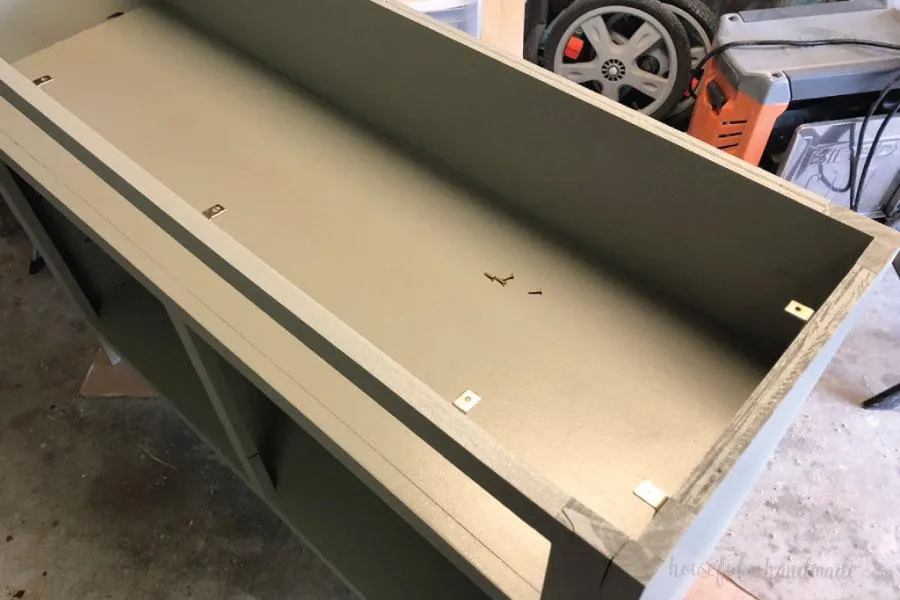
To attach the buffet top, drill pocket holes in the buffet back facing up. For inside the open shelf, use 1" corner braces (the face frame is too thin for the pocket holes to not be visible on the underside of the board). Attach the braces to the sides and face frame rail and then center your top side to side, but make sure the top is flush with the back of the buffet to allow the hutch top to be secured.
8. Build the buffet doors
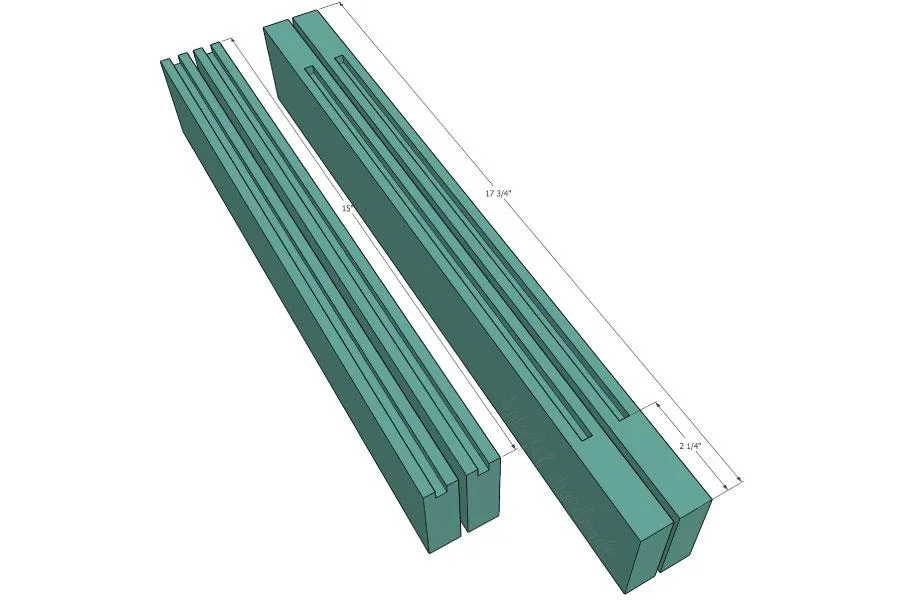
For the buffet doors, I chose to build easy doors with a routed inset center panel. If you do not have a router, I have a post on my blog with 3 ways to build cabinet doors (link in extras). Cut the buffet door rails and stiles and router a 1/4" x 1/4" groove in one side of the rails. For the stiles, router the 1/4" x 1/4" groove starting 2 1/4" in from the edge and stopping 2 1/4" in from the other edge.
9. Finish the buffet doors
- Drill pocket holes in the ends of the door rails. To assemble the doors, attach the rails to one stile with wood glue and 1 1/4" pocket hole screws making sure the routed groove is in the center and the outsides of the boards are flush.
- Slide the buffet doors panel inside the groove and then attach the other stile to the end with wood glue and pocket hole screws.
10. Build the hutch frame
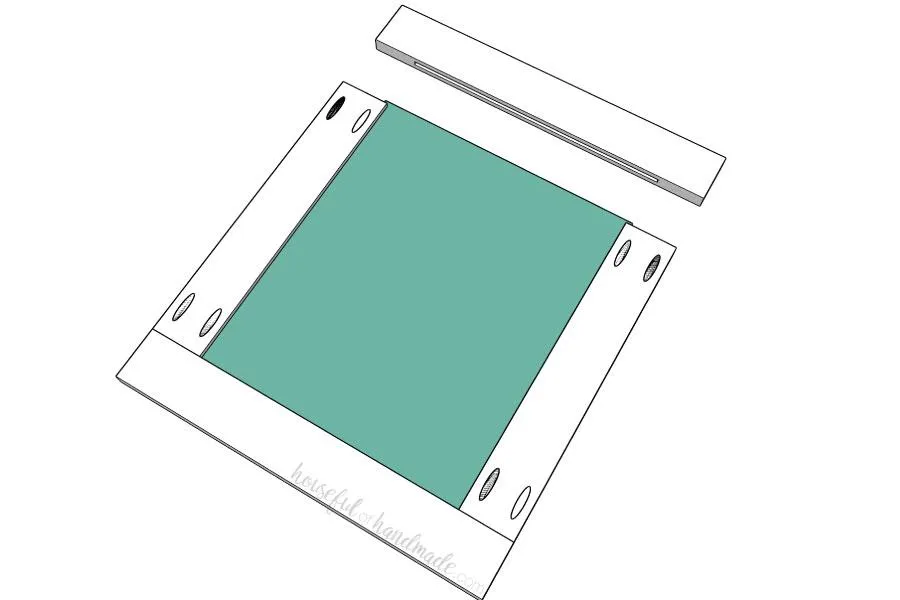
- Drill pocket holes set for 3/4" material in the top sides of the hutch top shelf and along the front and back.
- Attach the hutch top shelf if between the hutch sides with wood glue and 1 1/4" pocket hole screws so it is flush with the top of the sides and flush with the front of the hutch sides. It will be 3/4" in from the back of the hutch sides.
11. Build the hutch face frame
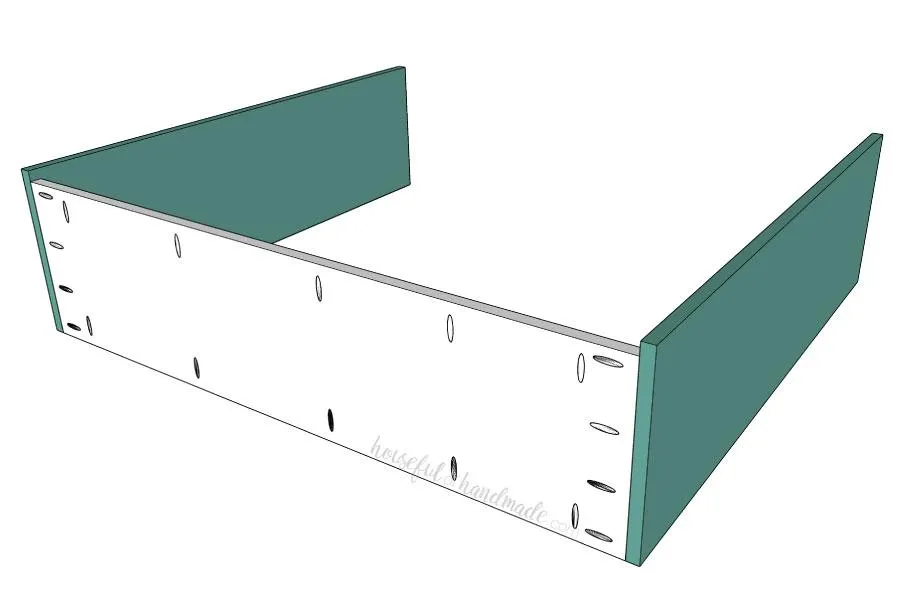
Drill pocket holes set for 3/4" material in the hutch face frame pieces as shown. Use wood glue and pocket hole screws, attach the pieces together.
12. Attach face frame
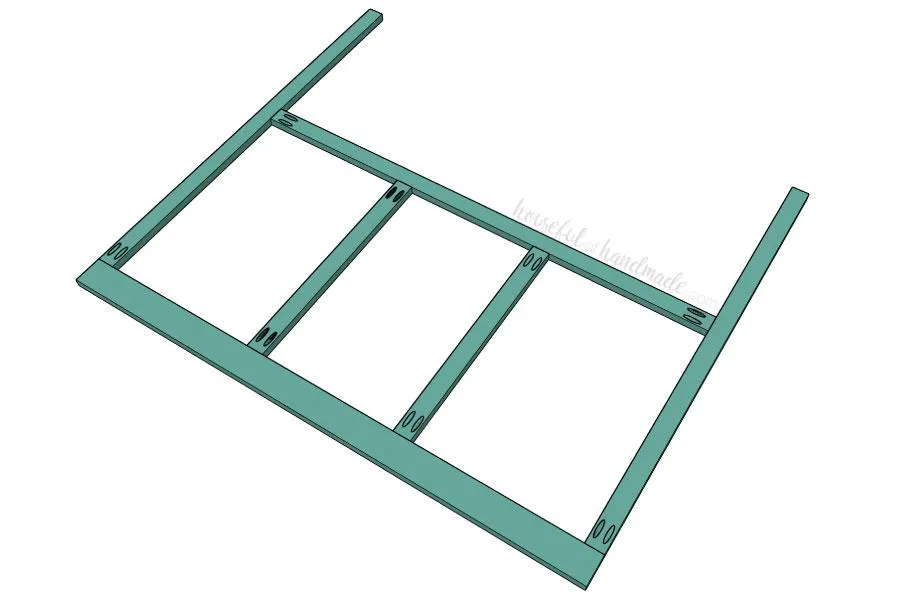
- Attach the face frame to the hutch frame with wood glue and 1 1/4" pocket hole screws in the pocket holes on the top of the hutch.
- Attach the face frame to the hutch sides with wood glue and 1 1/4" brad nails. Ensure the outside of the face frame is flush with the outside of the hutch frame.
13. Attach hutch shelves
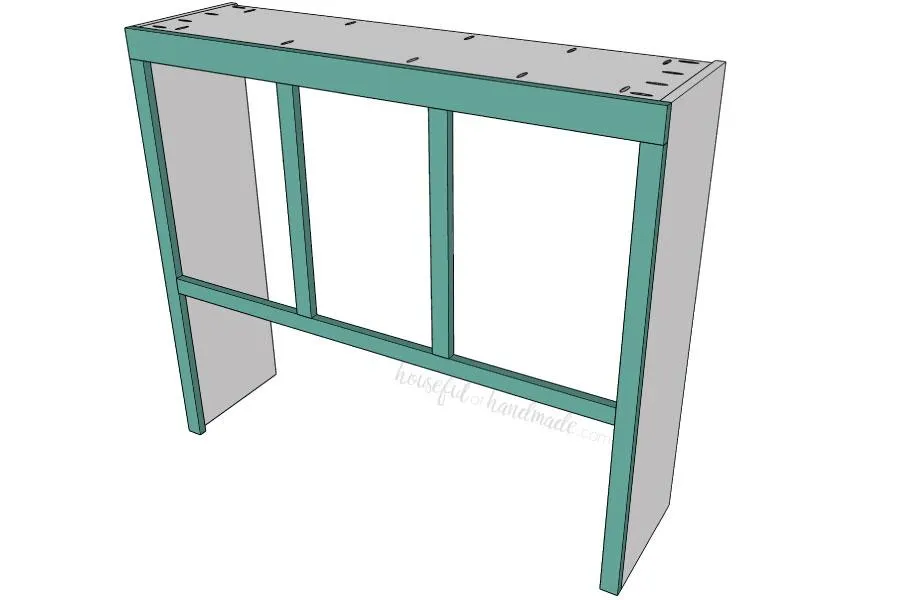
- Attach the hutch separators to the hutch top with wood glue and 1 1/4" finish nails so they are flush with the inside of the hutch face frame center stiles.
- Drill pocket holes in the sides and front of the hutch shelf and attach it to the hutch sides and face frame so it is flush with the top of the face frame rail. Use wood glue and 1 1/4" finish nails secure the hutch separators to the hutch shelf and use pocket hole screws to attach the shelf to the sides and face frame.
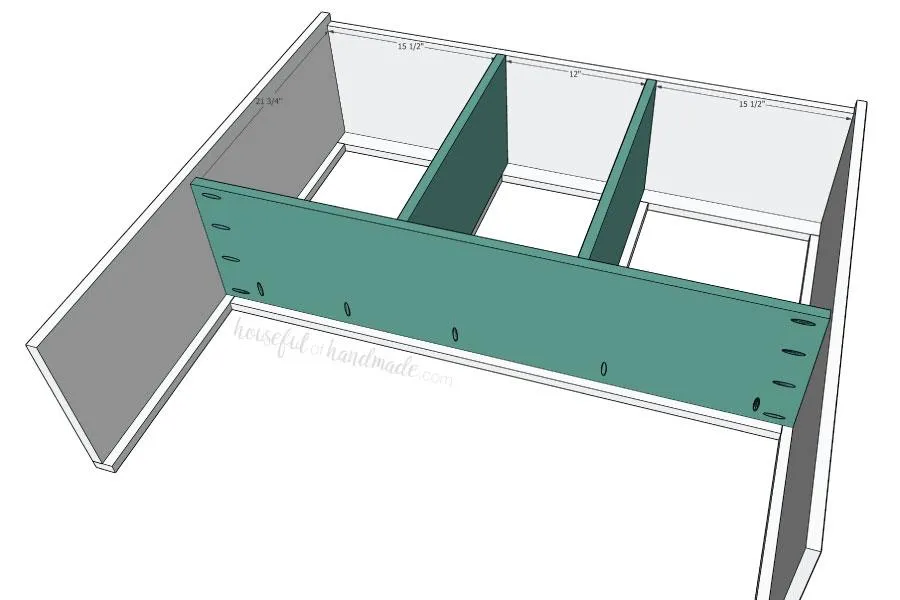
14. Add hutch bottom support
Drill pocket holes in the edges of the hutch bottom support and attach it to the hutch sides so it is flush with the bottom of the hutch and set 3/4" in from the back of the hutch.
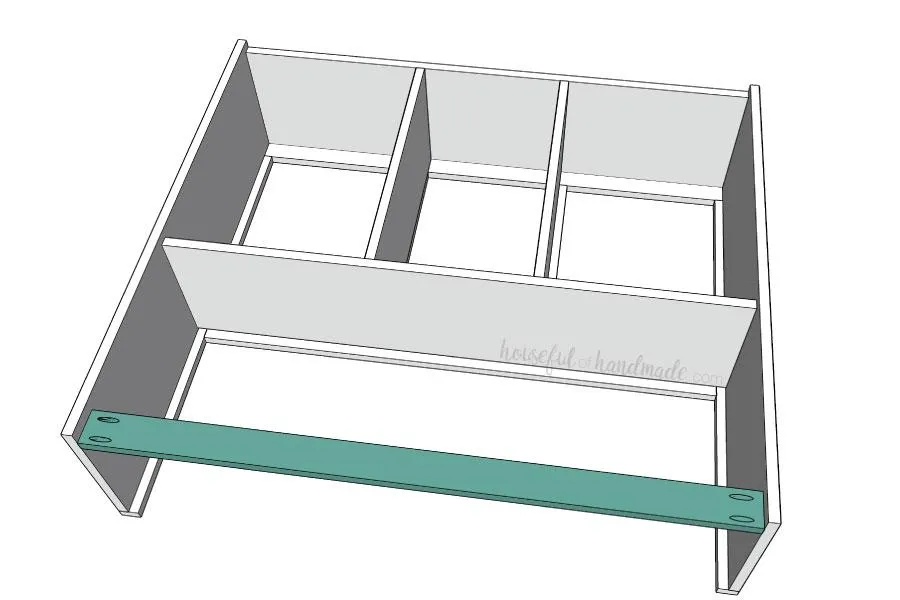
15. Attach hutch back
Drill pocket holes in the sides of the hutch back and attach it to the hutch with wood glue and pocket hole screws.
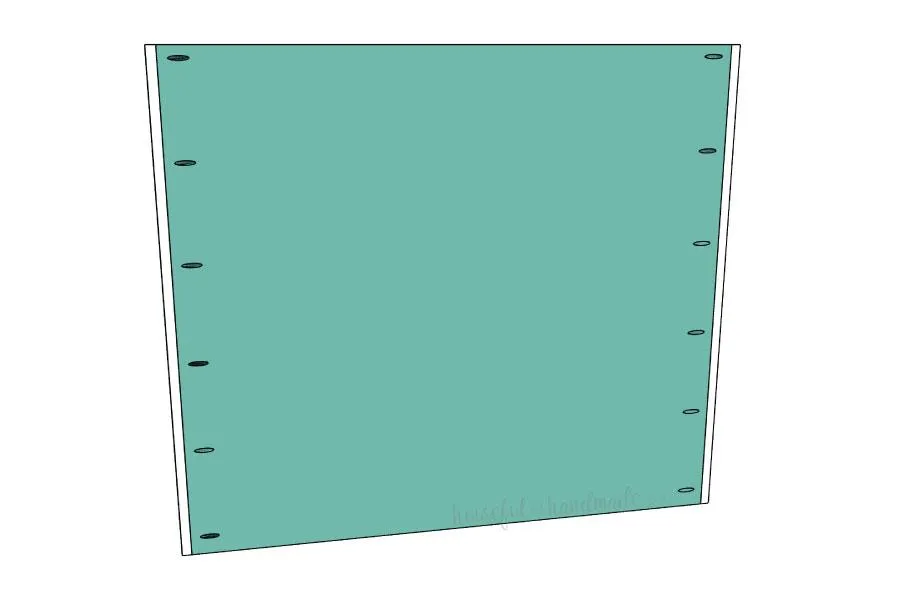
16. Build hutch doors
For the hutch doors, I chose to build doors with a plexiglass insert. Cut the hutch door rails and stiles and router a 1/8" wide x 1/4" deep groove in the back side of the rails. For the stiles, router the 1/8" x 1/4" groove starting 2 1/4" in from the edge and stopping 2 1/4" in from the other edge.
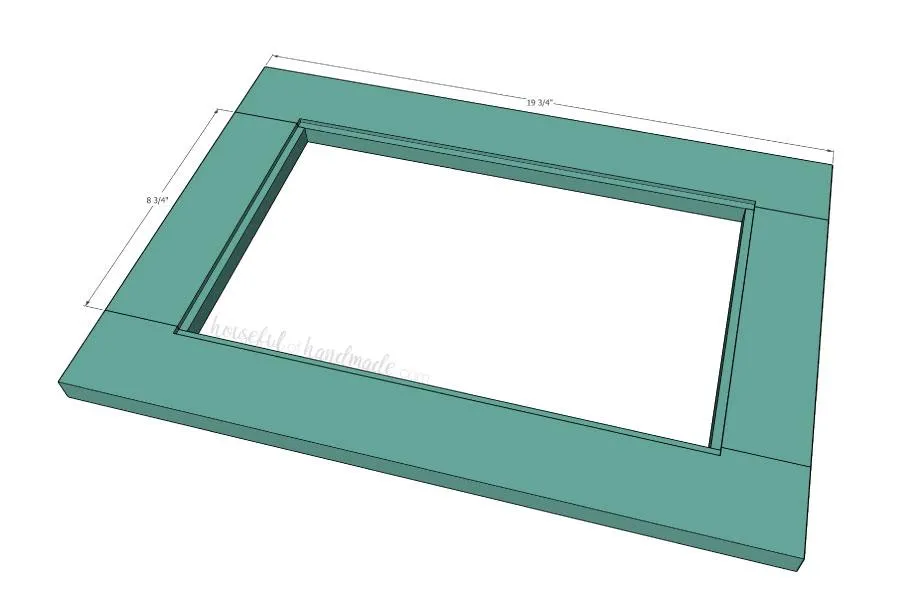
17. Finish the hutch doors
- Drill pocket holes in the ends of the door rails. To assemble the doors, attach the rails to the stiles with wood glue and 1 1/4" pocket hole screws making sure the routed groove is in the center and the outsides of the boards are flush.
- Cut the plexiglass to fit the door and place inside the groove.
- Cut 1/4" x 3/4" strips of trim to cover the groove and edge of plexiglass and attach with 5/8" brad nails. Make sure to attach the nails toward the outer edges of the trim so you don't break the glass. TIP: I painted the doors and trim first. That way the groove is painted and there was no cutting in around the glass.
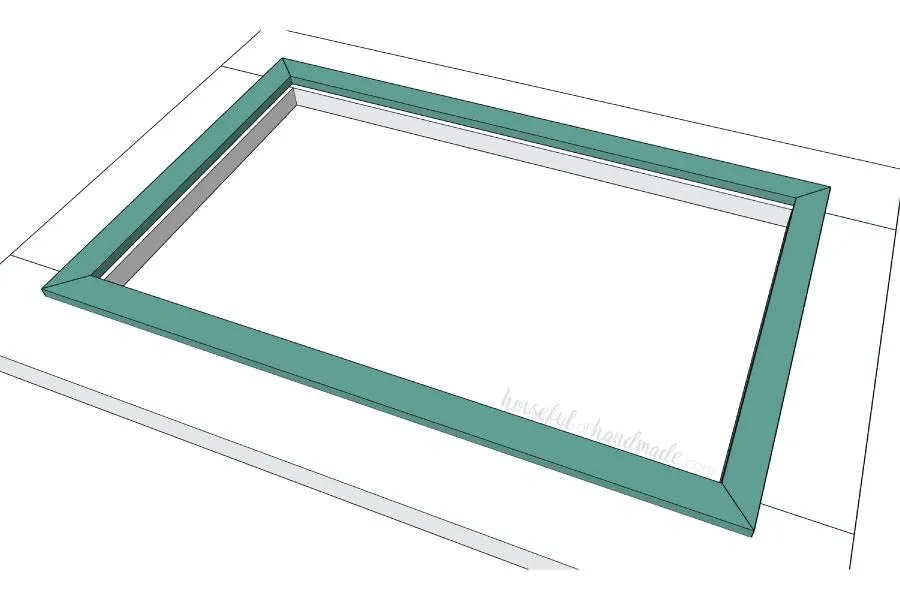
18. Add shelves to the buffet
If you want to add shelves to the buffet, drill shelf pin holes with the Kreg Shelf Pin Jig. Since the buffet has a large open area with a center frame post, one large shelf will not fit inside. Instead, I drilled shelf pin holes in the two sides as well as the center back and center of the center frame post. Depending on the type of shelf pins you use, cut the shelf to fit 1/2 the buffet cabinet. Now you can have independent shelves on either side instead of one large one.
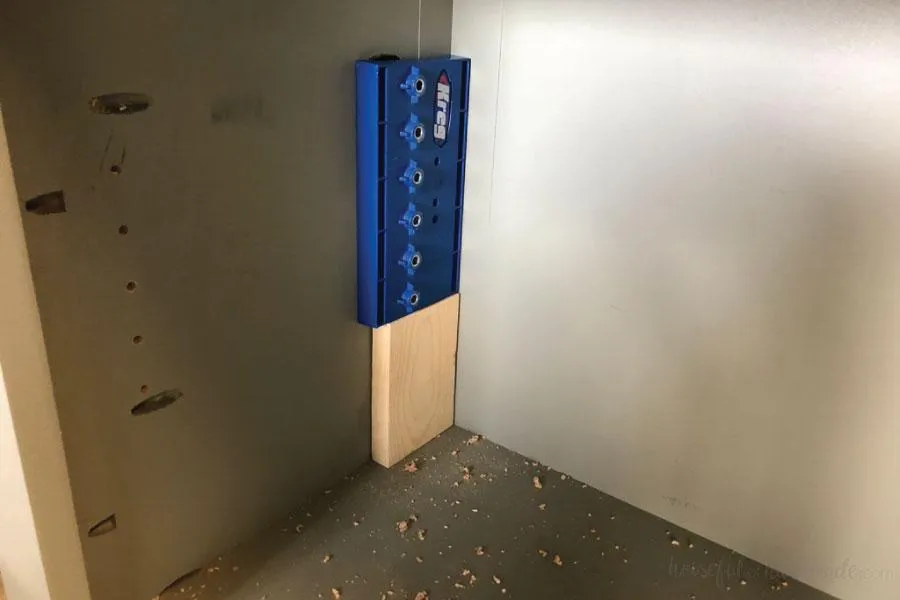
19. Cut shelves for the hutch
- Drill shelf pin holes in the 3 compartments of the hutch with the Kreg Shelf Pin Jig. Depending on the type of shelf pins you use, cut your shelves to fit out of the leftover plywood. I used 1/4" x 3/4" trim to finish off the front of the plywood, but you could also use iron on edge banding.
- Cut shelves so they are at least 1/4" back from the face frame so that the doors will fit properly with the trim on the back of them.
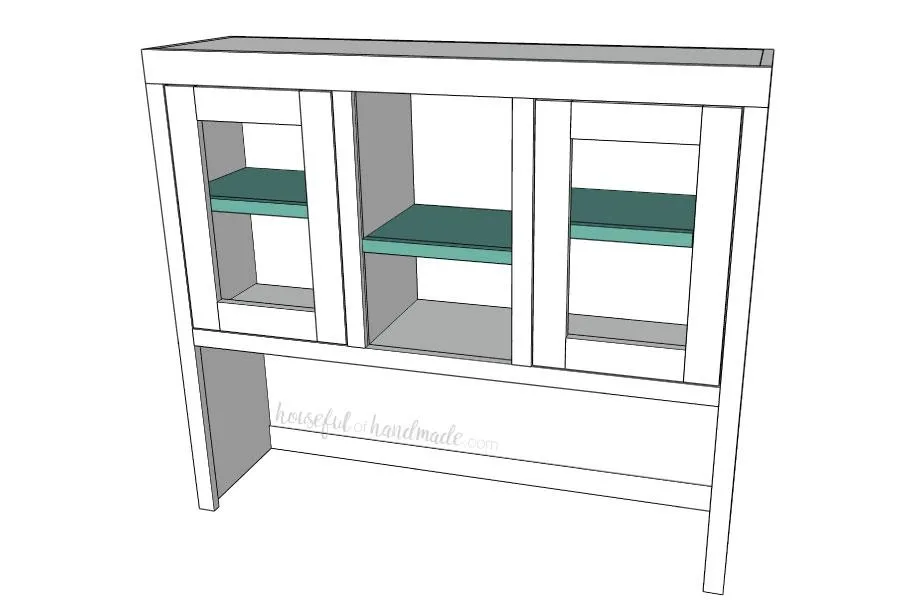
20. Install doors
Install the buffet and hutch doors with hinges made for inset face-frame cabinet doors. If using concealed hinges, use the Kreg Concealed Hinge Jig to drill cup holes for the hinges with a regular drill. Install the door hardware with the Kreg Cabinet Hardware Jig for accurate positioning of the hardware holes.
21. Finish the buffet and hutch
Fill pocket holes if desired, but the design makes it so the pocket holes are quite well hidden. Sand stain and/or paint the buffet and hutch.
22. Attach the hutch to the buffet
To attach the hutch to the buffet, center the hutch on the buffet top and make sure the back is flush with the back of the buffet. Use a 5" mending plate and 5/8" wood screws to secure the hutch to the buffet. For added security, you can attach the hutch to the wall with screws.