 Notch
NotchUse your browser's Print (Ctrl/Cmd + P) and choose Save as PDF. This page works offline once you've opened it with a signal.
Daybed
By day, this daybed provides a comfy place to sit.
- Difficulty
- Intermediate
- Time
- 5.8–11 hours
- Cost
- $$$
Cut list
| Part | Qty | T × W × L | Material | ✓ |
|---|---|---|---|---|
| Left Side Panel | 1 | 3" × 24" × 36" | — | ☐ |
| Right Side Panel | 1 | 3" × 24" × 36" | — | ☐ |
| Back Panel | 1 | 3" × 30" × 76" | — | ☐ |
| Front Leg | 2 | 2" × 2" × 24" | — | ☐ |
| Back Leg | 2 | 2" × 2" × 30" | — | ☐ |
| Outer Stretcher | 2 | 3/4" × 3" × 31" | — | ☐ |
| Center Stretcher | 1 | 3/4" × 3" × 31" | — | ☐ |
| Rail | 1 | 3/4" × 3" × 76" | — | ☐ |
| Front Panel | 1 | 3" × 11" × 76" | — | ☐ |
| Bottom Panel | 1 | 1" × 38" × 75" | — | ☐ |
Materials
| Item | Qty | ✓ |
|---|---|---|
| Board, 1x4 96" | 3 board | ☐ |
| Board, 3x3 36" | 4 board | ☐ |
| Plywood, 3/4" Thick Full Sheet | 1 board | ☐ |
| Plywood, 3/4" Thick Half Sheet | 1 board | ☐ |
| Plywood, 1/2" Thick Full Sheet | 1 board | ☐ |
| 1 1/4" coarse-thread pocket hole screws | 72 each | ☐ |
| 1" flathead wood screws | 12 each | ☐ |
| 25' roll iron-on edge banding | 1 each | ☐ |
| Pocket hole plugs (optional) | 16 each | ☐ |
| Wood glue | 1 each | ☐ |
Overall cost: $$$. Lumber varies by region, species, and season, so we give a band rather than a figure.
Tools
- Circular Saw
- Drill / Driver
- Iron for Edge Banding
- Jigsaw
- Miter Saw
- Pocket Hole Jig
- Random Orbit Sander
- Combination Square — optional
- Tape Measure — optional
Instructions
1. Make the First Side Panel
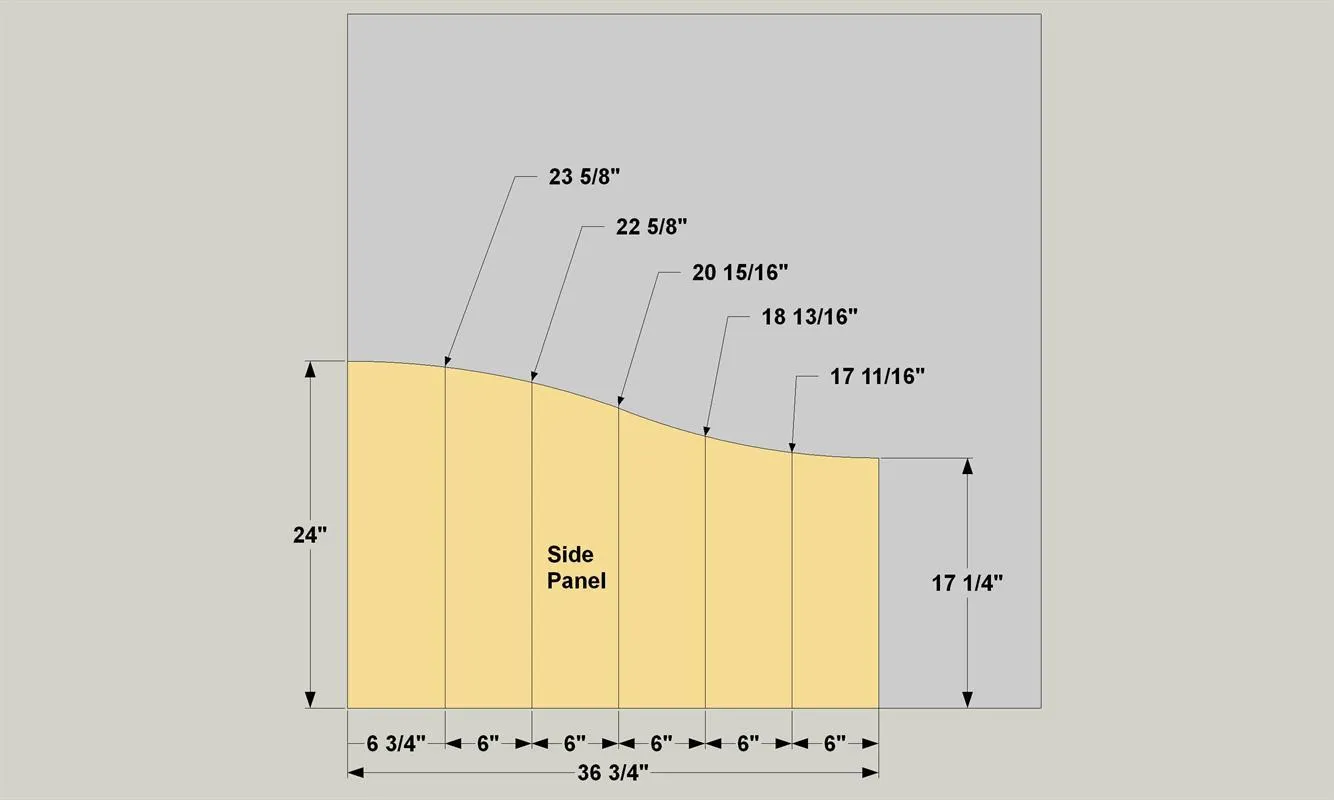
- The first step in building your daybed is to lay out the curved Side Panels on a sheet of from 3/4" plywood, as shown on the cutting diagram. To do that, start by laying out the front and back edge of one end panel. Make sure you are on the less-attractive face of the plywood. See the Tip.
- Next, locate a series of points, where shown a framing square works great for this. Connect those points to draw a gradual curve.
- Then, cut the curve to shape using a jigsaw, and sand the curve smooth.
Tip: Put the Best Face Outward When you buy plywood, it usually has one face that looks better than the other. When building this project, place the pocket holes in the less-attractive face. The better-looking face will be the one that shows, so by positioning your pocket holes this way, the best-looking face of each plywood part will be the most visible. ON a painted project, this probably isn’t a big deal. If you plan to stain, though, having the best face always outward can make a big difference.
2. Create the Second Side Panel
- Now use the Side Panel you just cut to create the second Side Panel. You’ll note that it faces the opposite direction. That ensures that, when the daybed is assembled, the "good" face of the plywood will face outward.
- Lay the first Side Panel on your plywood, and trace it. That way, both will have identical curves.
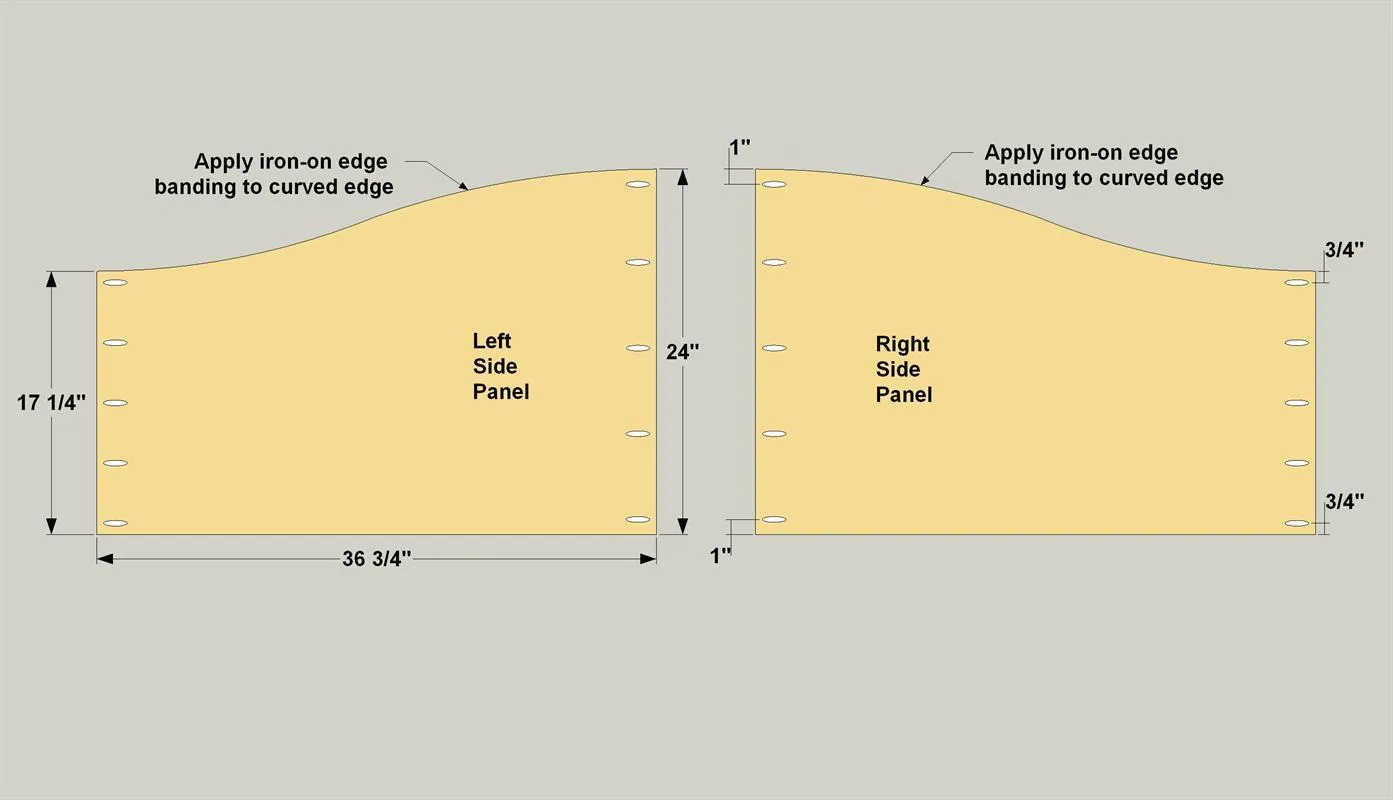
- Cut the second Side Panel, and then sand the curve smooth. When done, apply iron-on edge banding to the curved edge. See the Tip.
Tip: Iron On a Finished Edge Plywood is a wonderful material for building projects. Most of the time, though, you don’t want the raw exposed edges to show. To hide them, you can use iron-on edging. It comes with adhesive already applied. You just cut it to rough length, apply it using a hot iron, and then trim it to final width and length with a utility knife and sand the trimmed areas smooth.
3. Drill Pocket Holes
With your pocket hole jig set up for 3/4" material, drill pocket holes in the Side Panels, as shown. Make sure the holes are on the inside (less-attractive) face of the plywood. These will be positioned so they face toward the inside of the daybed.
4. Create the Back Panel
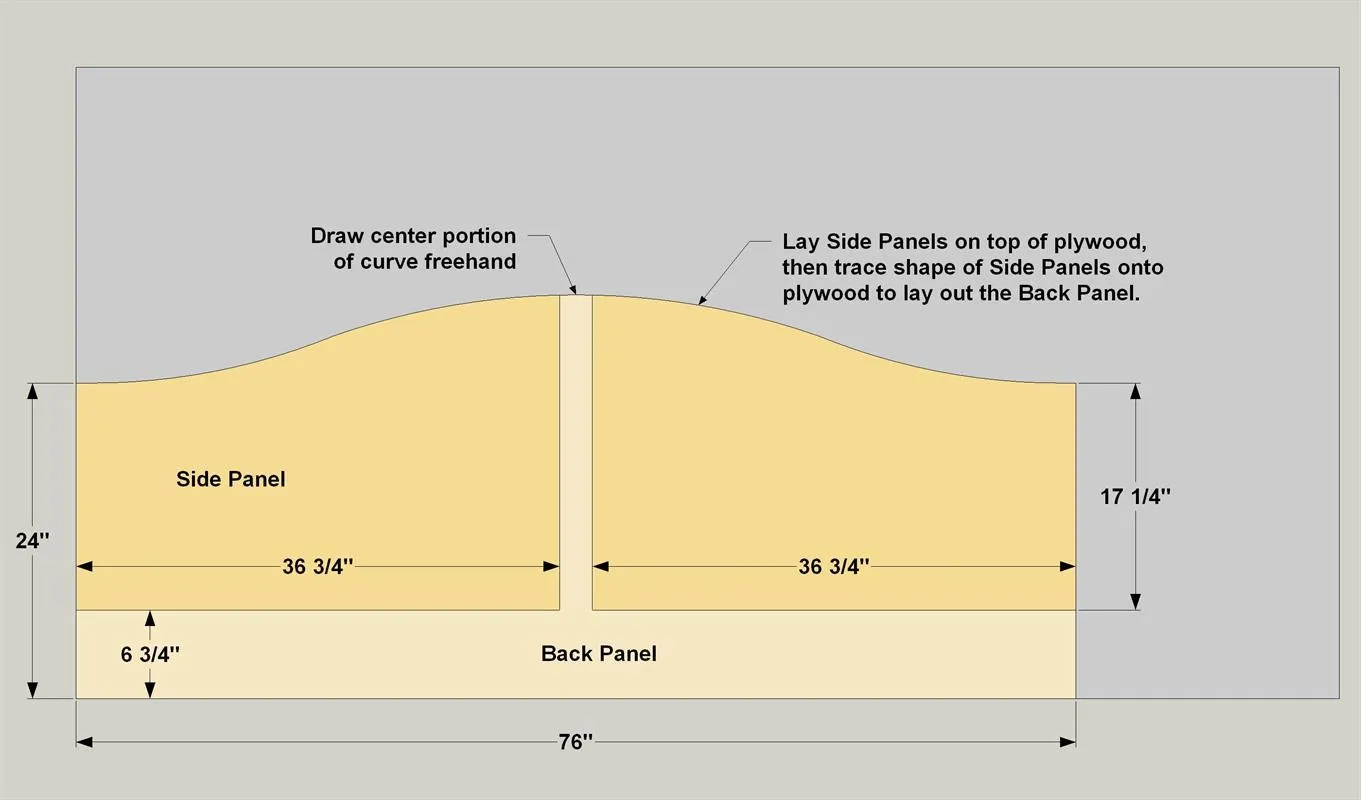
- Now you can make the Back Panel from 3/4" plywood, as shown in the cutting diagram. To do that, use the Side Panels to lay out the curve.
- Mark the ends of the Back Panel, and then lay the Side Panels in place, as shown. Trace the curve of the Side Panels on to the plywood. Note that there will be a gap between the Side Panels, so you’ll have to draw this section of the curve freehand.
- Once the curve is drawn on, cut it using a jigsaw, and then sand the curve smooth.
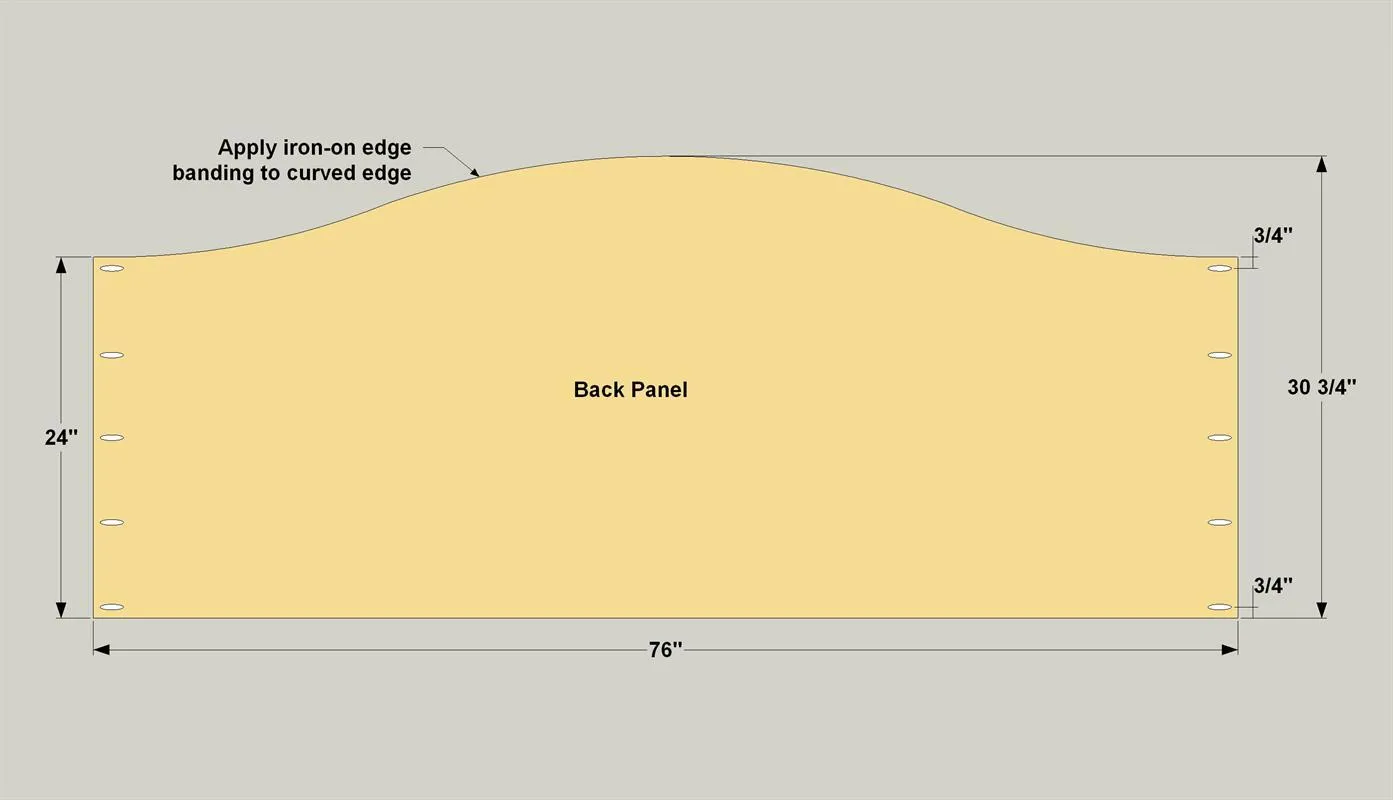
- Apply edge banding to the curve, and then drill pocket holes where shown.
5. Drill Pocket Holes
With your pocket hole jig set up for 3/4" material, drill pocket holes in the Back Panel, as shown. Make sure the holes are on the back (less-attractive) face of the plywood. This face will be positioned so it’s at the back of the daybed
6. Create the Front Panel
Now you can make the Front Panel from 3/4" plywood, as shown in the cutting diagram. Apply edge banding to the top edge of the Front Panel, and then drill pocket holes where shown.
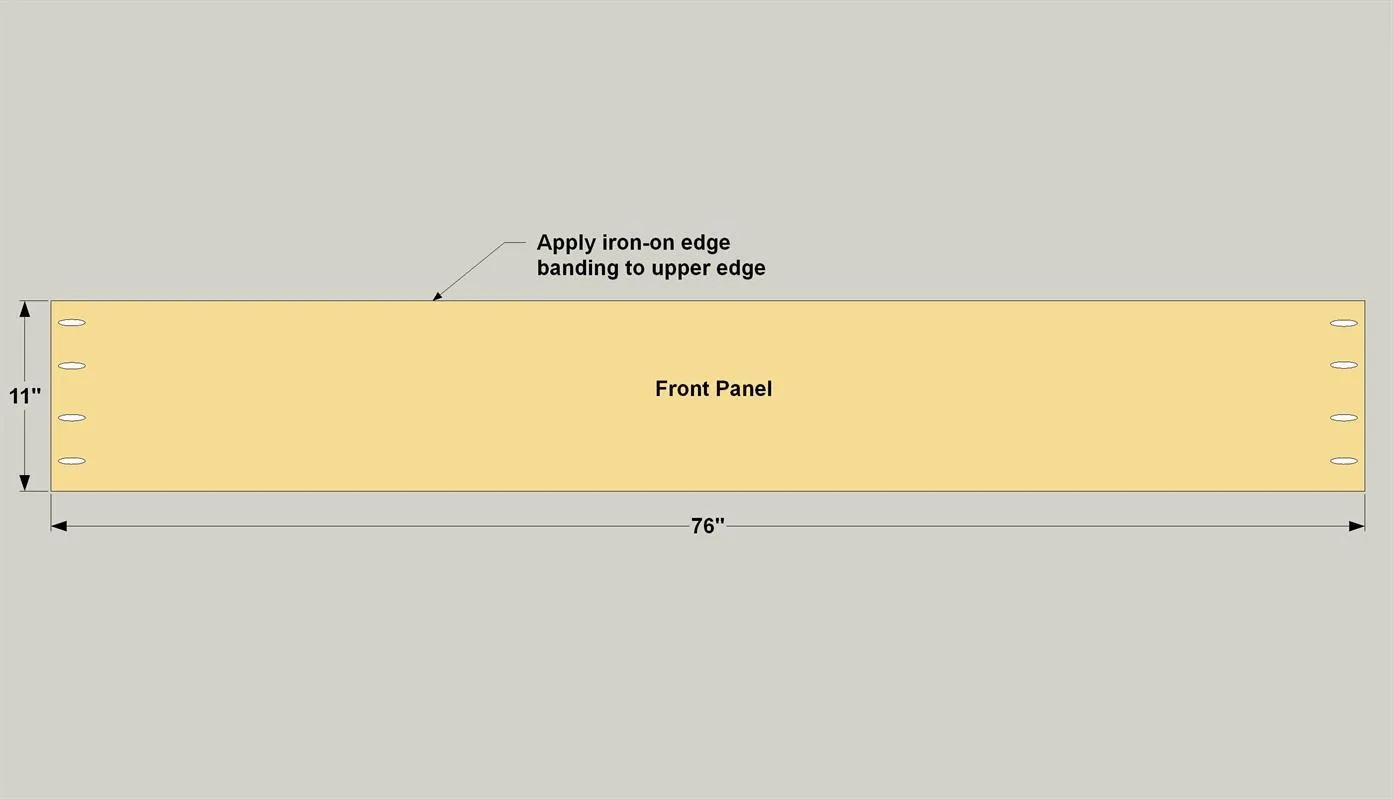
7. Make the Legs
Cut two Front Legs and two Back Legs length from 3x3 boards, as shown in the cutting diagram. Sand the Legs smooth.
8. Create Side Assemblies
Make two side assemblies by securing the Side Panels to the Front Legs and Back Legs, as shown, using 1 1/4" coarse-thread pocket hole screws. Make sure the Side Panels fit flush with the inside edge of the legs.
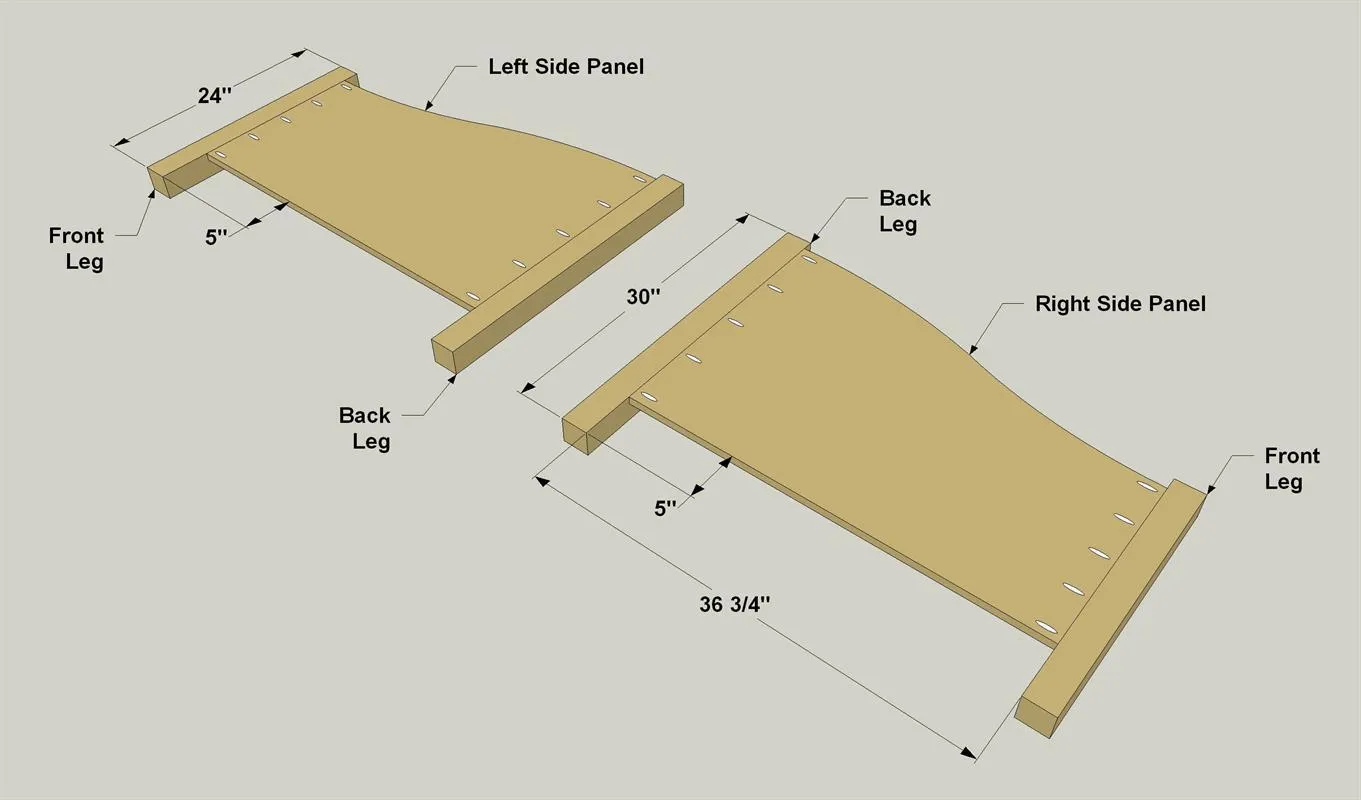
9. Make the Frame Parts
- Cut two Outer Stretchers, one Center Stretcher and two Rails to length as shown in the cutting Diagram.
- Drill pocket holes at the locations shown. Note that only the Outer Stretchers have pocket holes along the edges.
- Also, note the position of the pocket holes in the ends of the Rails. They’re positioned close to the edge so that, during assembly later, the screws will go into the daybed’s Legs.
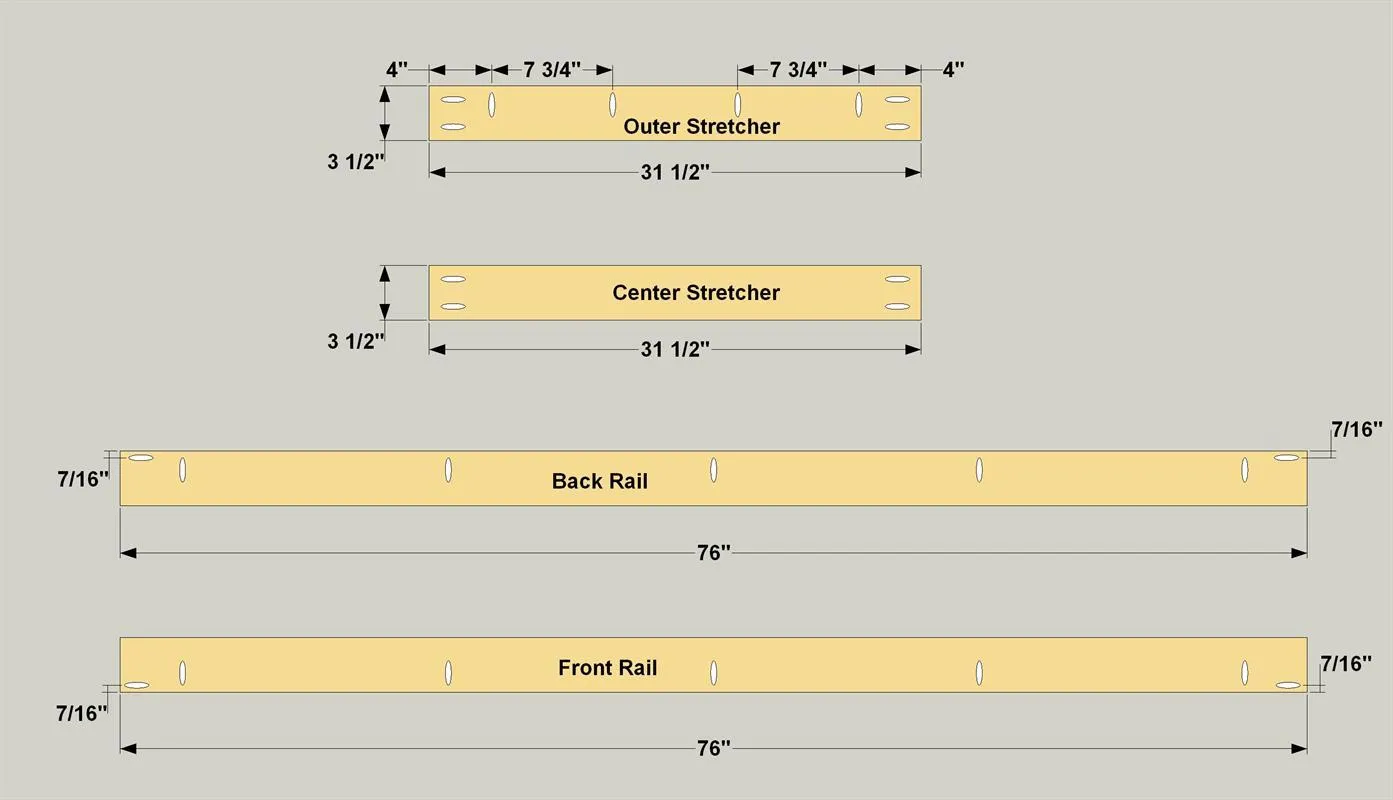
10. Assemble the Frame
Assemble the Rails and Stretchers with 1 1/4" coarse-thread pocket hole screws as shown. Make sure that the rails are oriented properly—with the pocket holes facing outward.
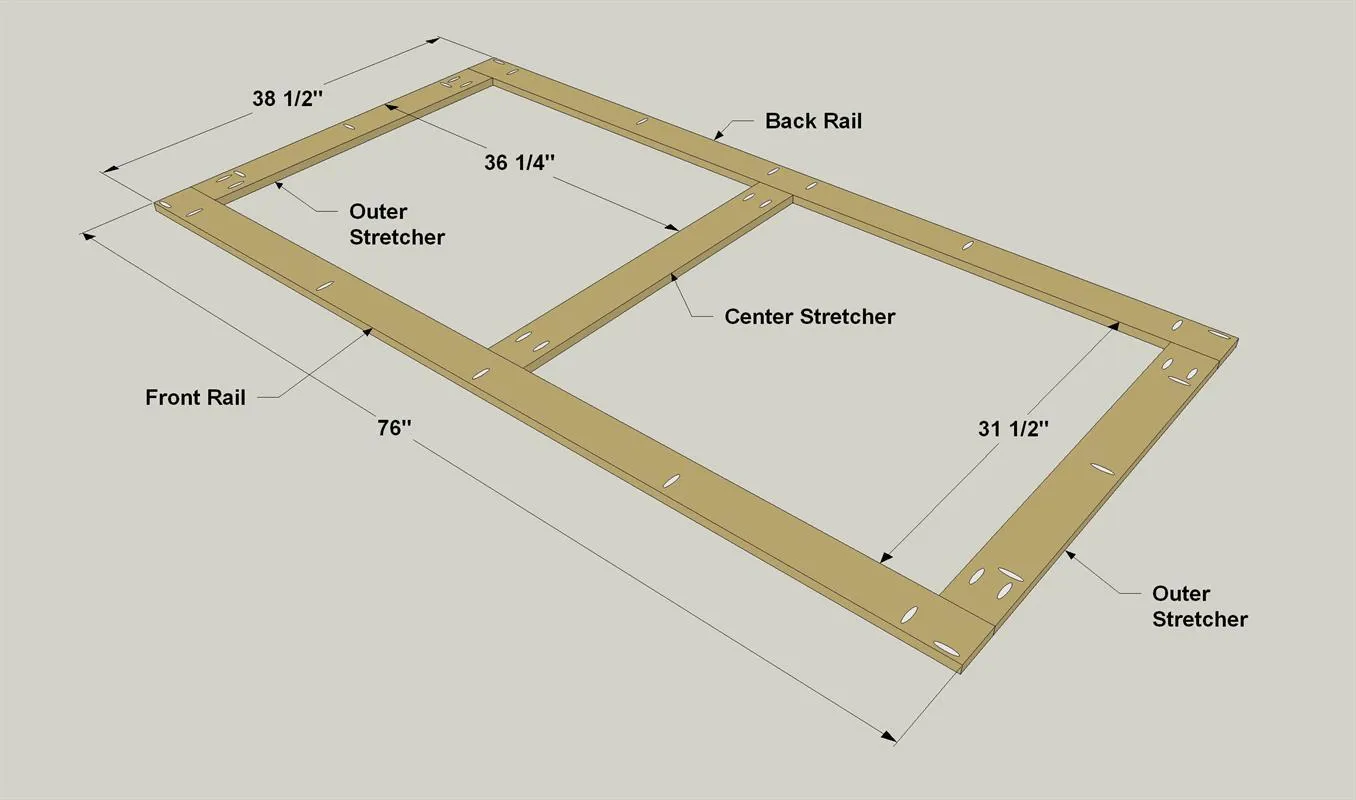
11. Attach the Sides to the Frame
Using 1 1/4" coarse-thread pocket hole screws, attach the frame assembly each side assembly, as shown.
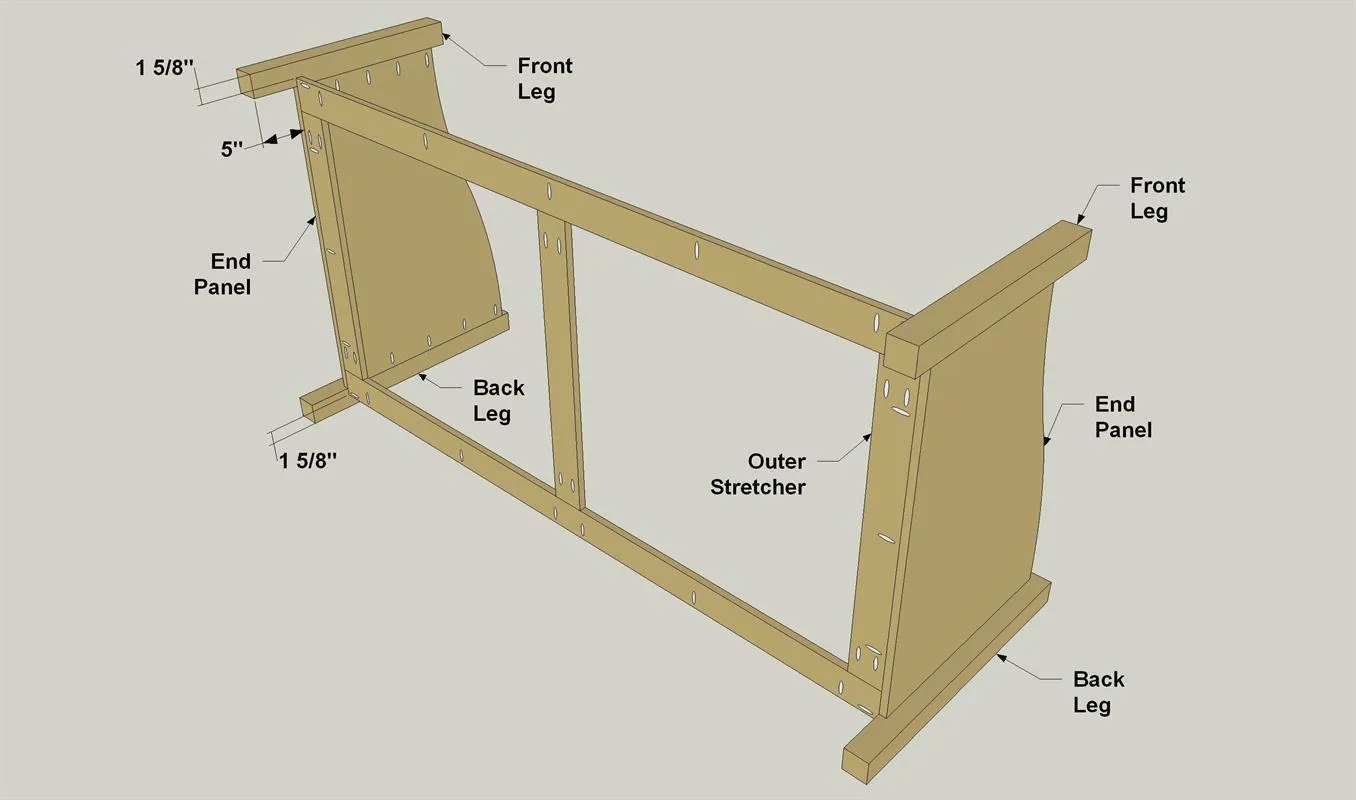
12. Attach the Back Panel
Secure the Back Panel to the frame assembly and to the Legs using 1 1/4" coarse-thread pocket hole screws, as shown. Make sure that the pocket holes are on the back side of the daybed.
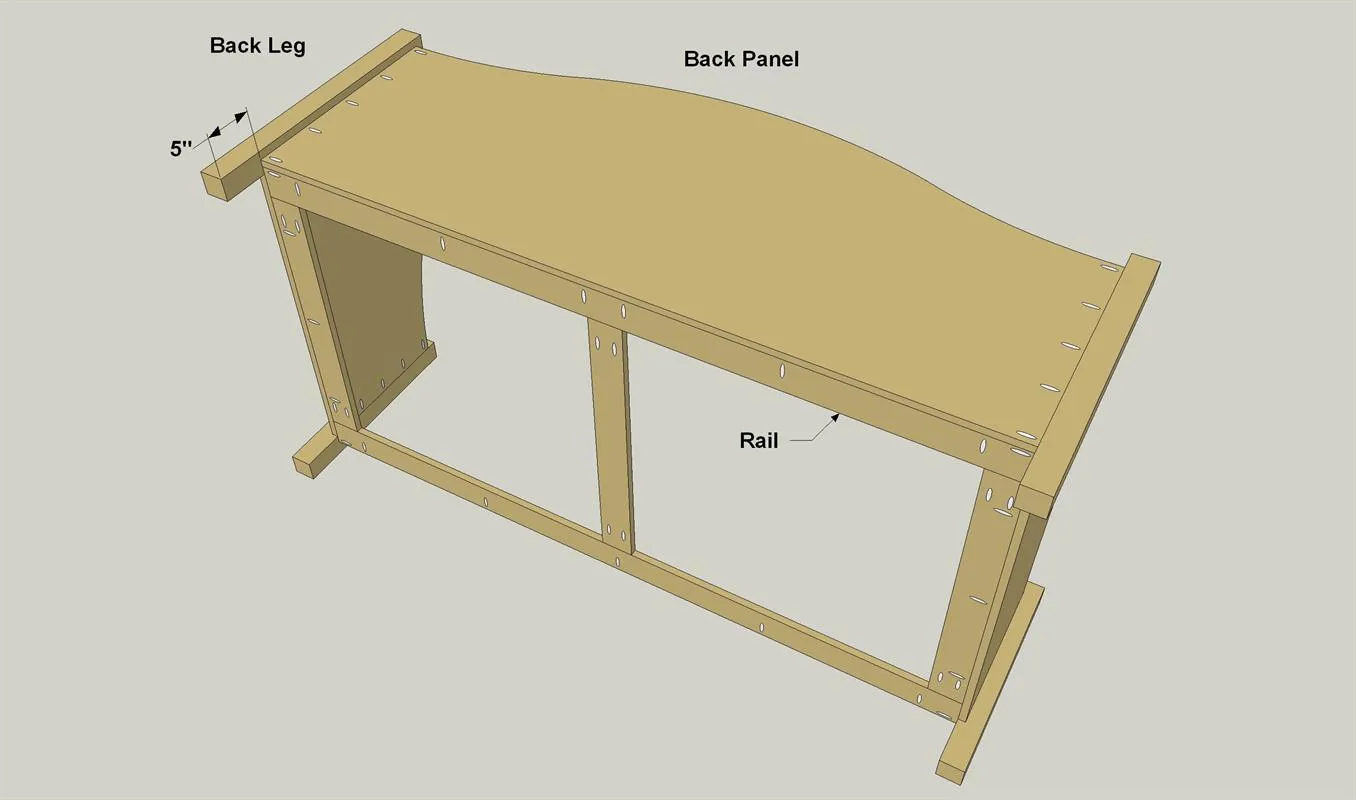
13. Add the Front Panel
Now you can attach the Front Panel, as shown, using 1 1/4" coarse-thread pocket hole screws. Make surethat the pocket holes are on the inside of the bed, and that the edge-banding is facing upward on the Front Panel.
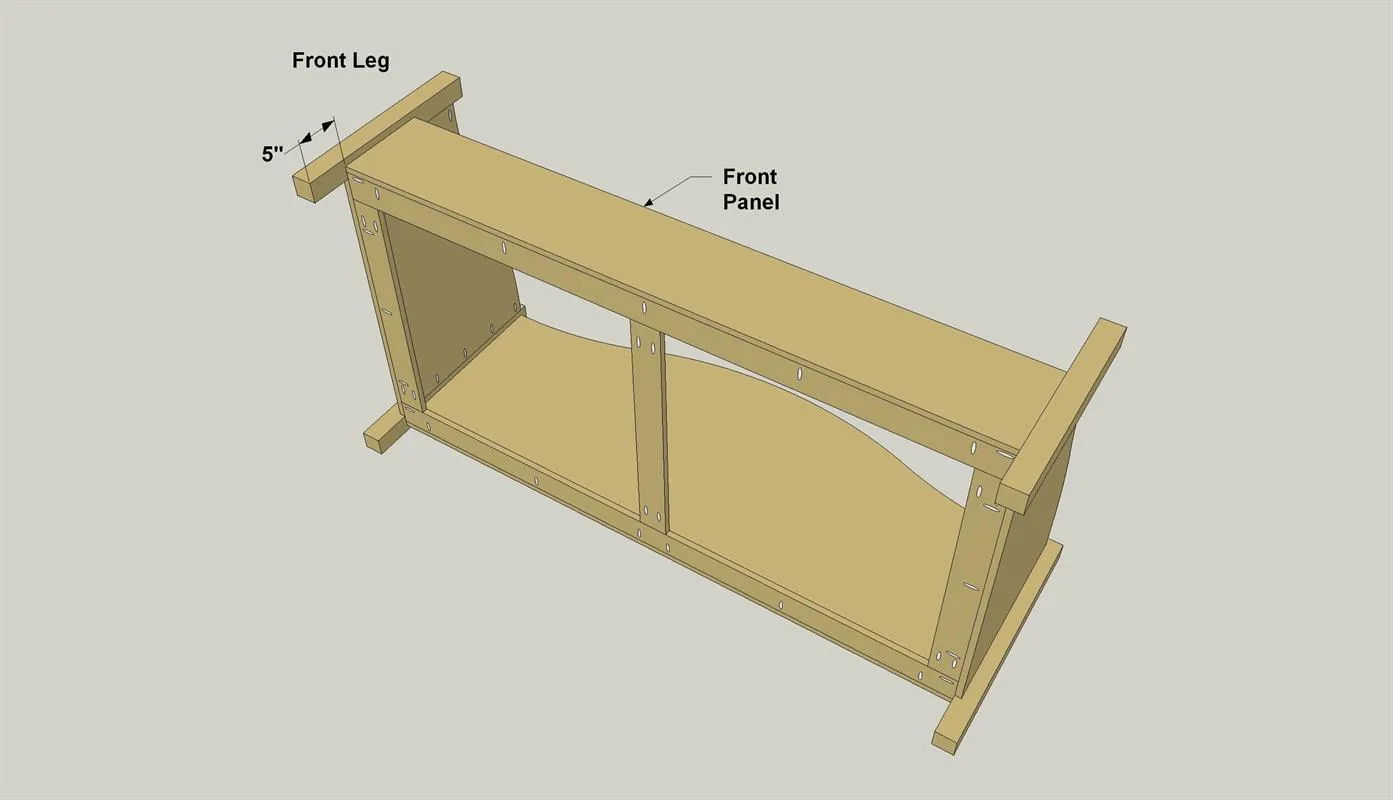
14. Install the Bottom
- Cut the Bottom Panel to size from 1/2" plywood, as shown in the cutting diagram.
- Sand the Bottom Panel as needed, and then secure it to the frame using 1" flat head wood screws. Exact screw placement isn’t critical. We used three screws in each Rail, and two in each Stretcher. You’ll want to drill pilot holes, and then drive the screws.
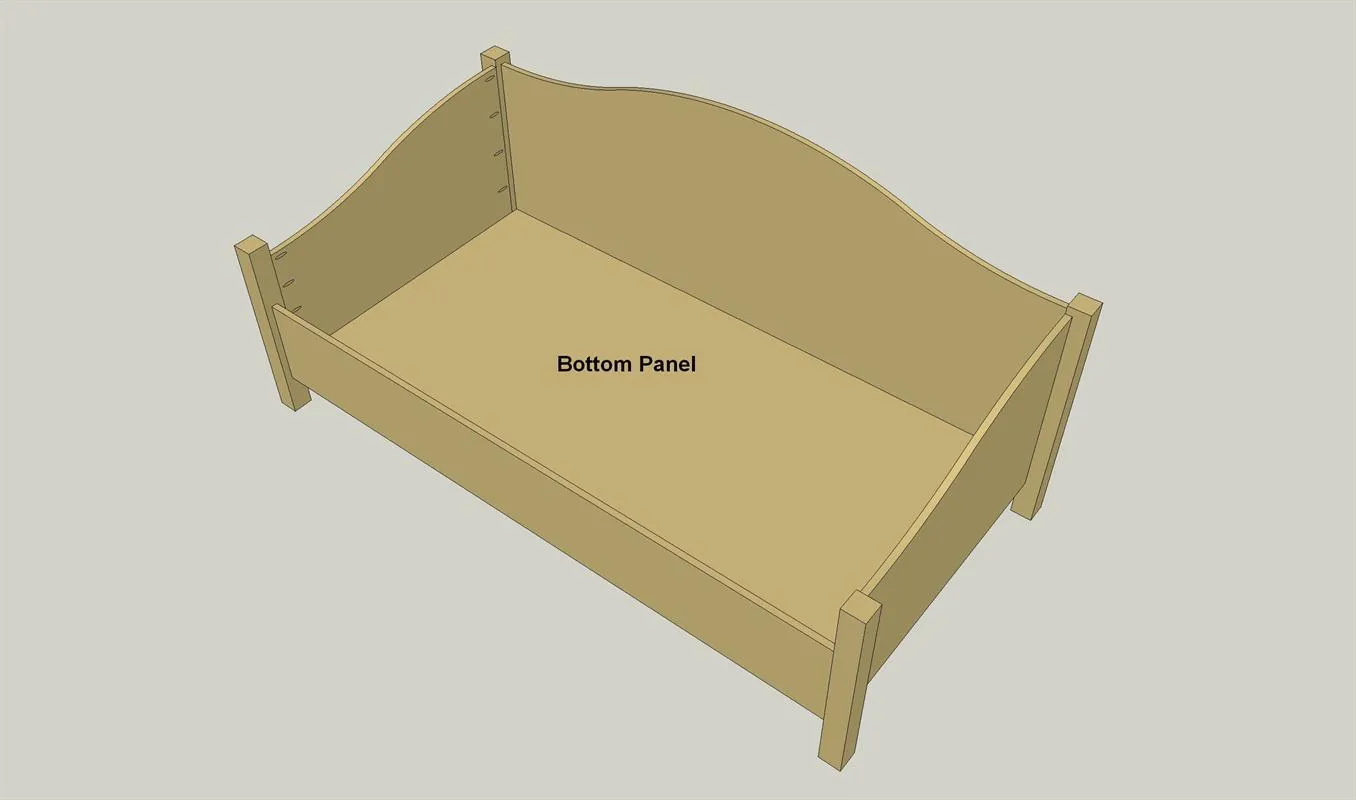
15. Sand and Finish
With everything assembled, you can give the project a final sanding and prepare for your paint or stain. There are some exposed pocket holes on the inside of the Sides and Front Panel. Most won’t be very visible once you add a mattress and box springs. For our bed, we simply made sure to paint inside the pocket holes. If you’d like more coverage, though, you can cover the holes using pocket hole plugs. Just glue them in place, and then sand them flush. After that, you’re all set to add the paint or wood finish of your choice.