 Notch
Notch- Difficulty
- Easy
- Time
- 3–5.5 hours
- Cost
- $$
About this build
Give a distinctive look to your home by building and installing your own custom house numbers sign. It even features lights to illuminate your address at night. And the lights are solar, so there’s no wiring involved. All you have to do is screw the lights to your sign.
Tools
Essential
- Drill / Driver
- Jigsaw
- Miter Saw
- Pocket Hole Jig
- Random Orbit Sander
Optional / nice to have
- Combination Square
- Tape Measure
Materials
| Item | Qty |
|---|---|
| Board, 1x2 48" | 3 board |
| Board, 1x4 48" | 1 board |
| Board, 1x6 48" | 1 board |
| Pair of Solar Railing Lights | 1 each |
| 1 1/2" exterior pocket-hole screw | 9 each |
| 1 1/2" flat-head exterior wood screw | 14 each |
| Waterproof exterior wood glue | 1 each |
| Hangman Hanging System, 6" | 1 each |
Overall cost: $$. Lumber prices vary by region, species, and season, so we give a band rather than a figure we would only be pretending to know.
Cut list
| Part | Qty | T × W × L |
|---|---|---|
| Cap | 1 | 7/8" × 3" × 22" |
| Long Cap Trim | 1 | 7/8" × 1" × 23" |
| Short Cap Trim | 2 | 7/8" × 1" × 3" |
| Sign Back | 1 | 7/8" × 5" × 23" |
| Sign Trim | 2 | 7/8" × 1" × 23" |
| Vertical Cleat | 2 | 7/8" × 1" × 8" |
| Hanger Cleat | 1 | 7/8" × 1" × 8" |
| Hanger Spacer | 1 | 7/8" × 1" × 1" |
What to buy
Buy 4 boards at 8 ft.
7/8" × 5"
1 board
7/8" × 3"
1 board
7/8" × 1"
2 boards
Assumes 8 ft stock, a 1/8" saw kerf, and buying each part at its own width. Change the board size or kerf on the full board plan →
Instructions
1Choose Your Material
We built our sign from 1x2, 1x4, and 1x6 cedar boards. It looks great, and will hold up really well outdoors. When you pick out your lumber, check the actual thickness. In our case, the cedar was 7/8" thick. So, the pocket-hole jig setups and screw lengths shown here are for that 7/8" thickness. In some stores, cedar may have an actual thickness of 3/4". Or, if you choose another wood, know that most other “1-by” boards are actually 3/4" thick. If your lumber is actually 3/4" thick, be sure to set up your pocket-hole jig accordingly, and choose shorter 1 1/4"-long pocket-hole screws and flat-head screws for assembly. Also, cedar is usually rough on one face. We used that rough face as the back or underside in all cases.
2Make the Cap
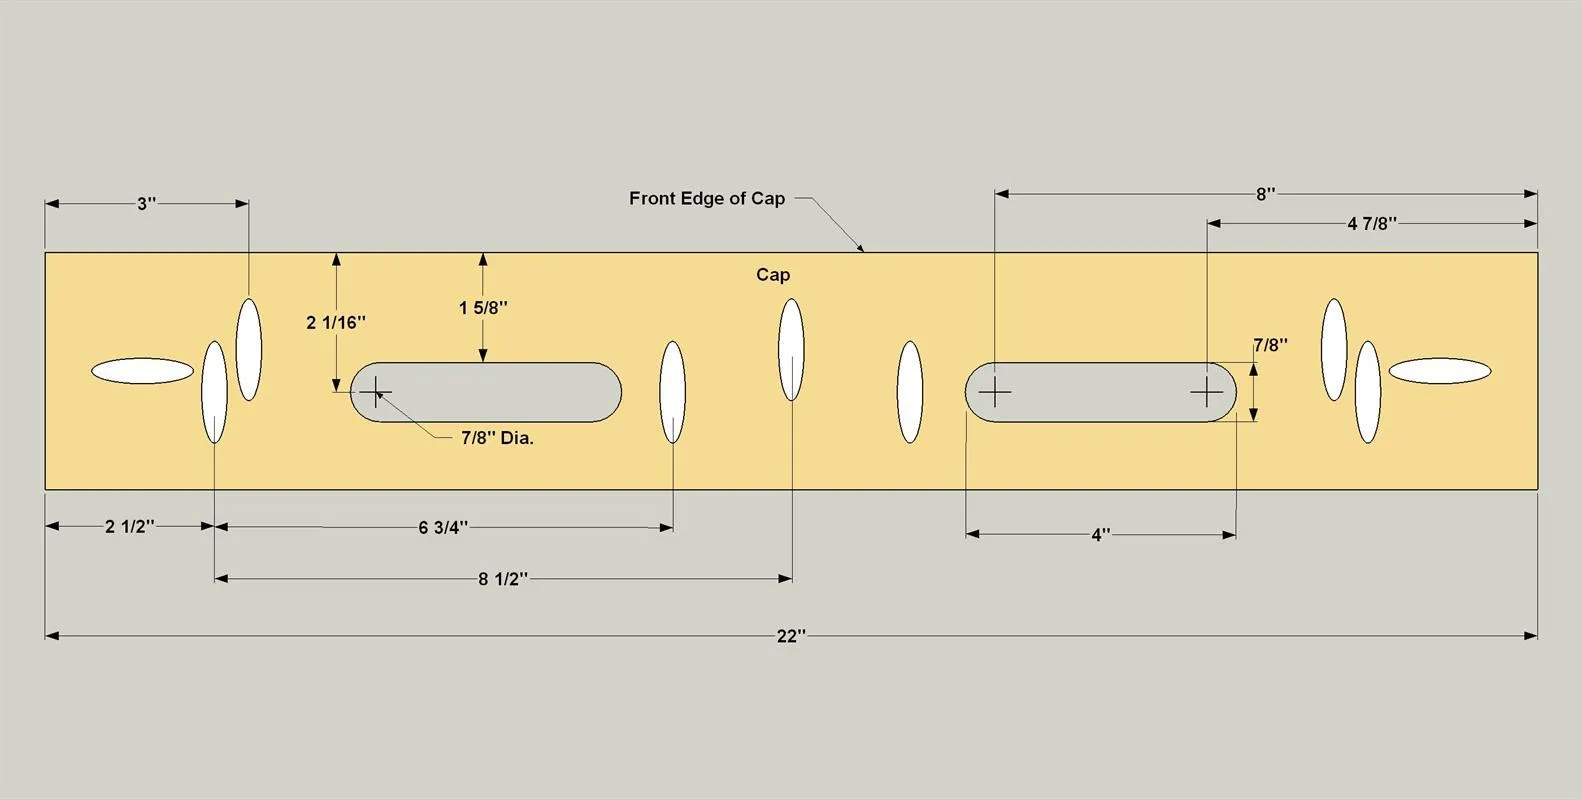
- Cut a Cap to length from a 1x4 cedar board, as shown in the cutting diagram. To make the openings for the solar lights, lay out four 7/8"-diameter holes at the locations shown.
- Then drill each hole through the board using a spade bit or a Forstner bit. Use scrap-wood backer to help prevent tearout as you drill.
- Next, use a straightedge and a pencil to draw lines connecting the two holes on each side of the Cap. With a jigsaw, cut out the holes to complete the openings. With your pocket-hole jig set for 7/8"-thick material, drill pocket holes, at the locations shown, in the rough face of the Cap.
3Add the Cap Trim
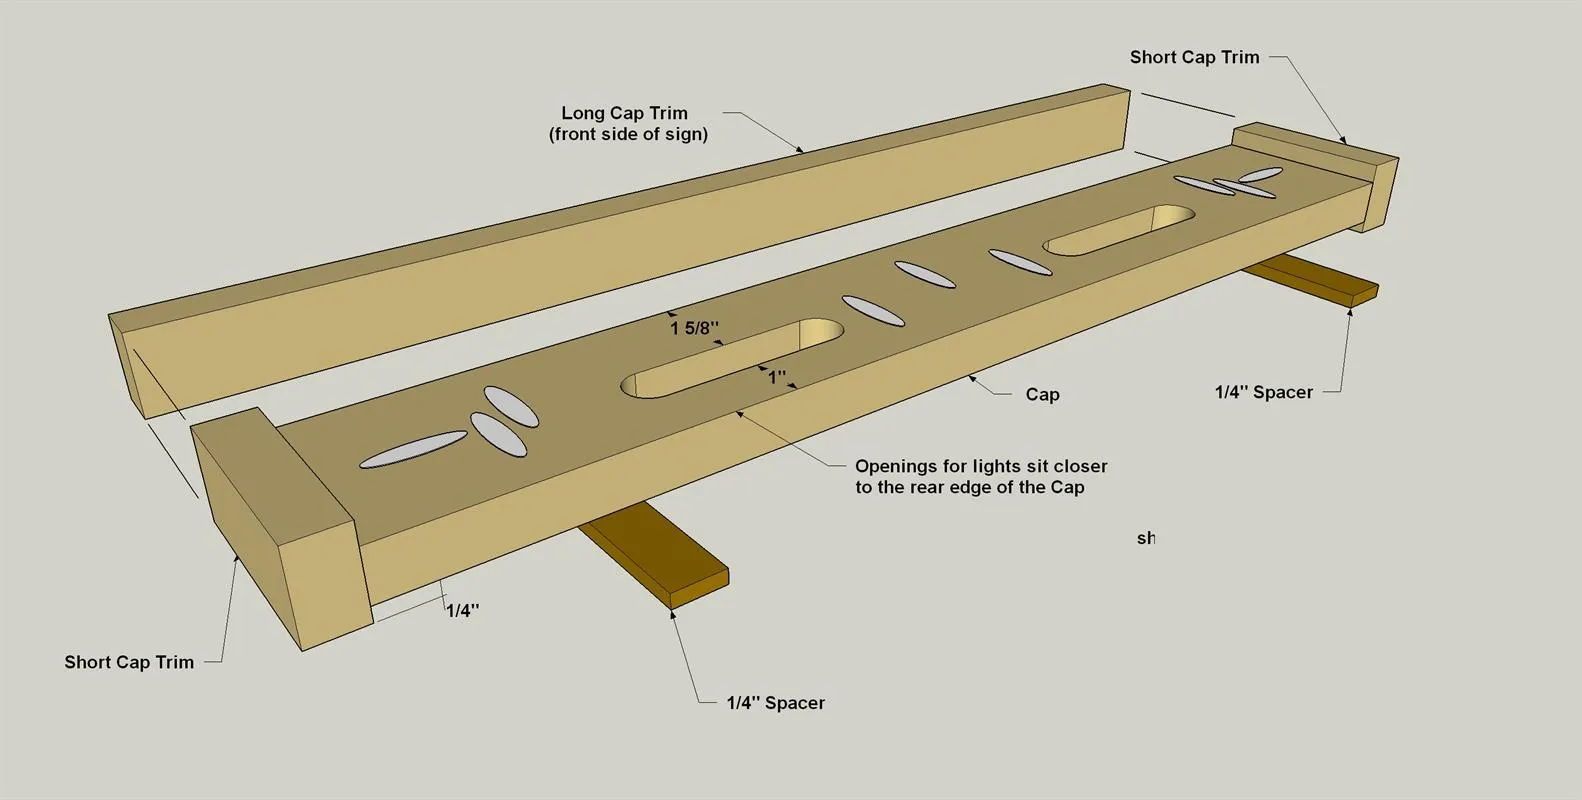
- Cut one Long Cap Trim and two Short Cap Trim boards to length from 1x2 cedar, as shown in the cutting diagram. Use spacers to help position the cap, as shown.
- Then spread waterproof exterior wood glue on the ends and front edge of the Cap.
- Position the Short Cap Trim at each end, and attach it using 1 1/2" exterior pocket-hole screws.
- Then position the Long Cap Trim, and attach it in the same way.
4Make the Cleats
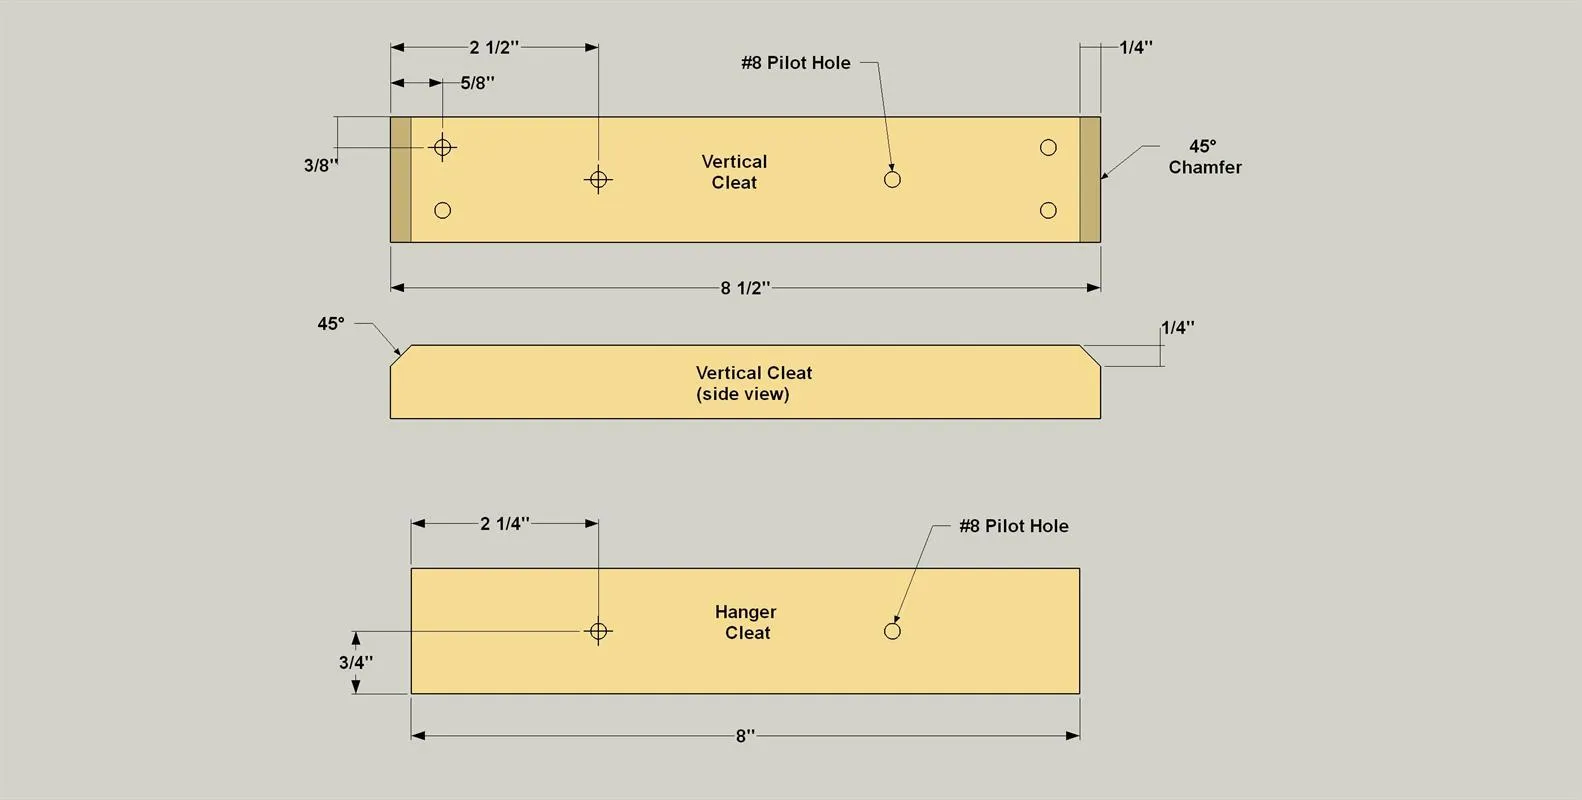
- Cut two Vertical Cleats to length form 1x2 cedar, as shown in the cutting diagram. On each Vertical Cleat, cut or sand a 1/4" chamfer the ends, as shown.
- Next, drill six 3/16" holes at the locations shown.
- Now cut a Hanger Cleat from 1x2 cedar and drill two 3/16" holes at the locations shown.
5Assemble the Sign Back
- Cut a two pieces of Sign Trim to length from 1x2 cedar, and one Sign Back from 1x6 cedar, as shown in the cutting diagram.
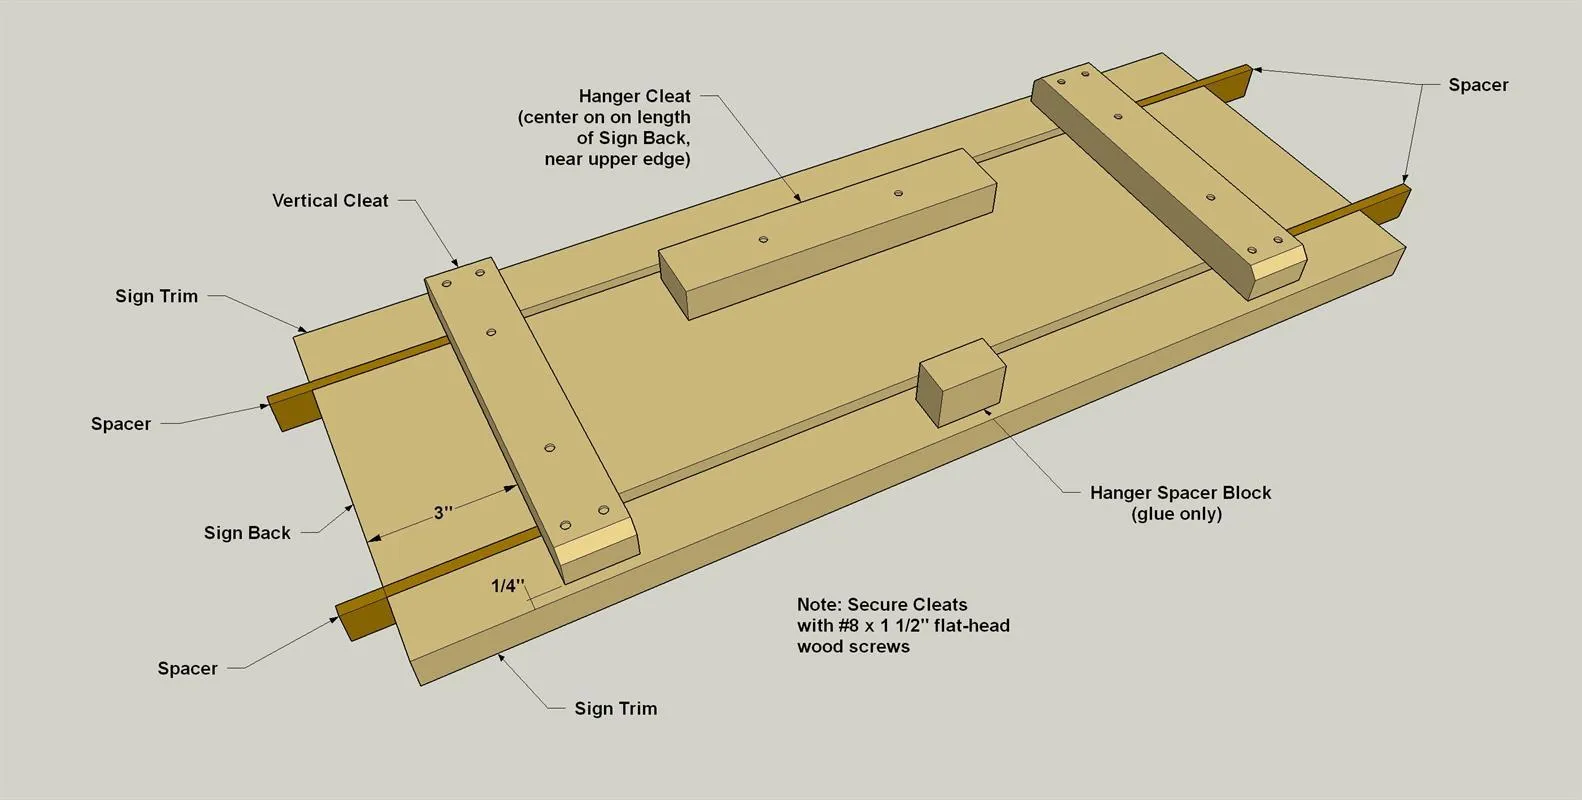
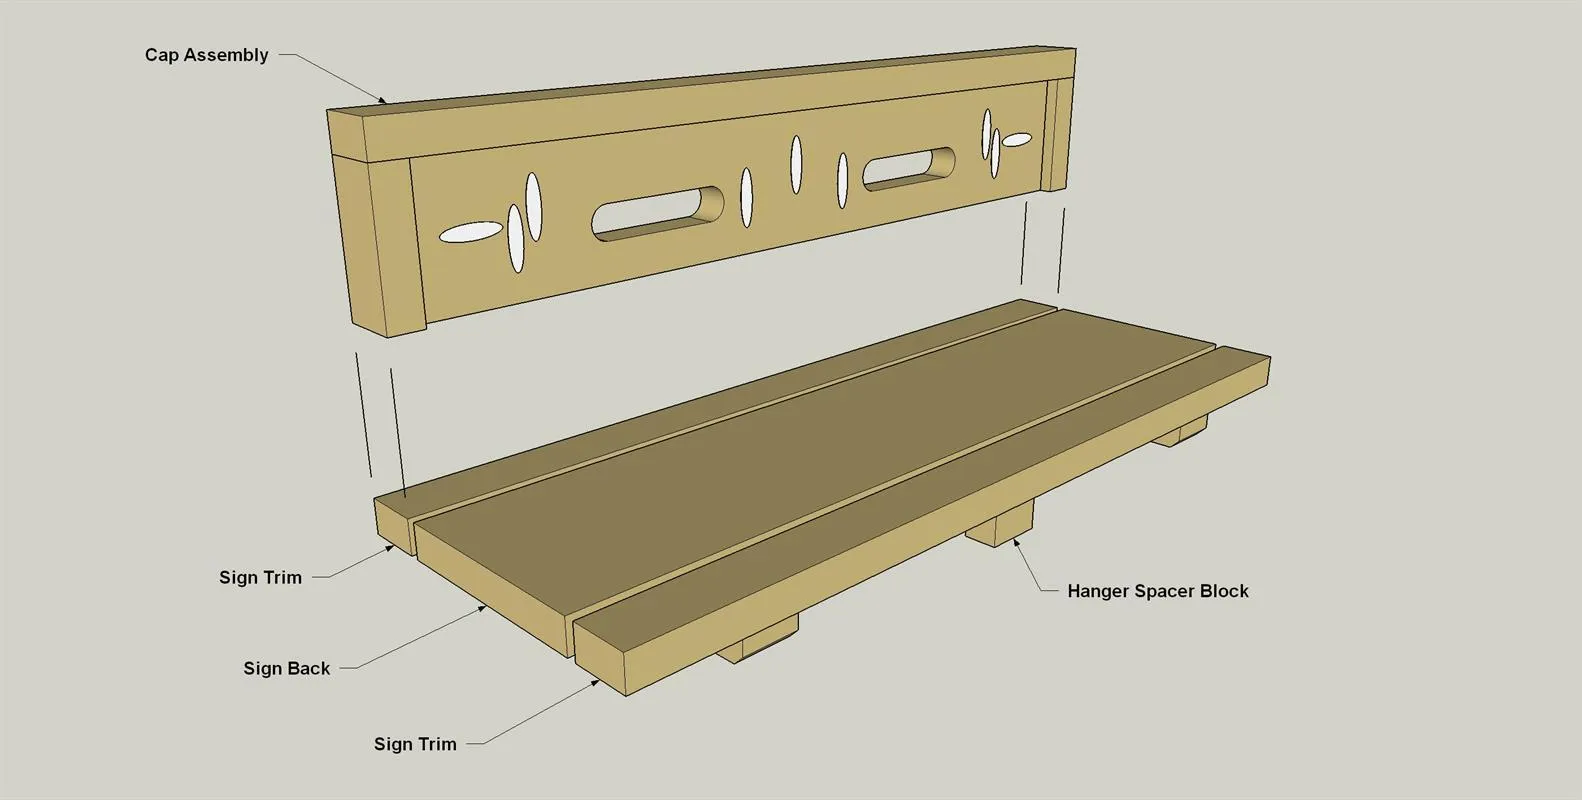
- Lay Sign Back and Sign Trim boards smooth side down on a work surface. Create gaps between the boards using 1/4" spacers. And make sure the ends of the boards are even.
- Then position the two Vertical Cleats, and attach them as shown using glue and 1 1/2" exterior flat-head wood screws.
- Add the Hanger Cleat to the Sign Back with two 1 1/2" exterior flat-head wood screws.
- Finally, cut the small Hanger Spacer from 1x2 cedar, and then secure it to the back of the Sign Trim Board with glue. This spacer will help the sign hang straight when it’s installed on your house.
6Attach the Cap to the Back
Flip the sign back assembly over onto the cleats, position and cap assembly on the back assembly where shown, and then secure the cap assembly using glue and 1 1/2" exterior flat-head wood screws.
7Sand and Apply a Finish
With the sign parts assembled, you can sand the exposed surfaces as needed using 150-grit sandpaper. We then applied a couple of coats of a clear exterior oil finish to protect and add beauty to the cedar. If you prefer, you can use an exterior stain.
8Attach the Numbers and Hardware
- When the finish dries, you can install the address numbers.
- Then mount the solar lights to the openings in the Cap.
- Finally, attach a hanger. We used a “Hangman” system (see the Materials tab) that’s normally used to hang pictures. This two-piece hanger is super easy to install, and it’s made from aluminum so it will hold up fine outdoors. Following the manufacturer’s instructions, attach one side of the Hangman to the Hanging Cleat on your sign, and the other half to your house.
Tags
- Beginning Woodworking Projects
- Beginner
Reviews & builds
No reviews yet
Sign in to review this plan or share your build.
No reviews yet. Be the first to build this.