Notch
NotchUse your browser's Print (Ctrl/Cmd + P) and choose Save as PDF. This page works offline once you've opened it with a signal.
Contemporary Cherry Wine Bar
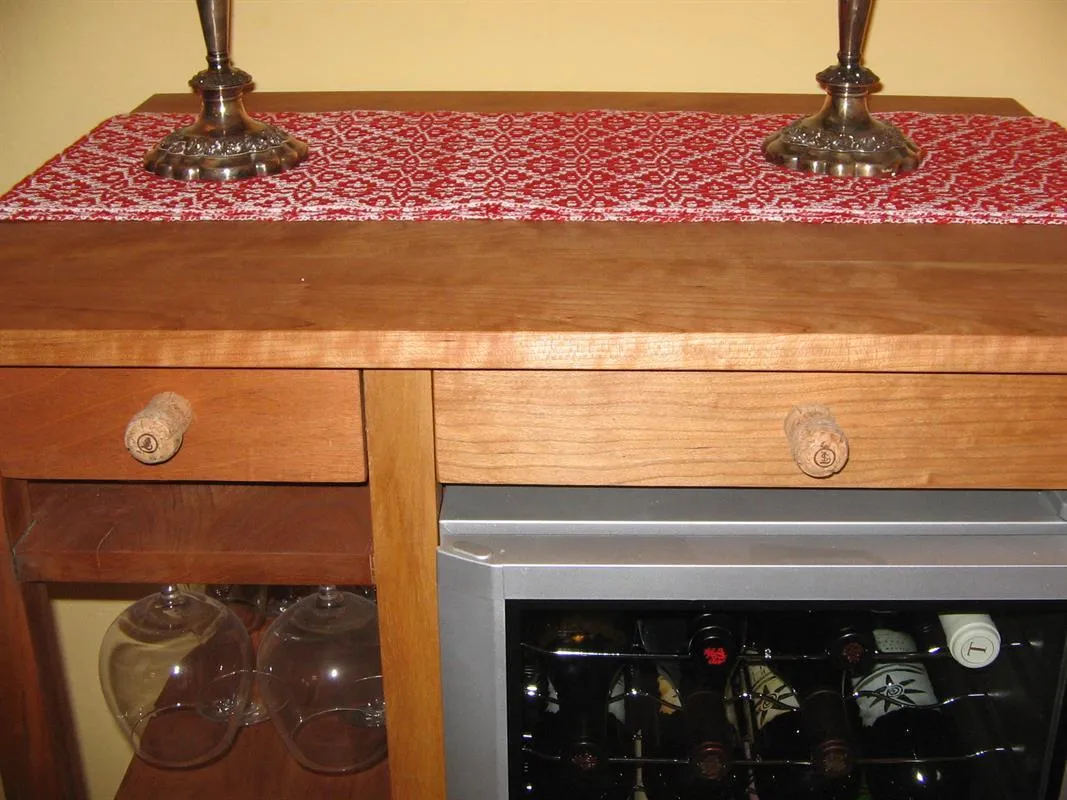
Cherry wine bar designed to surround and beautify our wine frig.
- Difficulty
- Expert
- Time
- 8.3–16 hours
- Cost
- $$$
Cut list
| Part | Qty | T × W × L | Material | ✓ |
|---|---|---|---|---|
| Top Cherry | 1 | 3/4" × 24" × 31" | — | ☐ |
| Legs Long Cherry | 4 | 1" × 1" × 35" | — | ☐ |
| Legs Short Cherry | 2 | 1" × 1" × 32" | — | ☐ |
| Shelves Cherry | 3 | 3/4" × 11" × 23" | — | ☐ |
| Drawer Front Large Cherry | 1 | 3/4" × 3" × 16" | — | ☐ |
| Drawer Front Small Cherry | 1 | 3/4" × 3" × 8" | — | ☐ |
| Sides Cherry | 3 | 3/4" × 3" × 20" | — | ☐ |
| Back Large Cherry | 1 | 3/4" × 3" × 16" | — | ☐ |
| Back Small Cherry | 1 | 3/4" × 3" × 8" | — | ☐ |
| Center Frame Poplar | 2 | 3/4" × 2" × 15" | — | ☐ |
| Frame Small Poplar | 2 | 3/4" × 2" × 9" | — | ☐ |
| Frame Large Poplar | 2 | 3/4" × 2" × 17" | — | ☐ |
| Drawer Sides Poplar | 4 | 1/2" × 1" × 20" | — | ☐ |
| Drawer Back Large Poplar | 1 | 1/2" × 1" × 16" | — | ☐ |
| Drawer Back Small Poplar | 1 | 1/2" × 1" × 8" | — | ☐ |
| Outer Drawer Guides Oak | 2 | 3/4" × 1" × 20" | — | ☐ |
| Inner Drawer Guides Oak | 2 | 3/4" × 1" × 20" | — | ☐ |
| Small Drawer bottom | 1 | 1/4" × 8" × 21" | — | ☐ |
| Large Drawer Bottom | 1 | 1/4" × 16" × 21" | — | ☐ |
Materials
| Item | Qty | ✓ |
|---|---|---|
| Board, Board Feet Cherry | 21 board | ☐ |
| Board, Board feet Poplar | 3 board | ☐ |
| Oak Board, 1x6 48" | 1 board | ☐ |
| Plywood, 1/4" Thick Quarter Sheet | 1 board | ☐ |
| Kreg 1 1/4" coarse & fine pocket screws | 82 each | ☐ |
| Sparkling Wine Corks | 2 each | ☐ |
| Small washers | 4 each | ☐ |
| Boiled linseed oil | 1 each | ☐ |
| Titebond I wood glue | 1 each | ☐ |
| Minwax Tung Oil | 1 each | ☐ |
| 1 1/2" #8 woodscrews | 2 each | ☐ |
| Minwax Polycrylic | 1 each | ☐ |
| 1" brad nails | 25 each | ☐ |
Overall cost: $$$. Lumber varies by region, species, and season, so we give a band rather than a figure.
Tools
- Brad Nailer
- Drill / Driver
- Jigsaw
- Jointer
- Miter Saw
- Pocket Hole Jig
- Random Orbit Sander
- Router
- Router Table
- Table Saw
- Thickness Planer
- Bar / Pipe Clamps — optional
- Tape Measure — optional
Instructions
1. Introduction
Please be sure to read through complete instructions before you begin any work on this project. It is also a good idea to dry fit the components before adding glue and doing final assembly.
2. Cut Cherry Boards
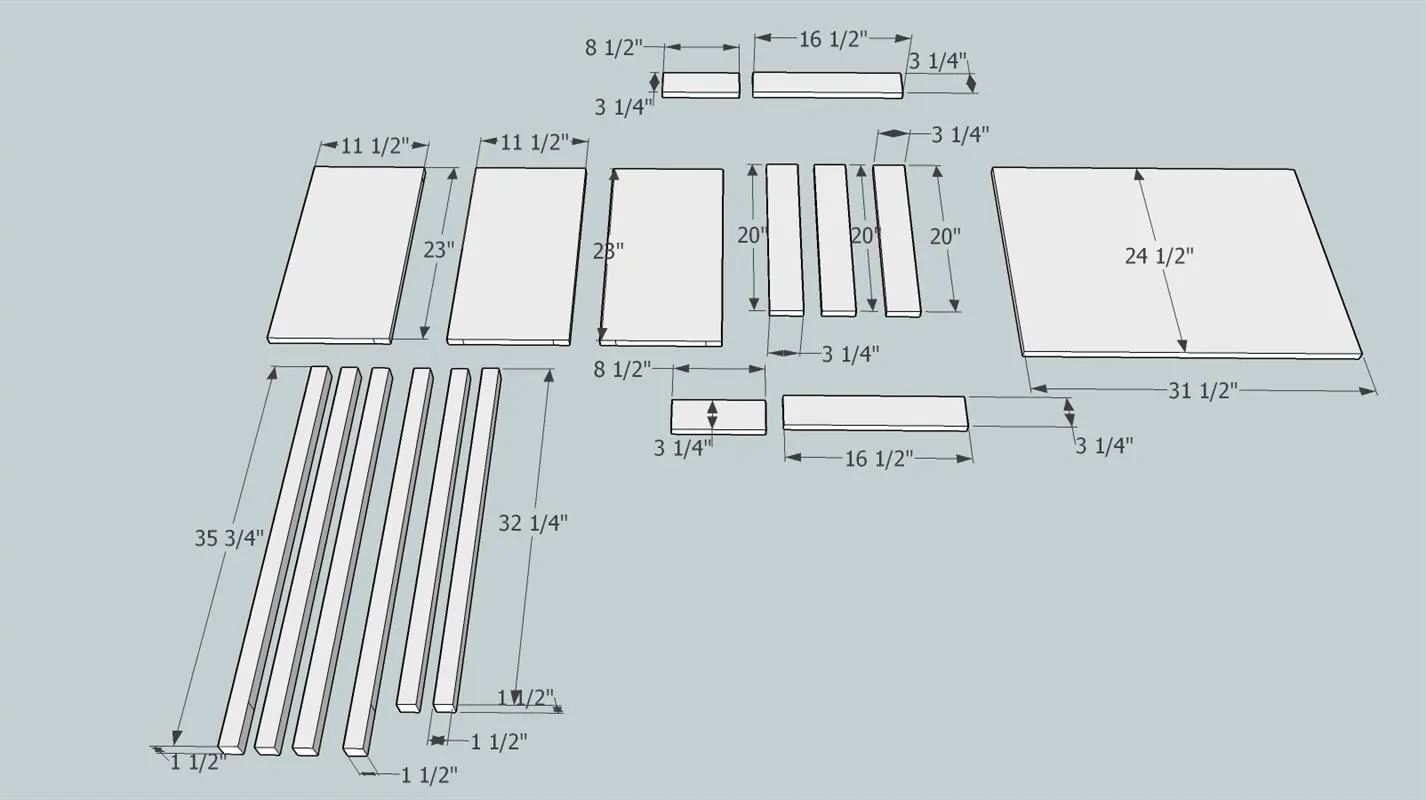
Using the dimensions in the parts/cut list, cut the pieces required for assembly. Please note that the top will require glueing up. Cut the 4 long and 2 short legs to the dimensions shown, I recommend using 8/4 cherry so that the legs are one solid piece. If you can only obtain 3/4" dimensional lumber, legs cut from laminated boards will work. Use 100 grit then 150 grit sandpaper to smooth the legs.
3. Cut 3/4" Poplar Boards
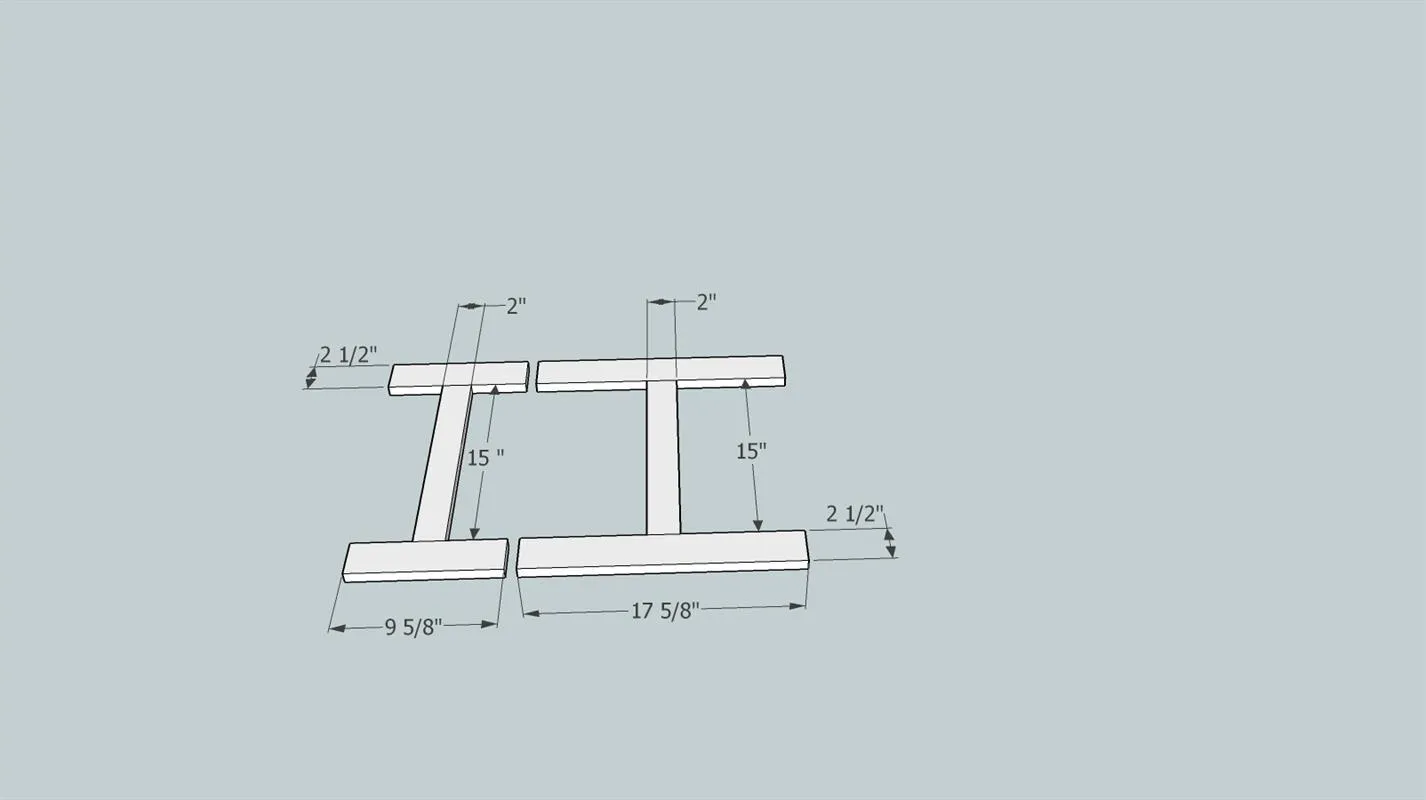
Cut the six Poplar frame components as listed in the cuts/parts list. Smooth with 150 grit sandpaper.
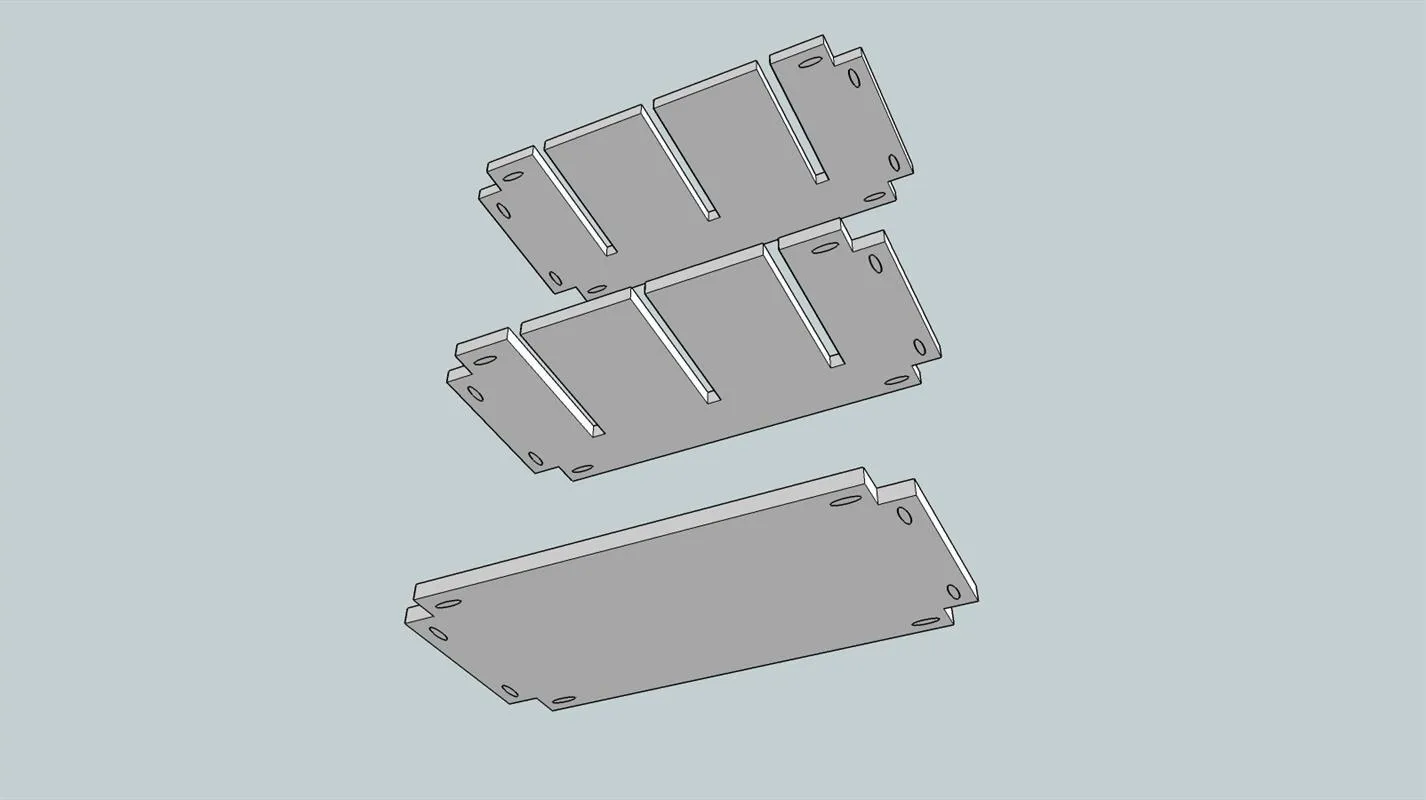
4. Cut Shelves
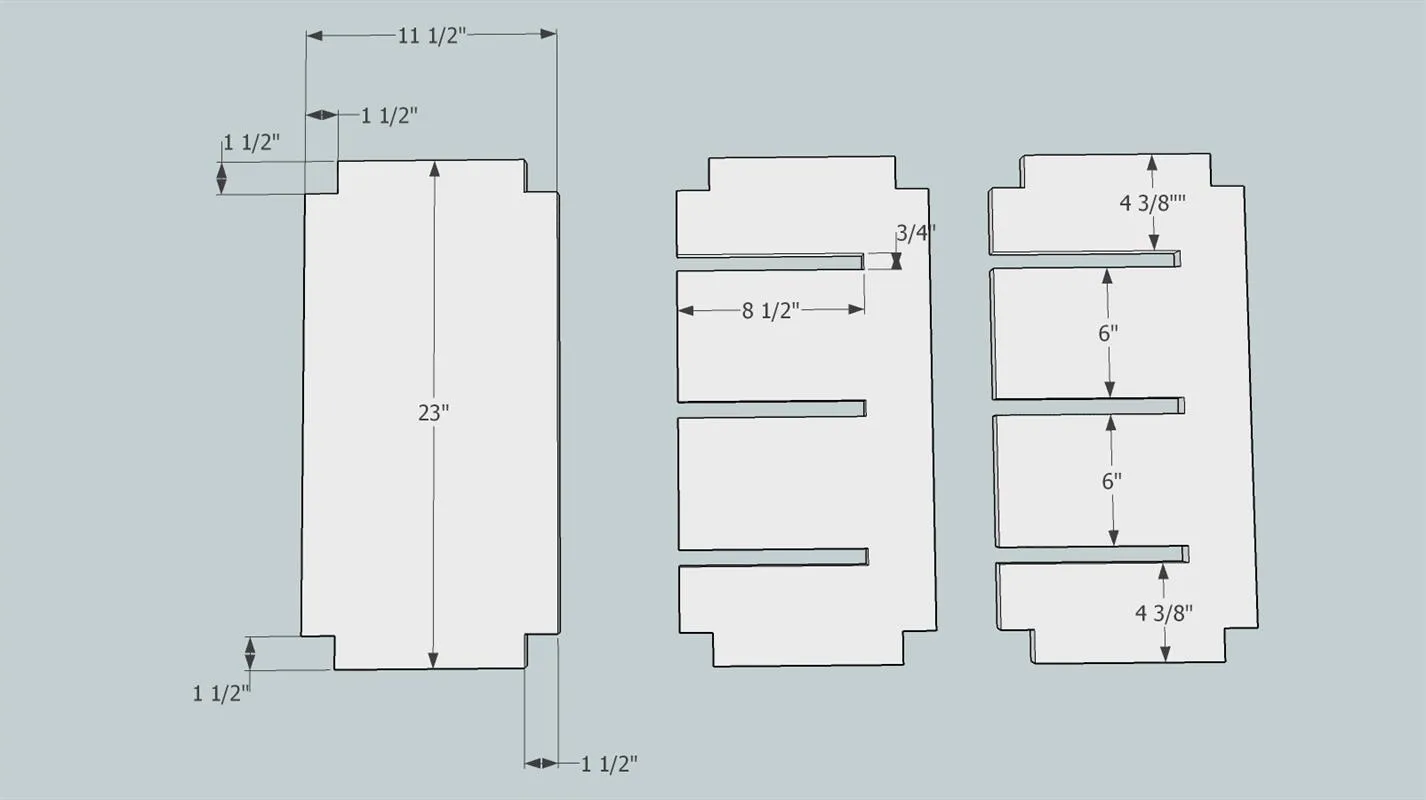
Use the following diagram to mark the corner cuts on all shelves and the wine glass slots on two of the shelves. Use either a band saw or jig saw to make the cuts. Smooth with 150 grit sandpaper.
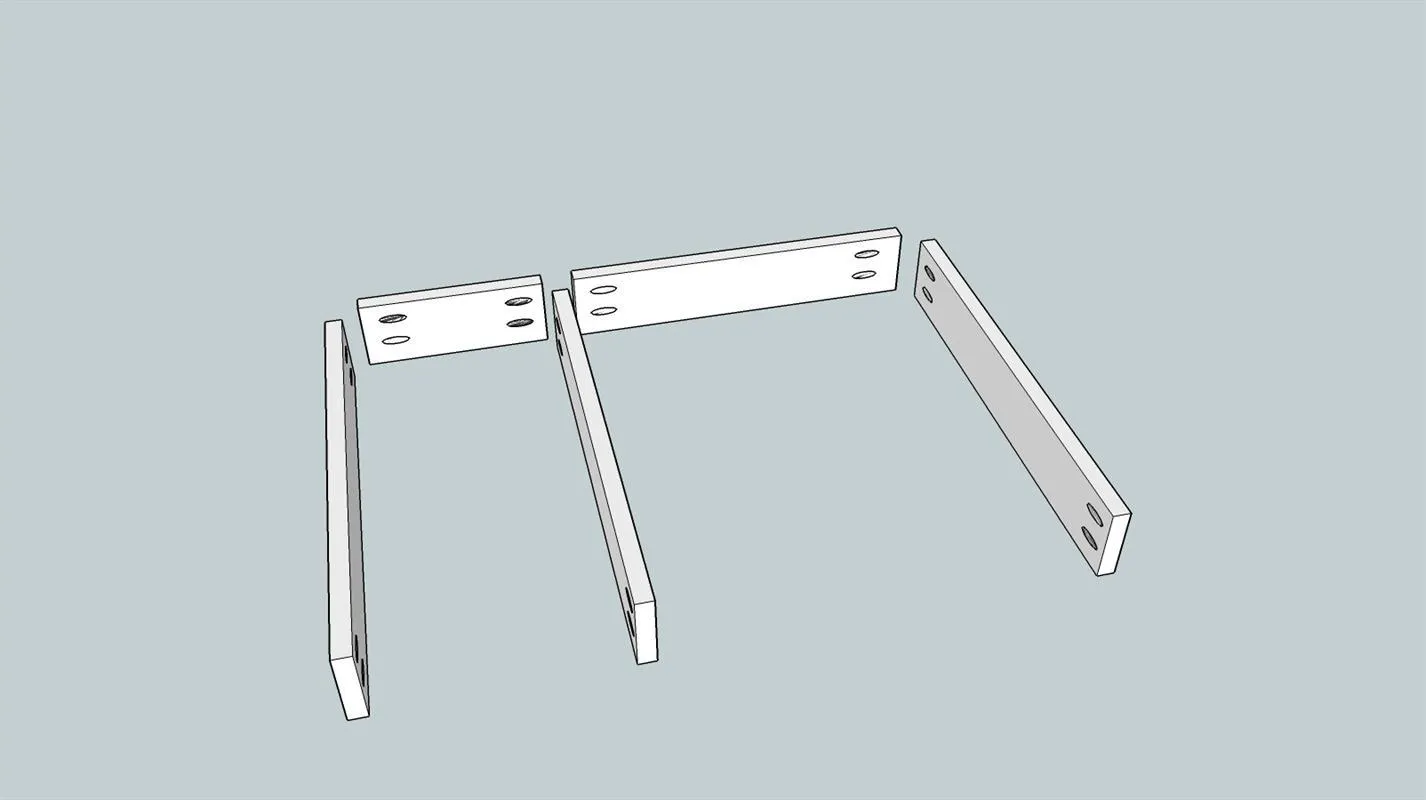
5. Add Pocket Holes to Sides & Backs
Using a Kreg pocket jig (set to 3/4" for all holes in this design) put 2 holes in each end of the 3 sides and 2 backs. It is a good idea to mark where the holes will be to prevent mistakes.
6. Add Pocket Holes to Shelves
Using a Kreg pocket jig (set to 3/4" for all holes in this design) put 2 holes in each corner of the 3 shelves. It is a good idea to mark where the holes will be to prevent mistakes.
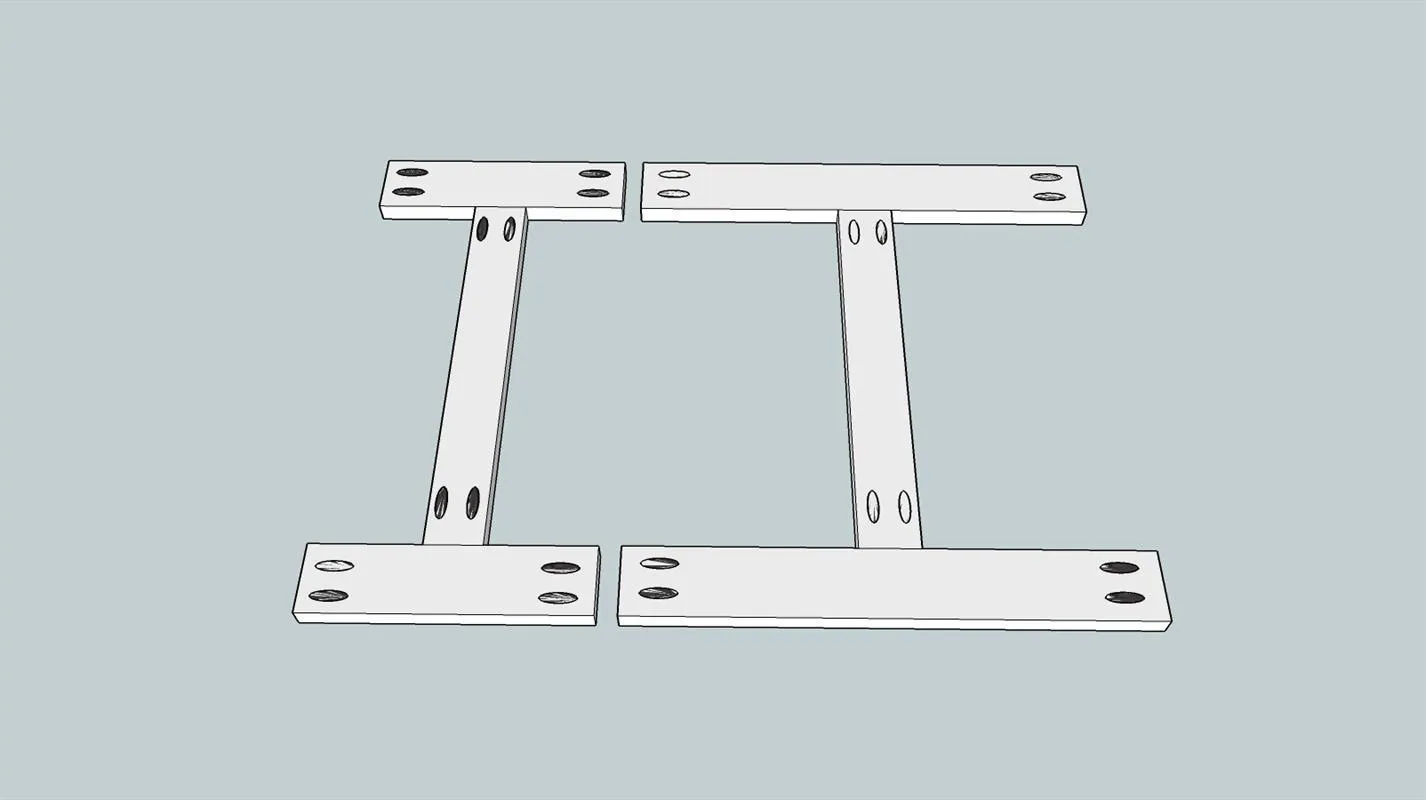
7. Add Pocket Holes to Poplar Frame
Using a Kreg pocket jig (set to 3/4" for all holes in this design) put two holes in each end of the 6 frame baords. It is a good idea to mark where the holes will be to prevent mistakes.
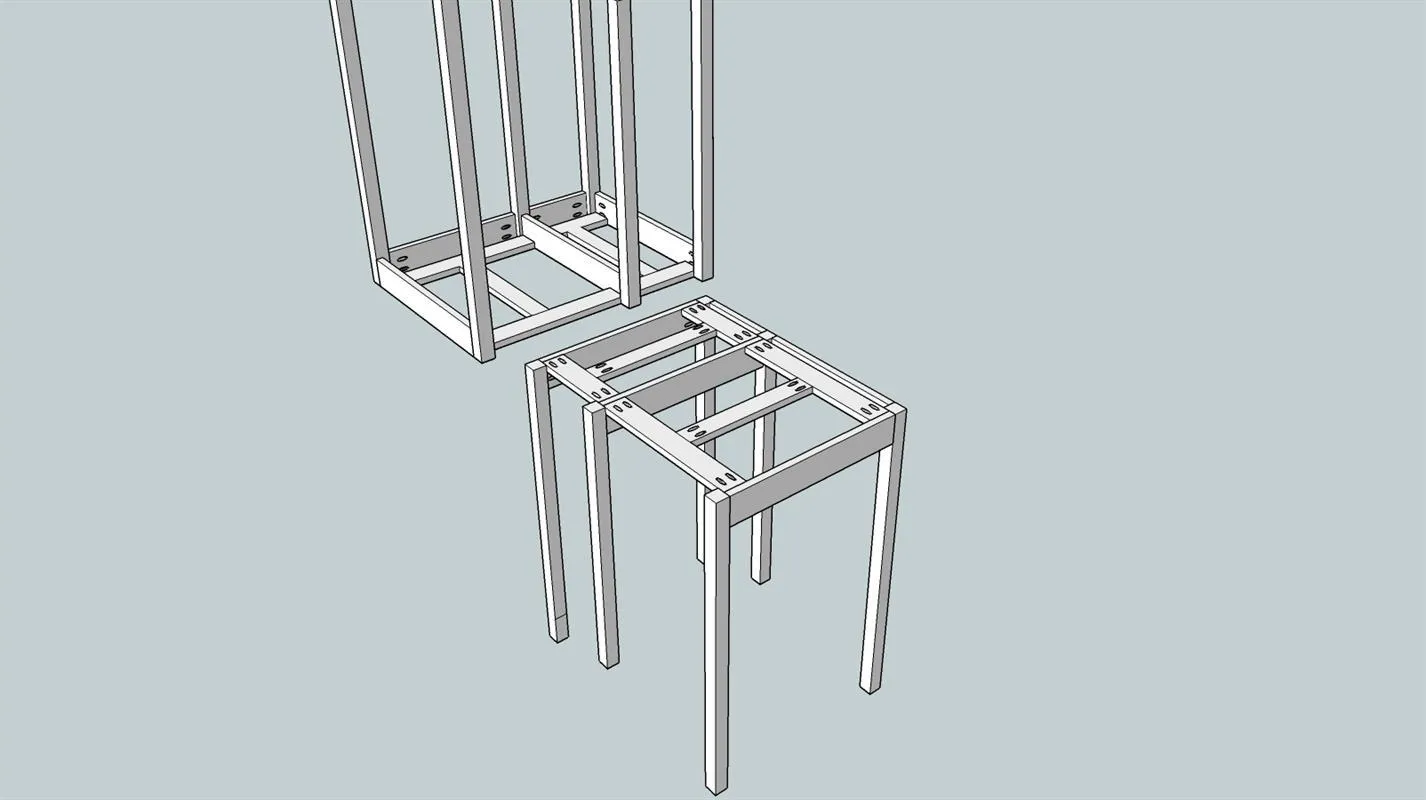
8. Attach Frame, Sides, Backs & Legs
Using the appropriate Kreg 1 1/4" pocket hole screws and Titebond I wood glue assemble the frames, backs, sides and legs to form main carcass. Use coarse screws on poplar to poplar joints and fine screws where joining to cherry.
9. Attach Shelves
Using fine Kreg 1 1/4" pocket hole screws and Titebond I wood glue attach the three shelves to the legs of the main carcass.The pocket holes should all face down.
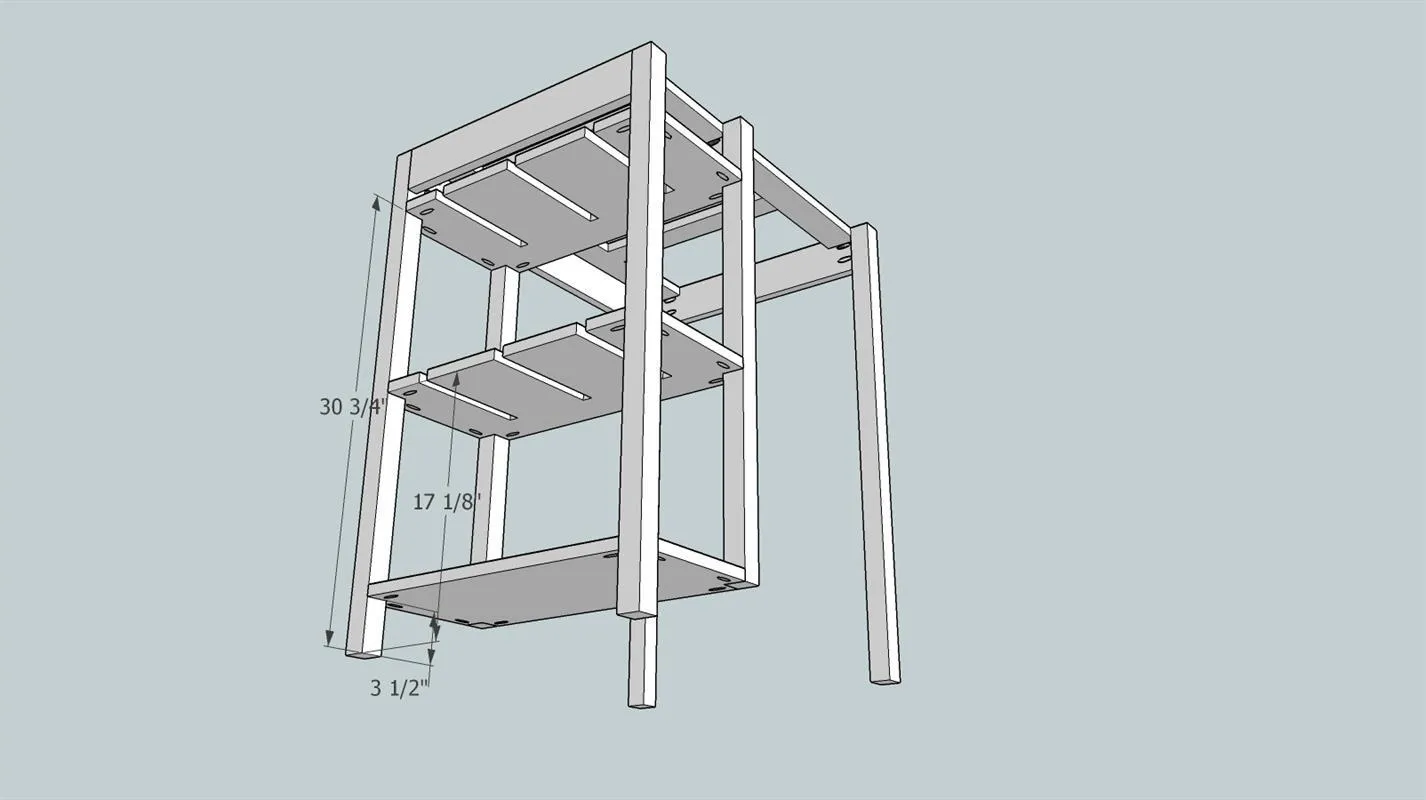
10. Cut Drawer Guides
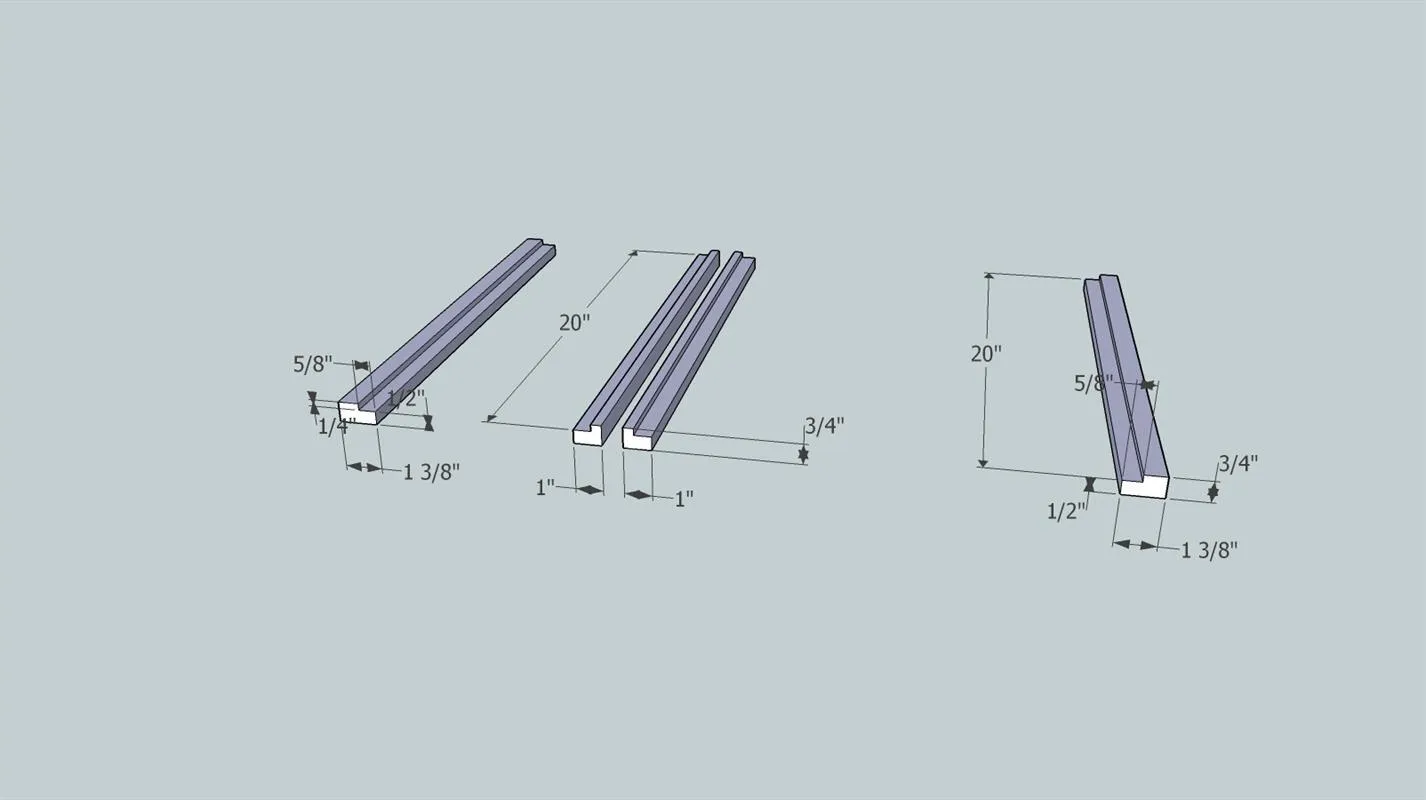
- Use close grain oak to make the outer & inner drawer guides. Using a table saw rip the drawer guides from 3/4" oak.
- Then use a chop saw to cut to length. Use either a table saw or a router table with the appropriate bit to cut the 1/4" X 5/8" rabbets in the drawer guides.
- Sand the rabbets and apply paste wax to help the drawers slide easily.
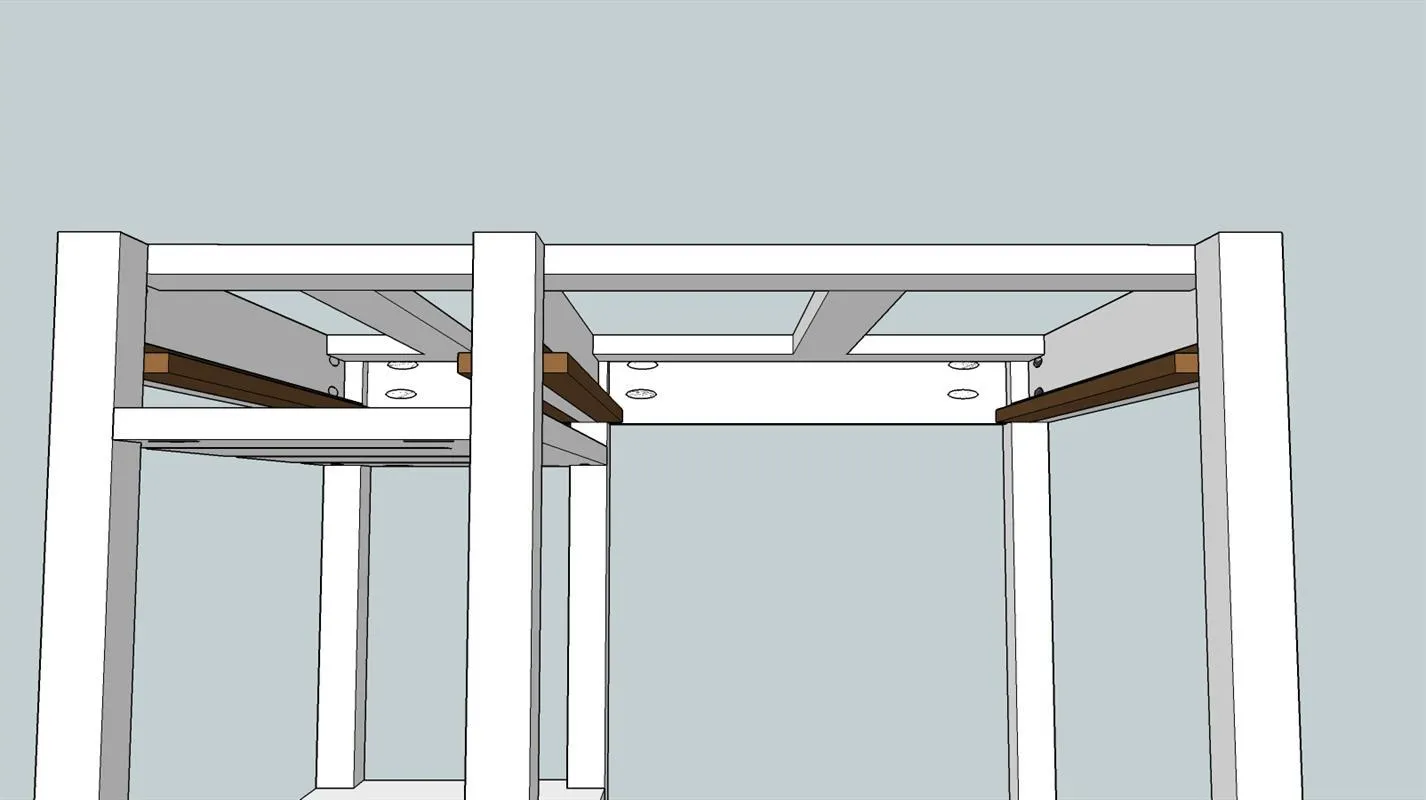
11. Attach Drawer Guides
Using Titebond I wood glue and 1" brad nails attach the guides to the main carcass.
12. Cut Drawer Parts
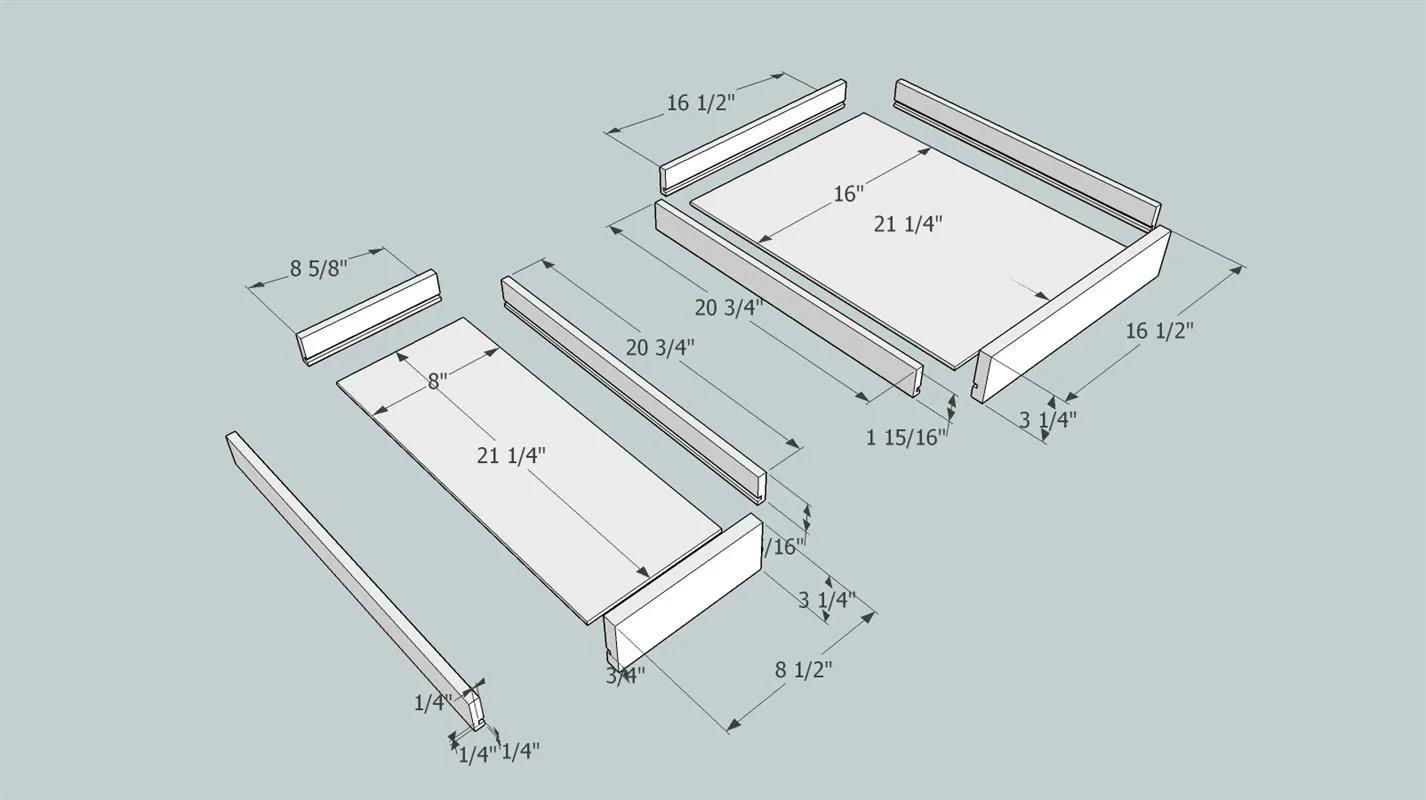
- Cut 4 drawer sides, 1 short drawer back and 1 long drawer back from 1/2" poplar (you can use 1/2" plywood but watch the thickness as it might be slightly less than 1/2").
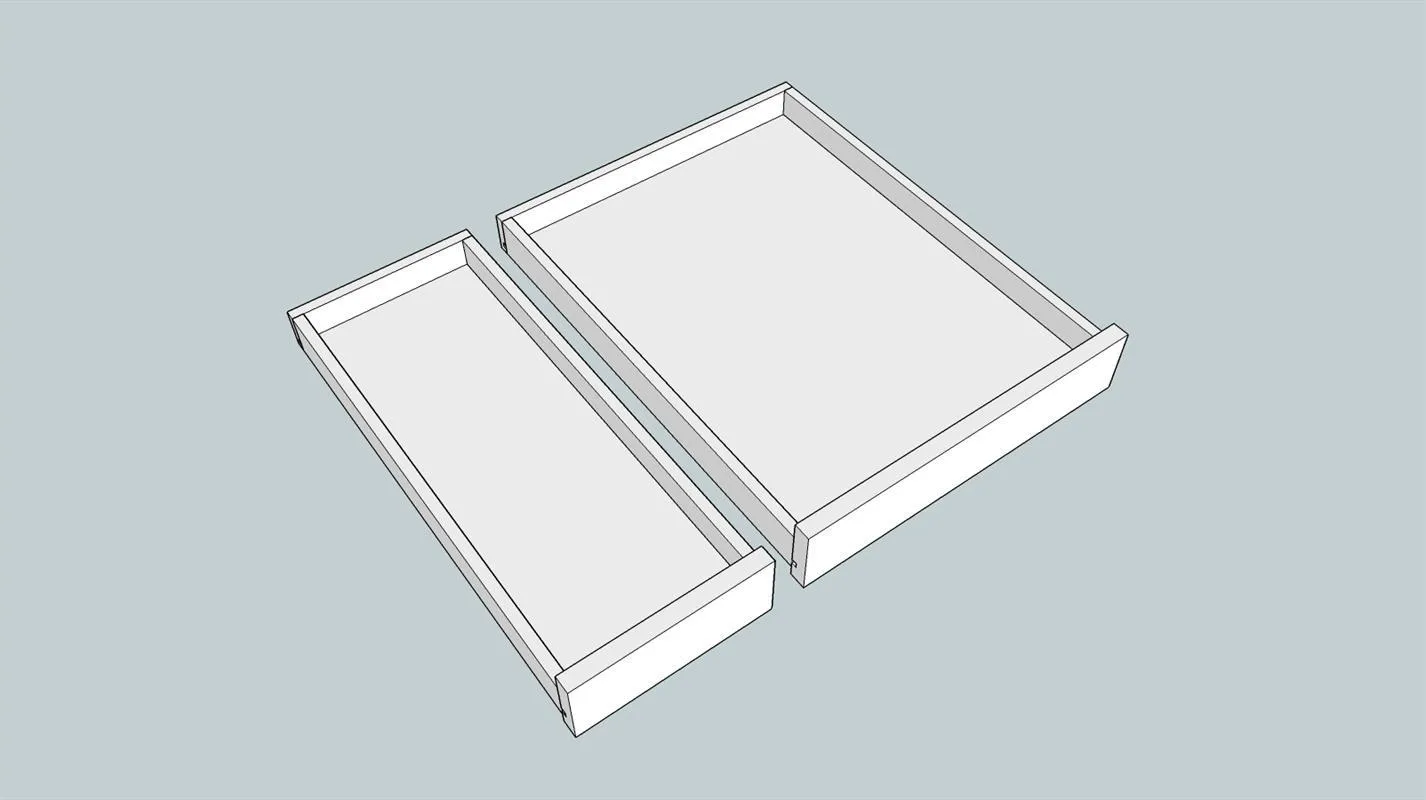
- Cut the two drawer bottoms from 1/4" plywood. Please note that my sizes are approximate and will vary depending on how you construct the box corners. I use a Freud (99-240) Drawer lock bit on my Kreg router table to cut all of the corners. I then use my table saw to cut a 1/4" deep X 1/4" wide dado in the 4 sides and the 2 backs. This dado should be 1/4 inch up from the bottom of each board. The 1/4" deep X 1/4" wide dado in the cherry drawer fronts should be 3/4" up from the bottom of each board.
- Once you have completed all of the operations smooth with 150 grit sandpaper
13. Assemble Drawers
- Assemble small drawer boxes using two sides, the short back, the short cherry front. Use wood glue at each corner joint and on the edges of the plywood bottom. You can either clamp until the drawers are dry or use pin nails in each corner.
- Repeat this process with the large drawer box. Smooth with 150 - 220 grit sandpaper and seal drawer box with three coats of Minwax Polycrylic Satin Finish. Do not finish the cherry drawer fronts. They will be sealed with boiled linseed oil and Minwax Tung Oil.
14. Attach Top
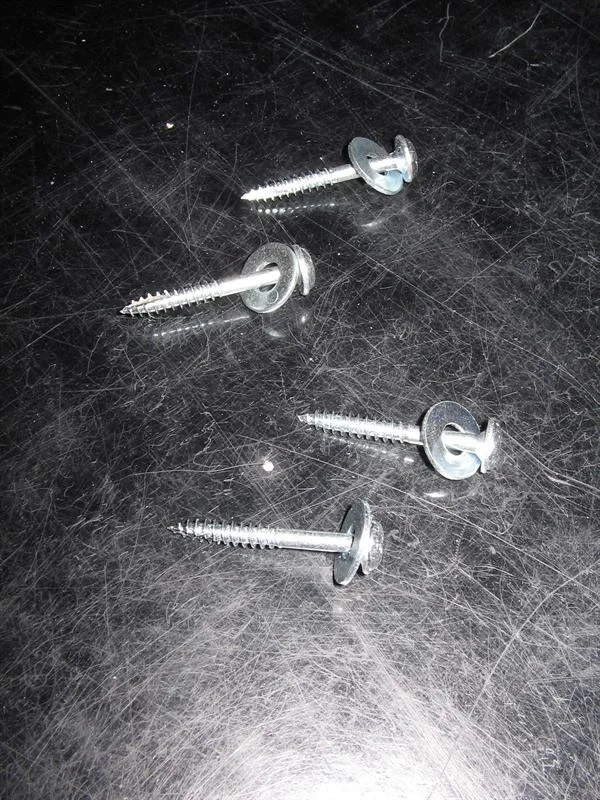
- Cut top assembly to final dimensions. Smooth top with 100 - 220 grit sandpaper. The top is held in place by four Kreg 1 1/4" fine pocket screws that have flat washers added. (see picture) Drill four 1/4" holes in the top support.
- Place the top on the cabinet.
- Center the top, approximately 1" overhang on both sides and 1 1/2" at the front.
- Insert the screws from the bottom side of the top frame. The screws should be drawn snug but not over tight. This should hold the top in place but allow for any expansion or contraction of the top.
15. Finish and Add Drawer Pulls
- Now that the build is complete use 220 sandpaper to do a once over on all surfaces in preparation for the finish.
- Clean well to remove all dust. (I use compressed air and clean dry rags) I gave the Wine Bar 2 coats of boiled linseed oil and allowed it to dry for 7 days.
- Then I gave it three coats of Minwax Tung Oil following manufacturers instructions. After the finish has dried add drawer pulls. I used wood screws to attach sparkling wine corks from Laetitia Vineyards in Arroyo Grande, CA.