 Notch
NotchUse your browser's Print (Ctrl/Cmd + P) and choose Save as PDF. This page works offline once you've opened it with a signal.
Compact Makeup Vanity
Create your own space for putting on makeup and getting ready for the day.
- Difficulty
- Intermediate
- Time
- 6.8–13.3 hours
- Cost
- $$$
Cut list
| Part | Qty | T × W × L | Material | ✓ |
|---|---|---|---|---|
| Drawer Top | 2 | 3/4" × 8" × 16" | — | ☐ |
| Side | 2 | 3/4" × 2" × 16" | — | ☐ |
| Divider | 2 | 3/4" × 2" × 15" | — | ☐ |
| Back | 1 | 3/4" × 2" × 34" | — | ☐ |
| Hinge Support | 1 | 3/4" × 2" × 19" | — | ☐ |
| Bottom | 1 | 3/4" × 16" × 36" | — | ☐ |
| Lid | 1 | 3/4" × 13" × 19" | — | ☐ |
| Lid Front | 1 | 3/4" × 2" × 19" | — | ☐ |
| Drawer Bottom | 2 | 3/4" × 5" × 13" | — | ☐ |
| Drawer Side | 4 | 3/4" × 1" × 14" | — | ☐ |
| Drawer Back | 2 | 3/4" × 2" × 5" | — | ☐ |
| Drawer Front | 2 | 3/4" × 2" × 6" | — | ☐ |
| Drawer Divider | 2 | 1/2" × 1/2" × 5" | — | ☐ |
Materials
| Item | Qty | ✓ |
|---|---|---|
| Plywood, 3/4" Thick Half Sheet | 1 board | ☐ |
| Board, 1x3 72" | 1 board | ☐ |
| Board, 1x3 96" | 1 board | ☐ |
| Board, 1x2 72" | 1 board | ☐ |
| Square Dowel, 1/2" x 1/2" 36" | 1 board | ☐ |
| Box of 50 - 1 1/4" coarse-thread Kreg pocket-hole screws | 1 each | ☐ |
| 1 1/2" flat-head wood screws | 17 each | ☐ |
| 28" Ash Table Legs | 2 each | ☐ |
| 12" Square Mirror | 1 each | ☐ |
| Mirror Tape | 1 each | ☐ |
| Pair No-Mortise Hinges | 1 each | ☐ |
| Drawer Knobs | 3 each | ☐ |
| 12" Hangman picture hanger | 1 each | ☐ |
| LED Vanity Lights | 1 each | ☐ |
| 1/4 Yard Felt Fabric | 1 each | ☐ |
| Wood filler or spackling | 1 each | ☐ |
| Wood Glue | 1 each | ☐ |
Overall cost: $$$. Lumber varies by region, species, and season, so we give a band rather than a figure.
Tools
- Circular Saw
- Drill / Driver
- Miter Saw
- Pocket Hole Jig
- Random Orbit Sander
- Bar / Pipe Clamps — optional
- Combination Square — optional
- Tape Measure — optional
Instructions
1. Cut the Drawer Tops to Size
Start by cutting Two Drawer Tops to size from 3/4" plywood, as shown in the cutting diagram.
2. Make the Sides and Dividers
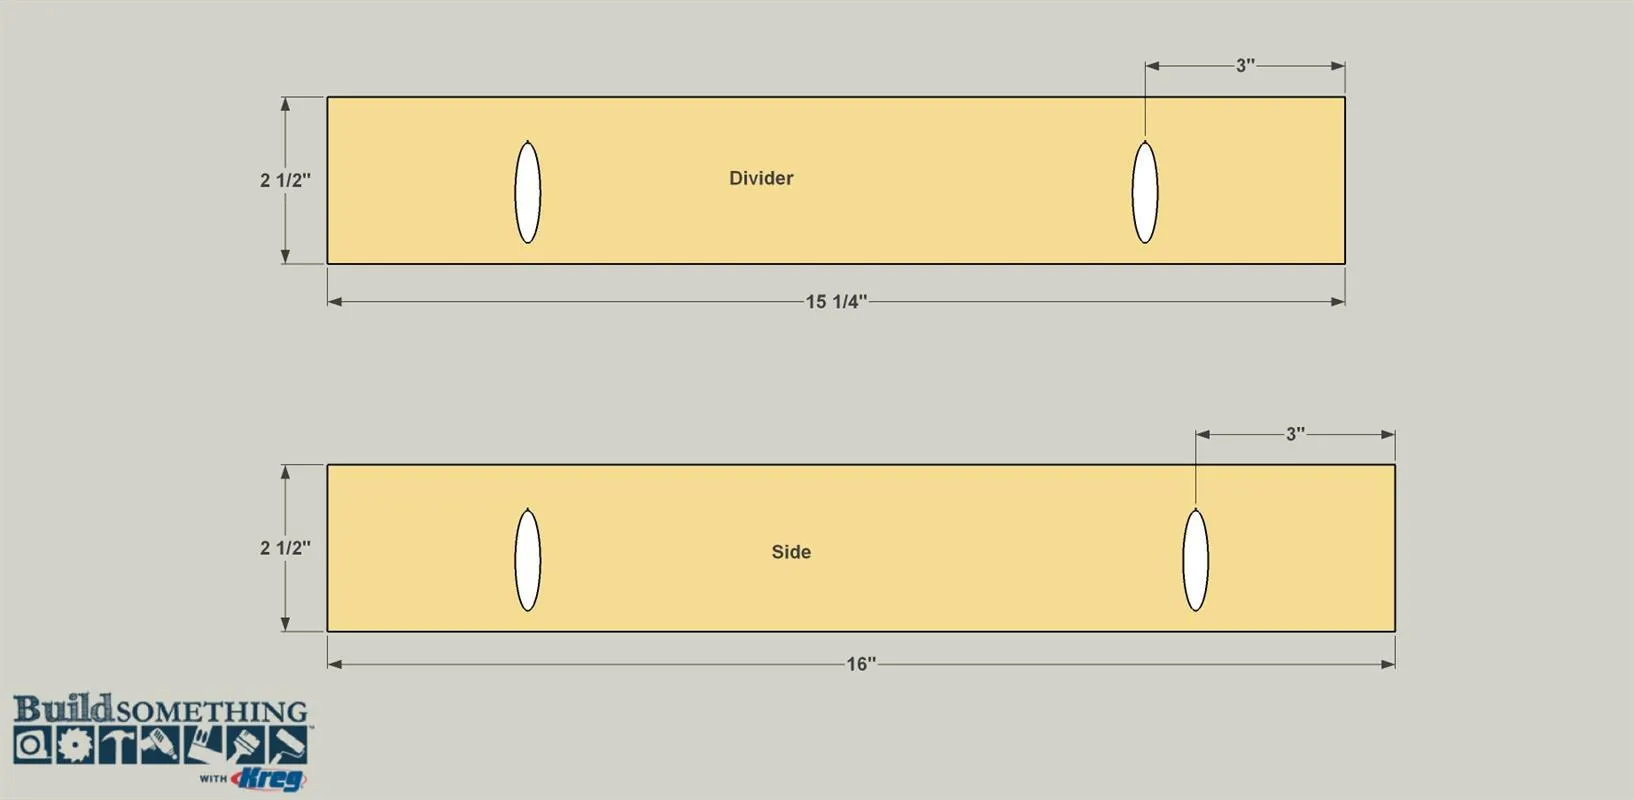
Cut two Sides and two Dividers to length from a 1x3 pine board, as shown in the cutting diagram. Set your Kreg Jig for 3/4" thick material, and then drill pocket holes in each of the boards at the locations shown.
3. Attach the Sides and Dividers
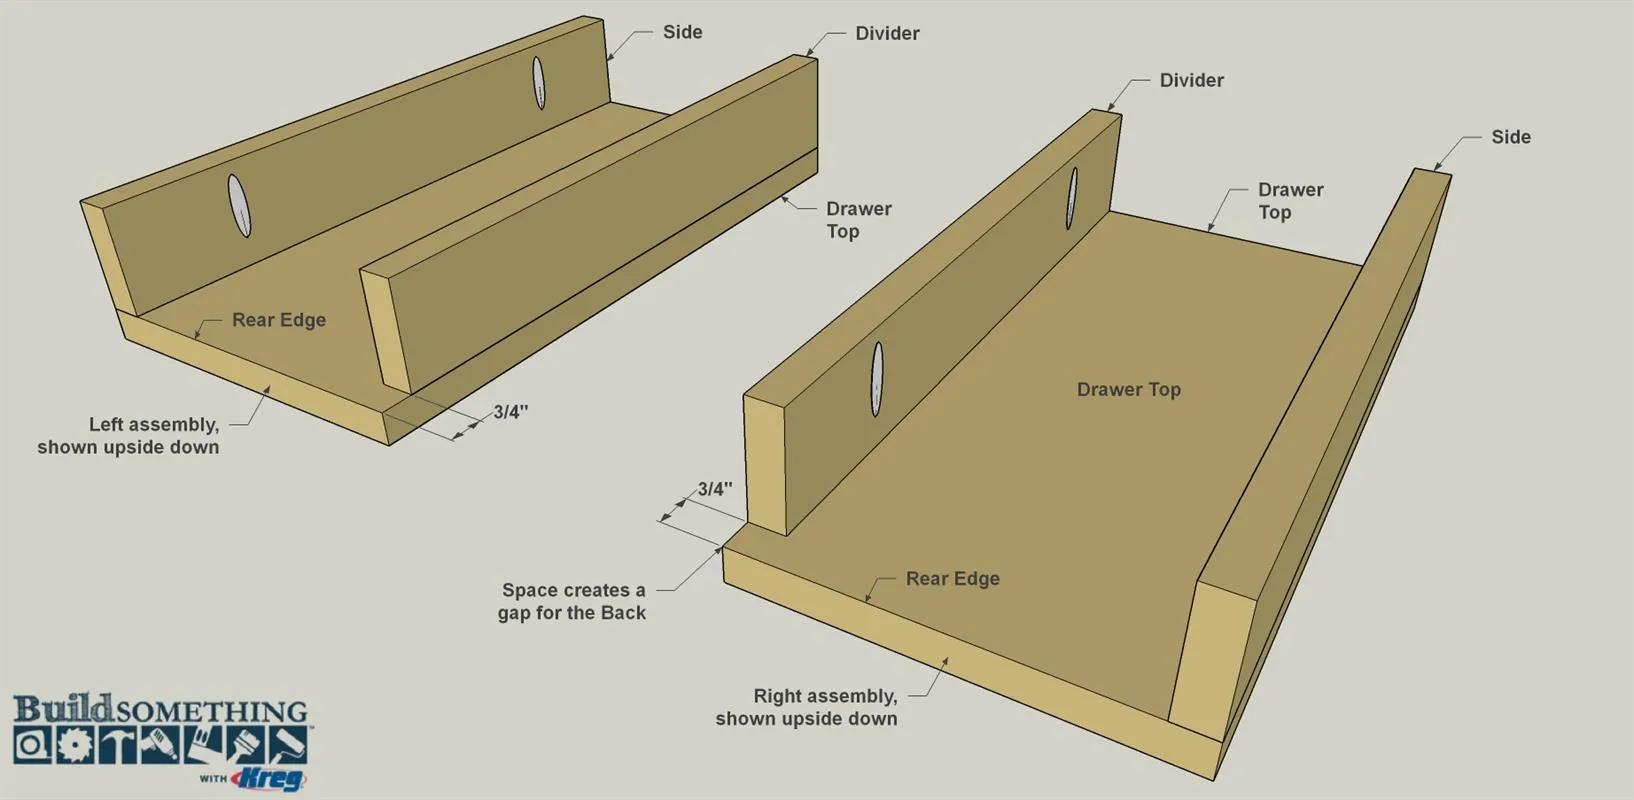
- Lay the Drawer Tops face down on a flat surface.
- Then position the Sides and Dividers, as shown. Note that each Divider and Side will sit flush with one end of the drawer Top, and that there will be a 3/4" gap at the rear end of each Divider. This gap creates space to add a Back in the next step. You should end up with two “mirror image” assemblies—one for the left side of the vanity, and one for the right.
- Apply glue to the mating edge of each Side and each Divider, and then attach the parts to the Drawer Top using 1 1/4" coarse-thread Kreg Screws.
4. Make the Back
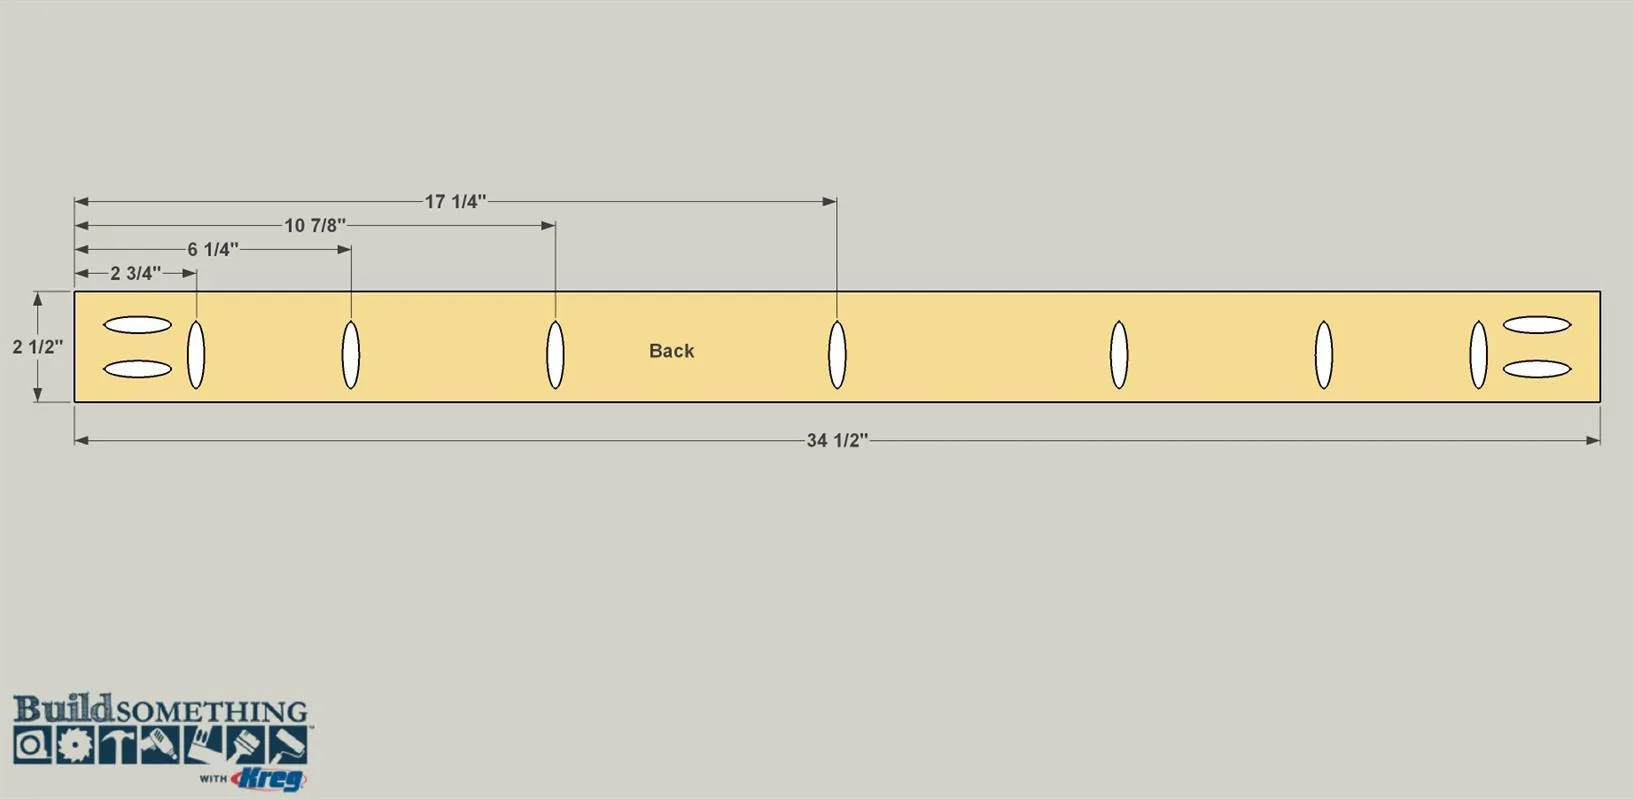
Cut a Back to length from a 1x3 board, as shown in the cutting diagram. Drill pocket holes at the locations shown.
5. Attach the Back to the Tops
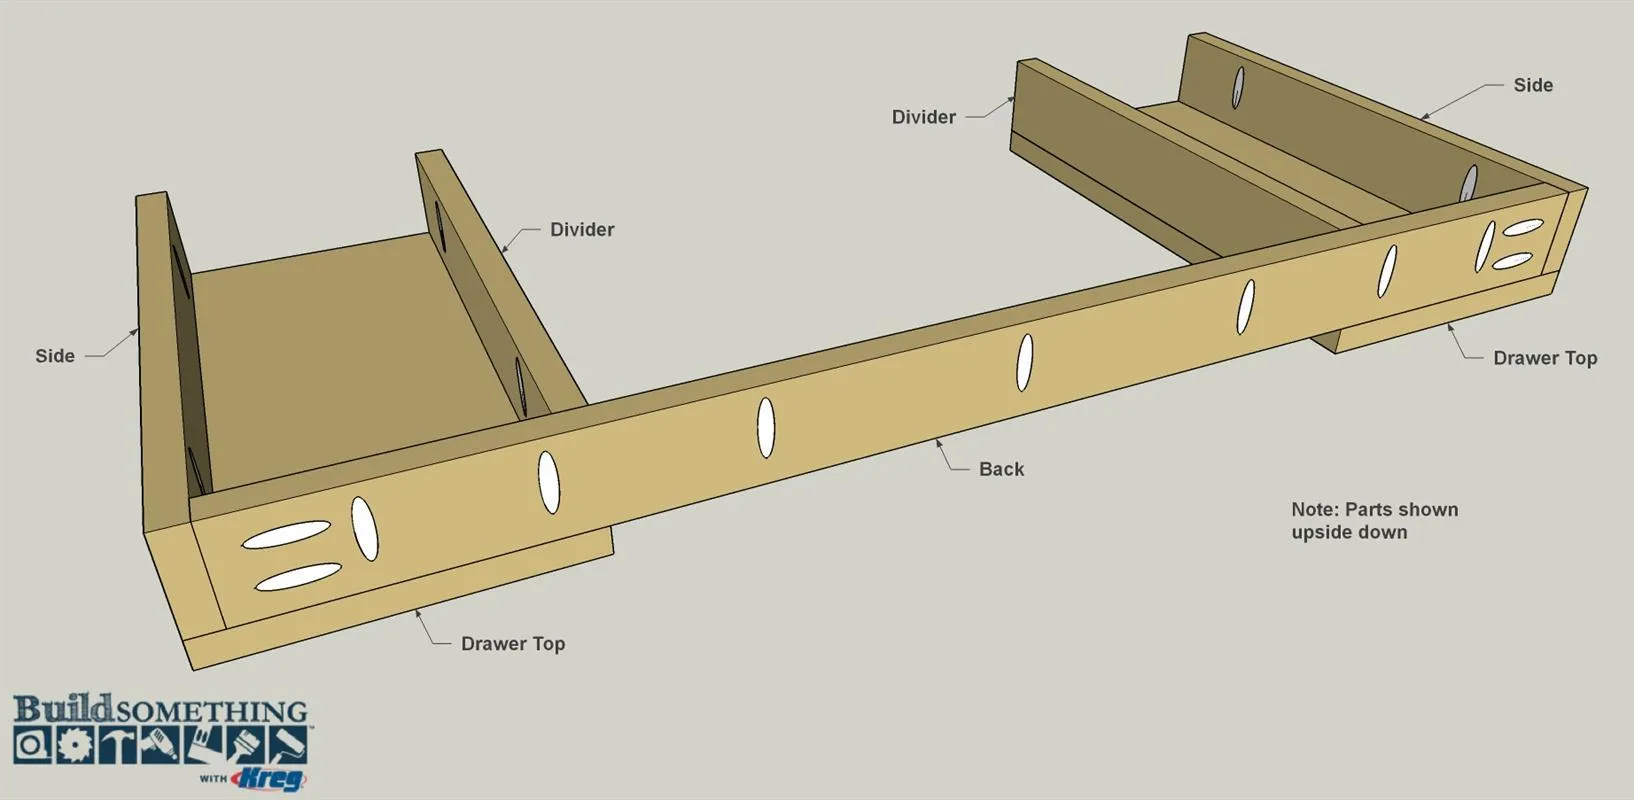
Now you can attach the Back to the top assemblies you created in Step 3. Position the assemblies as shown, and then connect the Back to them using 1 1/4" coarse-thread Kreg Screws.
6. Make the Hinge Support
Cut a Hinge Support from a 1x3 board, as shown in the cutting diagram. Locate and drill the two pocket holes on the Hinge Support. These will be used to attach the Hinge Support to the Dividers in order to help carry the weight of the Lid.
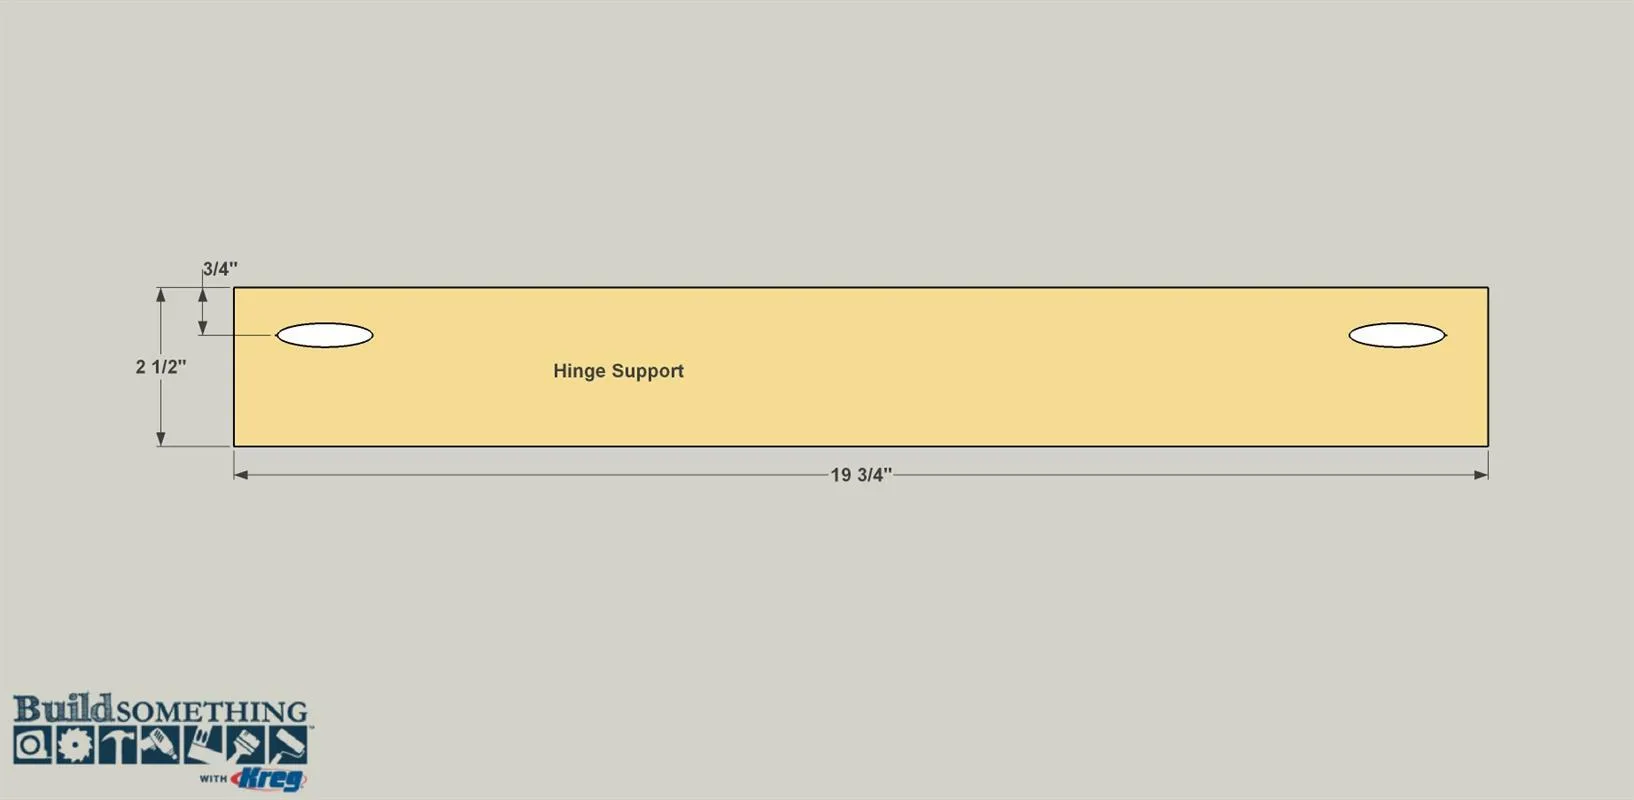
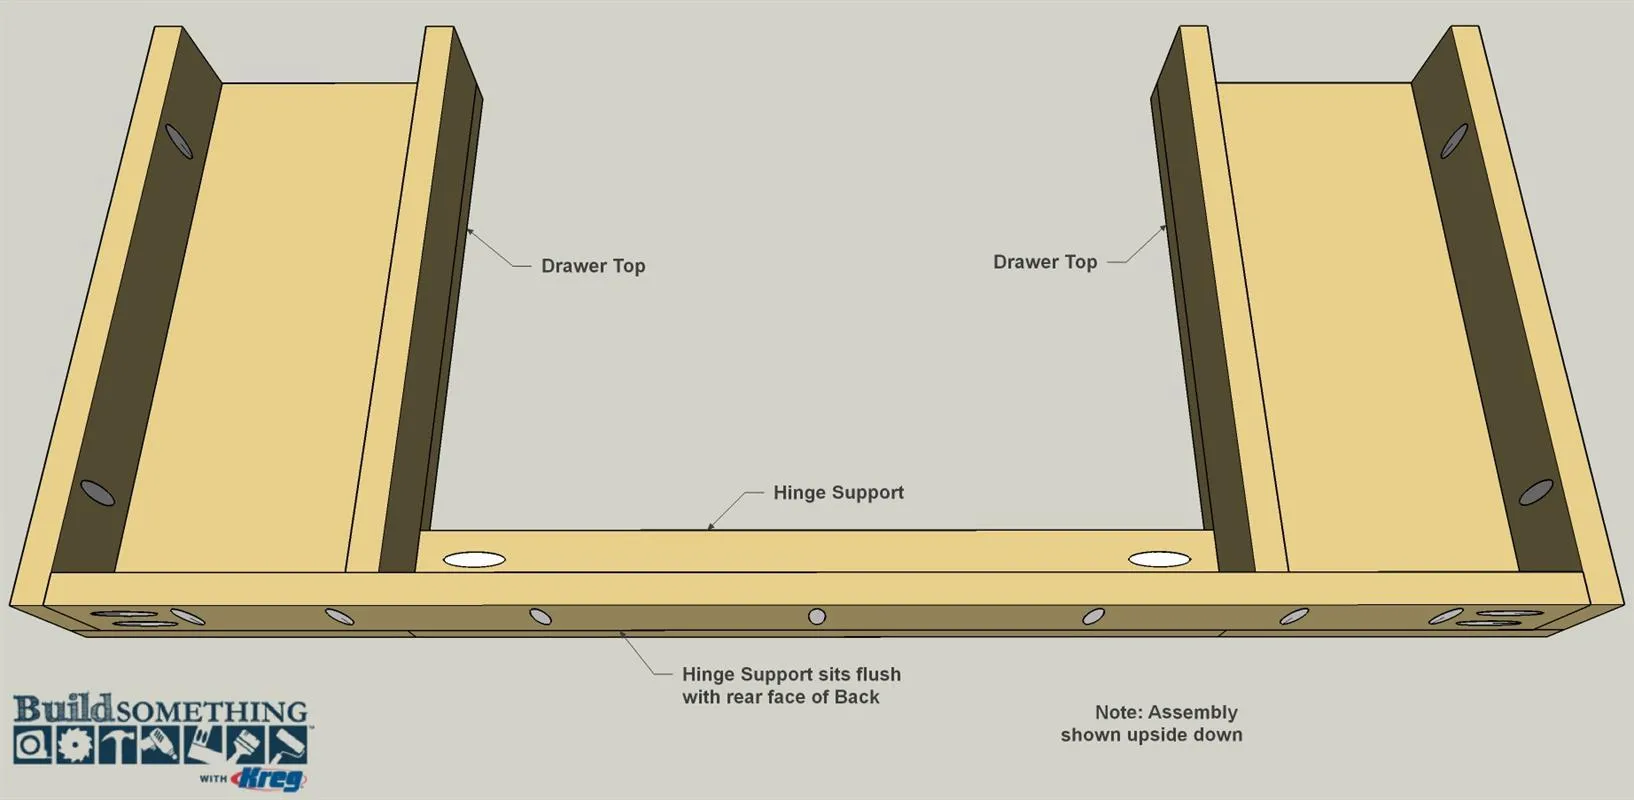
7. Attach the Hinge Support
- Position the Hinge Support, as shown, so the two pocket holes are between the Tops and are accessible. Make sure the rear edge of the Hinge Support is flush with the rear face of the Back.
- Spread glue on the mating edge of the Back, and then attach the Hinge Support to the Back and the Dividers using 1 1/4" coarse-thread Kreg Screws.
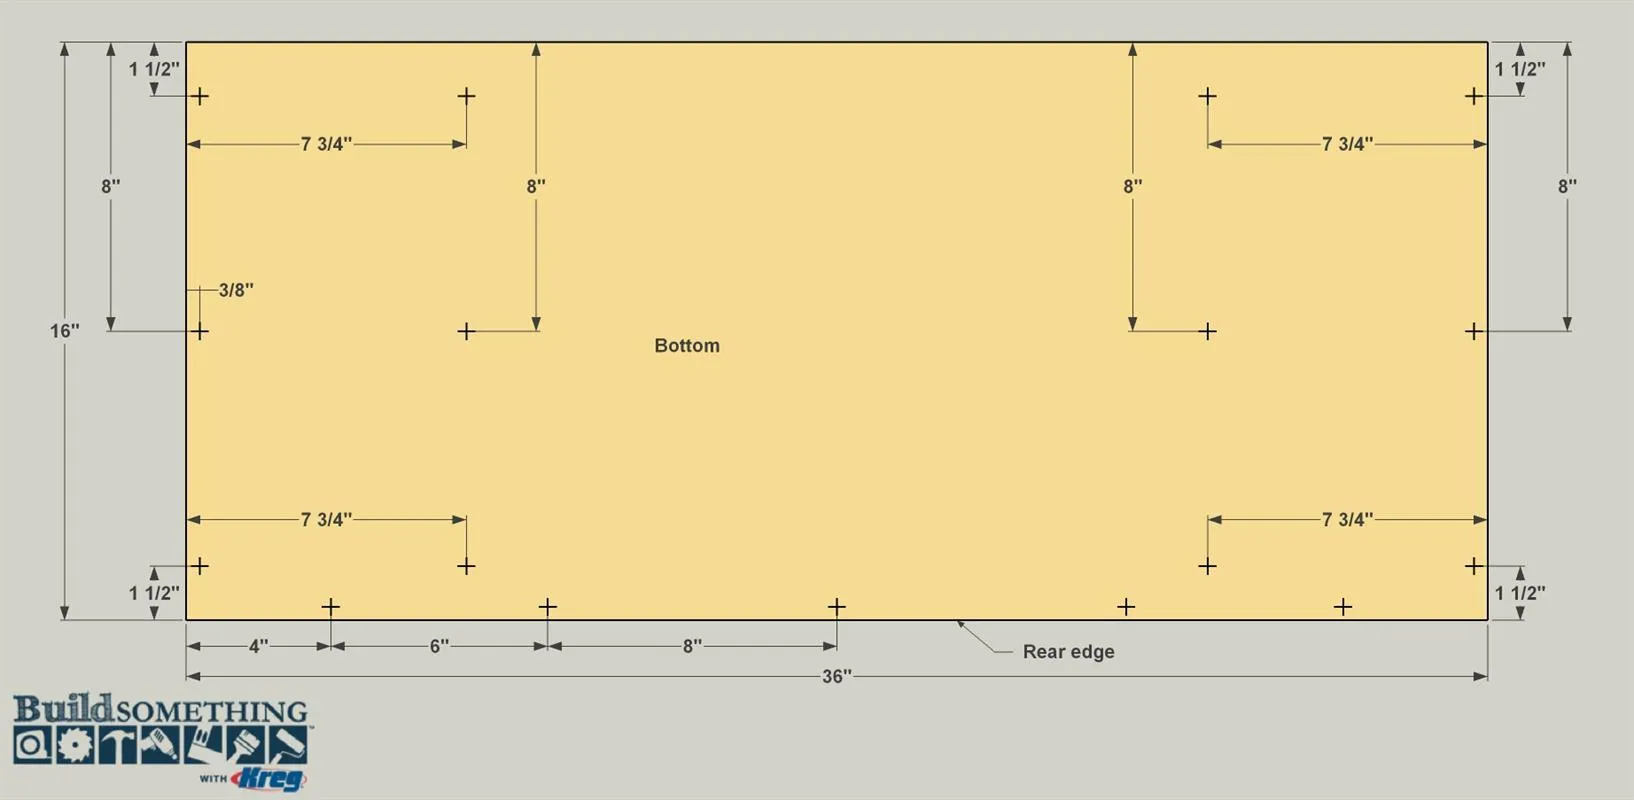
8. Make the Bottom
Cut the Bottom from 3/4" plywood, as shown in the cutting diagram. Lay out the locations for holes that will be used for mounting screws, and then drill each hole using a 1/8" drill bit.
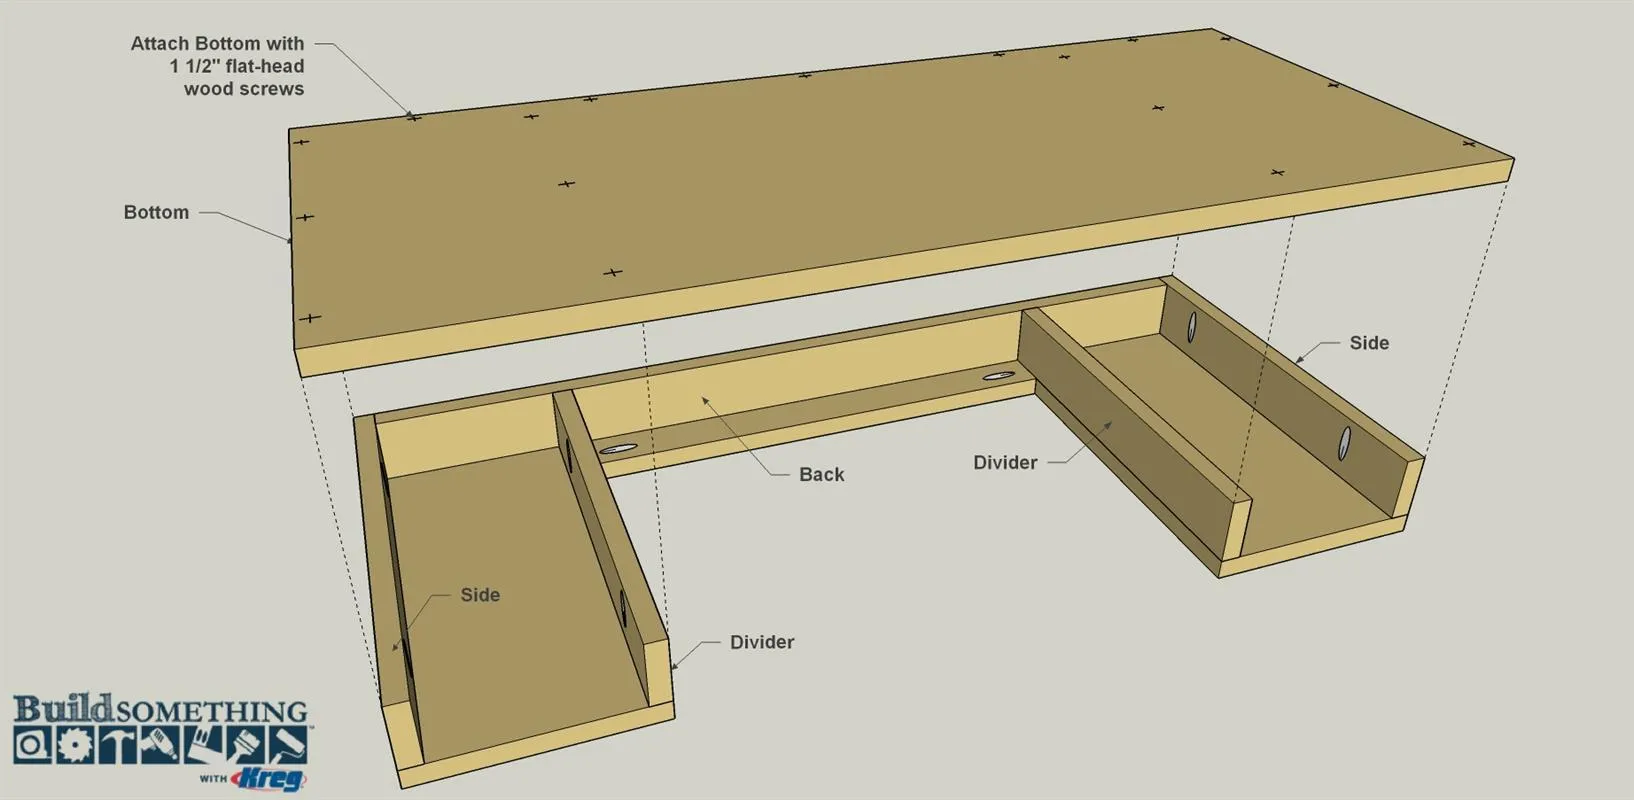
9. Attach the Bottom
- With the main assembly lying face down, apply glue along the exposed edge of the Back, Dividers, and Sides.
- Then position the Bottom, as shown, and clamp it in place. Use the holes in the Bottom as guides to drill 1/16" pilot holes into the Back, Dividers, and Sides.
- Then drive 1 1/2" flat-head wood screws to attach the Bottom.
10. Cut the Lid to Size
Cut the Lid from a piece of 3/4" thick plywood as shown in the cutting diagram. Note that the depth of the Lid slightly shorter than the depth of the area if fits in to—by about 1/16". This is to allow for the thickness of the no-mortise hinges that are used later to mount the lid to the vanity.
11. Make the Lid Front
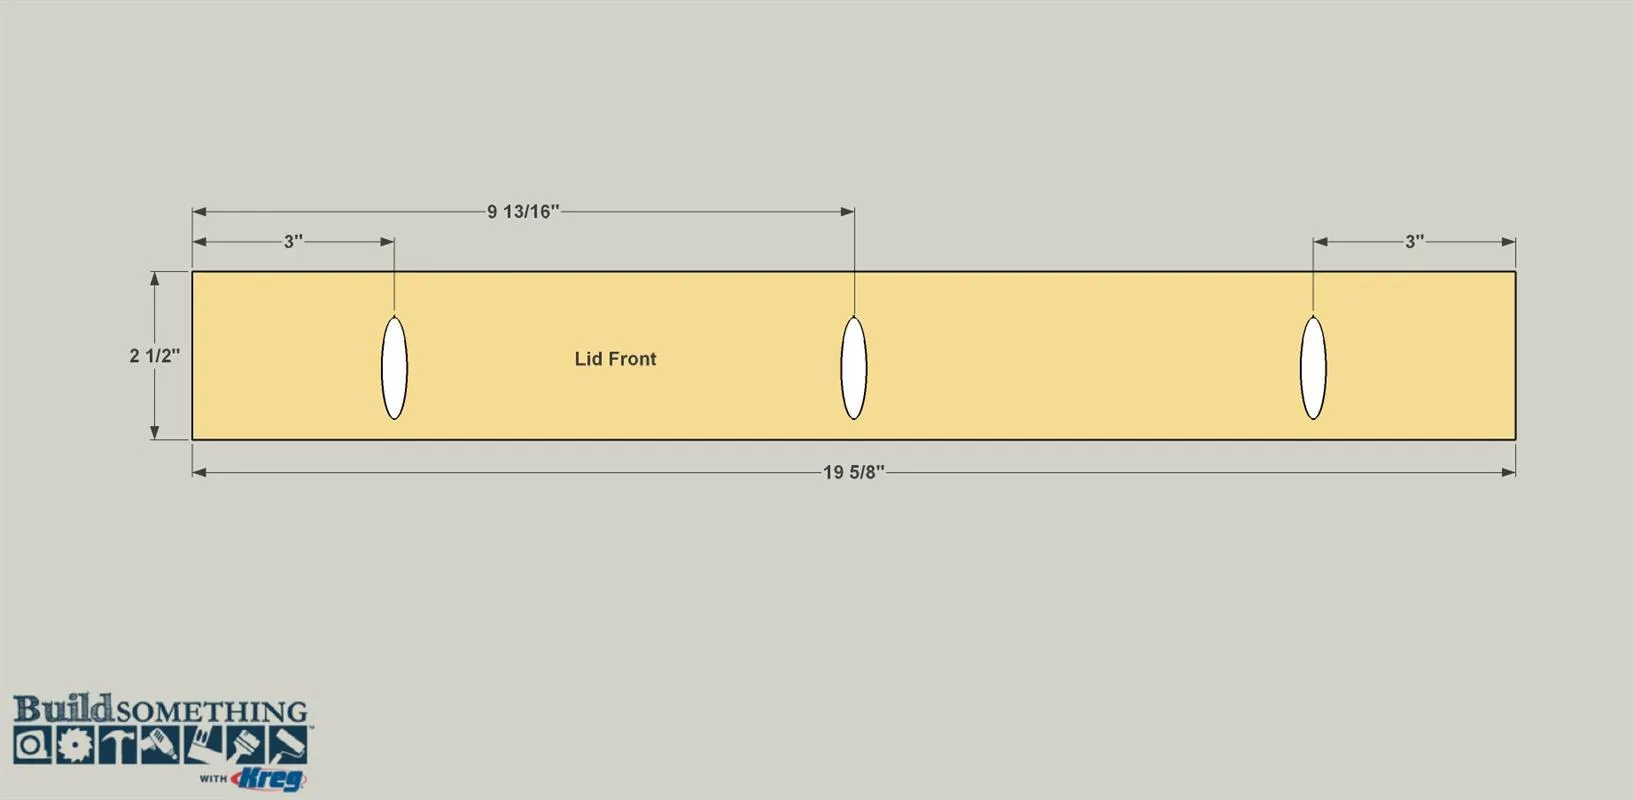
From a 1x3 board, cut the Lid Front to size, as shown in the cutting diagram. Drill pocket holes at the locations shown.
12. Assemble the Lid
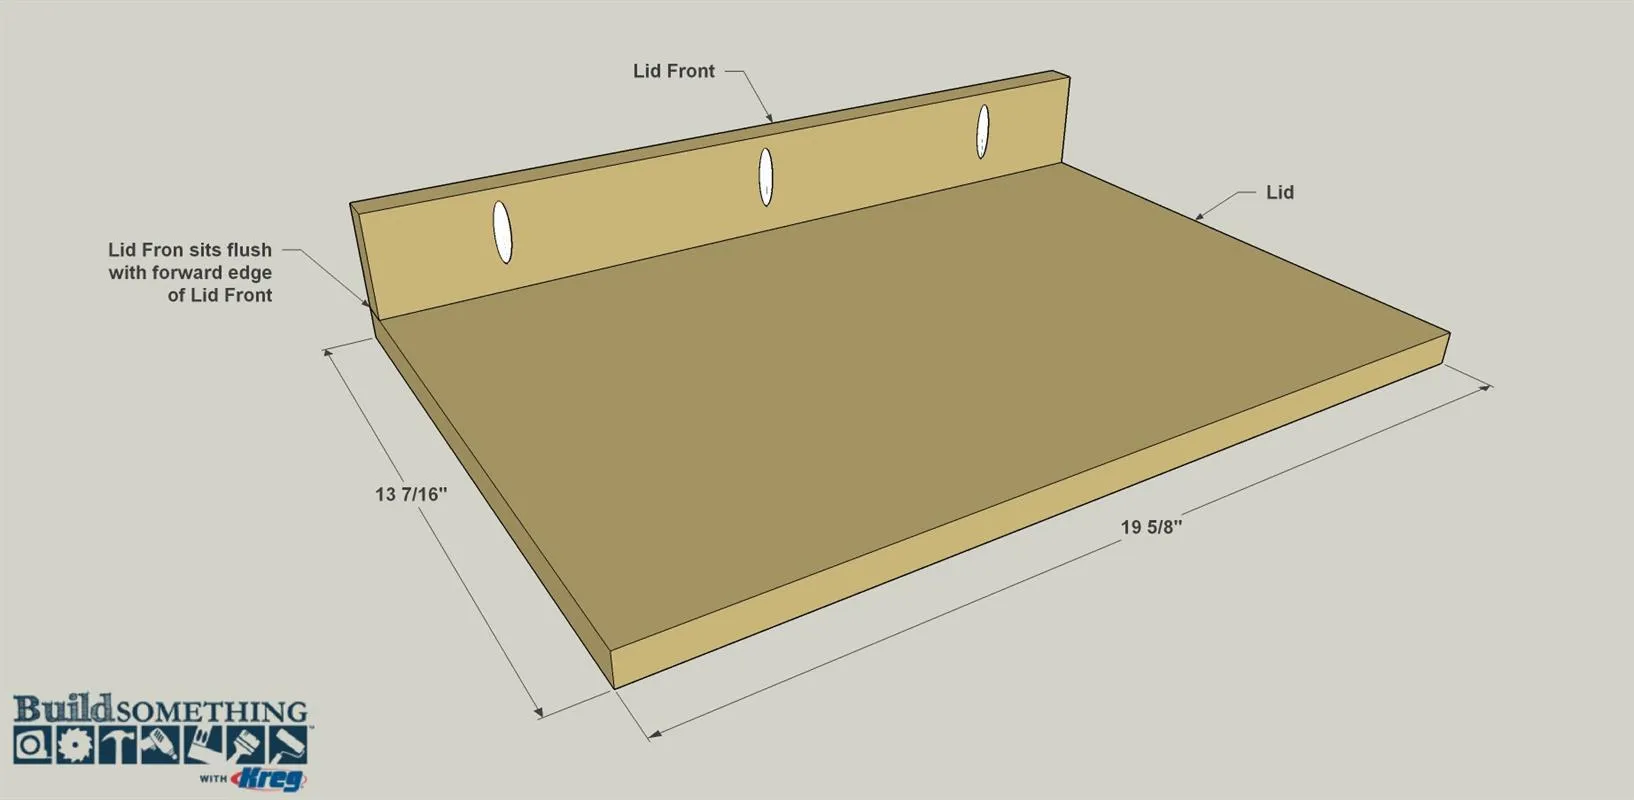
Attach the Lid Front to the Lid as shown. Make sure the front edge of the Lid is flush with the face of the Lid Front. Secure the parts using glue and 1 1/4" coarse-thread Kreg Screws.
13. Install the Hinges
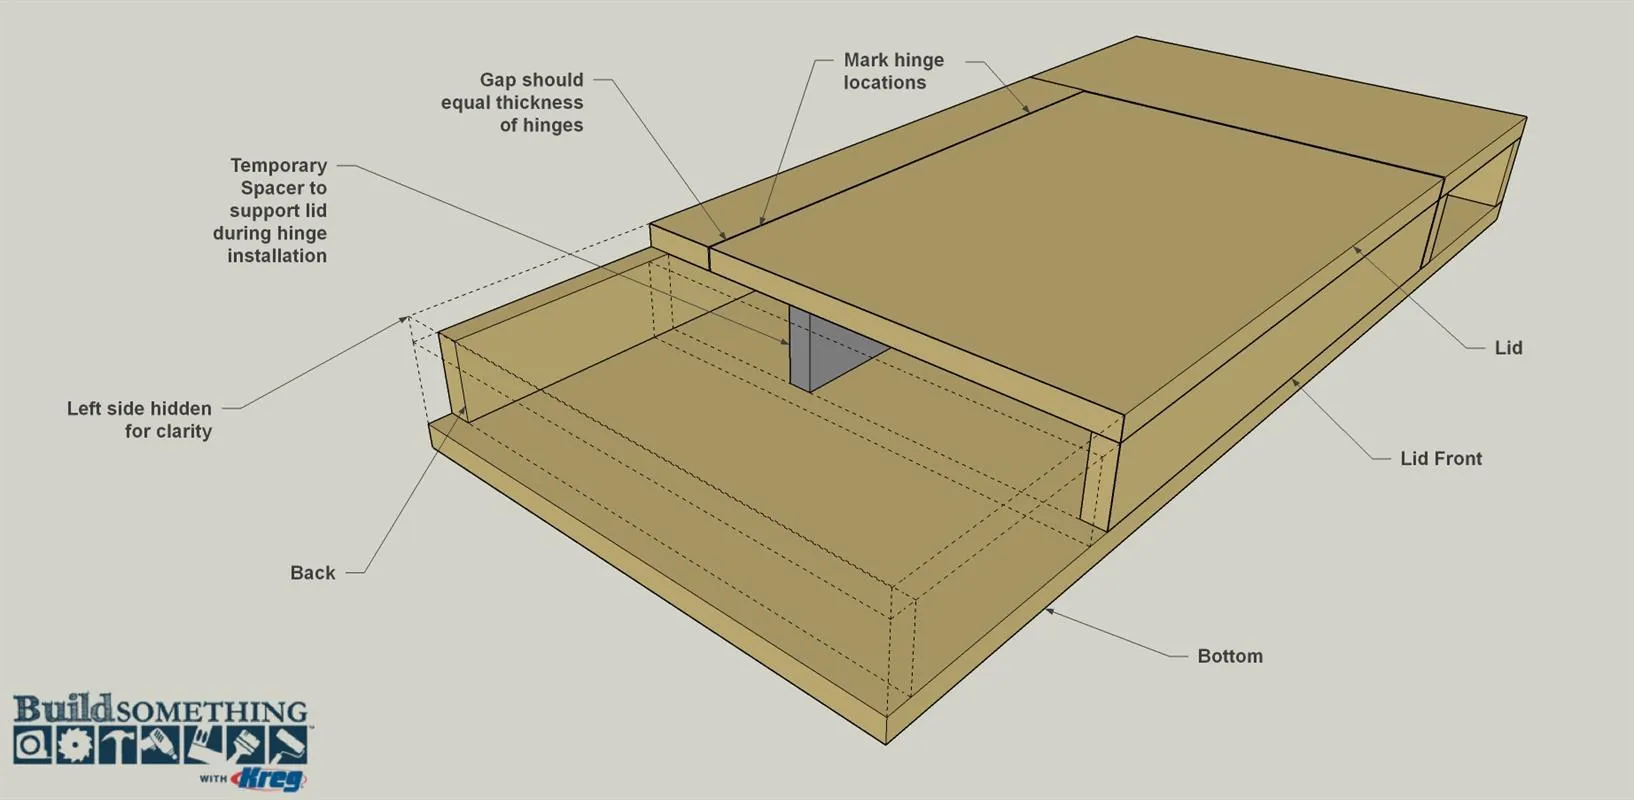
- Use a scrap of 1x3 to support the Lid while marking the hinge locations on the Lid and Lid Support. We placed the hinges about 4" in from each edge, but there’s no exact position required. Just make sure they’re located evenly.
- Once you have the hinge location marked, remove the Lid and install the hinges on the Hinge Support first.
- Next, install the hinges on the Lid.
- Finally, remove the Lid and the hinges for finishing.
14. Make the Drawer Bottom
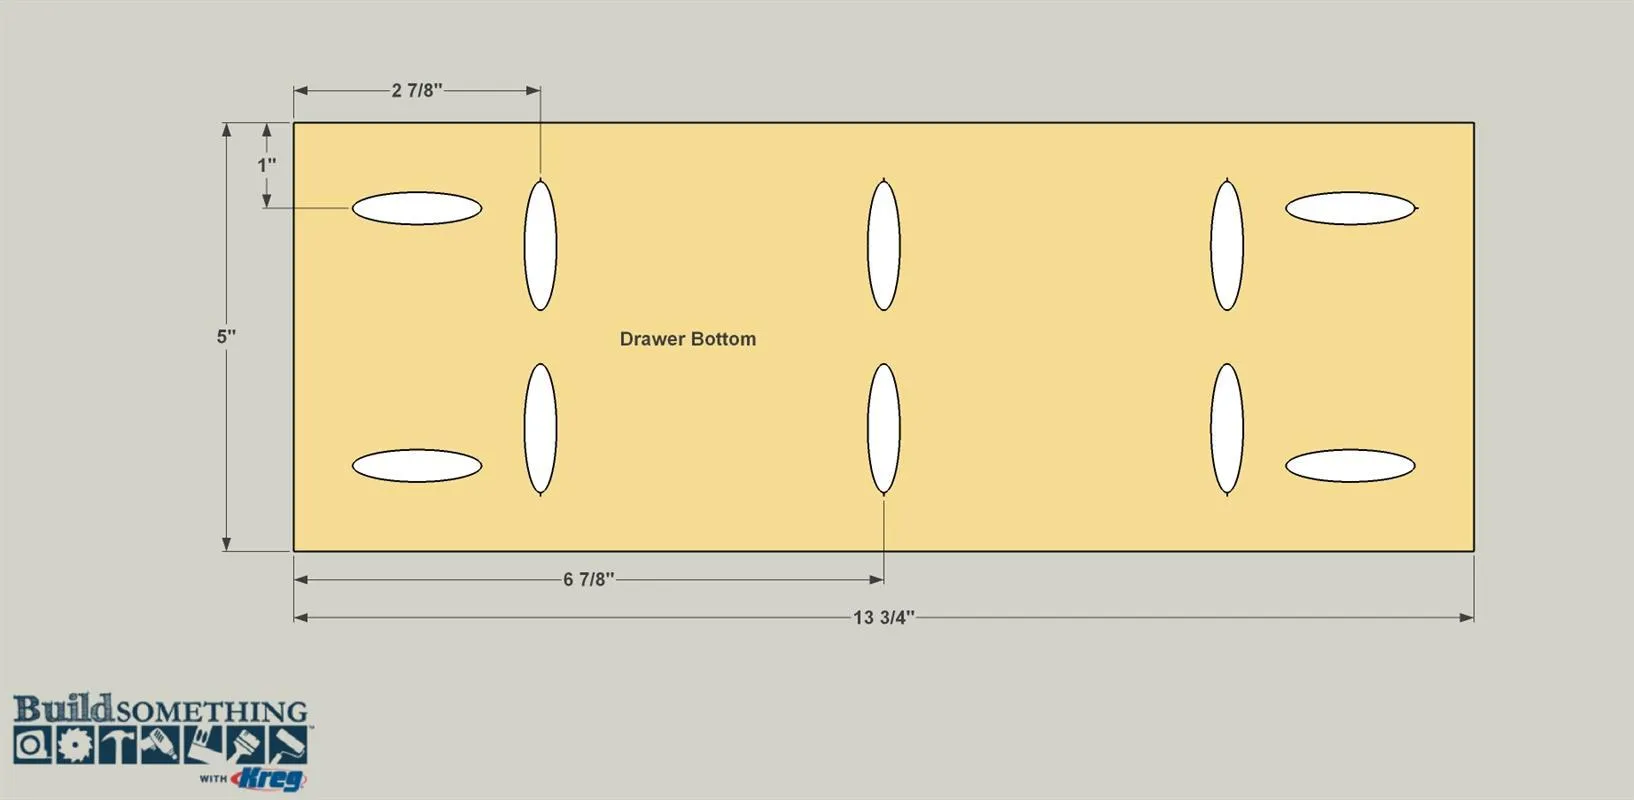
Cut two Drawer Bottoms to size from 3/4"-thick plywood, as shown in the cutting diagram. Drill pocket holes at the locations shown.
15. Cut and Install the Sides
From a 1x2 board, cut four Drawer Sides to length. Apply glue and secure them to Drawer Bottom with 1 1/4" coarse-thread Kreg Screws as shown.
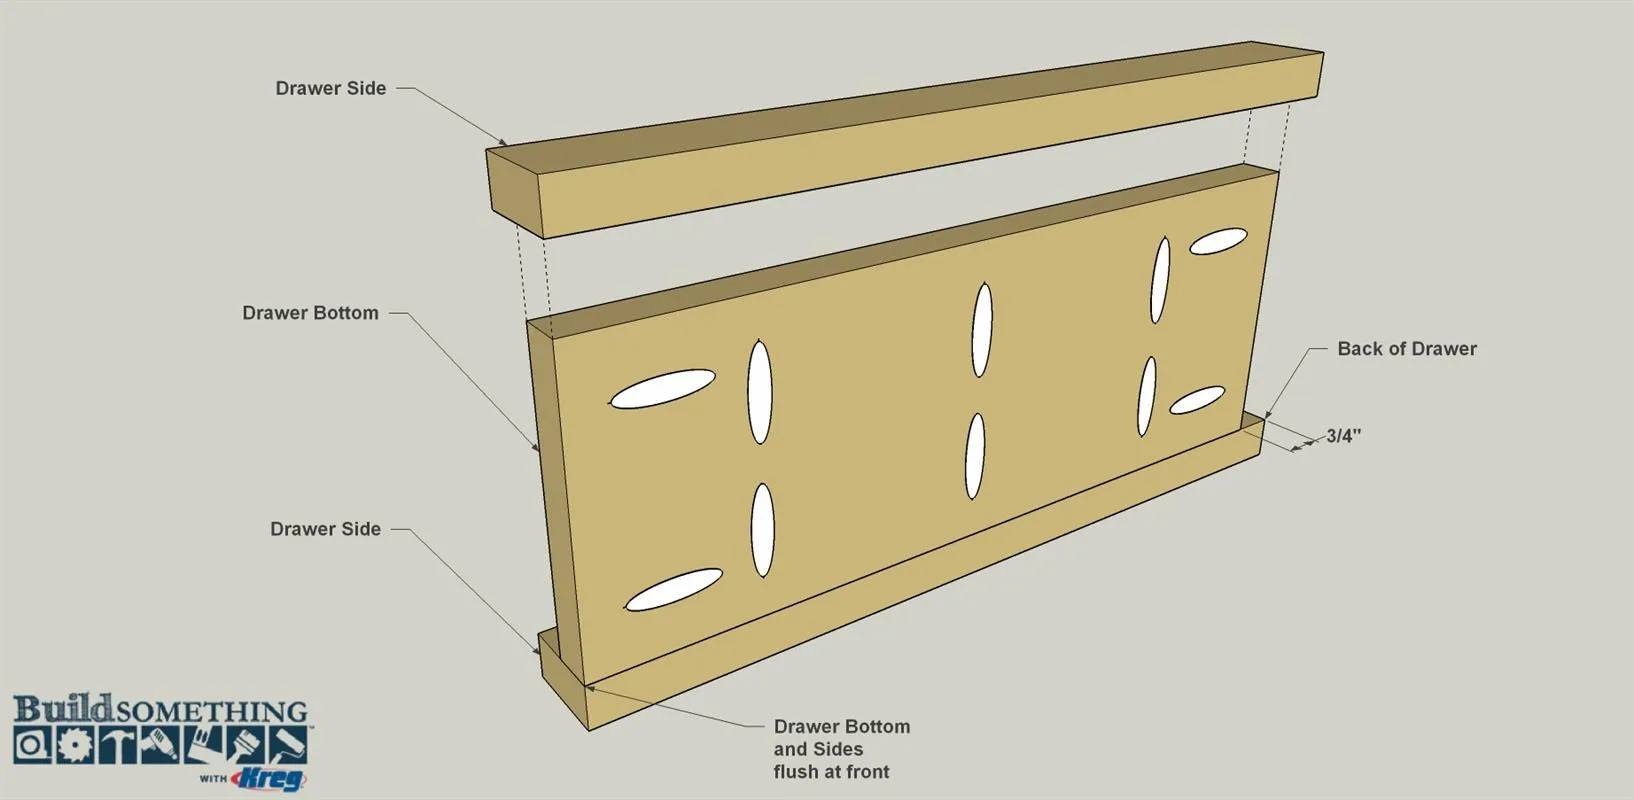
16. Make Drawer Front and Backs
Cut two Drawer Fronts and two Drawer Backs to length as shown in the cutting diagram. Using a coarse grit sand paper, sand about 1/16" off one long edge of each board. This will allow proper fit of the drawers in the drawer openings.
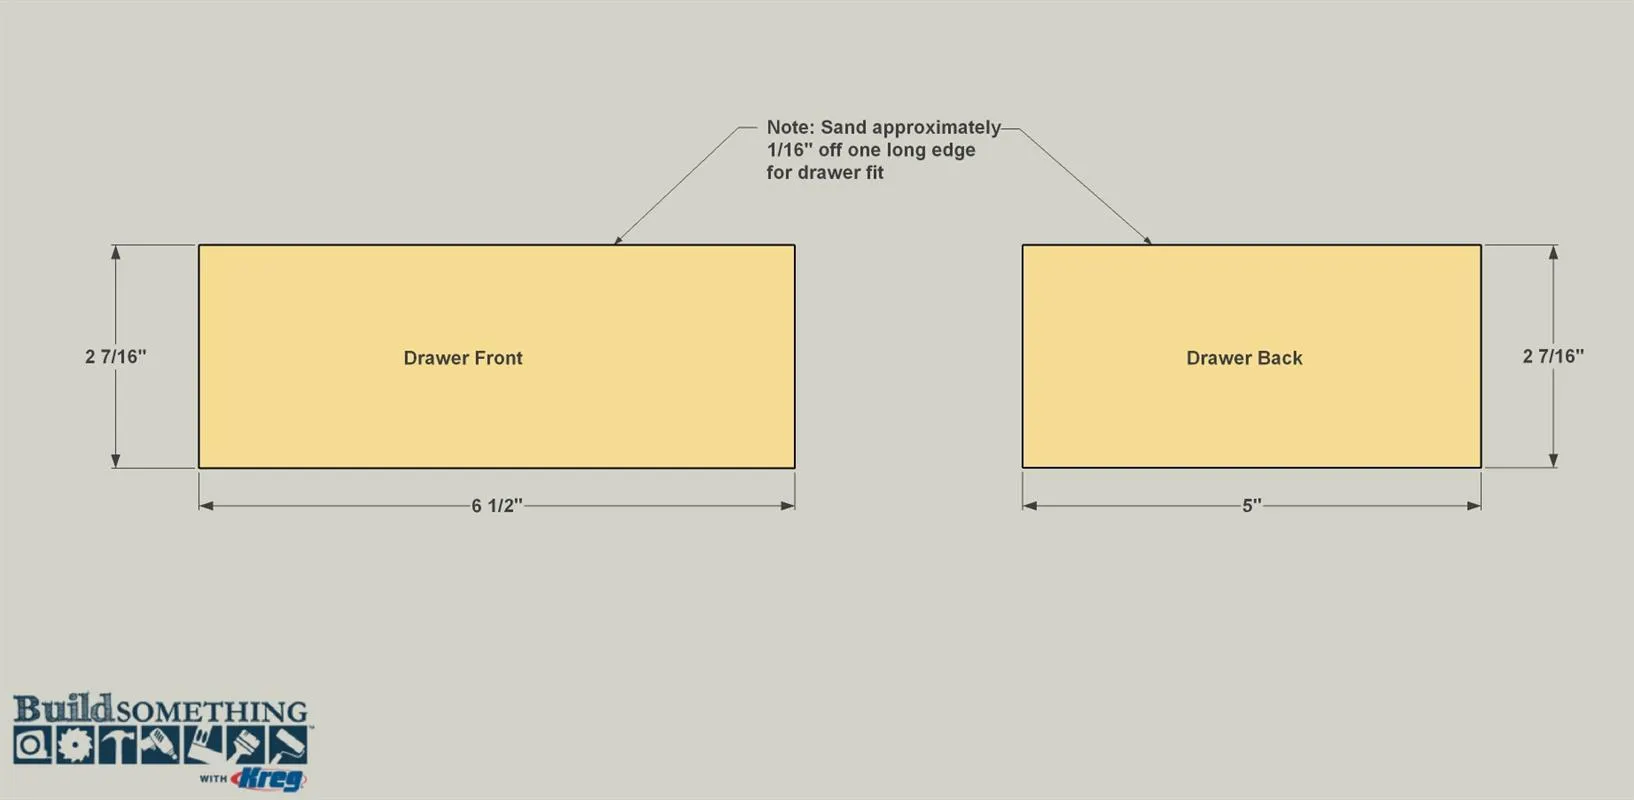
17. Install the Front and Back
- Apply glue to the mating edges of the Bottom, Sides, Front and Back.
- Position each piece and secure it using 1 1/4" coarse-thread Kreg Screws.
- Next, cut two lengths of 1/2" square dowel to fit between the Drawer Sides.
- Position them as you like and glue them in place with a little wood glue. After we sanded and painted our project, we applied some felt craft fabric to the bottom of each drawer for a more finished look.
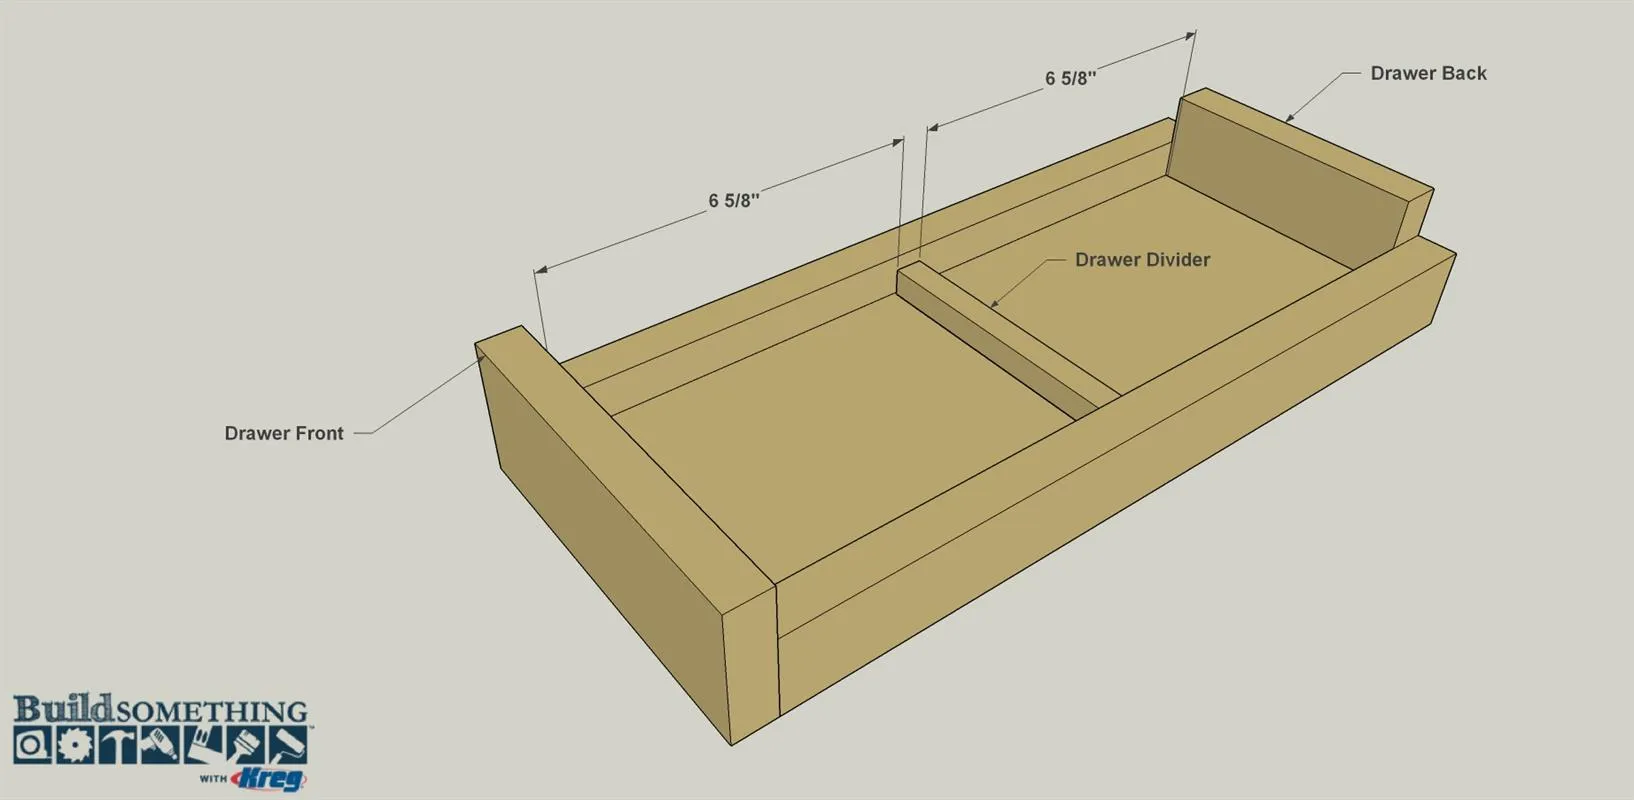
18. Add the Finishing Touches
- To finish off the piece, fill all the exposed plywood edges using the simple technique in the How-To video below.
- Then sand all of the other surfaces smooth. We then applied a couple coats of paint to the vanity and legs (we used a color called "Sailor's Bay" from Behr). After the paint dries, install the leg brackets and legs.
- Then install the Drawer and Lid knobs, and reinstall the hinges in the Lid and mount it to the Vanity. To mount the vanity to the way, we used a simple metal “Hangman” cleat. It’s easy to install on the wall and vanity following the manufacturer’s instructions.
- Finally, you can accessorize your vanity with a mirror and lights, if desired.