Notch
NotchUse your browser's Print (Ctrl/Cmd + P) and choose Save as PDF. This page works offline once you've opened it with a signal.
Cedar Patio Table
Here’s a great way to dine in style outdoors.
- Difficulty
- Easy
- Time
- 2.8–5.3 hours
- Cost
- $$$
Cut list
| Part | Qty | T × W × L | Material | ✓ |
|---|---|---|---|---|
| End Rail | 2 | 1" × 3" × 23" | — | ☐ |
| Side Rail | 2 | 1" × 3" × 53" | — | ☐ |
| Center Rail | 1 | 1" × 3" × 53" | — | ☐ |
| Leg | 4 | 3" × 3" × 30" | — | ☐ |
| End Top Slat | 2 | 1" × 5" × 30" | — | ☐ |
| Top Slat | 9 | 1" × 5" × 30" | — | ☐ |
Materials
| Item | Qty | ✓ |
|---|---|---|
| Cedar decking, 5/4x6 x 96" | 4 board | ☐ |
| Cedar board, 2x4 x 96" | 3 board | ☐ |
| Cedar board, 4x4 x 96" | 2 board | ☐ |
| 1 1/2" Kreg Blue-Kote™ or Stainless Pocket-Hole Screws | 62 each | ☐ |
| 2 1/2" Kreg Blue-Kote™ or Stainless Pocket-Hole Screws | 20 each | ☐ |
| Waterproof wood glue | 1 each | ☐ |
Overall cost: $$$. Lumber varies by region, species, and season, so we give a band rather than a figure.
Tools
- Drill / Driver
- Jigsaw
- Miter Saw
- Pocket Hole Jig
- Random Orbit Sander
- Bar / Pipe Clamps — optional
- Tape Measure — optional
Instructions
1. Make the End Rails
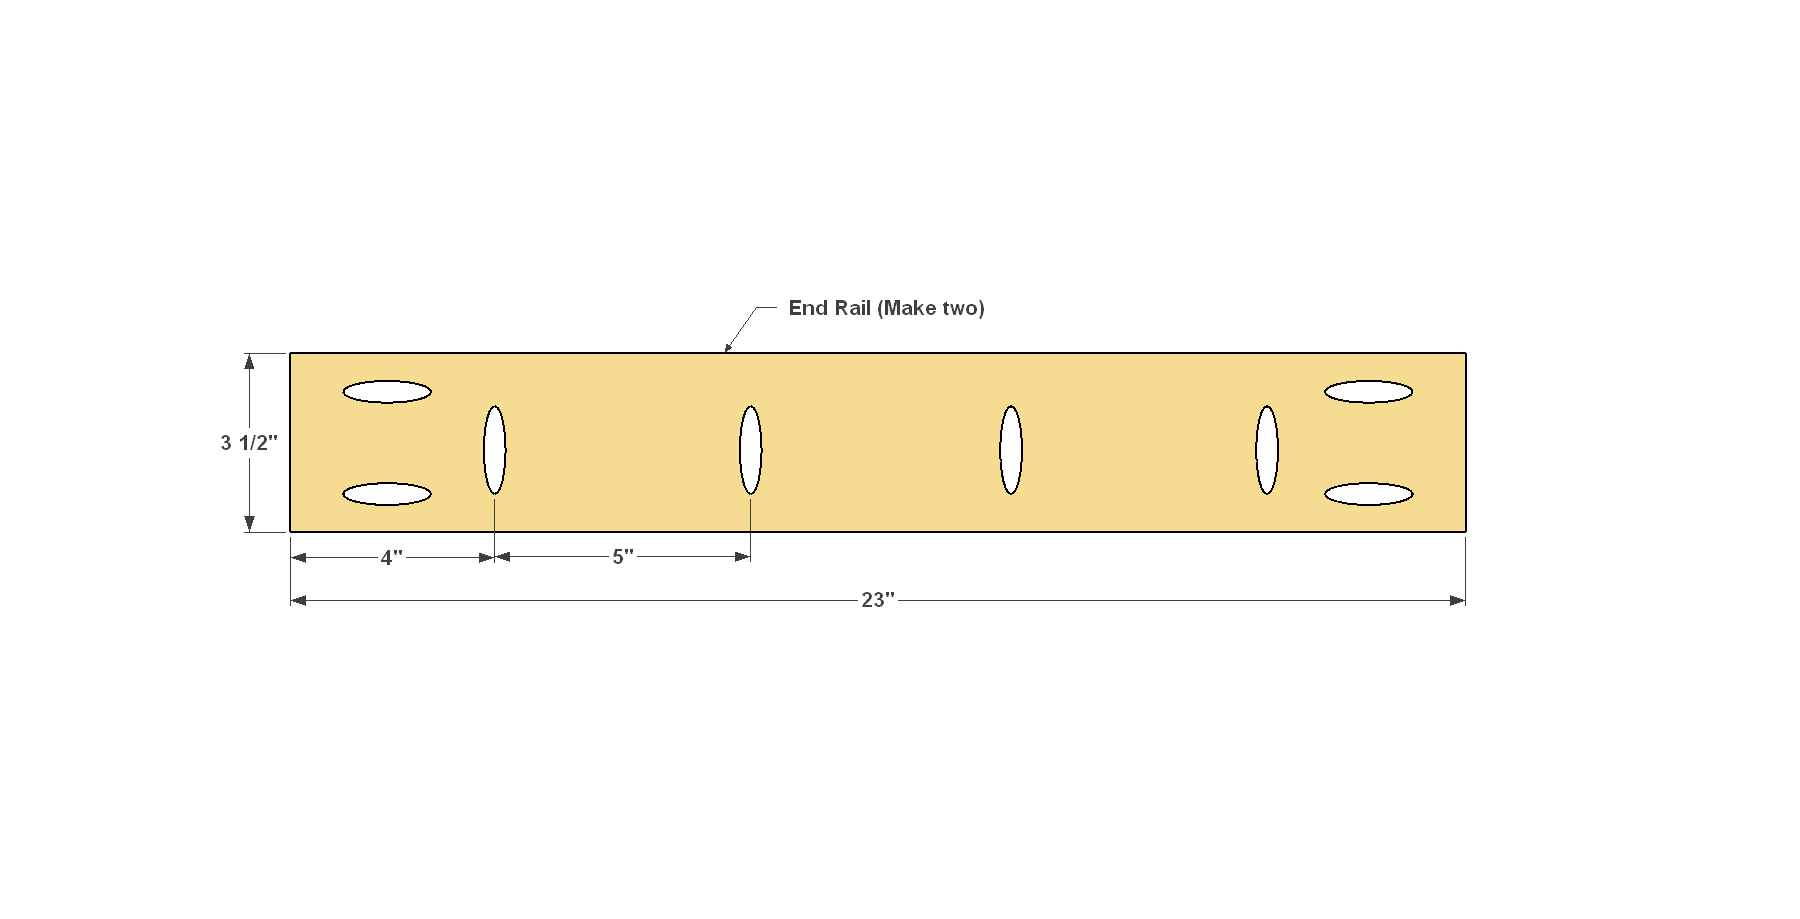
- Cut two End Rails to length from a 2x4 cedar board, as shown in the cutting diagram.
- Set your Kreg® Pocket-Hole Jig and drill bit for 3/4" material, and then drill pocket holes along one edge of each End Rail at the locations shown. These holes will be used to at tach the table’s Top Slats. Reset your jig and drill bit for 1 1/2"-thick material, and drill holes in the ends of the End Rails.
- Sand the faces and edges smooth, but don’t sand the ends.
2. Add Side and Center Rails
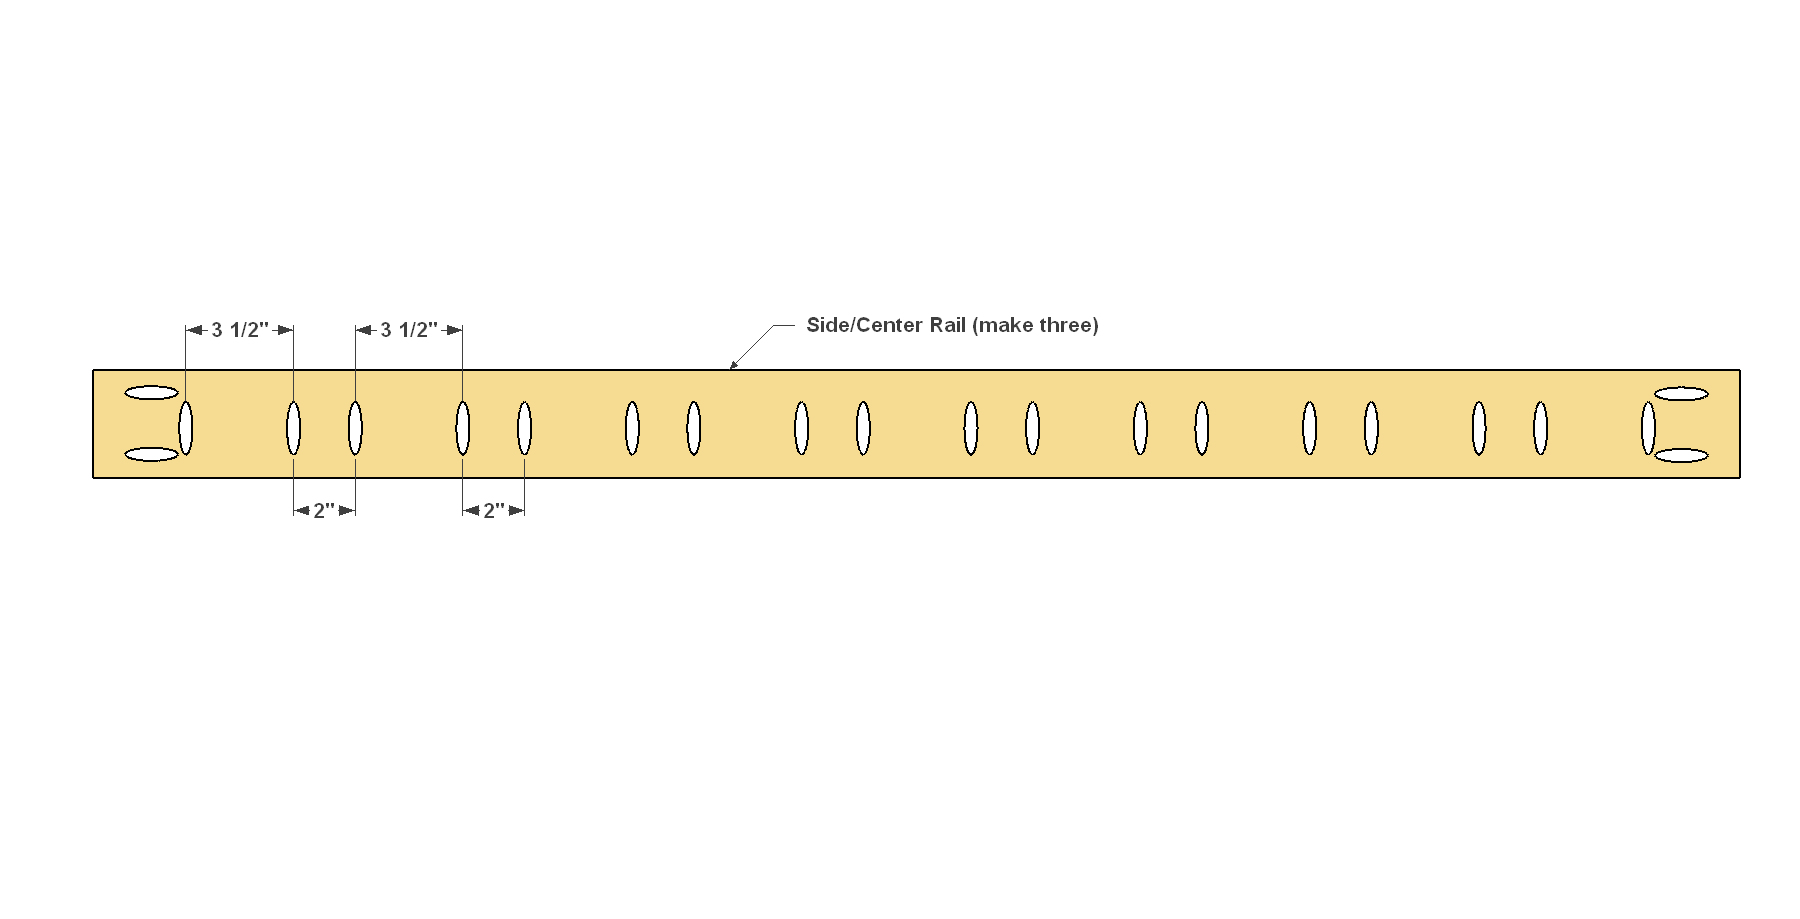
- Cut two Side Rails and a Center Rail to length, as shown in the cutting diagram.
- Set your Kreg® Pocket-Hole Jig and drill bit for 1" material, and then drill pocket holes along one edge of each Rail at the locations shown. These holes will be used to at tach the table’s Top Slats.
- Once again, reset your jig and drill bit for 1 1/2"-thick material, and drill holes in the ends of the Side Rails.
- Sand these pieces smooth.
3. Make the Legs
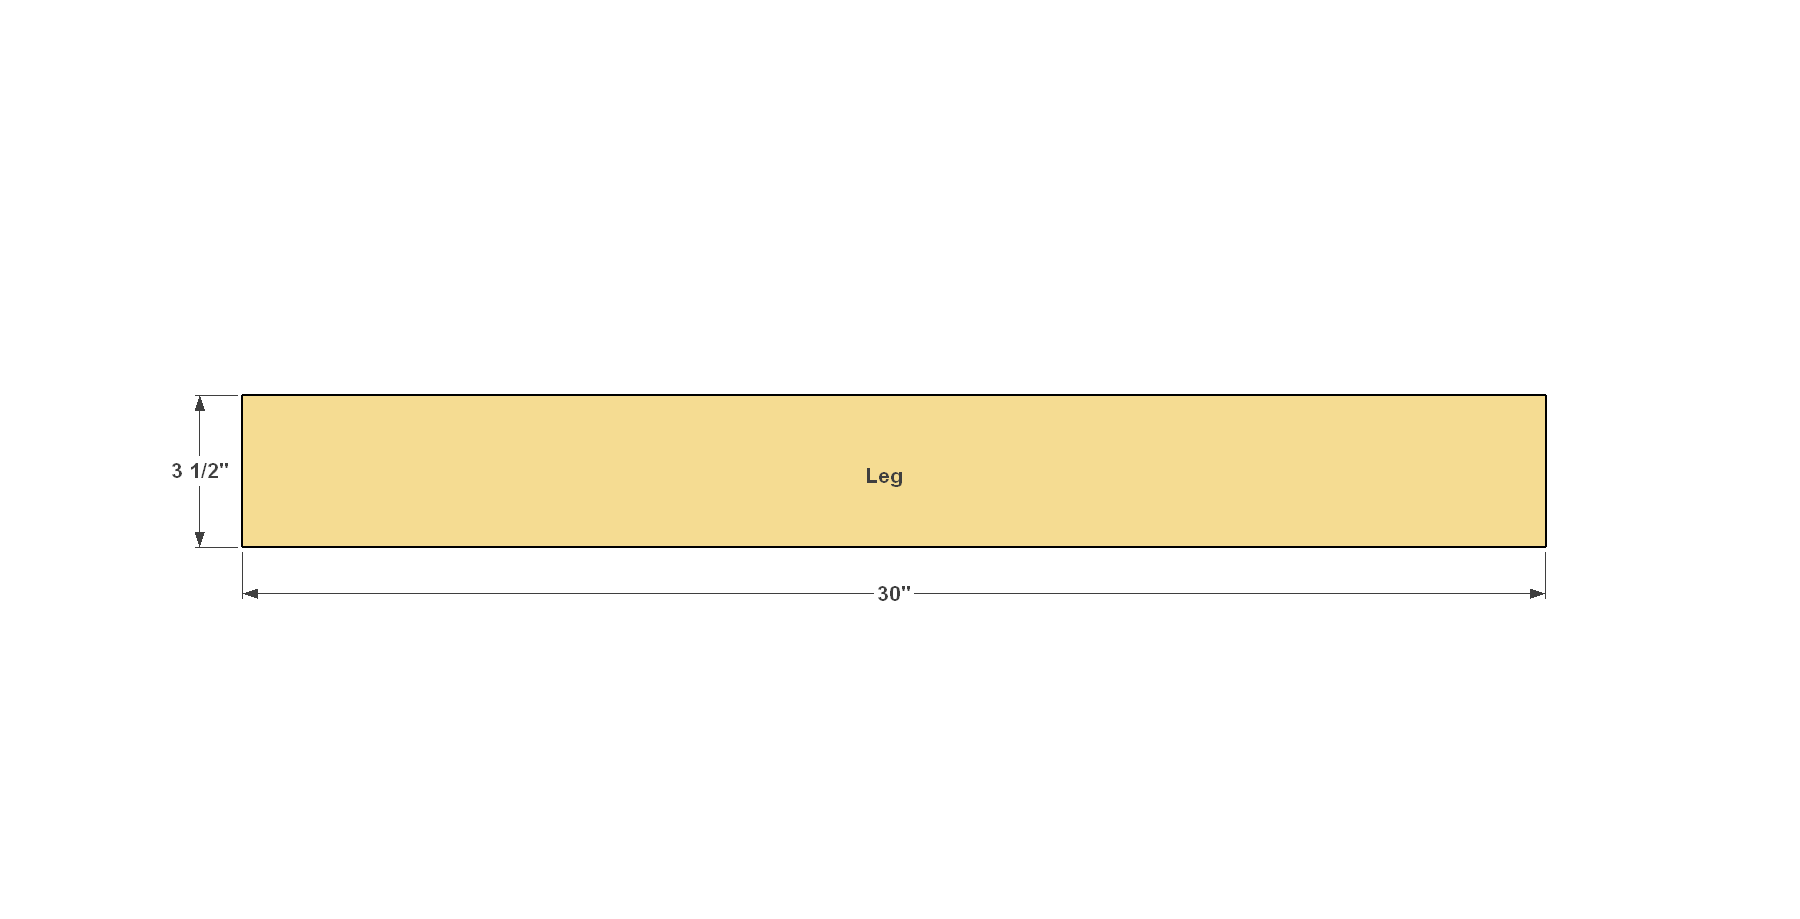
Cut four Legs to length from 4x4 cedar, as shown in the cutting diagram. With a 1/4" roundover bit in a router, round over all the edges of the Legs. If you don't have a router, you can use a sander to ease all of the edges. After that, sand the faces and ends smooth.
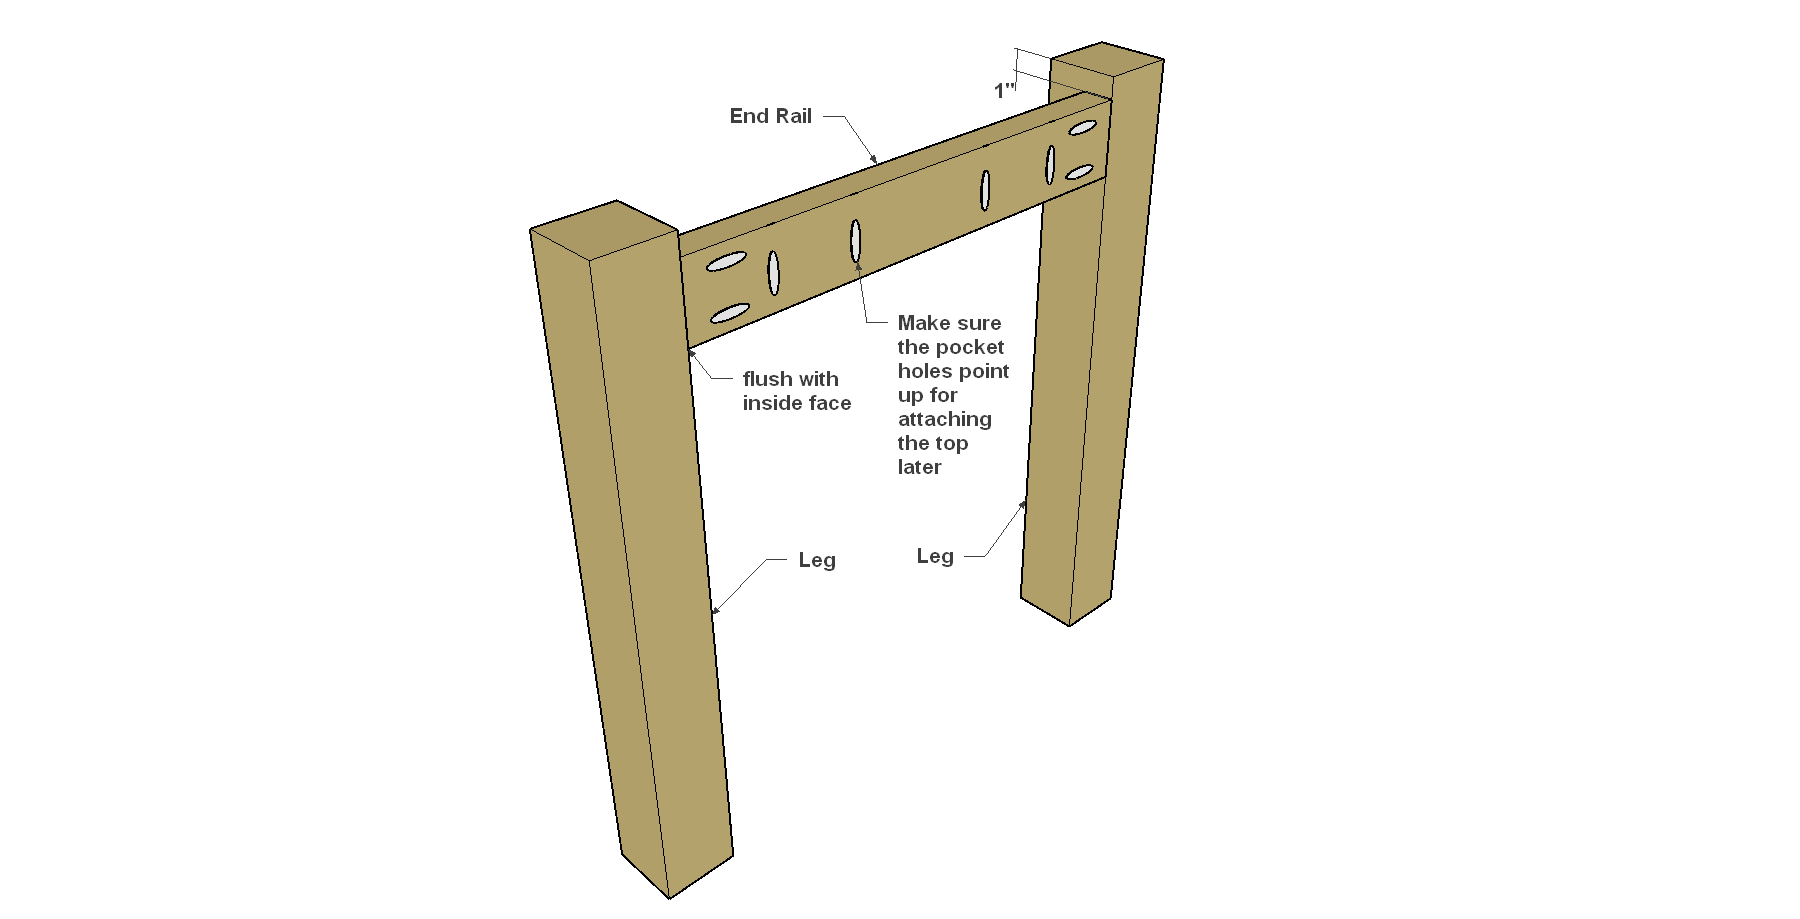
4. Attach the End Rails
Spread exterior wood glue on the ends of the End Rails, and then position them against the Legs, as shown. Secure the End Rails to the Legs using 2 1/2" Blue-Kote™ Pocket-Hole Screws where shown. Do the same with the other two Legs and End Rail.
5. Connect the Side and Center Rails
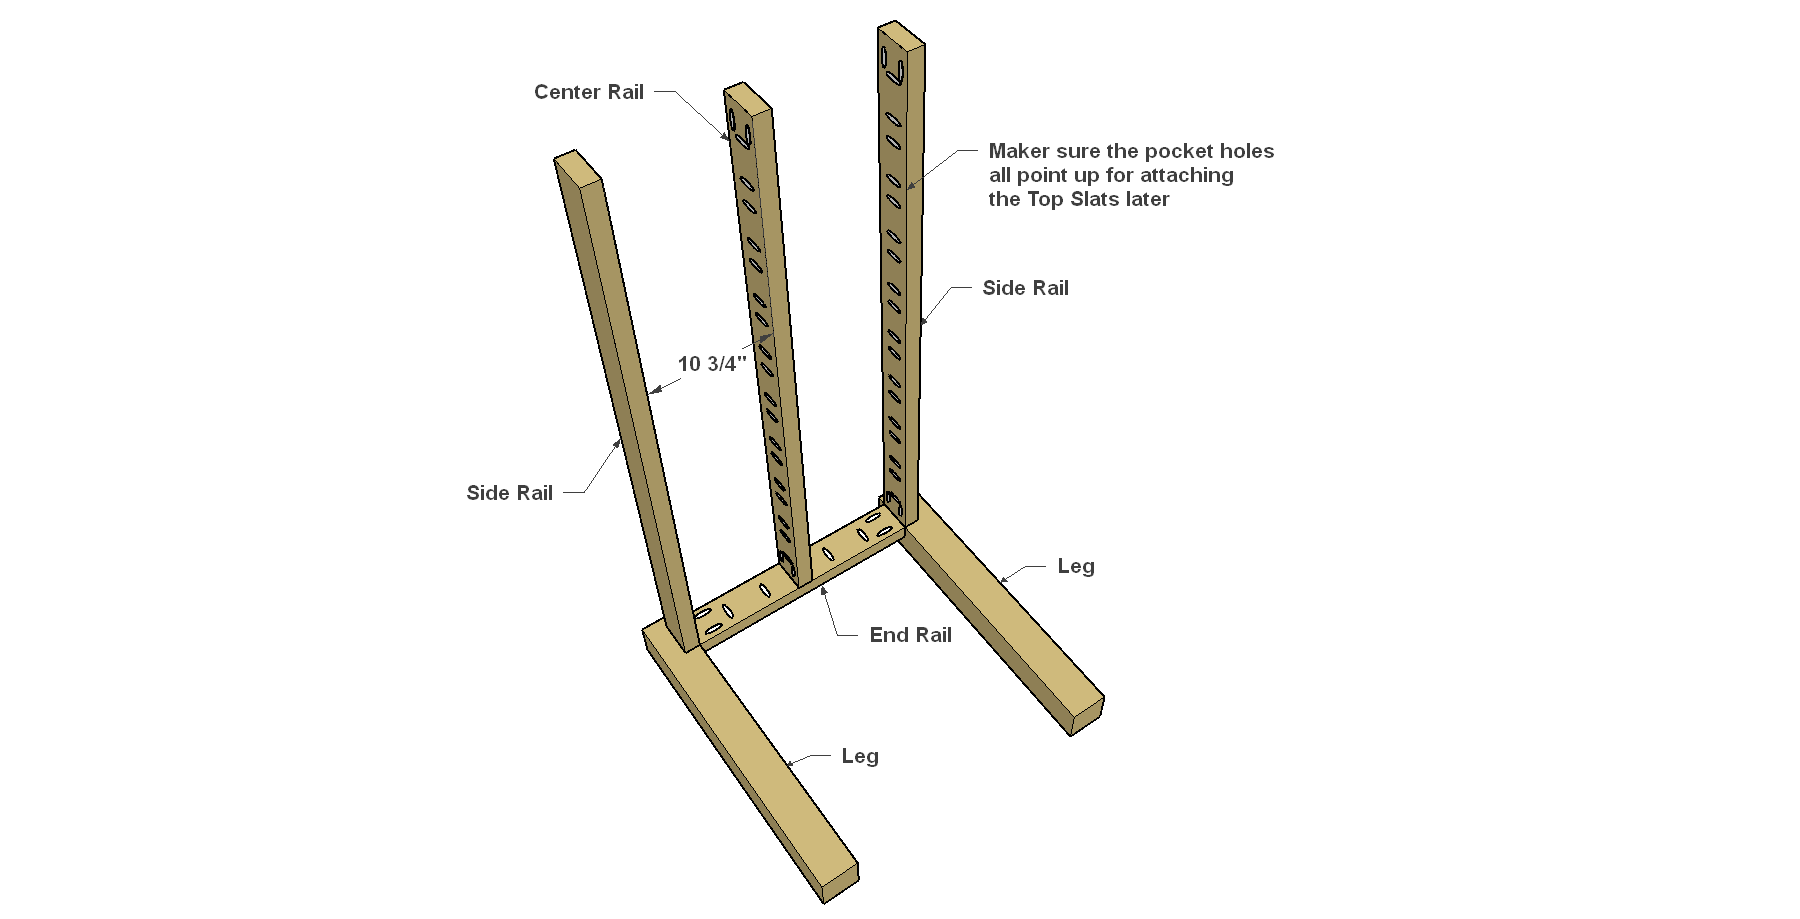
- Lay the Leg Assembly flat on a work surface.
- Spread Glue on one end of each Side Rail and the Center Rail, and then position the Rails where shown. Secure all three Rails using 2 1/2" Blue-Kote™ Pocket-Hole Screws.
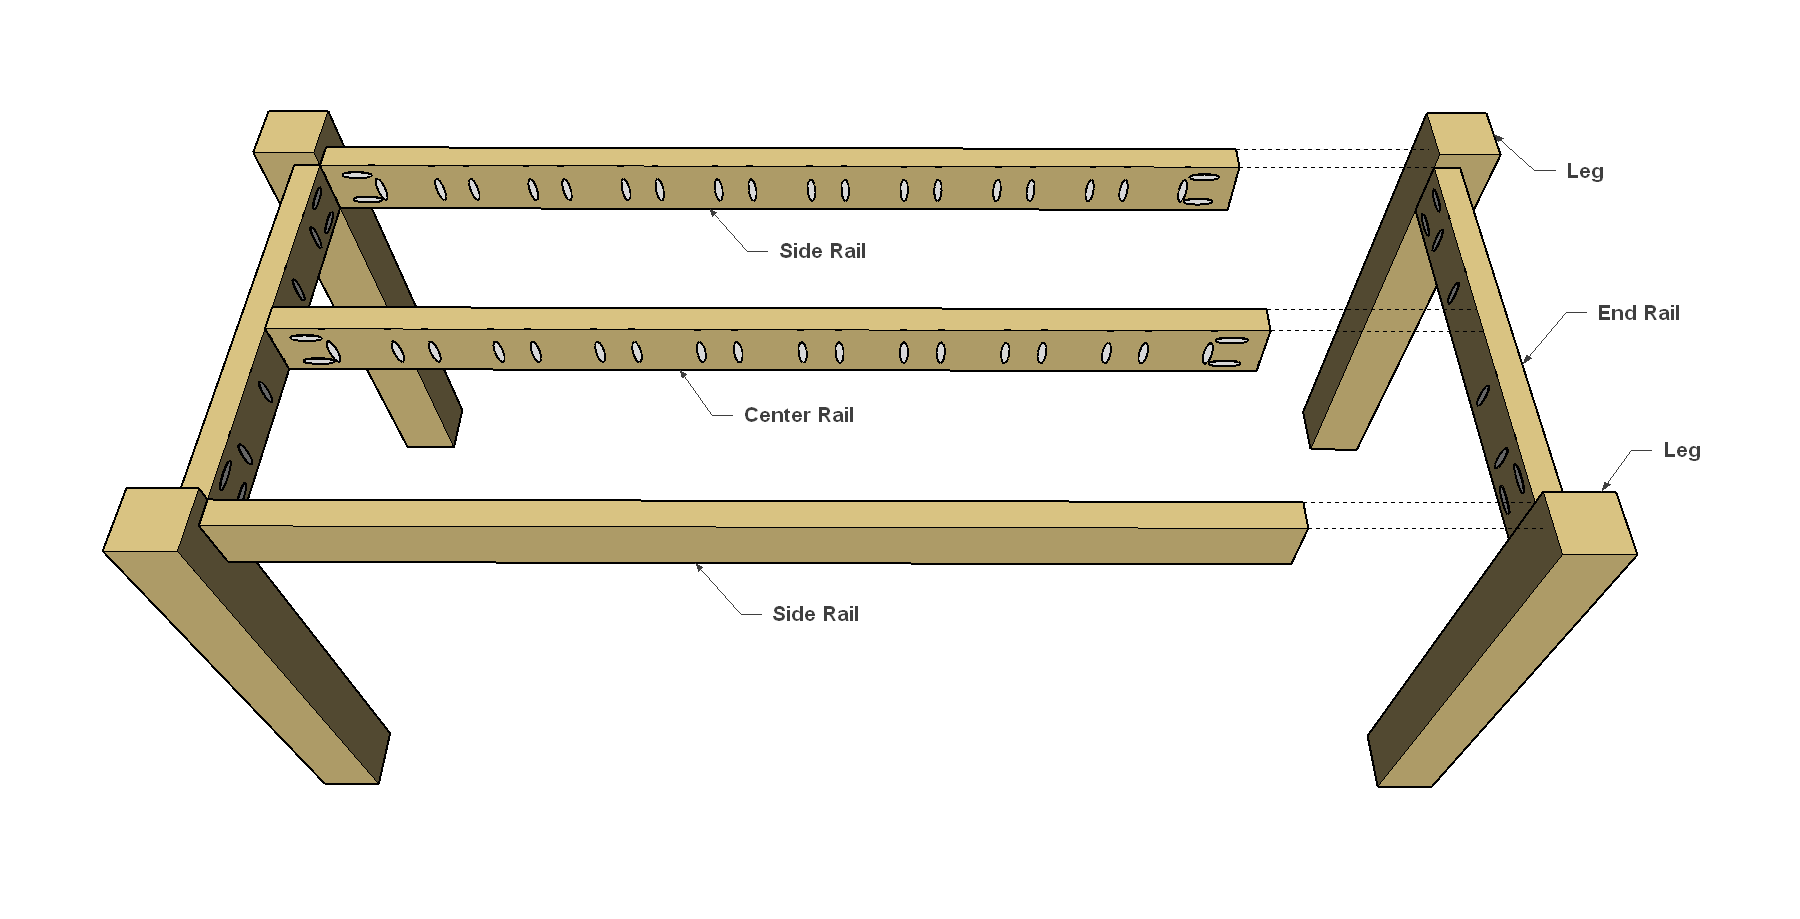
6. Add the Other End Assembly
Attach the second End Assembly the same way, using exterior glue and 2 1/2" Blue-Kote™ Pocket-Hole Screws. If you plan to apply a two-tone color treatment, like we did, go ahead and apply the stain to the completed base assembly now. If you’re just using one stain color for the entire table, you stain the base now, or wait until the Slats are attached.
7. Make the Top Slats
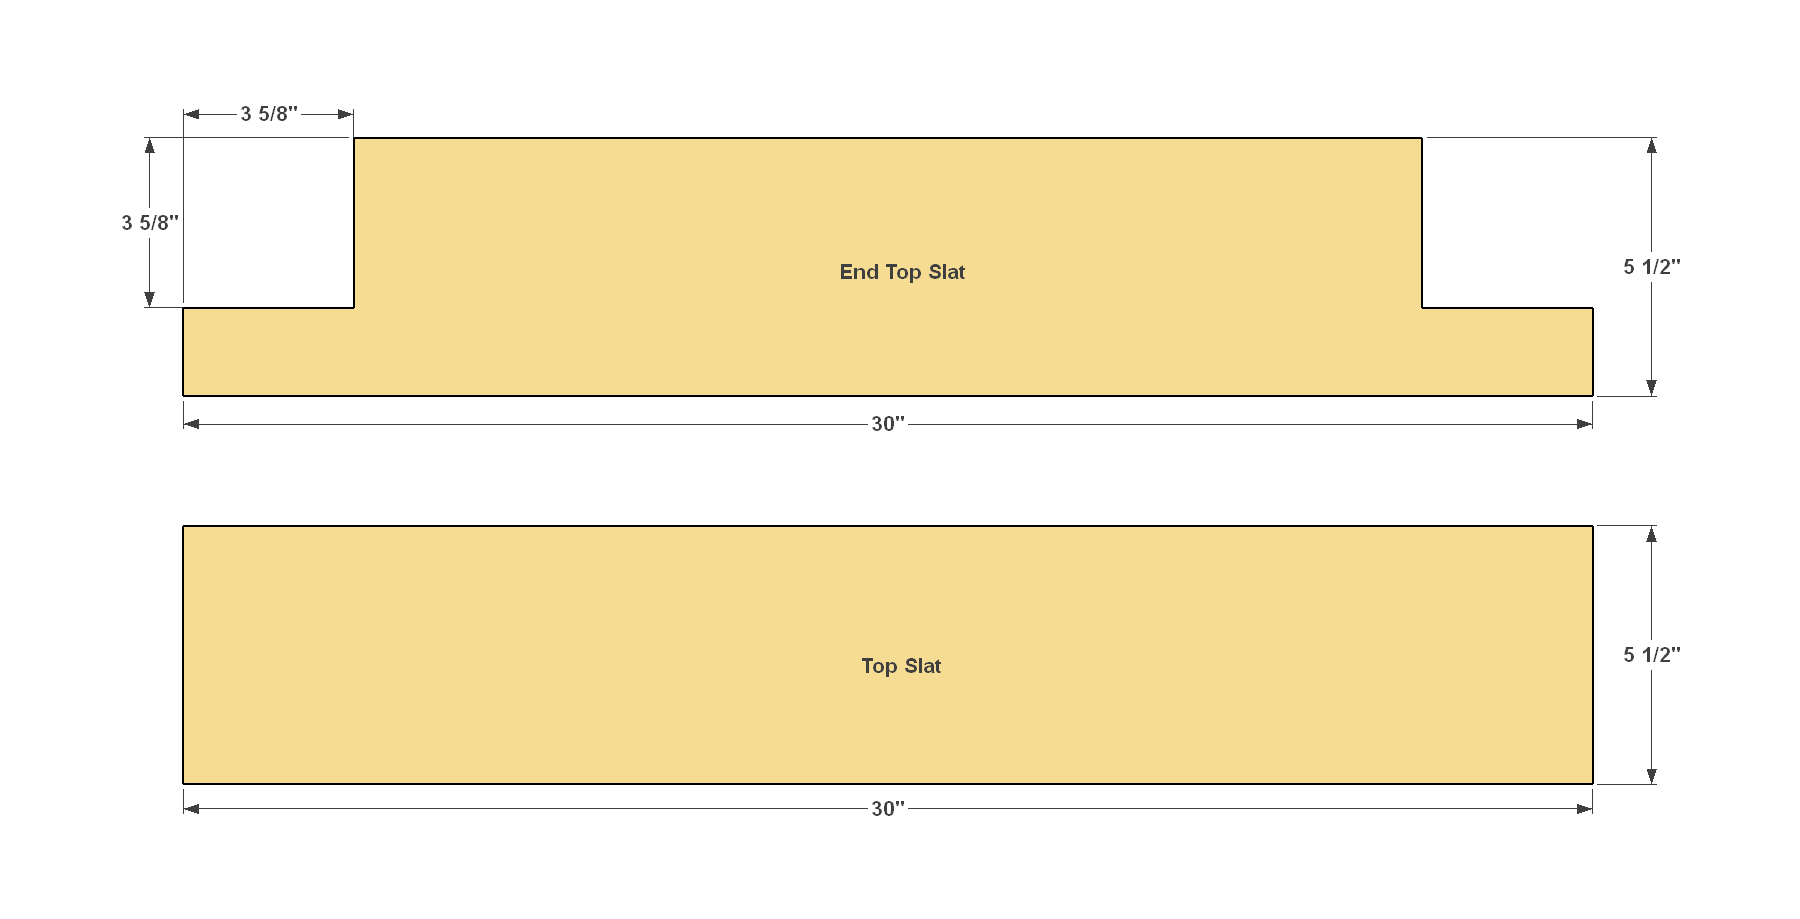
- Cut nine Top Slats and two End Top Slats to length from 5/4 x 6" cedar deck boards, as shown in the cutting diagram.
- Set the nine Top Slats aside. On the two End Top Slats, lay out the notch on each end, as shown.
- Cut the notch out with a jigsaw.
- Round over all of the edges of the boards with a router and a 1/4" roundover bit.
- Then sand the faces, edges, and ends of all the Slats smooth. If your slats will be a different color than the base, go ahead and apply the stain now.
8. Install the Top Slats
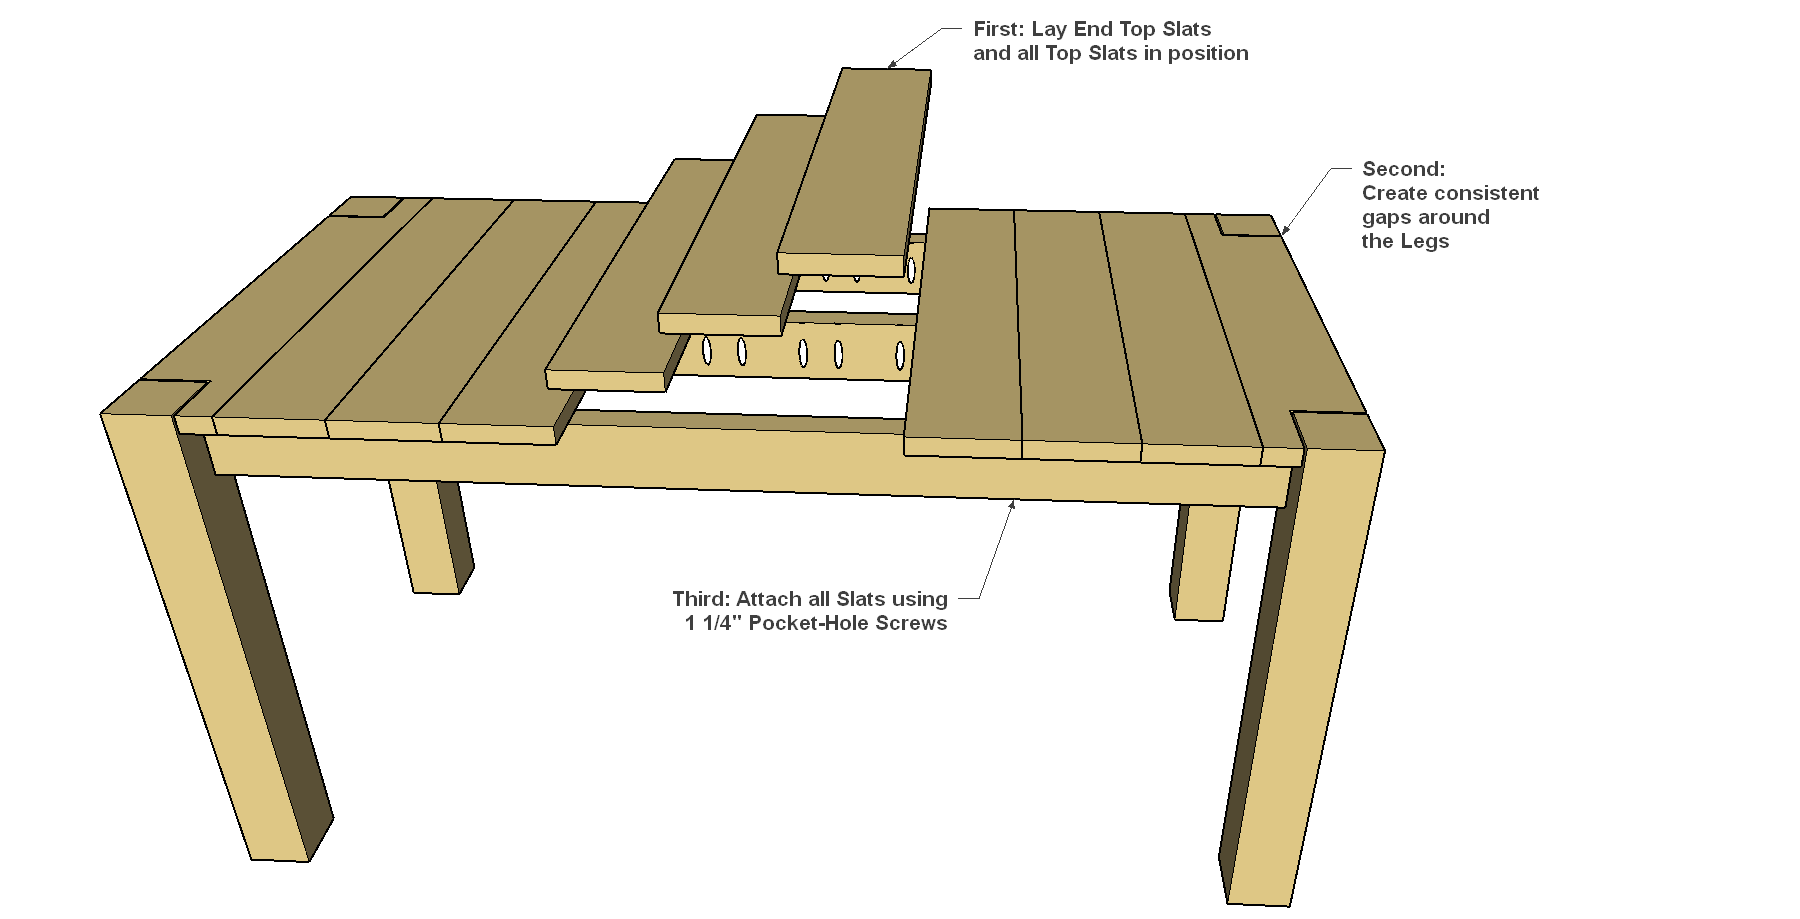
- Lay all the Top Slats in place temporarily.
- Position the End Top Slats so the gap around each leg is consistent. And then attach these two Slats using 1 1/2" S Blue-Kote™ Pocket-Hole Screws.
- Finally, use the End Top Slats as reference to position the nine Top Slats, and then attach them the same way.