 Notch
NotchWasher & Dryer Pedestals with Storage
Step-by-step build — 30 steps. Also available as a print sheet.
1Check out the project
It’s always a good idea to look over the project before you begin, just so you’re familiar with all the parts. You’ll also want to note that the materials list and cutting diagrams show everything for building a pair of pedestals.
2Make the Side Frame Parts
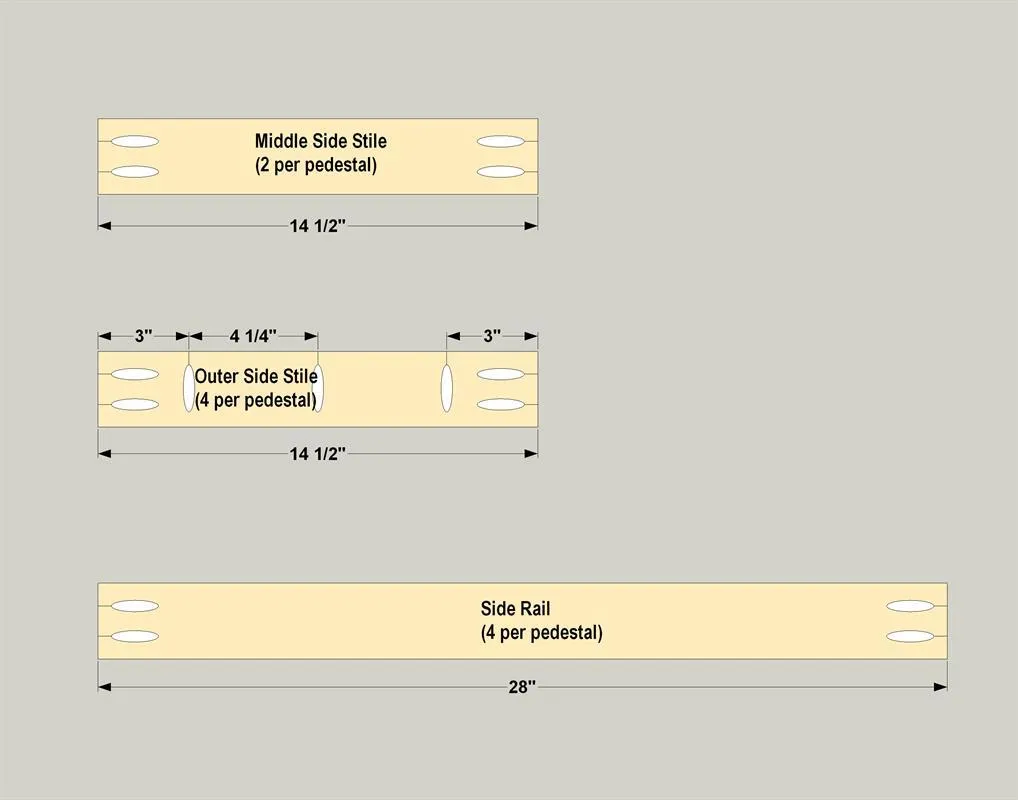
- Start by cutting the Side Rails and Side Stiles to length from 1x3 boards, as shown in the cutting diagram.
- Then, with your pocket hole jig set for 3/4" stock, drill pocket holes in the ends of all these pieces, as shown.
- Also for each pedestal, you’ll need to drill pocket holes along one edge of four of the stiles, as shown. You can also cut four Legs for each pedestal from 2x2 boards, as shown in the cutting diagram. The Legs don’t need pocket holes.
3Assemble the Side Frames
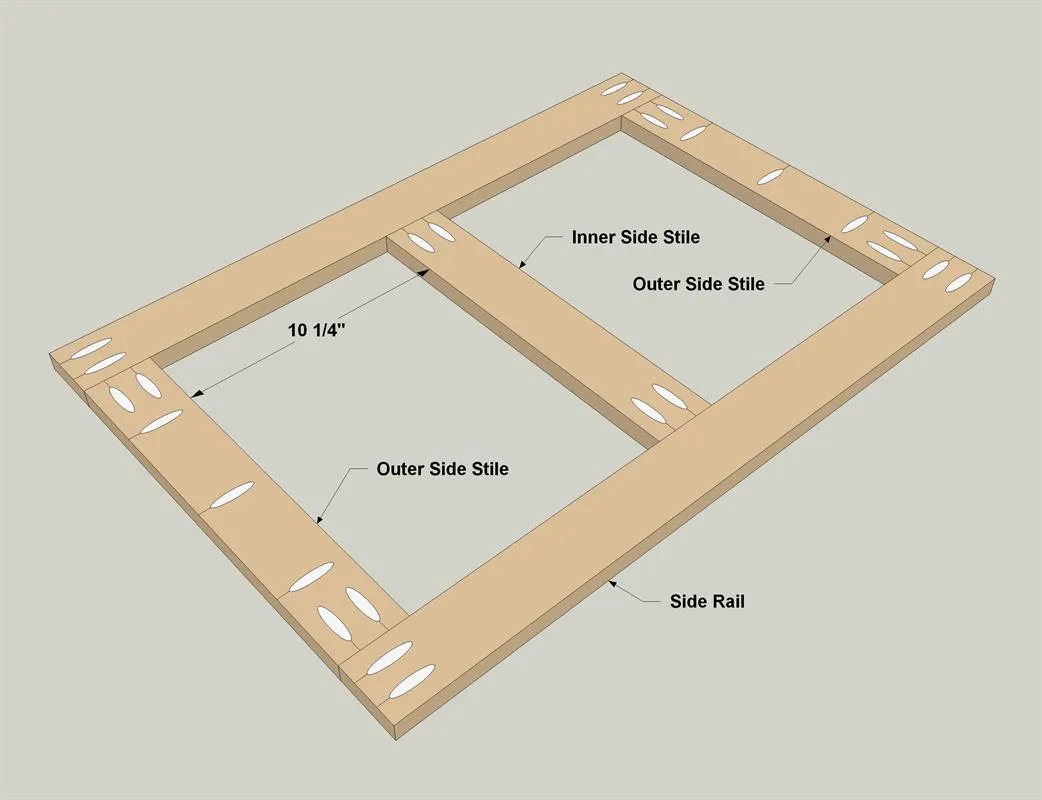
Now you can assemble the side frames using 1 1/4" pocket hole screws, as shown. Make sure that the pocket holes in the edges of the outer stiles are pointing outward. The Tip below will help you decide which type of screws.
Tip: Match Screws to Your Wood Type When using pocket-hole screws, be sure to match the thread types to your wood. Fine-thread screws (left) are best for hardwoods like oak, cherry, maple and poplar. Coarse-thread screws are best for softwoods like pine, spruce, etc. Coarse screws are also great for plywood. If you’re using a softwood and plywood together, choose coarse screws for all. If you’re using hardwood and plywood together, there’s no need to switch types. Just go with fine-thread screws throughout.
4Add the Legs
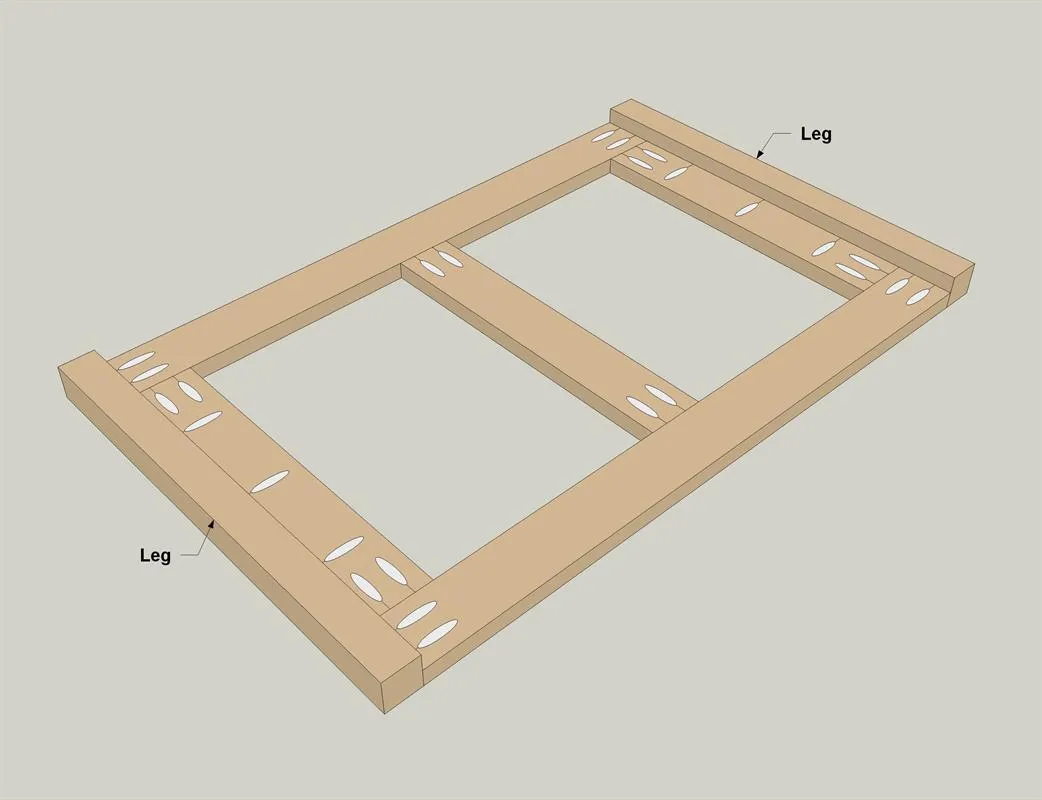
- Now you can attach the legs to the side frames.
- Spread glue along the edges of the outer Stiles. This will add some strength to the overall assembly, and then attach the legs using 1 1/4" pocket hole screws, as shown.
5Make the Side Panels
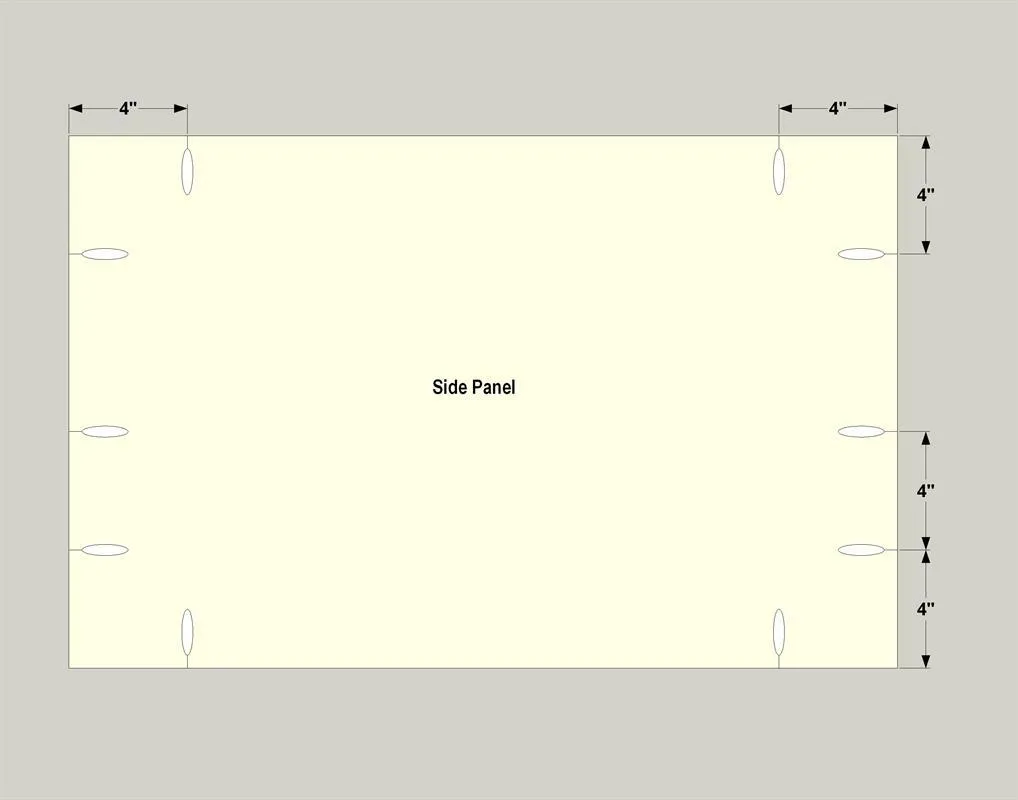
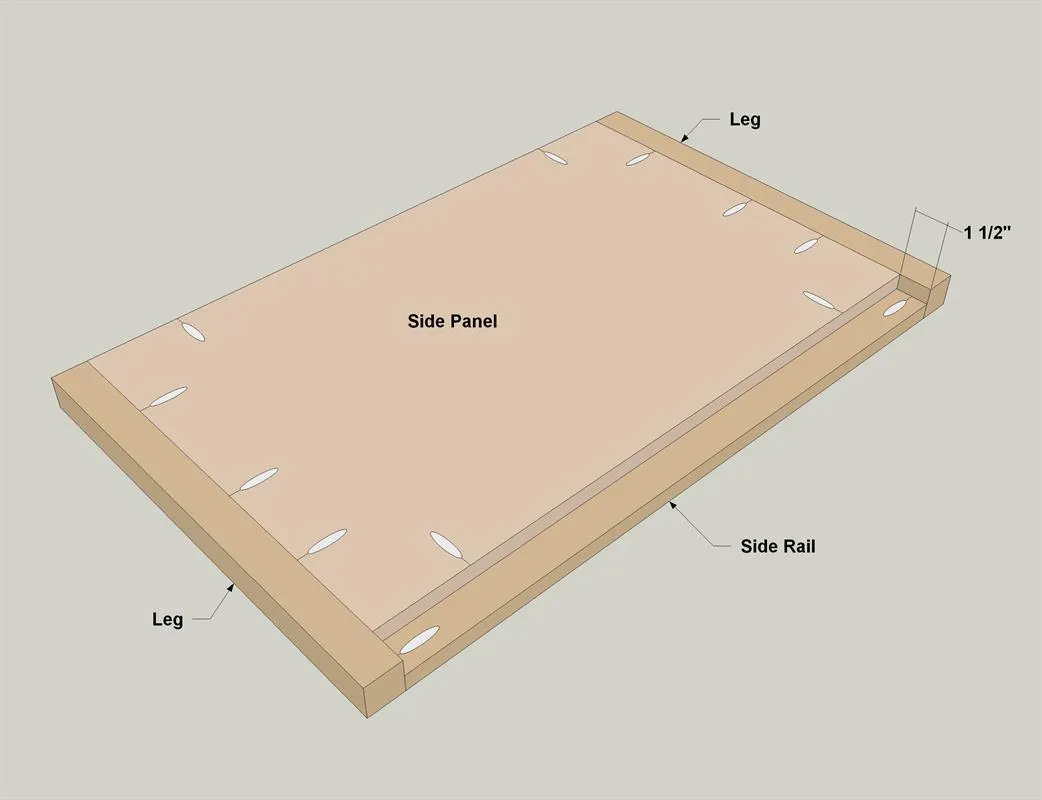
Cut a pair of Side Panels to size from 3/4"plywood, as shown in the cutting diagram. Then, with your pocket hole jig set for 3/4" stock, drill pocket holes in the Side Panels, as shown.
6Mount the Side Panels
With the Side Panels cut, you can attach them to the side frames. Again, add some glue to the inside faces of the frame parts, and then add the panels by driving 1 1/4" pocket hole screws into the Legs. Be sure to position the panels 1 1/2" from the bottom of the Legs, as shown. This will provide space to add a bottom panel to the pedestal assembly later.
7Make the Front Rails
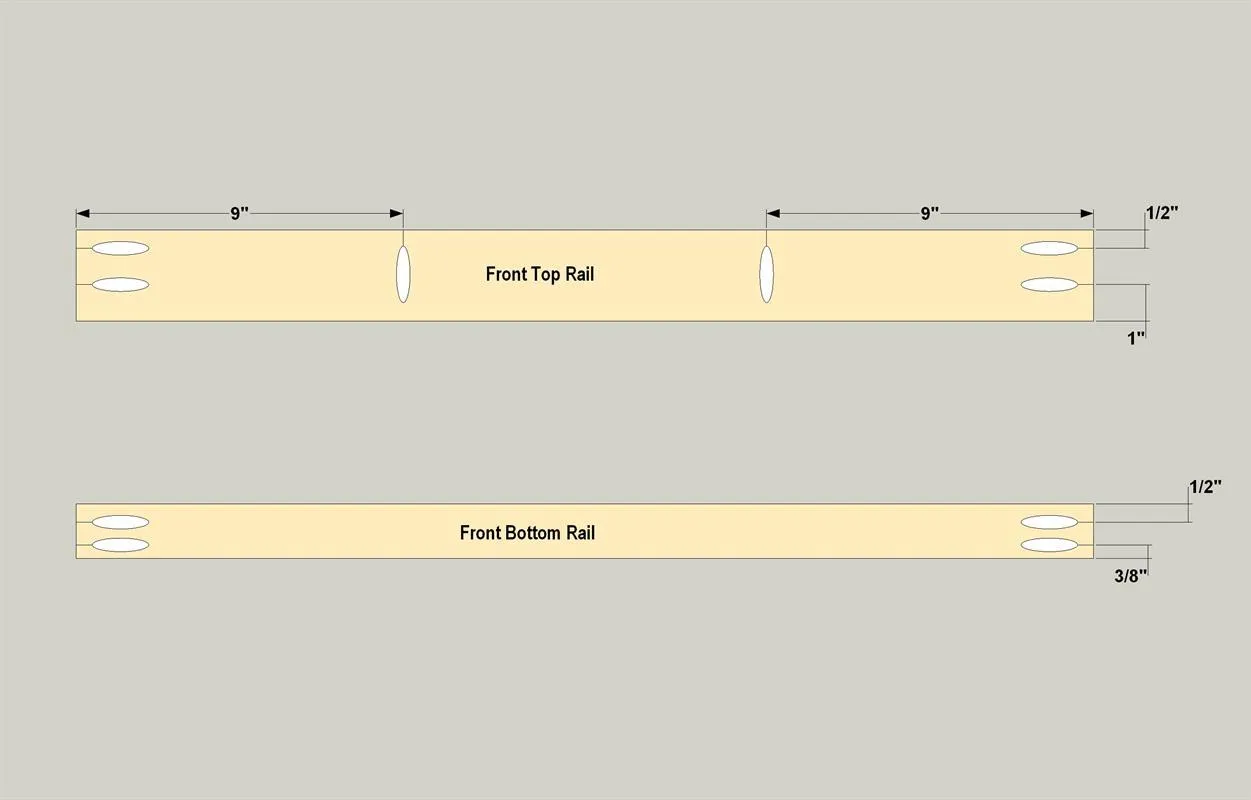
Cut a Top Front Rail and Bottom Front Rail for each pedestal from 1x3 and 1x2 boards, as shown in the cutting diagram. Then, with your pocket hole jig set for 3/4" stock, drill pocket holes in the rails, as shown.
8Connect the Sides
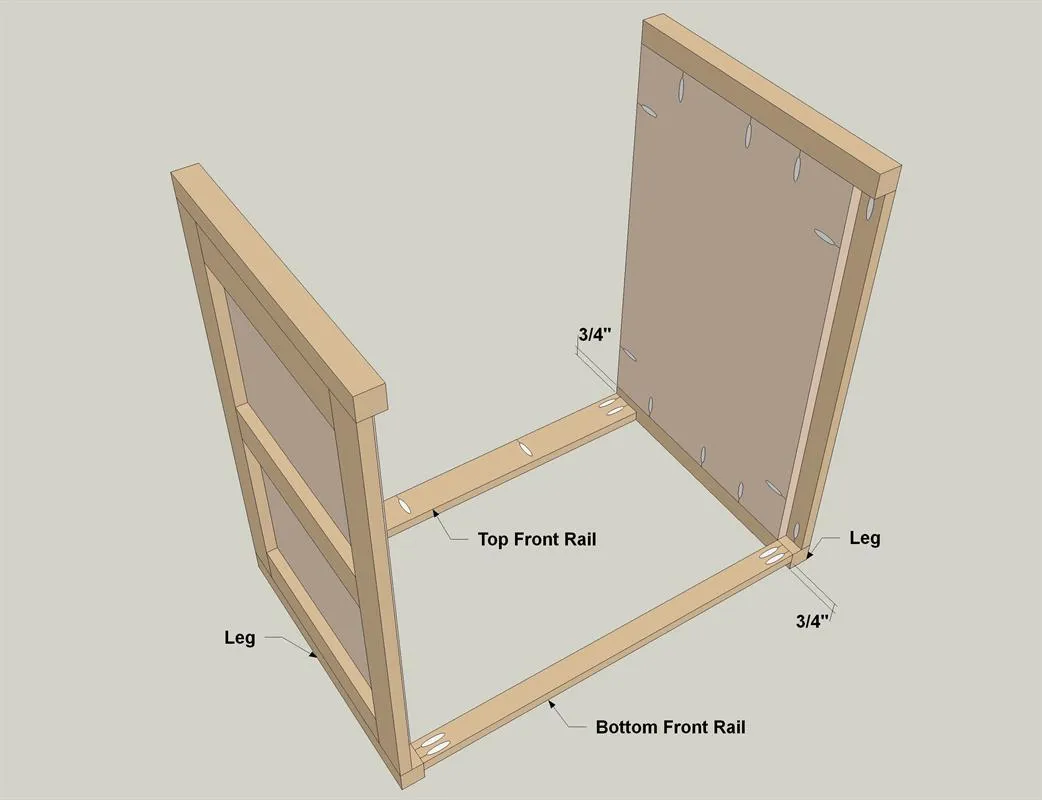
Now you can connect the side assemblies by attaching the Top Front Rail and Bottom Front Rail using 1 1/4" pocket hole screws, as shown. Note that the Top Front Rail sits flush with the outer face of the Legs, and the Bottom Front Rail sits flush with the inside face of the Legs.
9Make the Back Rails and Stiles
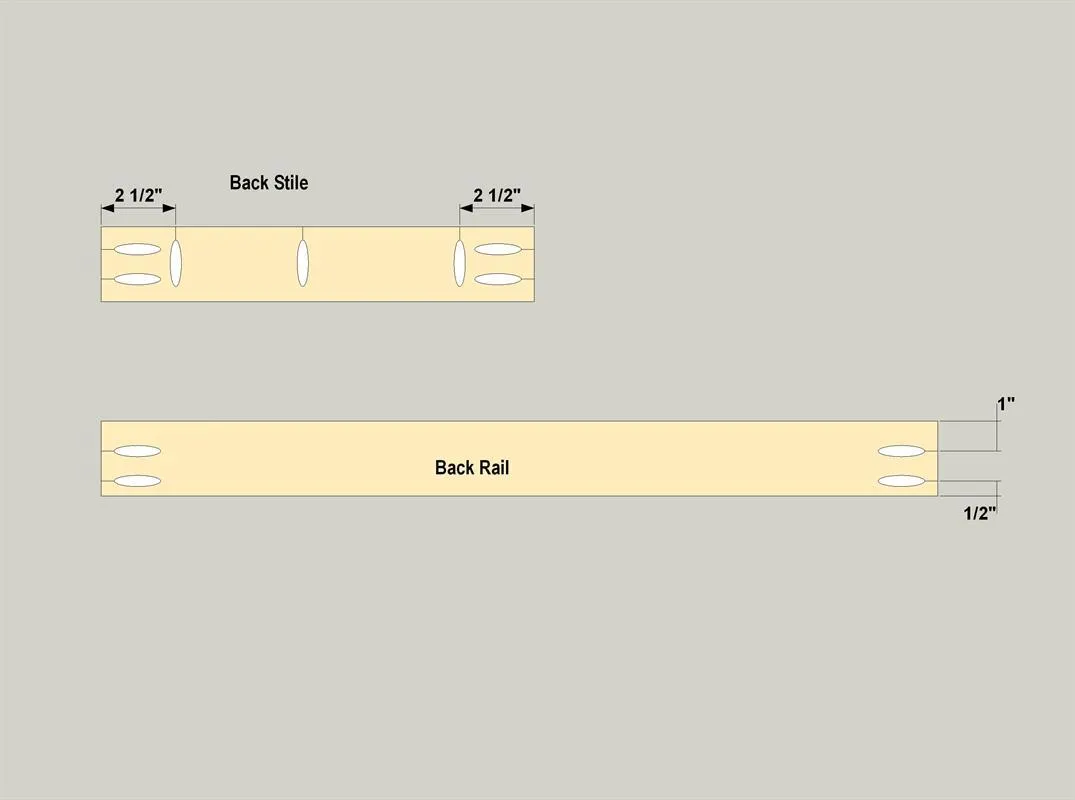
Start by cutting two Back Rails and two Back Stiles for each pedestal from 1x3 boards, as shown in the cutting diagram. Then, with your pocket hole jig set for 3/4" stock, drill pocket holes these pieces, as shown.
10Assemble the Back Frame
Now you can assemble the back frame using 1 1/4" pocket hole screws, as shown. Make sure that the pocket holes in the edges of the stiles are pointing outward.
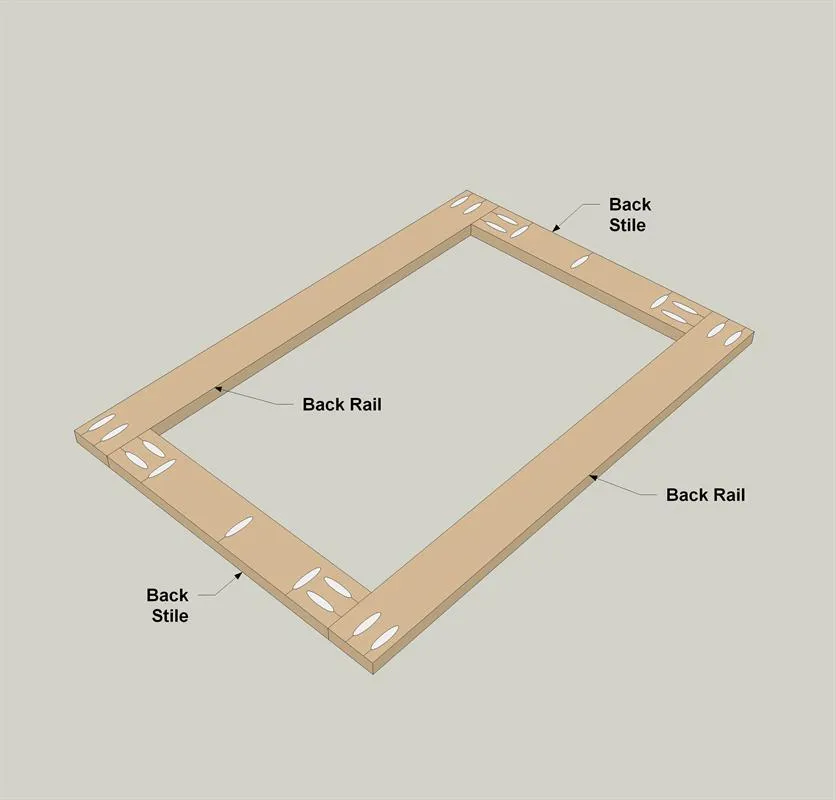
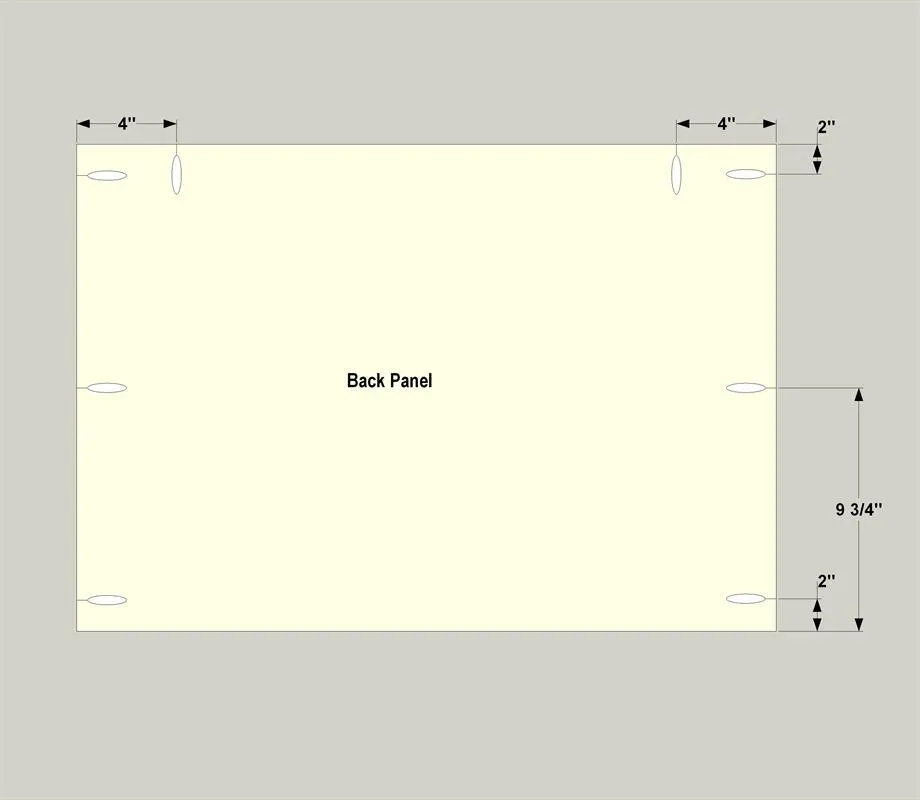
11Make the Back Panel
Cut a Back Panel to size from 3/4"plywood, as shown in the cutting diagram. Then, with your pocket hole jig set for 3/4" stock, drill pocket holes in the Back Panel, as shown.
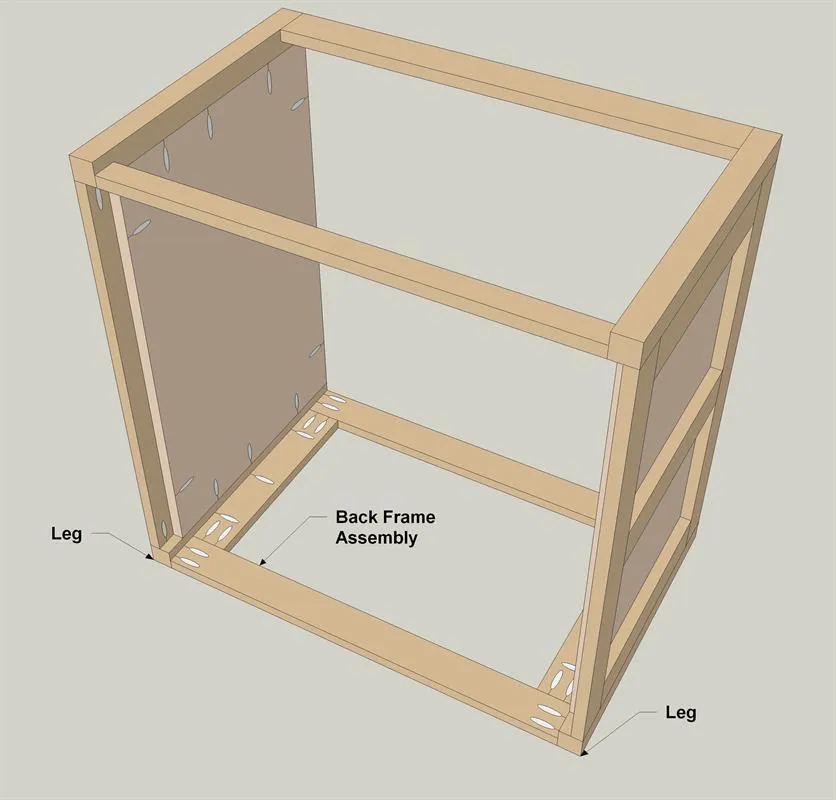
12Attach the Back Frame
Now attach the back frame to the back Legs using glue and 1 1/4" pocket hole screws. The frame sits flush with the outside face of the Legs.
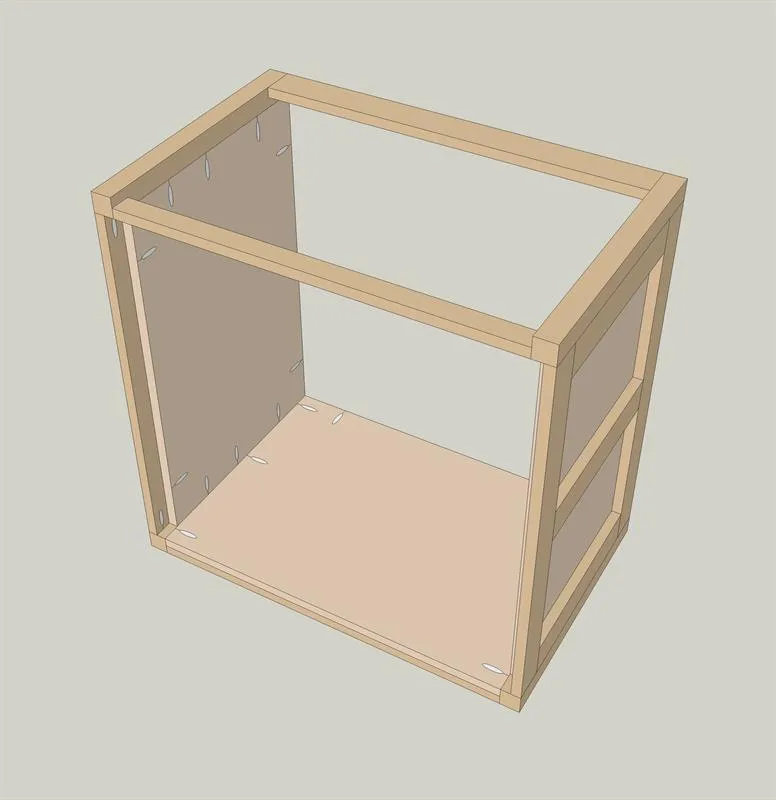
13Mount the Back Panel
Now you can attach the Back Panel. Again, add some glue to the inside faces of the frame parts, and then add the panel by driving 1 1/4" pocket hole screws into the Legs. Don’t worry that this panel is taller than the Side Panels. It’s supposed to be.
14Make a Top Stretcher
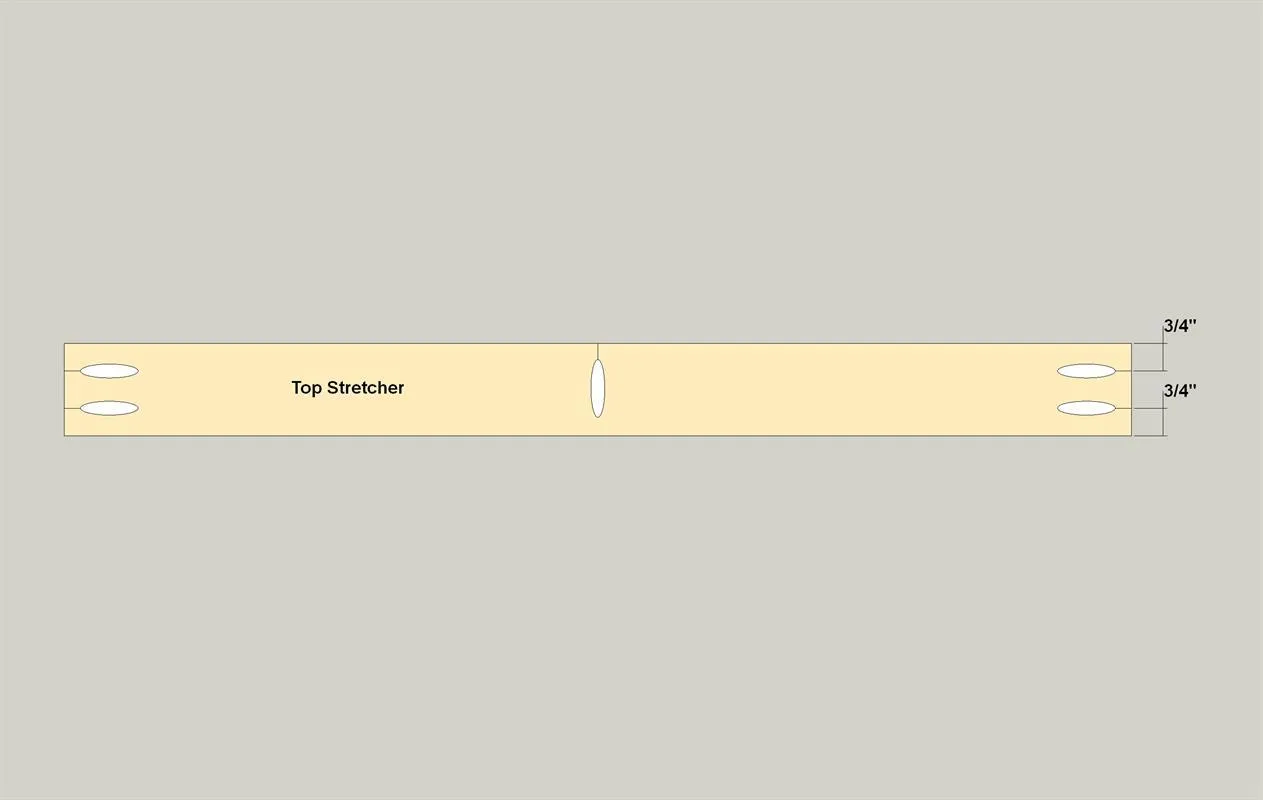
Cut a Top Stretcher to length for each pedestal from a 1x3, as shown in the cutting diagram. Then, with your pocket hole jig set for 3/4" stock, drill pocket holes in the ends of the Top Stretcher, as shown.
15Install the Top Stretcher
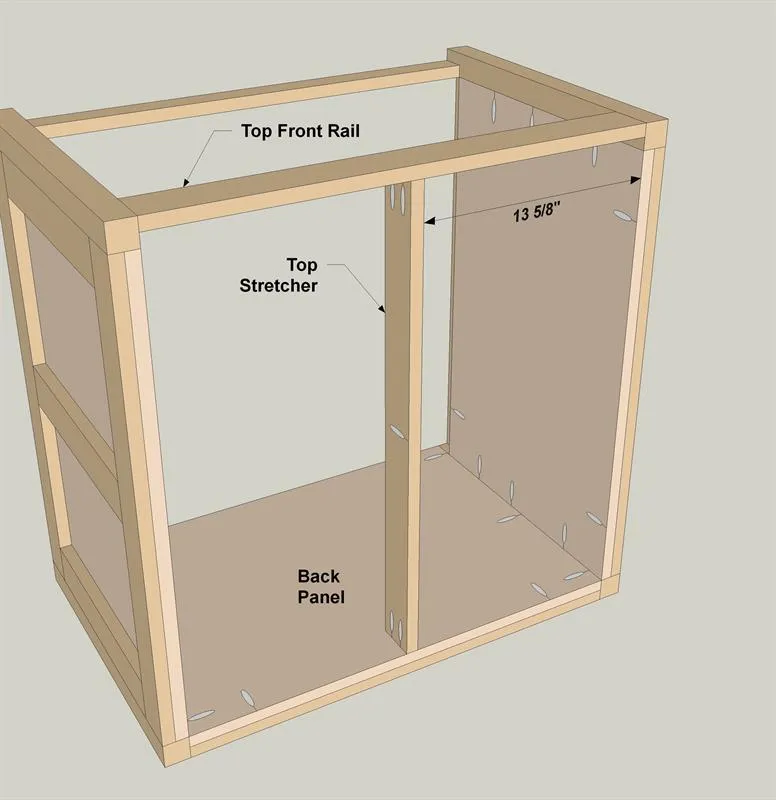
Attach the Top Stretcher, as shown to help stiffen up the assembly and support the pedestal top. Use 1 1/4" pocket hole screws.
16Create the Top Parts
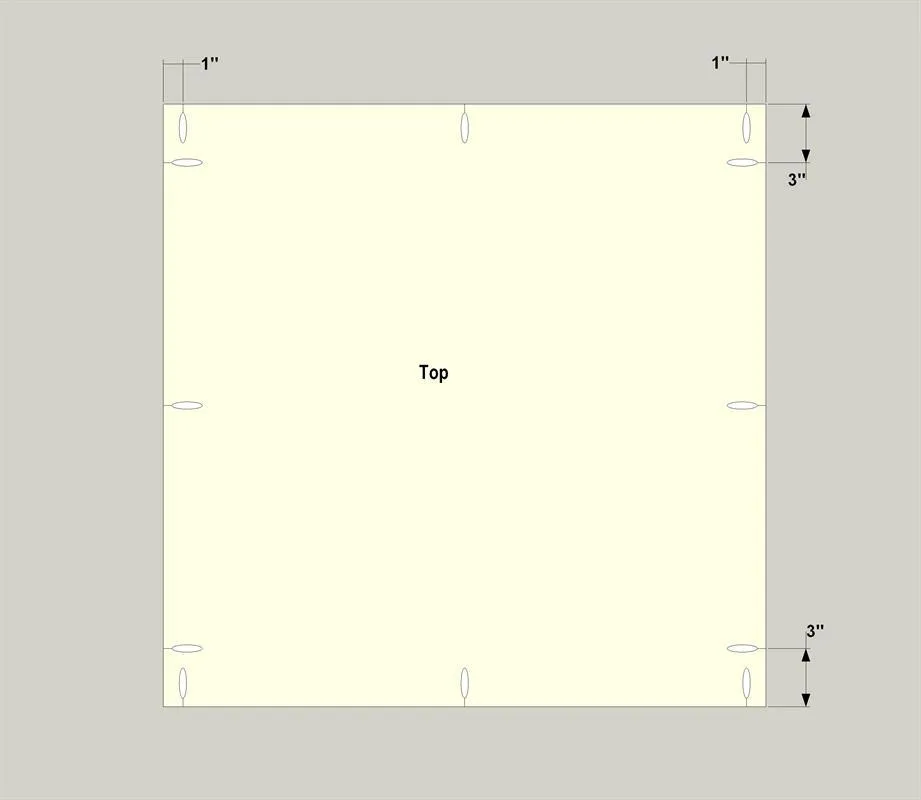
- Cut a Top to size from 3/4"plywood, as shown in the cutting diagram.
- Then, with your pocket hole jig set for 3/4" stock, drill pocket holes in the Top, as shown.
- Also cut Long Top Trim and Short Top Trim, as shown in the cutting diagram.
17Assemble the Top
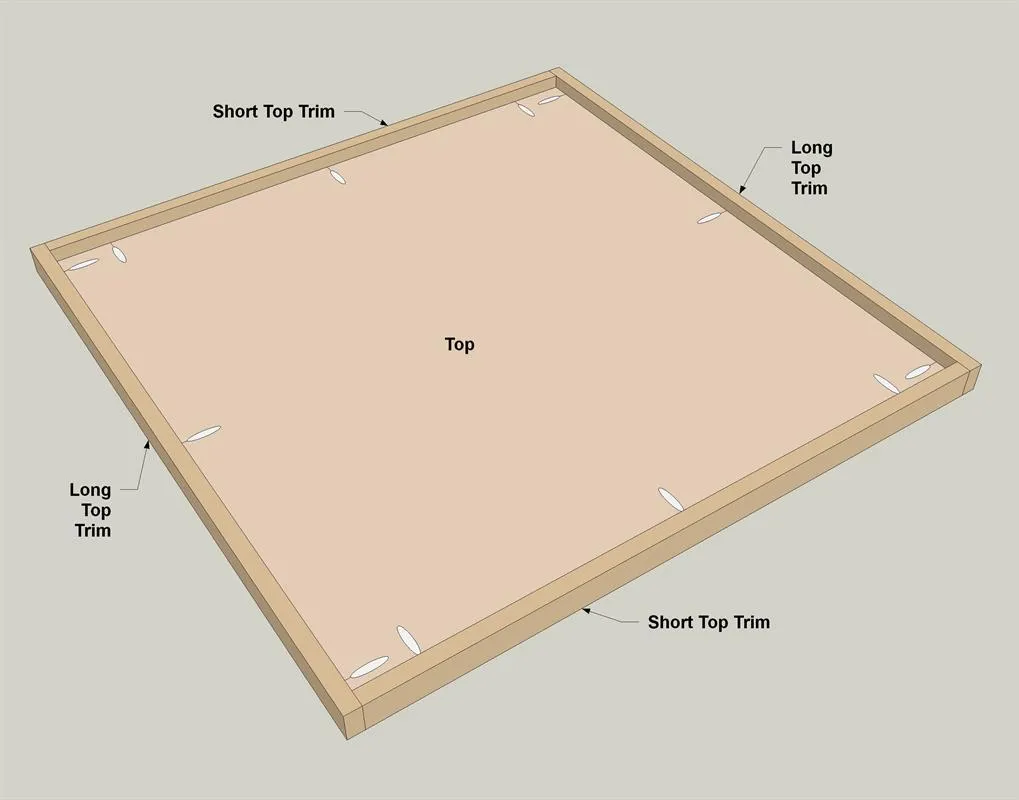
- Now you can attach the Trim pieces to the Top. You don’t need glue here, but adding some will help create a more seamless joint.
- Start by attaching the Short Trim on opposite sides of the Top, making sure the ends are flush.
- Then add the Long Trim. Use 1 1/4" pocket hole screws.
18Attach the Top
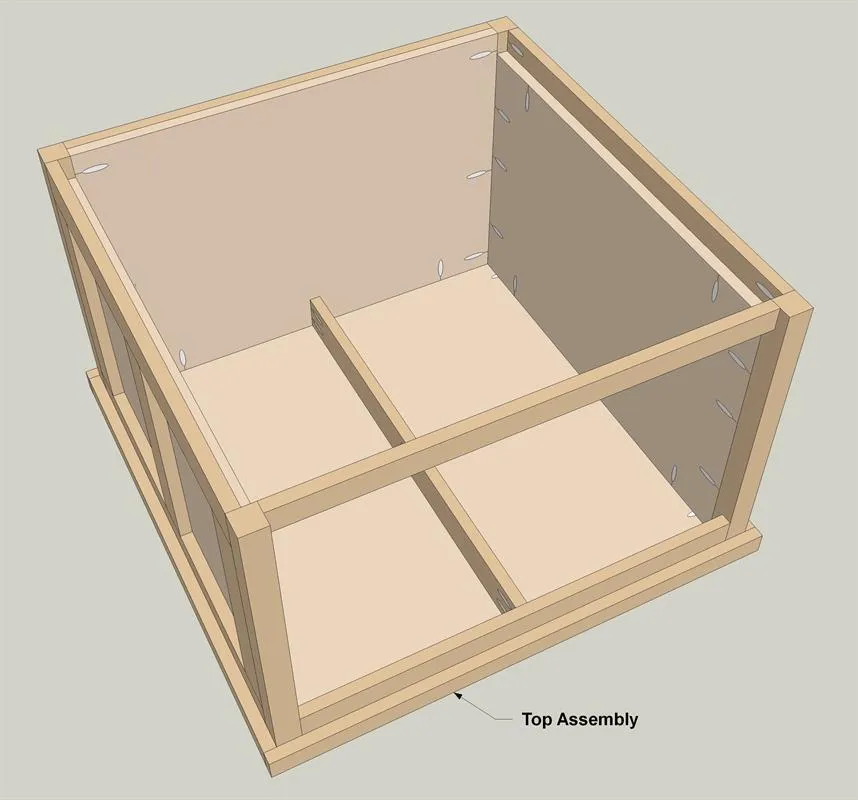
With the Trim on, you can attach the top assembly to the pedestal using 1 1/4" pocket hole screws.
19Create the Bottom
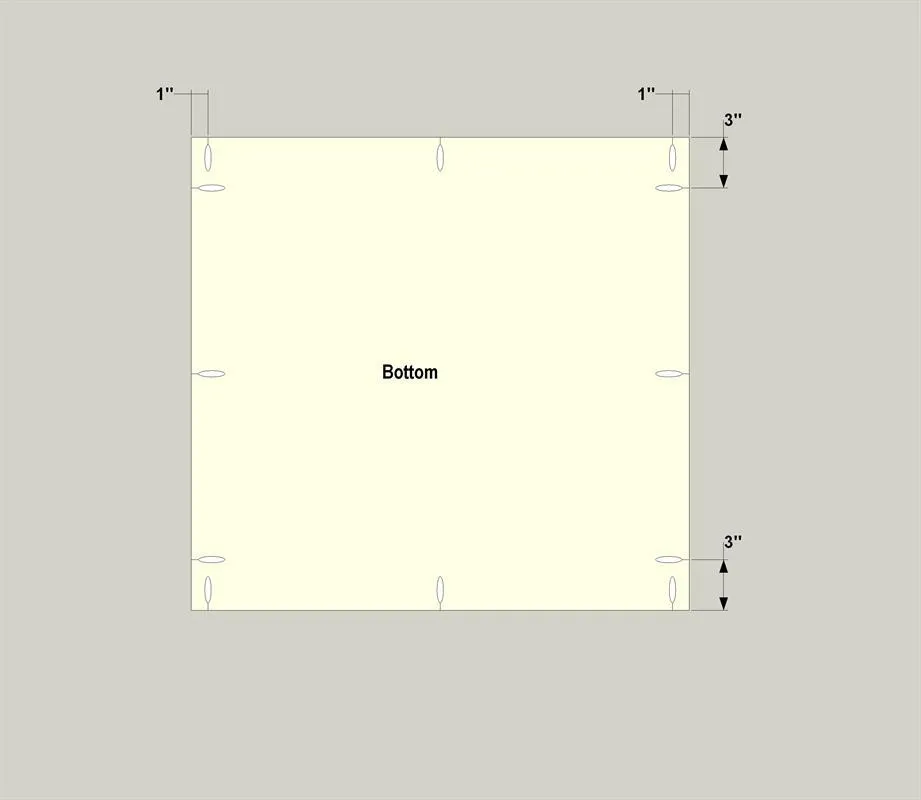
Cut a Bottom to size from 3/4"plywood, as shown in the cutting diagram. Then, with your pocket hole jig set for 3/4" stock, drill pocket holes in the Bottom, as shown.
20Attach the Bottom
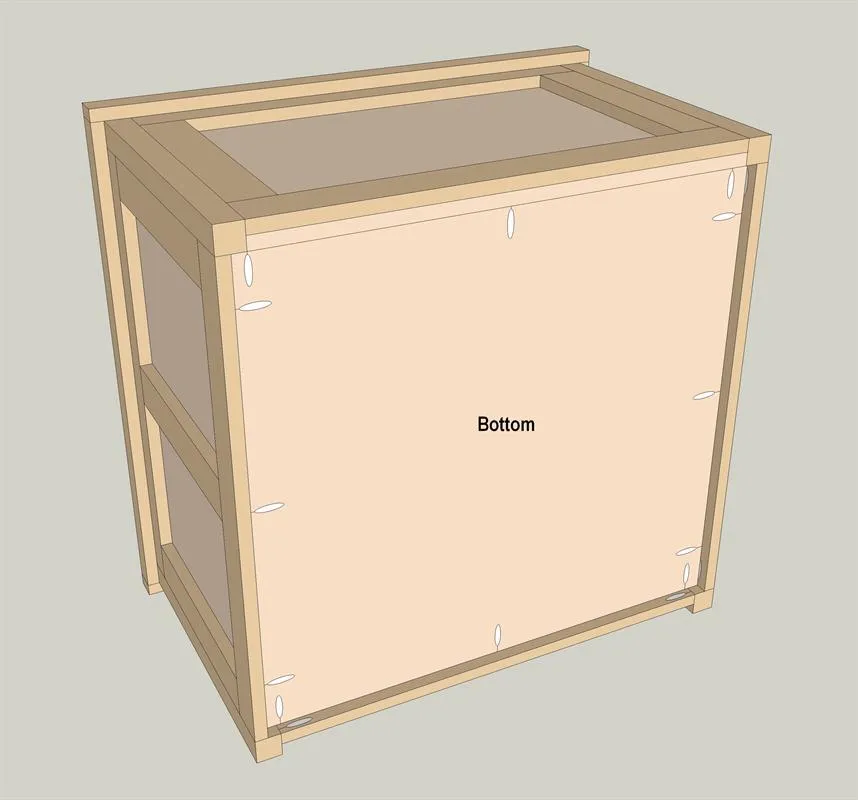
Now attach the bottom to the pedestal, as shown, using 1 1/4" pocket hole screws.
21Create the Drawer Front and Back
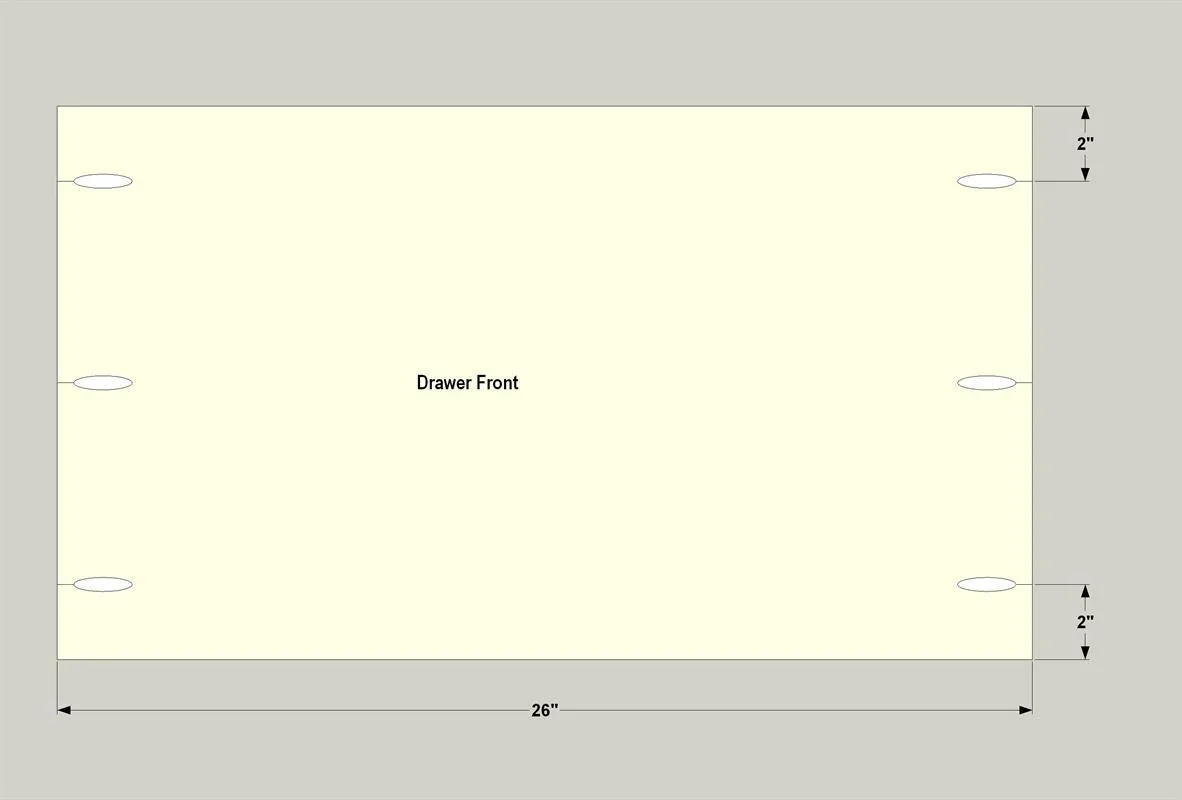
- Cut a one Drawer Front and one Drawer Back to size from 3/4"plywood, as shown in the cutting diagram.
- Then, with your pocket hole jig set for 3/4" stock, drill pocket holes in the Drawer Front, as shown. The Drawer Back doesn’t need holes.
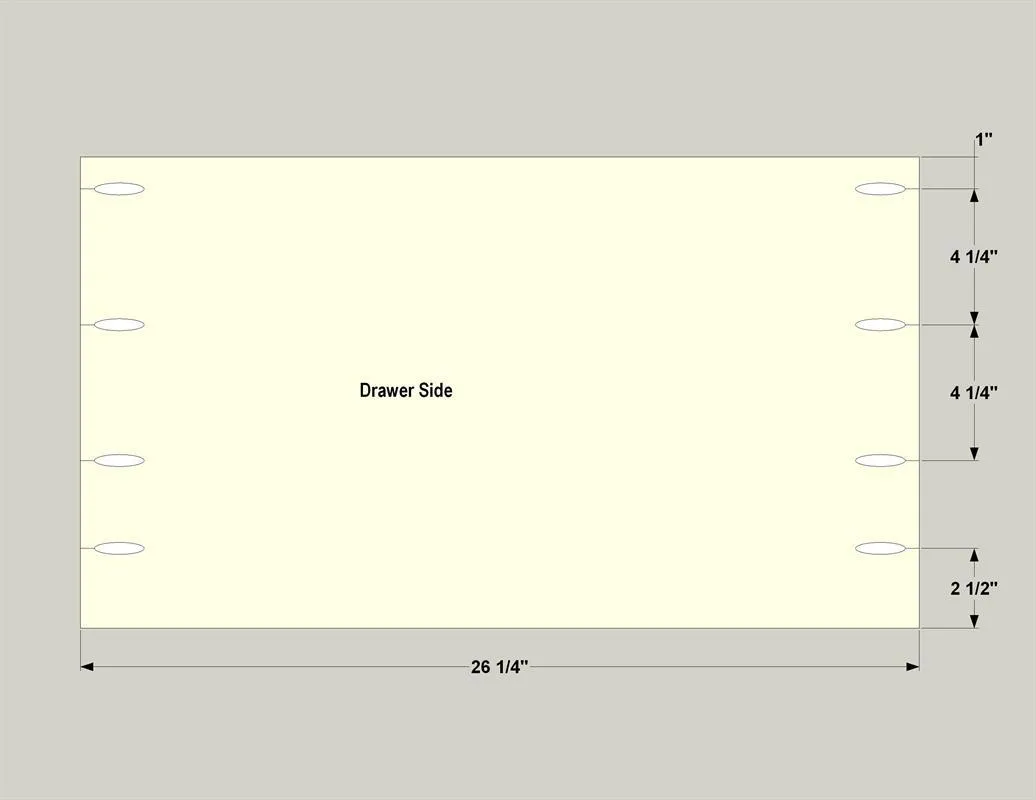
22Create the Drawer Sides
Cut two Drawer Sides to size from 3/4"plywood, as shown in the cutting diagram. Then, with your pocket hole jig set for 3/4" stock, drill pocket holes in these pieces, as shown.
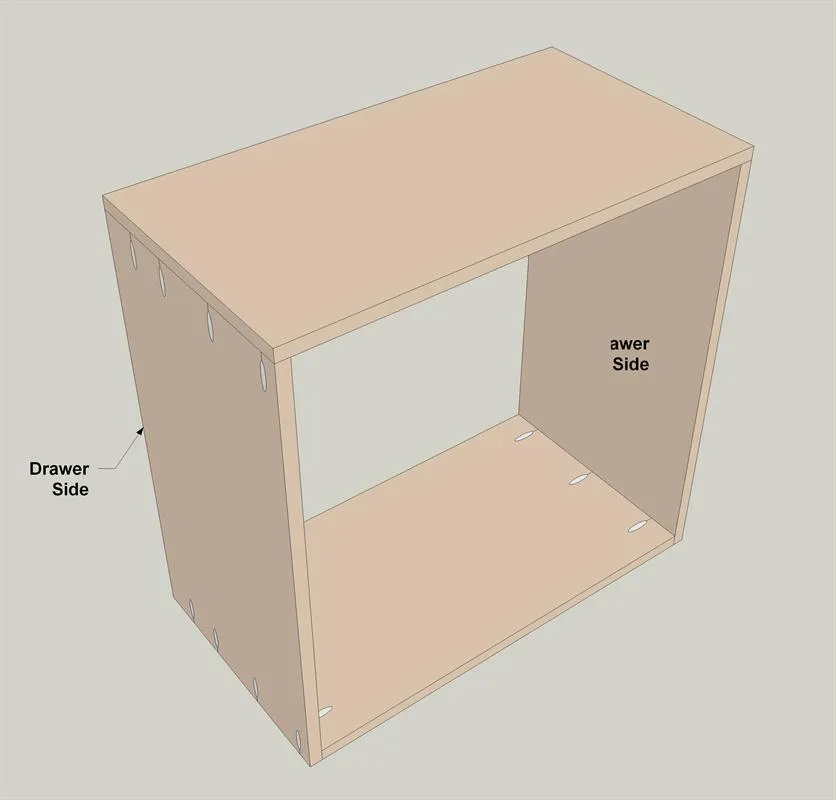
23Assemble the Drawer Box
Now you can assemble the drawer box, as shown, using 1 1/4" pocket hole screws.
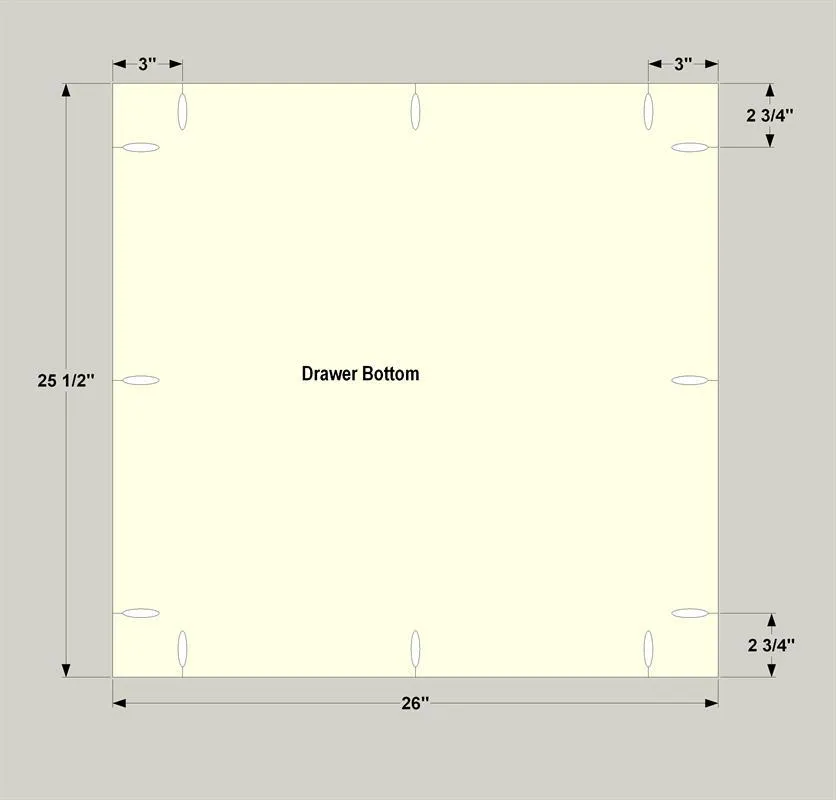
24Create the Drawer Bottom
Cut a Drawer Bottom to size from 3/4"plywood, as shown in the cutting diagram. Then, with your pocket hole jig set for 3/4" stock, drill pocket holes in the Bottom, as shown.
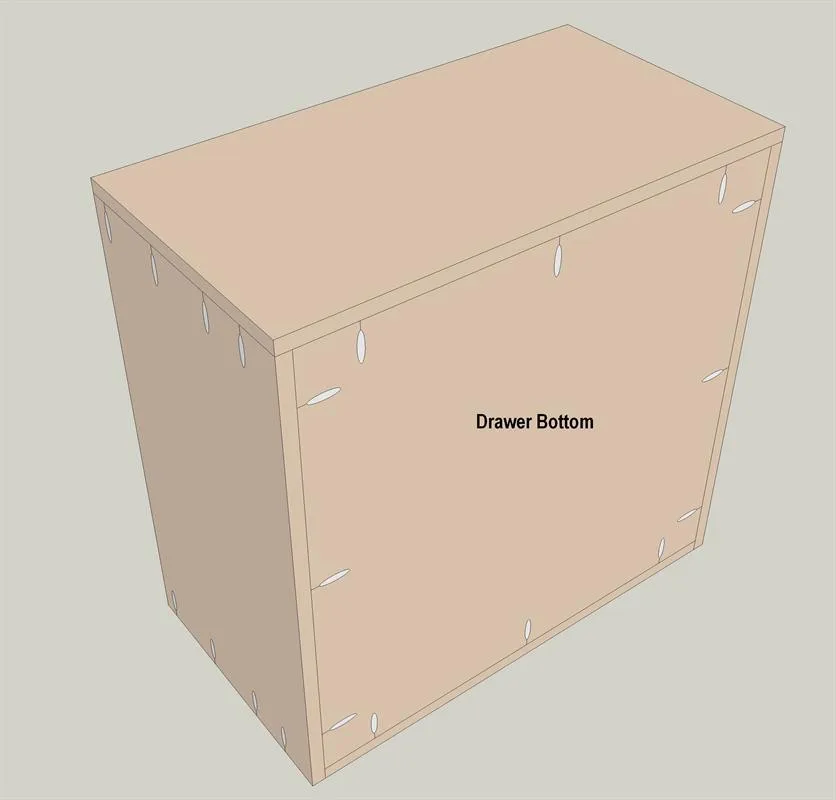
25Install the Drawer Bottom
Now you can attach the Drawer Bottom, as shown, using 1 1/4" pocket hole screws.
26Make the Drawer Frame Parts
- Adding a frame to the drawer dresses it up and makes it match the rest of the pedestal.
- Start the frame by cutting the Drawer Front Top Rail to length from a 1x3 board, and the Drawer Front Bottom Rail from a 1x2 board, as shown in the cutting diagram.
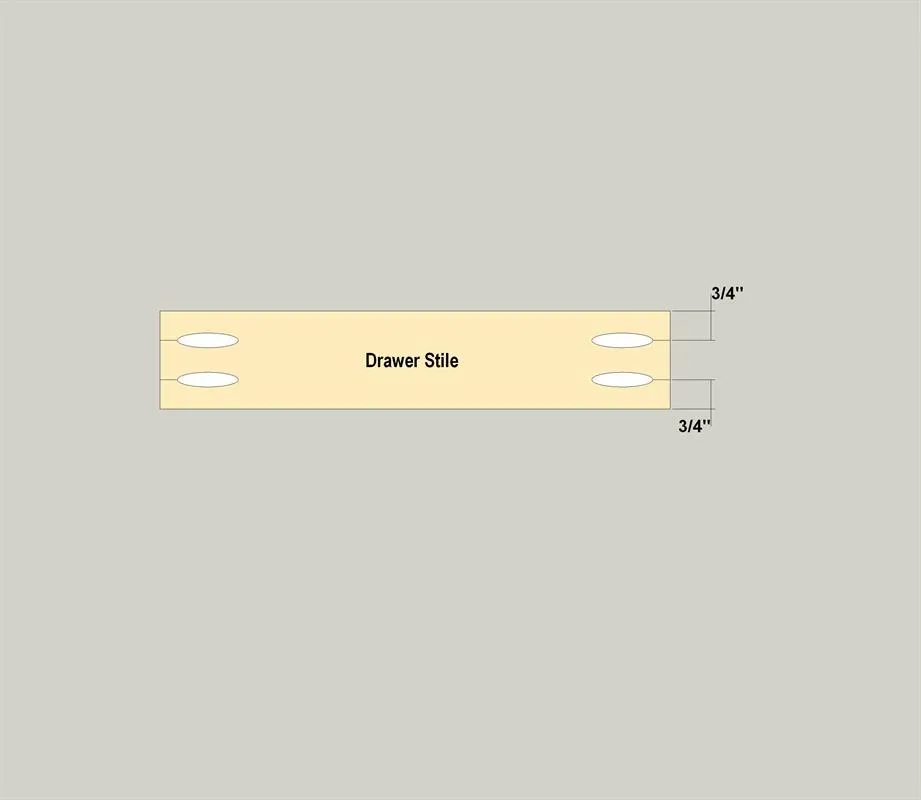
- Now Cut three Drawer Front Stiles to length from a 1x3 board, as shown in the cutting diagram. With your pocket hole jig set for 3/4" stock, drill pocket holes in the Drawer Front Stiles as shown.
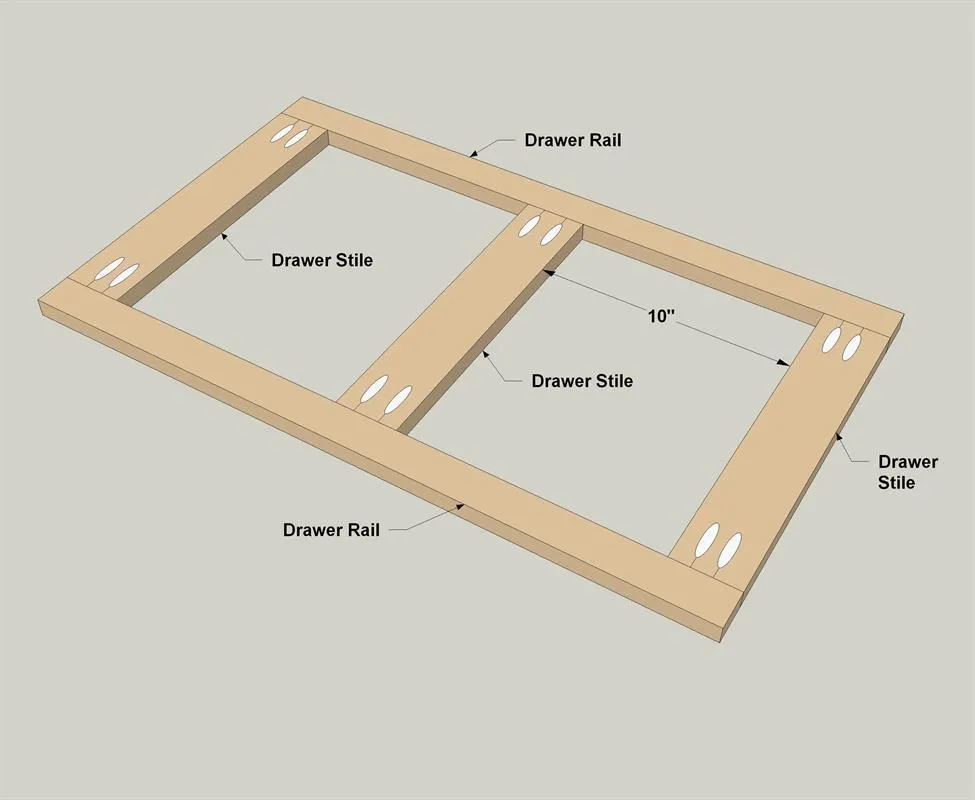
27Assemble the Drawer Frame
Now you can assemble the drawer frame using 1 1/4" pocket hole screws, as shown.
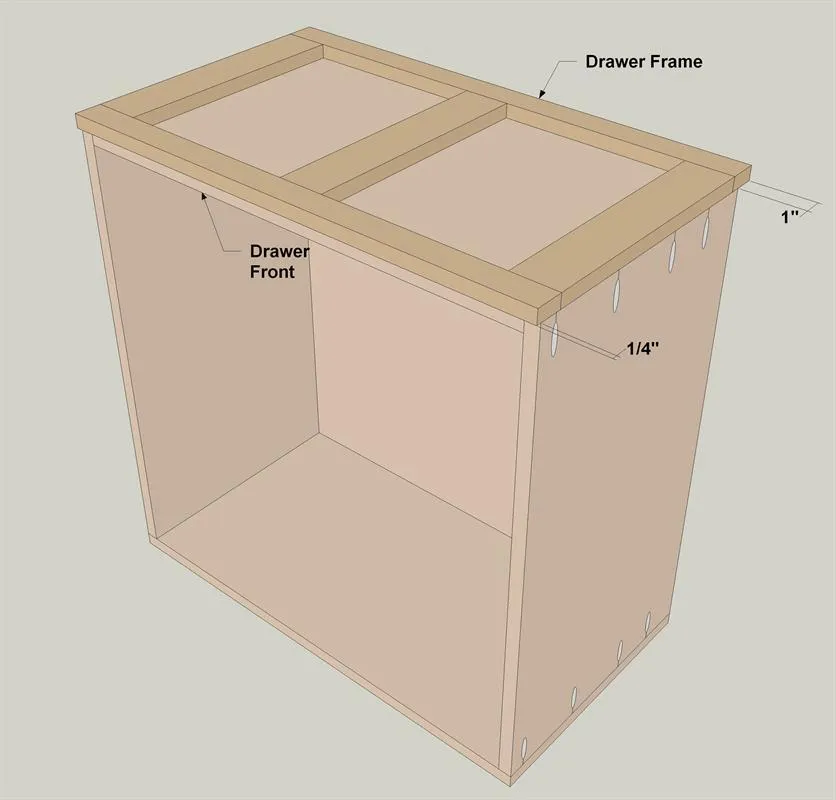
28Attach the Drawer Frame
To complete the drawer construction, attach the drawer frame assembly to the drawer box. Spread some glue on the inside faces of the drawer frame parts, and then attach the frame with 1 1/4" pocket hole screws. Be sure to note that the drawer frame protrudes 1/4" above the Drawer Front at the top, and 1" below at the bottom.
29Add Paint and Drawer Slides
With everything complete, you can paint your pedestals to complement your washer and dryer. Then install drawer slides to mount the drawer using the manufacturers instructions. The drawers are designed for 21" slides that mount underneath the drawer, rather than the type of slides that mount on the side. Be sure you get the right type when purchasing.
30Under-mount Drawer Glides
This project was designed with under-mount slides in mind, so the size of the drawer is larger than when using typical side mount drawer glides. Find the Amazon link under the Extras tab To size the drawer for standard side mount drawer glides, use the following: Drawer Front & Back - 3/4" x 14 3/4" x XXX Drawer Bottom - 3/4" x 14 3/4" x XXX