 Notch
Traditional Coffee Table with Storage
Step-by-step build — 21 steps. Also available as a print sheet.
1Make the Legs
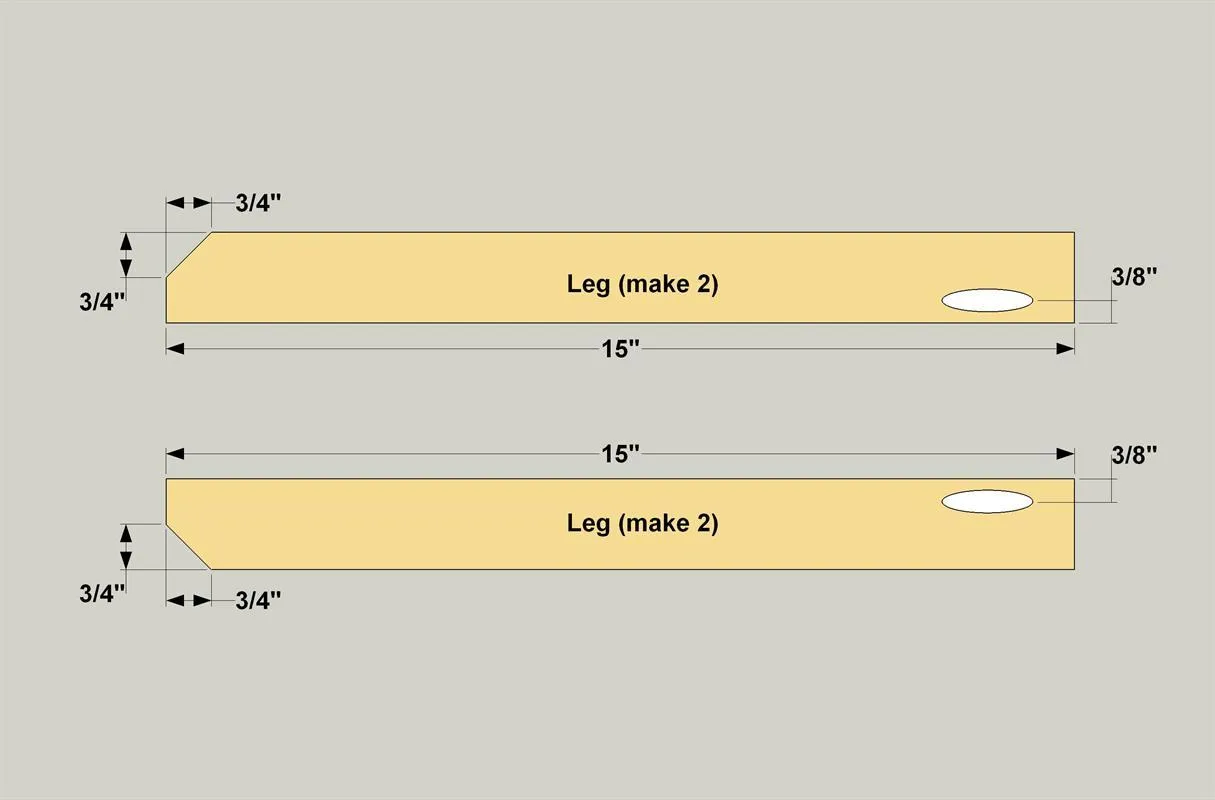
- Cut four Legs to size from a 2x2 board, as shown in the cutting diagram.
- Cut the angle, as shown, at the bottom of each Leg.
- Then sand the cut edges smooth. With your pocket-hole jig set up for 3/4" material, drill pocket holes in the Legs, creating two matched pairs of legs, as shown.
2Make End Aprons and Shelf Rails
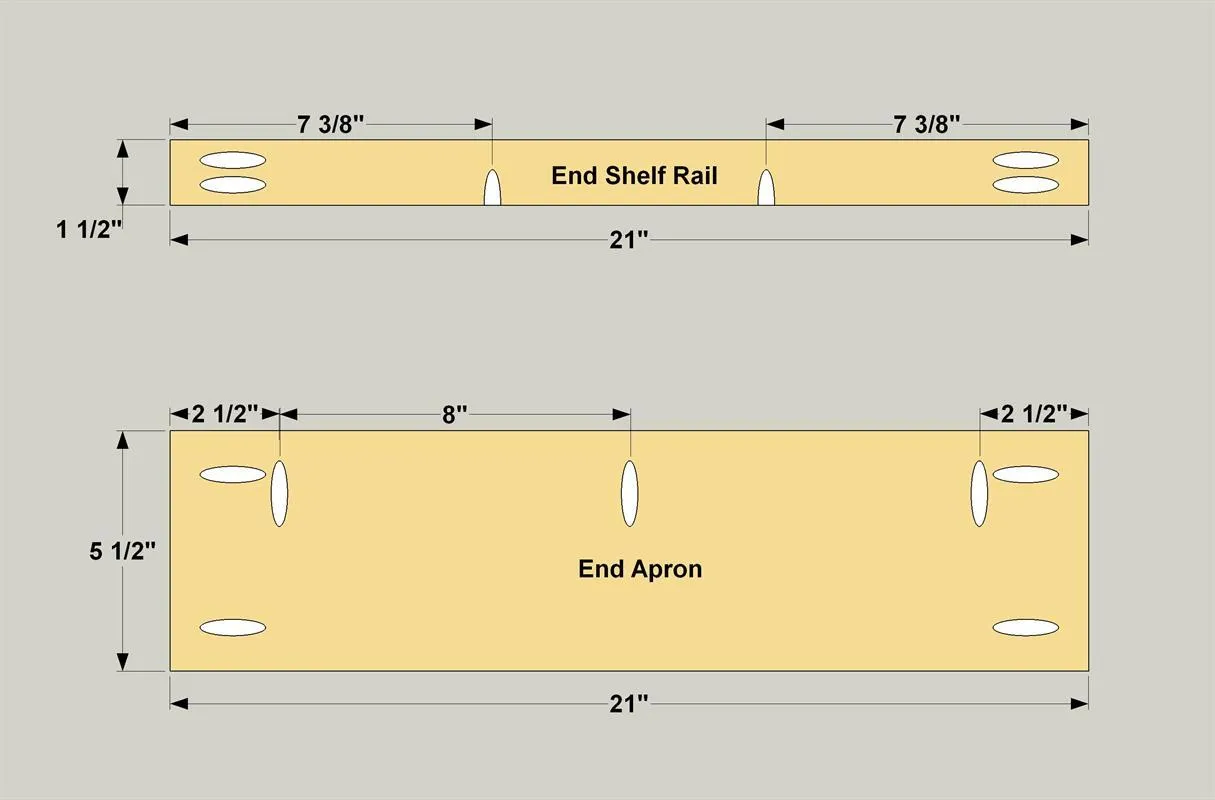
- Cut two End Aprons to length from 1x6 boards, as shown in the cutting diagram.
- Then cut two End Shelf Rails from a 1x2 board. With your pocket-hole jig set up for 3/4" material, drill pocket holes in the Aprons and Rails, as shown.
3Assemble the Ends
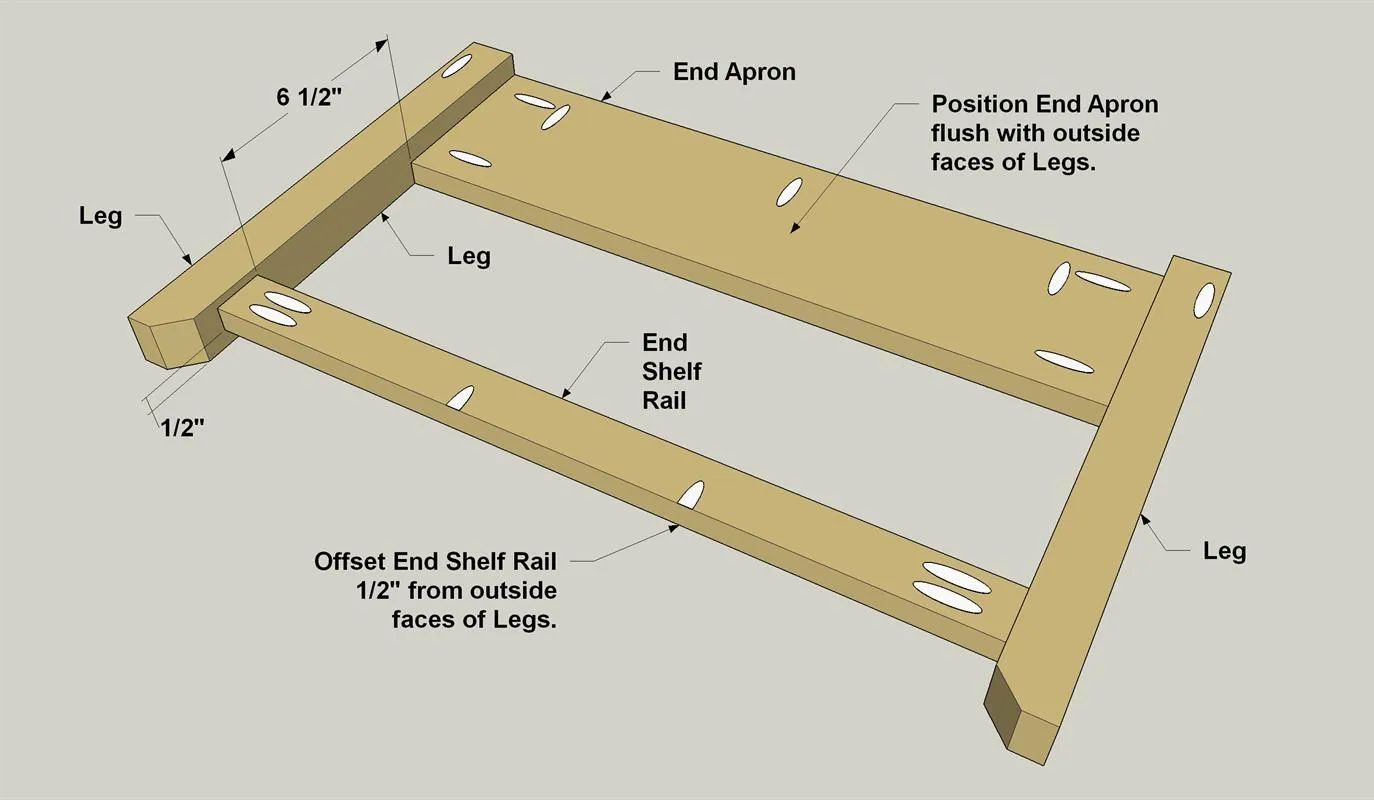
Assemble the Legs, End Aprons, and End Shelf Rails, as shown, using 1 1/4" fine-thread pocket hole screws. Make sure to position the End Shelf Rails so they are inset by 1/2", as shown.
4Make Front and Back Aprons
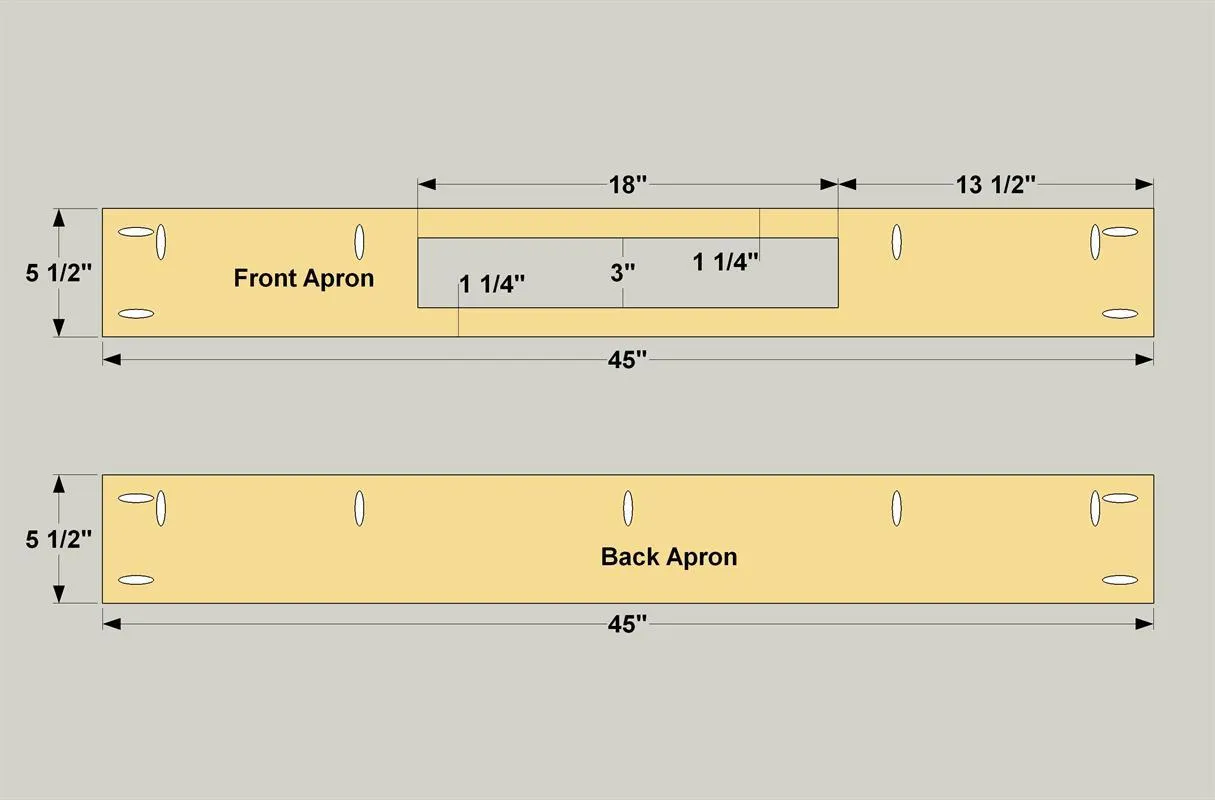
- Cut one Front Apron and one Back Apron to length from a 1x6 board, as shown in the cutting diagram.
- Next, lay out the drawer opening in the Front Apron.
- Cut it by drilling holes at the corners, and then cutting along the layout lines with a jigsaw.
- Then sand the cut edges smooth. With that done, and with your pocket hole jig set up for 3/4" material, drill pocket holes where shown.
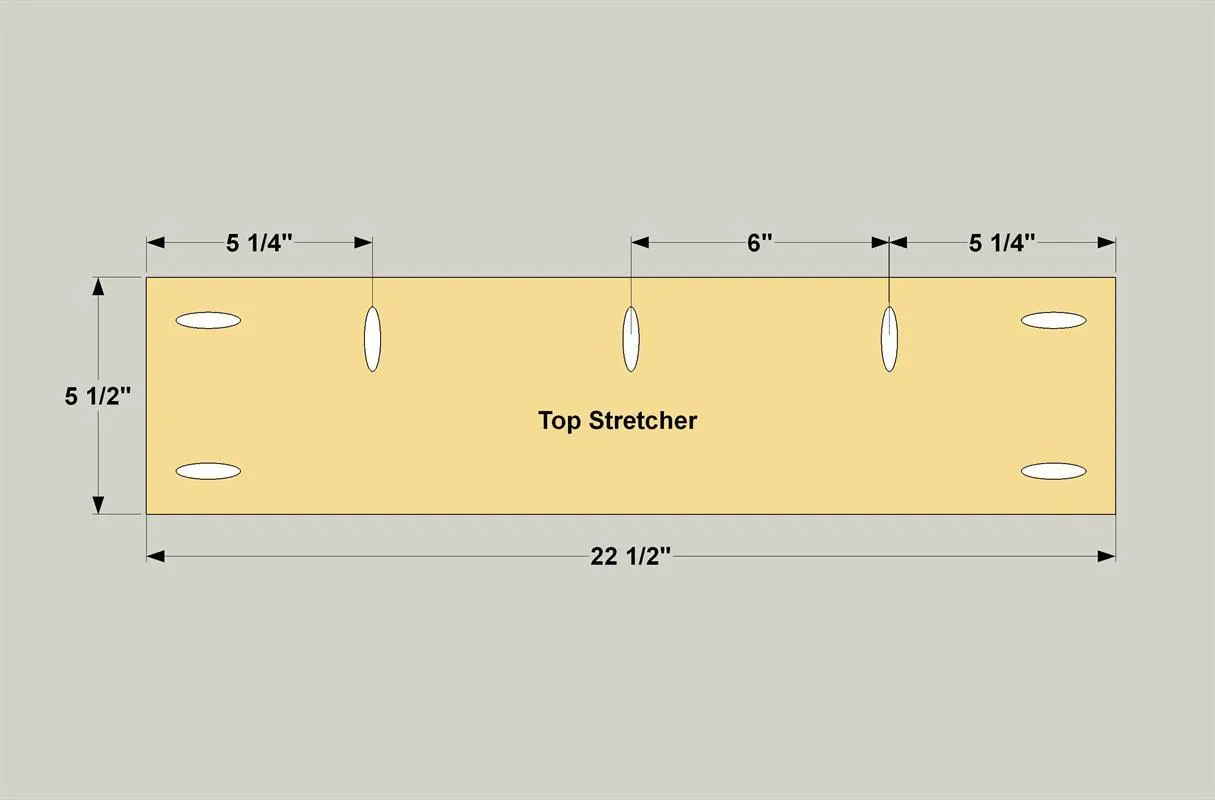
5Make Top Stretchers
Cut two Top Stretchers to length from 1x6 boards, as shown in the cutting diagram. With your pocket hole jig set up for 3/4" material, drill pocket holes where shown.
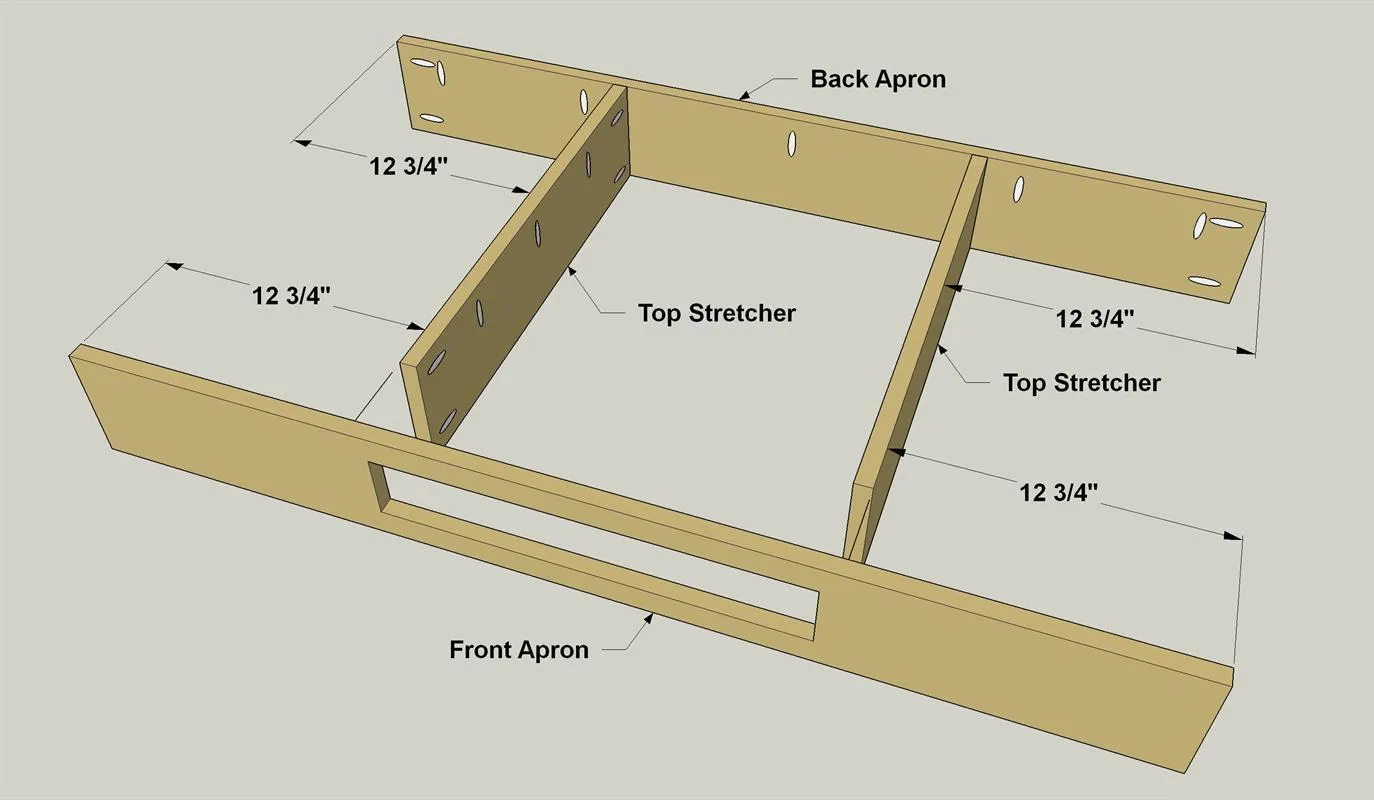
6Assemble the Aprons and Stretchers
Attach the Top Stretchers to the Front Apron and Back Apron, as shown, using 1 1/4" fine-thread pocket hole screws. Make that the pocket holes in the pieces are all oriented in the correct direction.
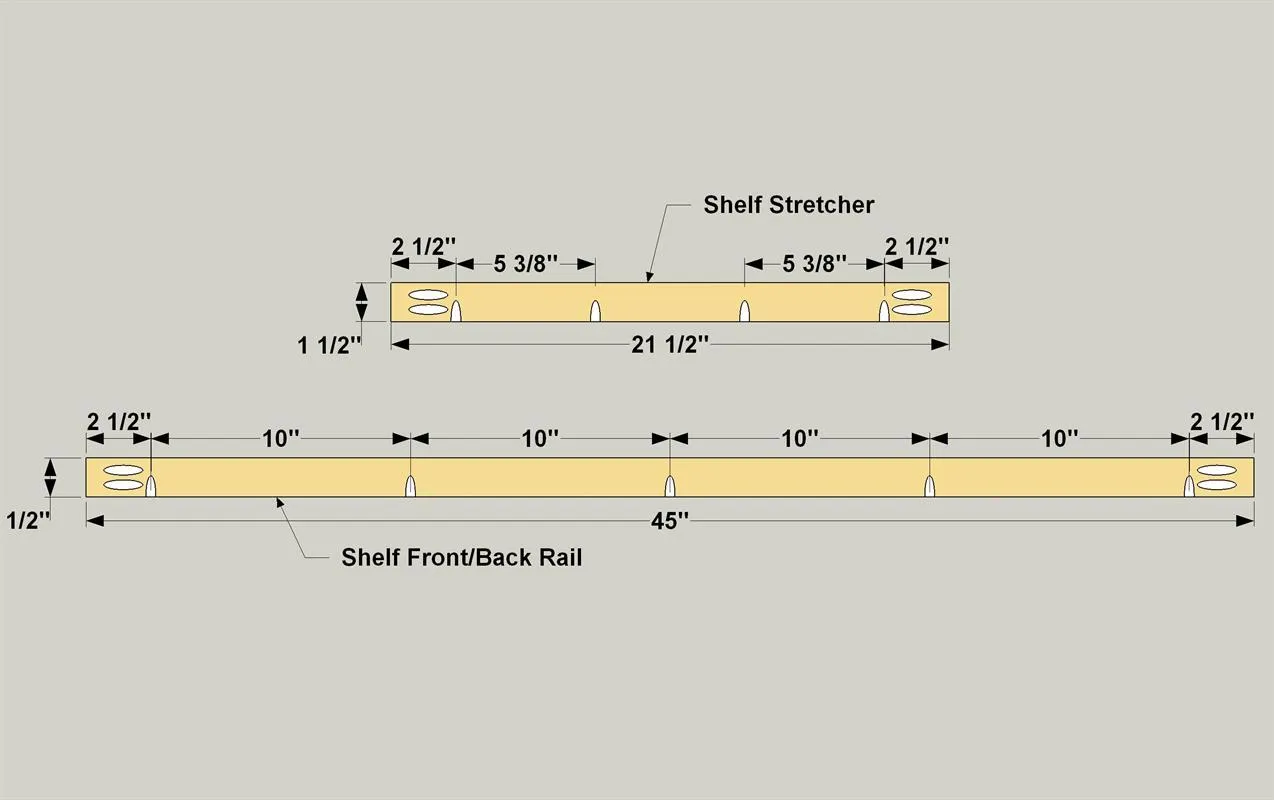
7Make Shelf Rails and Stretchers
Cut two Shelf Stretchers, one Shelf Front Rail and one Shelf Back Rail to length from 1x2 boards, as shown in the cutting diagram. With your pocket hole jig set up for 3/4" material, drill pocket holes where shown.
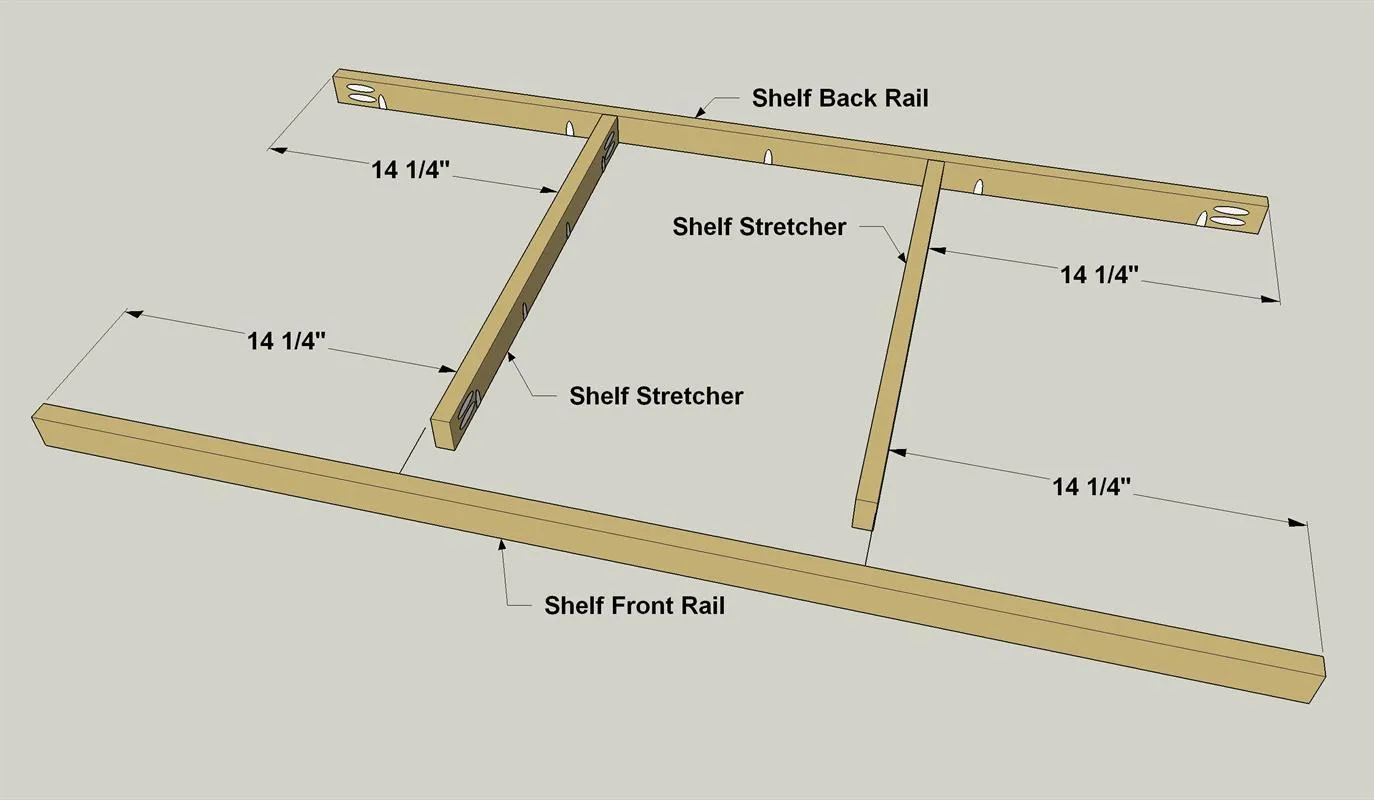
8Assemble the Rails and Stretchers
Attach the Shelf Stretchers to the Front Shelf Rail and Back Shelf Rail, as shown, using 1 1/4" fine-thread pocket hole screws. Make that the pocket holes in the pieces are all oriented in the correct direction.
9Make the Shelf Slats
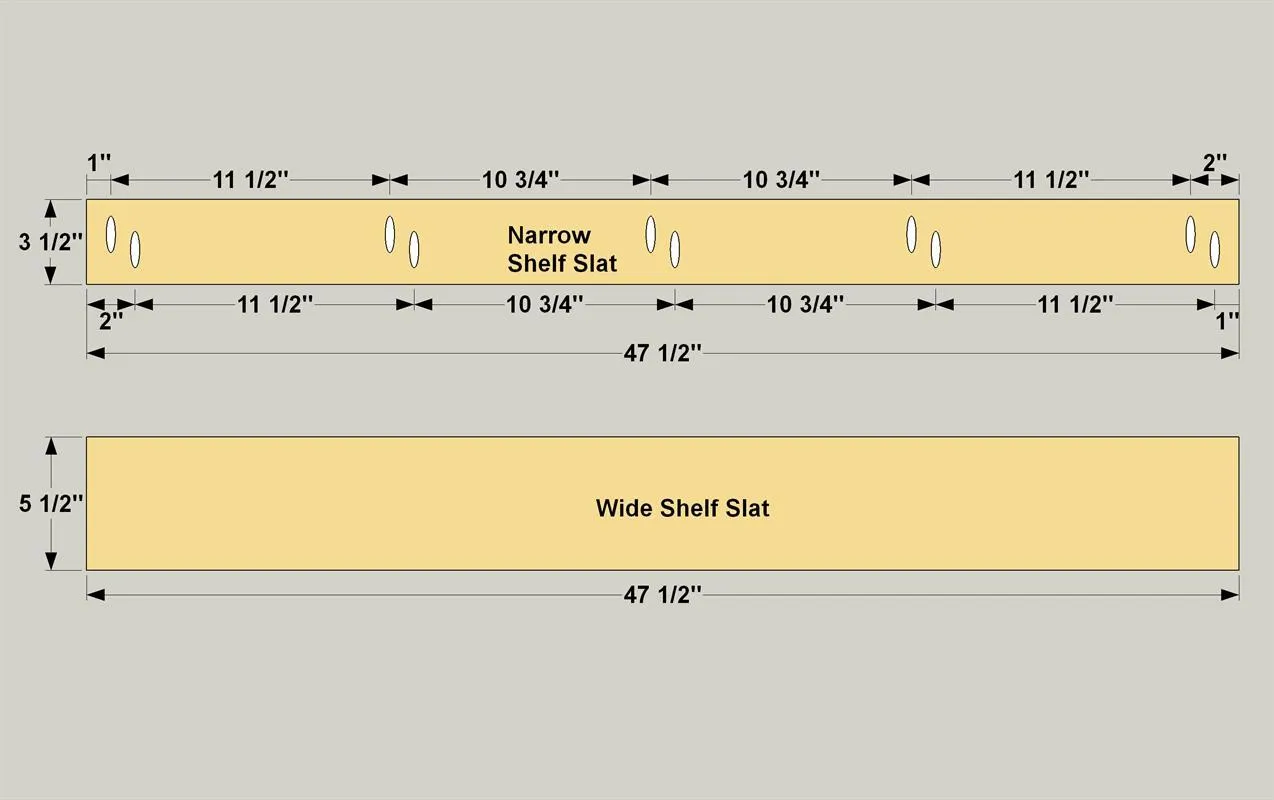
- Cut three Wide Shelf Slats to length from 1x6 boards, as shown in the cutting diagram.
- Then cut two Narrow Shelf Slats from a 1x4 board, as shown in the cutting diagram. With your pocket hole jig set up for 3/4" material, drill pocket holes in the Narrow Shelf Slats, where shown.
10Assemble the Shelf
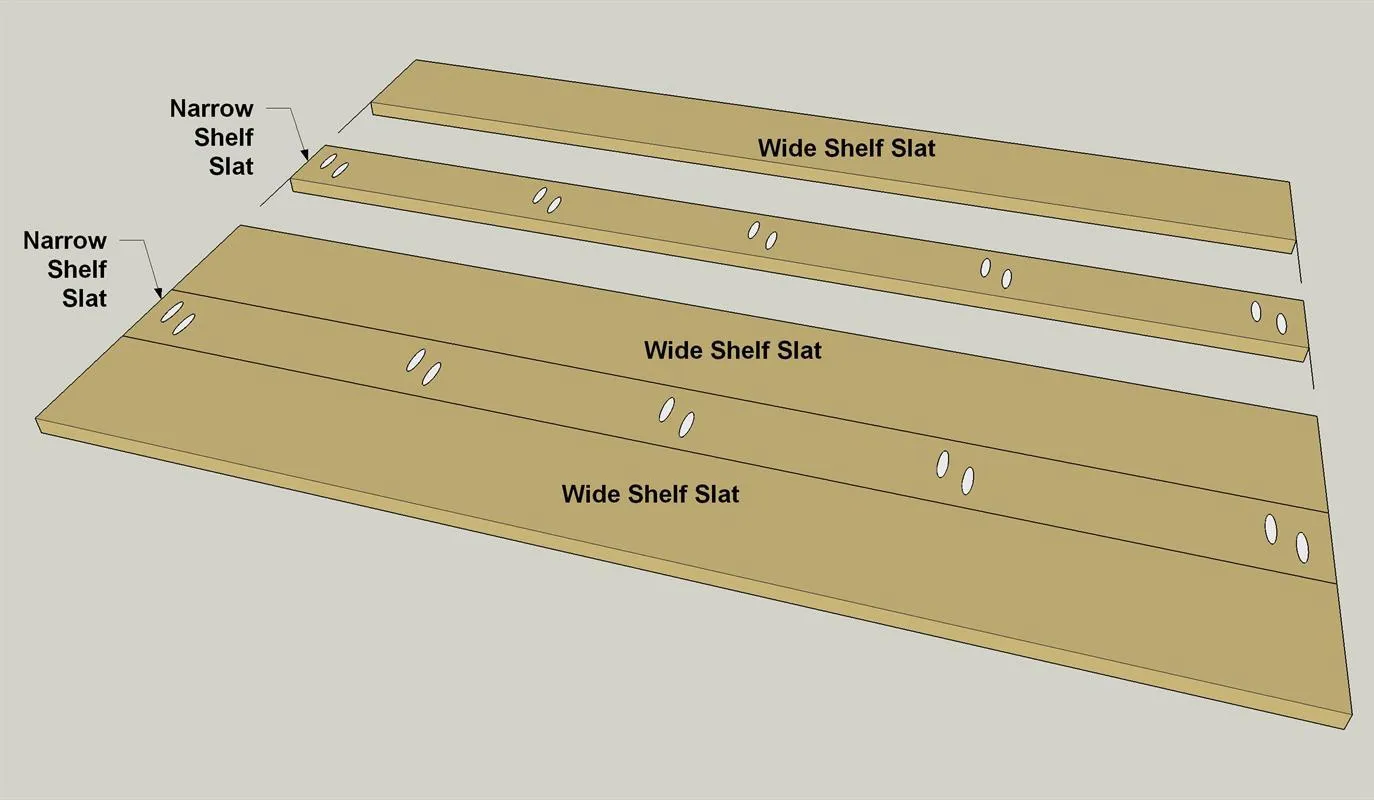
- Now you can assemble the shelf using glue and 1 1/4" fine-thread pocket hole screws.
- Align the boards carefully, and drive in the screws to hold the boards while the glue dries. After the glue sets, sand the shelf smooth.
11Notch and Rout the Shelf
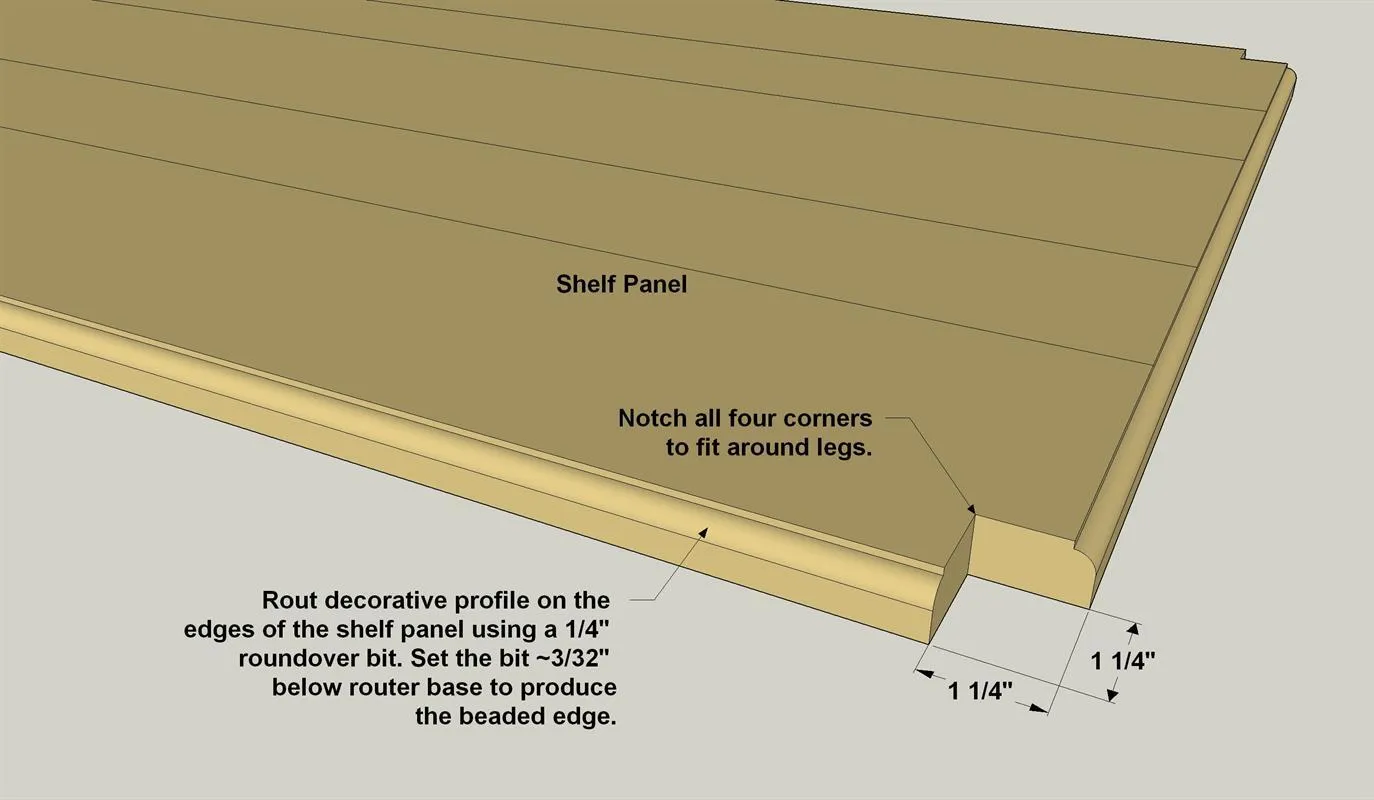
- Now you can lay out the notch at each corner of the shelf. These will allow the shelf to fit around the Legs.
- Cut the notches with a jigsaw, and then sand the cut edges smooth.
- Now you can add the decorative profile, if you’d like. It’s made using a 1/4" roundover bit in a router.
12Assemble the Base
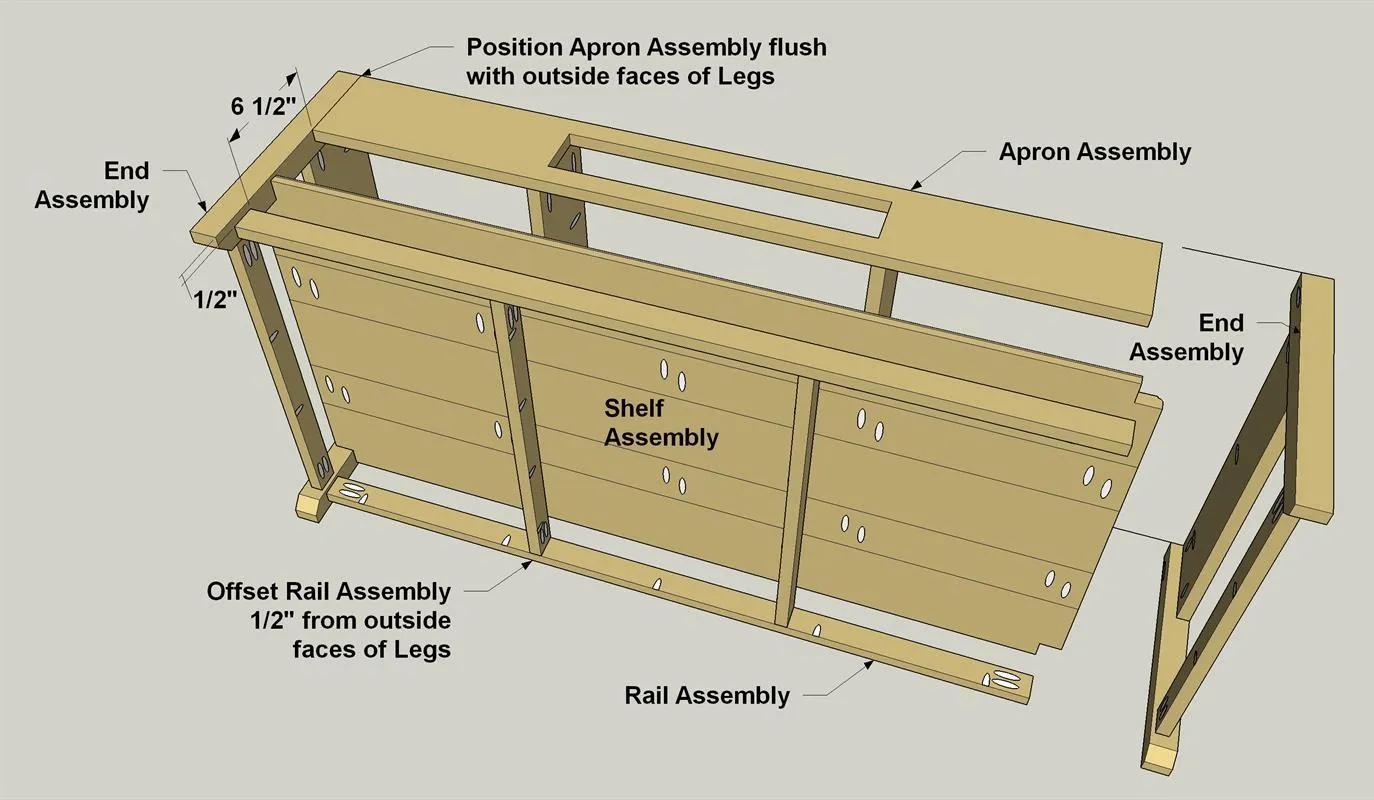
- Now you can assemble the base using 1 1/4" fine-thread pocket hole screws.
- Start by attaching the apron assembly to one end assembly.
- Then add the shelf rail assembly.
- Now slide the shelf in place.
- Then, attach the other end assembly.
- Finally, secure the shelf in place.
13Make the Top Slats
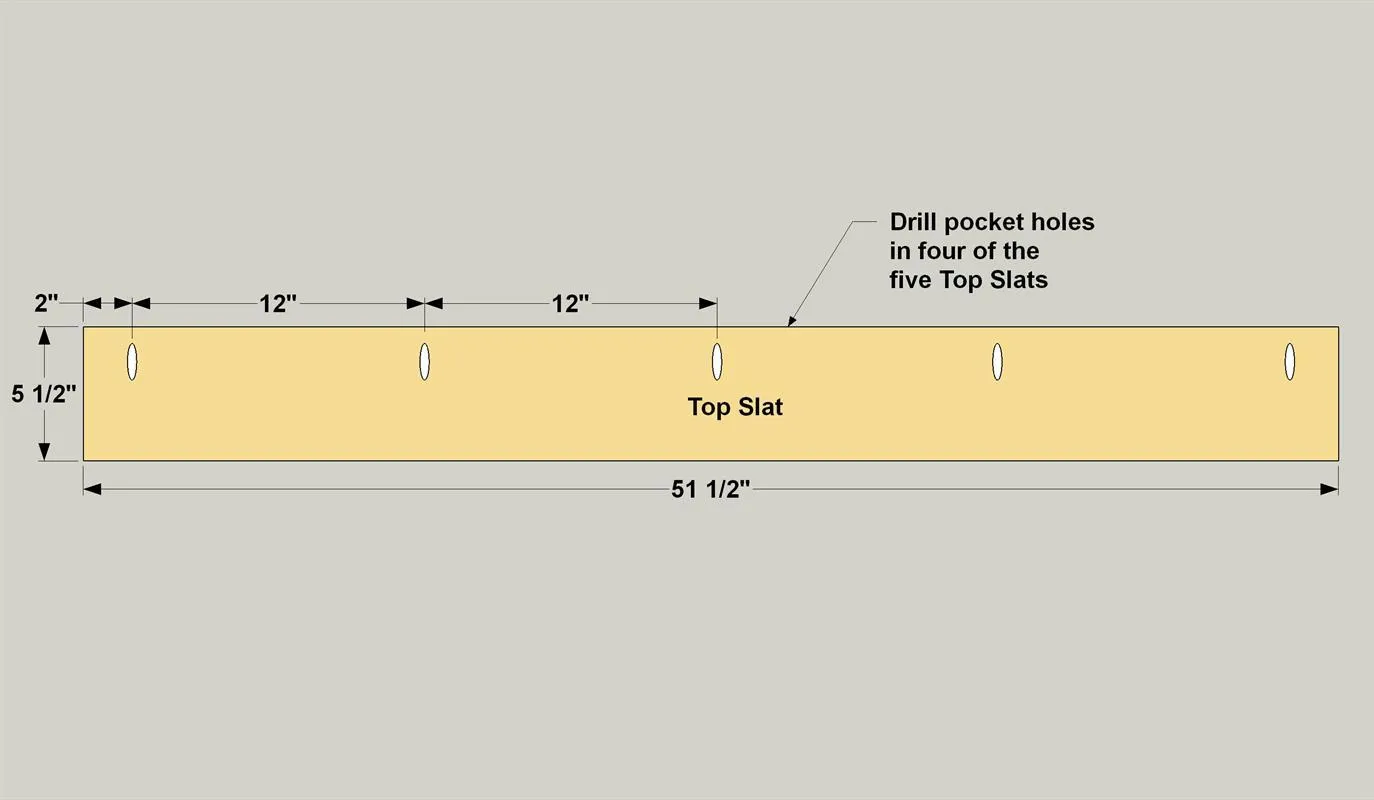
Cut five Top Slats to length from 1x6 boards, as shown in the cutting diagram. With your pocket hole jig set up for 3/4" material, drill pocket holes in four of the five Top Slats, as shown.
14Assemble the Top
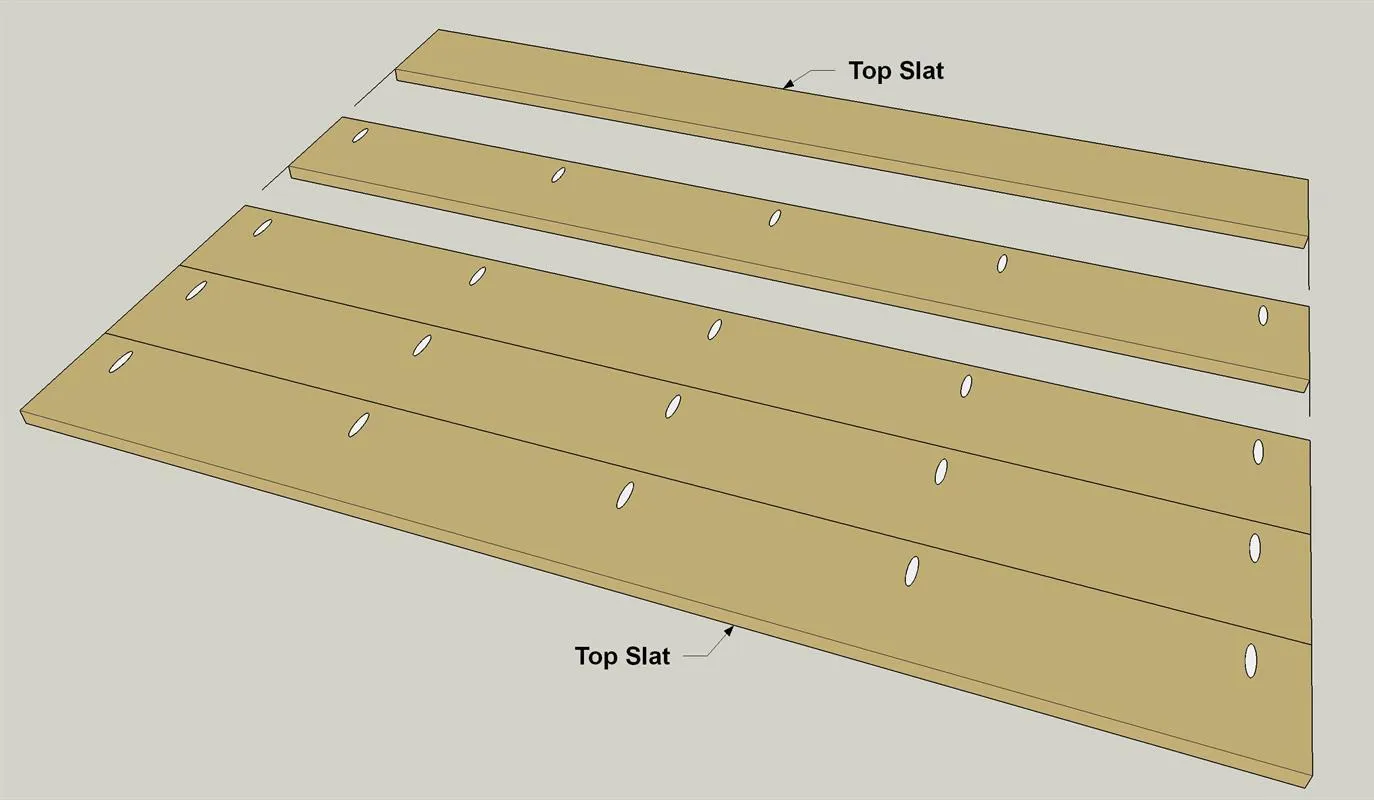
- Now you can assemble the top using glue and 1 1/4" fine-thread pocket hole screws.
- Align the boards carefully, and drive in the screws to hold the boards while the glue dries. After the glue sets, sand the top smooth.
15Rout the Top Edges
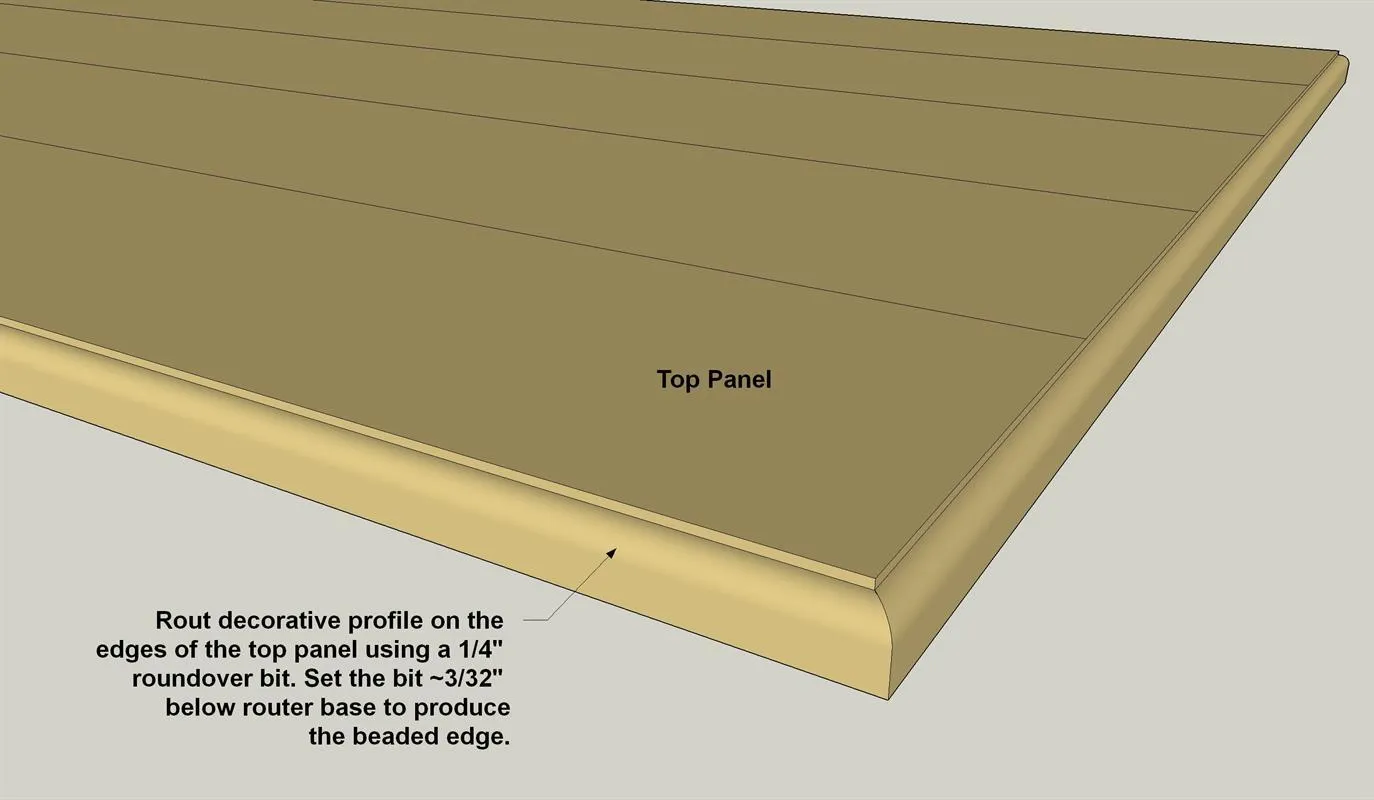
Now you can add the decorative profile around the top, if you’d like. It’s made using a 1/4" roundover bit in a router, just like the shelf.
16Attach the Top
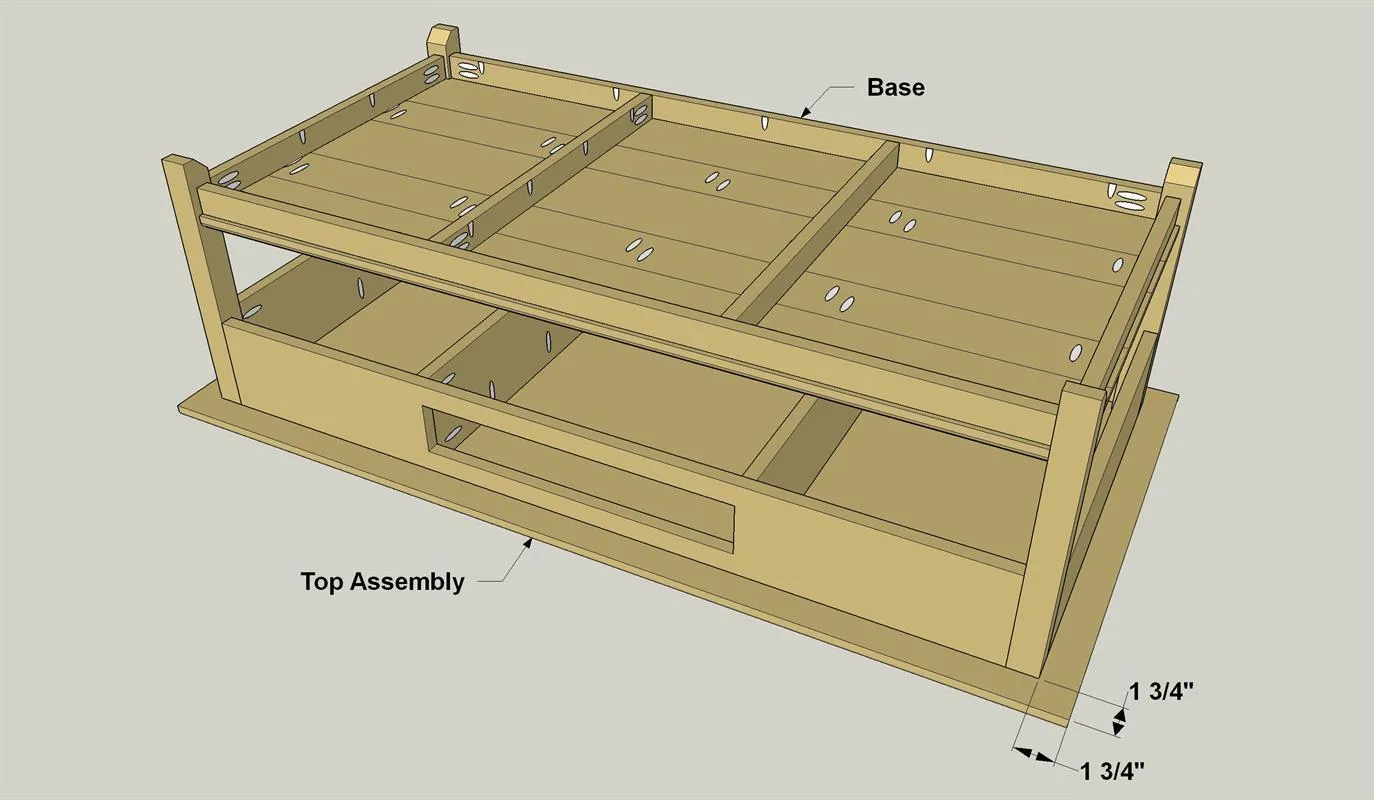
Attach the top to the table base using 1 1/4" fine-thread pocket hole screws. Make sure that the top is positioned so it overhangs the base evenly, as shown.
17Make the Drawer Box Parts
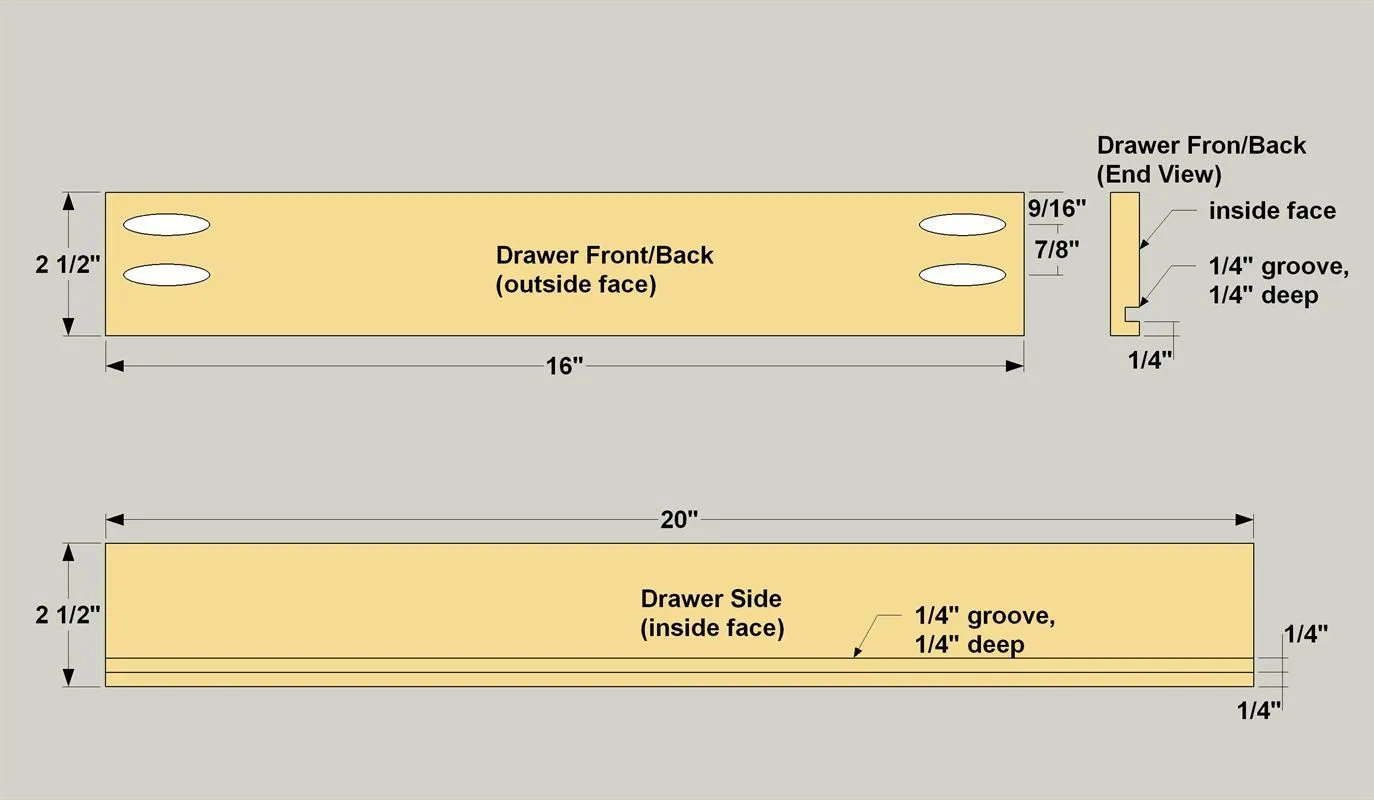
- Cut two Drawer Sides, one Drawer Front, and one Drawer Back to length from a 1/2" x 3" (2 1/2" actual width) board, as shown in the cutting diagram.
- Then, using a router, a 1/4" straight bit, and an edge guide, rout a 1/4" wide groove 1/4" deep in each off the pieces, as shown. With that done, set up your pocket hole jig and bit for 1/2" material, and drill pocket holes in the Drawer Front and Drawer Back, as shown.
- Also cut a Drawer Bottom to size from 1/4" plywood, as shown in the cutting diagram.
18Make the False Front
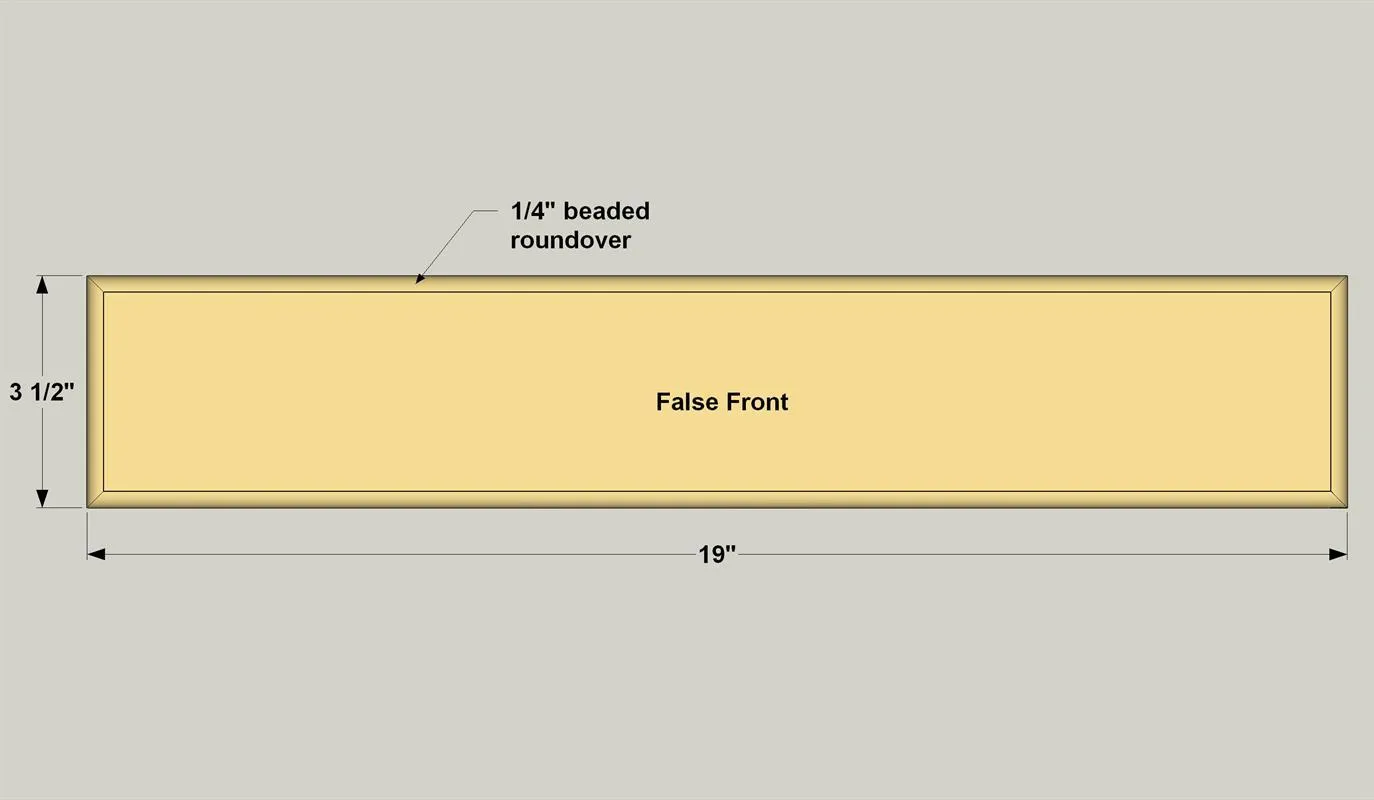
- Cut a False Front to length from a 1x4 board, as shown in the cutting diagram.
- Then you can add the decorative profile around the False Front, if you’d like. It’s made using a 1/4" roundover bit in a router.
19Assemble the Drawer
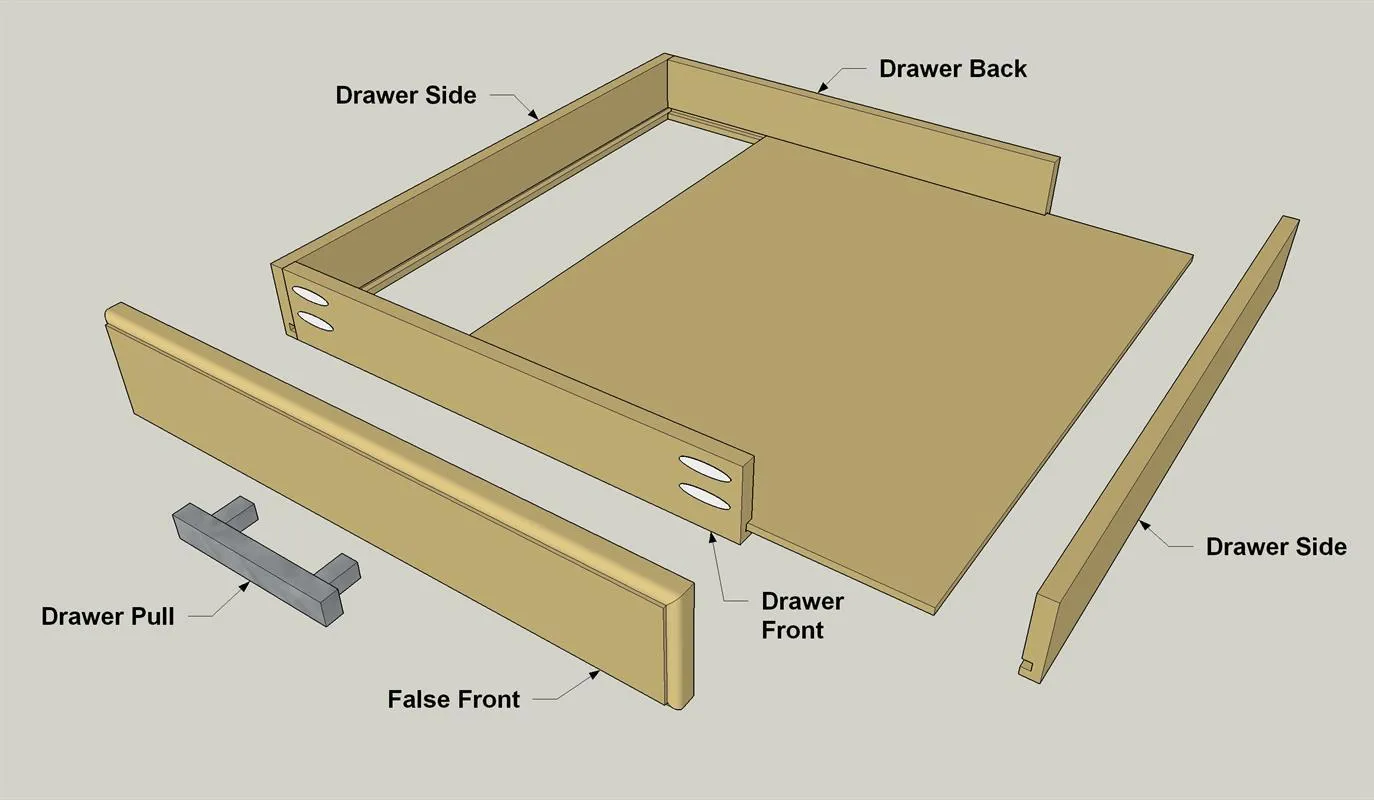
- Now you can assemble the drawer.
- First, attach the Drawer Front and Drawer Back to one Drawer Side using 1" fine-thread pocket hole screws.
- Slide the Drawer Bottom into place, and then attach the other Drawer Side. After that, you can attach the False Front. To do that, first center the drawer pull on the False Front, and then drill holes for the screws.
- Center the False Front on the drawer box, and continue the holes through the drawer front. After you stain and finish the table, you can attach the False Front to the drawer box using the mounting screws for the pull.
20Install the Drawer
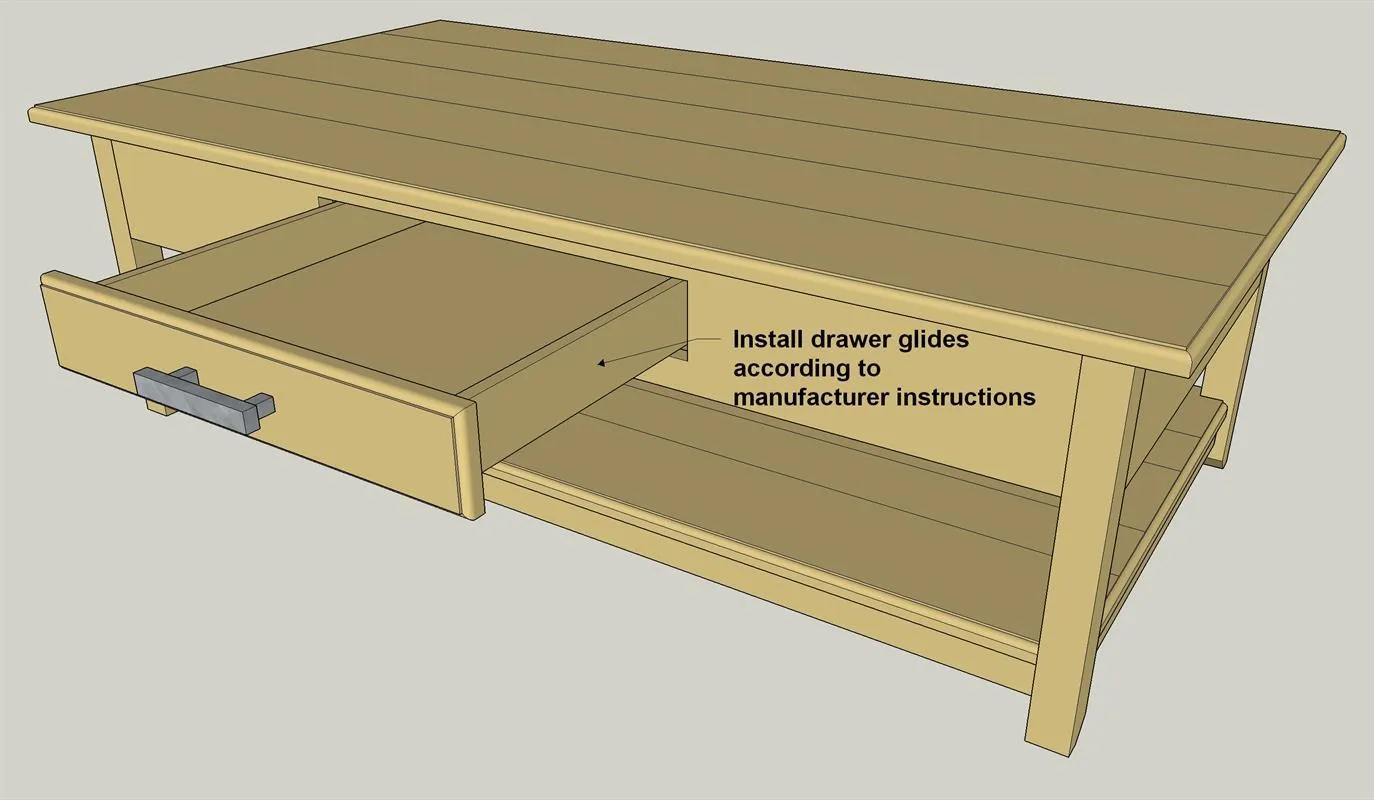
Now is a good time to add the drawer slides, as well. The procedures may vary depending on the type of drawer slides you buy. Just follow the manufacturer’s instructions to install them and center the drawer box in the opening.
21Stain and Finish the Table
- Remove the drawer slides from the drawer, as well as the drawer pull if you’ve installed it.
- Then sand the table as needed.
- Apply the finish, or stain and finish, of your choice.
- Then reattach the hardware, and your table is ready to use.