 Notch
- Difficulty
- Intermediate
- Time
- 4.8–9 hours
- Cost
- $$
About this build
Creating your own lighting is easier than you might think. All you need are a few boards, a lamp hardware kit, and a lampshade. We’ll walk you step by step through the process, as well as how to dress your lamp up, if desired, using a router and a chamfer bit.
Tools
Essential
- Drill / Driver
- Miter Saw
- Pocket Hole Jig
- Random Orbit Sander
- Router
Optional / nice to have
- Bar / Pipe Clamps
- Combination Square
- Tape Measure
Materials
| Item | Qty |
|---|---|
| Board, 1x6 24" | 1 board |
| Board, 2x2 36" | 2 board |
| Square Dowel, 1" x 1" 36" | 1 board |
| 1 1/4" fine-thread pocket-hole screws | 4 each |
| #8 x 2 1/2" flat-head wood screw | 4 each |
| Lamp hardware kit | 1 each |
| Lamp shade (approx. 14" square at base) | 1 each |
| 45° Chamfer Bit | 1 each |
Overall cost: $$. Lumber prices vary by region, species, and season, so we give a band rather than a figure we would only be pretending to know.
Cut list
| Part | Qty | T × W × L |
|---|---|---|
| Post | 4 | 1" × 1" × 16" |
| Base | 2 | 3/4" × 5" × 11" |
| Short Brace | 4 | 1" × 1" × 2" |
| Long Brace | 2 | 1" × 1" × 5" |
| Foot | 4 | 1" × 1" × 1" |
What to buy
Buy 2 boards at 8 ft.
1" × 1"
1 board
3/4" × 5"
1 board
Assumes 8 ft stock, a 1/8" saw kerf, and buying each part at its own width. Change the board size or kerf on the full board plan →
Instructions
1Cut the Base Pieces
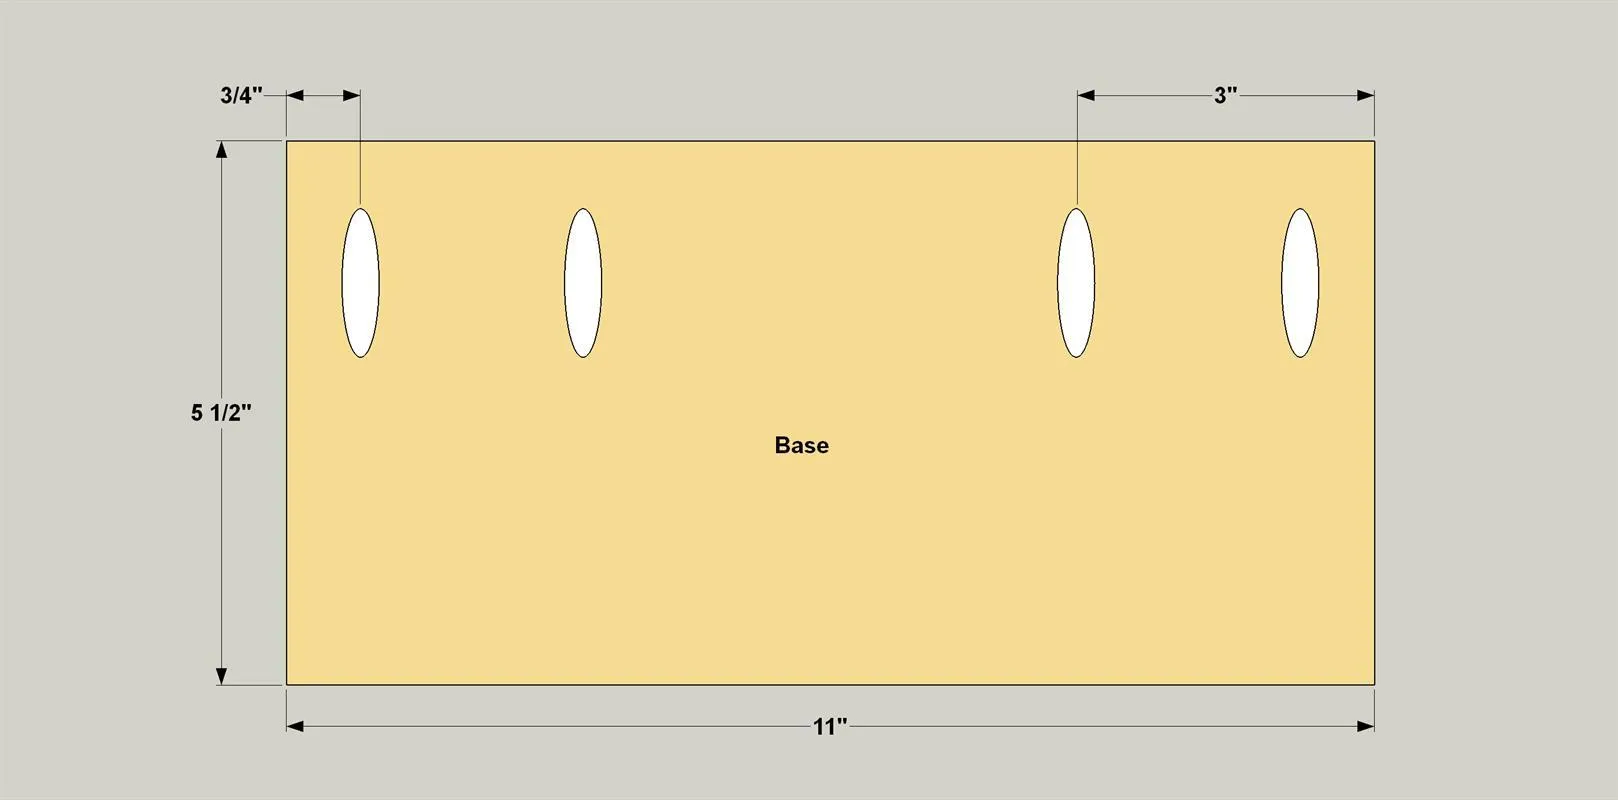
Cut the two Base pieces from a 1x6 board, as shown in the cutting diagram. Set your pocket-hole jig for 3/4" thick material and drill pocket holes in one Base as shown.
2Assemble the Base
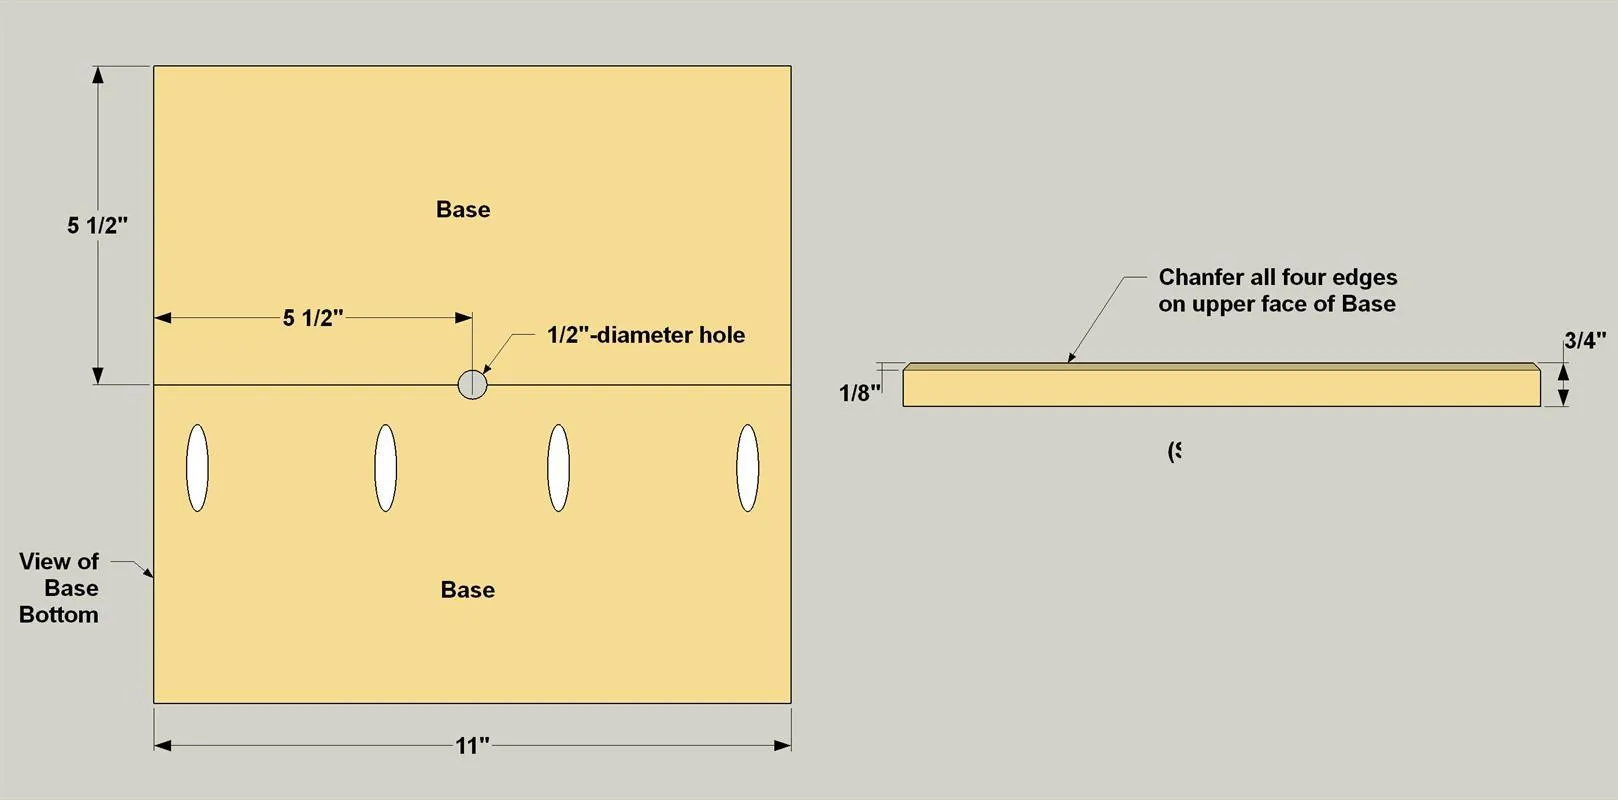
- Secure the two Base boards together with glue and 1 1/4" fine-thread pocket-hole screws.
- Then drill a 1/2" hole through the center of the assembly, as shown. You will thread the lamp cord through this hole in a later step.
- Finally, chamfer the top edge of the base assembly using a router and 45° chamfer bit.
3Cut the Posts and Feet
- Cut four blanks 17"-long from 2x2 oak boards.
- Next, cut a 1/2"-long Foot from each blank.
- Then cut a 16"-long Post from each remaining piece, as shown in the cutting diagram.
- Set the Feet aside for a later step.
4Add a Chamfer to Each Post
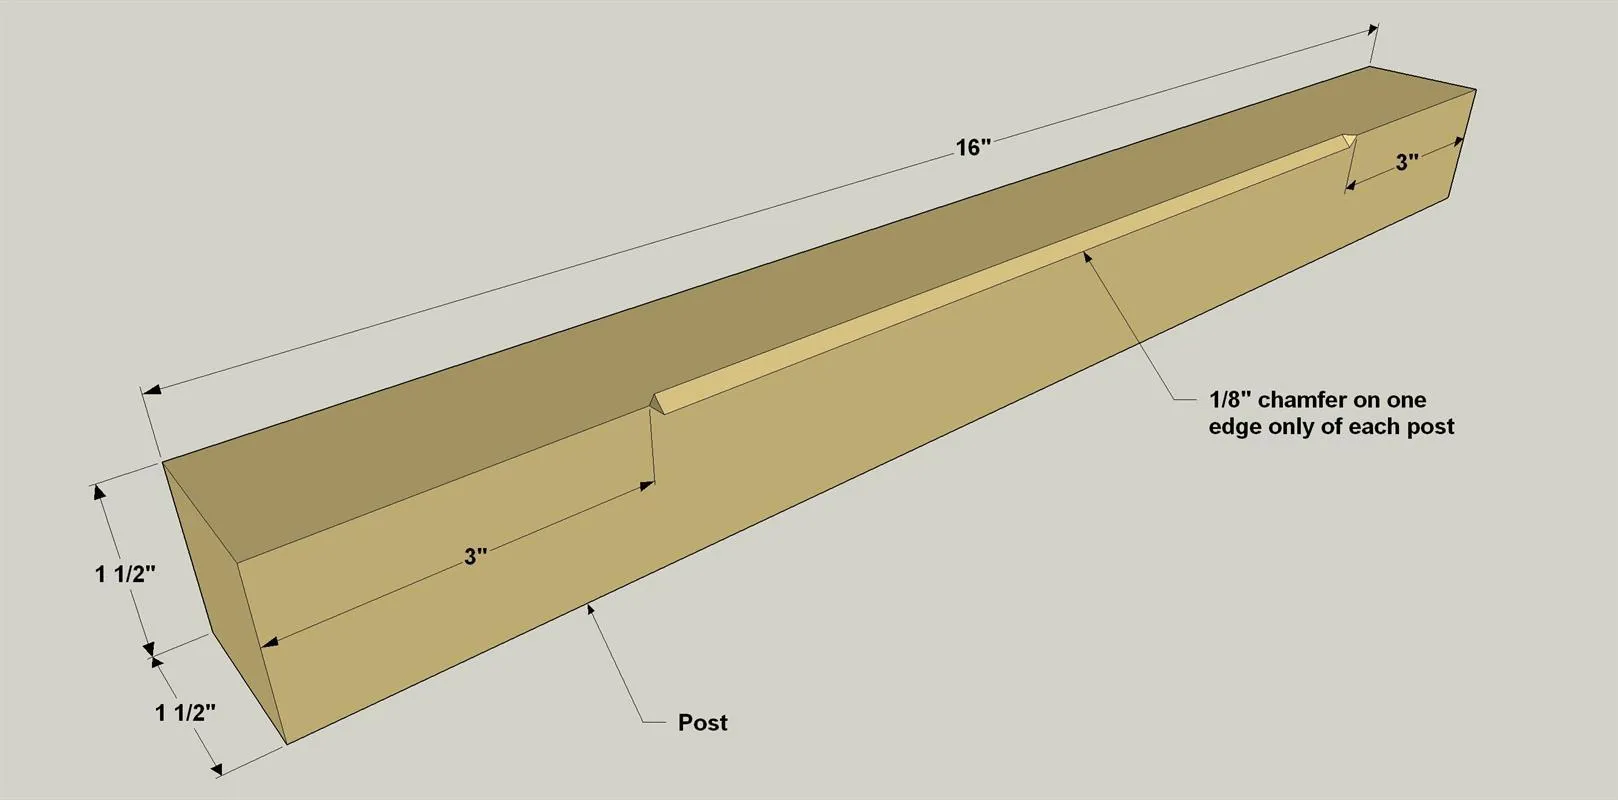
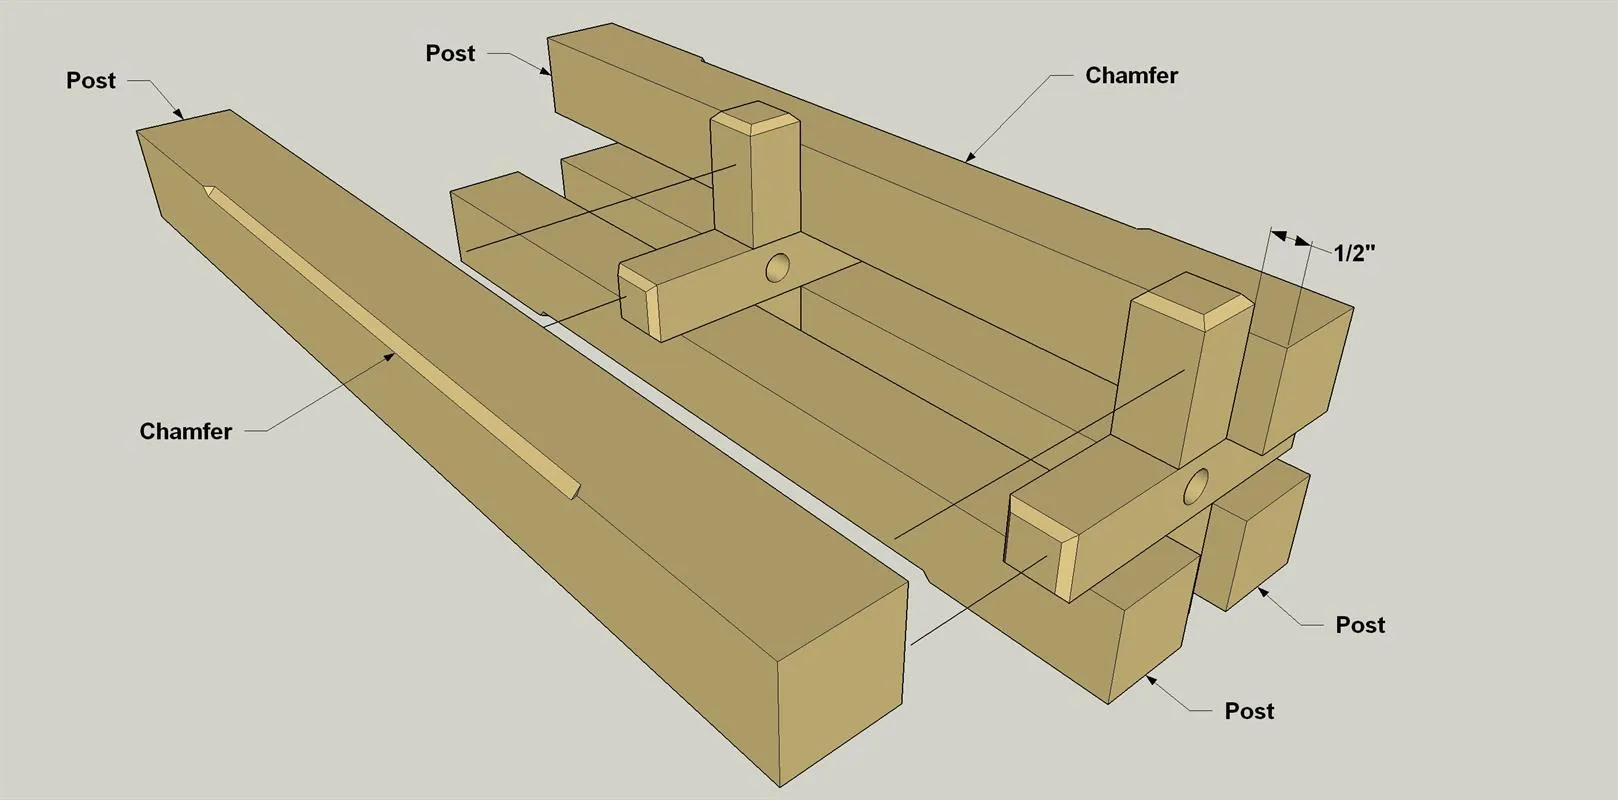
Using a router and a 45° chamfer bit again, cut a decorative chamfer on one edge of each Post at the location shown. Set the posts aside for now.
5Create the Braces
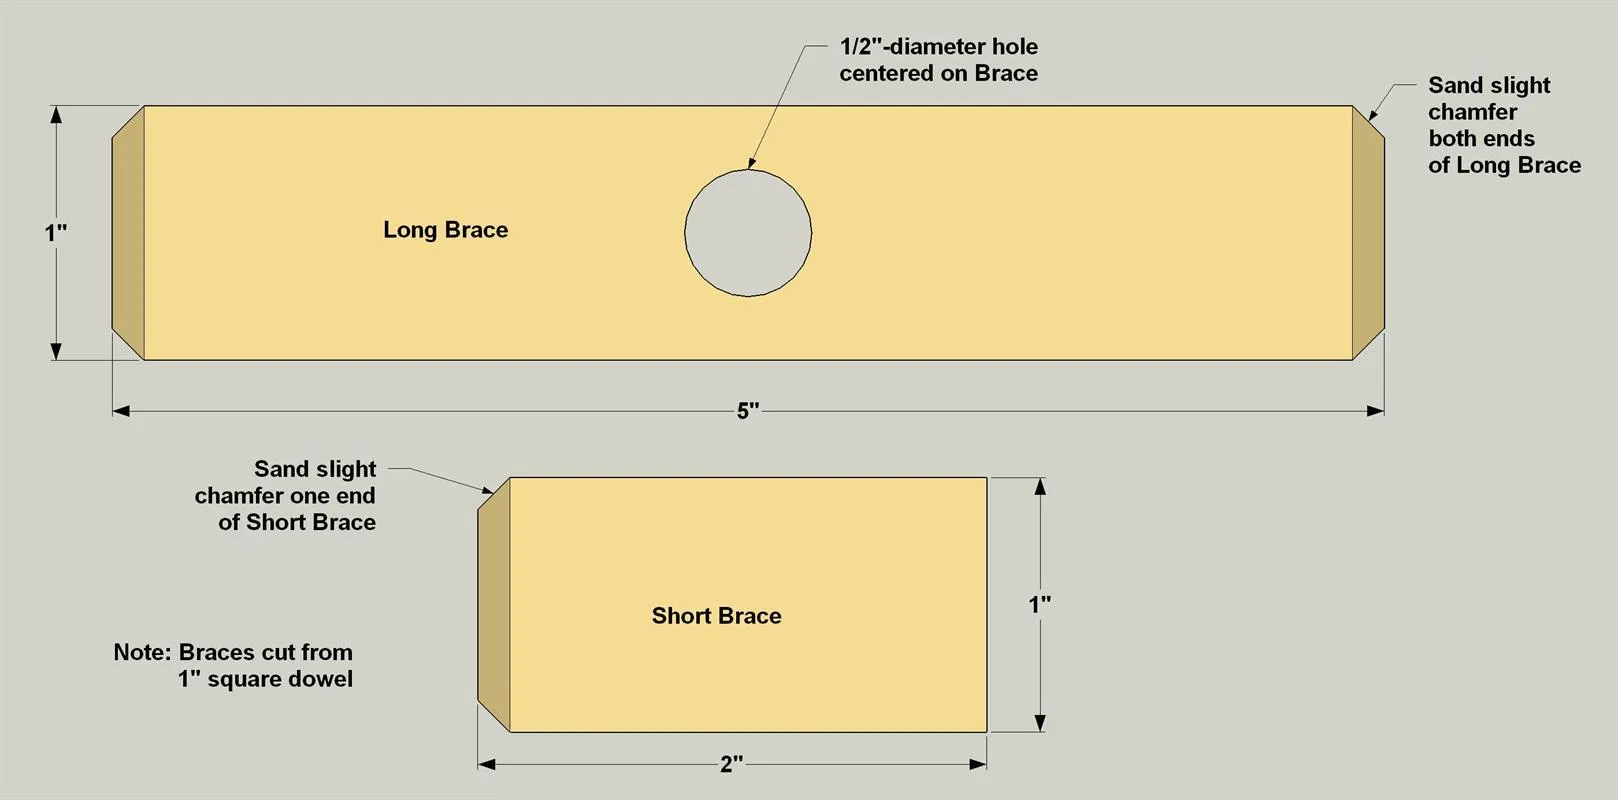
- Cut two Long Braces and four Short Braces to length from a 1" x 1" square dowel, as shown in the cutting diagram.
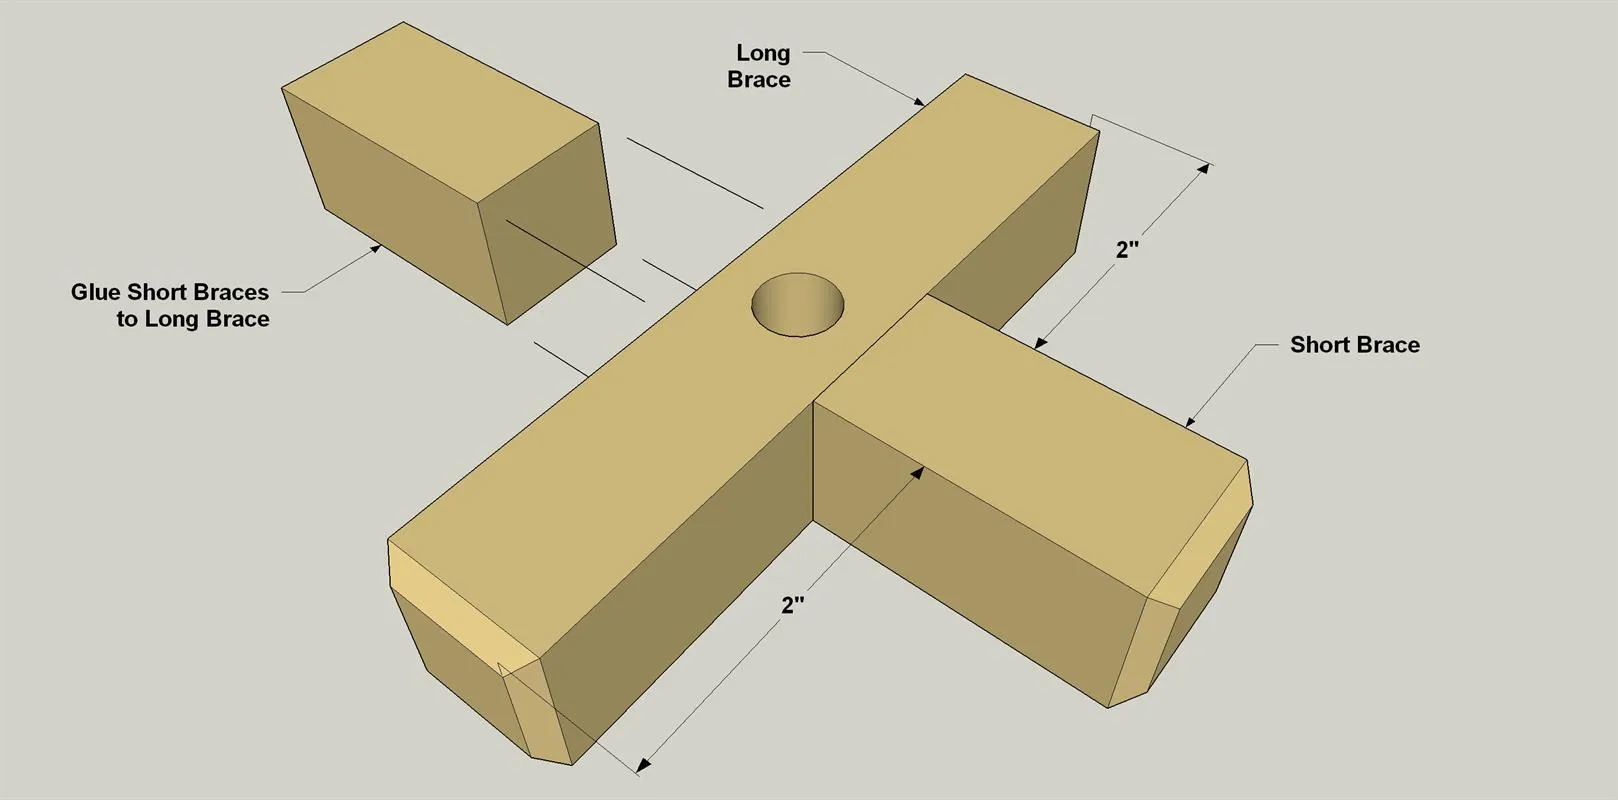
- Drill a 1/2" hole through the center if the two Long Braces for the lamp cord to pass through. With sandpaper and a sanding block, sand a small chamfer on one end of each Short Brace, and both ends each Long Brace, as shown.
6Assemble the Braces
Glue and clamp two Short Braces to each Long Brace, as shown, centering the Short Braces on the length of the Long Braces.
7Stain the Lamp Parts
- Because there are some tight spaces between the Posts and Braces after the lamp is assembled, it's a good idea to apply stain before you put the lamp parts together.
- Stain is better than a clear finish for this project, because stain will allow you to match the color of the oak parts to the poplar square dowels that are used for the Braces.
- Sand all of the parts smooth, wipe away dust, and then apply the stain. Allow the recommended drying time before moving on to lamp assembly.
8Assemble Two Posts and Braces
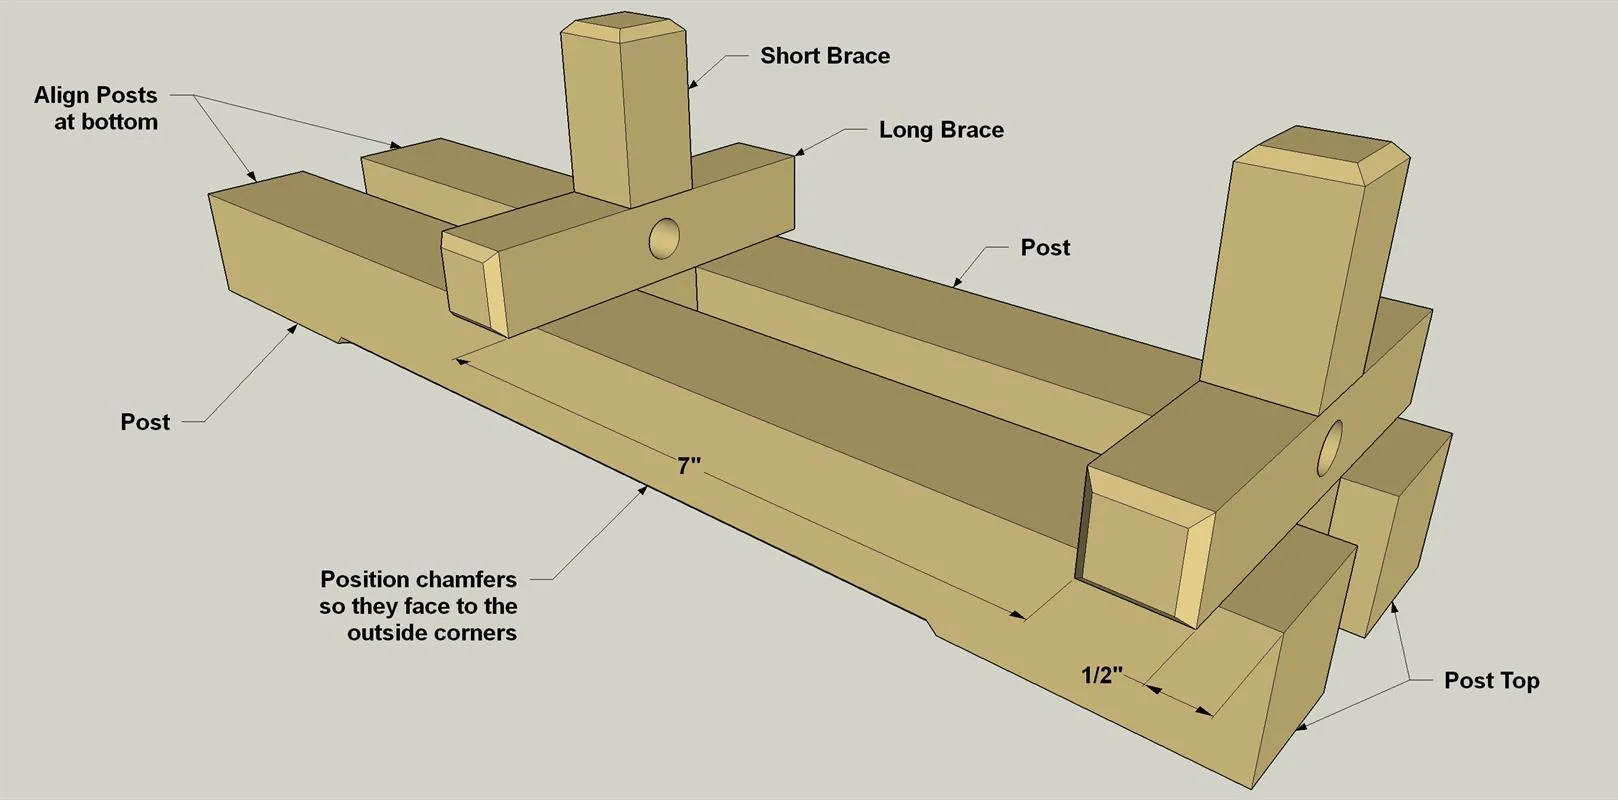
- Mark the locations for the two brace assemblies one face of each of the Posts.
- Position two Posts, making sure the chamfered edge of each one is pointed toward the outside, and that the ends of each post are aligned.
- Apply glue to the brace assemblies where they’ll contact the Posts, position the brace assemblies as shown, and clamp the assemblies together.
9Complete the Post Assembly
After the glue dries enough to handle, glue the other two posts in place. Again, make sure the chamfers face outward and the ends are aligned.
10Lay Out Post Mounting Holes
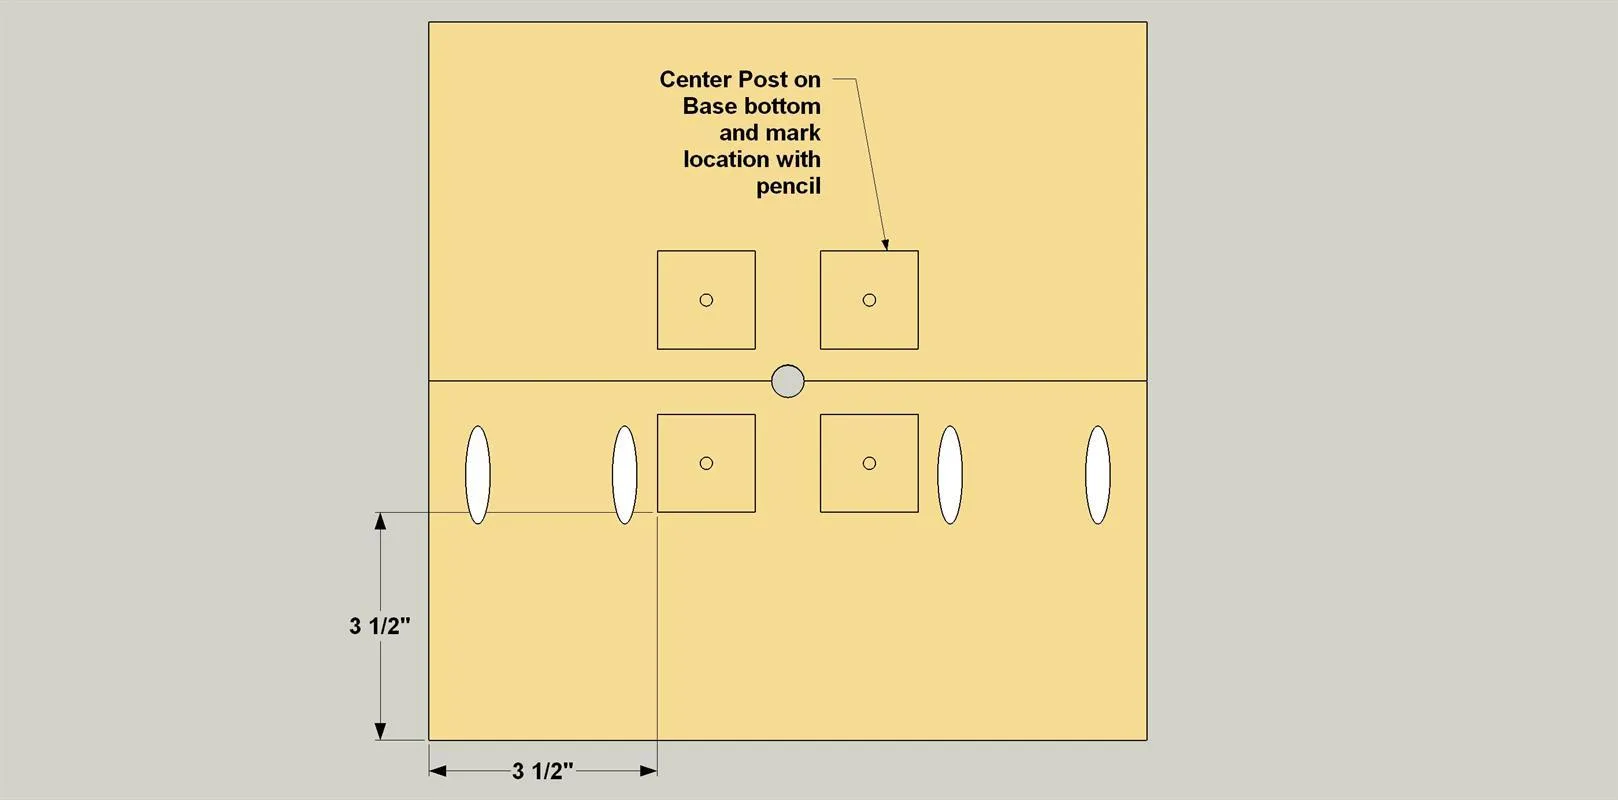
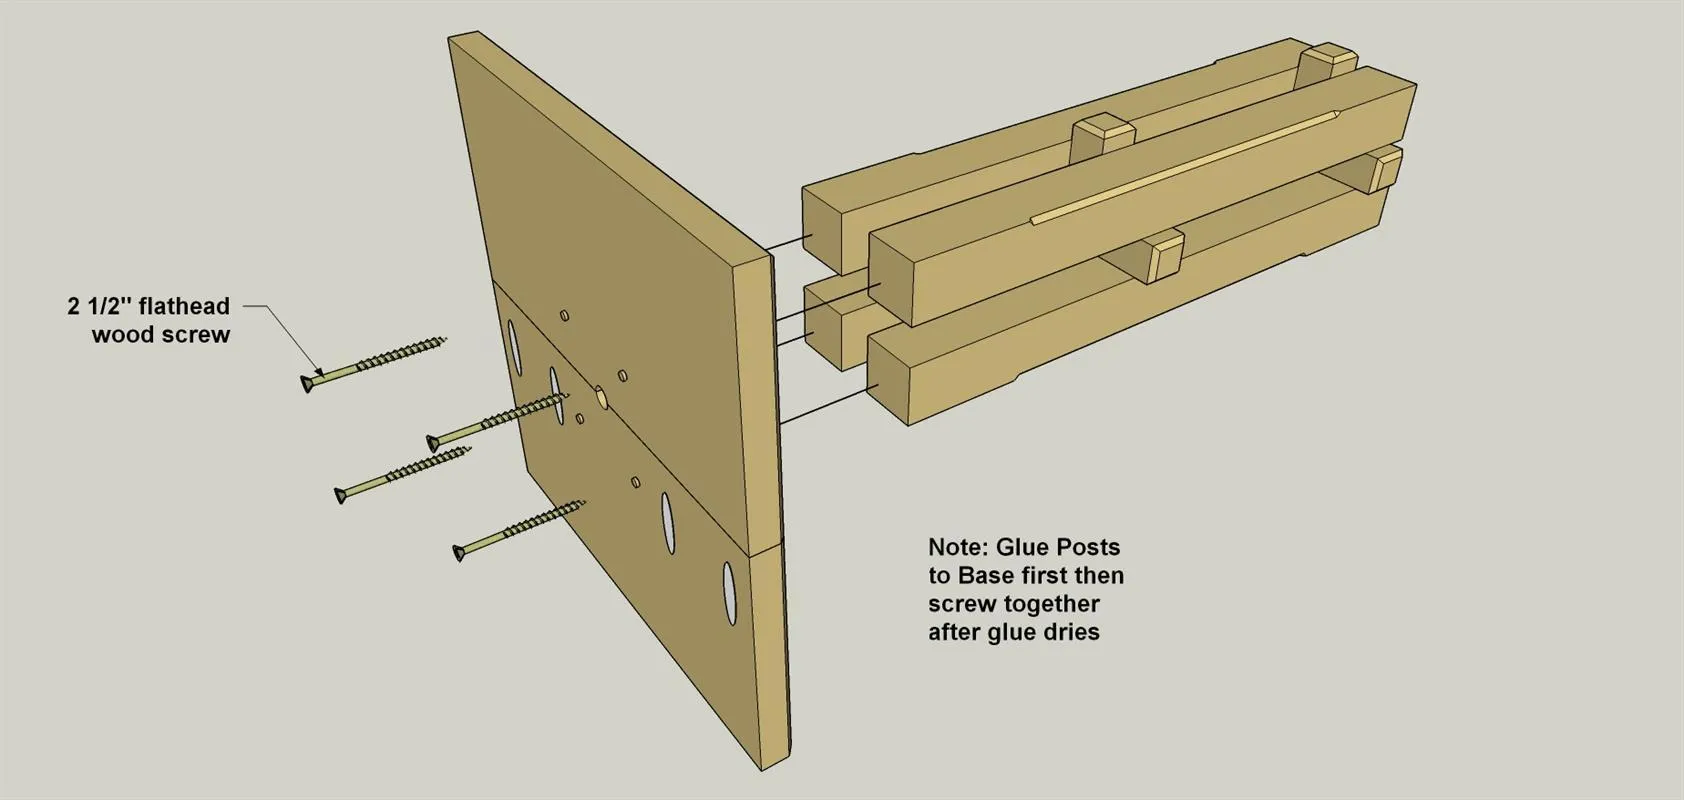
Center the post assembly on the underside of the base assembly, and then trace the location of the posts with a pencil. At each post location, mark its center. With a countersink drill bit, drill a 1/8" hole through the base at each of those centerpoints.
11Attach the Posts
- Flip the base assembly over and center the post assembly on the base, once again.
- Apply a small amount of glue to the bottom of each Post, and place it back on the base at the marked locations. Use clamps, tape, or weights to hold everything together while the glue dries. When the glue is dry, use the holes in the base as guides to drill pilot holes into the posts.
- Then drive a 2 1/2" flathead wood screw through the base and in to each Post.
12Add the Feet
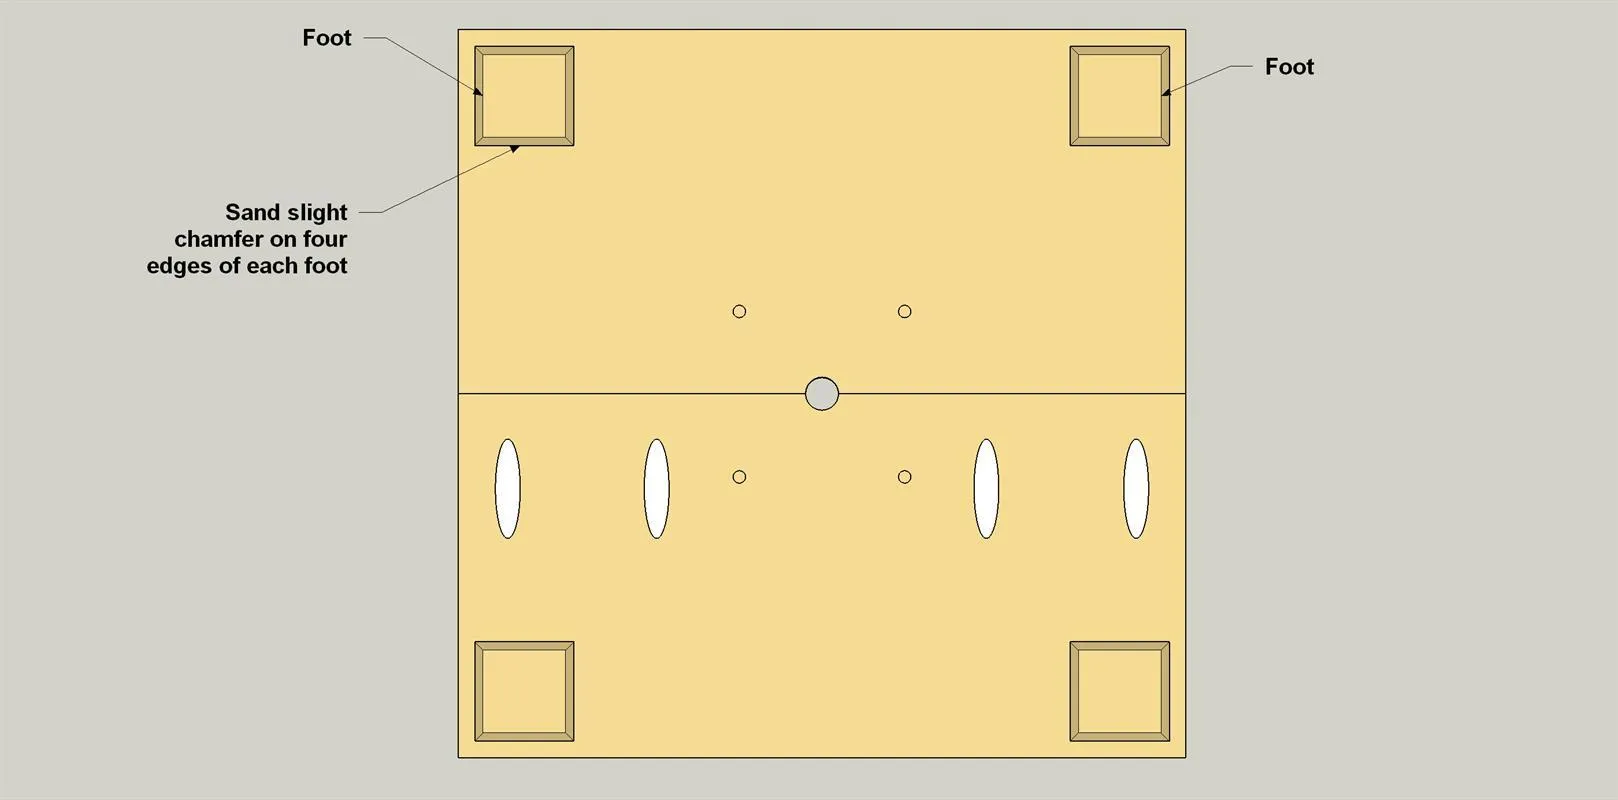
With a sanding block, sand a slight chamfer on the edges of one side of each foot. Glue the feet to the bottom of the base at the locations shown. When the glue dries, apply the same stain as you used on the rest of the lamp.
13Install the Lamp Kit
- Now you can install the lamp hardware kit. Most kits will come with a short threaded pipe nipple that you can thread into the holing in the upper brace.
- Then screw the lamp socket onto this nipple. Thread the lamp cord through the lamp base and braces into the lamp socket, and then connect the wires following the manufacturer’s instructions.
- Then add the harp and lampshade to complete your lamp.
Tags
- Advanced Woodworking Projects
- Intermediate
Reviews & builds
No reviews yet
Sign in to review this plan or share your build.
No reviews yet. Be the first to build this.