 Notch
- Difficulty
- Intermediate
- Time
- 3.5–6.5 hours
- Cost
- $$$
About this build
Create a rustic looking kitchen table for a cast iron antique sewing machine base
Tools
Essential
- Drill / Driver
- Miter Saw
- Pocket Hole Jig
- Random Orbit Sander
Optional / nice to have
- Bar / Pipe Clamps
- Tape Measure
Materials
| Item | Qty |
|---|---|
| Board, 2x8 96" | 9 board |
| Rockler Drop Leaf Hinges for Straight Edges | 4 each |
| Rockler Metal Drop Leaf Supports | 4 each |
Overall cost: $$$. Lumber prices vary by region, species, and season, so we give a band rather than a figure we would only be pretending to know.
Cut list
| Part | Qty | T × W × L |
|---|---|---|
| Main Table Top Boards | 5 | 1 1/2" × 7 1/4" × 39" |
| End Caps | 2 | 1 1/2" × 7 1/4" × 36" |
| Flip-Up Leaves | 2 | 1 1/2" × 7 1/4" × 36" |
What to buy
Buy 5 boards at 8 ft.
1 1/2" × 7 1/4"
5 boards
Assumes 8 ft stock, a 1/8" saw kerf, and buying each part at its own width. Change the board size or kerf on the full board plan →
Instructions
1Buy lumber
I chose to use Douglas Fir because it was cheap. Try to find boards that are as straight as possible. I purchased a quantity of nine 2x8s that were 8 feet long.
2Measure twice, cut once
There are 5 main boards running vertically and two end caps. The main boards for this project were cut at 39 inches long. Be sure to pay attention to cutting on the line you draw, or to the left or to the right of your line because you must account for the width of the saw blade. Do not cut the end cap boards until the 5 center boards are cut, sanded, stained on the edges and pockethole screwed together to get an accurate measurement.
3Sanding & Staining Before Assembly
Before attempting to attach the 5 main boards, sand each piece for about 5 minutes using 80 grit sandpaper on all sides. This ensures that any pieces that may have been rough are smooth. Using a mixture of vinegar and steel wool, which had been steeping in a mason jar for about a week, coat the edges and ends of each board to color them darkly. Be careful not to get any vinegar/steel wool solution on the face of the boards. Allow the boards to dry completely before attempting the next step.
4Assembly of the 5 Main Boards
Dry assemble your table with the underside facing up and mark your boards by numbering them, and adding arrows pointing the direction of the pockethole screws. This is helpful for working on different pieces and removing and adding them back to your dry fit. For 39 inch boards, mark 5 equally spaced pocketholes and arrows. On the ends of these boards, mark 2 equally spaced pocketholes for attaching to the end caps. Most important tips - be sure to CLAMP your project securely & assemble 2 boards at a time before moving forward. Rubbing your screws with a block of soap helps to make the screws go in easily. Set your drill/driver to 8 or 10. If the screw head starts to slip STOP, remove it & use a new screw.
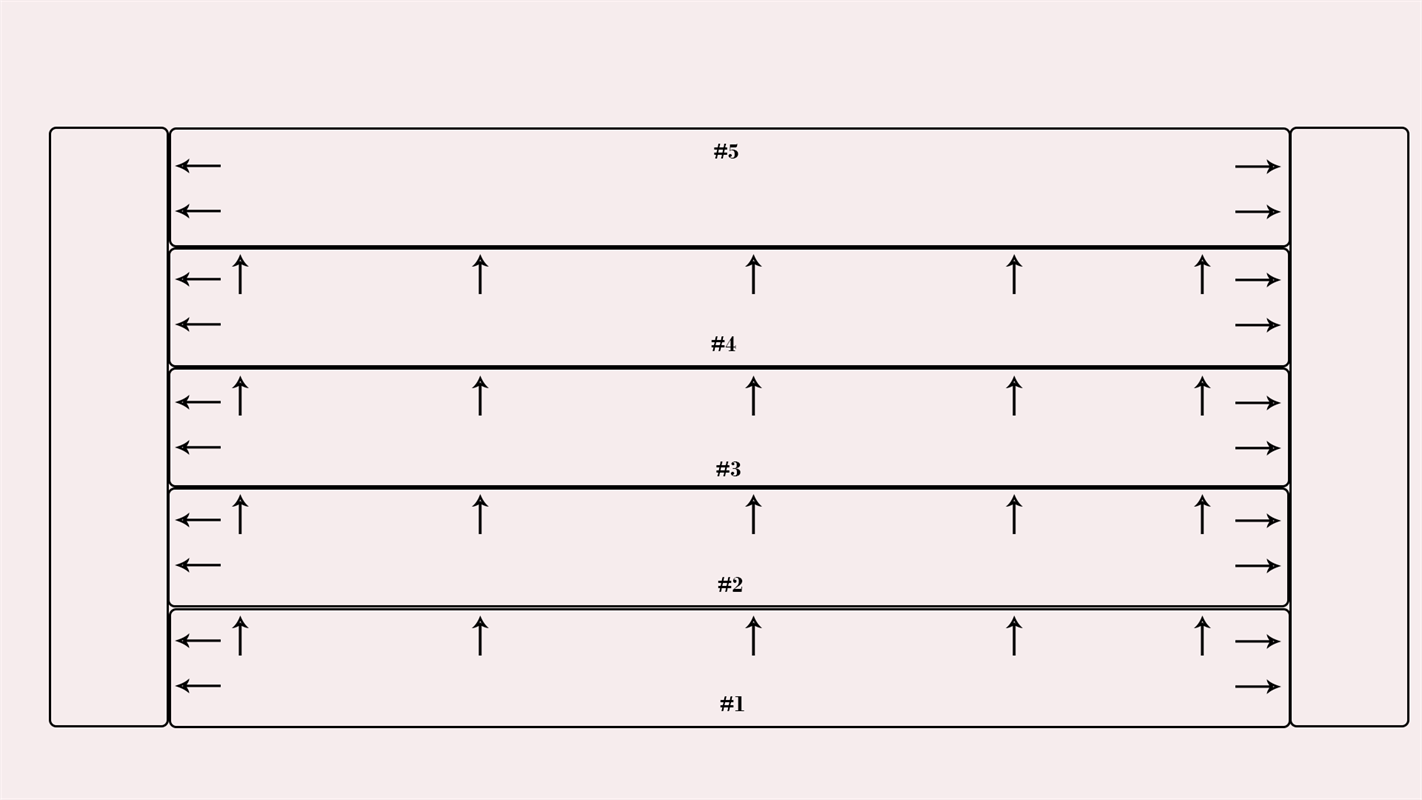
5Attaching End Caps
- Once your 5 main boards are attached, you can measure the length for your end caps. The end cap length will depend on how closely your boards are attached in step 4. The end caps for this table were 36 and 3/16ths during this build.
- Measure & cut the end caps, then sand & stain the edges as done in Step 3. Make sure the boards are completely dry before assembling.
- Clamp your 5 main boards which are already attached to each other, and clamp your end cap securely. Soap your screws, set your drill/driver 8 or 10 and attach. If the board moves or the screw starts to strip out, STOP, remove the screw, secure your clamps and start again.
6Sanding, Staining After Assembly
- First and second coats are Danish Oil with Medium Walnut Finish applied with a rag. Allow to dry for 72 hours before continuing. Second finish is Redwood colored deck stain and sealer, two coats. Allow to dry completely before continuing. Third application is vinegar/steel wool. Applied with a sponge brush, and wiped off after all boards are covered. This will darken the wood and bring out the grain. Darkens as it dries.
- Once the vinegar/steel wool application dries completely, reapply Redwood colored deck stain and sealer.
- Once completely dry, finish with several coats of MATTE polyurethane. If the vinegar/steel wool is too dark for your liking, re-sand and only the knots will remain dark.
7Hardware
If you would like to add leaves that hang down and flip up when needed, use Rockler metal leaf table supports and straight edge hinges from Rockler.
8Weathering Boards
After sanding, and before staining, beat the boards up with chains, hammers, screws, nails, anything you can find to make the boards look weathered.
9Attaching the base
- To attach the base from the antique sewing machine, cut 2 boards to 14 inches long.
- Center your sewing machine base, which is (in this case) 23 inches wide and 12 inches deep) onto the underside of your table top. Secure the newly cut 14 inch boards to the table top with 2.5 inch screws, be sure to pre-drill so you do not affect the perfection of your table top!
- Once the 14 inch boards are secured, use bolts through the holes of the sewing machine base to attach it to the 14 inch boards. We added a pipe clamp for extra help.
Tags
- Kitchen
- Intermediate
Reviews & builds
No reviews yet
Sign in to review this plan or share your build.
No reviews yet. Be the first to build this.