 Notch
Small Computer Desk
Step-by-step build — 20 steps. Also available as a print sheet.
1Cut the Legs
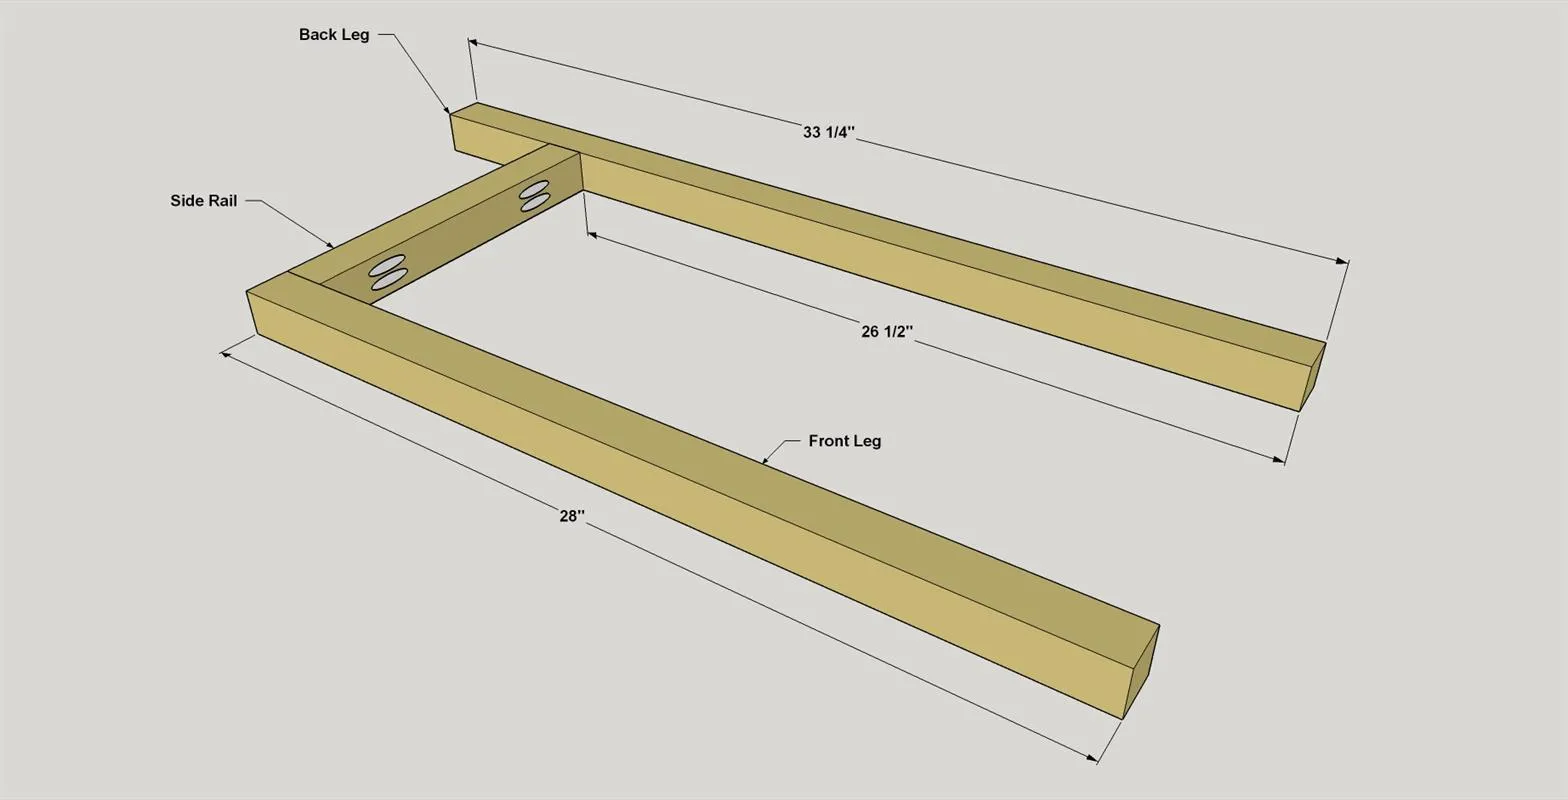
Cut two Front Legs and two Back Legs to length from 2x2 boards as shown in the cutting diagram.
2Make the Side Rails
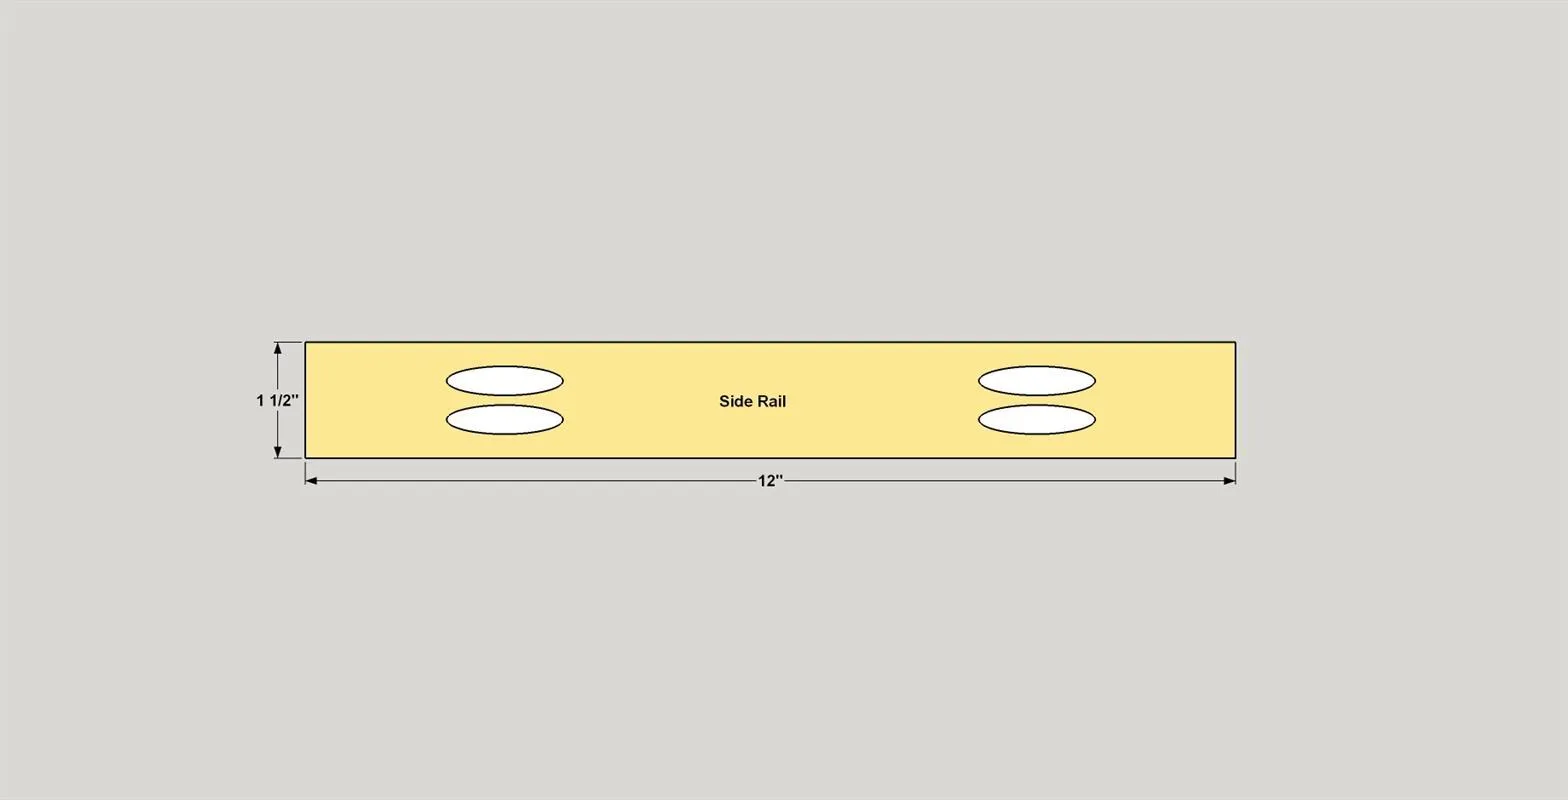
Cut four Side Rails to length from 2x2 boards, as shown in the cutting diagram. Set your pocket-hole jig for 1 1/2"-thick material, and then drill pocket holes at the locations shown.
3Create the Side Assemblies
- Attach one Front Leg and one Back Leg to one Side Rail, as shown. Secure them using 2 1/2" coarse-thread pocket-hole screws.
- Repeat this process for the other side.
4Make the Top Rails
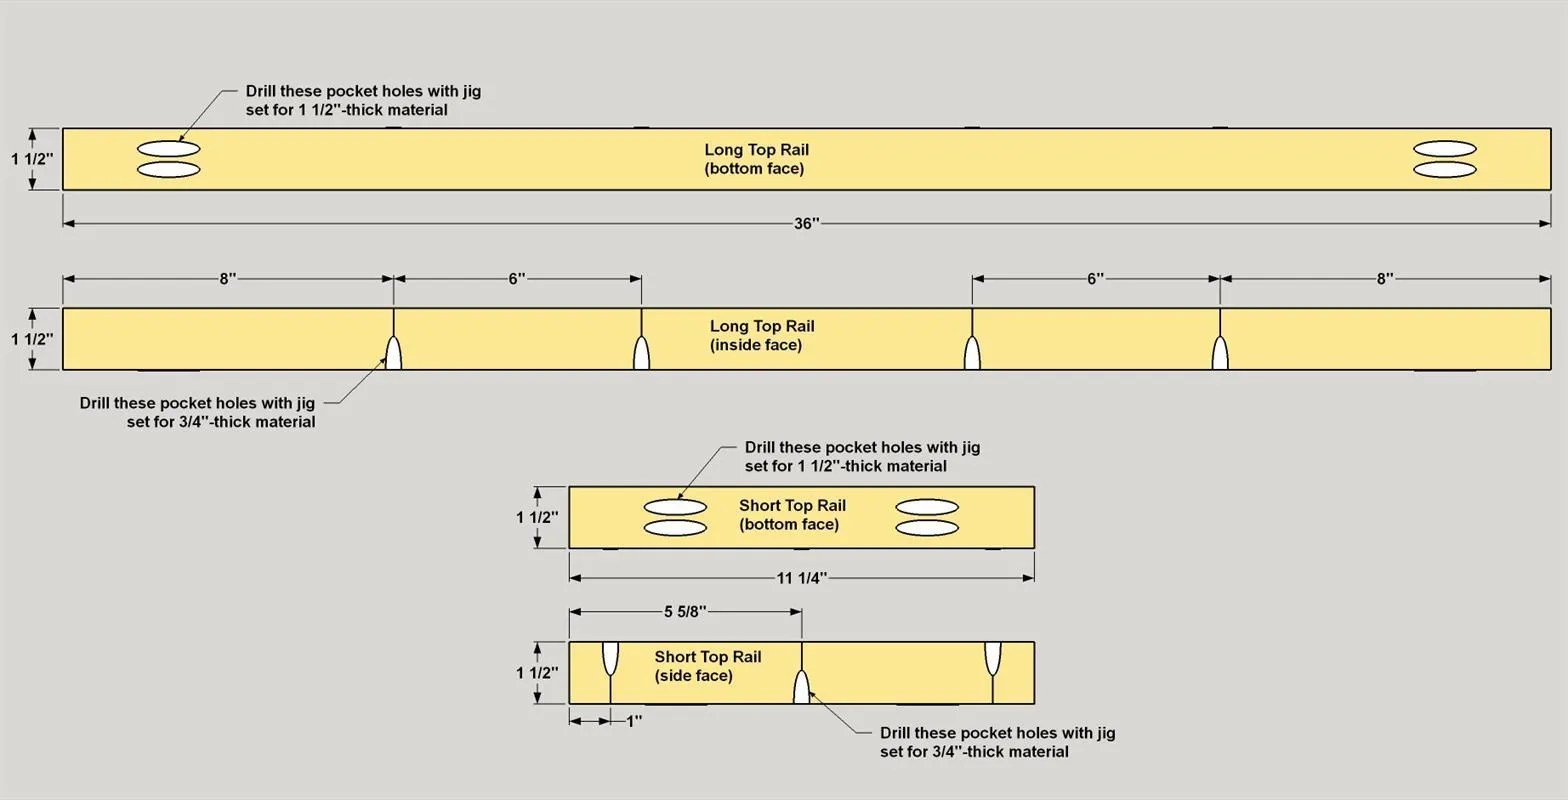
- Cut two Long Top Rails and two Short Top Rails to length from a 2x2 board, as shown in the cutting diagram. With your pocket-hole jig set up for 1 1/2"-thick material, drill pocket holes at ends of the Rails, as shown.
- Then change your jig (and bit) settings for 3/4"-thick material, and drill pocket holes across the width of the Rails, as shown.
5Assemble the Top Rails
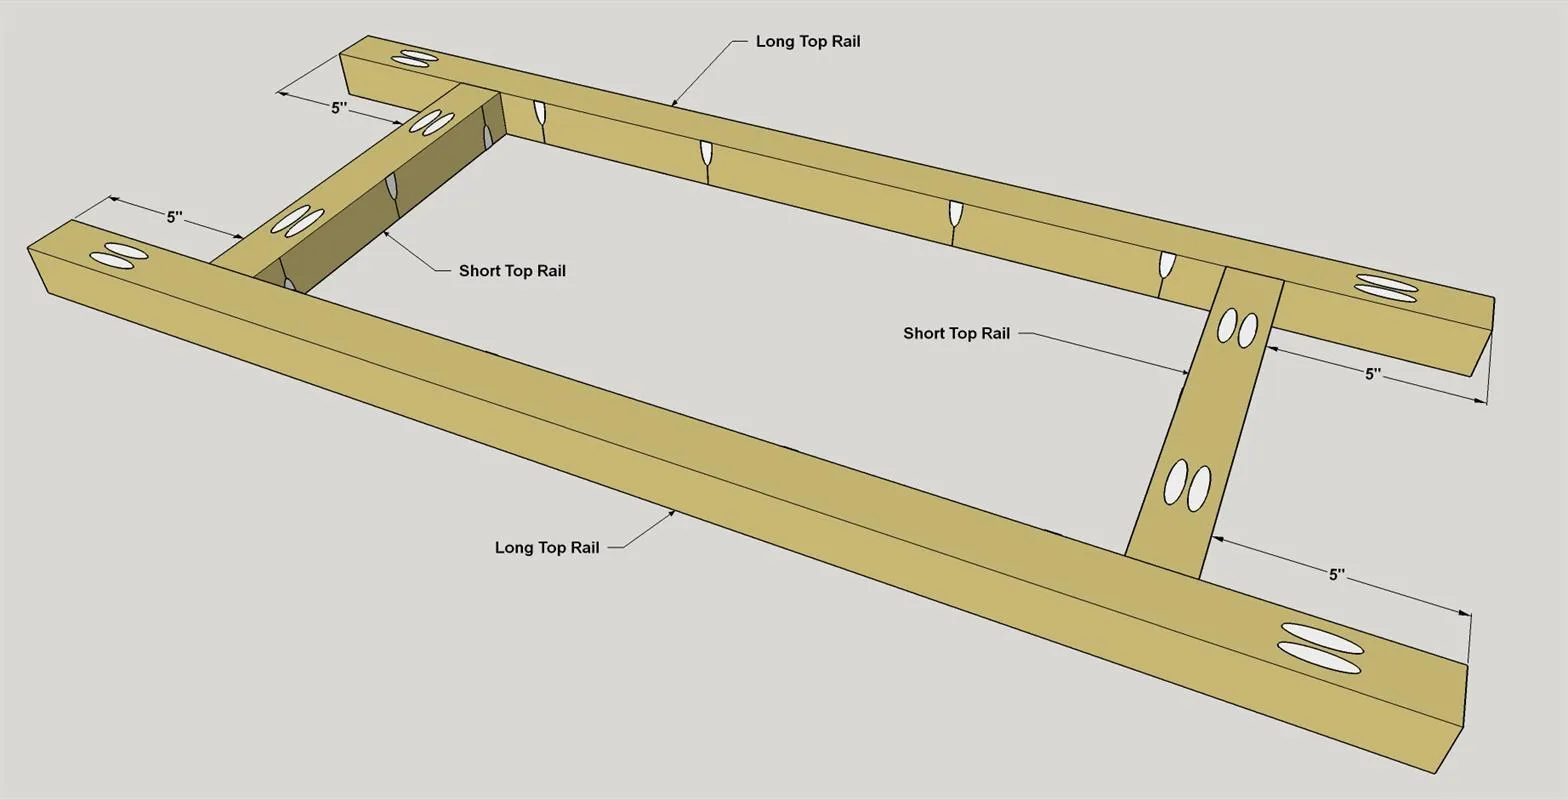
Attach the two Short Top Rails to the Long Top Rails where shown using 2 1/2" coarse-thread pocket-hole screws. Make sure that all of the pocket holes are oriented correctly.
6Attach the Top Rails to the Sides
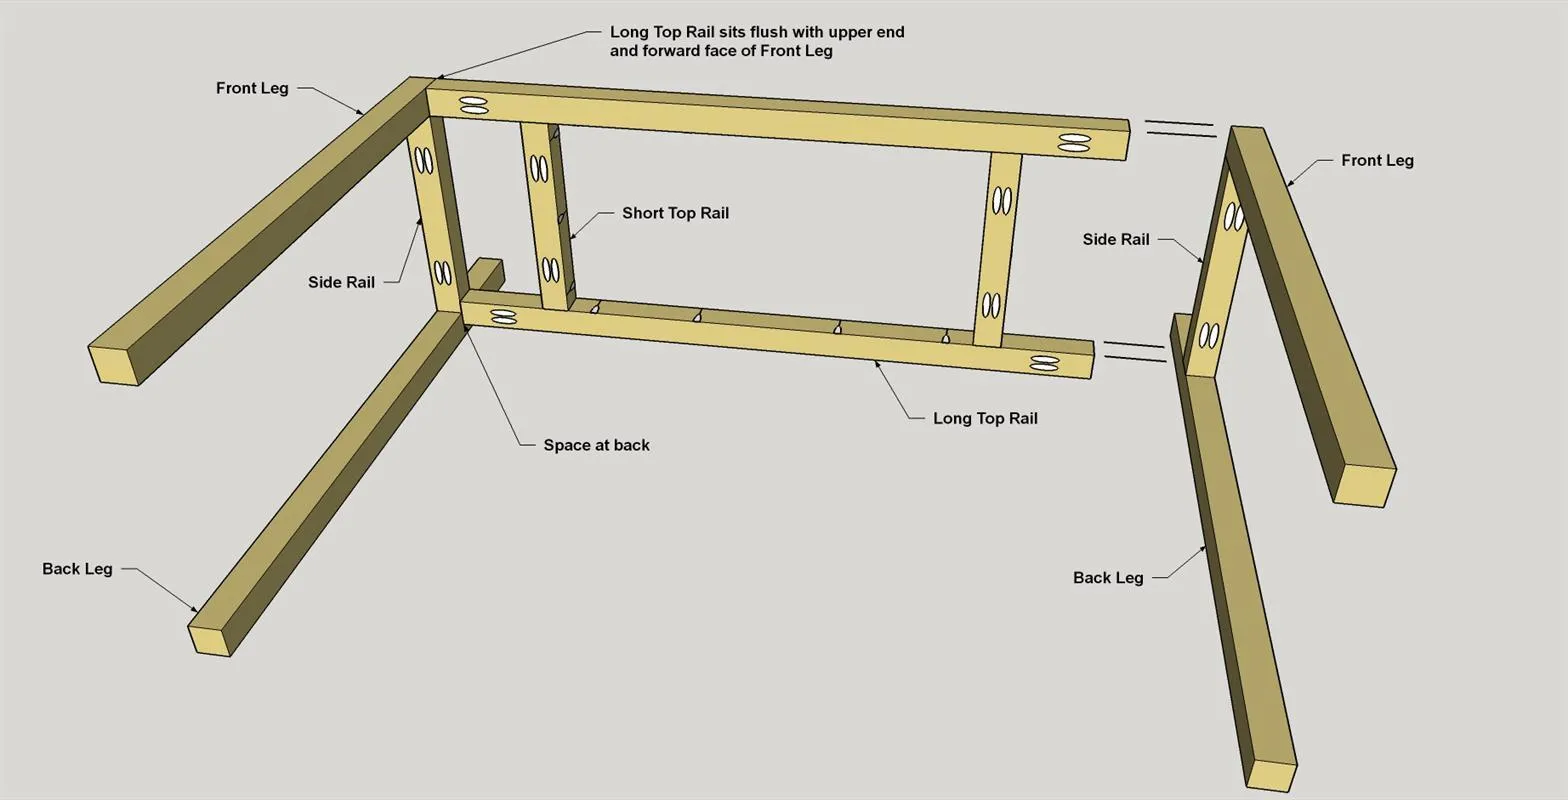
- Now you can attach the top rail assembly to the side assemblies.
- Position the top rail assembly so it is flush with the upper end of each Front Leg, as shown. Note that this will leave a space behind the rear Long Top Rail. Secure the top rail assembly to the side assemblies using 2 1/2" coarse-thread pocket-hole screws.
7Cut the Back Rails
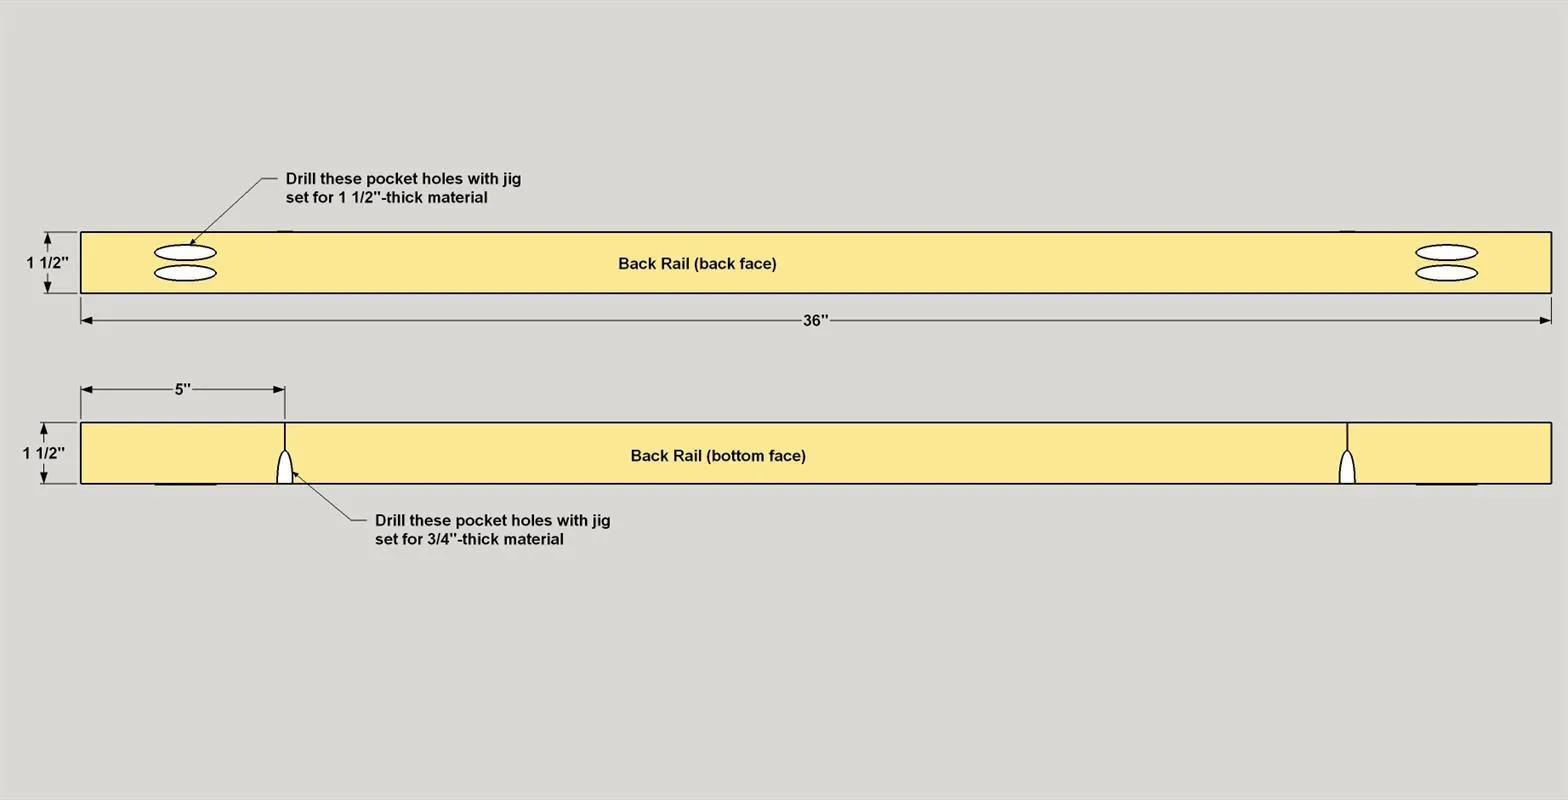
- Cut two Back Rails to length from a 2x2 board, as shown in the cutting diagram.
- Then, with your pocket-hole jig set for 1 1/2"-thick material, drill pocket holes at the ends on the rear face of each Back Rail. These will be used to attach the Back Rails to the Legs in the next step. Change your pocket-hole jig (and bit) setup back to 3/4"-thick material, and then drill pocket holes across the lower face of each Back Rail, as shown. These will be used later to attach the Shelf Backs to the Back Rails.
8Attach the Back Rails
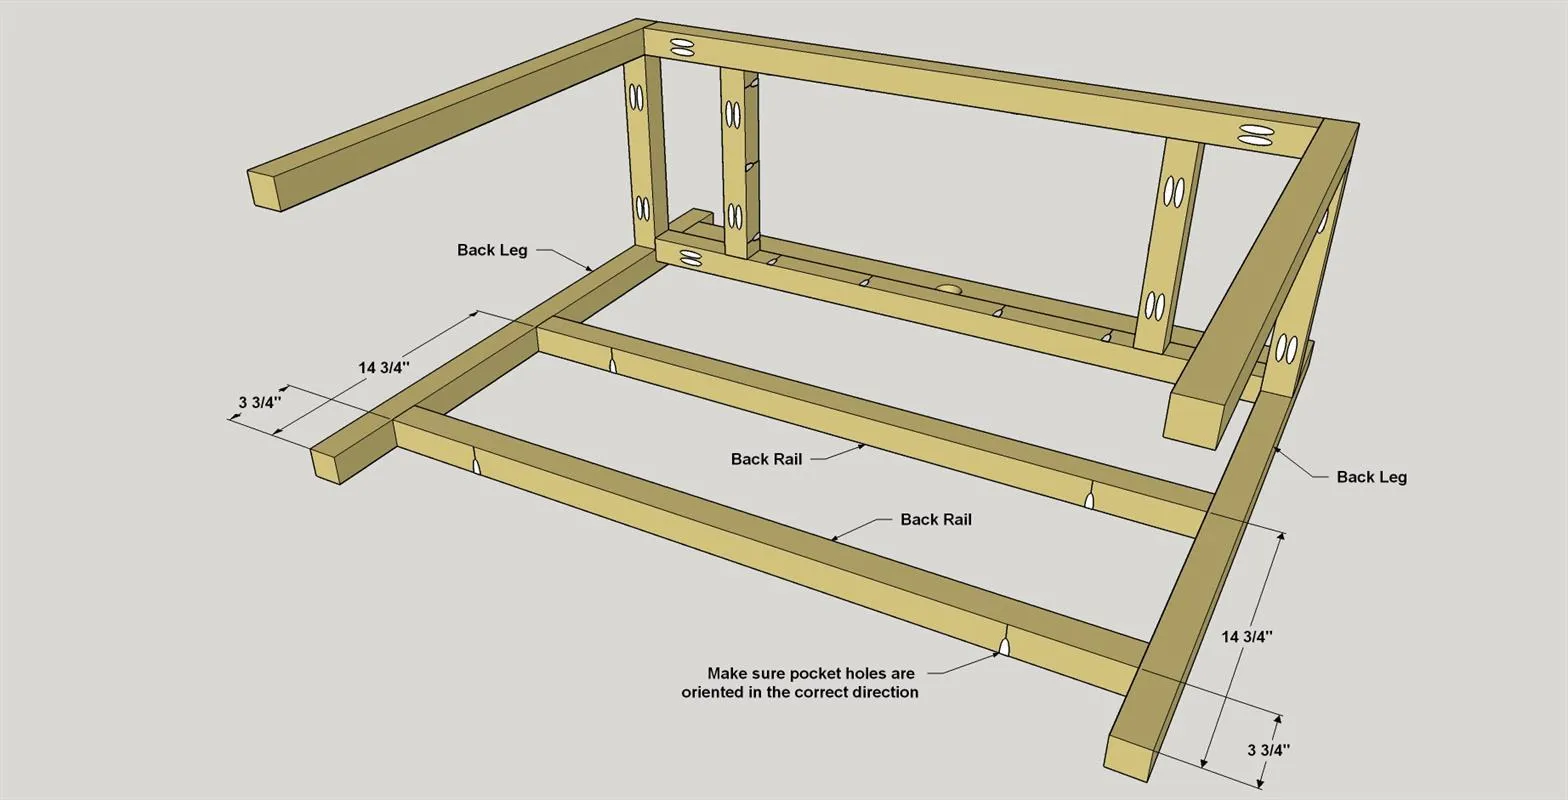
- Position the Back Rails between the Back Legs where shown. Make sure that the pocket holes are oriented correctly for securing the Back Rails to the Back Legs, and for securing the Shelf Backs later.
- Attach the Back Rails to the Legs using 2 1/2" coarse-thread pocket-hole screws.
9Make the Shelf Parts
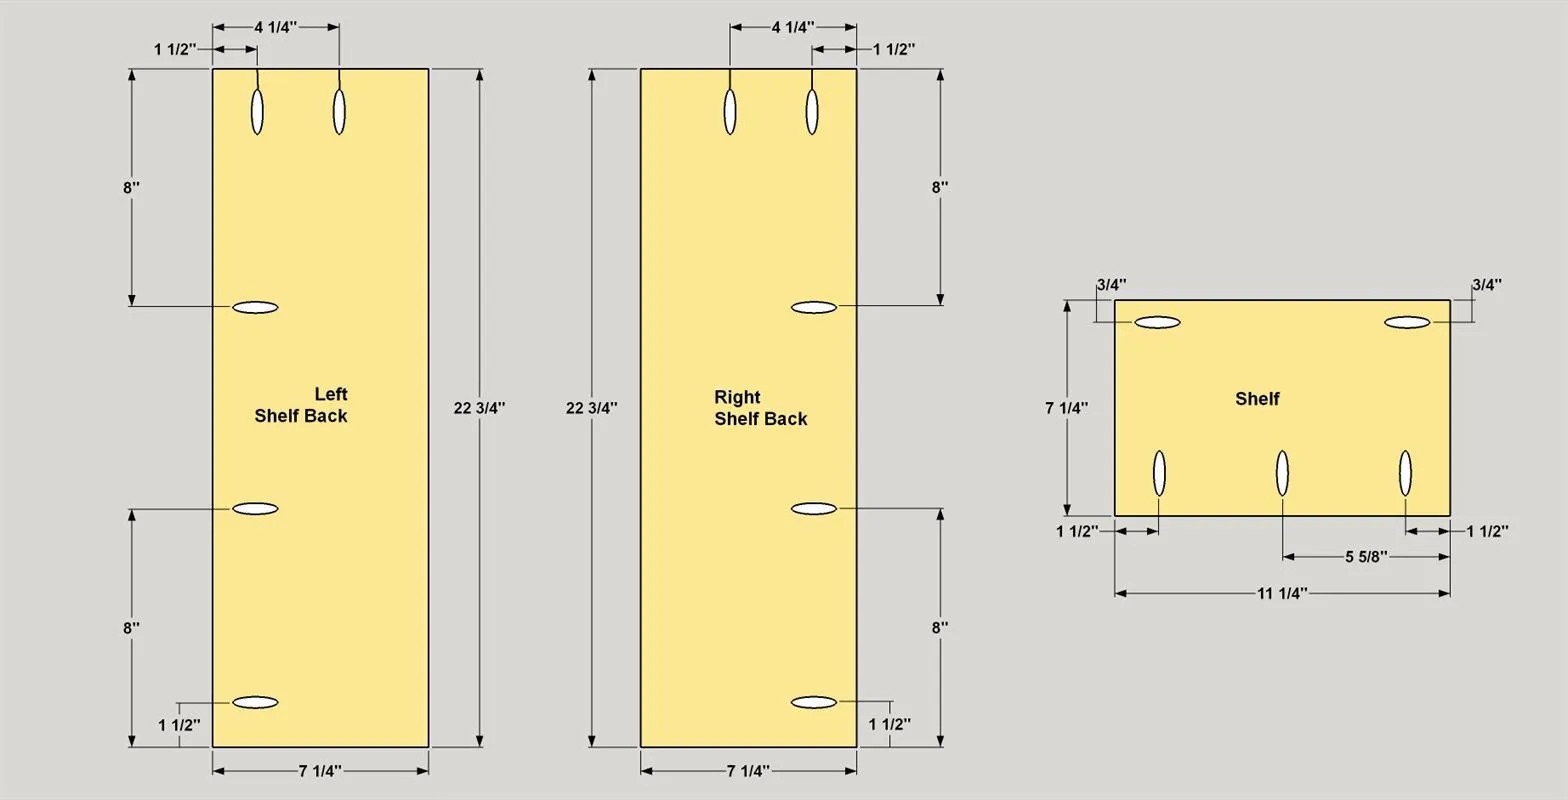
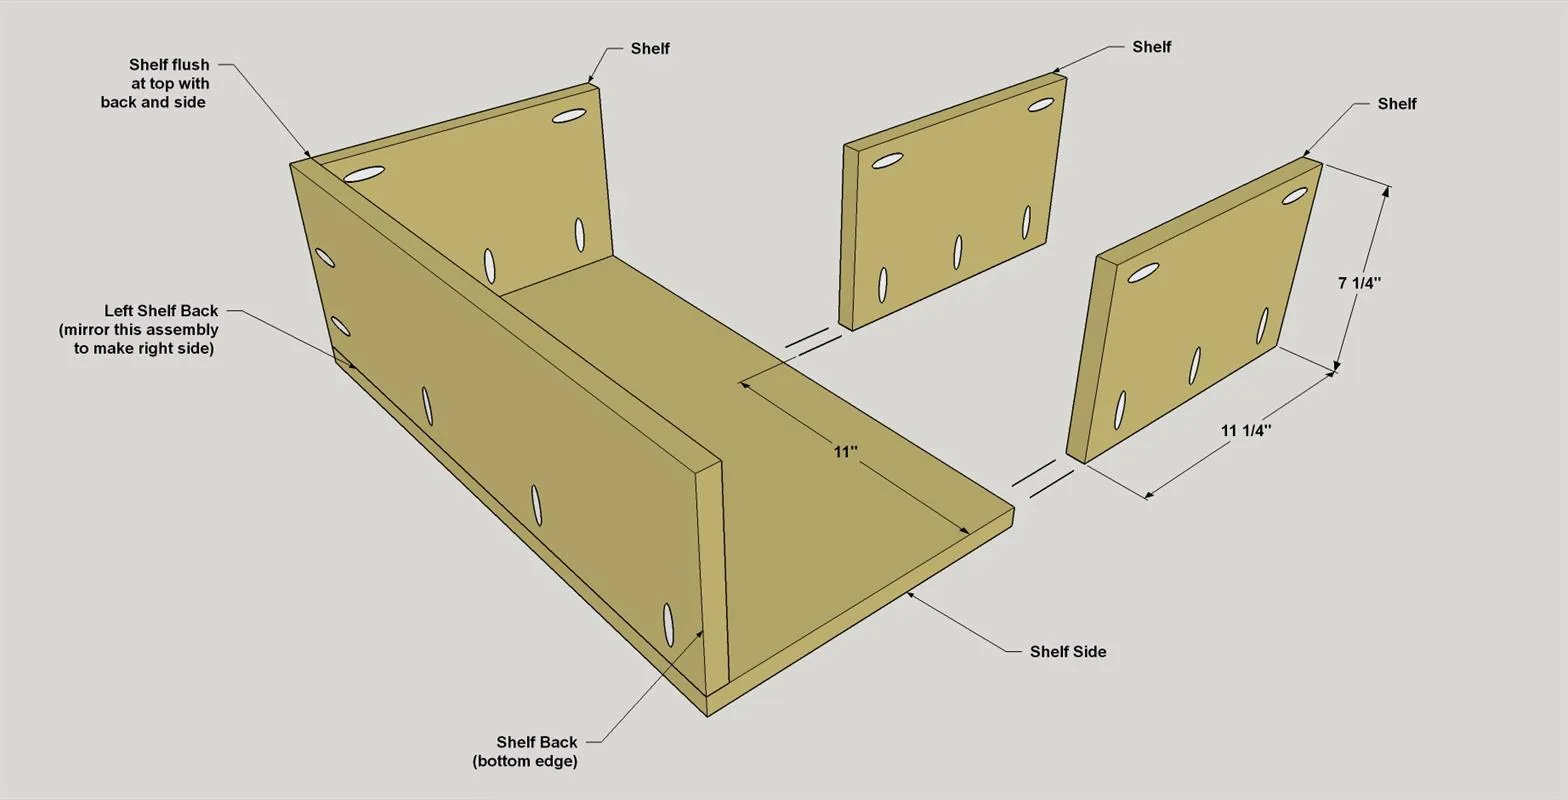
From 1x8 boards, cut two Shelf Backs and six Shelves to length, as shown in the cutting diagram. From 3/4" plywood, cut two Shelf Sides to size, as shown. Make sure your pocket-hole jig is set up for 3/4"-thick material, and then and drill pocket holes on all of the Shelf parts at the locations shown. Note that there is a left and a right side Shelf Back.
10Create the Shelf Assemblies
- Now you can create a left shelf assembly and a right shelf assembly. To do that, lay a Shelf Side flat on a work surface.
- Then attach a Shelf Back in the position shown using 1 1/4" coarse-thread pocket-hole screws.
- Next, attach the three shelves, as shown.
- Repeat this process to assemble the shelf assembly for the other side. If you plan to paint the shelves, as we did, this is a good time to sand the parts and apply paint.
11Attach the Shelf Assemblies
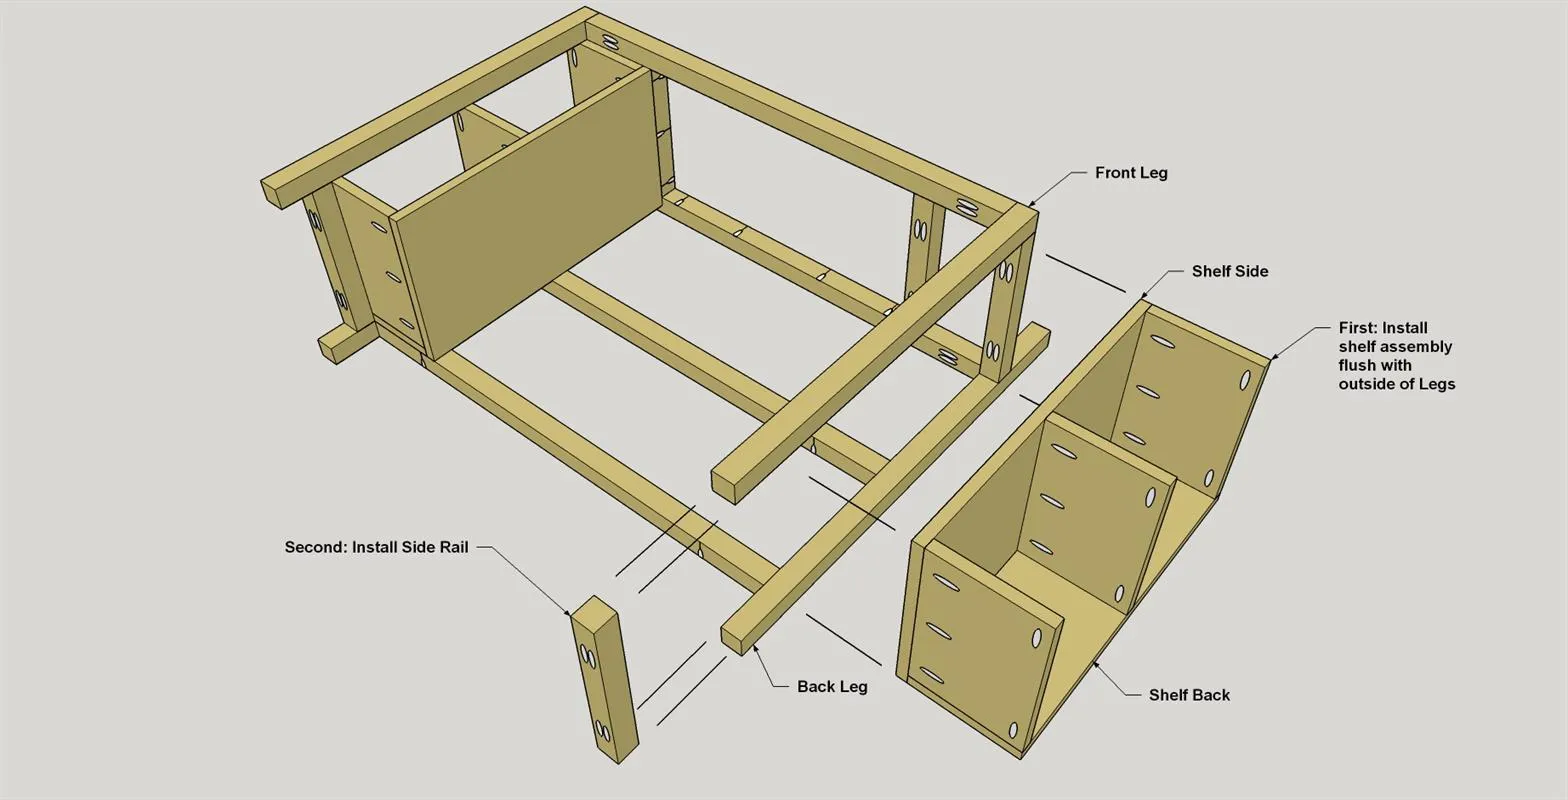
- Position each shelf assembly in the base, making sure that you have the left and right assemblies on the proper sides. When in position, the uppermost Shelf should fit tight against the underside of the upper Side Rail, and the outer edges of the assembly should be flush with the outer faces of the Legs.
- Once you have each assembly in place, secure it by driving 1 1/4" coarse-thread pocket-hole screws into the Legs and into the inner Short Top Rails. To drive the screws in the Shelves, you will need a short square-drive bit and a right-angle attachment for your drill.
- Also drive 1 1/4" coarse-thread screws into the Shelf Backs to secure them to the Back Rails.
12Add the Final Side Rails
Finally, position the two remaining Side Rails on the Legs so that they fit tight against the shelf assemblies, and then attach these Rails using 2 1/2" coarse-thread pocket-hole screws. Once again, you’ll need to use a right-angle attachment on your drill.
13Make the Desk Back
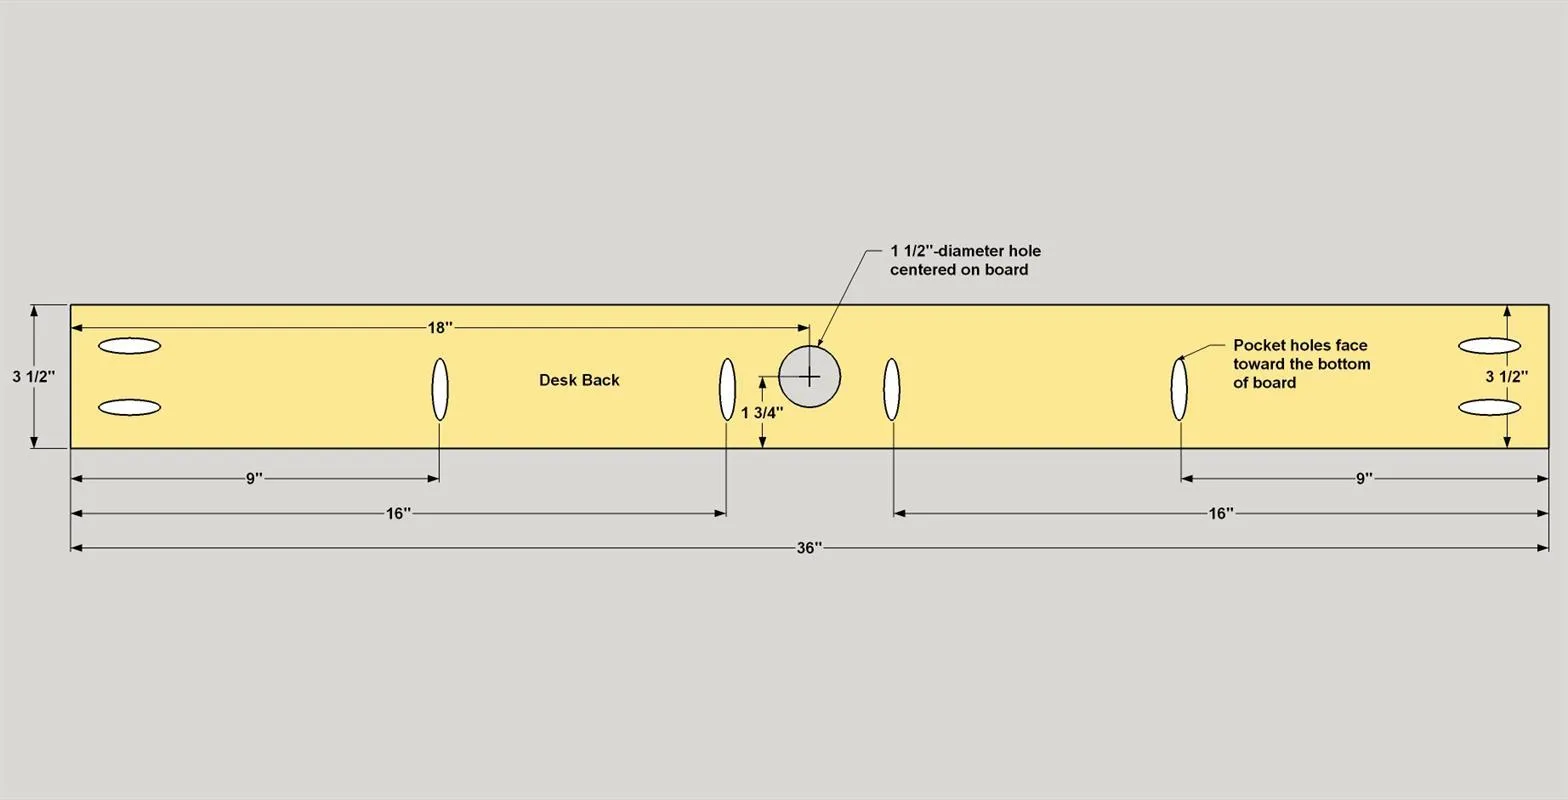
- Cut the Desk Back from a 1x4 board, as shown in the cutting diagram.
- Set your pocket-hole jig for 3/4"-thick material and drill pocket holes at the locations shown.
- Next, drill a 1 1/2"-diameter hole centered on the board as shown.
14Install the Desk Back
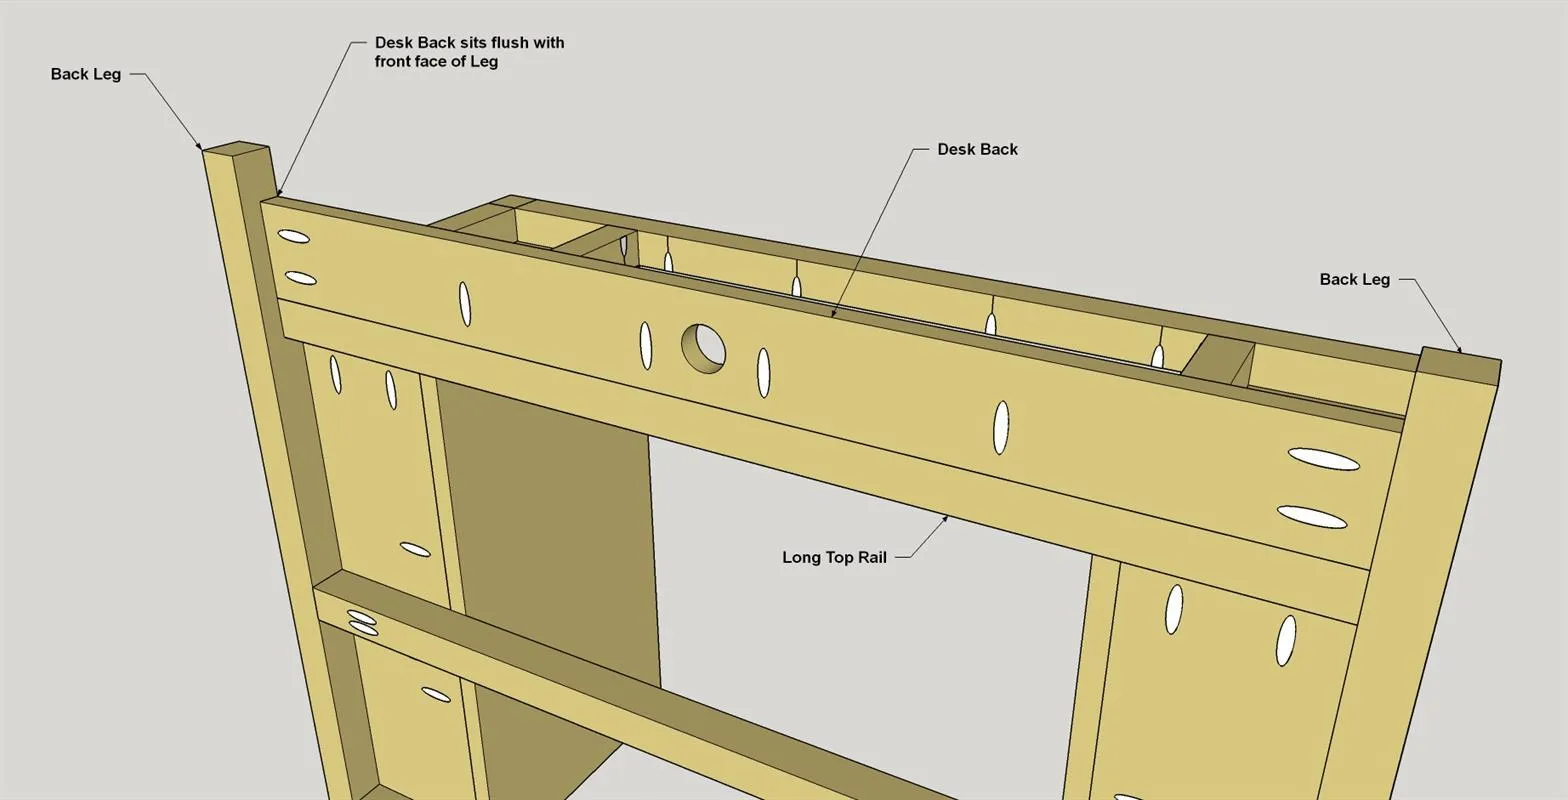
Install the Desk back so it rests on top of the Long Top Rail and is flush with the forward face of the Back Legs. Secure it in place with 1 1/4" coarse-thread pocket-hole screws.
15Make the Charger Rail
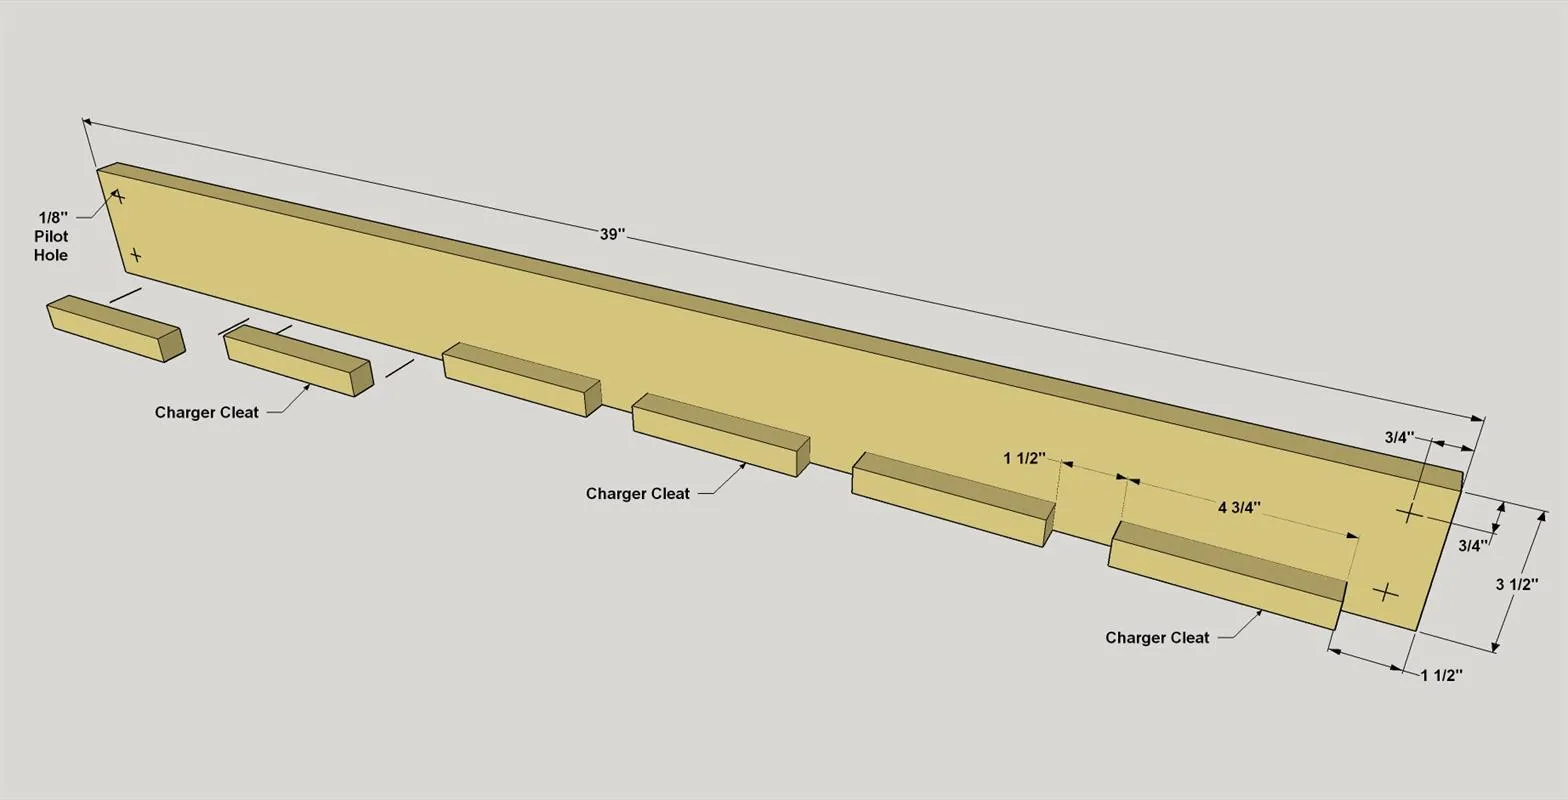
- Cut the Charger Rail from a 1x4 board, as shown in the cutting diagram.
- Drill four 1/8" pilot holes where shown. From 3/4" x 3/4" square dowel, cut six Charger Cleats to length.
- Glue the Charger Cleats to the Rail so they are flush at the bottom and spaced as shown. Let the glue dry before you install the Charger Rail. It will only take 15 to 20 minutes for the glue to dry enough to handle the piece.
16Install the Charger Rail
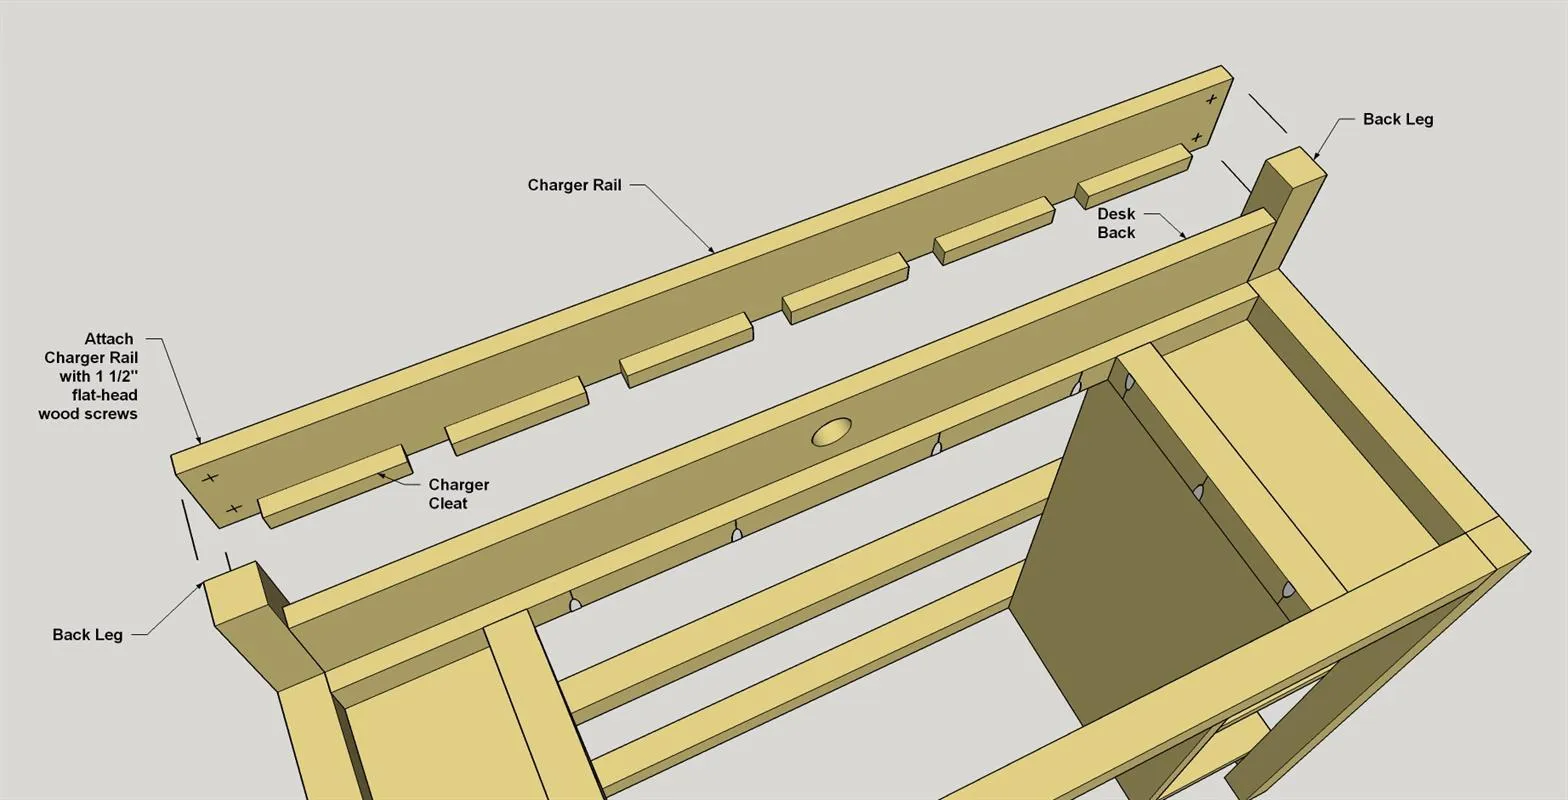
Apply a small amount of glue to the face of each Charger Cleat, and then position the Charger Rail assembly on the Back Legs, as shown. Secure the assembly in position using four 1 1/2" flat-head wood screws.
17Make the Desk Top and Lids
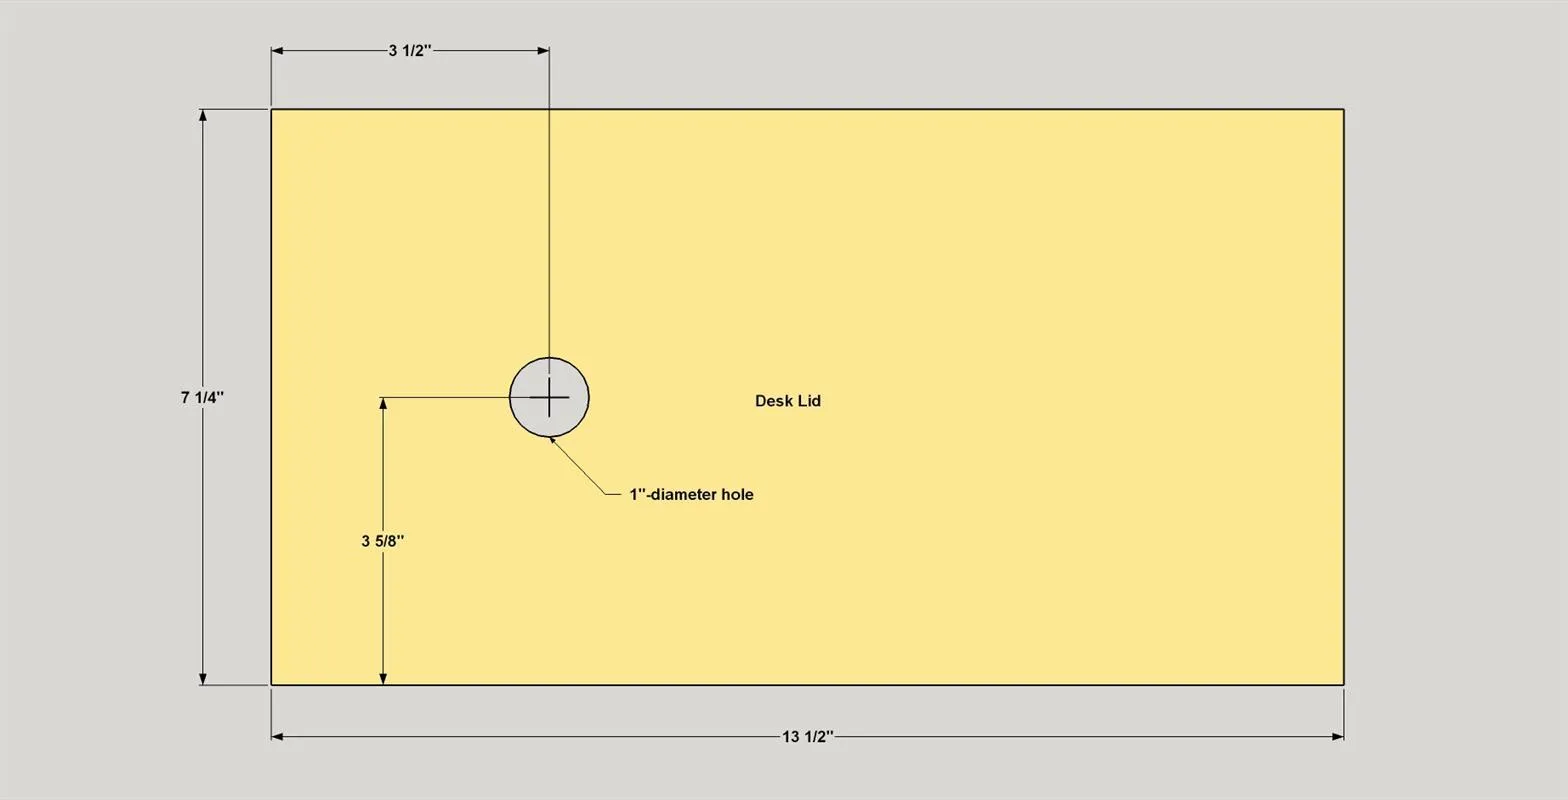
Cut the Desk Top and two Desk Lids to size from 3/4" plywood, as shown in the cutting diagram. Drill a 1"-diameter hole in each Lid at the location shown.
18Cut and Install the Lid Stops
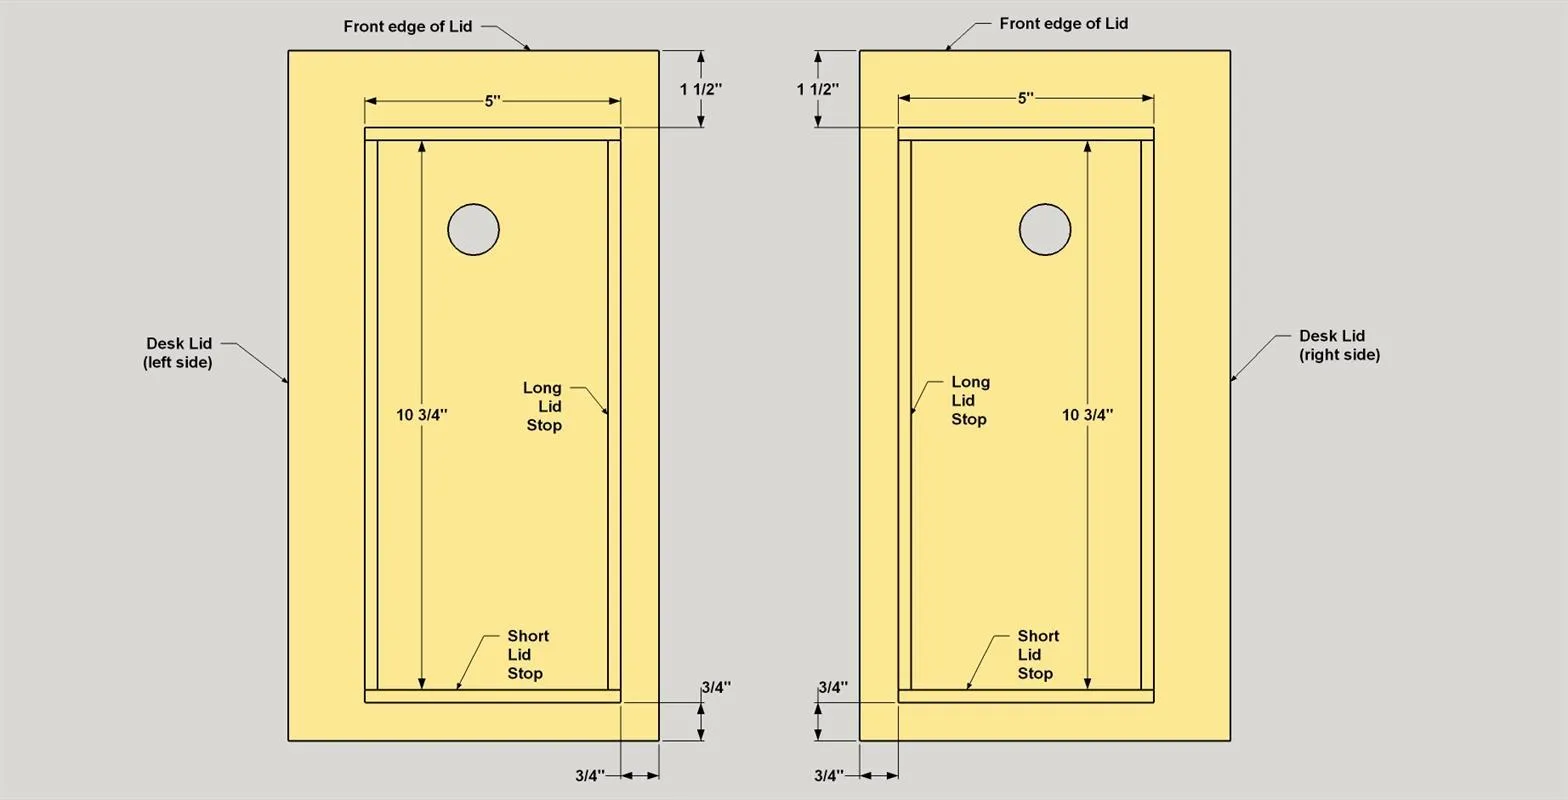
- Cut four Short Stops and four Long Stops to length from 1/4" square dowels, as shown in the cut diagram.
- Glue them to the bottom of each Desk Lid at the locations shown. Note that you’ll need to position the Stops to make a left and right lid.
- Once the glue dries, this is a good time to paint the Desk Top and Desk Lids if you are finishing your desk that way.
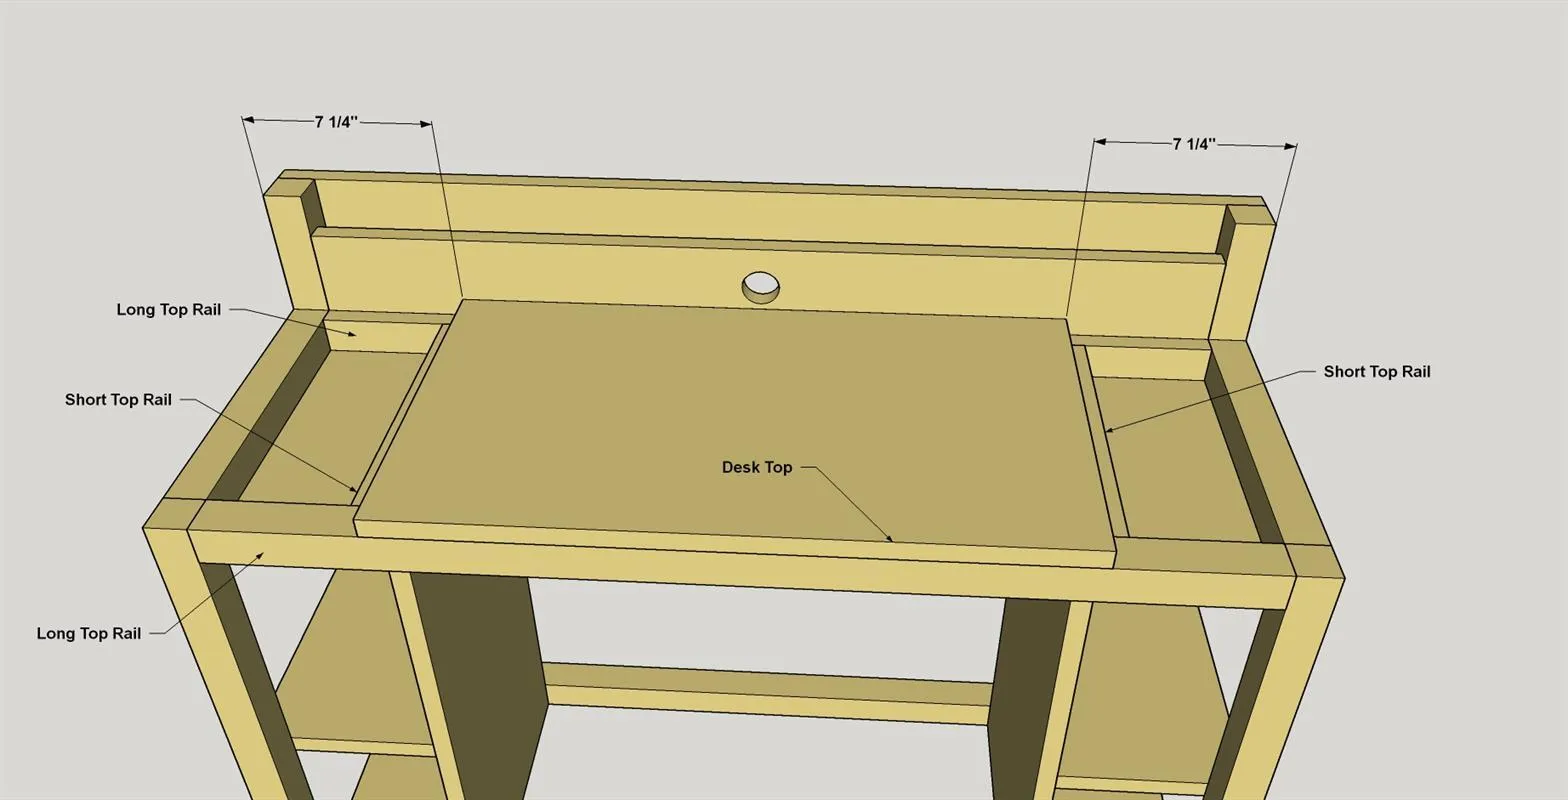
19Install the Desk Top
- Position the Desk Top as shown, so that it is centered from side to side.
- Then secure the Top to the Long Top Rails and the Short Top Rails using 1 1/4" coarse-thread pocket-hole screws where shown.
- Then double-check the fit of the Desk Lids
20Apply a Finish
With everything together, you can apply finish to your desk. If you have already painted the desk top pieces and the shelves, all you’ll need to do is wipe a coat of clear oil on the rest of the desk parts. Once the oil dries, you can load up your desk with supplies, and put it to work.