 Notch
Notch- Difficulty
- Easy
- Time
- 3.5–6.8 hours
- Cost
- $$$
About this build
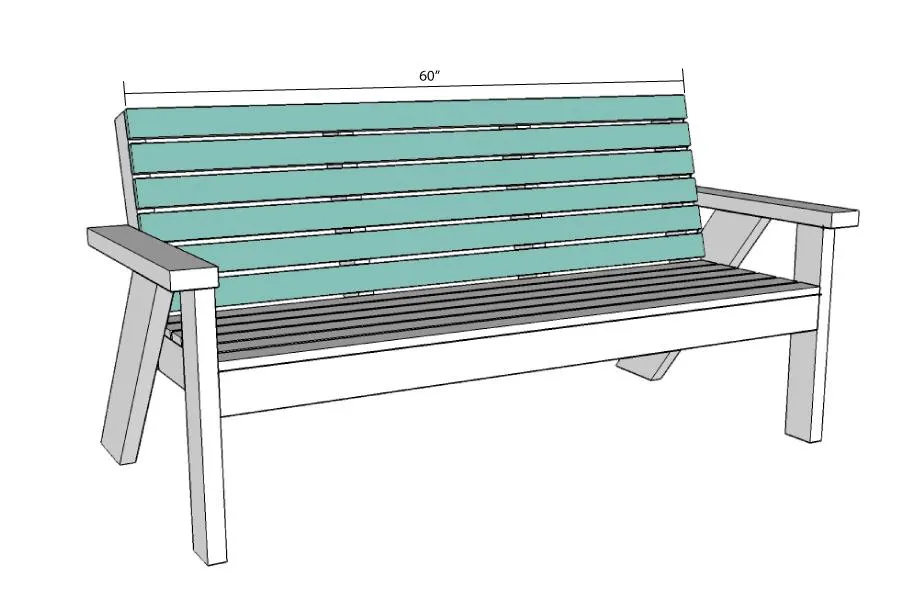
Create the perfect place to enjoy the outdoors with this Slatted Outdoor Sofa. Beautiful lines on the legs and slatted seat/back make this sofa perfect with or without cushions. Easy build made primarily with 2x4 boards. Heavy duty wood screws add detail to the outside of the sofa.
Tools
Essential
- Brad Nailer
- Drill / Driver
- Impact Driver
- Miter Saw
- Pocket Hole Jig
- Random Orbit Sander
Optional / nice to have
- Bar / Pipe Clamps
- Combination Square
- Tape Measure
Materials
| Item | Qty |
|---|---|
| Board, 2x4 96" | 5 board |
| Board, 2x6 72" | 1 board |
| Board, 1x3 96" | 12 board |
| 2 1/2" Blue-Kote Pocket Hole Screws | 50 each |
| 2 1/2" TimberLOK Heavy Duty Wood Screws | 12 each |
| 1 1/2" Finishing Nails | 100 each |
| Wood Glue | 1 each |
| Wood Stain | 1 each |
| Outdoor Wood Sealer | 1 each |
Overall cost: $$$. Lumber prices vary by region, species, and season, so we give a band rather than a figure we would only be pretending to know.
Cut list
| Part | Qty | T × W × L |
|---|---|---|
| Front Leg | 2 | 1" × 3" × 21" |
| Arm | 2 | 1" × 3" × 24" |
| Seat Frame | 2 | 1" × 3" × 60" |
| Seat Frame | 4 | 1" × 3" × 14" |
| Back Frame | 2 | 1" × 3" × 22" |
| Back Frame | 2 | 1" × 3" × 20" |
| Back Frame | 1 | 1" × 3" × 57" |
| Back Leg | 2 | 1" × 5" × 31" |
| Seat and Back Slats | 12 | 3/4" × 2" × 60" |
What to buy
Buy 18 boards at 8 ft.
1" × 5"
1 board
1" × 3"
5 boards
3/4" × 2"
12 boards
Assumes 8 ft stock, a 1/8" saw kerf, and buying each part at its own width. Change the board size or kerf on the full board plan →
Instructions
1Final Dimensions
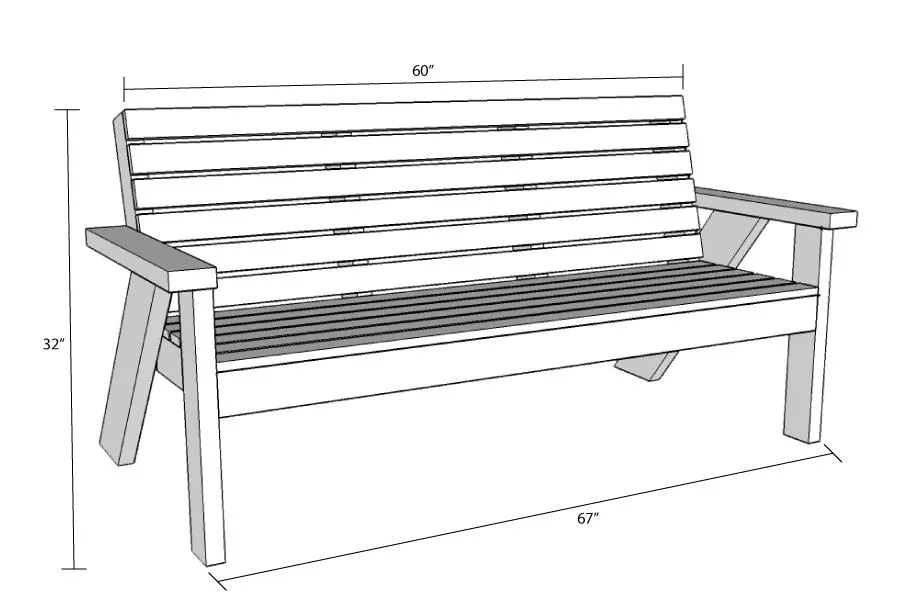
The finish sofa will be 67" wide and 32" tall. The seat area is 60" wide x 18" deep.
2Cut Back Leg Boards
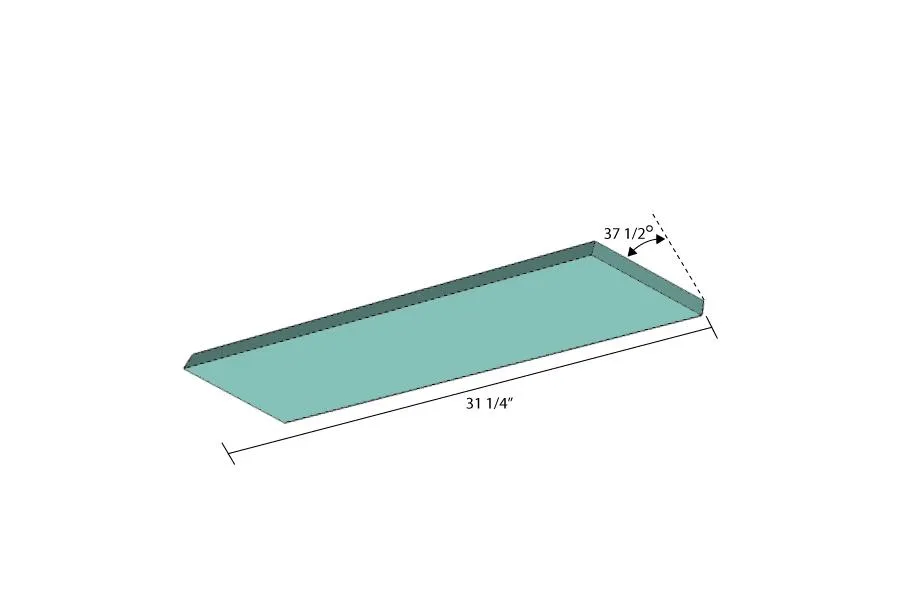
- Cut 2 pieces of 2x6 board to 31 1/4" long.
- Cut both ends off at a 37 1/2 degree angle in the same direction.
- Drill 3 pocket holes on the inside top of each back leg board
3Build the Sides
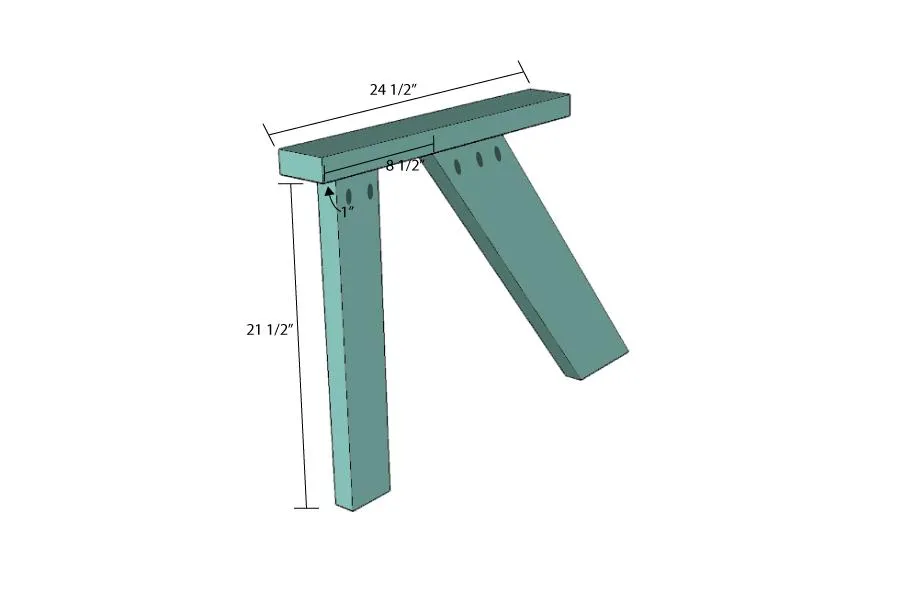
- Add 2 pocket holes to the top of the front leg boards.
- Attach the front leg to the arm board with 2 1/2" pocket hole screws. The front leg should be 1" in from the front of the arm and flush with the inside of the arm.
- Attach the back leg board 8 1/2" in from the front of the arm and flush with the inside of the arm.
- Repeat for the other side, making sure the arms are mirrored.
4Build the Seat
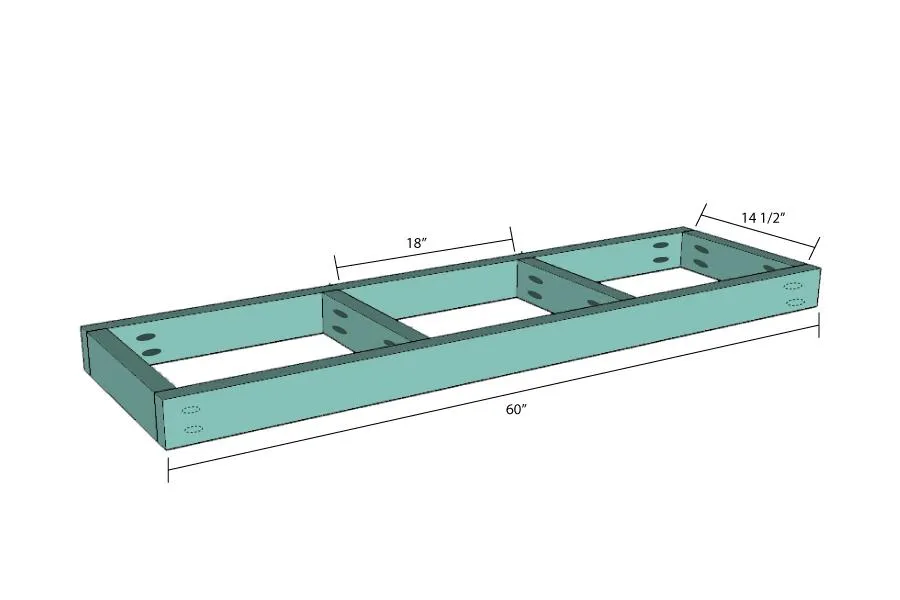
- Drill 2 pocket holes in each end of the 60" seat frame boards.
- Drill 2 pocket holes in each end of the 14 1/2" seat frame boards.
- Attach the 14 1/2" boards between the 60" boards. Two boards will be flush to the outside ends of the 60" boards and the other two will be equally spaced with 18" between all boards.
5Attach the Seat Frame
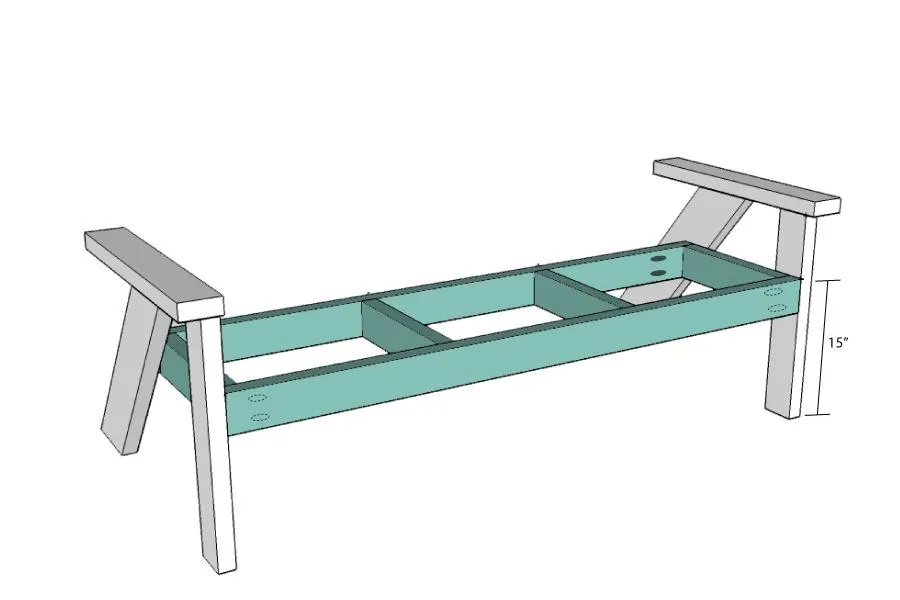
Attach the seat frame to the sides with pocket holes previously drilled in the ends of the 60" seat frame boards. The top of the seat frame should be 15" up from the bottom of the legs. Additionally secure the seat with 2 heavy duty wood screws from the outside of the leg into the 60" seat frame boards (in the front and the back of the seat frame).
6Add Back Frame Supports
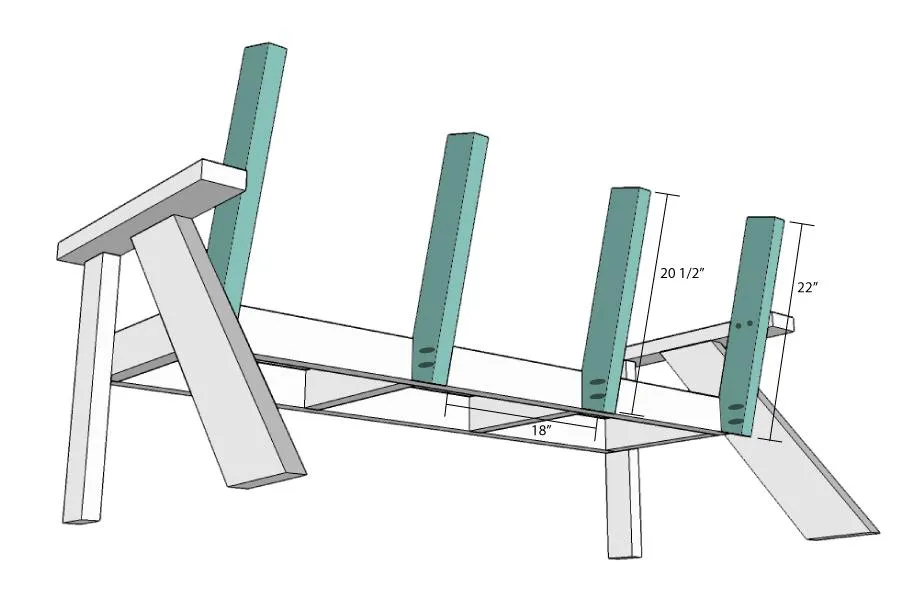
- Print the template for the back frame supports (in the extras). Trace the cut lines on the 22" and 20 1/2" back frame boards.
- Cut along the lines.
- Add pocket holes to the flat edge on the front and to the top of the boards. Secure the 22" boards to each side of the seat frame and secure the 20 1/2" boards to the back of the seat frame lined up with the center seat supports.
- Add 1 heavy duty screw through the outside of the back leg into the outer back frame board.
- Add 2 2 1/2" pocket hole screws through the inside of the back support frame boards into the arm rest (no pocket holes needed).
7Finish the Back Frame Support
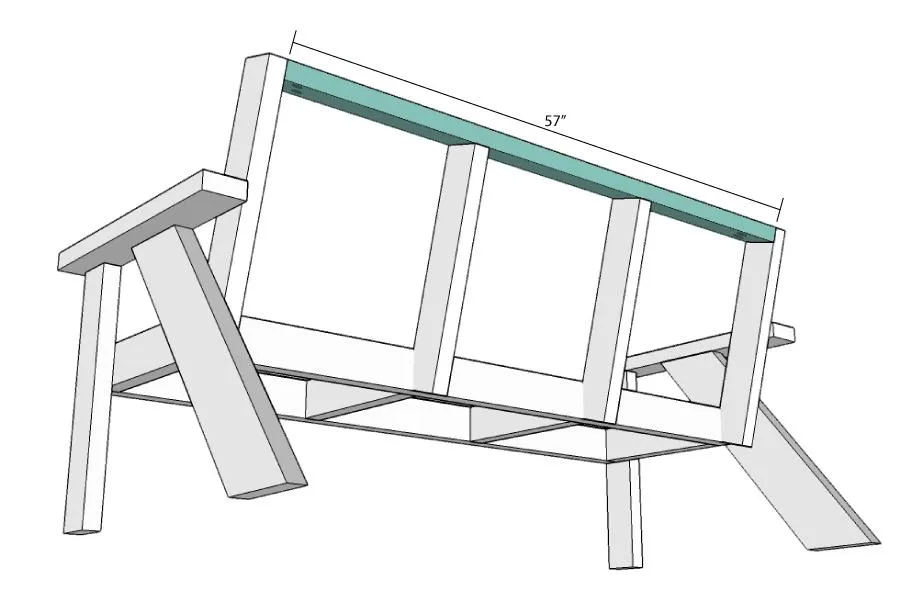
- Add pocket holes to each end of the 57" back frame board.
- Attach it to the top of the back frame support boards so it is flush with the top of the side boards and sits on top of the center boards (secure with pocket hole screws in the holes in the center frame support boards).
- Add heavy duty screw to the outside back frame boards into the 57" back frame board.
8Add the Seat Slats
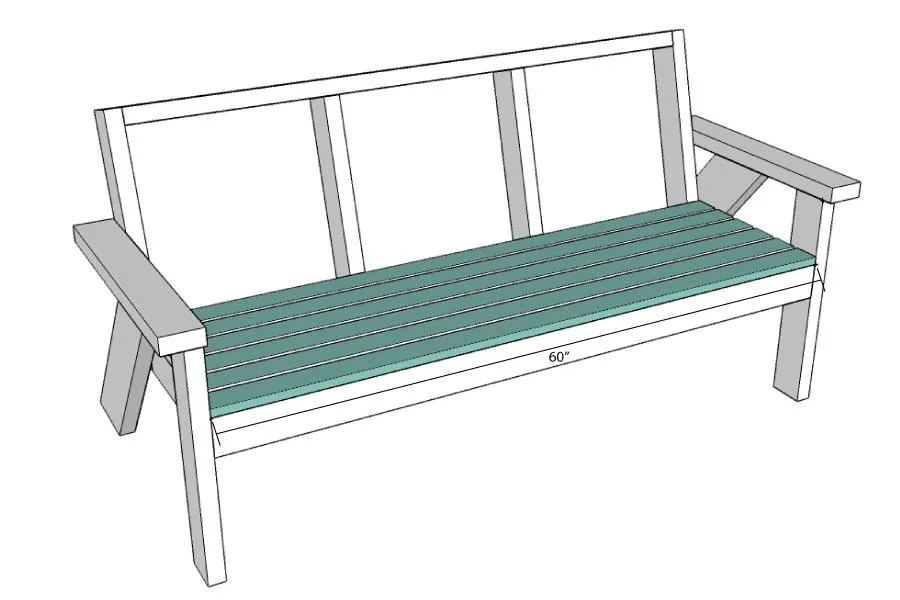
Add the 1x3 seat slats to the seat frame so they are flush with the edges of the seat frame and 1/2" gap between boards. Secure with wood glue and finishing nails.
9Add the Back Slats
Add the 1x3 back slats to the back frame so they are flush with the edges of the seat frame and 1/2" gap between boards. Secure with wood glue and finishing nails.
10Finish the sofa
Sand and stain the wood. Make sure to seal it with an outdoor wood sealer to protect it from the elements.
Tags
- Outdoor Furniture
- Beginner
Reviews & builds
No reviews yet
Sign in to review this plan or share your build.
No reviews yet. Be the first to build this.