 Notch
- Difficulty
- Easy
- Time
- 2.8–5.3 hours
- Cost
- $$
About this build
Everyone has some special small items that they’d love to display. That can be challenging, though, since small pieces tend to get lost on shelves. These shadow boxes offer a dramatic way to display these special items while adding some style to any wall. NOTE: Materials List is for ONE FRAME.
Tools
Essential
- Drill / Driver
- Miter Saw
- Pocket Hole Jig
- Random Orbit Sander
Optional / nice to have
- Tape Measure
Materials
| Item | Qty |
|---|---|
| Board, 1/2" x 6" (5 1/2" Actual) 36" | 3 board |
| Board, 1/2" x 3" (2 1/2" Actual) 24" | 1 board |
| 1" brad nails | 6 each |
| 1" fine-thread pocket hole screws | 33 each |
| Wood glue | 1 each |
| Sawtooth picture frame hanger | 1 each |
Overall cost: $$. Lumber prices vary by region, species, and season, so we give a band rather than a figure we would only be pretending to know.
Cut list
| Part | Qty | T × W × L |
|---|---|---|
| Frame Rail | 2 | 1/2" × 5" × 19" |
| Frame Stile | 2 | 1/2" × 5" × 6" |
| Box Side | 2 | 1/2" × 5" × 8" |
| Box Top/Bottom | 2 | 1/2" × 5" × 9" |
| Back Wide | 1 | 1/2" × 5" × 10" |
| Back Narrow | 1 | 1/2" × 2" × 10" |
What to buy
Buy 3 boards at 8 ft.
1/2" × 5"
2 boards
1/2" × 2"
1 board
Assumes 8 ft stock, a 1/8" saw kerf, and buying each part at its own width. Change the board size or kerf on the full board plan →
Instructions
1Review the Project Before You Begin
It's always a good idea to look through everything before you begin building to make sure you understand the steps and to ensure that you have everything you need. For this project, you'll want to note that the materials lists and cutting diagrams are for building ONE FRAME. So, you'll need to multiply everything by the number of frames you want to build.
2Make the Frame Parts
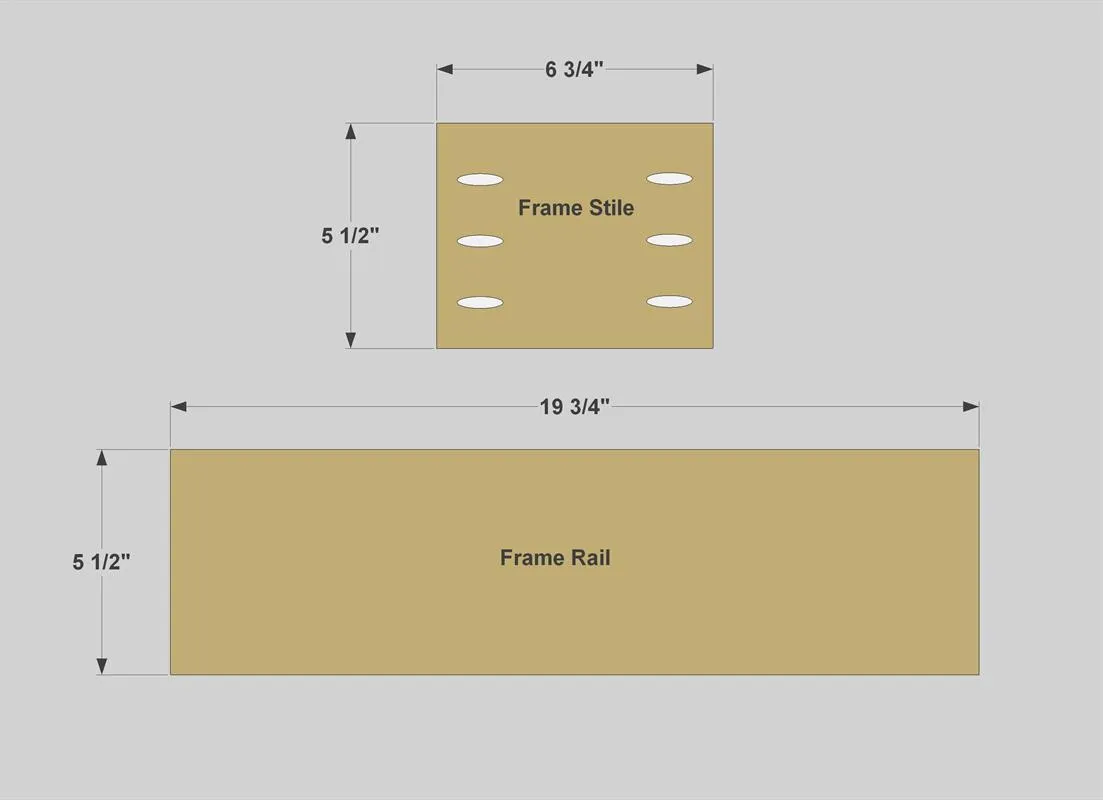
Cut two Frame Rails and two Frame Stiles to length from 1/2"x6" boards, as shown in the cutting diagram. With your pocket hole jig set up for 1/2" material, drill pocket holes in the Stiles as shown.
3Assemble the Frame
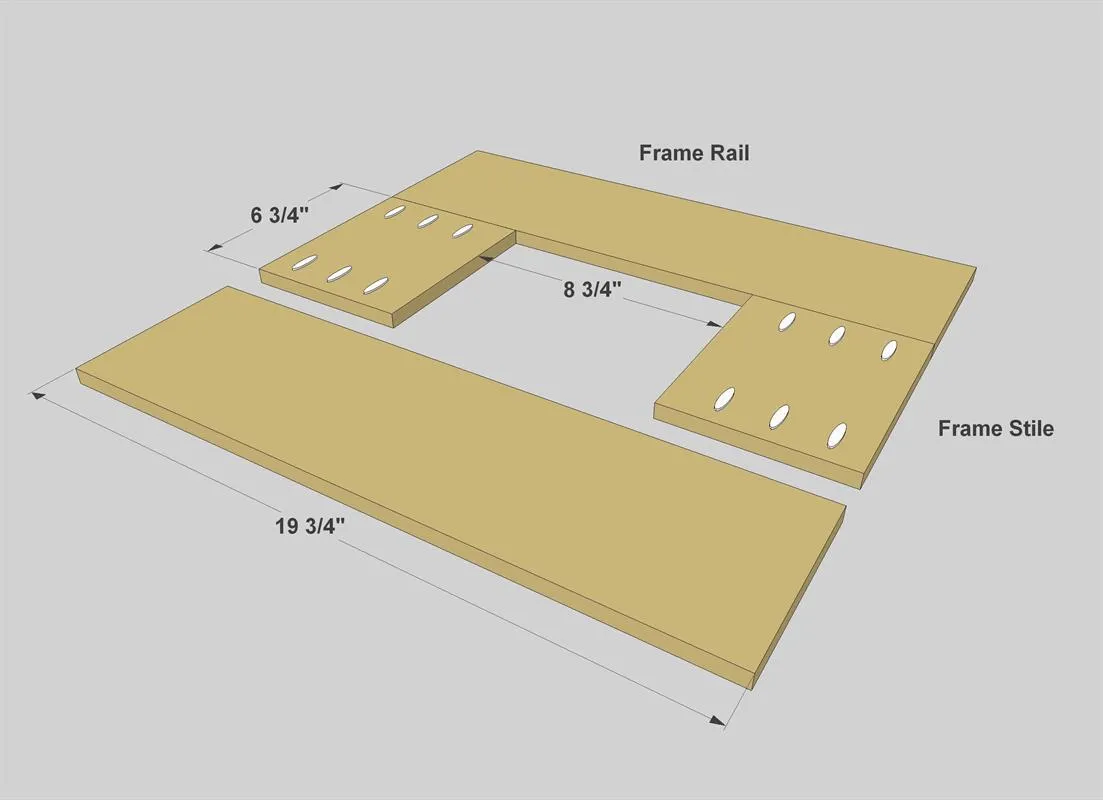
Assemble the Rails and Stiles using glue and 1" pocket hole screws, as shown, to create the frame.
4Make the Box Top, Bottom and Sides
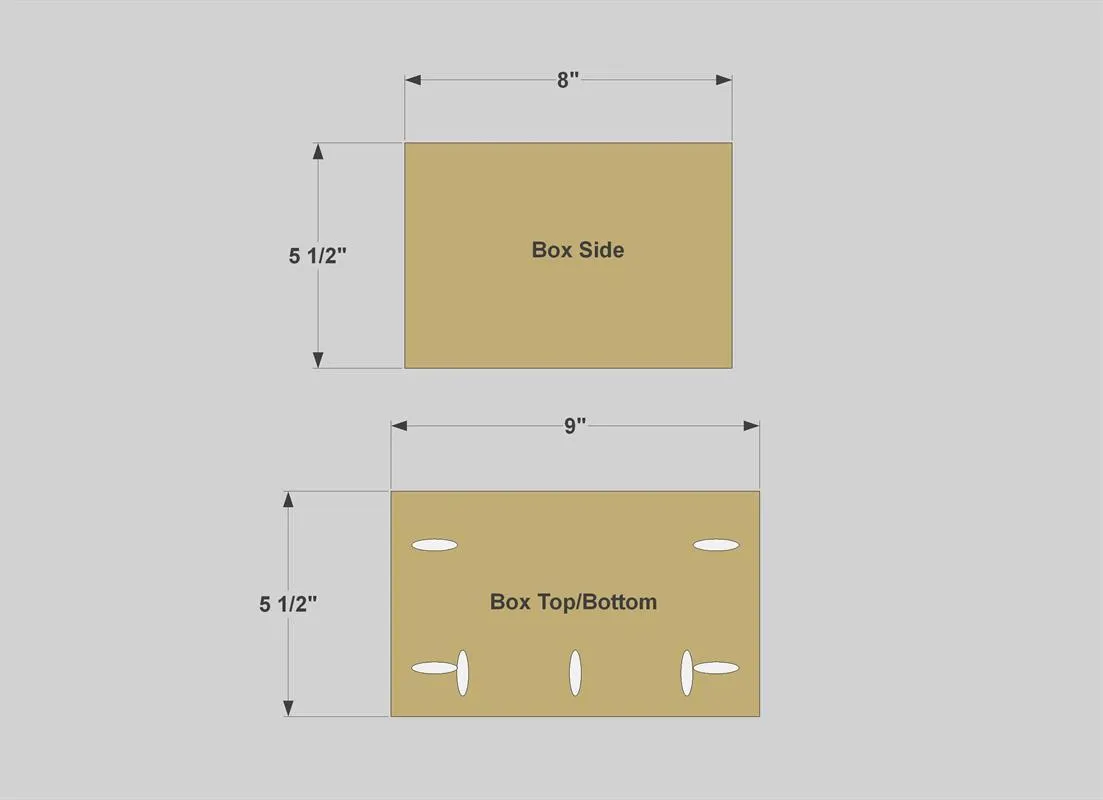
Cut one Box Top, one Box Bottom, and two Box Sides to length from 1/2"x6" boards, as shown in the cutting diagram. With your pocket hole jig set up for 1/2" material, drill pocket holes in the Box Top and Box Bottom as shown.
5Assemble the Box Parts
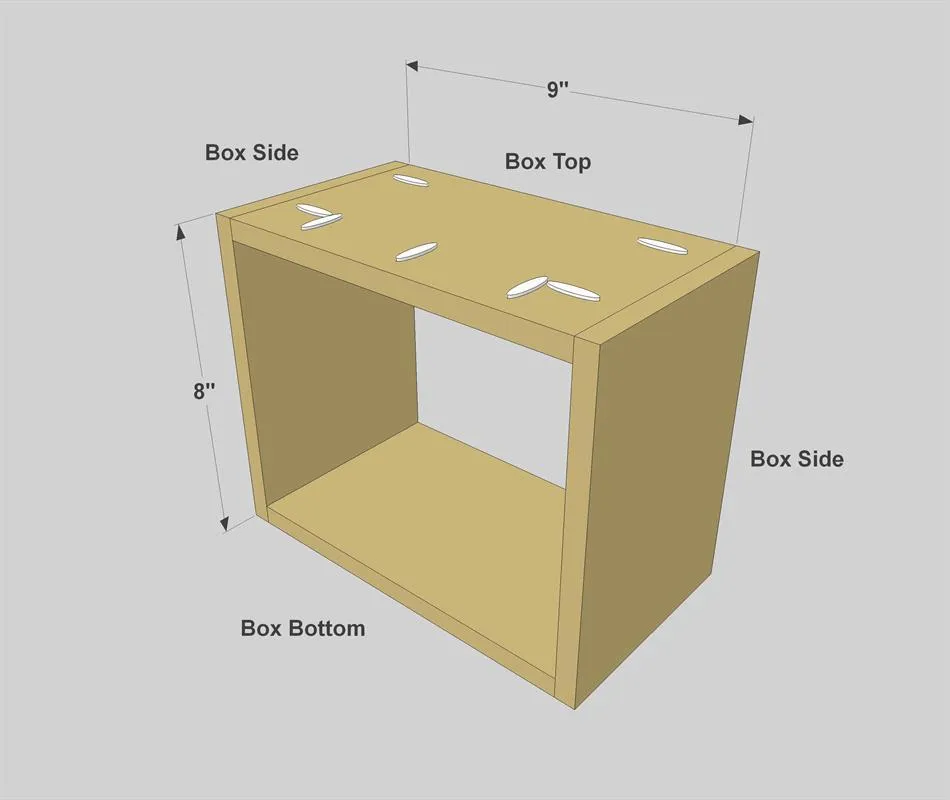
Assemble the Box Sides, Top and Bottom using glue and 1" pocket hole screws, as shown.
6Make the Back Parts
Cut one Back Wide to length from a 1/2"x6" board, and cut one Back Narrow from a 1/2"x3" board, as shown in the cutting diagram. Then, with your pocket hole jig set up for 1/2" material, drill pocket holes in the Back Wide, as shown.
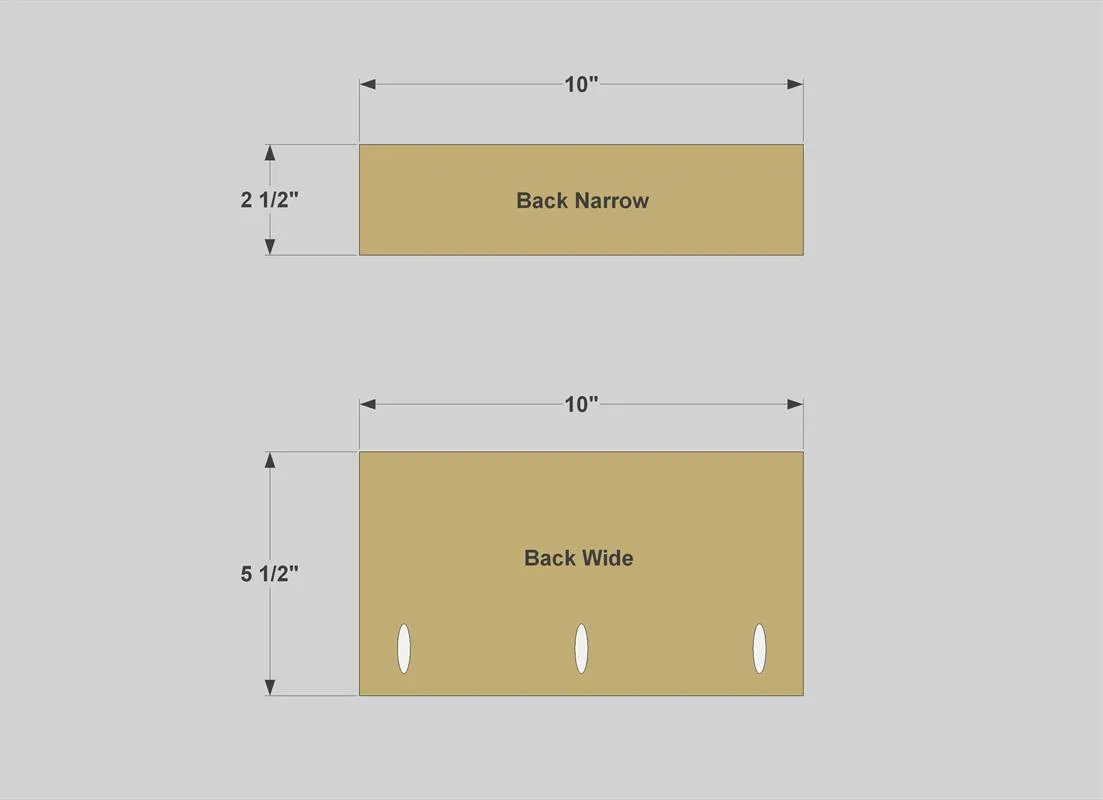
7Assemble and Attach the Back
- Attach the Back Narrow to the Back Wide using glue and 1" pocket hole screws.
- Then you can attach the back to the box. Make sure you attach it to the edge edges without pocket holes. To attach the back, use glue and 1" brads, as shown. It's a good idea to drill pilot holes for the brads using the Tip below.
Tip: Use a Brad as a Pilot Bit To prevent splitting, it's a good idea to drill pilot holes for the brad nails. A great way to do this is to use a nail instead of a drill bit. Just chuck a nail into your drill, and then create your holes.
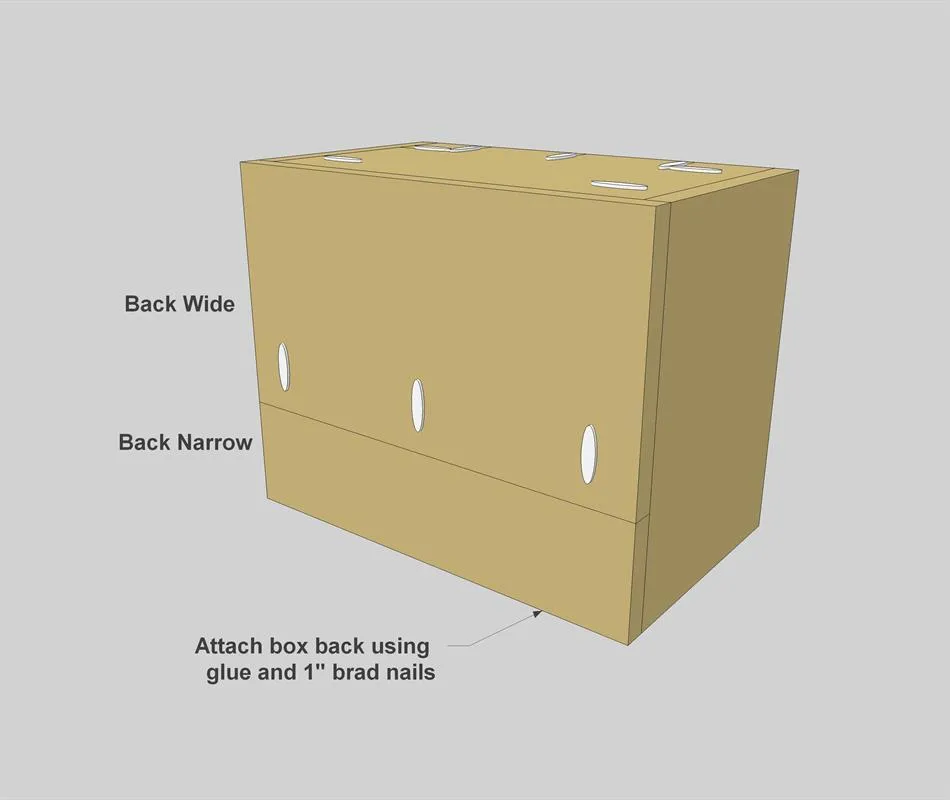
8Attach the Box to the Frame
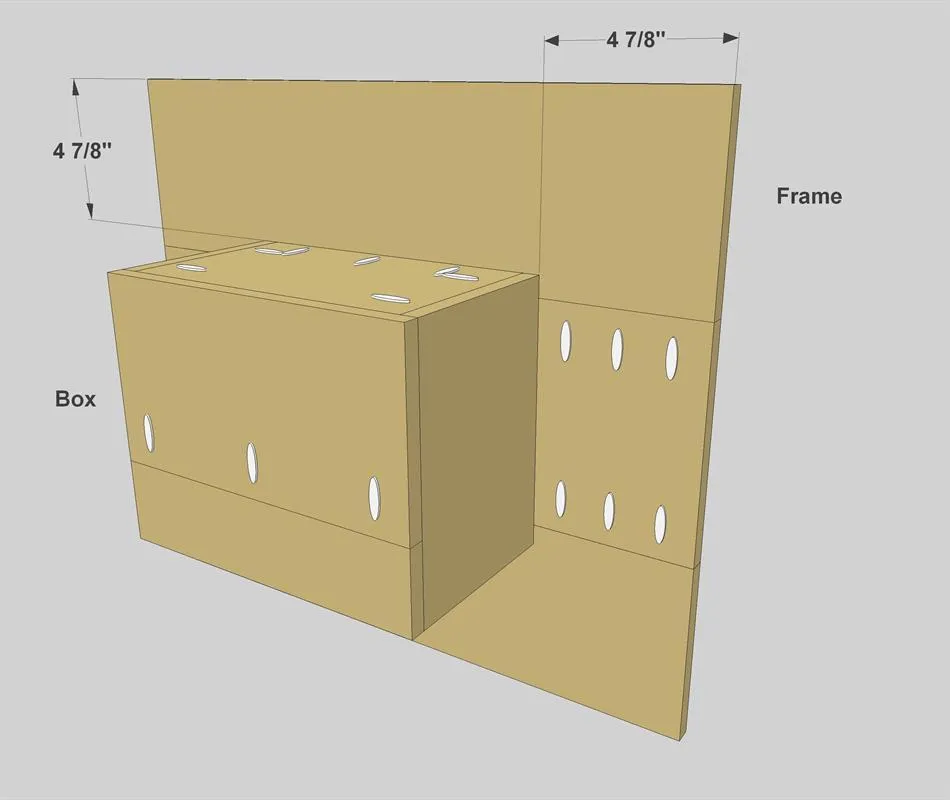
After sanding he parts as needed, you can attach the box to the frame using glue and 1" pocket hole screws. Then paint or finish the frame to match your style, and hang it on the wall. The frame is light, so you can use a standard sawtooth picture-frame hanger.
Tags
- Decor
- Beginner
Reviews & builds
No reviews yet
Sign in to review this plan or share your build.
No reviews yet. Be the first to build this.