 Notch
Notch- Difficulty
- Easy
- Time
- 3.5–6.5 hours
- Cost
- $$
About this build
Storage is important, that’s why these easy to build side tables are so great. They add just the right amount of storage for any space, and all you need are a couple boards and some stock legs from the home center. They're simple enough you can easily build a couple of them in just a weekend.
Tools
Essential
- Drill / Driver
- Miter Saw
Optional / nice to have
- Bar / Pipe Clamps
- Combination Square
- Tape Measure
Materials
| Item | Qty |
|---|---|
| Board, 1x6 72" | 1 board |
| Board, 1x6 96" | 1 board |
| Box - 1 1/4" fine-thread Kreg pocket-hole screws (42 screws needed) | 1 each |
| 17" ash table legs | 4 each |
| Metal table leg angle top plates | 4 each |
| Wood glue | 1 each |
| Self-Centering Drill Bits | 1 each |
Overall cost: $$. Lumber prices vary by region, species, and season, so we give a band rather than a figure we would only be pretending to know.
Cut list
| Part | Qty | T × W × L |
|---|---|---|
| Top | 3 | 3/4" × 5" × 20" |
| Shelf | 3 | 3/4" × 5" × 15" |
| Side | 6 | 3/4" × 5" × 6" |
What to buy
Buy 2 boards at 8 ft.
3/4" × 5"
2 boards
Assumes 8 ft stock, a 1/8" saw kerf, and buying each part at its own width. Change the board size or kerf on the full board plan →
Instructions
1Cut the Top Boards
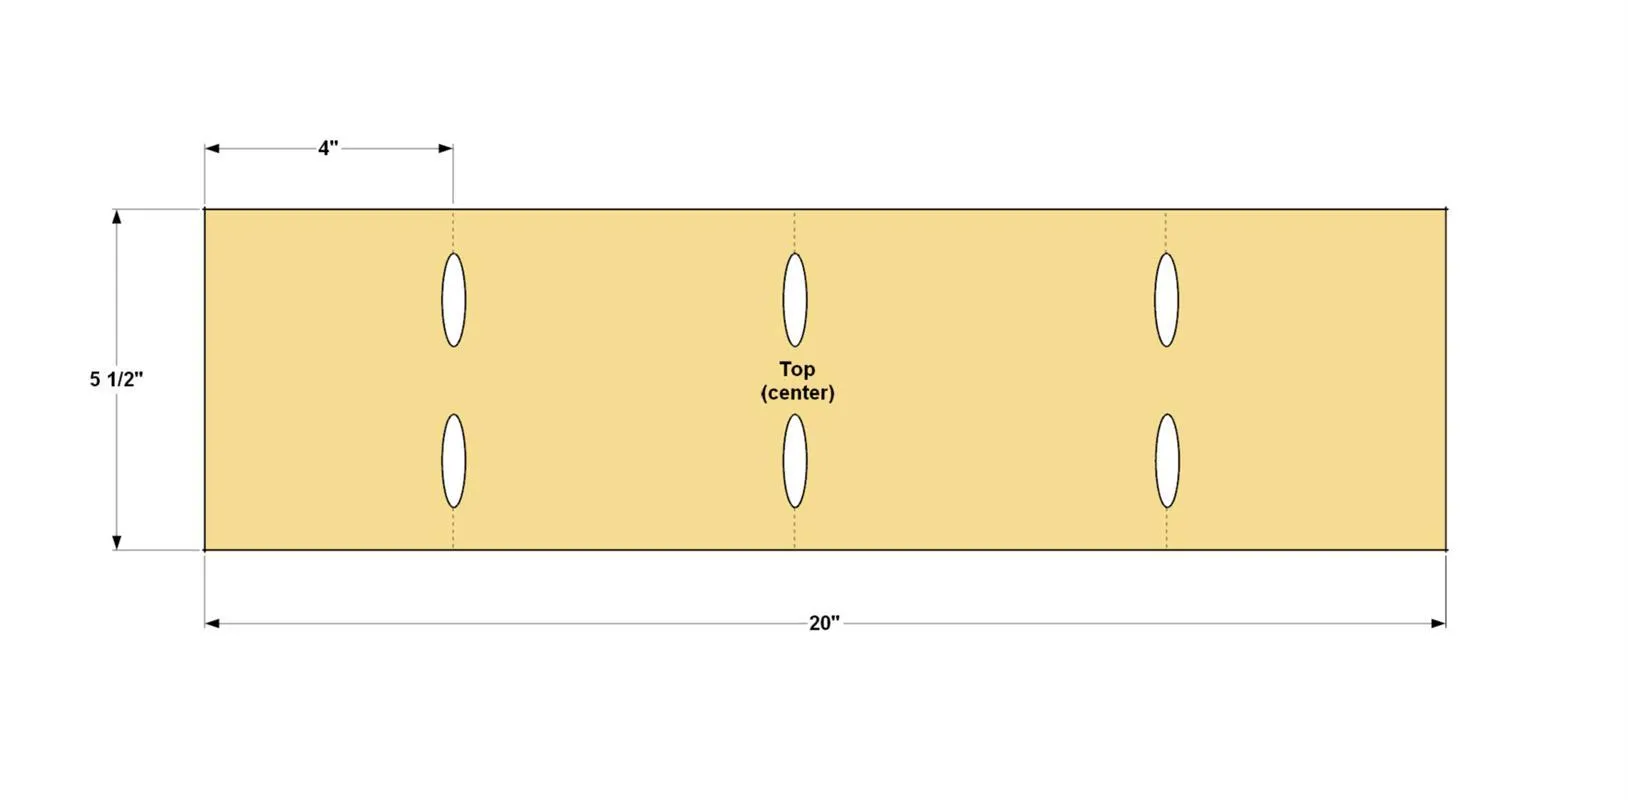
Start by cutting all of the Top boards to finished size from a 1 x 6 alder board, as shown in the cutting diagram. Set your Kreg Pocket-Hole Jig for 3/4"-thick material, and then drill pocket holes in one of the Top boards at the locations shown.
2Assemble the Top
Apply glue to the mating edges of the Top boards and align them to form the top. Clamp the boards together and then secure and them with 1 1/4" fine-thread Kreg screws.
Tip: Sand Before Assembly After the table is assembled, some of the spaces may be too tight for a sander to reach. A good tip is to sand the panels before assembling them into the finished table. Sand both sides of the panel flat with 120 grit sand paper, and then finish with 150 or 180 grit for the final surface.
3Cut the Side Boards
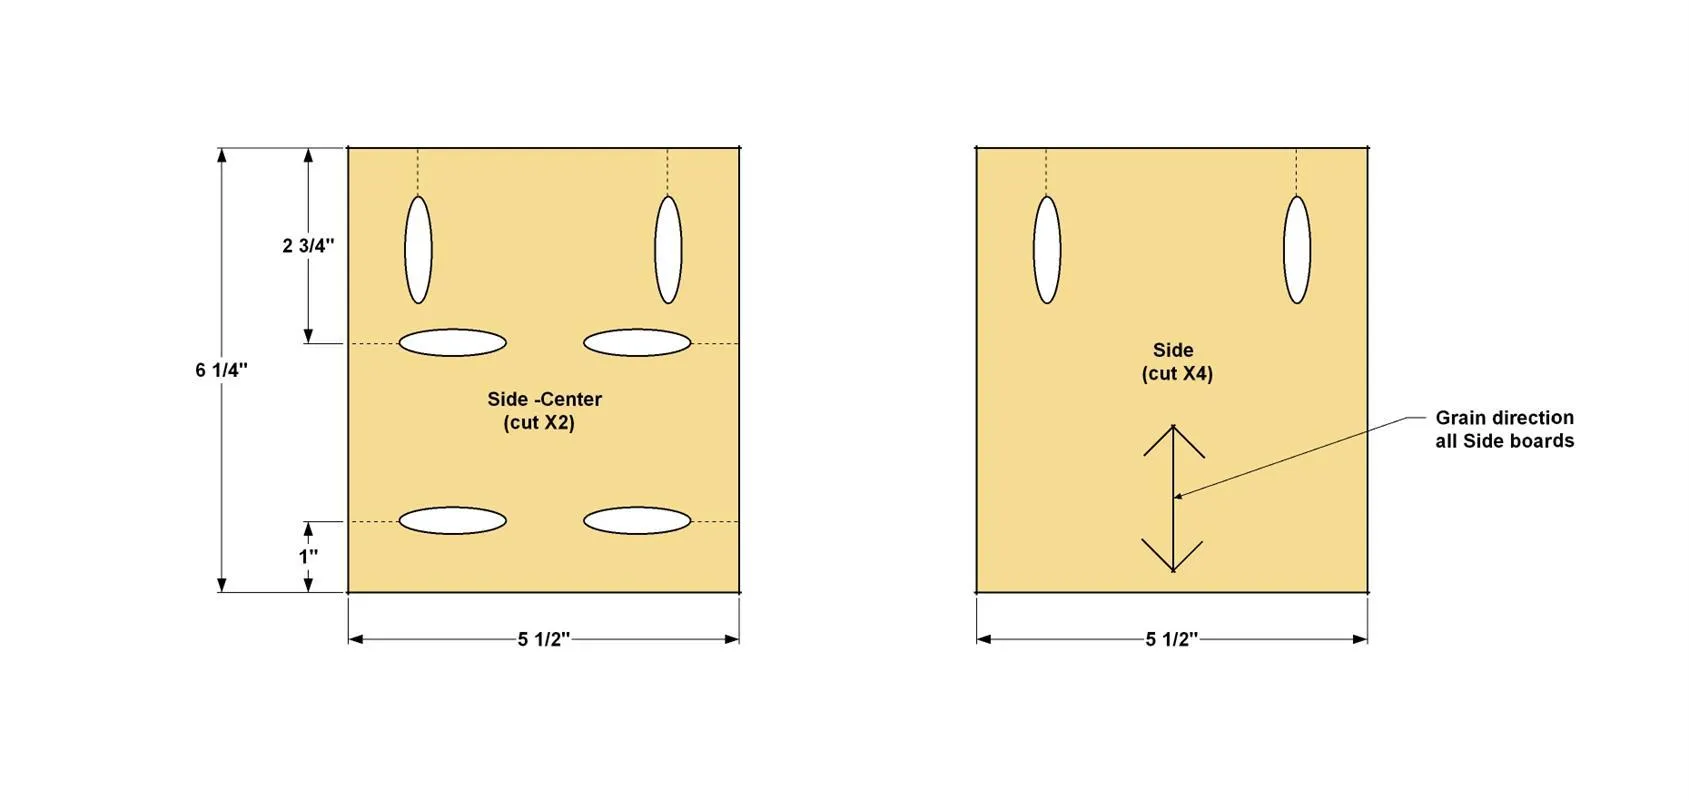
Cut six Side boards to finished size from a 1 x 6, as shown in the cutting diagram. Drill pocket holes in each board, at the locations shown.
4Assemble the Sides
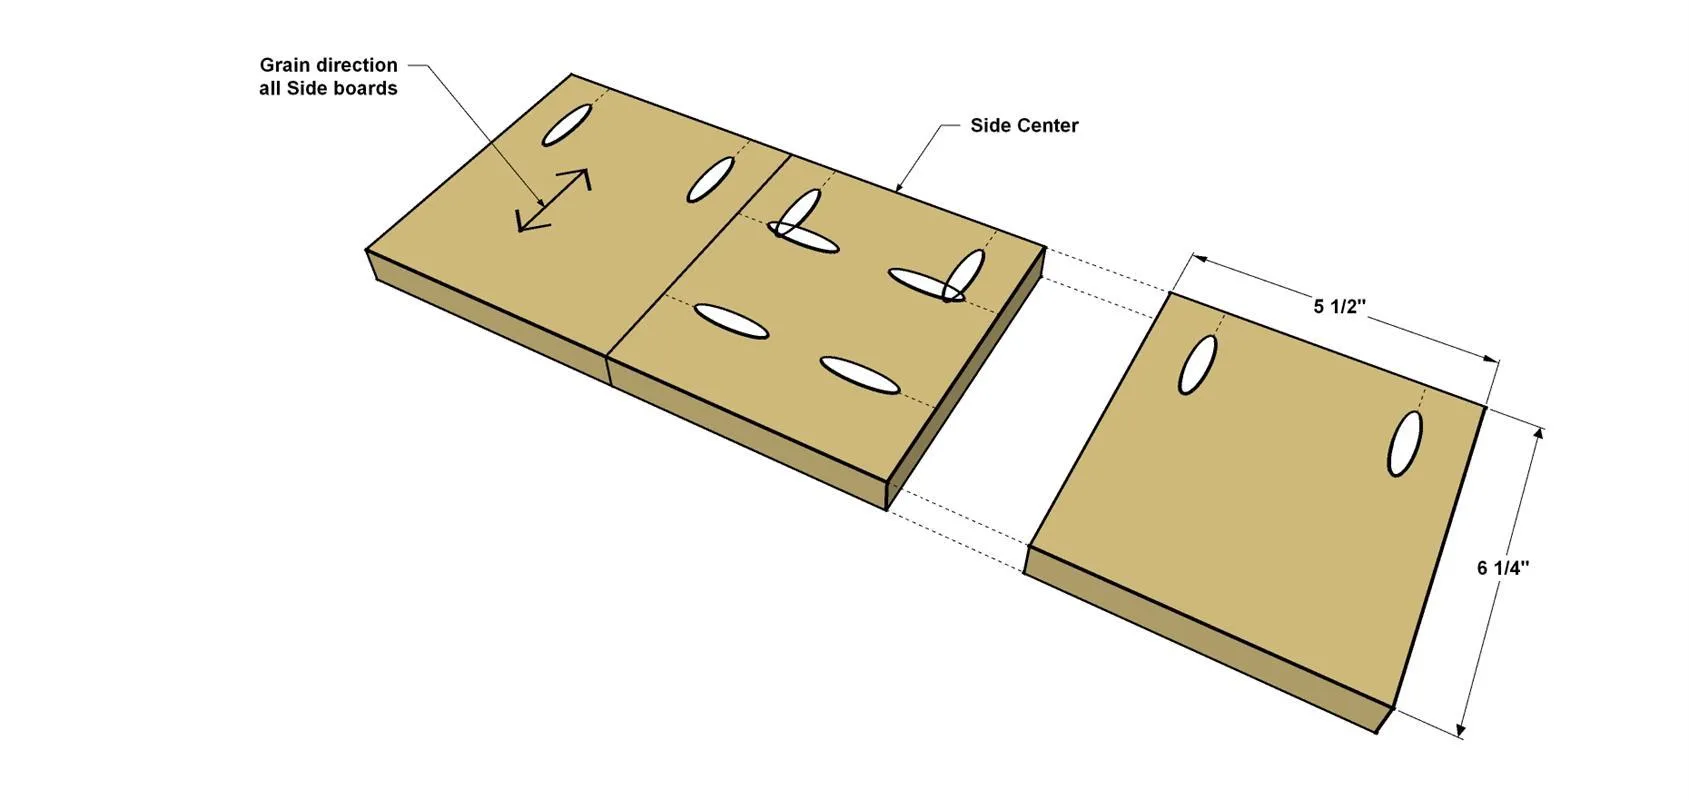
- Apply glue to the mating edges of the three Side boards and align them to form a Side panel, as shown.
- Clamp the boards together and then secure and them with 1 1/4" fine-thread Kreg screws.
- Repeat this process for the other Side.
- Sand both sides of each panel with 120 grit sand paper first, and then finish with 150 or 180 grit for the final surface.
5Cut the Shelf Boards
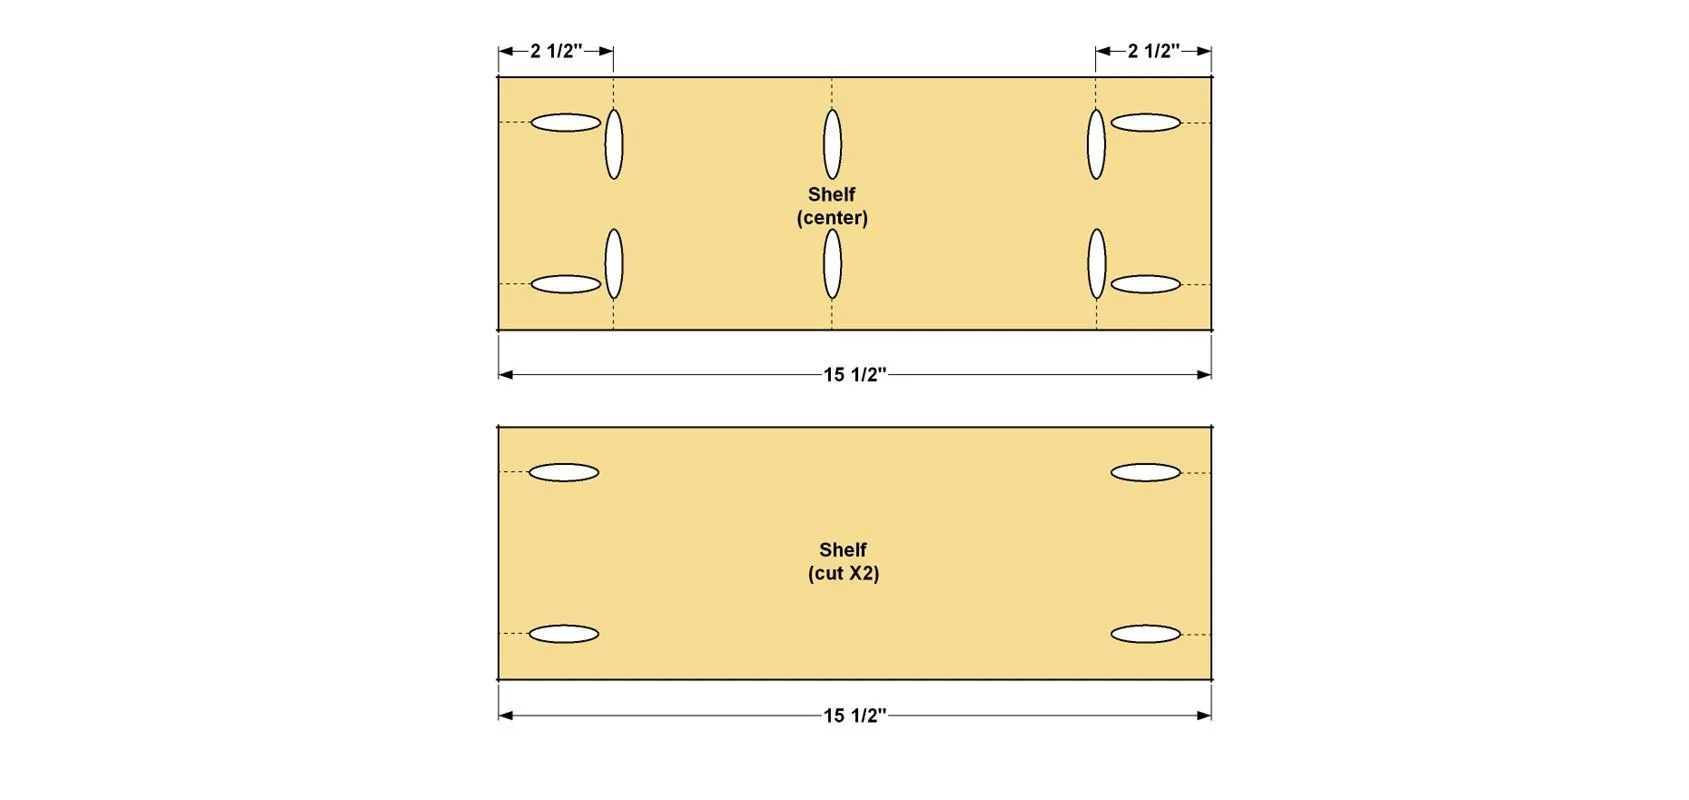
Cut three Shelf boards to finished size from a 1 x 6 alder, as shown in the cutting diagram. Drill pocket holes in all the boards at the locations shown.
6Assemble the Shelf
- Apply glue to the mating edges of three Shelf boards and align them to form a Shelf panel, as shown.
- Clamp the boards together and then secure and them with 1 1/4" fine-thread Kreg screws.
- Sand both sides of the panel with 120 grit sand paper first, and then finish with 150 or 180 grit for the final surface.
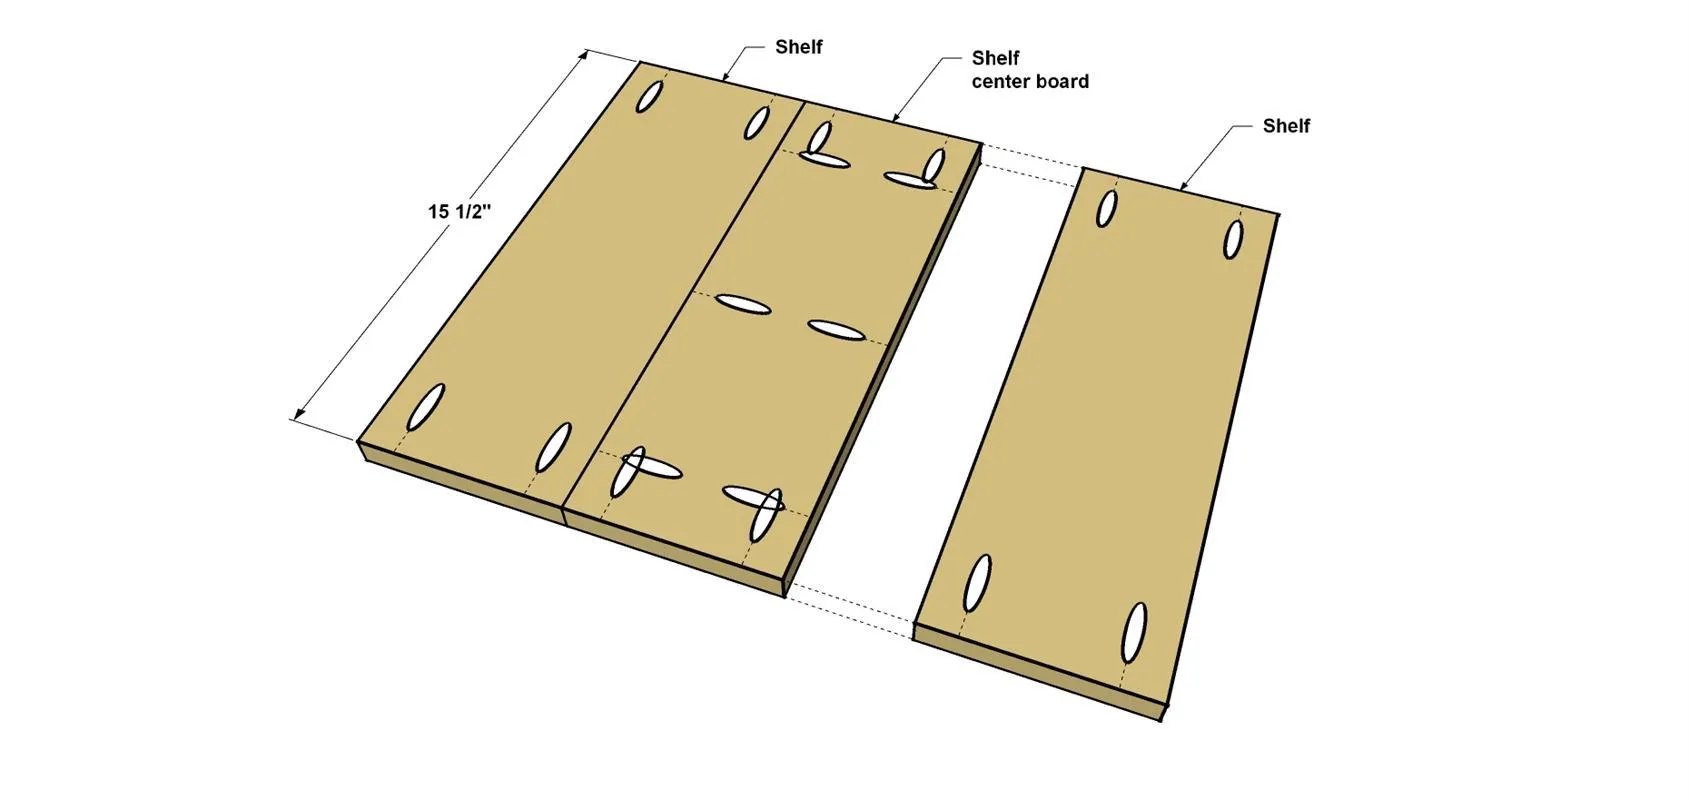
7Add the Sides to the Top
Apply glue to the mating edges of three Side boards and align them to form a Side panel, as shown. Clamp the boards together and then secure and them with 1 1/4" fine-thread Kreg screws.
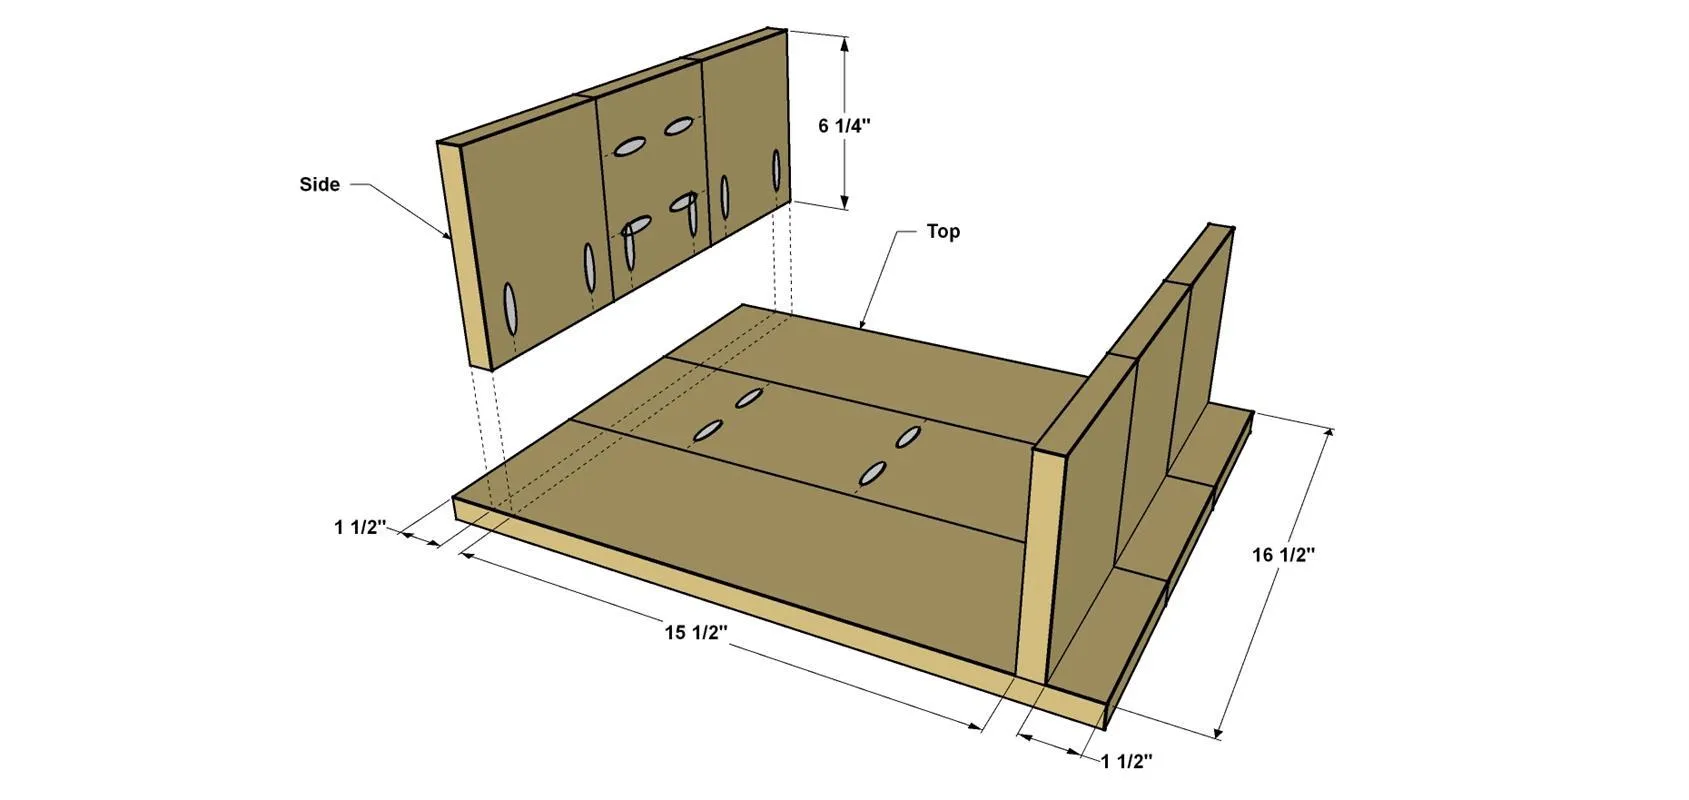
8Add the Shelf
Position the Shelf between the Side so the edges and face are flush with the Sides. Clamp the Shelf in position, as shown, and secure it to the Sides using 1 1/4" fine-thread Kreg Screws.
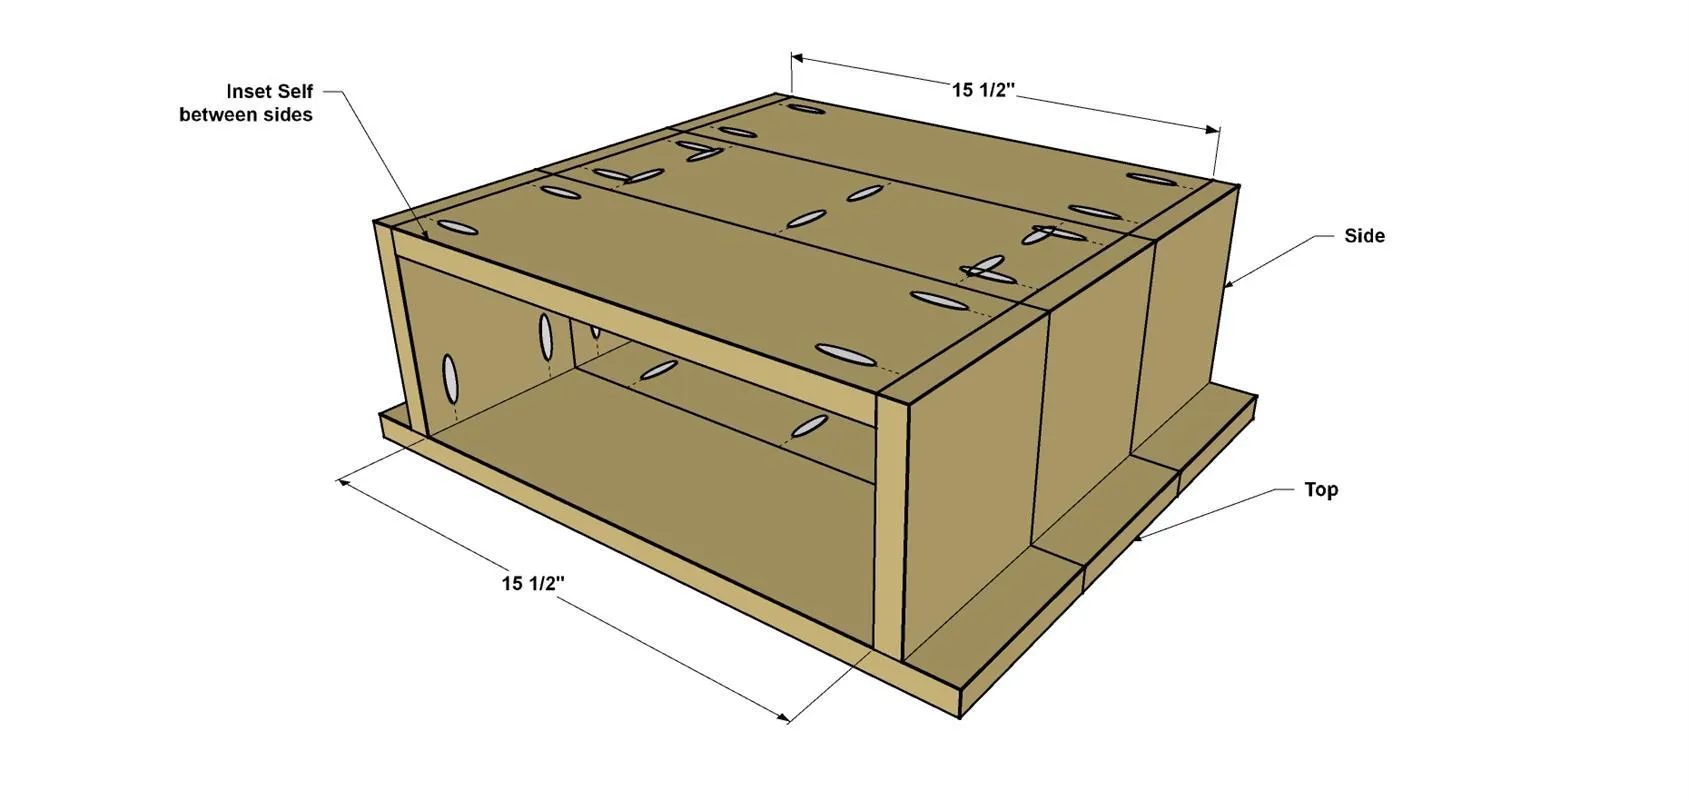
9Finish the Table
- Sand all the parts smooth and wipe away dust with a rag.
- Apply the finish of your choice. We finished our Side Tables with a natural oil to highlight the alder wood we used. For a little extra protection, you can add a couple thin coats of paste wax after the oil has had time to dry. Follow the manufacturer’s recommendations for proper drying time and application process.
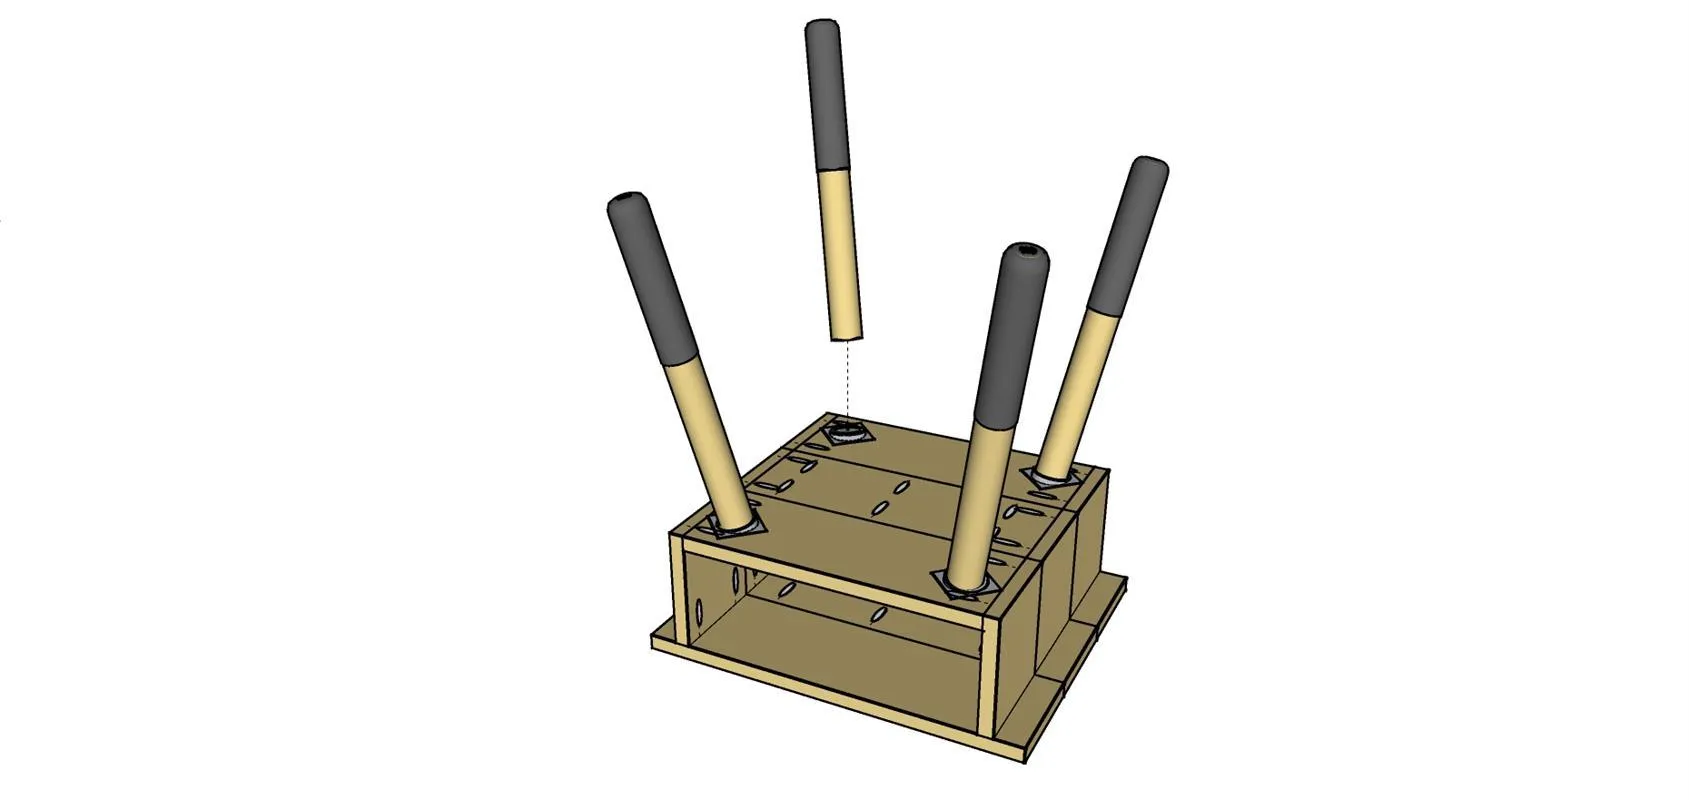
10Add the Leg Brackets
- Position the first leg bracket at a 45° angle to the corners of the table, where shown. Using the bracket screw holes and a self-centering drill bit, drill pilot holes for the first bracket. Secure the bracket to the Side Table with the screws provided.
- Repeat this process for the other three brackets.
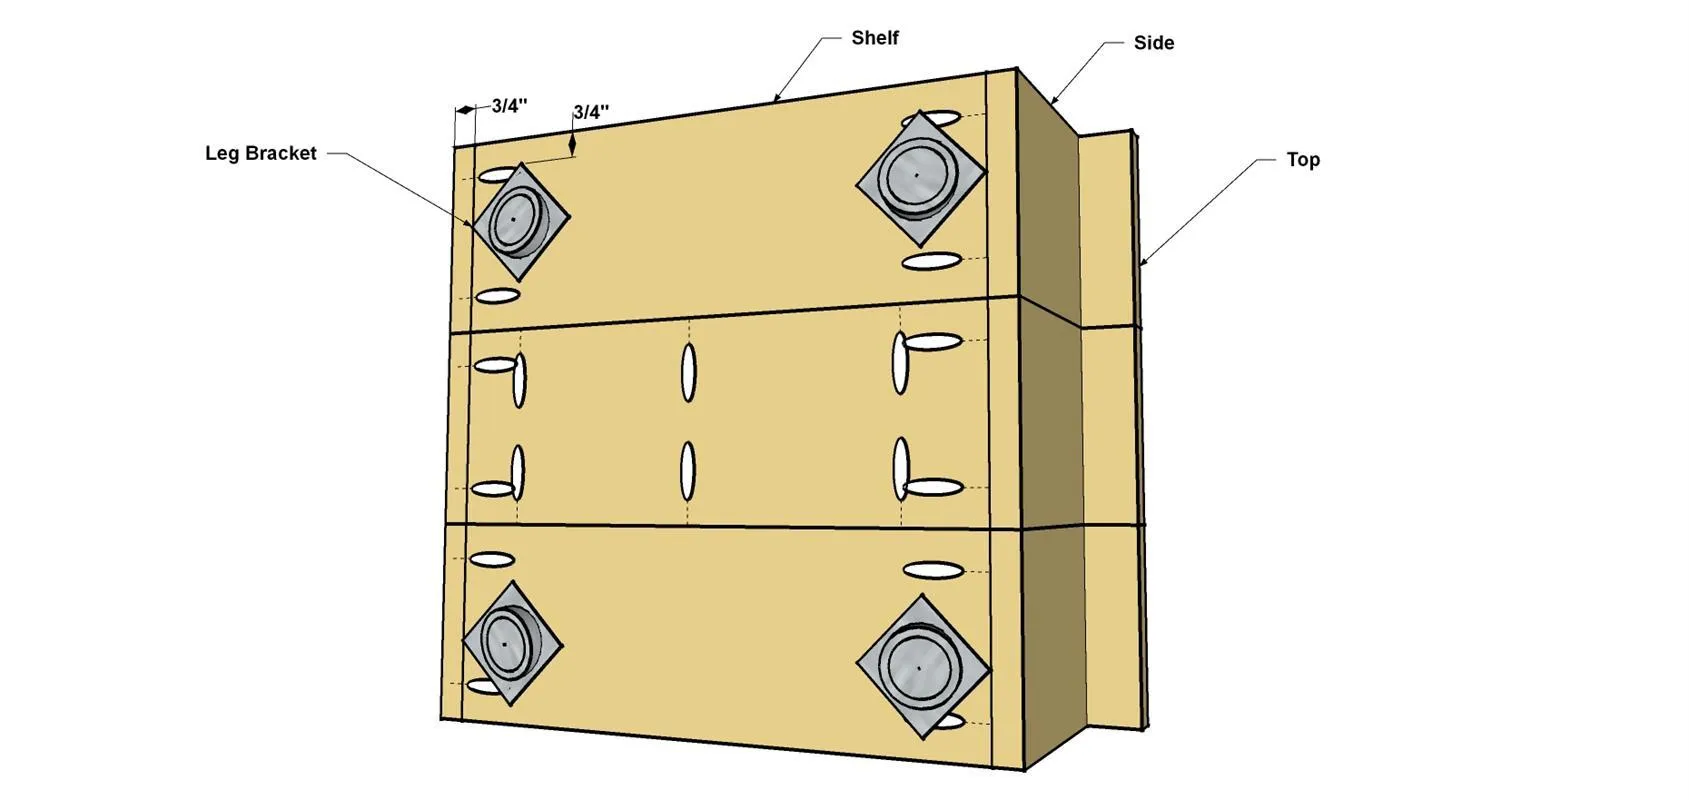
11Paint, Finish, and Attach the Legs
- Finally, to achieve the dipped leg look, mask off the bottom 6" or so of each leg with a quality painters’ tape. Here’s a little tip to support the legs while you paint them: Using a scrap piece of wood about 3’ long, drill four 1/4" holes spread out along the board.
- Next, screw the legs into the board.
- Now you can paint the legs with ease.
- Once the paint dries, you can apply a clear protective finish to the legs. This will enhance the natural color of the wood as well as help protect them. When the finish is dry, screw the legs into the brackets until they are snug.
- Flip the table over and they will be ready to support a good nights sleep..as well as a lamp.
Tags
- Bedroom
- Beginner
Reviews & builds
No reviews yet
Sign in to review this plan or share your build.
No reviews yet. Be the first to build this.