 Notch
Notch- Difficulty
- Intermediate
- Time
- 7.5–14.5 hours
- Cost
- $$$
About this build
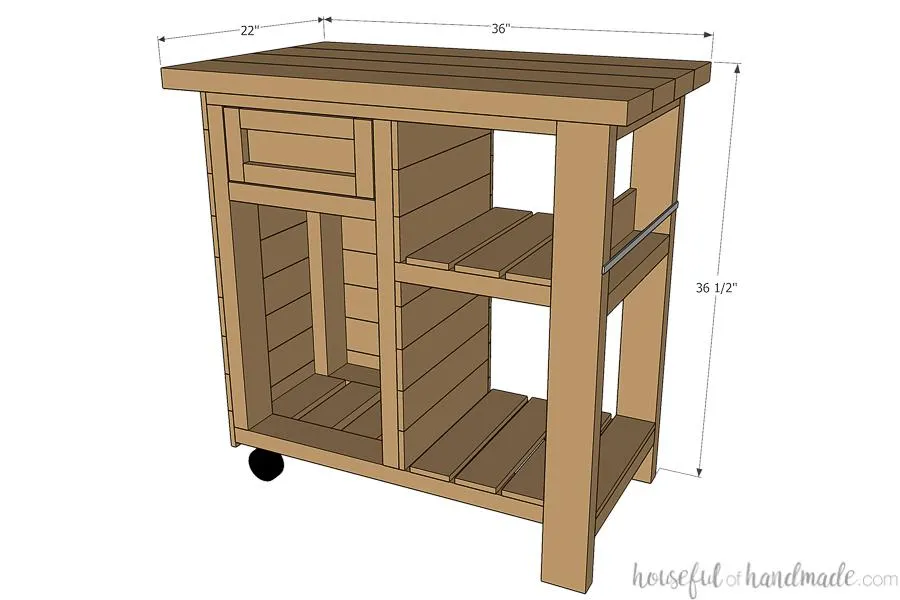
Give yourself some extra room and storage next to your grill with this beautiful grill side table. Includes a drawer to hold grilling accessories, a spot for an extra fuel tank, a rack for your grill spray and spices, plus 2 more shelves to store anything you need for your outdoor dinner!
Tools
Essential
- Brad Nailer
- Drill / Driver
- Impact Driver
- Jigsaw
- Miter Saw
- Pocket Hole Jig
- Random Orbit Sander
Optional / nice to have
- Bar / Pipe Clamps
- Tape Measure
Materials
| Item | Qty |
|---|---|
| Board, 2x4 96" | 5 board |
| Board, 1x2 36" | 1 board |
| Board, 2x6 72" | 2 board |
| Board, 1x4 72" | 1 board |
| Cedar Fence Picket, 1/2" x 3 1/2" 72" | 10 board |
| 2 1/2" blue-cote pocket hole screws | 88 each |
| 1 1/4" blue-cote pocket hole screws | 16 each |
| 1 1/4" brad nails | 100 each |
| Pair 14" drawer slides | 1 each |
| Drawer pull | 1 each |
| 1/2" flat aluminum rod | 1 each |
| Coat hooks | 2 each |
| 3" wheels (4" total height) | 2 each |
Overall cost: $$$. Lumber prices vary by region, species, and season, so we give a band rather than a figure we would only be pretending to know.
Cut list
| Part | Qty | T × W × L |
|---|---|---|
| Frame Top/Bottom | 4 | 1" × 3" × 29" |
| Frame Top/Bottom Slats | 6 | 1" × 3" × 9" |
| Frame Top/Bottom Side | 3 | 1" × 3" × 16" |
| Frame Under Shelves | 2 | 1" × 3" × 13" |
| Frame Under Drawer | 2 | 1" × 3" × 13" |
| Legs | 2 | 1" × 3" × 35" |
| Frame Sides | 4 | 1" × 3" × 28" |
| Drawer Front Stiles | 2 | 3/4" × 1" × 5" |
| Drawer Front Rails | 2 | 3/4" × 1" × 10" |
| Drawer Box Front/Back | 2 | 3/4" × 3" × 11" |
| Drawer Box Sides | 2 | 3/4" × 3" × 14" |
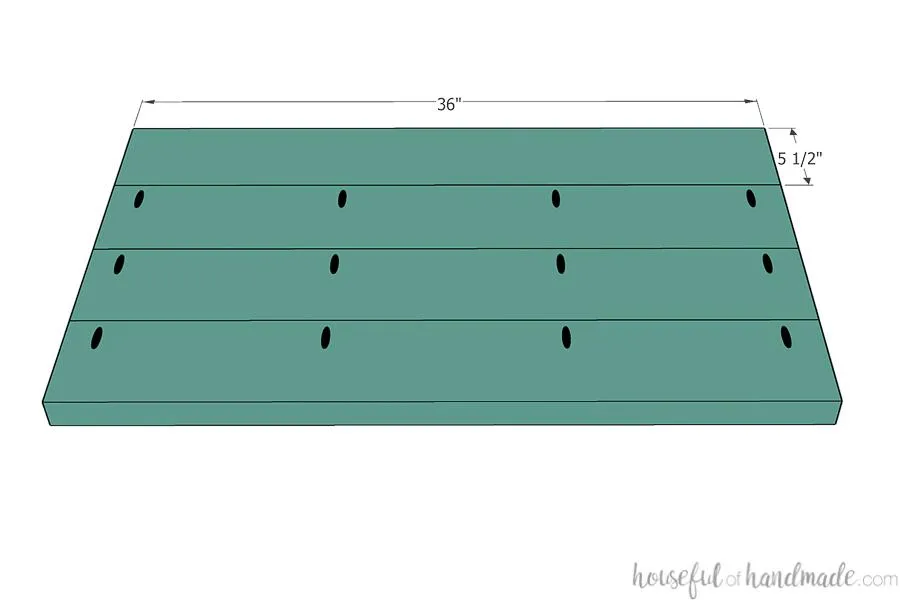
| Top Slats | 4 | 1" × 5" × 36" |
| Inside Slats and Shelf Slats | 15 | 1/2" × 3" × 16" |
| Side Slats | 9 | 1/2" × 3" × 16" |
| Back Slats | 9 | 1/2" × 3" × 17" |
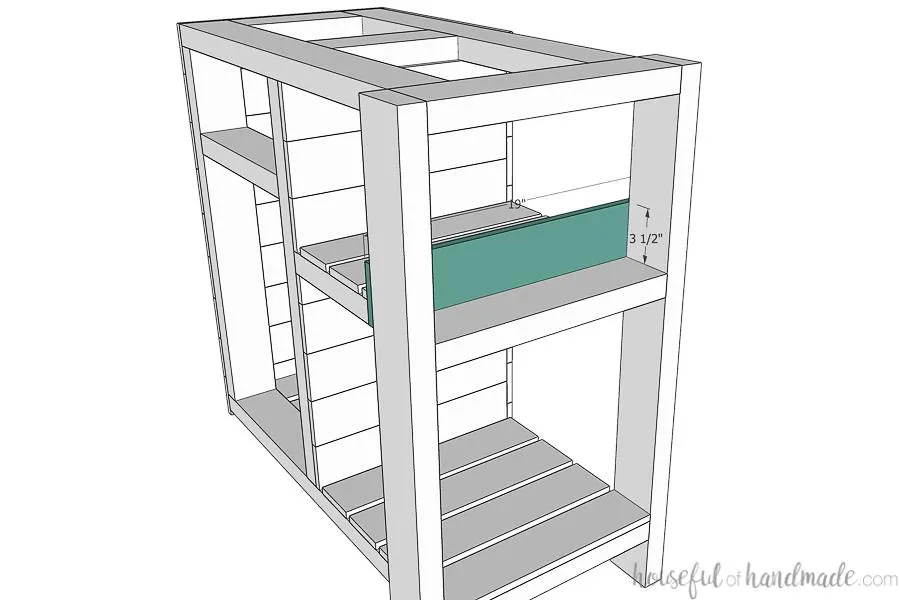
| Spice Shelf Back | 1 | 1/2" × 3" × 19" |
| Drawer Front Panel | 1 | 1/2" × 3" × 12" |
| Drawer Bottom Slats | 4 | 1/2" × 3" × 12" |
What to buy
Buy 17 boards at 8 ft.
1" × 5"
2 boards
1" × 3"
6 boards
3/4" × 3"
1 board
3/4" × 1"
1 board
1/2" × 3"
7 boards
Assumes 8 ft stock, a 1/8" saw kerf, and buying each part at its own width. Change the board size or kerf on the full board plan →
Instructions
1Build the top and bottom frames
- Set your pocket hole jig for 1 1/2" thick material.
- Drill 2 pocket holes on each end of the frame top/bottom slats boards.
- Drill 2 pocket holes on one end of the frame top/bottom boards. And drill 2 pocket holes on both ends of the frame top/bottom side boards.
- Assemble the top and bottom frame pieces according to the diagram. Secure the boards with wood glue and 2 1/2" pocket hole screws.
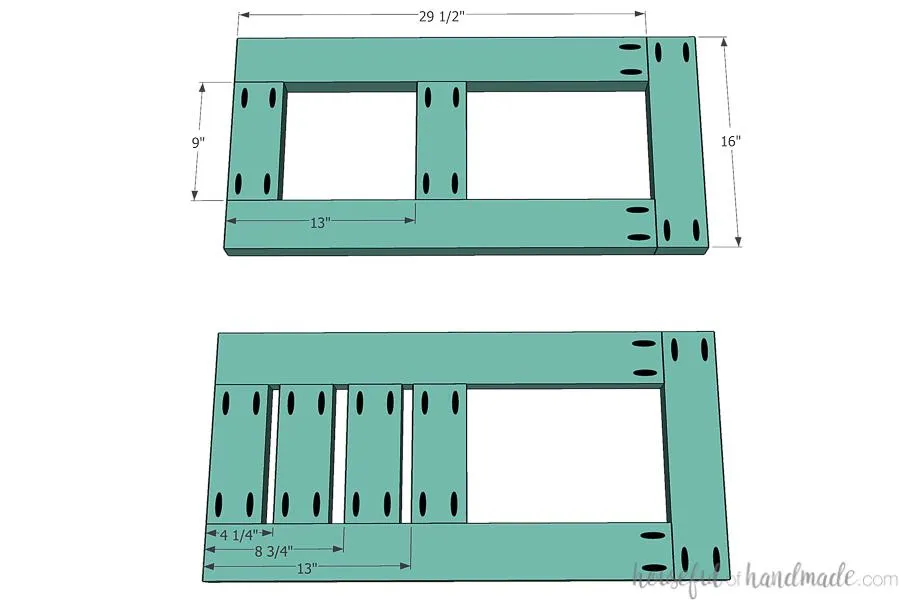
2Build the inside of the frame
- Drill pocket holes on both ends of the frame side boards and frame under drawer boards.
- Attach the under drawer boards between the sides so they are 6" down from the top. Secure with wood glue and 2 1/2" pocket hole screws. Aim the pocket holes on the under drawer boards toward the top (they will be hidden under the drawer) and aim the pocket holes for the frame side boards toward the outside (they will be hidden behind the cedar slats).
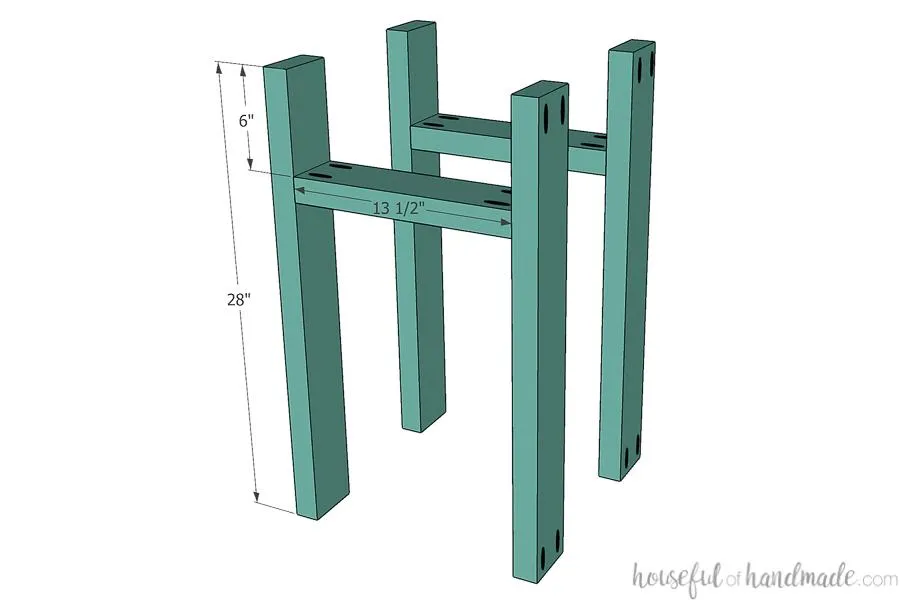
3Attach inside frame
Secure the assembled inside frame to the bottom frame (the one with the extra slats). The outside should line up with the edge of the bottom frame and the inside should line up with the outside of the middle slat. Secure with 2 1/2" pocket hole screws and wood glue through the pre-drilled pocket holes.
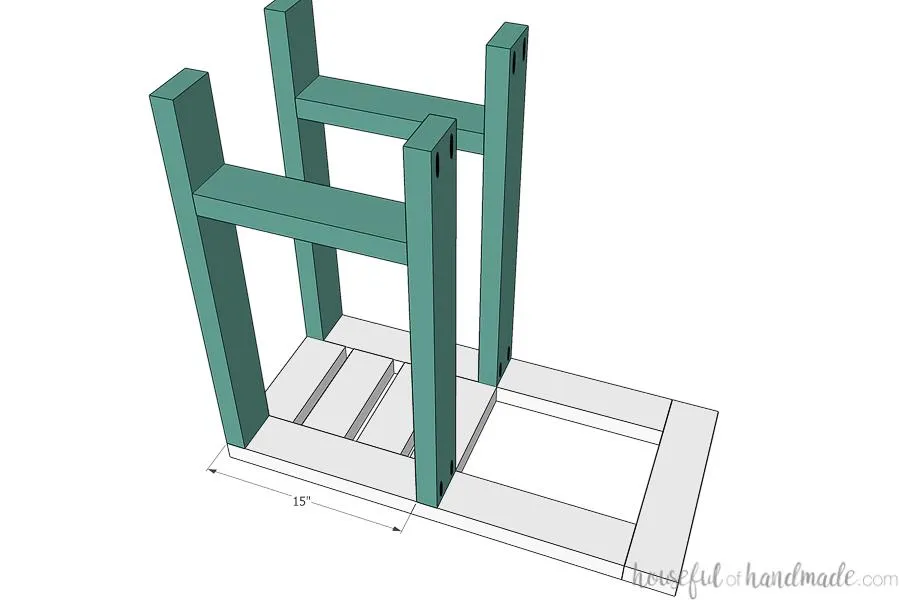
4Attach the top frame
- Attach the assembled top frame to the top of the inside frames lining up the same as when attaching the bottom. Secure with 2 1/2" pocket hole screws and wood glue through the pre-drilled pocket holes.
- Attach so the pocket holes are facing the top (they will be hidden when you attach the top.
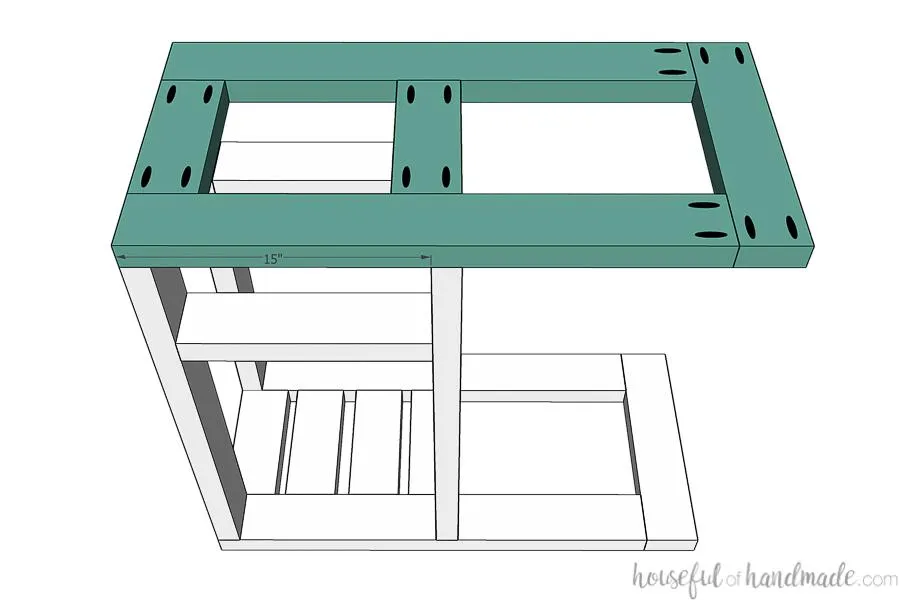
5Attach under shelf boards
- Drill pocket holes in each end of the frame under shelves boards and the last frame top/bottom side board. Secure the under shelf boards to the inside frame at your desired height (the height I used is noted in the drawing). Face the pocket holes up so they can be hidden with the shelf slats.
- Then secure the side board to the end of them. Face the pocket holes for the end piece down since it will be the bottom of the spice rack.
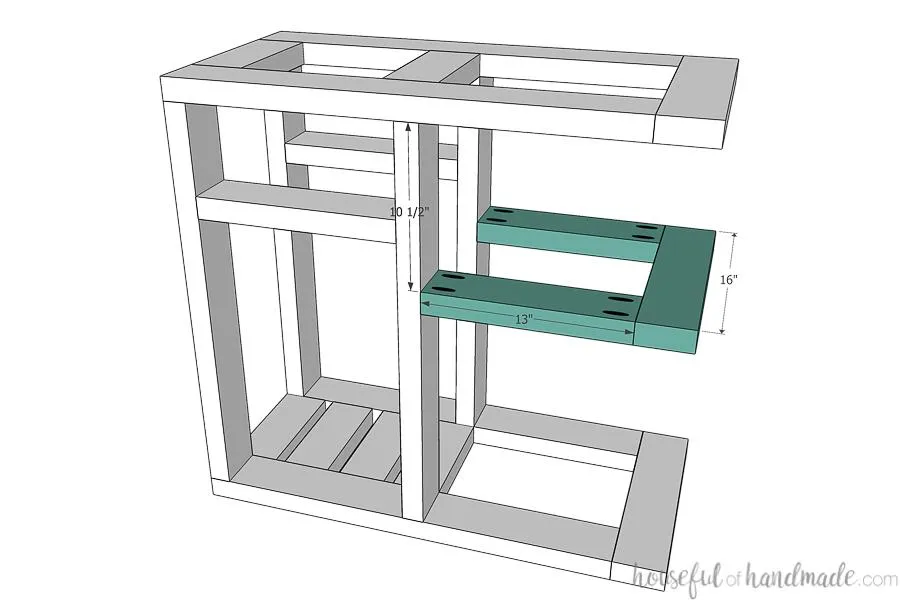
6Attach the legs
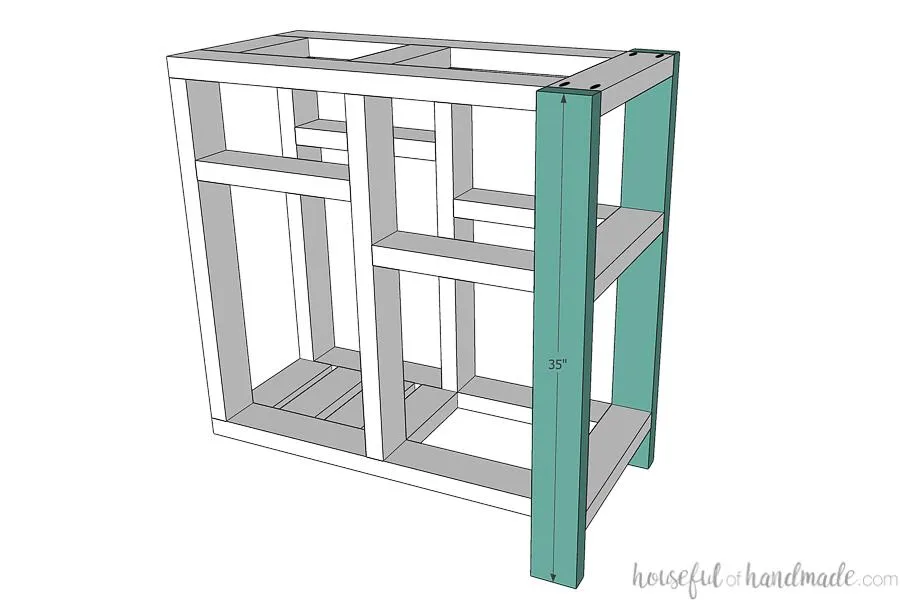
The leg piece measurements are for wheels with a 4" clearance from the top to bottom. If you wheels are taller or shorter, adjust the legs as needed. Then attach the legs to the sides of the cart using the pocket holes drilled on the ends of the frame top/bottom side boards. The top of the legs should be flush with the top and the bottom will hang over the ends 4".
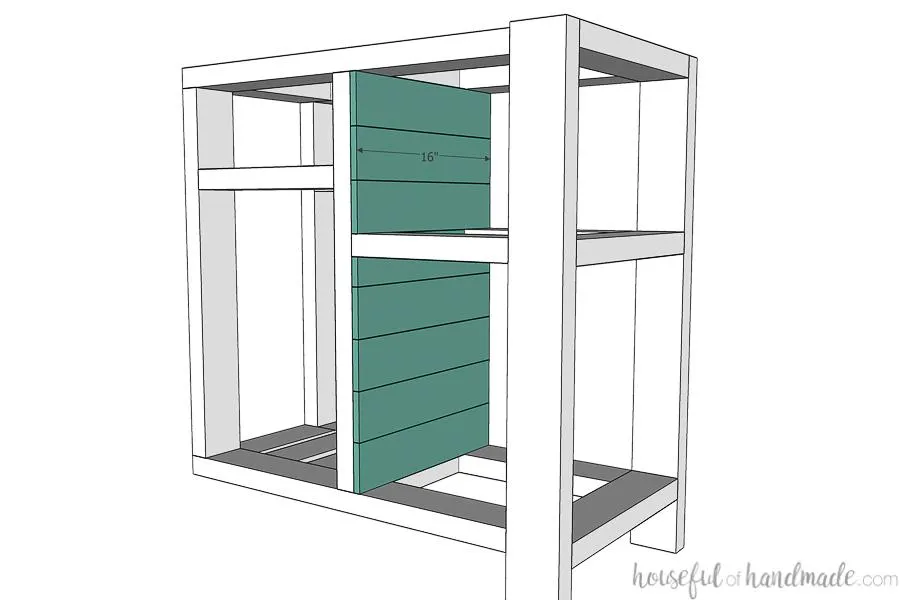
7Cover inside in cedar slats
Cover the side of the inside frame boards with cedar slats. You will have to use the jigsaw to cut out around the under shelf boards. My cedar fence pickets were slightly larger than 3 1/2" so I had to trim the top slat to fit around the top frame as well. Secure with brad nails.
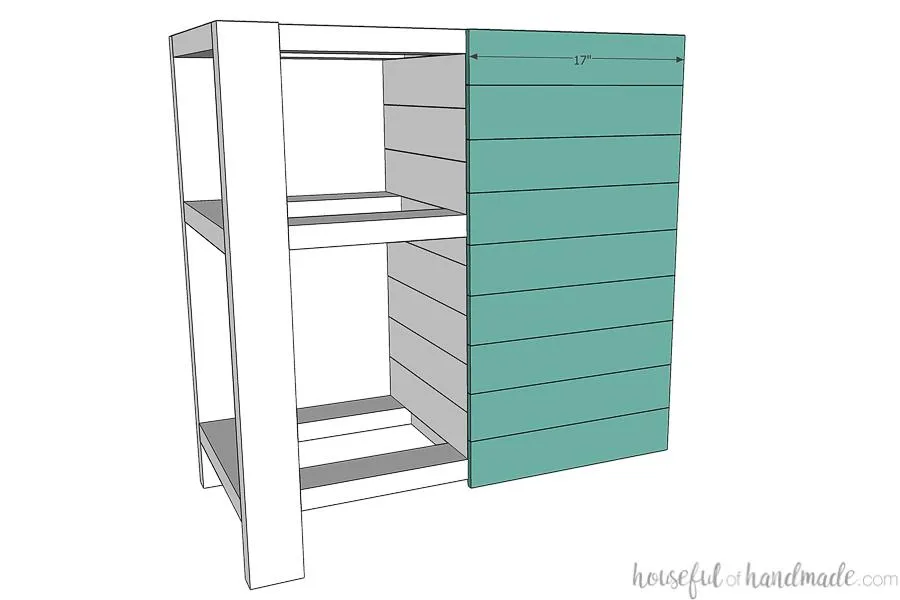
8Cover the back with cedar slats
Cover the back of the drawer/fuel tank compartment with cedar fence pickets. Start at the top keeping it flush with the top. The bottom slat will hang over the edge a little bit, you can trim if you want, but I chose to let it hang over to cover the top of the castor. Secure with brad nails.
9Cover the side of with cedar slats
Cover the side of the cart with cedar slats. Start at the top and keep it flush. Again, the bottom will hang over the bottom a little bit. Secure with brad nails.
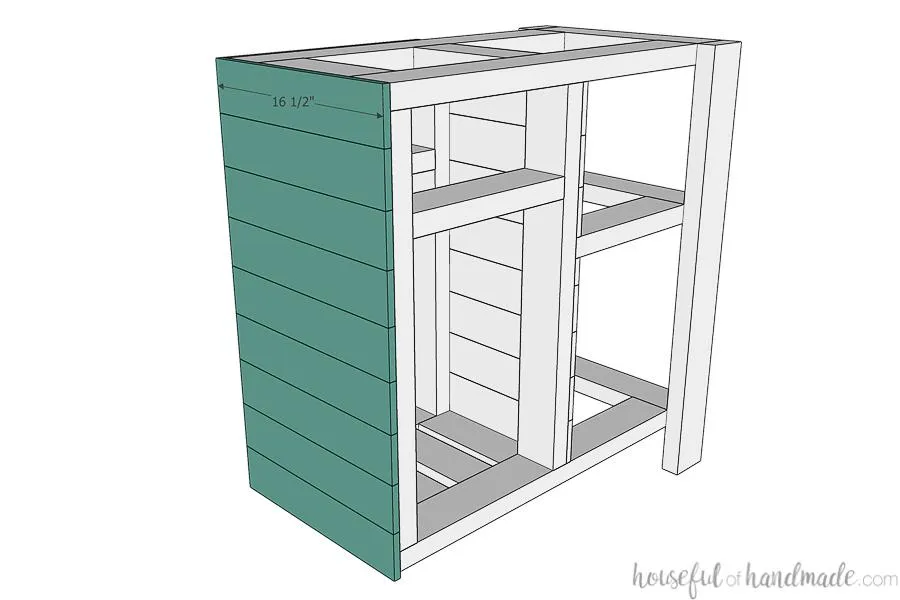
10Add shelf slats
Space the shelf slats on the bottom shelf area so that they are even spaced along the entire space. Secure with brad nails. For the upper shelf, only use 3 slats and do not cover the frame top/bottom side board.
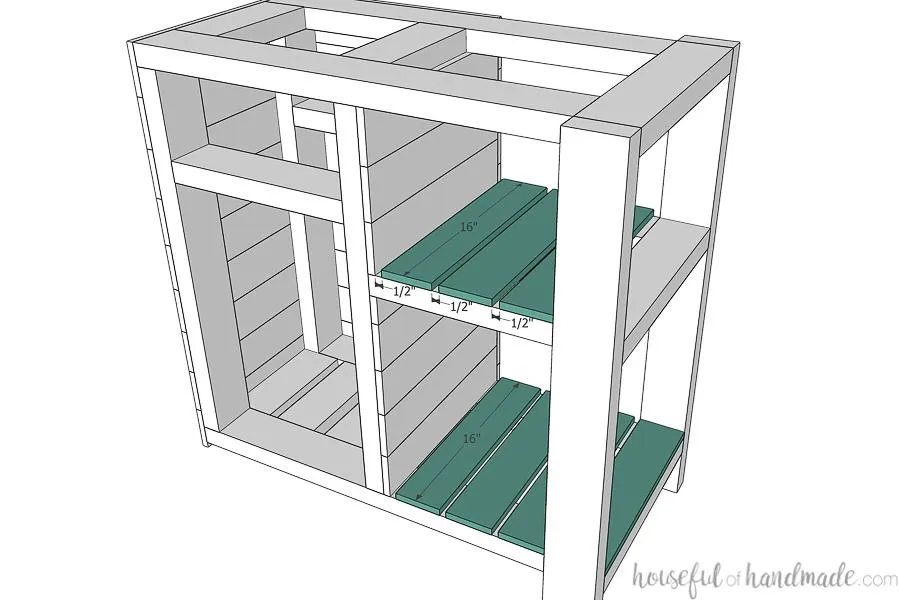
11Create the spice rack
- Attach the spice rack back to the inside of the legs to create the back of the spice rack. Secure with brad nails.
- Cut the piece of aluminum to length and drill a pilot hole in each end. Secure to the front of the spice rack shelf to hold spices in place when moving the cart around.
12Build the top
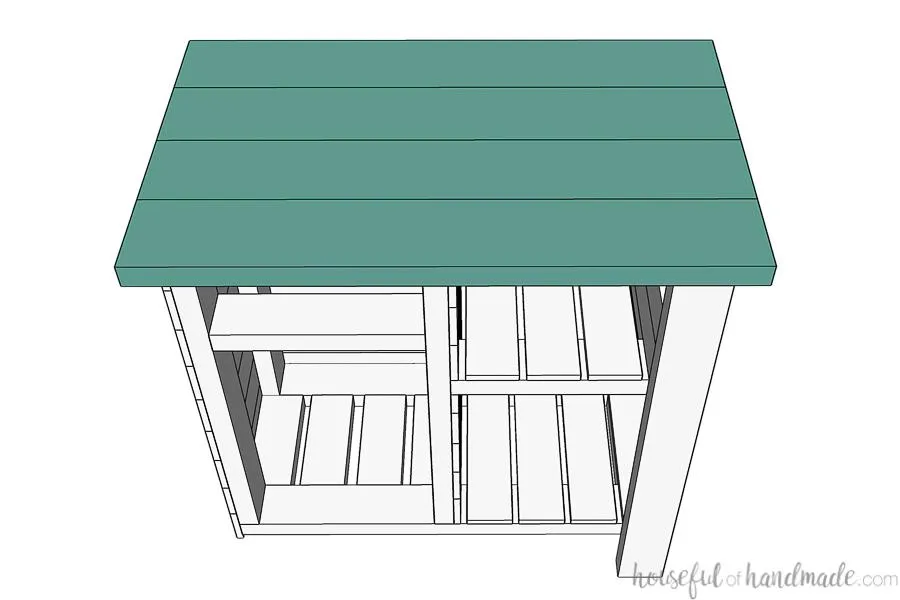
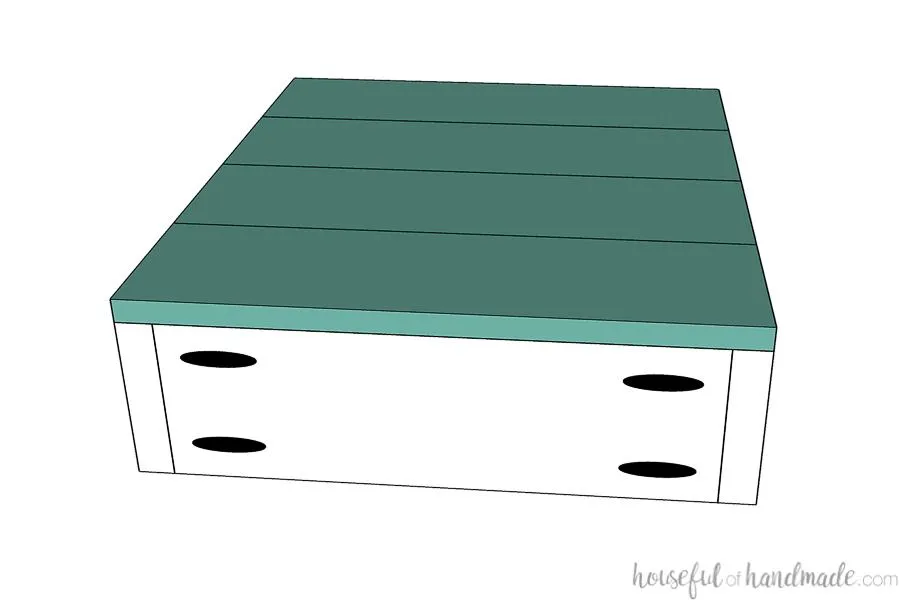
Add pocket holes to the inside back of 3 of the top boards. Create a cart top by securing the top slats together with wood glue and 2 1/2" pocket hole screws. Use clamps to keep the boards flat while securing.
13Attach the top
Center and attach the top to the cart. To secure, I drilled holes in the top frame boards, then secured the top though the holes using washers. This allows the top to have some room to expand/contract with the weather.
14Build drawer face frame
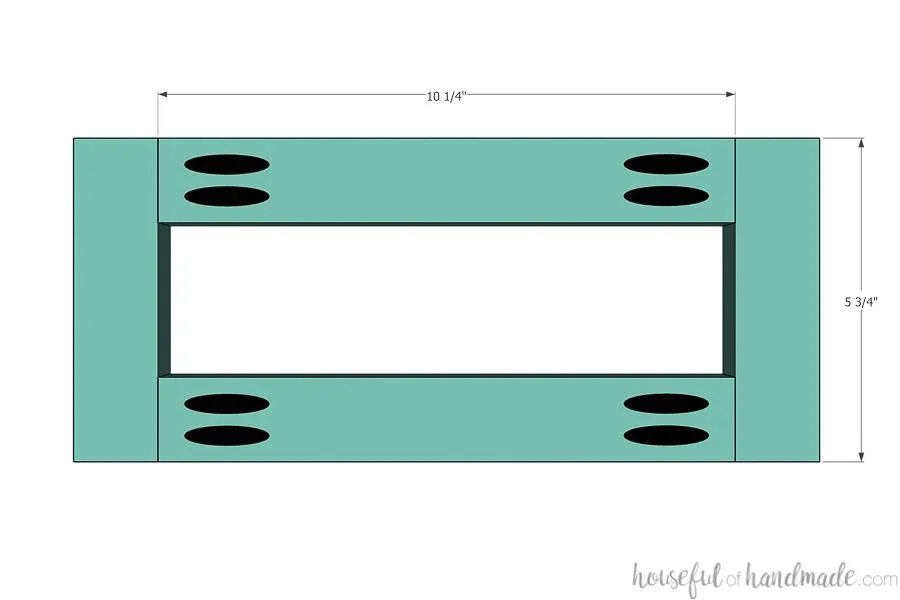
- Set pocket holes for 3/4" thick material.
- Drill 2 pocket holes in each end of the drawer front rails boards. Secure the rails between the stiles with 1 1/4" pocket hole screws and wood glue.
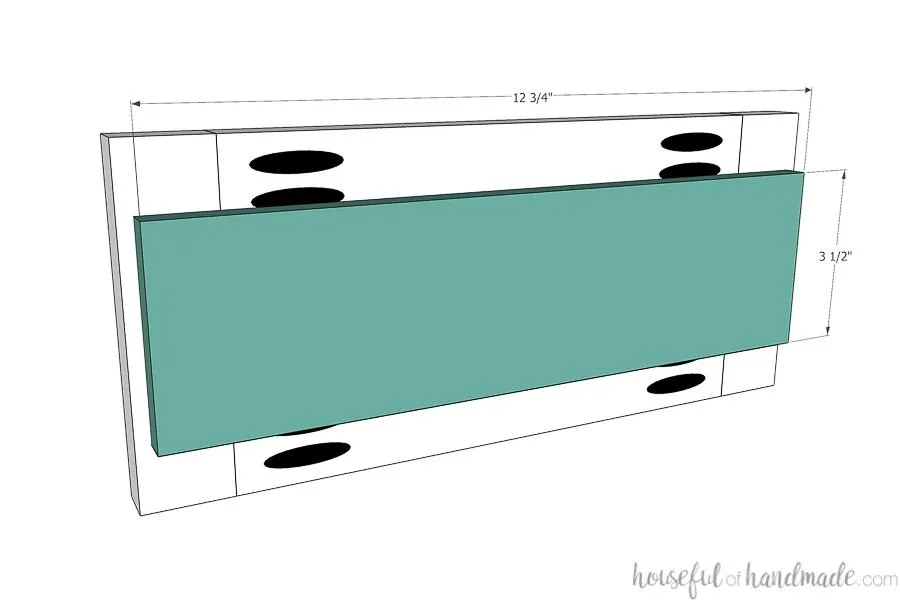
15Attach the drawer panel
Center the drawer panel on the back of the drawer front face frame. Secure with wood glue and brad nails.
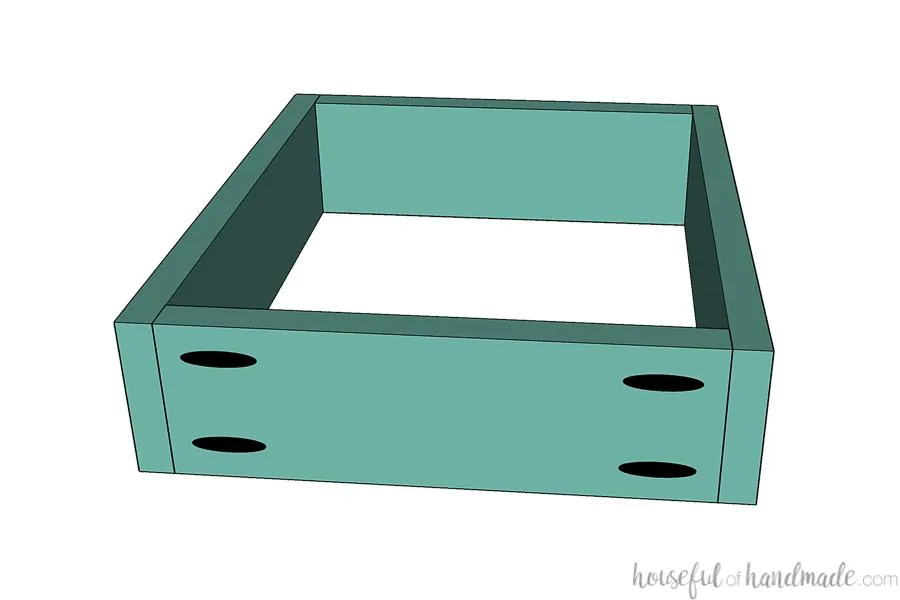
16Build the drawer box
- Drill 2 pocket holes in each end of the drawer box front/back boards.
- Build the drawer box by securing the front/back boards between the drawer box side boards with wood glue and 1 1/4" pocket hole screws. Make sure to keep the box square.
17Add drawer bottom
Attach the drawer bottom panels to the bottom of the drawer with wood glue and brad nails. If the cedar slats are a little wider than the drawer box, let the extra hang over the back slightly.
18Install drawer
- Install the drawer with the drawer slides.
- Attach the drawer front to the front and use the cabinet hardware jig to drill holes to secure your drawer pull.
- Attach hooks to the legs of the cart for hanging grill accessories.
19Enjoy!
Enjoy your new grill table. And for more amazing things to build for your backyard, make sure to visit Houseful of Handmade and say hi!

Tags
- Grilling
- Intermediate
Reviews & builds
No reviews yet
Sign in to review this plan or share your build.
No reviews yet. Be the first to build this.