 Notch
- Difficulty
- Easy
- Time
- 4.3–8.3 hours
- Cost
- $$$
About this build
Make it easy to keep your recyclables separated with this recycling bin. It holds three 23-gallon plastic trash bins that can easily be removed, and houses them in a handsome wood cabinet. The center is made from 1×4, 1×6, and 2×2 boards, and it goes together with pocket-hole screws and nails.
Tools
Essential
- Brad Nailer
- Drill / Driver
- Miter Saw
- Pocket Hole Jig
- Random Orbit Sander
Optional / nice to have
- Combination Square
- Tape Measure
Materials
| Item | Qty |
|---|---|
| Board, 1x4 96" | 3 board |
| Board, 1x4 48" | 1 board |
| Board, 1x6 96" | 9 board |
| Board, 2x2 96" | 5 board |
| 23-Gallon Plastic Trash Can | 3 each |
| 2 1/2" coarse-thread pocket-hole screws | 40 each |
| 1 1/4" coarse-thread pocket-hole screws | 46 each |
| 1-1/4" brad nails | 116 each |
| Wood glue | 1 each |
Overall cost: $$$. Lumber prices vary by region, species, and season, so we give a band rather than a figure we would only be pretending to know.
Cut list
| Part | Qty | T × W × L |
|---|---|---|
| Leg | 4 | 1" × 1" × 33" |
| Long Frame Rail | 4 | 1" × 1" × 37" |
| Short Frame Rail | 4 | 1" × 1" × 22" |
| Divider Rail | 2 | 1" × 1" × 22" |
| Base Slats | 6 | 3/4" × 5" × 25" |
| Short Side Slats | 6 | 3/4" × 5" × 25" |
| Long Side Slats | 4 | 3/4" × 5" × 27" |
| Short Front/Back Slats | 4 | 3/4" × 5" × 40" |
| Long Front/Back Slats | 6 | 3/4" × 5" × 41" |
| Long Lid Rail | 2 | 3/4" × 3" × 42" |
| Short Lid Rail | 4 | 3/4" × 3" × 20" |
| Lid Front/Back Rail | 2 | 3/4" × 3" × 42" |
| Lid Side Rail | 2 | 3/4" × 3" × 26" |
What to buy
Buy 20 boards at 8 ft.
1" × 1"
5 boards
3/4" × 5"
11 boards
3/4" × 3"
4 boards
Assumes 8 ft stock, a 1/8" saw kerf, and buying each part at its own width. Change the board size or kerf on the full board plan →
Instructions
1Make the Base Frame Parts
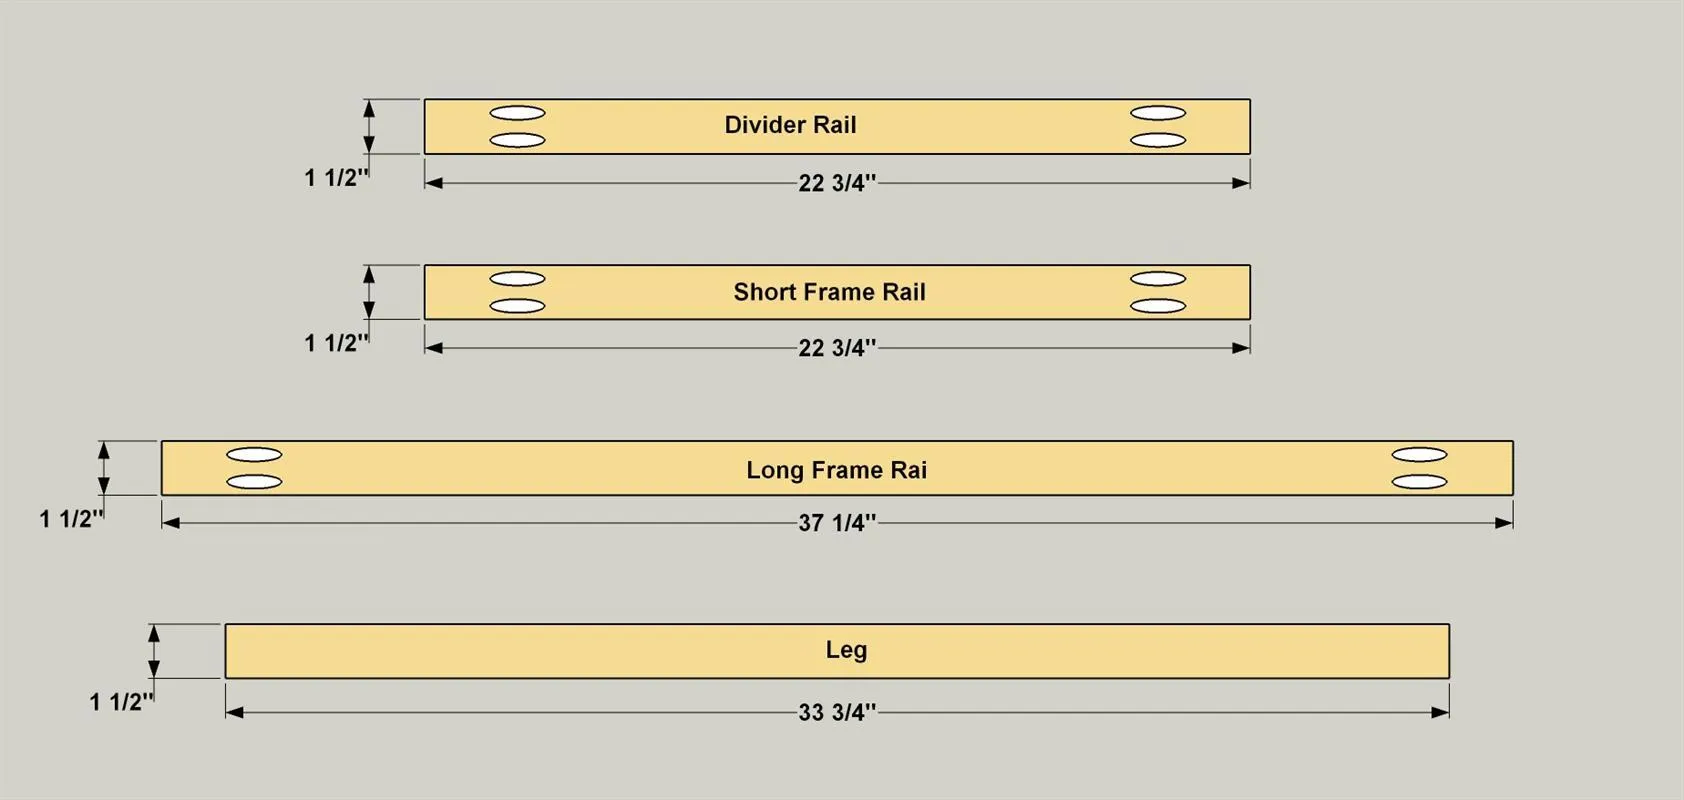
Cut four Legs, Four Long Frame Rails, four Short Frame Rails, and two Divider Rails to length from 2x2 pine boards, as shown as shown in the cutting diagram. Set your pocket-hole jig for 1 1/2" material and drill holes into the Long Frame Rails, the Short Frame Rails, and the Divider Rails at the locations shown.
2Assemble the Front and Back Frames
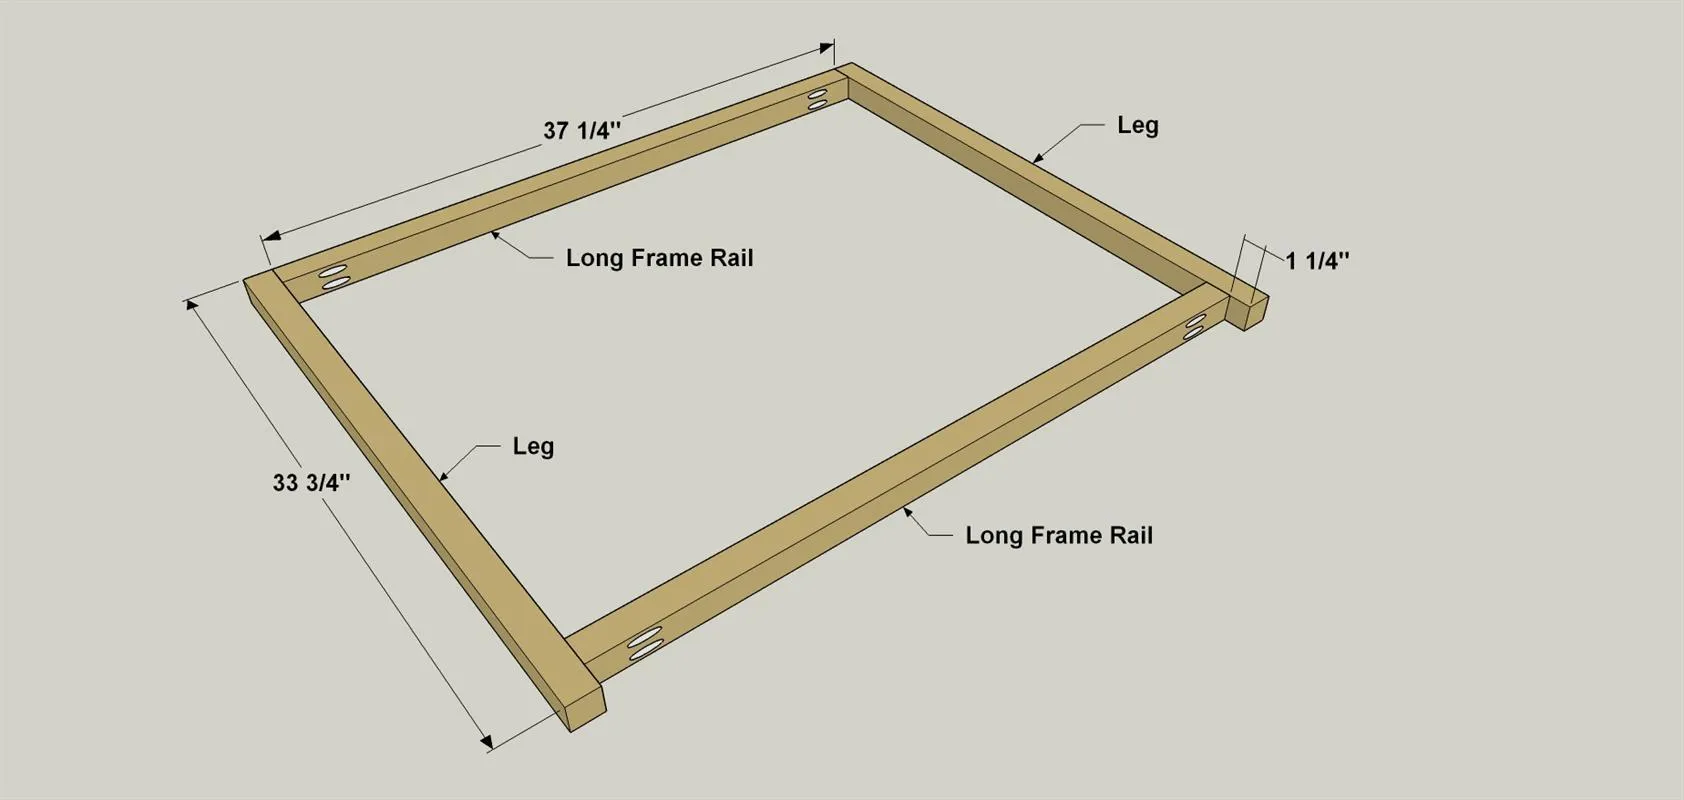
- Lay out two Long Frame Rails with two Legs, as shown, so that the upper Long Frame Rail is flush with the upper ends of the Legs, and the lower Long Frame Rail is positioned 1 1/4" up from the lower ends of the Legs. Make sure pocket screws are facing downward.
- Spread glue on the ends of the Long Frame Rails, and then attach them to the Legs using 2 1/2" coarse-thread pocket-hole screws.
- Repeat this process to put together the second frame assembly.
3Connect the Front and Back Frames
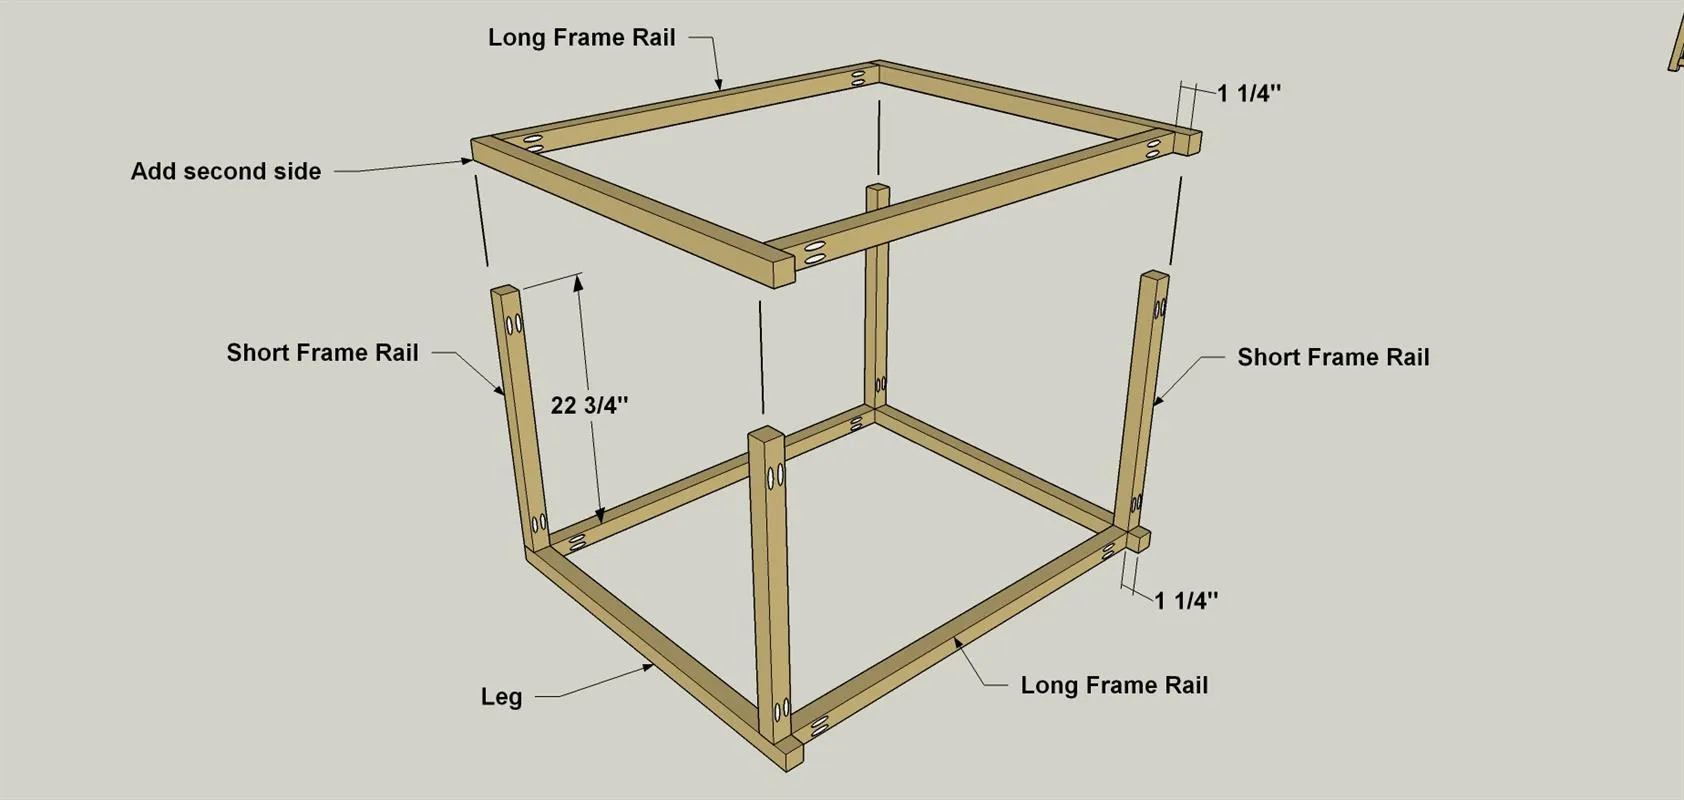
Connect the four Frame Short Rails to the first side assembly, aligning them with the Long Frame Rails, and attach the Short Frame Rails using glue and 2 1/2" coarse-thread pocket-hole screws. Then set the second side assembly in place and secure it to the Short Frame Rails in the same manner.
4Attach the Divider Rails
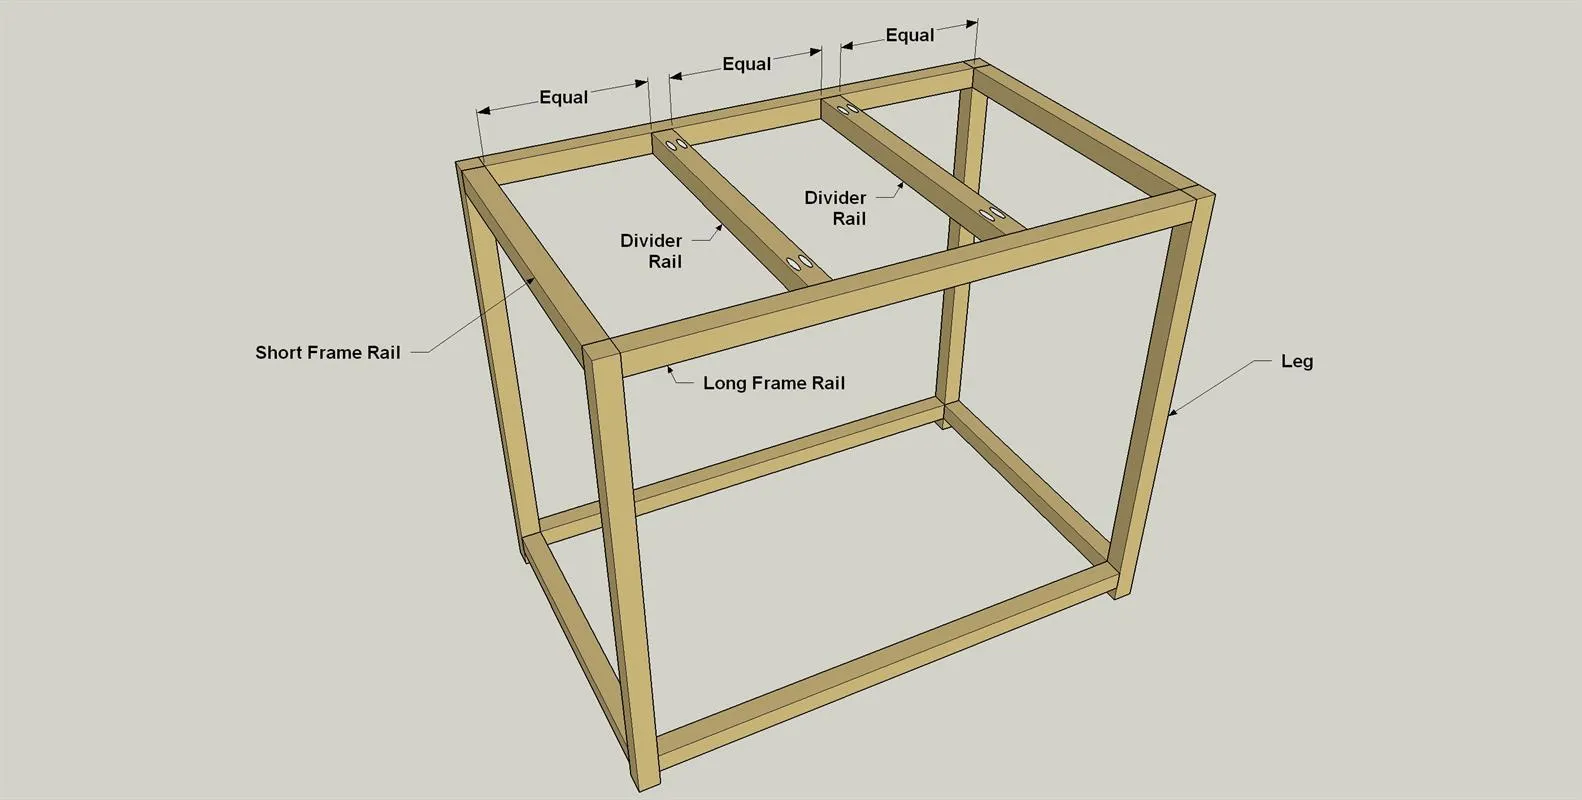
- You can now add the two Divider Rails to strengthen the base assembly, and to help keep the trash bins separated in the recycling center.
- Position the Divider Rails between the upper Long Frame Rails, as shown, so that they are spaced evenly.
- Then attach the Divider Rails using glue and 2 1/2" coarse-thread pocket-hole screws, as shown.
5Cut and Attach Base Slats
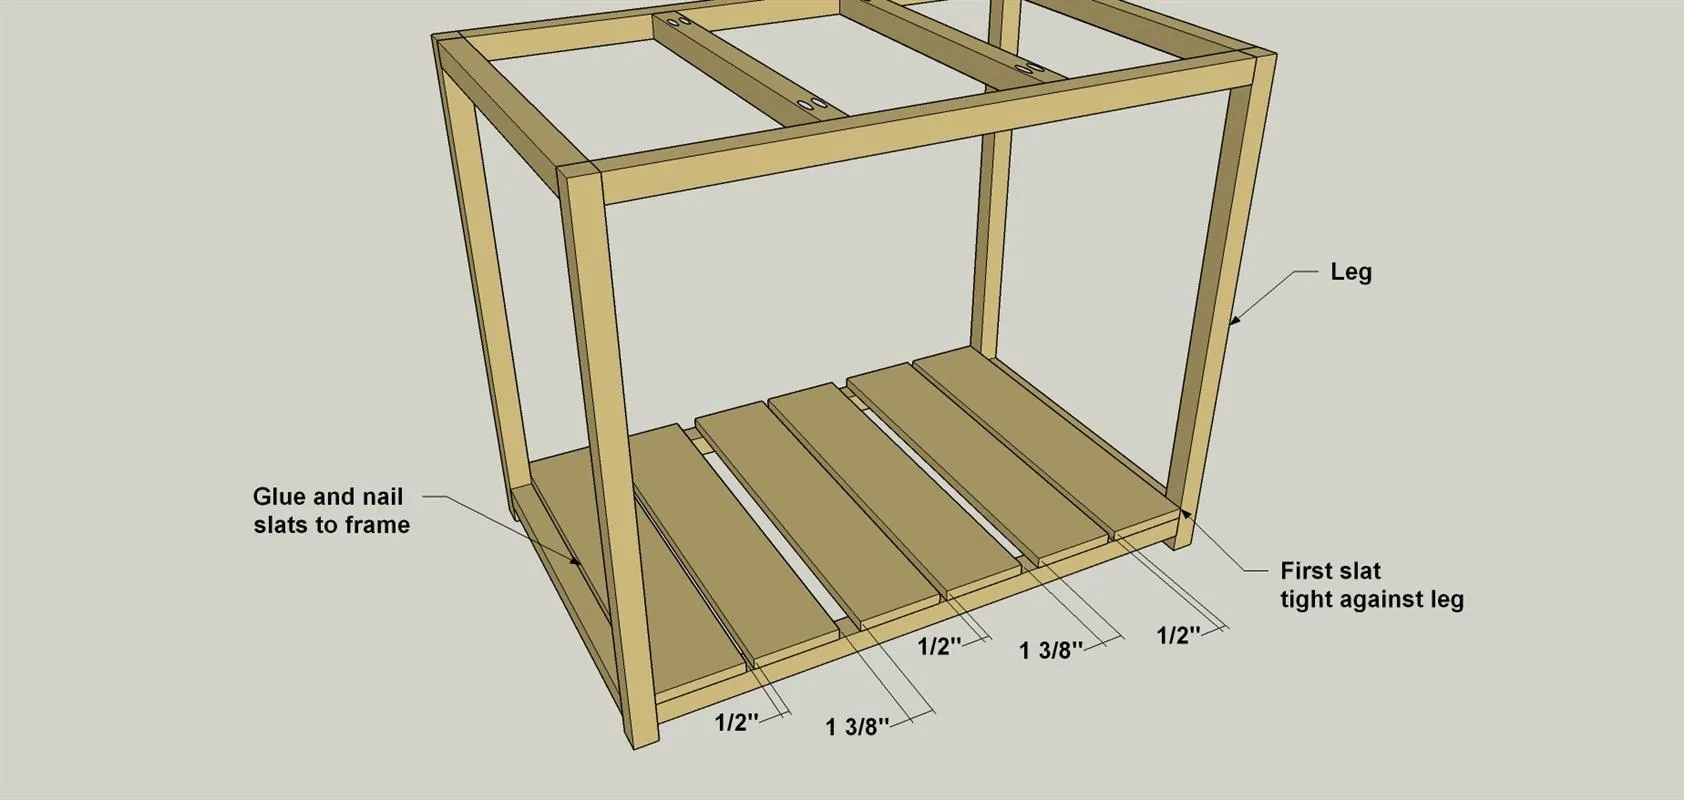
- Cut six Base Slats to length from 1x6 pine boards, as shown in the cutting diagram. Notice that the boards are placed in pairs, and that the gaps between the pairs are larger.
- Attach the Base Slats using glue and 1 1/2" brad nails—about three brads per board end. You can use a hammer and nails for this, but a brad nailer works best. If you don’t have one, you have a couple choices: You can rent an 18-gauge brad nailer and a compressor at a local tool rental shop, or you can buy a nailer. Prices are pretty low these days, and it’s a very handy tool to have around. You’ll find nailer/compressor combos, and even cordless, battery-operated nailers.
6Attach the First Side Slats
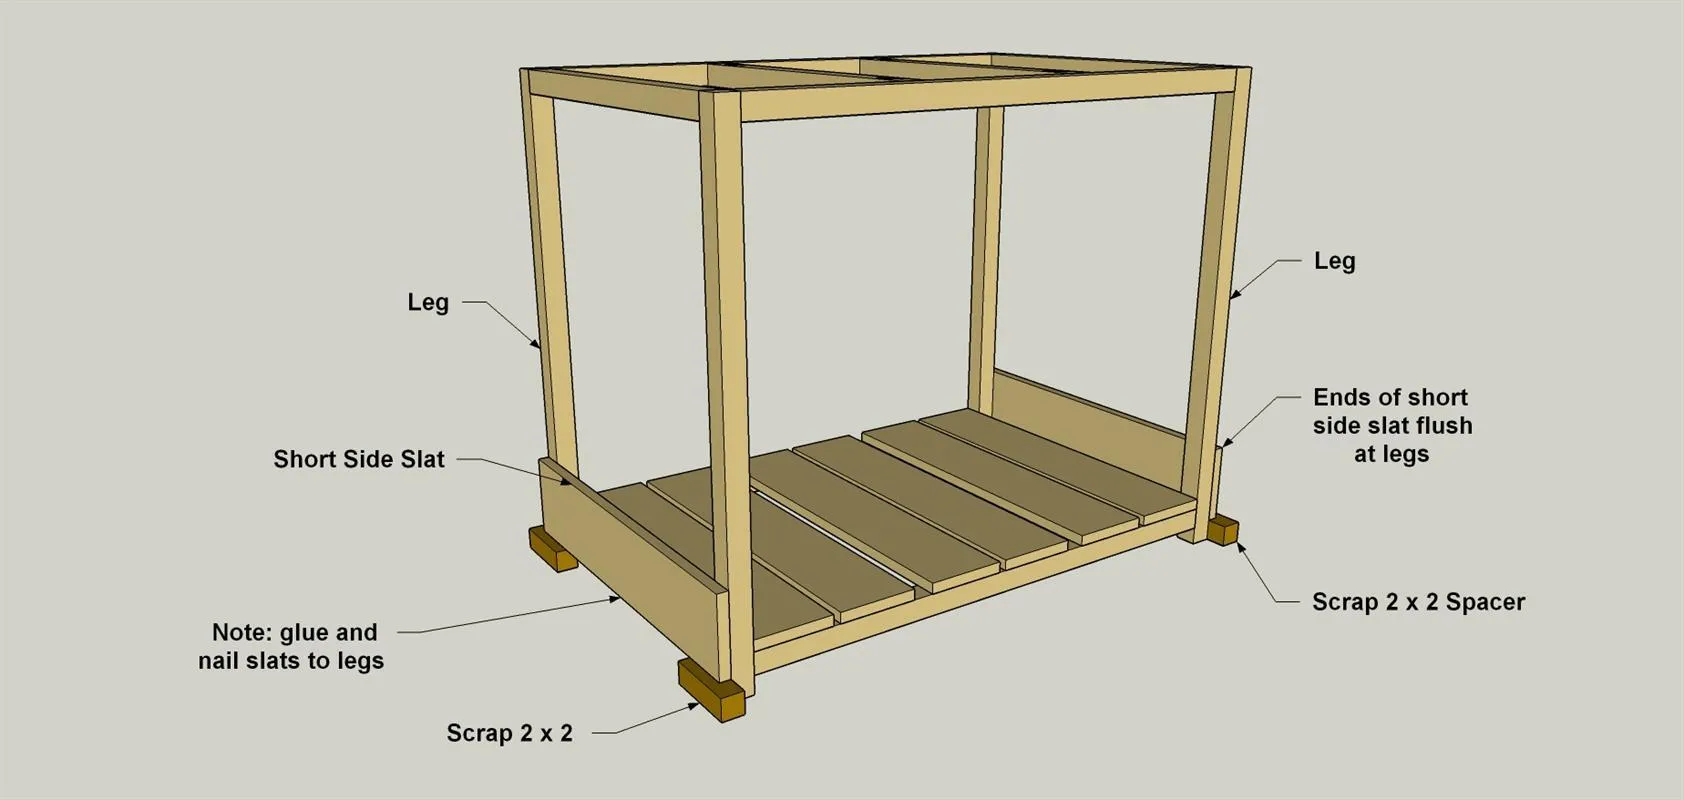
- Cut six Short Side Slats, four Long Side Slats, four Short Front/Back Slats and six Long Front/Back Slats, as shown in the cutting diagram. Using scrap 2x2 pieces as spacers, set the first Short Side Slats on the spacers, and position the Slat so the ends are flush with the outsides of the Legs.
- Next, using wood glue and 1 1/2" brad nails attach the first two Short Side Slats to the Frame Legs—we used four nails at each end to attach these Slats.
7Attach the First Front/Back Slats
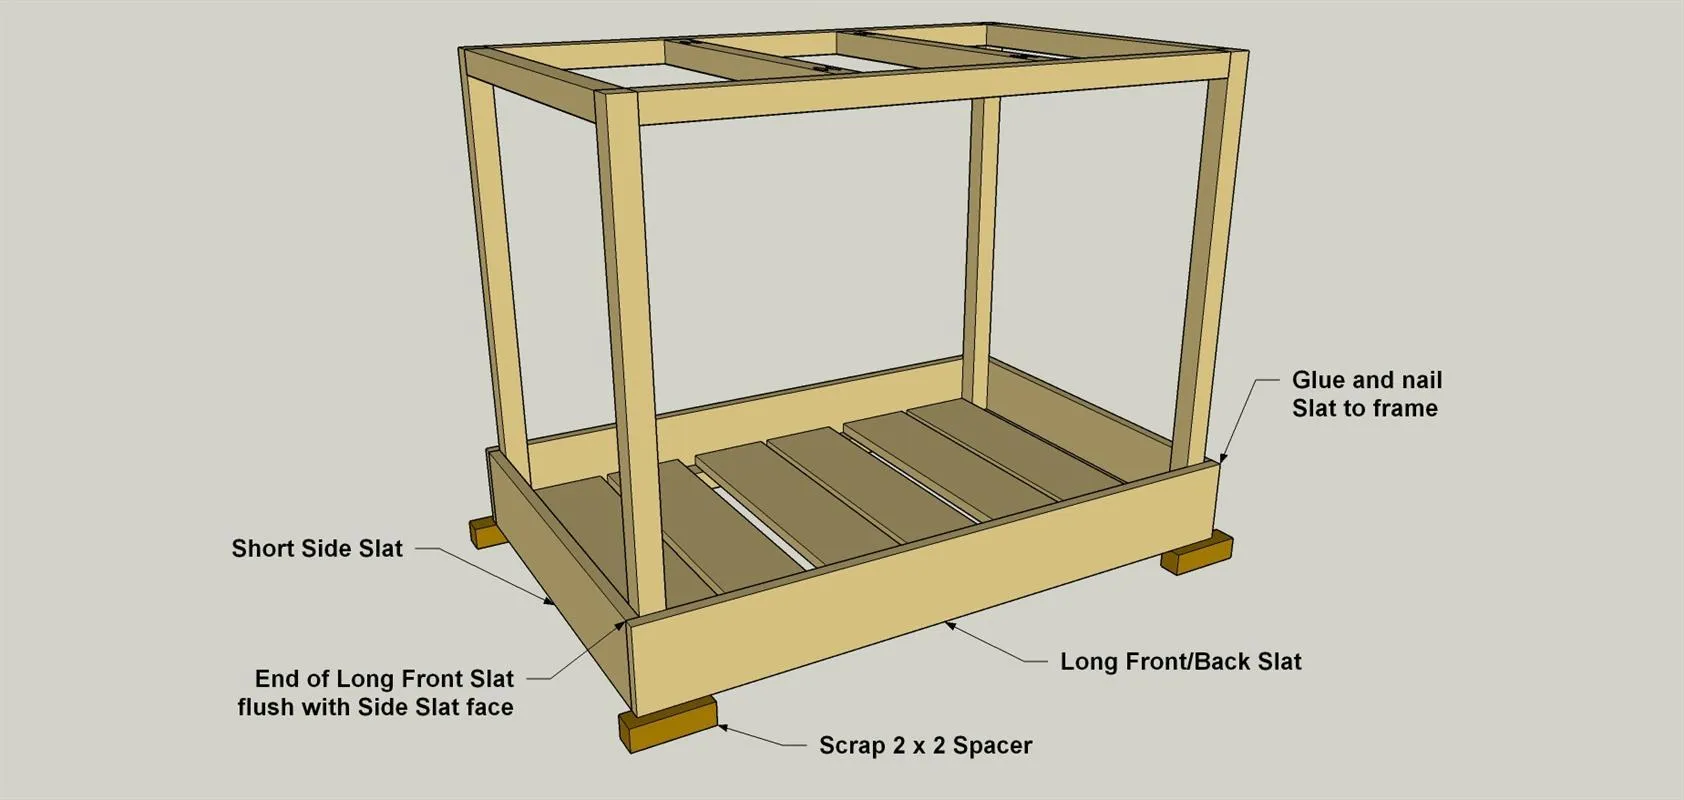
Using the same 2x2 spacers, set the first Long Front/Back Slats in position so that the ends are flush with the Short Side Slats. Secure these Long Front/Back Slats to the Legs using wood glue and 1 1/2" brad nails, as shown.
8Attach the Remaining Base Slats
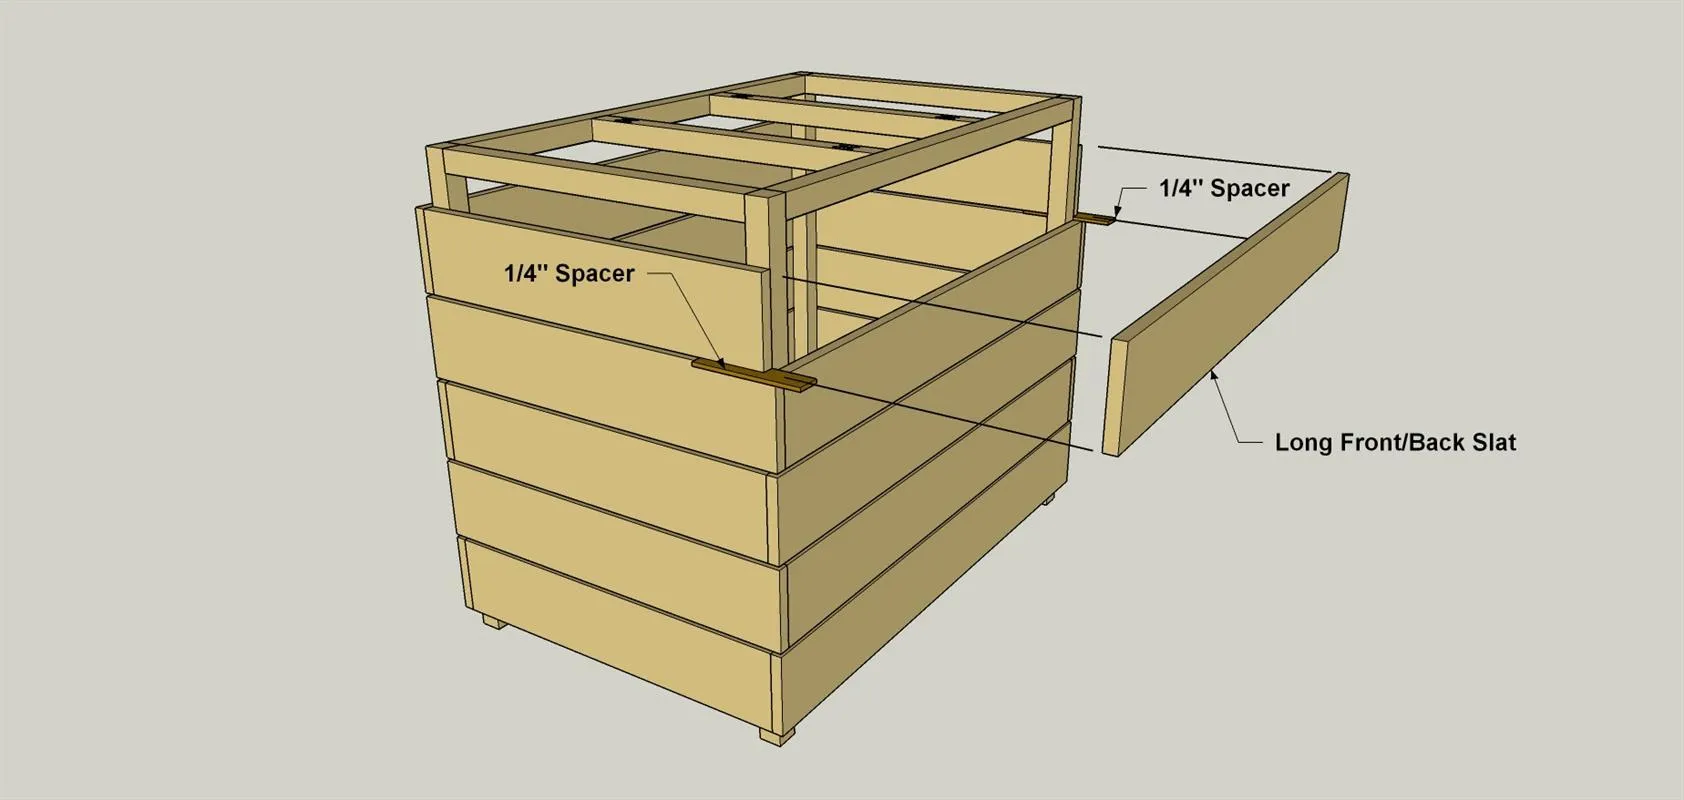
Now you can attach the remaining slats to the base. Use 1/4"-thick spacers, as shown, to space the slats properly.
9Make the Lid Parts
- Note: the Lid for the recycling center is sized slightly larger than the base so it will slide on and off the frame easily.
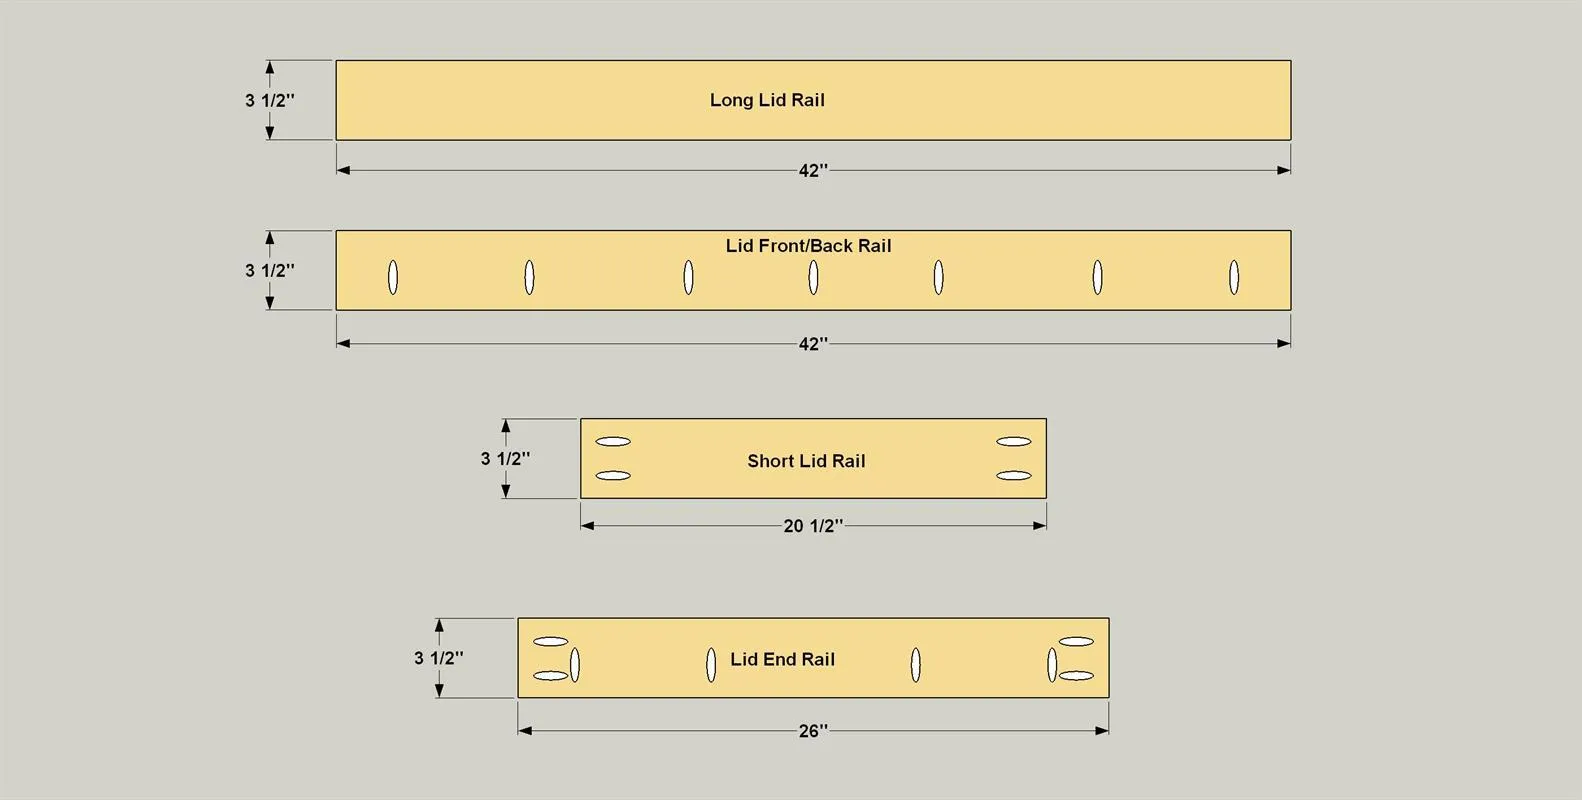
- Cut two Long Lid Rails, four Short Lid Rails, two Lid Front/Back Rails, and two Lid End Rails to length from 1x4 boards, as shown in the cutting diagram.
- Set your pocket-hole jig for 3/4"-thick material, and then drill pocket holes in the parts at the locations shown. Note that the Long Lid Rails don’t get any pocket holes.
10Assemble the Lid Frame
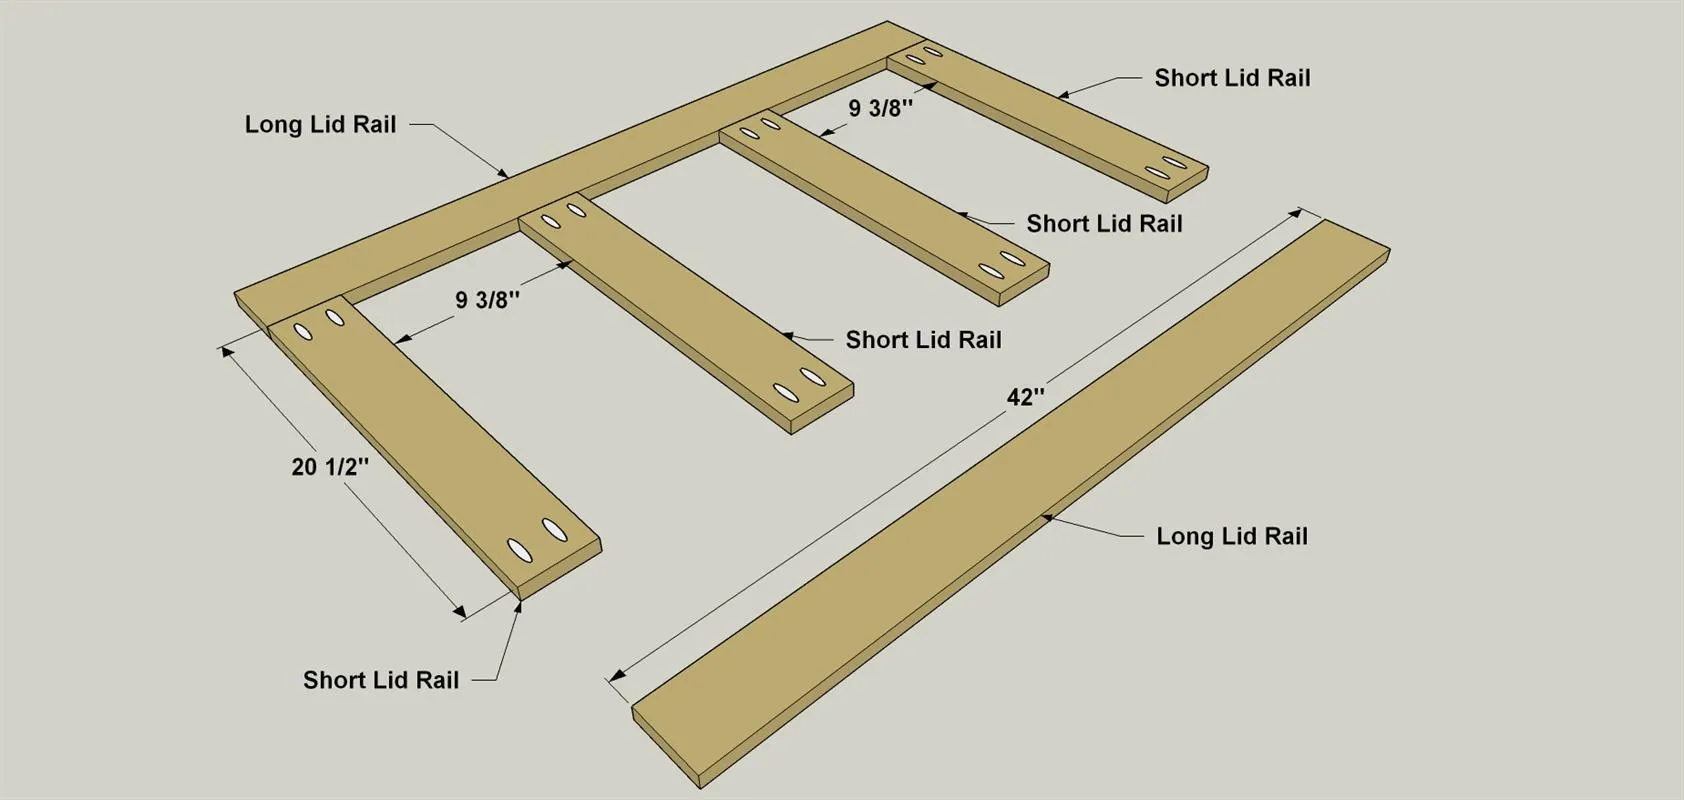
Attach one Long Lid Rail to four Short Lid Rails using glue and 1 1/4" coarse-thread pocket-hole screws, as shown. Next, set the second Long Lid Rail in position and secure it to the Short Lid Rails in the same way.
11Complete the Lid
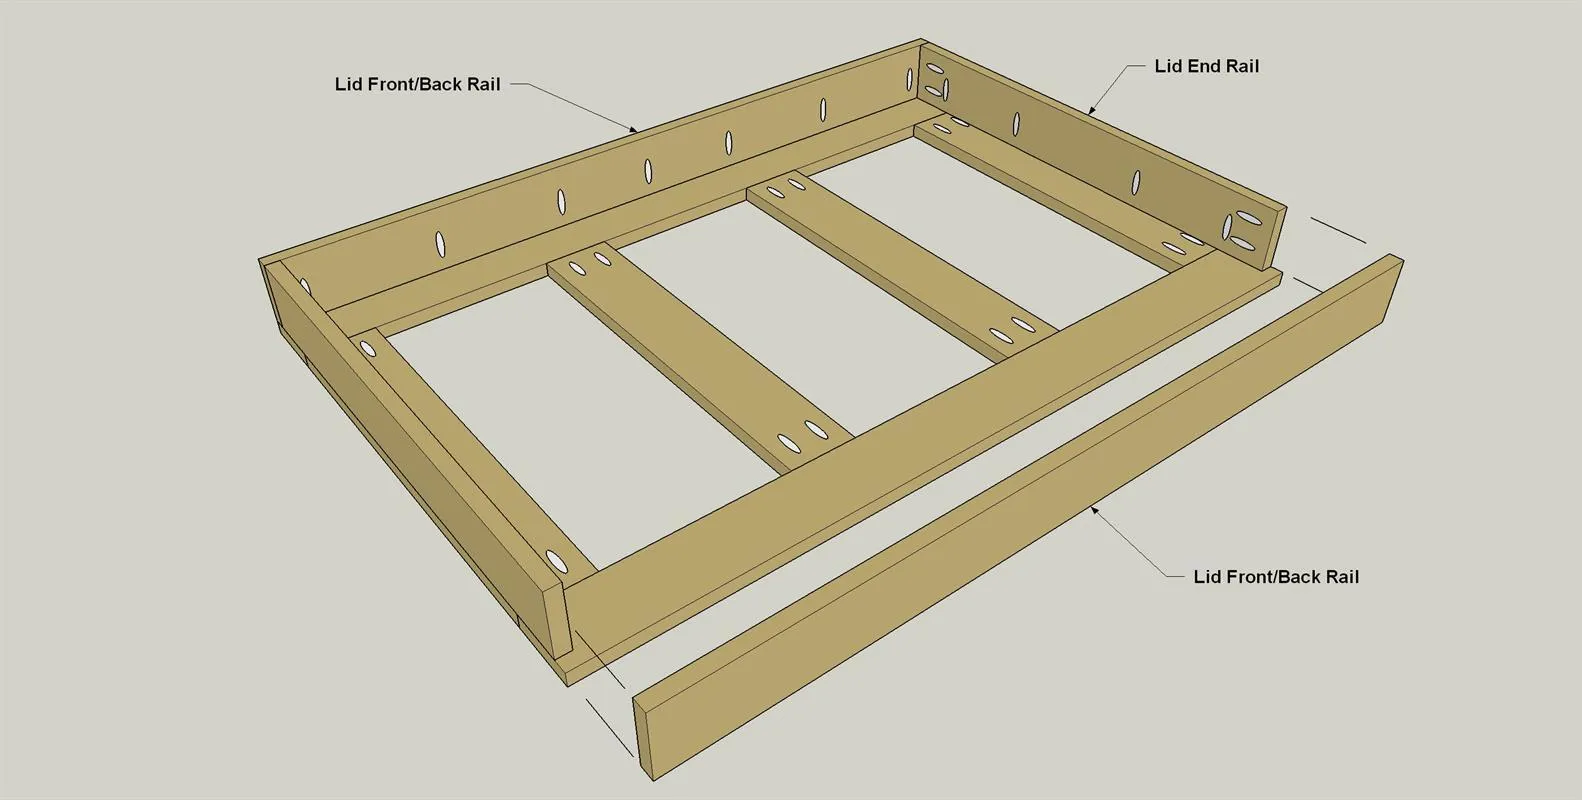
Attach the one Lid Front/Back Rail to the lid frame assembly using glue and 1 1/4" coarse-thread pocket-hole screws, as shown. Then add the Lid End Rails, and then the final Lid Front/Back Rail
12Add a Protective Finish
- With assembly done, you could slip your trash bins into the recycling center and put it to work without any stain or finish. Over time, though, the wood will get dirty and dingy looking. So, we decided to dress ours up a bit.
- First, we gave the exterior a light sanding with 120-grit sandpaper.
- Then we brushed a quick coat of polyurethane onto the outside of the base assembly. For the lid, we used a dark stain, and then painted three panels using chalkboard paint.
- Once dry, we wrote the items that get placed in each bin onto the chalkboard panels.
- Then we slipped the trash bins into place and put the recycling center to work in the garage.
Tags
- Garage
- Beginner
Reviews & builds
No reviews yet
Sign in to review this plan or share your build.
No reviews yet. Be the first to build this.