 Notch
- Difficulty
- Beginner
- Time
- 1.3–2.5 hours
- Cost
- $$
About this build
This DIY mirror shelf features a 24" diameter mirror that is perfect for a bathroom vanity.
Tools
Essential
- Circular Saw
- Jigsaw
- Pocket Hole Jig
- Random Orbit Sander
Materials
| Item | Qty |
|---|---|
| Sheet of walnut plywood (or whatever plywood you choose), 4'x8'x3/4" | 1 board |
| 24" round mirror | 1 each |
| Box of 1 1/4" Kreg pocket-hole screws (See tools list) | 1 each |
| Polyurethane sealer | 1 each |
| Sandpaper | 1 each |
Overall cost: $$. Lumber prices vary by region, species, and season, so we give a band rather than a figure we would only be pretending to know.
Cut list
| Part | Qty | T × W × L |
|---|---|---|
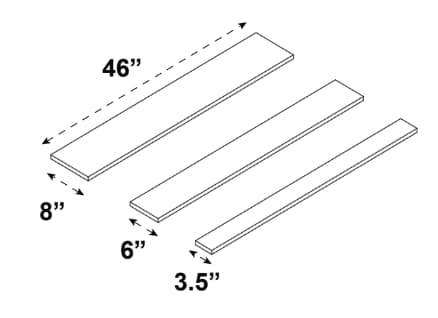
| Back | 1 | 3/4" × 8" × 46" |
| Top shelf | 1 | 3/4" × 3" × 46" |
| Bottom shelf | 1 | 3/4" × 6" × 46" |
What to buy
Buy 3 boards at 8 ft.
3/4" × 8"
1 board
3/4" × 6"
1 board
3/4" × 3"
1 board
Assumes 8 ft stock, a 1/8" saw kerf, and buying each part at its own width. Change the board size or kerf on the full board plan →
Instructions
1Cut plywood
Cut three pieces of plywood. These are the sizes I used but this design idea can be adapted in all dimensions.
2Determine location of mirror & cut slots
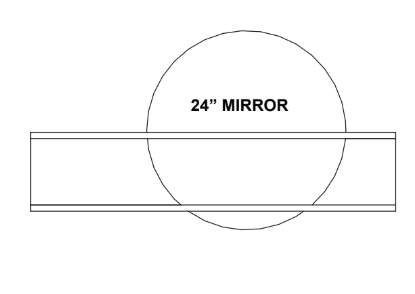
Place the shelf pieces over the mirror to determine the length of the slots before cutting these 3/8” wide slots with a jigsaw.
3Assemble shelf with pocket holes
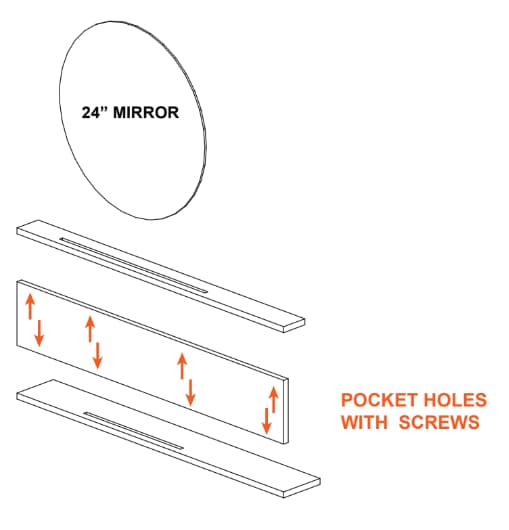
Assemble with pocket holes and screws. The shelf unit can be attached to the wall by screwing through the back panel in the area that the mirror will cover.
Tags
- Bathroom
- Beginner
Reviews & builds
No reviews yet
Sign in to review this plan or share your build.
No reviews yet. Be the first to build this.