 Notch
Notch- Difficulty
- Easy
- Time
- 6–11.8 hours
- Cost
- $$
About this build
This handsome cedar outdoor chair provides a super comfy place to site and enjoy the great outdoors. It’s made from just five cedar boards, and it goes together with pocket-hole screws. You can build one or as many as you want. The chair is also a perfect companion to our Outdoor Chaise Lounge plan.
Tools
Essential
- Circular Saw
- Drill / Driver
- Jigsaw
- Pocket Hole Jig
- Random Orbit Sander
Optional / nice to have
- Bar / Pipe Clamps
- Tape Measure
Materials
| Item | Qty |
|---|---|
| Cedar board, 1x6 x 96" | 5 board |
| 1 1/4" Kreg Blue-Kote™ Pocket-Hole Screws | 107 each |
| Waterproof wood glue | 1 each |
Overall cost: $$. Lumber prices vary by region, species, and season, so we give a band rather than a figure we would only be pretending to know.
Cut list
| Part | Qty | T × W × L |
|---|---|---|
| Front Leg | 2 | 3/4" × 5" × 15" |
| Side Rail | 2 | 3/4" × 5" × 14" |
| Back Leg | 2 | 3/4" × 5" × 14" |
| Back Support | 2 | 3/4" × 5" × 23" |
| Cleat | 2 | 3/4" × 4" × 9" |
| Top Cap | 1 | 3/4" × 5" × 23" |
| First Slat | 1 | 3/4" × 5" × 23" |
| Slat | 6 | 3/4" × 5" × 23" |
| Front Rail | 1 | 3/4" × 5" × 23" |
| Back Filler | 2 | 3/4" × 5" × 23" |
What to buy
Buy 6 boards at 8 ft.
3/4" × 5"
5 boards
3/4" × 4"
1 board
Assumes 8 ft stock, a 1/8" saw kerf, and buying each part at its own width. Change the board size or kerf on the full board plan →
Instructions
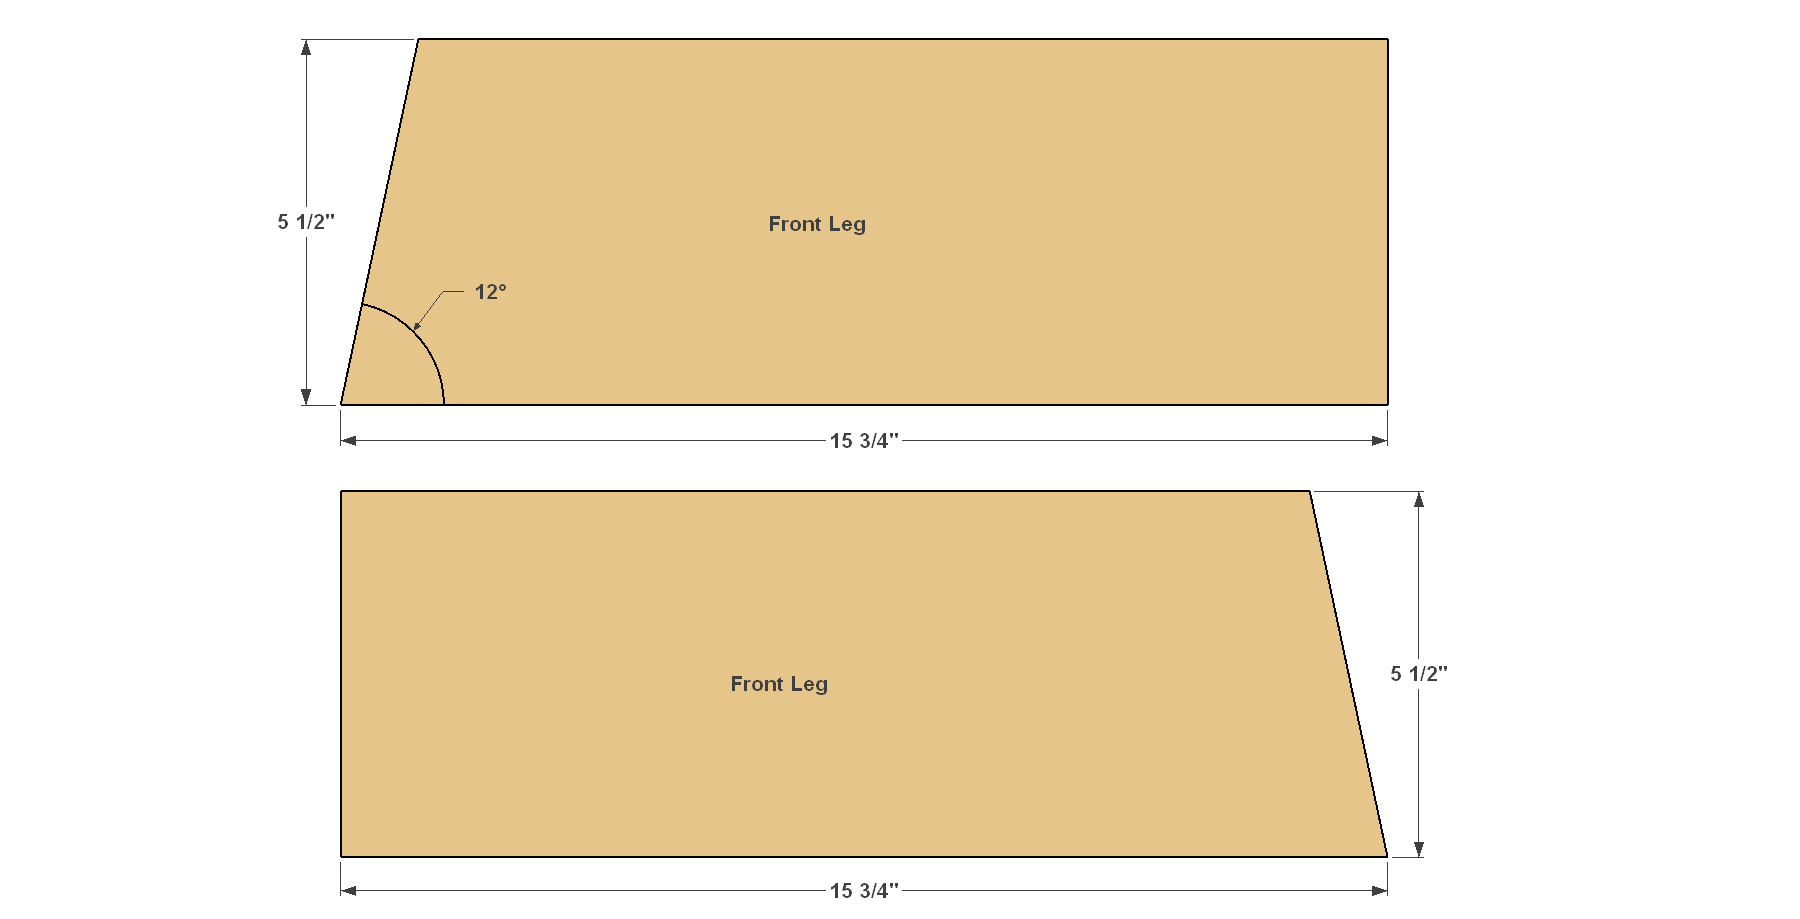
1Cut the Front Legs
Cut two Front Legs to length and shape from 1x6 cedar boards, as shown in the cutting diagram. Cedar typically has one smooth face and one rougher face. To create the best look on this project, plan to have the rough faces toward the underside of the chair, so that the smooth faces will be what you see and touch.
2Make the Side Rails
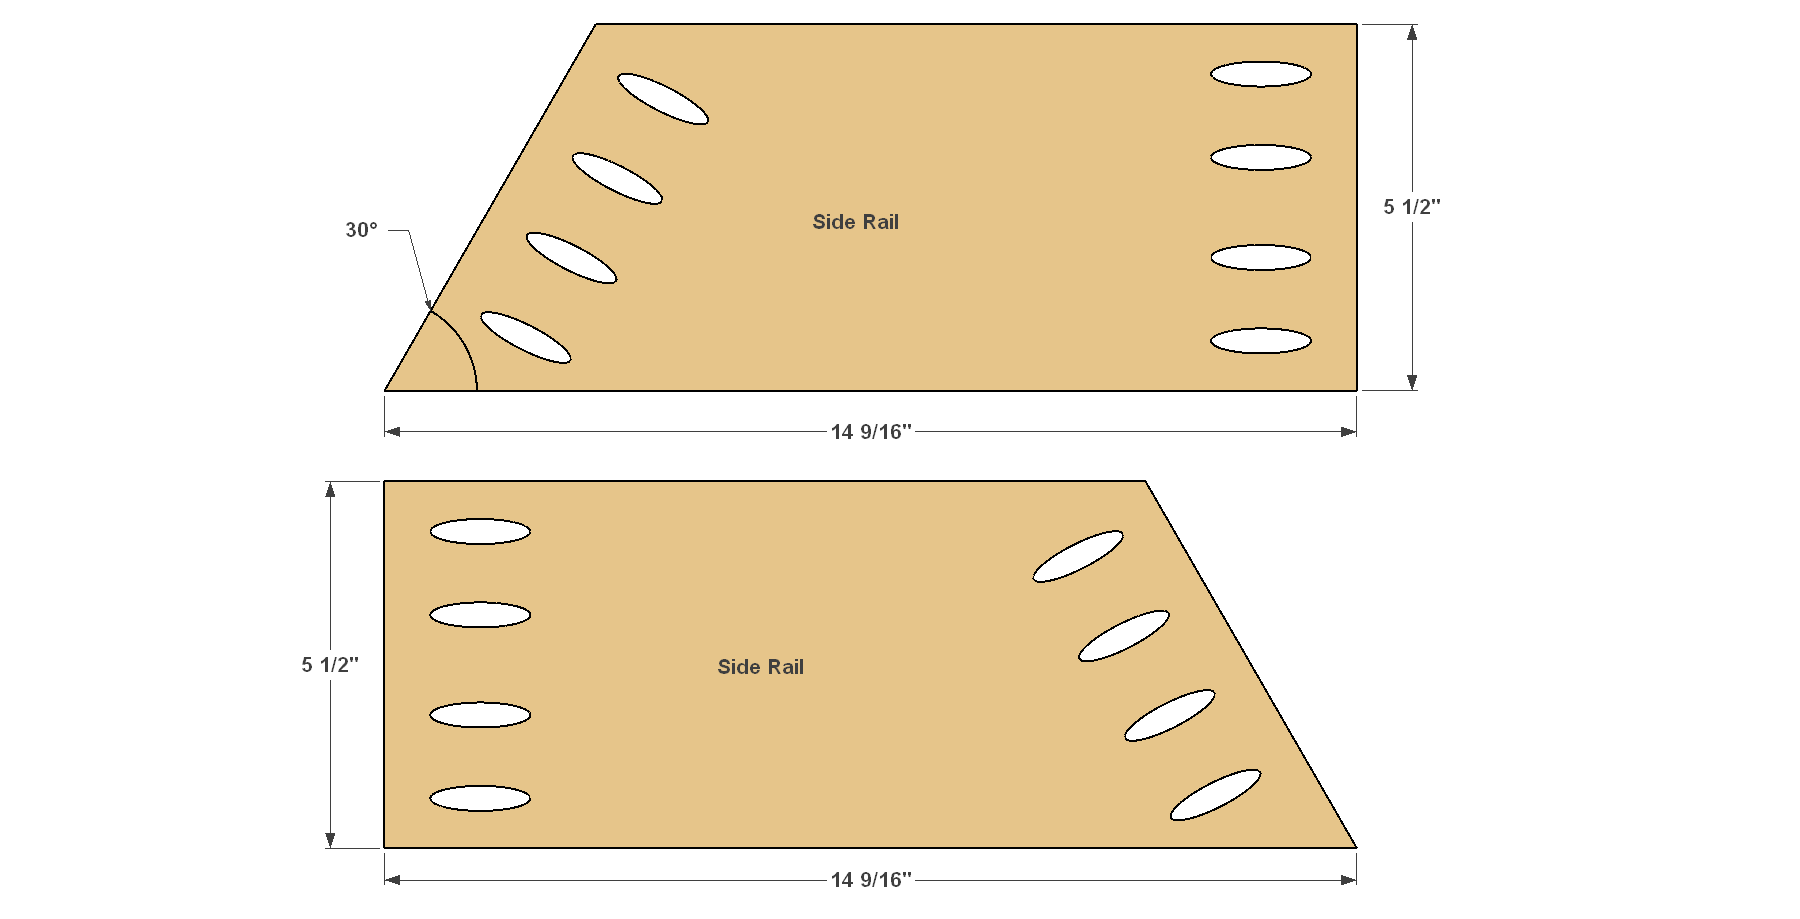
- Cut two Side Rails to length from 1x6 cedar, as shown in the cutting diagram. Orient your Side Rails so that the pocket holes will be in the rough face, and so that you’ll produce tow mirror-image pieces.
- Set your Kreg® Pocket-Hole Jig for 3/4" thick material, and then drill pocket holes in each of the Rails, as shown.
3Assemble the Leg and Side Rail
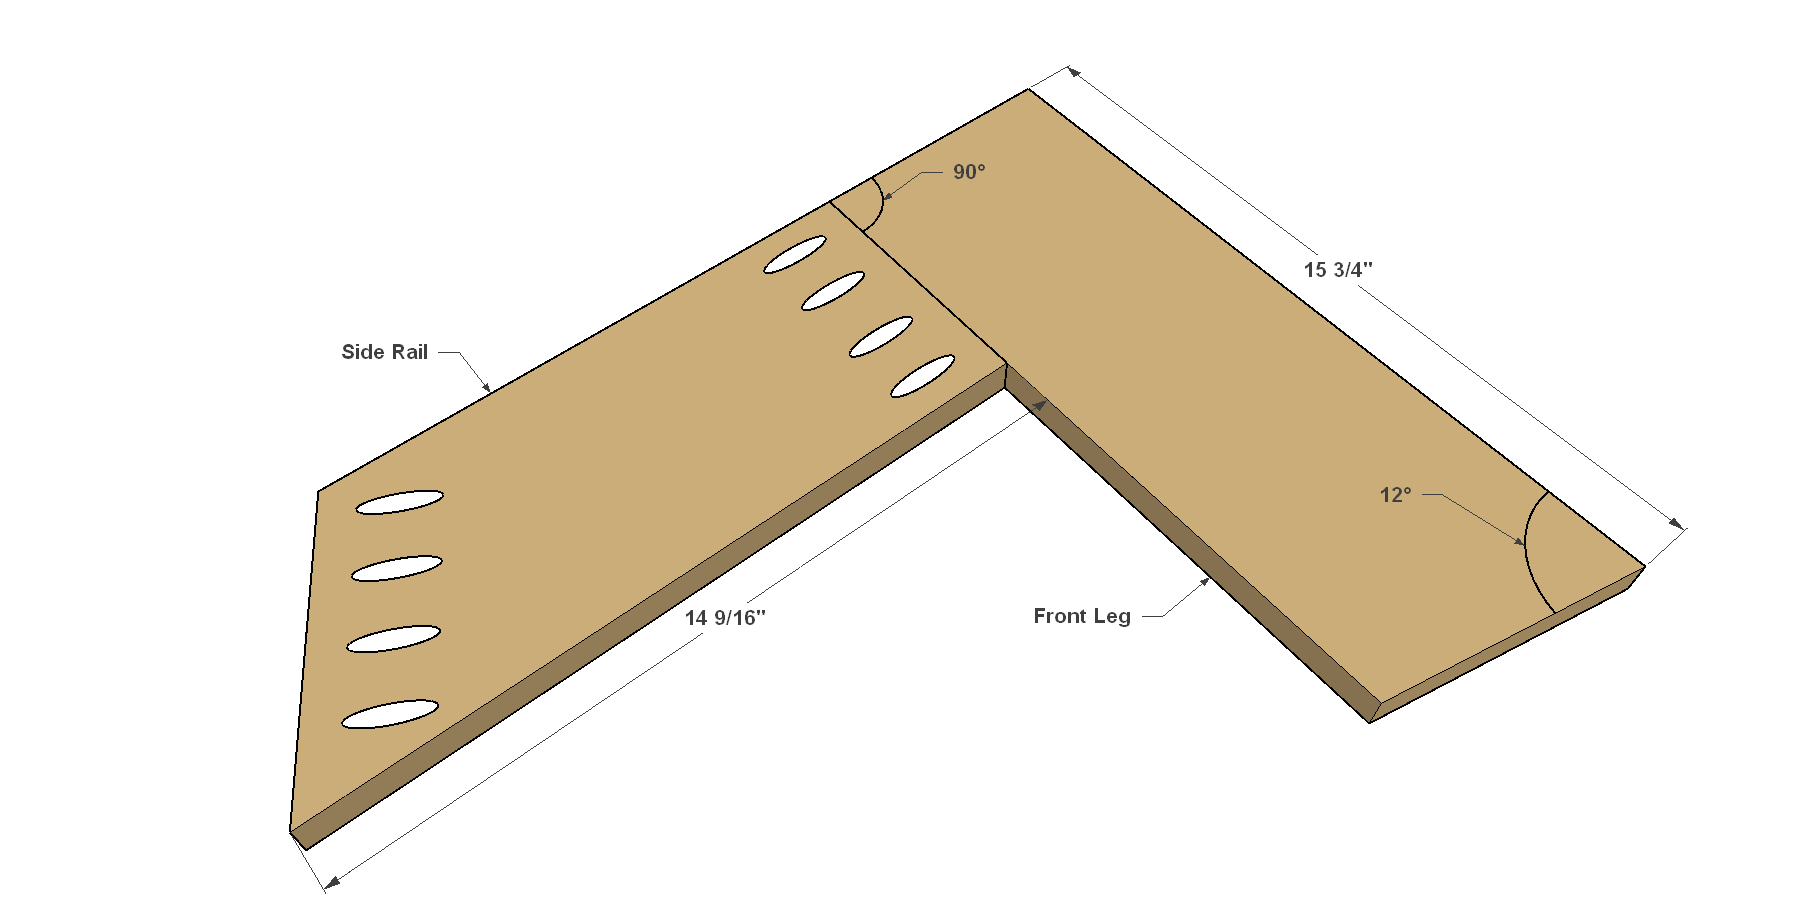
- Position one Front Leg against one Side Rail as shown, making sure that the Leg is oriented correctly.
- Assemble the parts using waterproof exterior wood glue and 1 1/4" Kreg Blue-Kote™ Pocket-Hole Screws.
- Repeat the process for the second Leg and Rail.
4Make the Back Leg
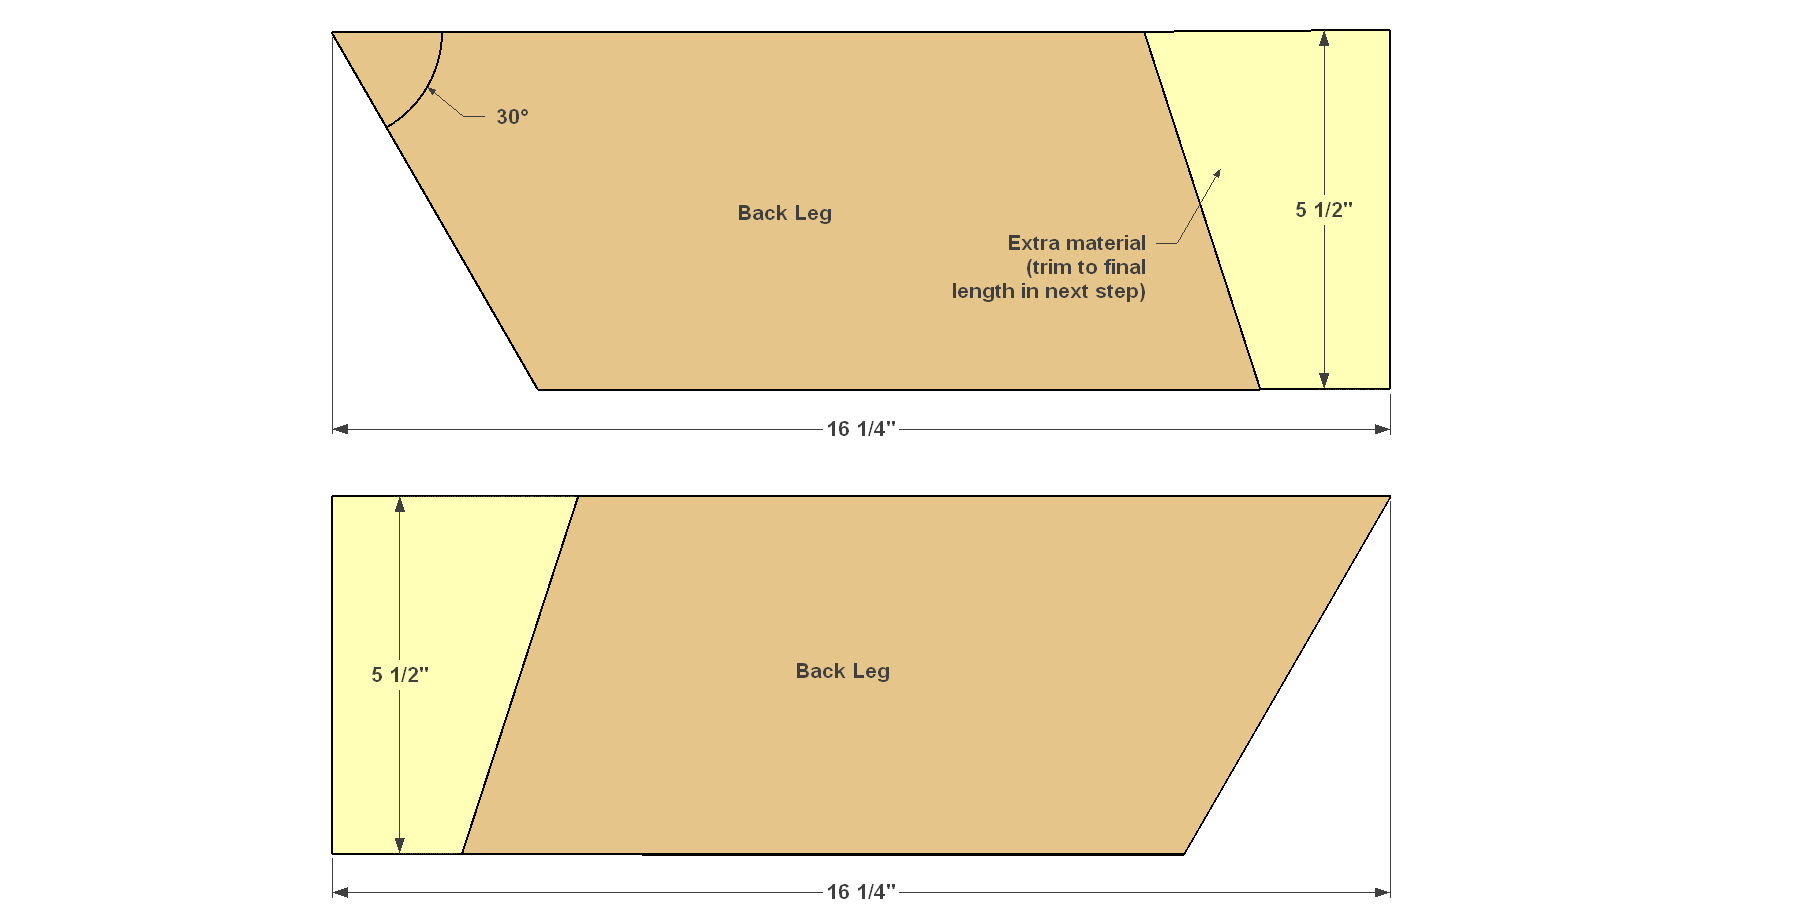
Cut two Back Legs from 1x6 boards, as shown in the cutting diagram. Note that the Back Legs don’t get cut to final length yet. They’re left extra-long, and will get trimmed later to ensure that they match angle of the Front Legs.
5Attach and Trim the Back Leg
- Position the rough-length Back Leg against the Side Rail as shown, but do not secure it just yet.
- Place a long straight edge along the bottom of the Front Leg and extend it over the Back Leg as shown.
- Mark the final length of the back leg with a pencil, and then cut the Back Leg to length on the miter saw. Be sure you rotate the saw so that it will cut at the angle that matches the line you drew.
- Place the Leg back in position, and then secure it to the Side Rail with exterior glue and 1 1/4" Blue-Kote™ screws.
- Repeat the process for the other side.
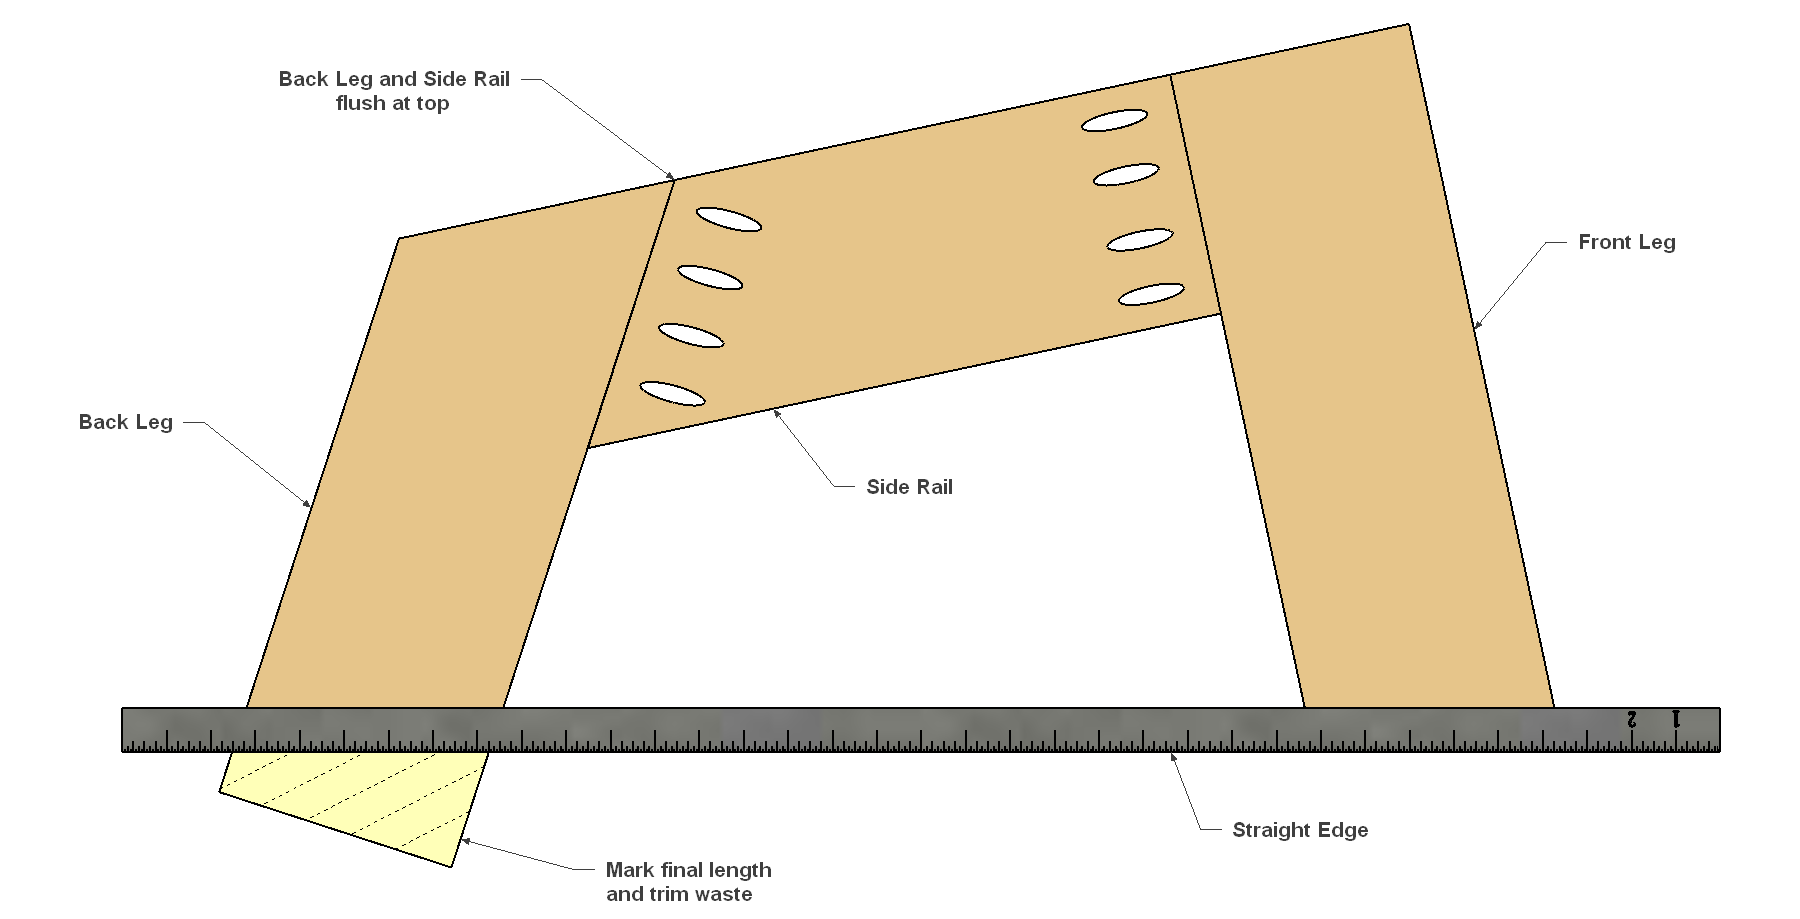
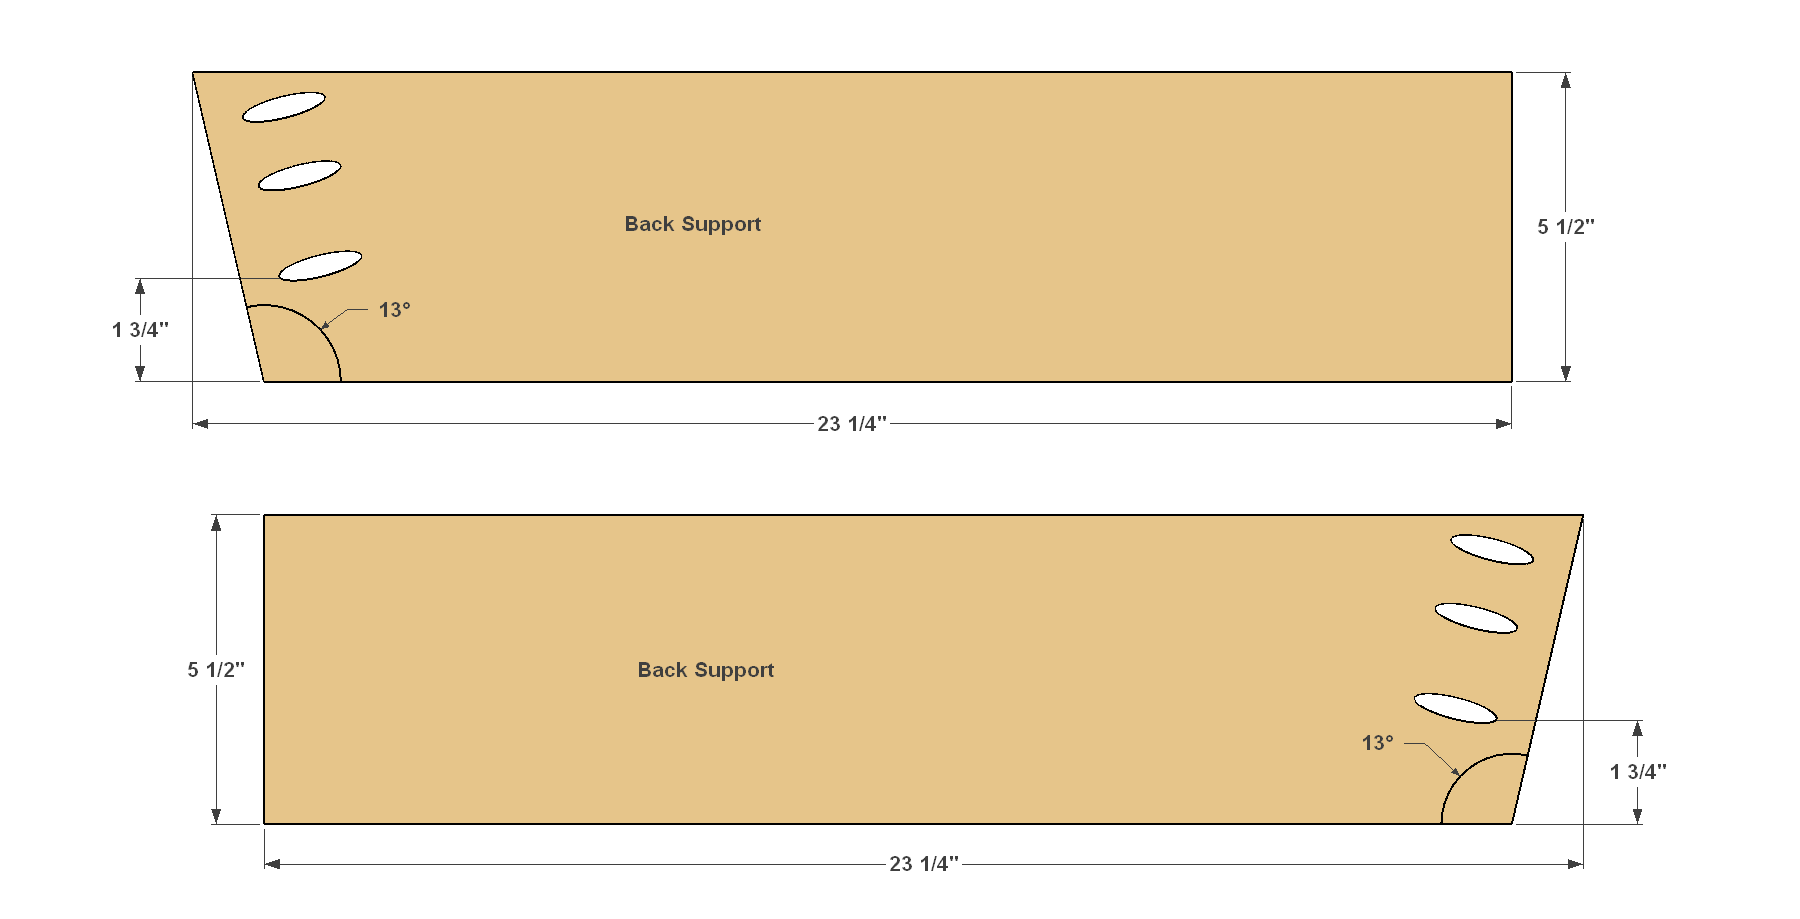
6Make the Back Support
- Cut two Back Supports from 1x6 boards, as shown in the cut diagram.
- Drill pocket holes at the locations shown. Again, make sure you are drilling the holes in the rough face of each piece.
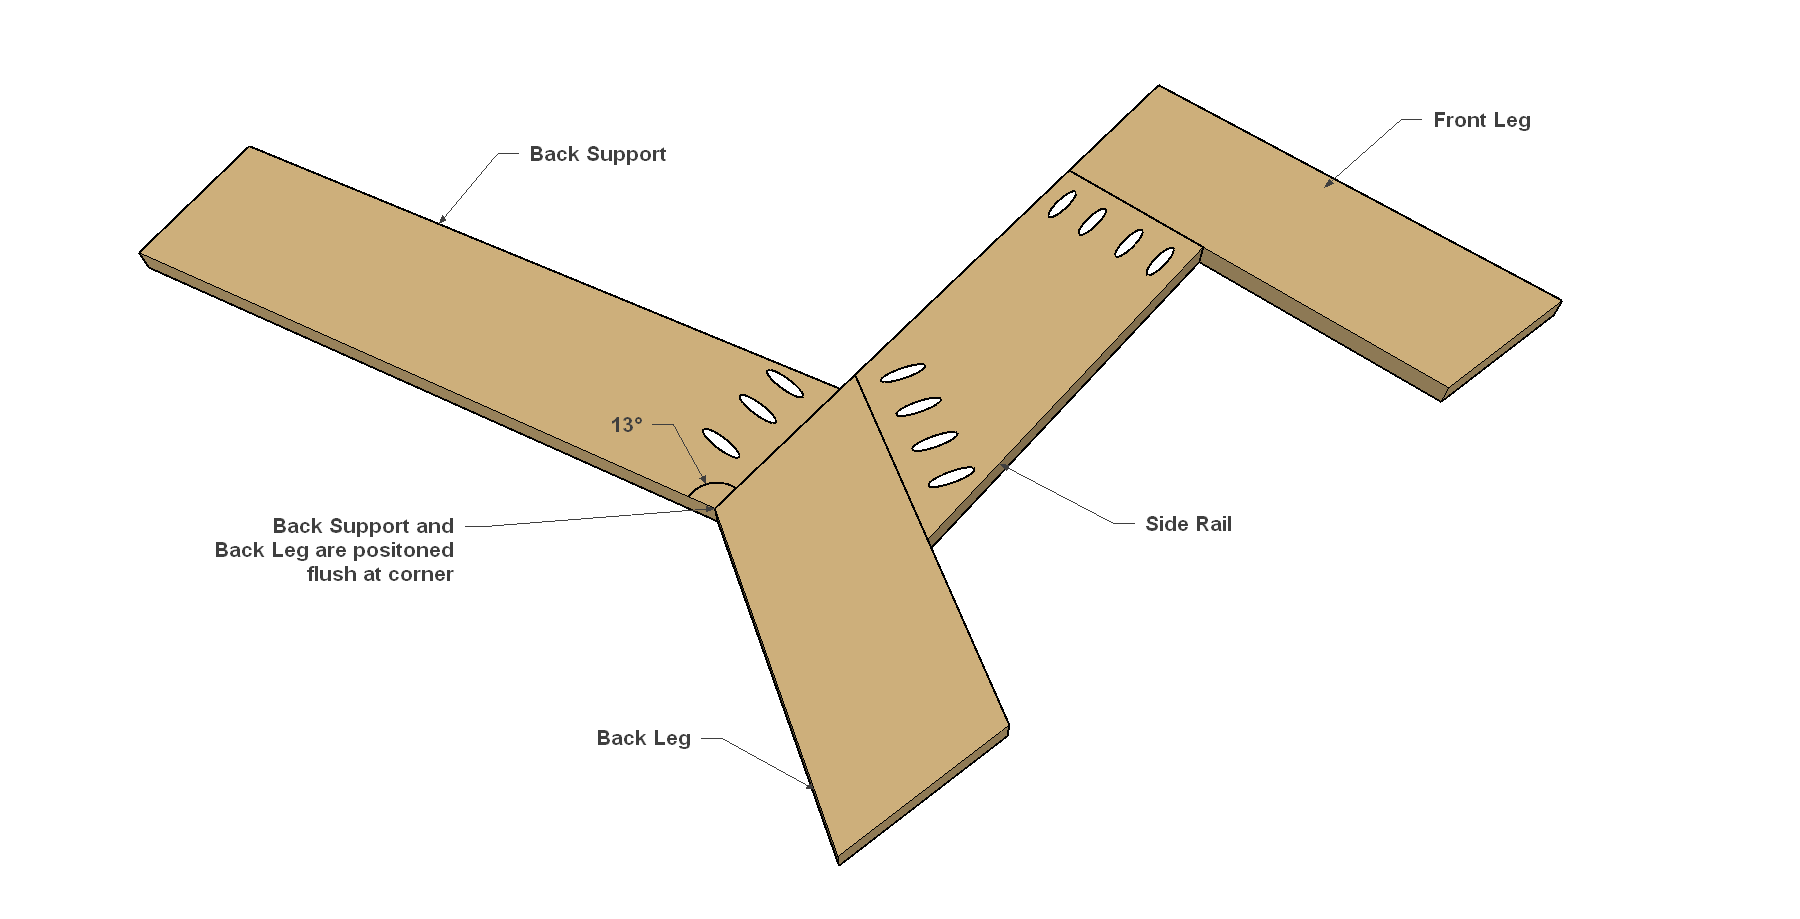
7Attach the Back Support
- Apply glue to the end of the Back Support, and then position the Support so the back edge is flush with the back edge of the Back Leg, as shown. Secure the two pieces together 1 1/4" Blue-Kote™ screws.
- Repeat the process for the other side.
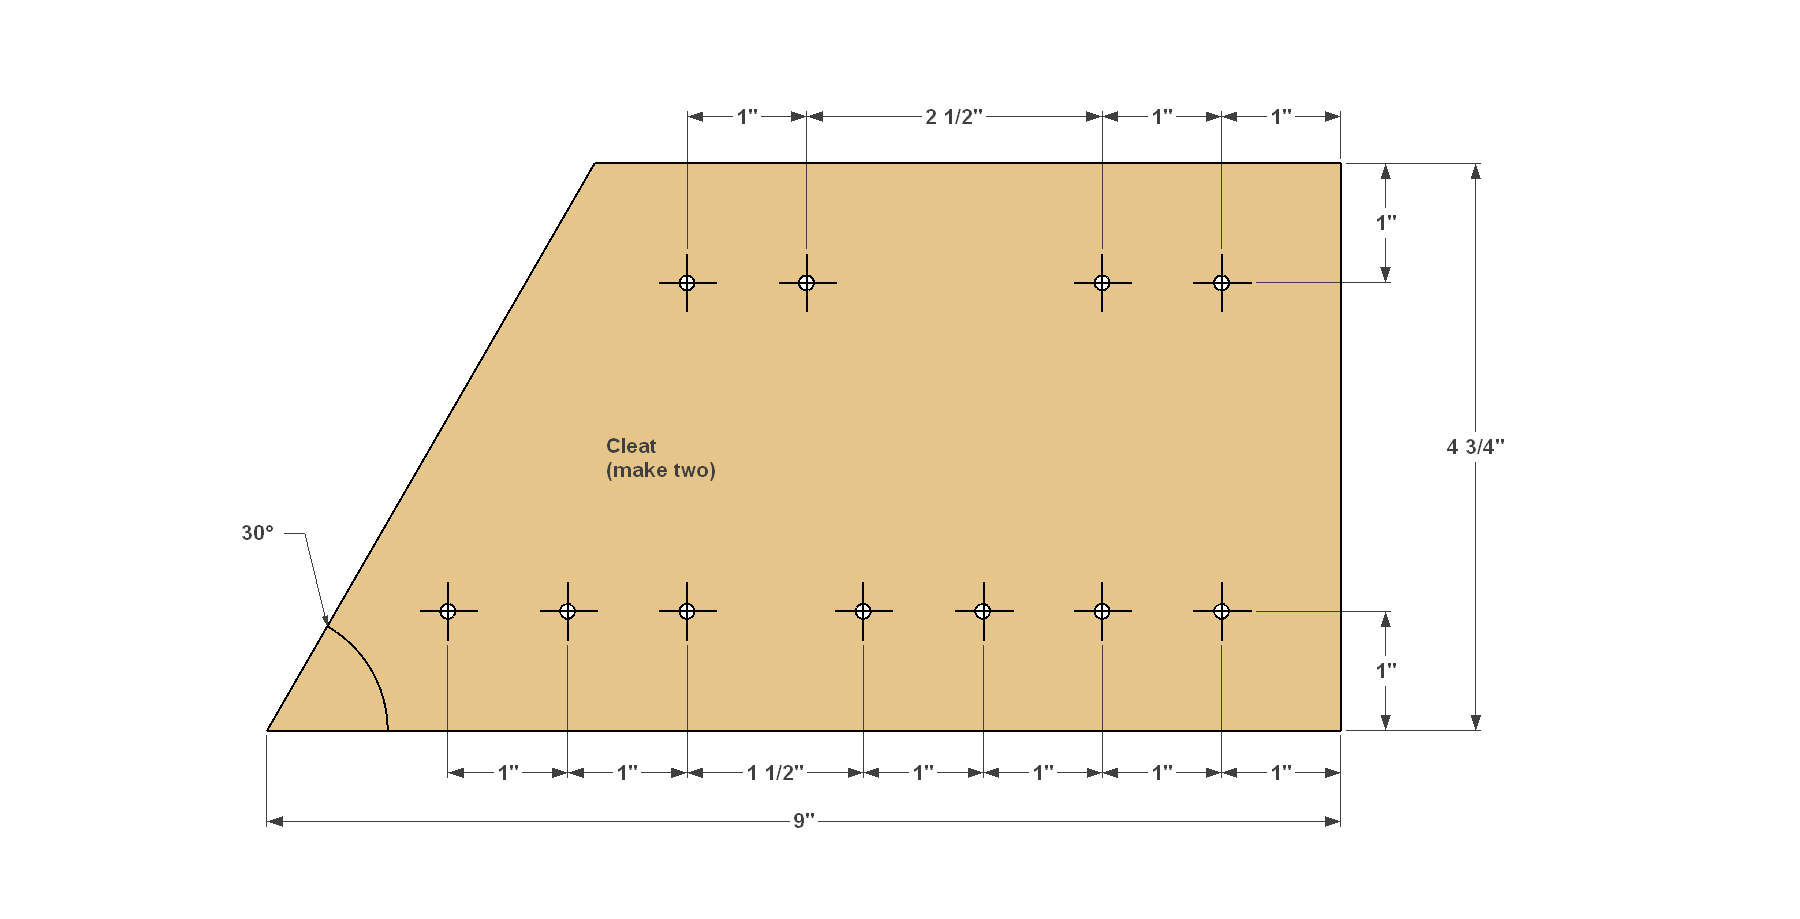
8Make the Cleats
Cut two Cleats to length from 1x6 boards, as shown in the cutting diagram, and then cut them to width using a jigsaw. Lay out the pilot hole locations, and then drill each one using a 1/8" drill bit.
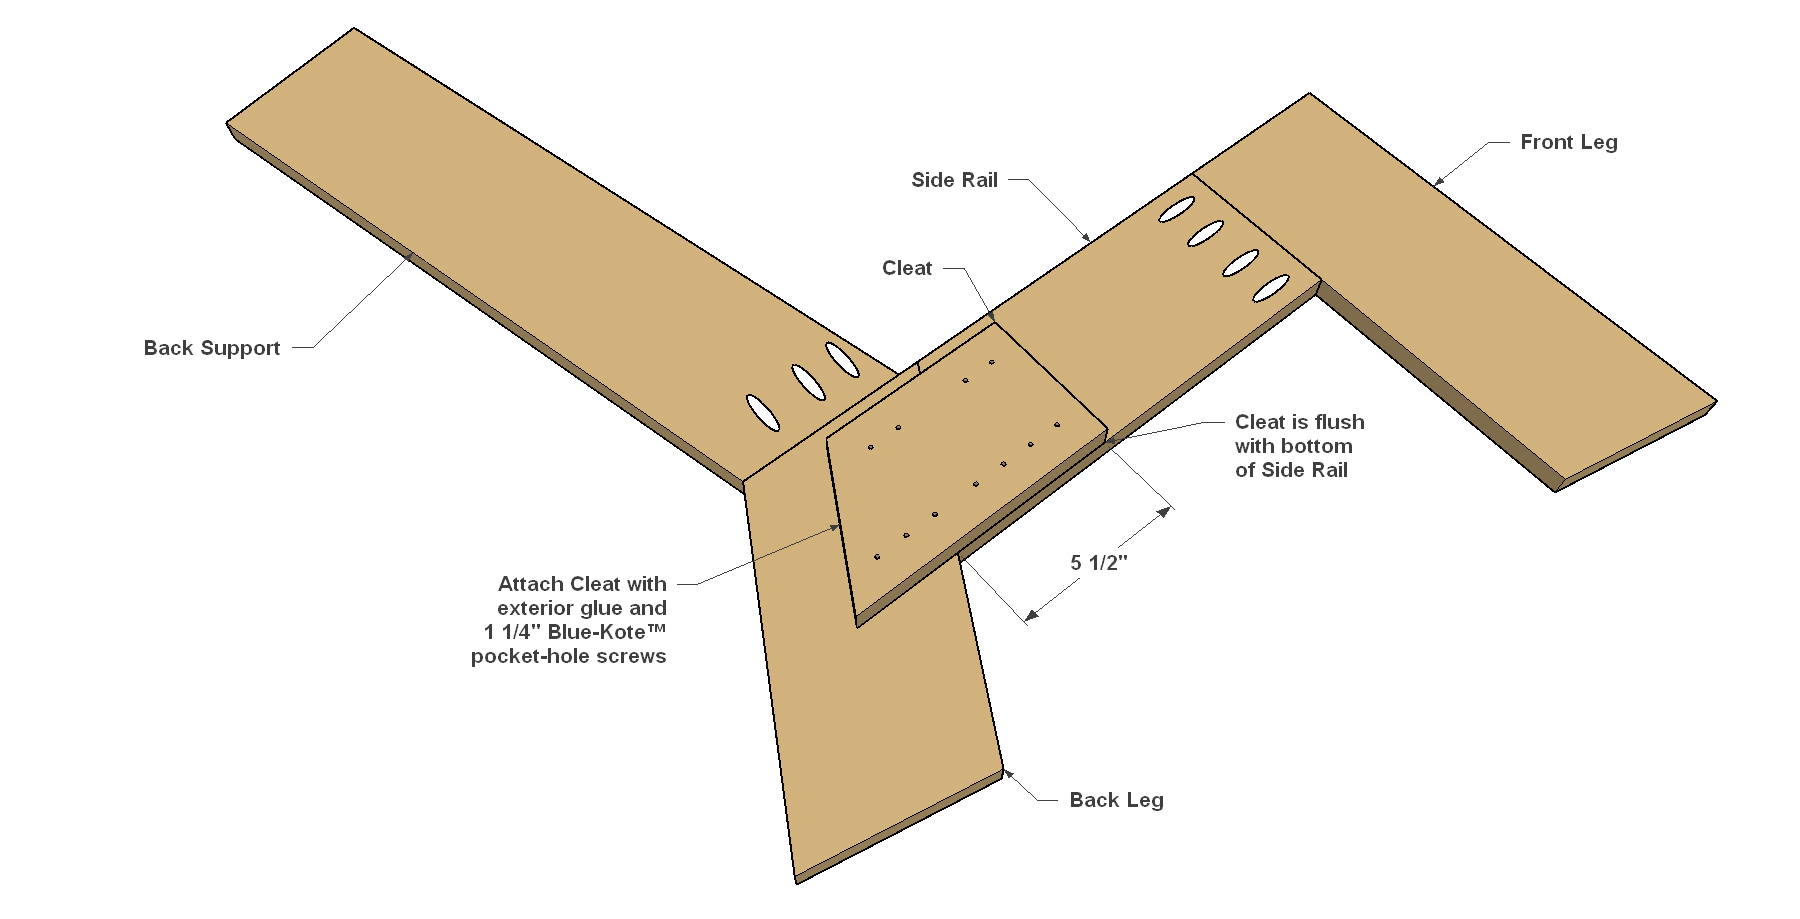
9Attach the Cleats
- Apply glue generously to the rough face of a Cleat, and then position it as shown.
- Clamp the Cleat in place and secure it using 1 1/4" Blue-Kote™ Pocket-Hole Screws—they’re great in assemblies like this, too, not just in pocket-hole joints.
- Repeat for the other side.
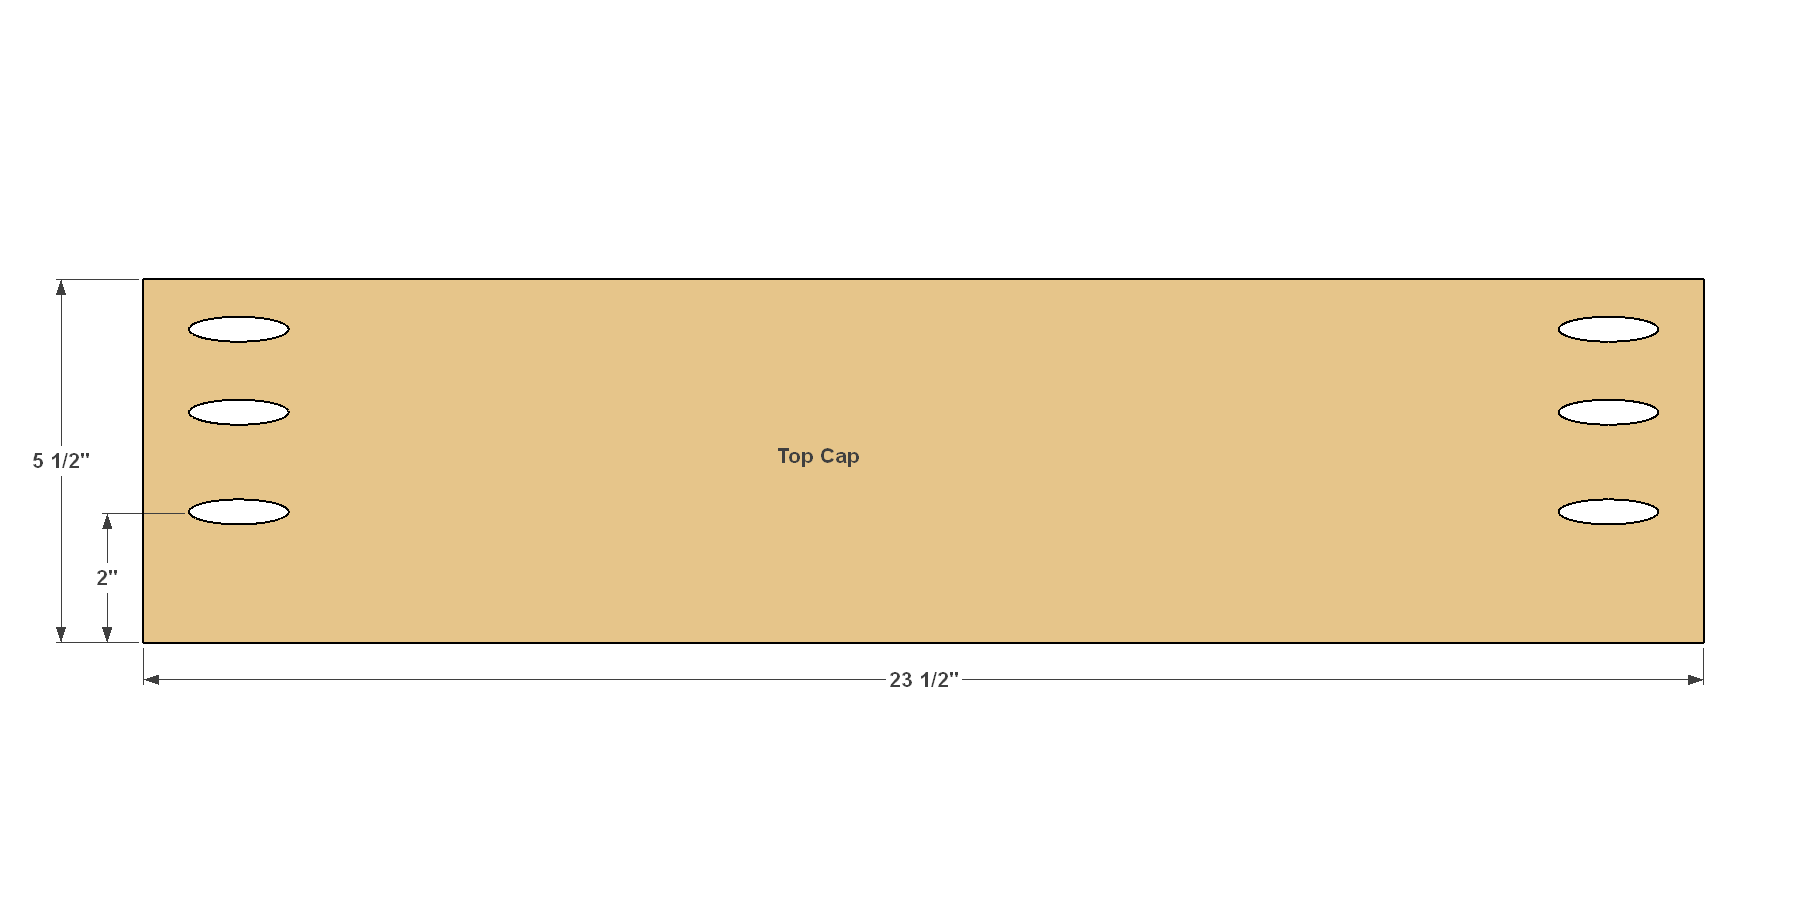
10Make the Top Cap
Cut one Top Cap to length from a 1x6 board, as shown in the cut diagram. Drill pocket holes at the locations shown.
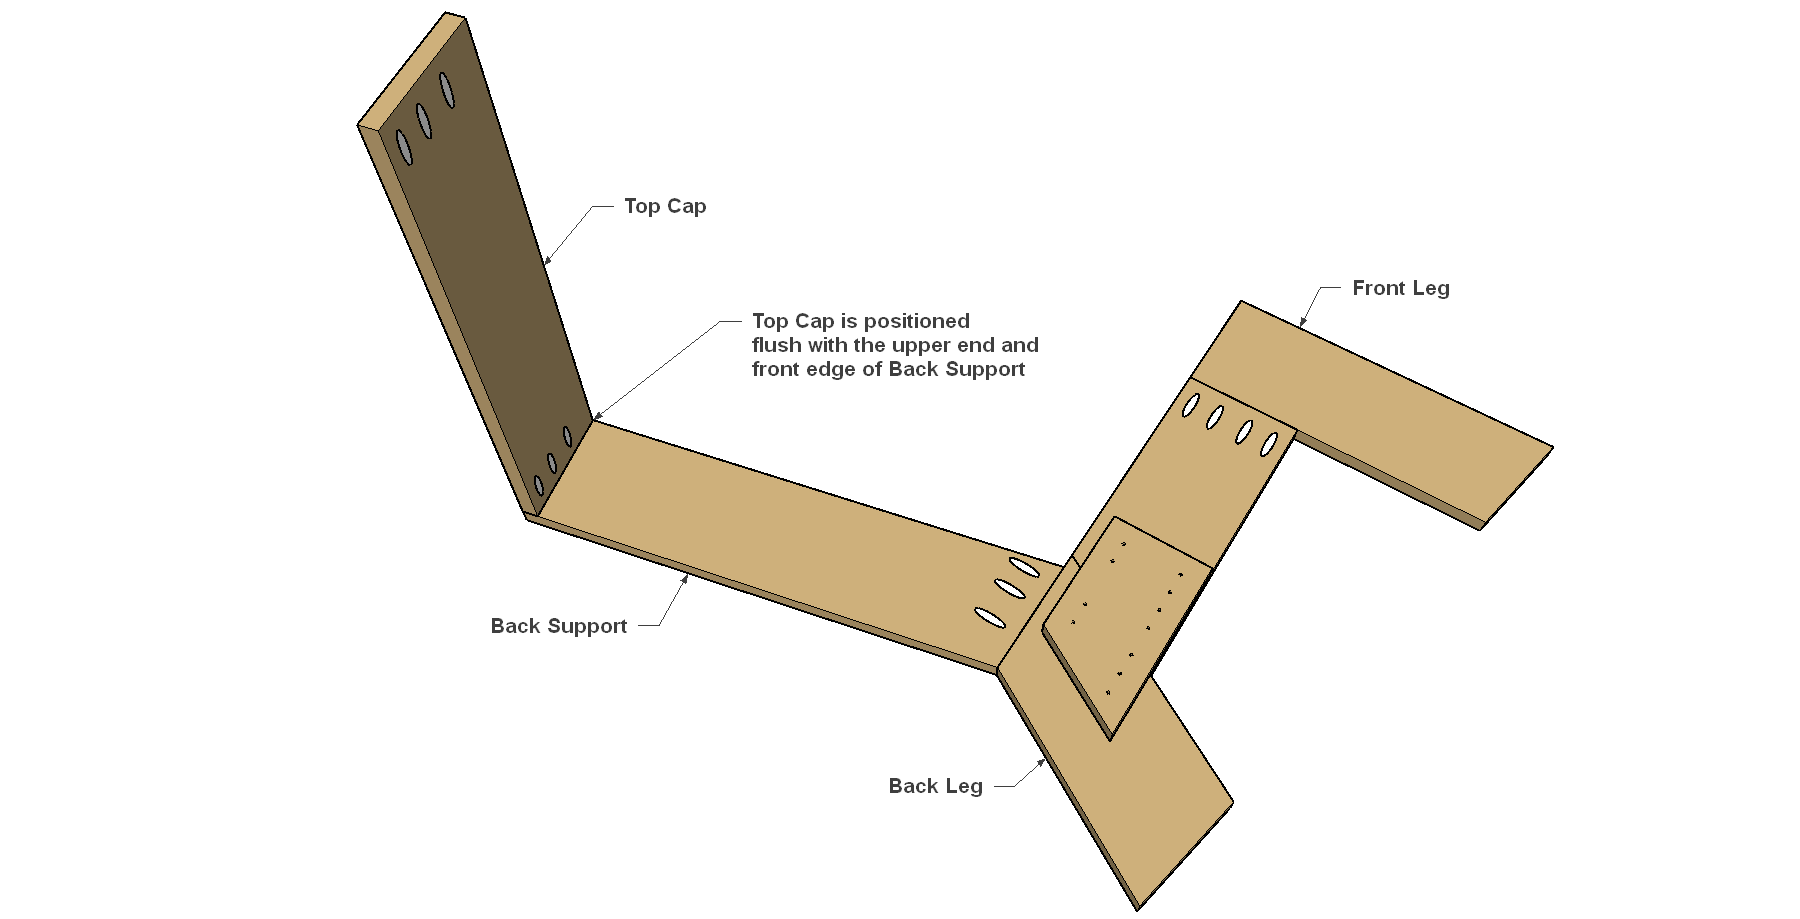
11Attach the Top Cap
Position the Top Cap so the three pocket holes on the end are toward the rear of the chair, and then secure the Top Cap with glue and 1 1/4" Blue-Kote™ screws.
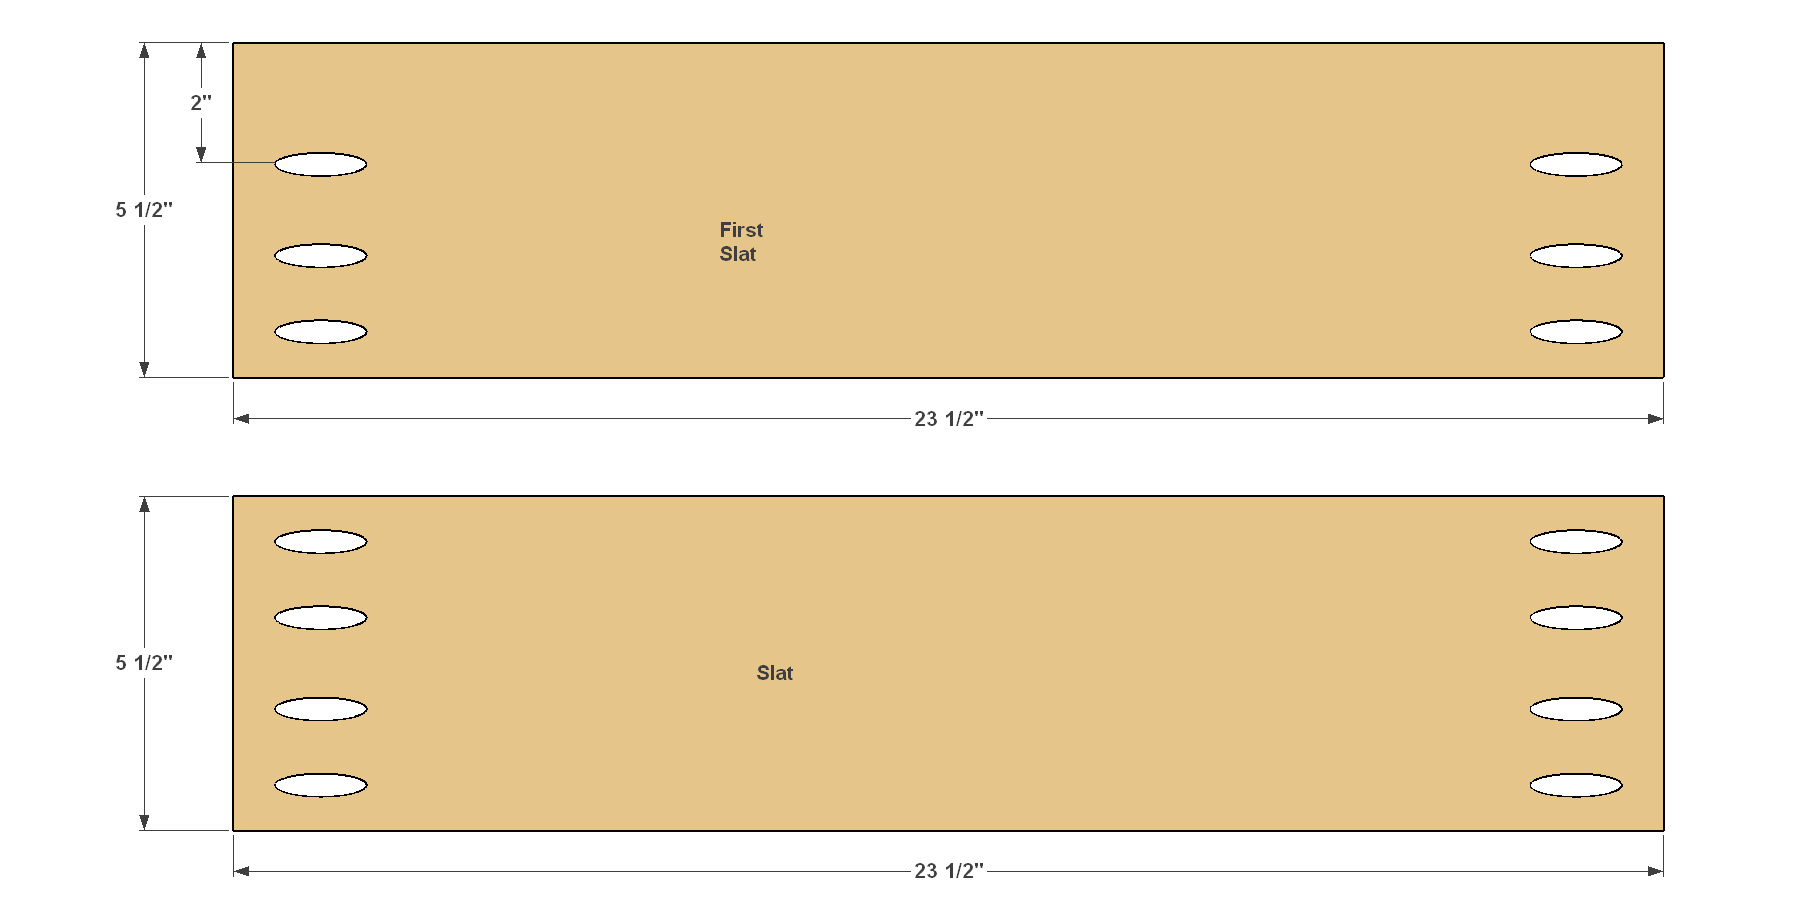
12Make the Slats
- Cut 7 slats to length from 1x6 boards. In one of the Slats, drill three pocket holes in each end, as shown, to create the First Slat.
- Then, drill four pocket holes in the remaining six Slats, as shown.
13Attach the First Slat
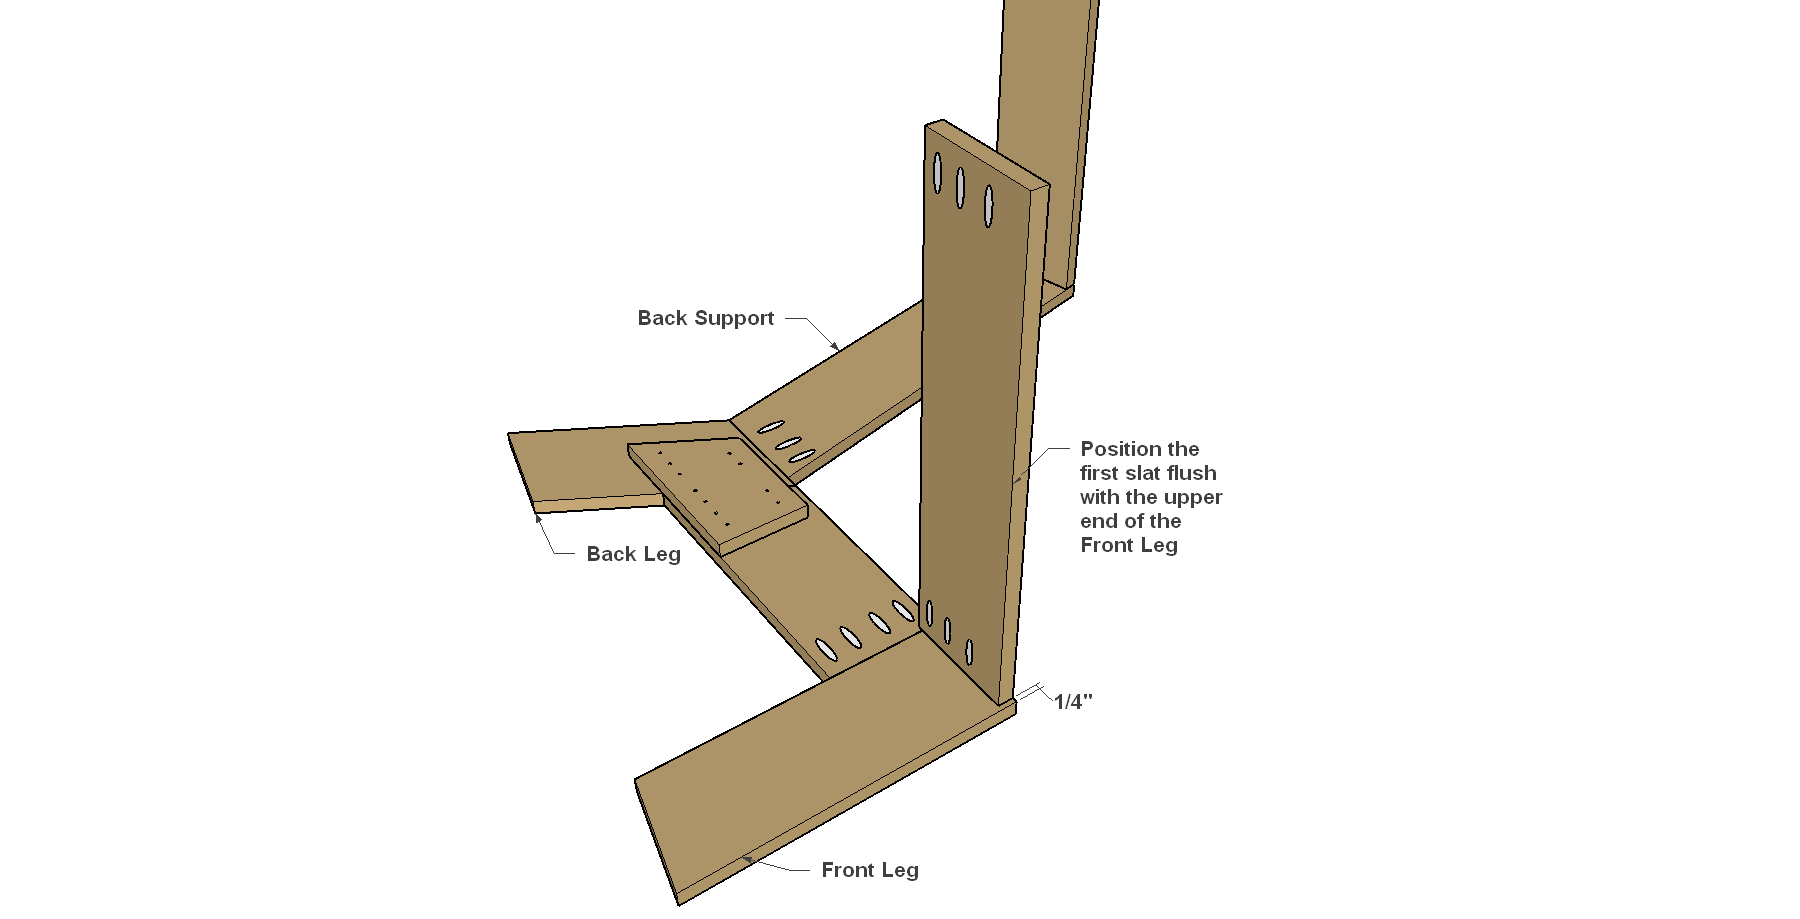
Position the First Slat so it is inset 1/4" from the front edge of the Front Leg, and so that the upper face of the First Slat is flush with the upper end of the Front Leg as shown. Secure it with glue and 1 1/4" Blue-Kote™ screws.
14Add the Remaining Slats
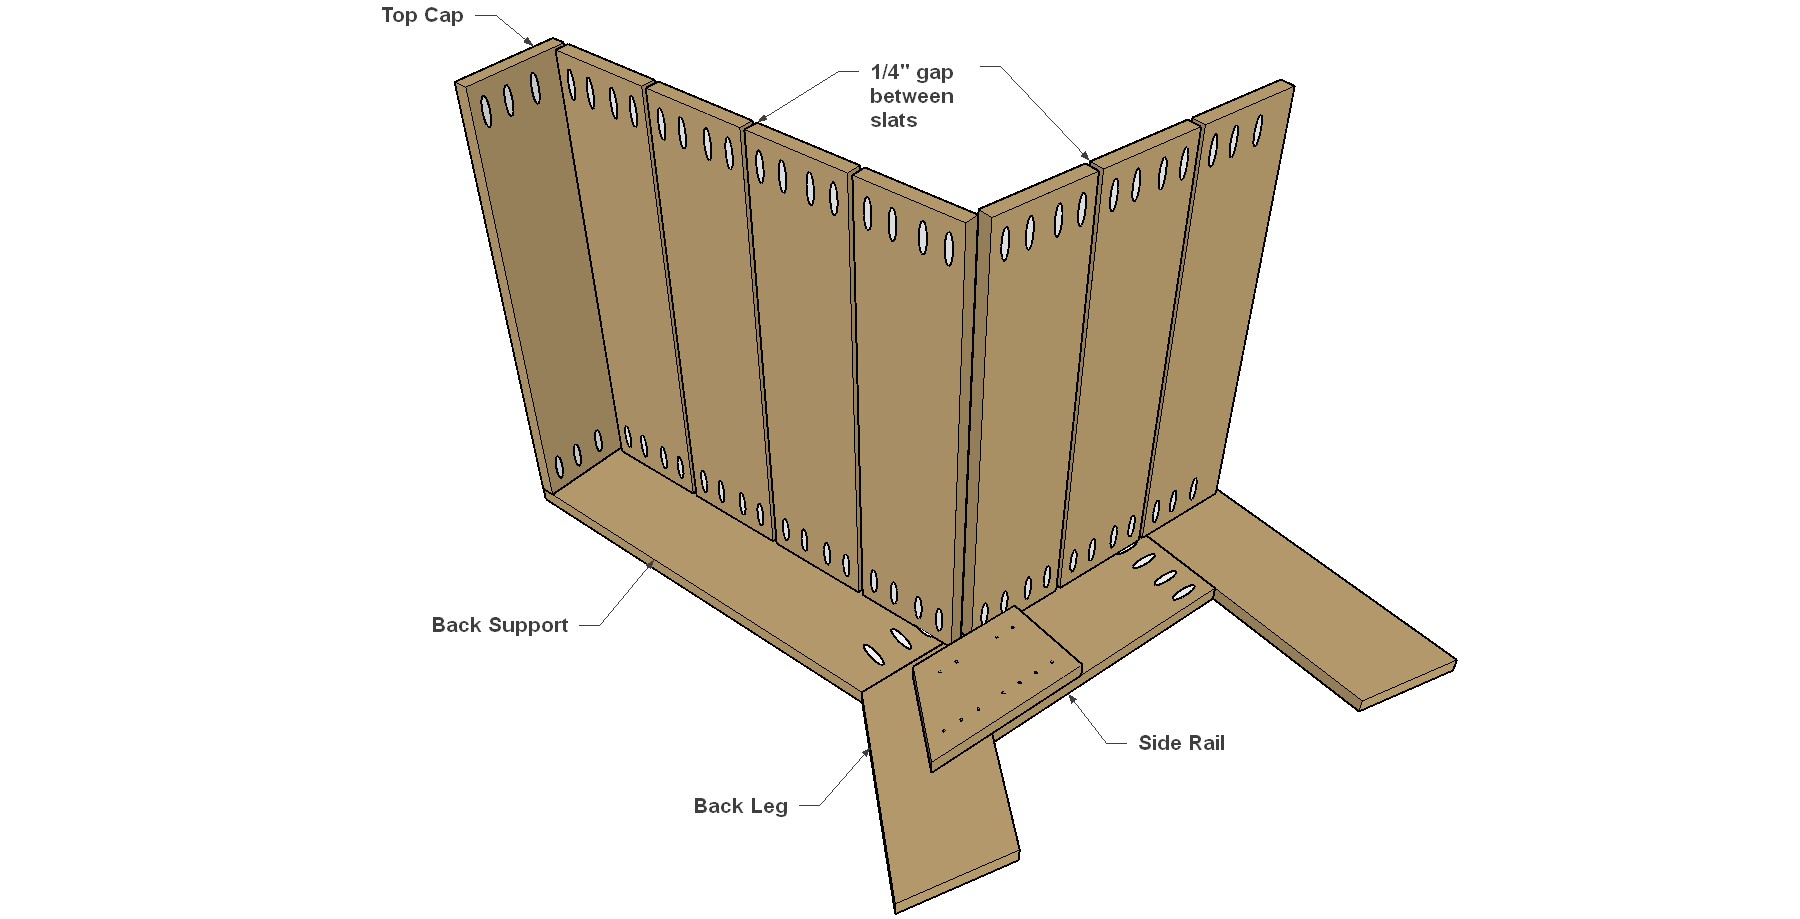
Now, attach the remaining Slats with glue and 1 1/4" Blue-Kote™ screws, spacing them evenly (about 1/4" apart) as you go.
15Make the Front Rail
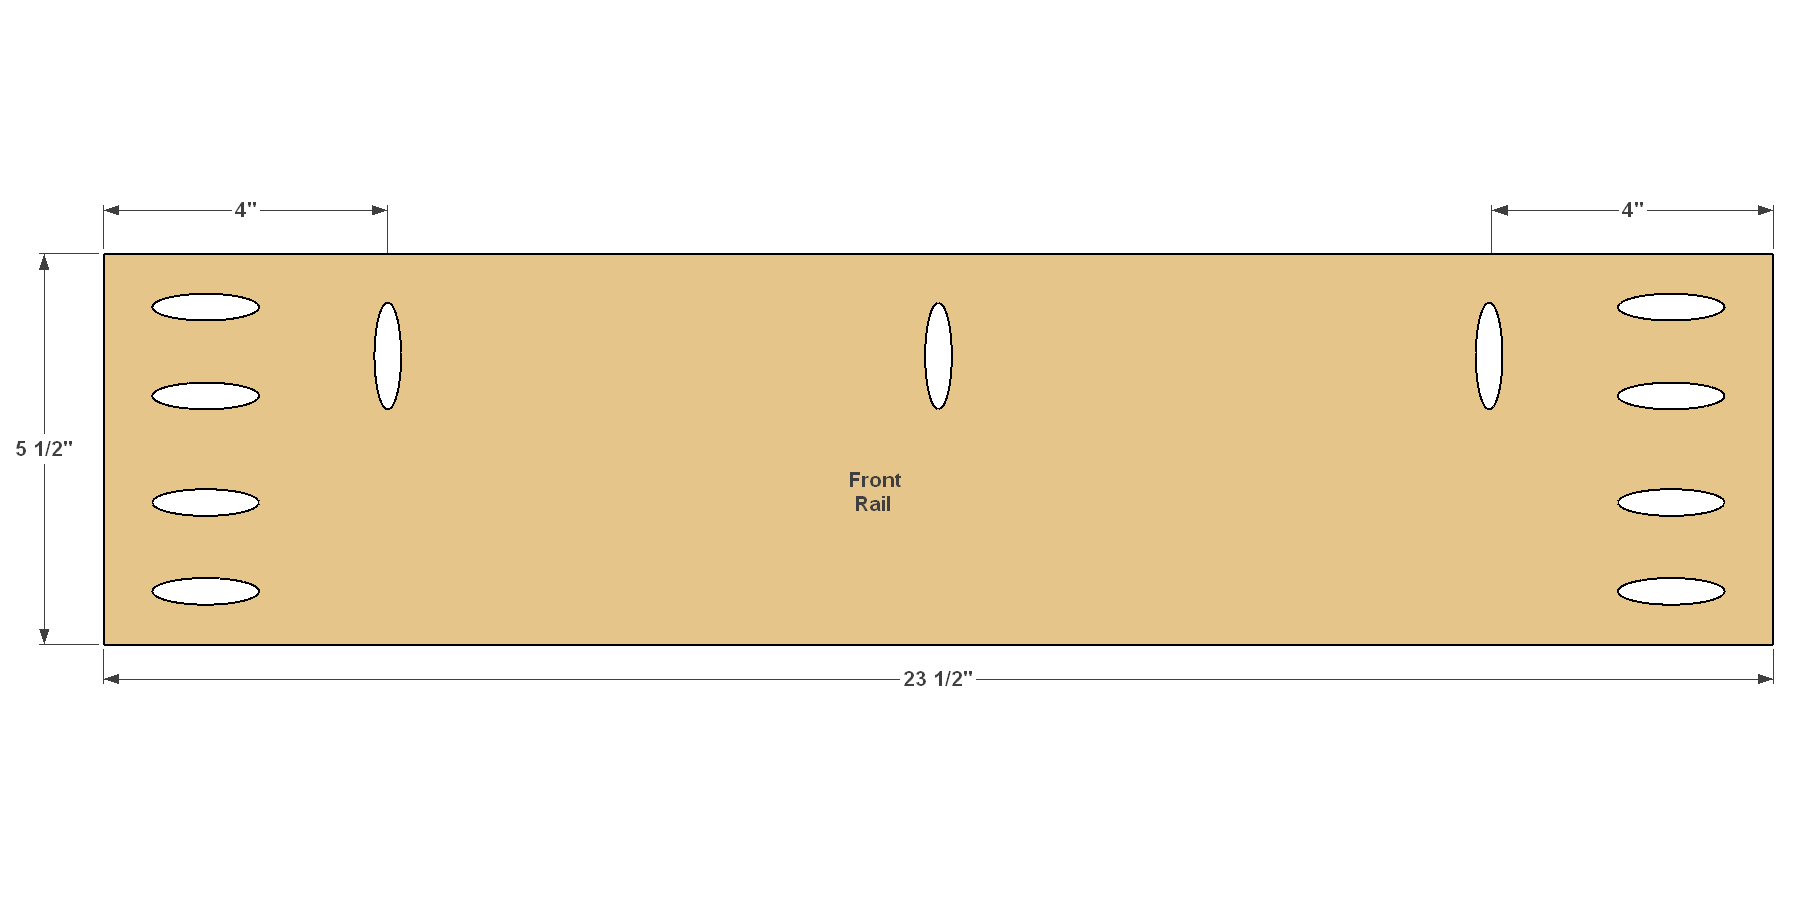
Cut one Front Rail, as shown in the cut diagram. Drill pocket holes where shown.
16Attach the Front Rail
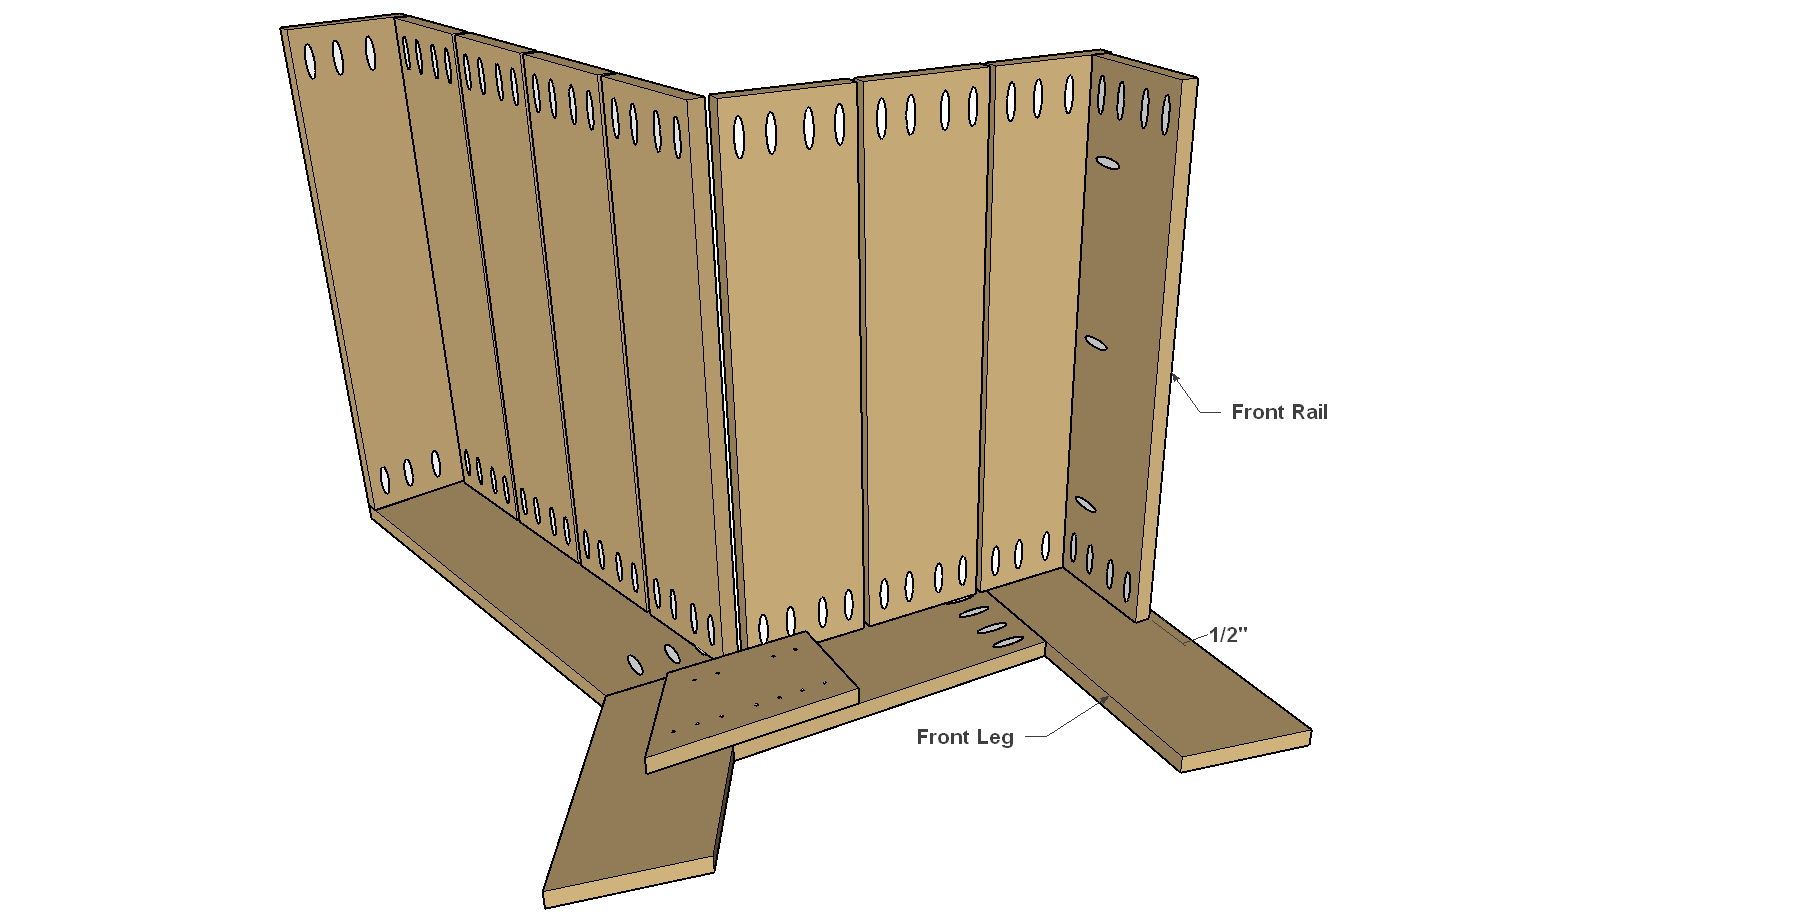
Position the Front Rail at the location shown and secure it to the Front Leg and the First Slat with glue and 1 1/4" Blue-Kote™ screws.
17Make the Back Fillers
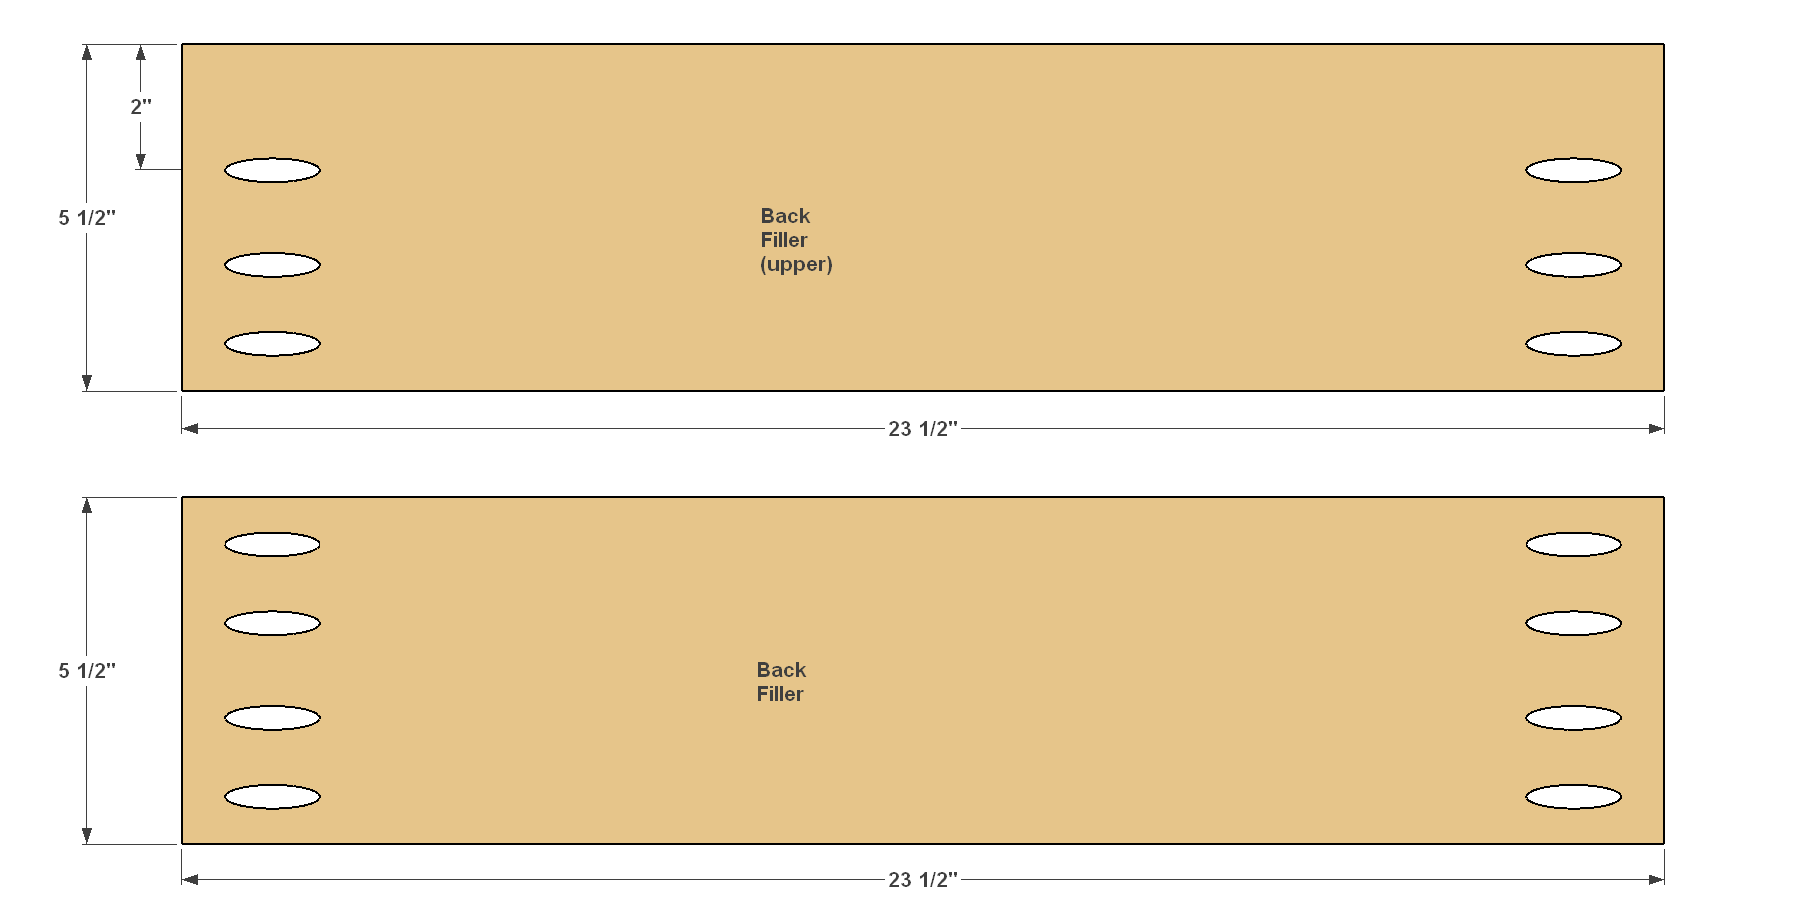
- Cut two Back Fillers to length, as shown in the cut diagram.
- Drill pocket holes at the locations shown. The pocket holes are located slightly differently for clearance. The upper Filler just has space to squeeze a driver in during installation, and offsetting the pocket holes helps provide clearance.
18Attach the Back Fillers
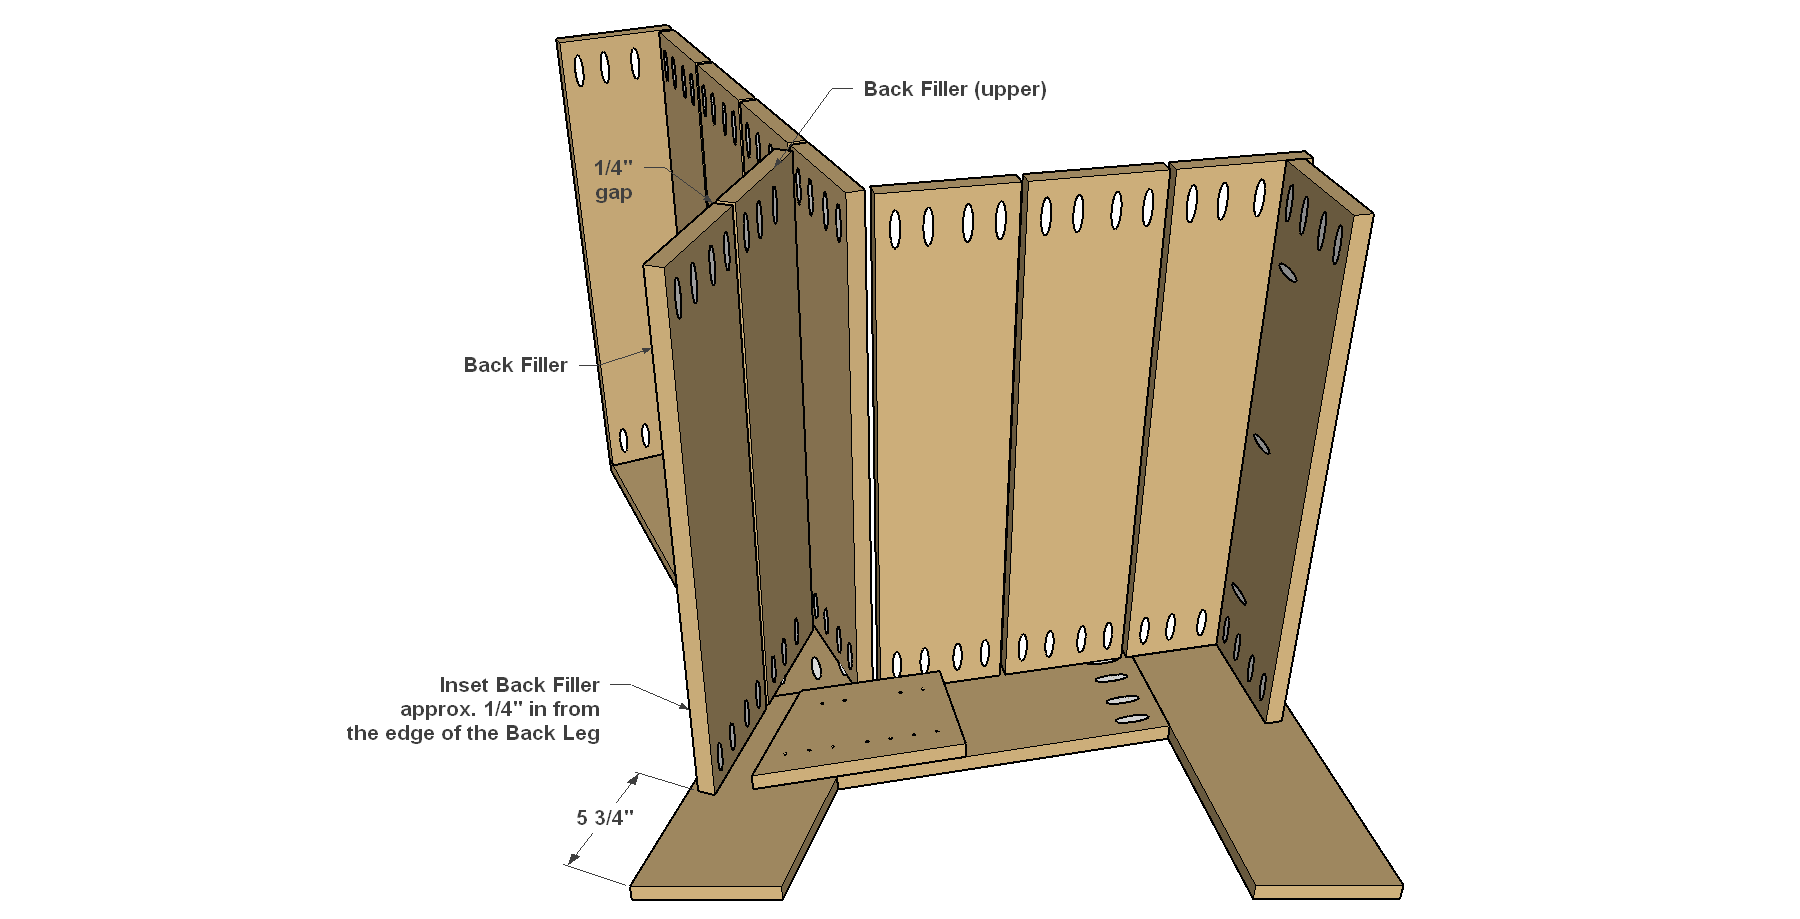
Position the Back Fillers as shown and secure them with glue and 1 1/4" Blue-Kote™ screws. Note that the offset holes in the upper Filler should be positioned toward the bottom.
19Attach the Second Side
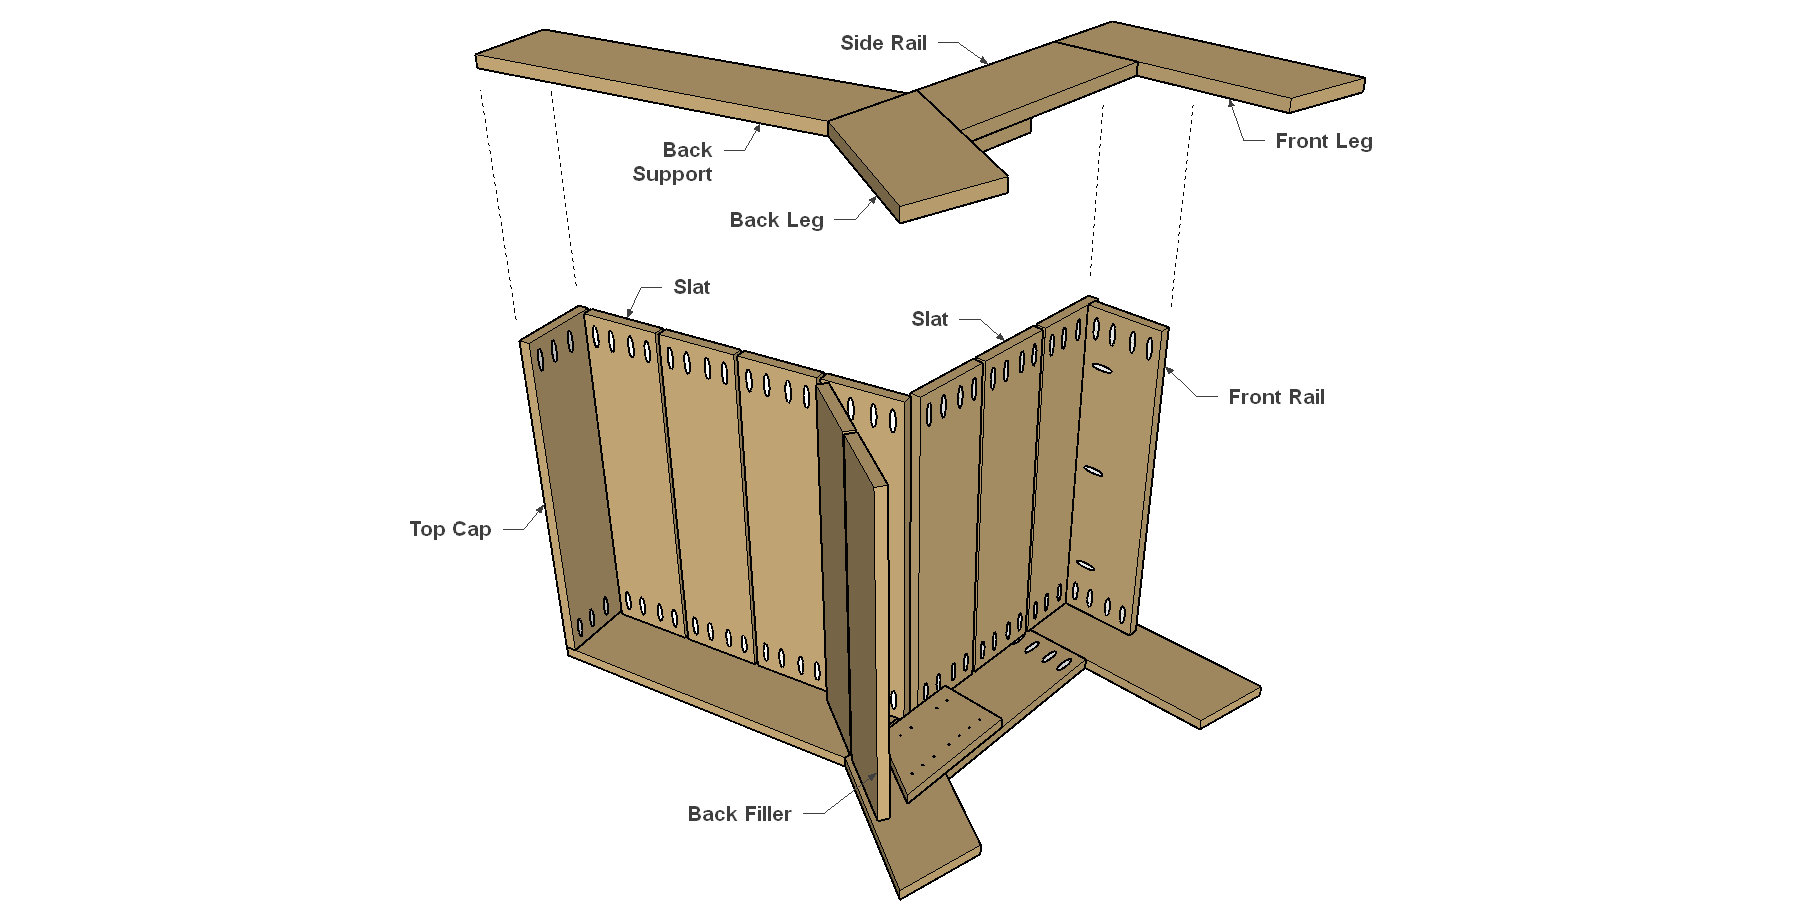
- Lay the second side on a flat work surface with the Cleat facing up.
- Apply glue to the ends of each Slat and Rail and Flip the chair assembly over to position the second side.
- Position each part, starting with the Top Cap and working down to the Front Rail, and then glue and screw them to the second side assembly.
20Sand and Finish
Complete any final sanding, clean the chair, and then apply an exterior finish. We used “Cedar Naturaltone” transparent stain.
Tags
- Outdoor Living
- Beginner
Reviews & builds
No reviews yet
Sign in to review this plan or share your build.
No reviews yet. Be the first to build this.