 Notch
- Difficulty
- Intermediate
- Time
- 6.3–12.5 hours
- Cost
- $$$
About this build
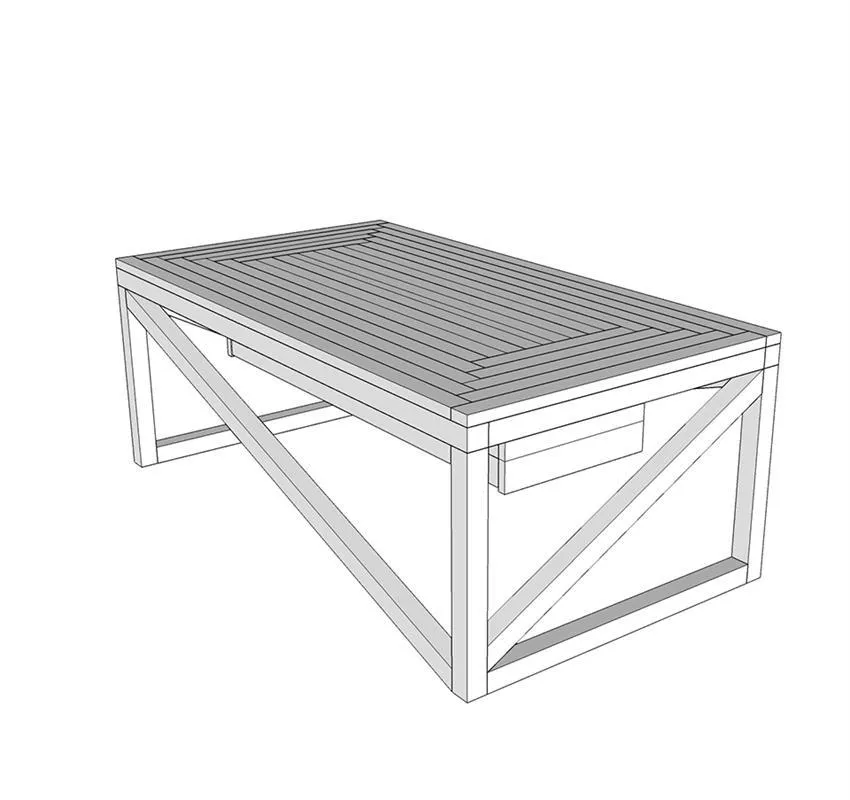
This cedar-tone outdoor coffee table is a great addition to any patio or deck with a removable drop-down insert that can be filled with ice for a beverage cooler. The insert can also hold plants if you prefer! When extra table-top space is needed, just cover the insert with the lid that sits flush.
Tools
Essential
- Brad Nailer
- Drill / Driver
- Miter Saw
- Pocket Hole Jig
- Random Orbit Sander
- Table Saw
Optional / nice to have
- Tape Measure
Materials
| Item | Qty |
|---|---|
| Cedar-tone treated pine, 2x2 96" | 7 board |
| Cedar-tone treated pine, 1x2 96" | 12 board |
| Cedar picket - ripped to 2" strips, 1x6 72" | 3 board |
| Pressure-treated fill-it strip, 1/4" x 1 1/4" 72" | 2 board |
| Thompson's Timber Oil in Natural | 1 each |
| 220 Grit Sandpaper | 1 each |
| 1 1/2" Exterior wood screws | 4 each |
| 2 1/2" Exterior pocket hole screws | 58 each |
| 2" Exterior 18 gauge nails | 50 each |
| 1 1/4" Exterior 18 gauge nails | 100 each |
| Wood filler | 1 each |
| Cotton cloth | 1 each |
| 3/4" Exterior 18 gauge nails | 50 each |
| 2" Exterior 18 gauge nails | 24 each |
Overall cost: $$$. Lumber prices vary by region, species, and season, so we give a band rather than a figure we would only be pretending to know.
Cut list
| Part | Qty | T × W × L |
|---|---|---|
| Insert frames | 2 | 2" × 2" × 23" |
| Insert frames | 2 | 2" × 2" × 36" |
| Outer frame | 2 | 2" × 2" × 23" |
| Outer frame | 2 | 2" × 2" × 48" |
| Insert support frame | 4 | 2" × 2" × 5" |
| Insert supports | 2 | 1" × 2" × 36" |
| Legs | 4 | 2" × 2" × 16" |
| Cross leg supports | 2 | 2" × 2" × 23" |
| Table top supports | 4 | 2" × 2" × 6" |
| Table top supports | 4 | 2" × 2" × 3" |
| Angle leg supports | 2 | 2" × 2" × 47" |
| Angle leg supports | 2 | 2" × 2" × 26" |
| Insert cross supports | 3 | 1/4" × 1" × 11" |
| Insert cover planks | 6 | 5/8" × 2" × 36" |
| Insert cover planks | 6 | 5/8" × 2" × 12" |
| Table top planks | 2 | 1" × 2" × 46" |
| Table top planks | 2 | 1" × 2" × 25" |
| Table top planks | 2 | 1" × 2" × 43" |
| Table top planks | 2 | 1" × 2" × 22" |
| Table top planks | 2 | 1" × 2" × 19" |
| Table top planks | 2 | 1" × 2" × 41" |
| Table top planks | 2 | 1" × 2" × 16" |
| Table top planks | 2 | 1" × 2" × 38" |
| Table top planks | 2 | 1" × 2" × 13" |
| Table top planks | 2 | 1" × 2" × 35" |
| Lid planks | 7 | 1" × 2" × 34" |
| Lid middle plank | 1 | 1" × 1" × 34" |
| Lid plank supports | 10 | 1/4" × 1" × 8" |
What to buy
Buy 25 boards at 8 ft.
2" × 2"
7 boards
1" × 2"
11 boards
1" × 1"
1 board
5/8" × 2"
4 boards
1/4" × 1"
2 boards
Assumes 8 ft stock, a 1/8" saw kerf, and buying each part at its own width. Change the board size or kerf on the full board plan →
Instructions
1Build Frame Around Insert
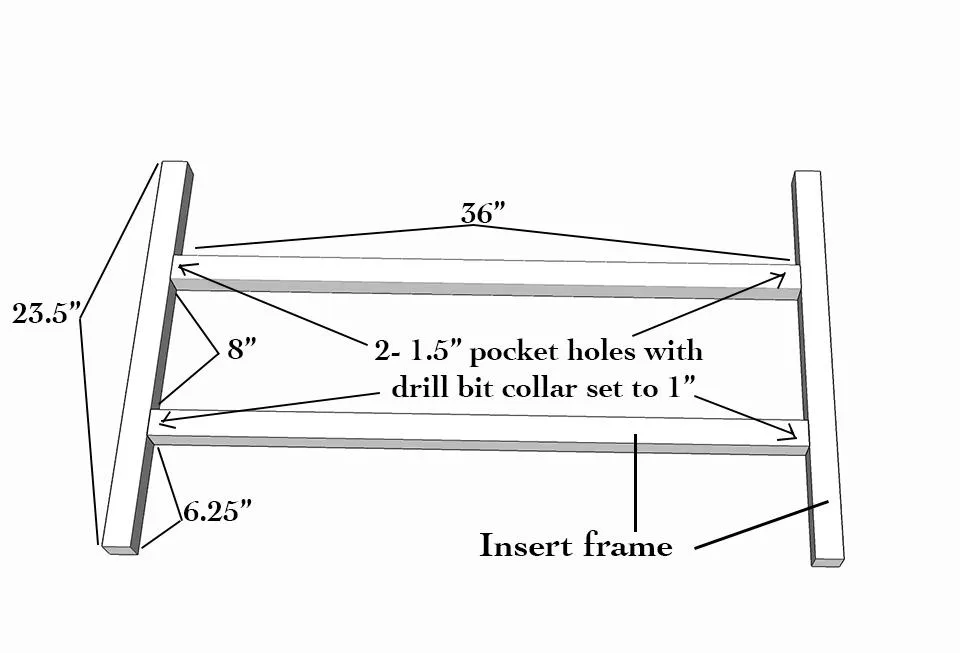
- Drill 2- 1 1/2" pocket holes on either end of 36" & all 4- 23 1/2" 2x2s, making sure the drill bit collar depth is set to about 1" instead of 1 1/2". This difference is to ensure the 2 1/2" pocket hole screw doesn't go all the way through the wood on the other side.
- Attach these 36" boards to the 23 1/2" boards at 6 1/4" from each end, so that there is an 8" space in the middle. This should fit perfectly around the planter insert that has top dimensions of 36" x 8" and a height of 6". ALWAYS use exterior grade wood glue when joining two pieces of wood before attaching screws
2Attach Insert Frame to Outer Frame
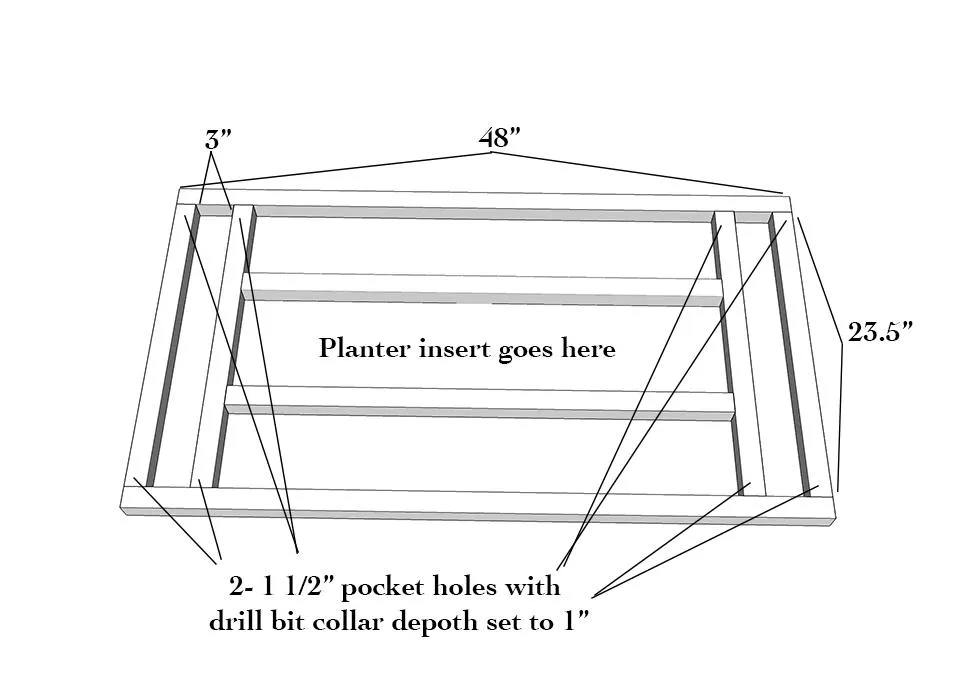
Drill 2- 1 1/2" pocket holes (using the same collar depth as before) on both ends of all 4 of the 23 1/2" boards and attach them to the 48" boards using 2 1/2" pocket hole screws. Be sure to attach the insert frame to the 48" boards first, 4 1/2 inches from each end, then attach the remaining 23 1/2" boards flush in between the 48" boards, forming the outer frame.
3Attach Insert Support Frame
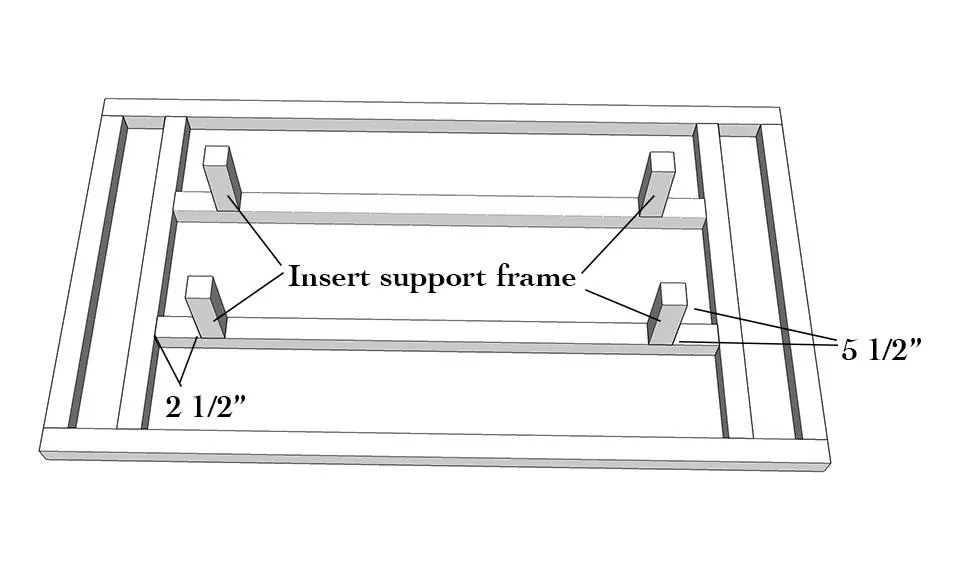
Drill 1 1/2" pocket holes (with same collar depth) into one end of all 4 of the insert support frame pieces that are 5 1/2" long. Attach them to the 36" insert frame pieces at 3" from each end using 2 1/2" pocket hole screws.
4Attach Insert Supports
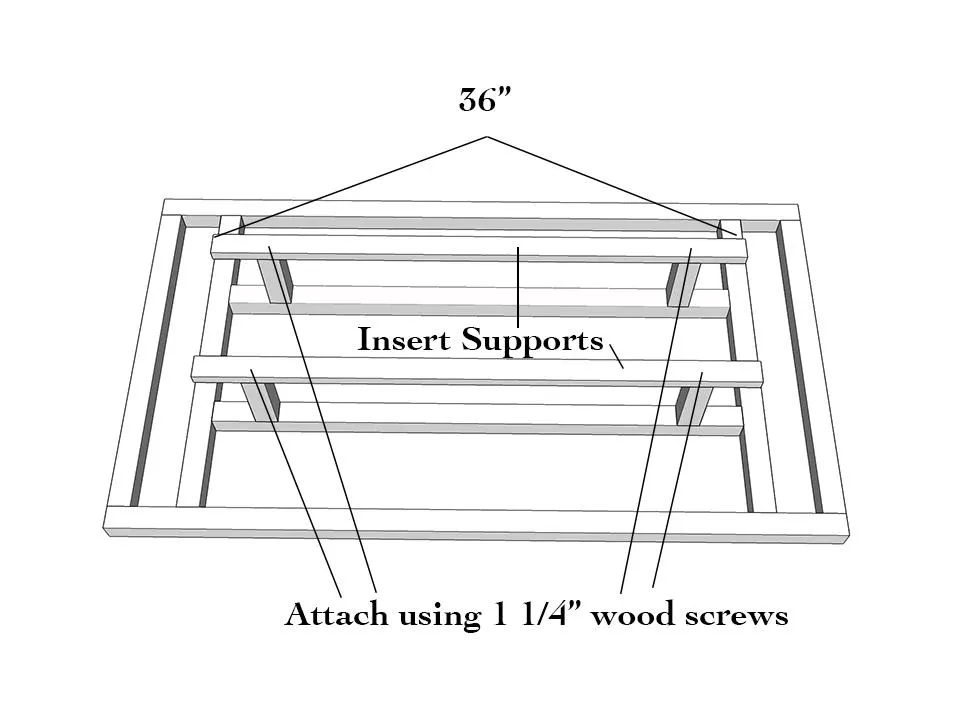
Attach insert supports that run the length of the insert frame using 1 1/4" exterior wood screws. The insert supports should hit the insert support frame at 3" from each end.
5Attach Insert Cross Supports
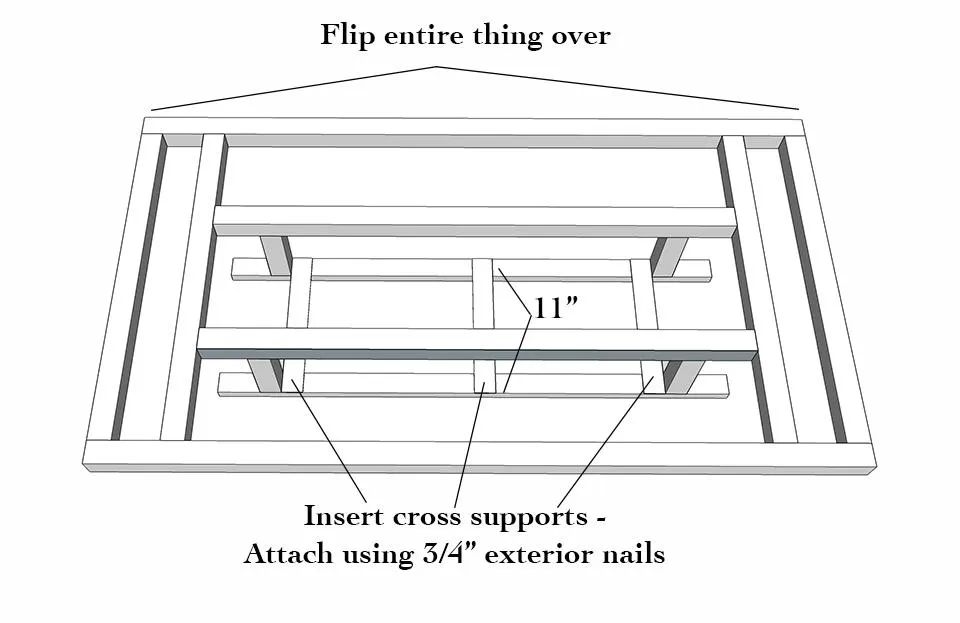
Turn the entire table frame over and attach the insert cross supports (the thin fill-it strips that are 11" long) at either end of the insert supports and in the middle using 3/4" exterior nails.
6Attach Legs
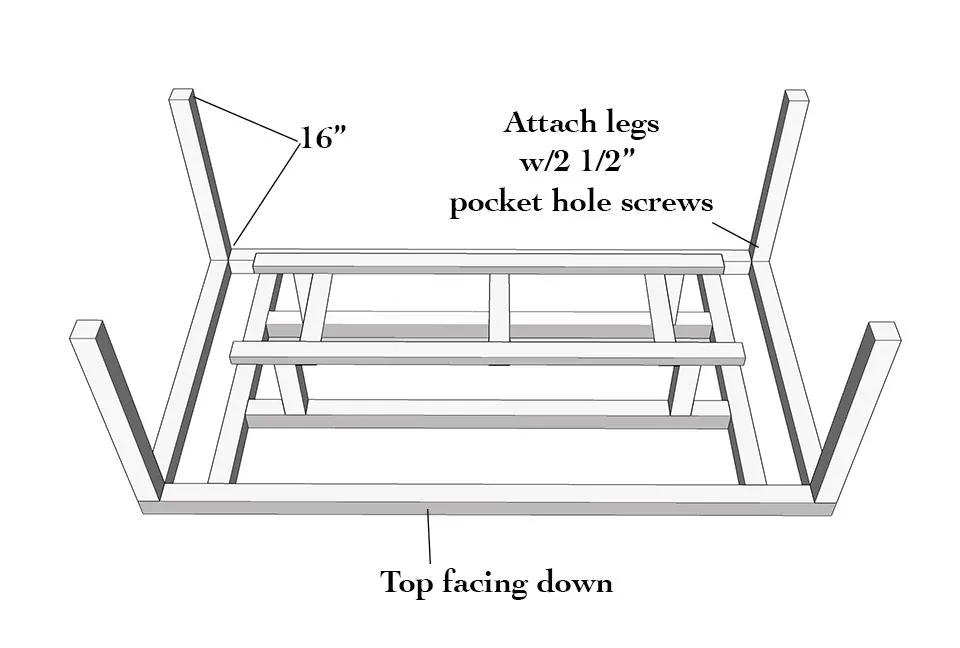
- Drill 1 1/2" pocket holes on one end of all 4 legs.
- Flip the entire table frame over again so the top is facing down and attach them to each corner of the outer frame using 2 1/2" pocket hole screws. *Tip* 2x2 cedar is slightly (about 1/8") larger than 2x2 cedar-toned pine and offers better strength and support for the legs when drilling and attaching the pocket hole screws. Because the legs support the entire weight of the coffee table, I felt it was worth it to use the more expensive cedar 2x2s for this part only.
7Attach Cross Leg Supports
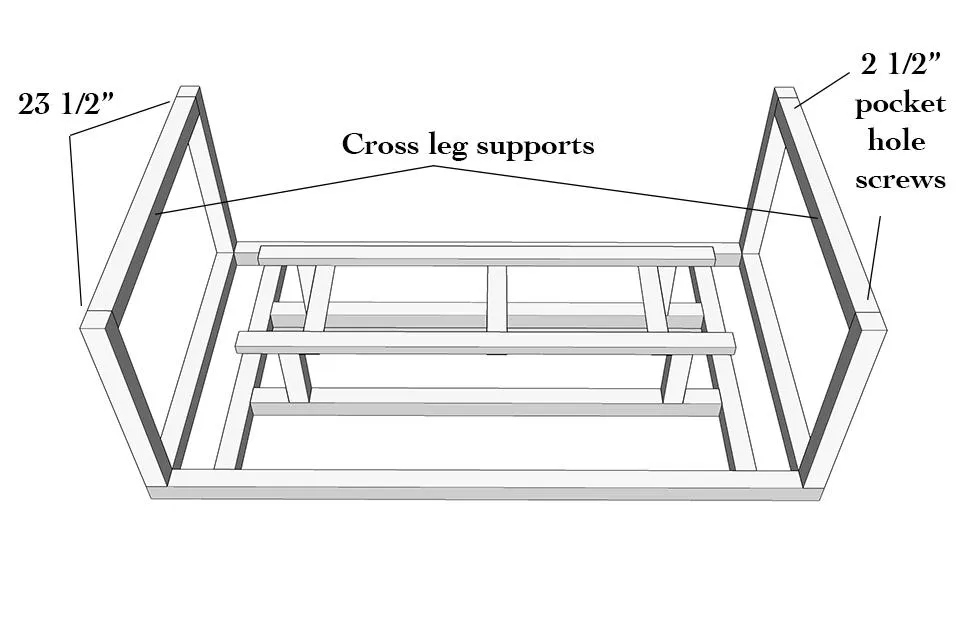
Drill 1 1/2" pocket holes on either end of both 23 1/2" cross leg supports. Attach them to the ends of the legs so that the pocket holes are on the understand (facing up, since the table is upside down) and so that they will sit flush on the ground when the table is turned over.
8Attach Table Top Supports
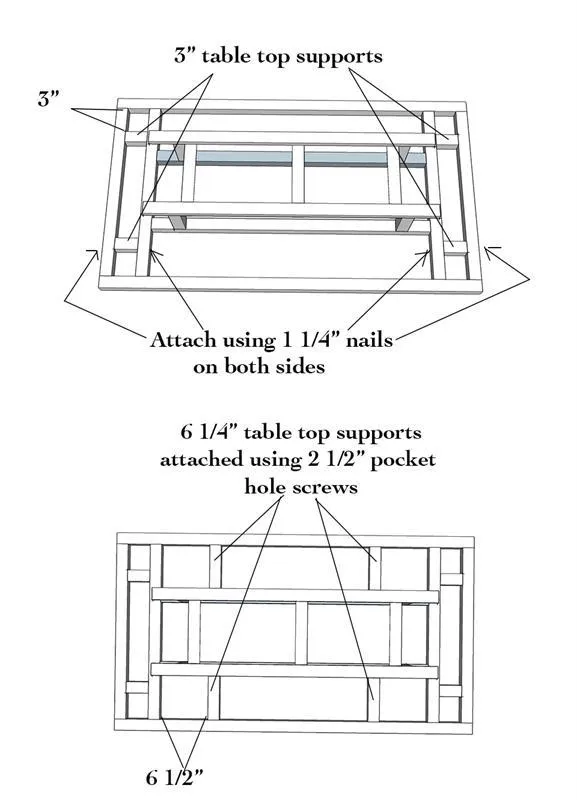
Because the table top planks (1x2s) are attached in herringbone design, additional support is needed so that each small piece will have something to nail into. So, between the 23 1/2" outer frame and the 23 1/2" insert frame, 3" from both inside edges of the 48" outer frame, nail into place a 3" table top support using 1 1/4" nails. Using the same idea, attach the 6 1/4" table top supports going the other direction, but drill 1- 1 1/2" pocket hole on each end of the 6 1/4" pieces. You will want to dry fit the pieces before you drill pocket holes, as the length might need to be trimmed a bit to fit without being too tight. It should slide in easily, with no large gaps. Space the 6 1/4" pieces about 6 1/2" from the insert frame boards.
9Nail Planks to Top
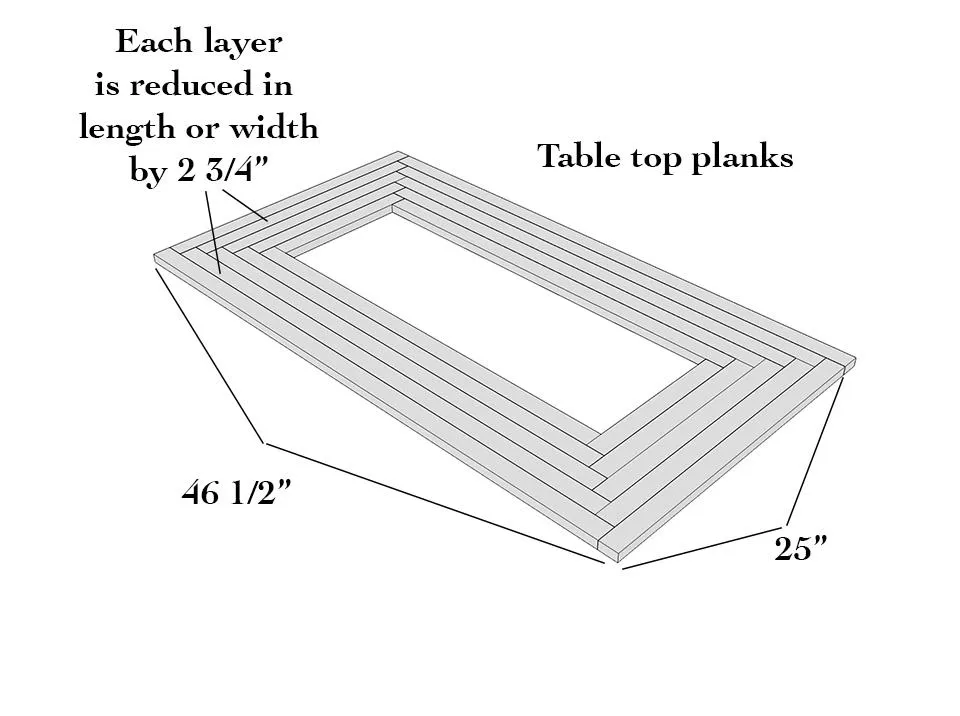
- The herringbone pattern on top requires lots of cuts but it very easy to assemble once all the pieces are in place. For the outer layer of planks arrange the long 1x2s (46 1/2") so that one side is flush with the edge and the other leaves a 1 1/2" gap for the adjacent plank. Allow some gaps between the layers so the wood has room to expand or contract with temperature changes, therefore not all of the pieces are exactly 2 3/4" difference.
- Cut each layer as you go and dry fit everything before attaching them to the top frame.
- Attach with 1 1/4" nails into the frame. *Do not nail last short length plank to allow for easy removal of the planter insert (since it overlaps on the edge of the insert).
10Build Plank Lid
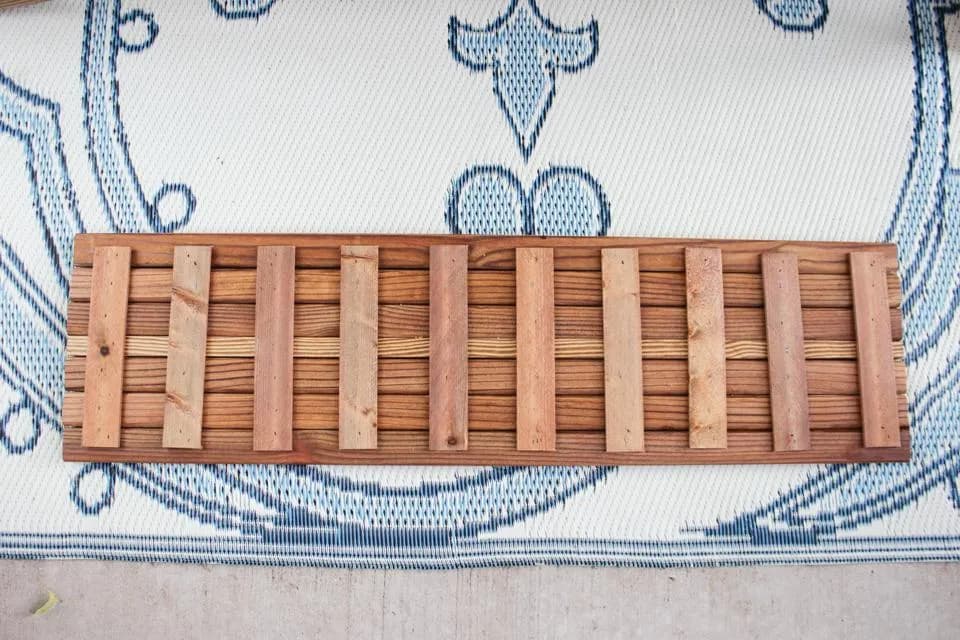
- Arrange remaining plank pieces (34" each) including the middle plank that is a 1x2 ripped in half to be a 1x1.
- Place the 10 pieces of fill-it strips that are 8" long across the planks so that it overlaps the outer planks about half way.
- Nail into place with 3/4" nails into each plank (that's a lot of nails!).
11Attach Insert Cover Planks
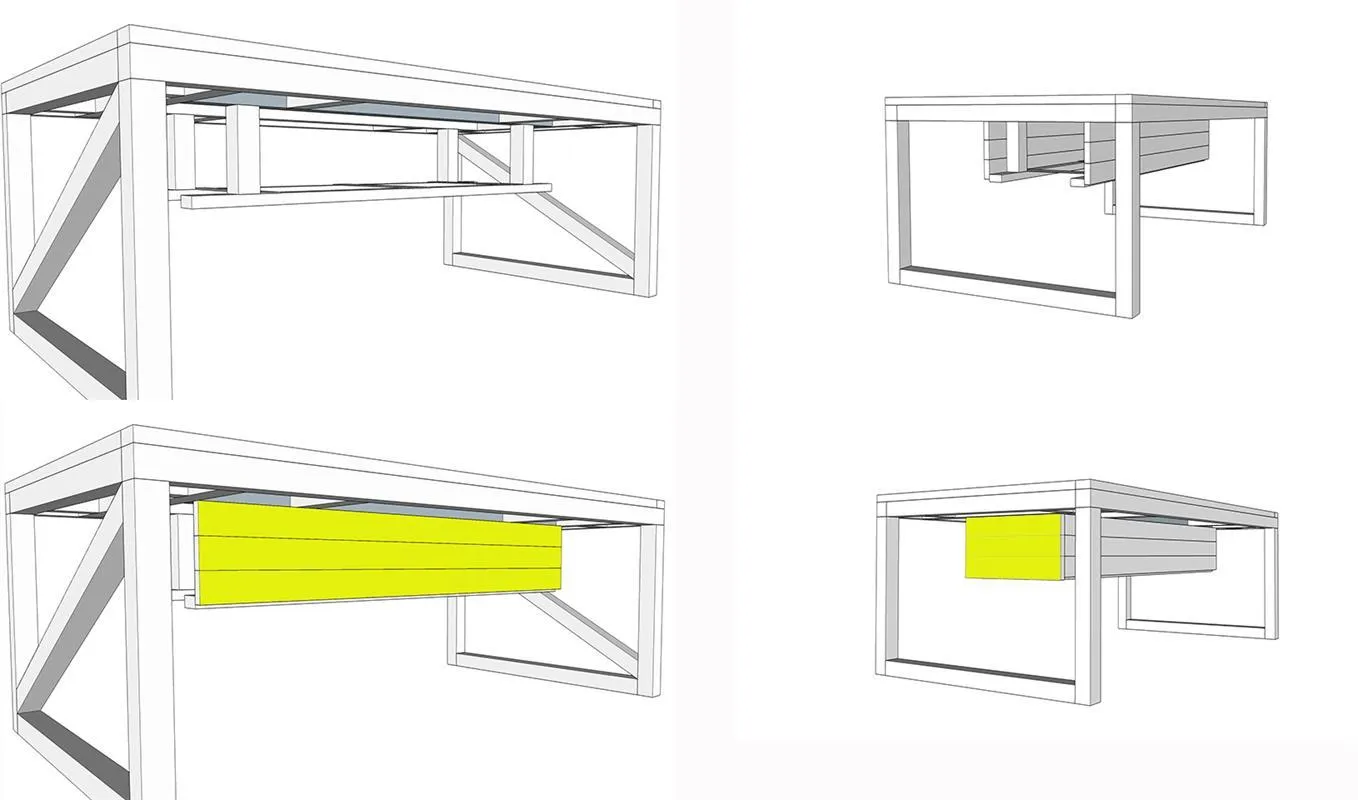
- To cover the planter insert and frame, attach the ripped down pickets over the insert frame using 1 1/4" nails.
- Start at the top on the long side and nail 3 cover planks.
- Then attach the short side cover planks by nailing them into the end-edges of the long cover planks.
12Attach Angle Leg Supports
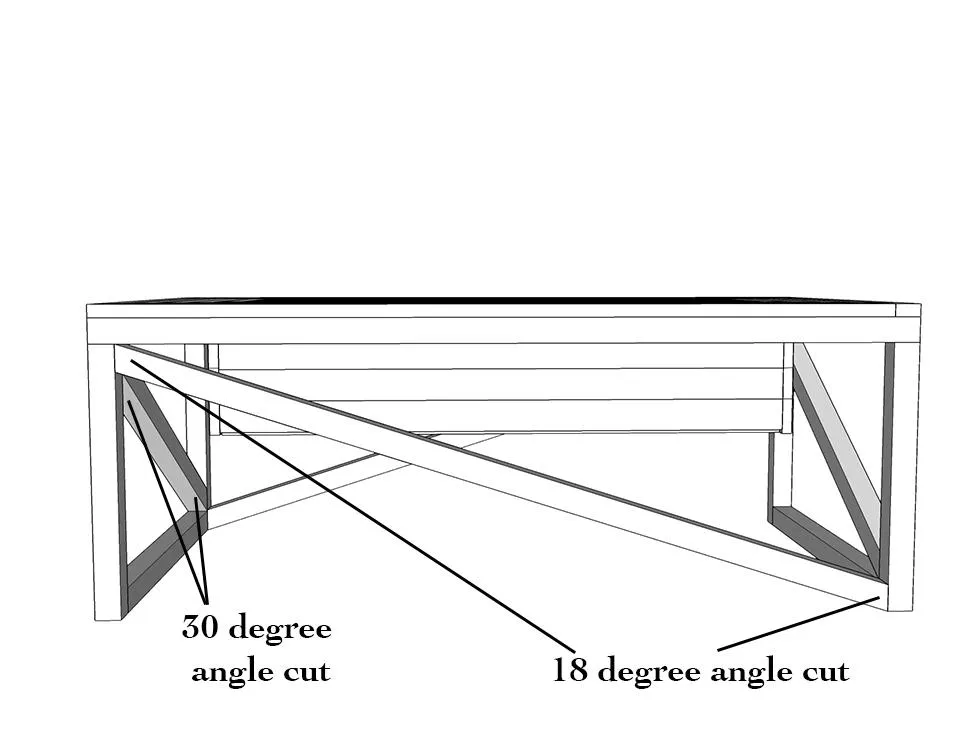
Attach angle leg supports by driving 2" nails into the other side of the leg where the angle support meets it. Alternate the direction the angles go, so that if one starts in the bottom left corner and ends in the top right, the adjacent side starts in the top left and ends in the bottom right.
13Fill Holes, Sand, Seal
- Fill all nail holes with exterior grade wood filler, let dry and sand smooth using 220 grit sandpaper and an orbital sander.
- Also sand any sharp corners, edges or places where there may be splinters.
- Remove dust with a cloth, then seal the wood with Thompson's Timber Oil in Natural. This will enhance the cedar-tone and prolong the life and durability of the wood.
- Apply 2-3 coats of the Timber Oil, letting dry for several hours between coats. Let the table dry completely for 24 hours before exposing to the elements.
Tags
- Outdoor Living
- Intermediate
Reviews & builds
No reviews yet
Sign in to review this plan or share your build.
No reviews yet. Be the first to build this.