Notch
NotchOutdoor Chaise Lounge
Step-by-step build — 9 steps. Also available as a print sheet.
1Make the Back Rails
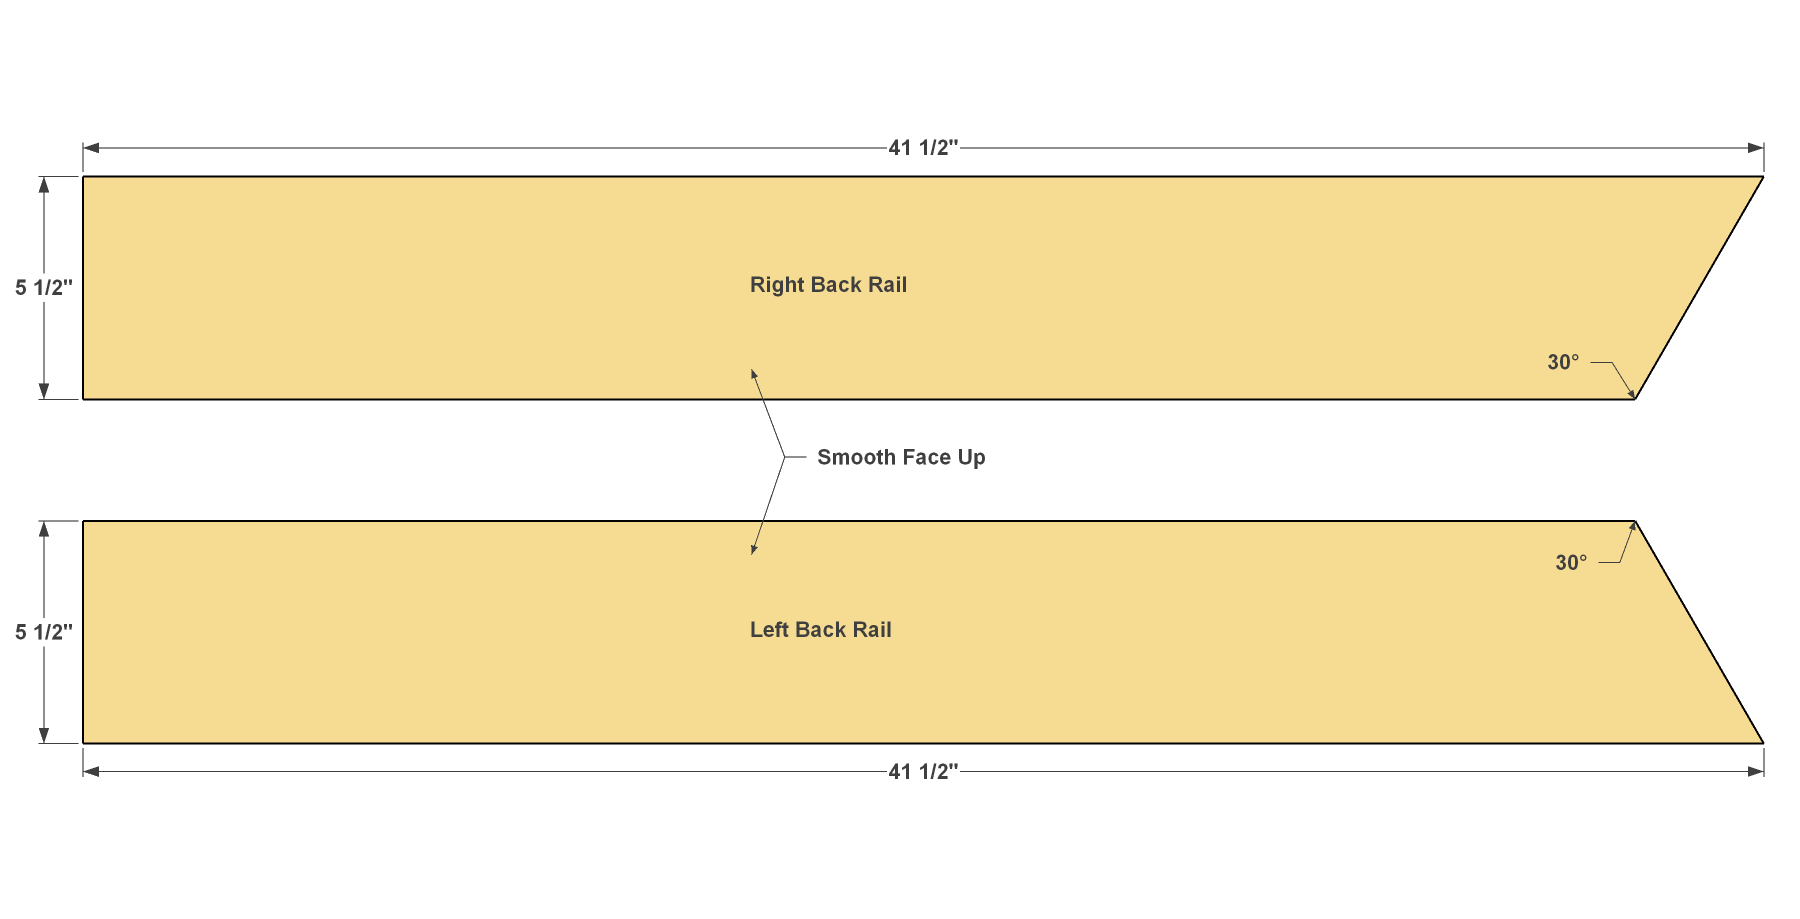
Cut two Back Rails to length from 1x6 Cedar boards, as shown in the cutting diagram. As you’re cutting all the Rails for this chaise, you want to be sure to end up with “mirror image” pieces. This matters because most of the time 1-by cedar has a smooth face and a rough face. You’ll always want the smooth face outward, so pay attention to how the boards are laid out as you work. Note that one end of each Back Rail is cut square, while the other is cut at a 30° angle.
2Make the Leg Rails
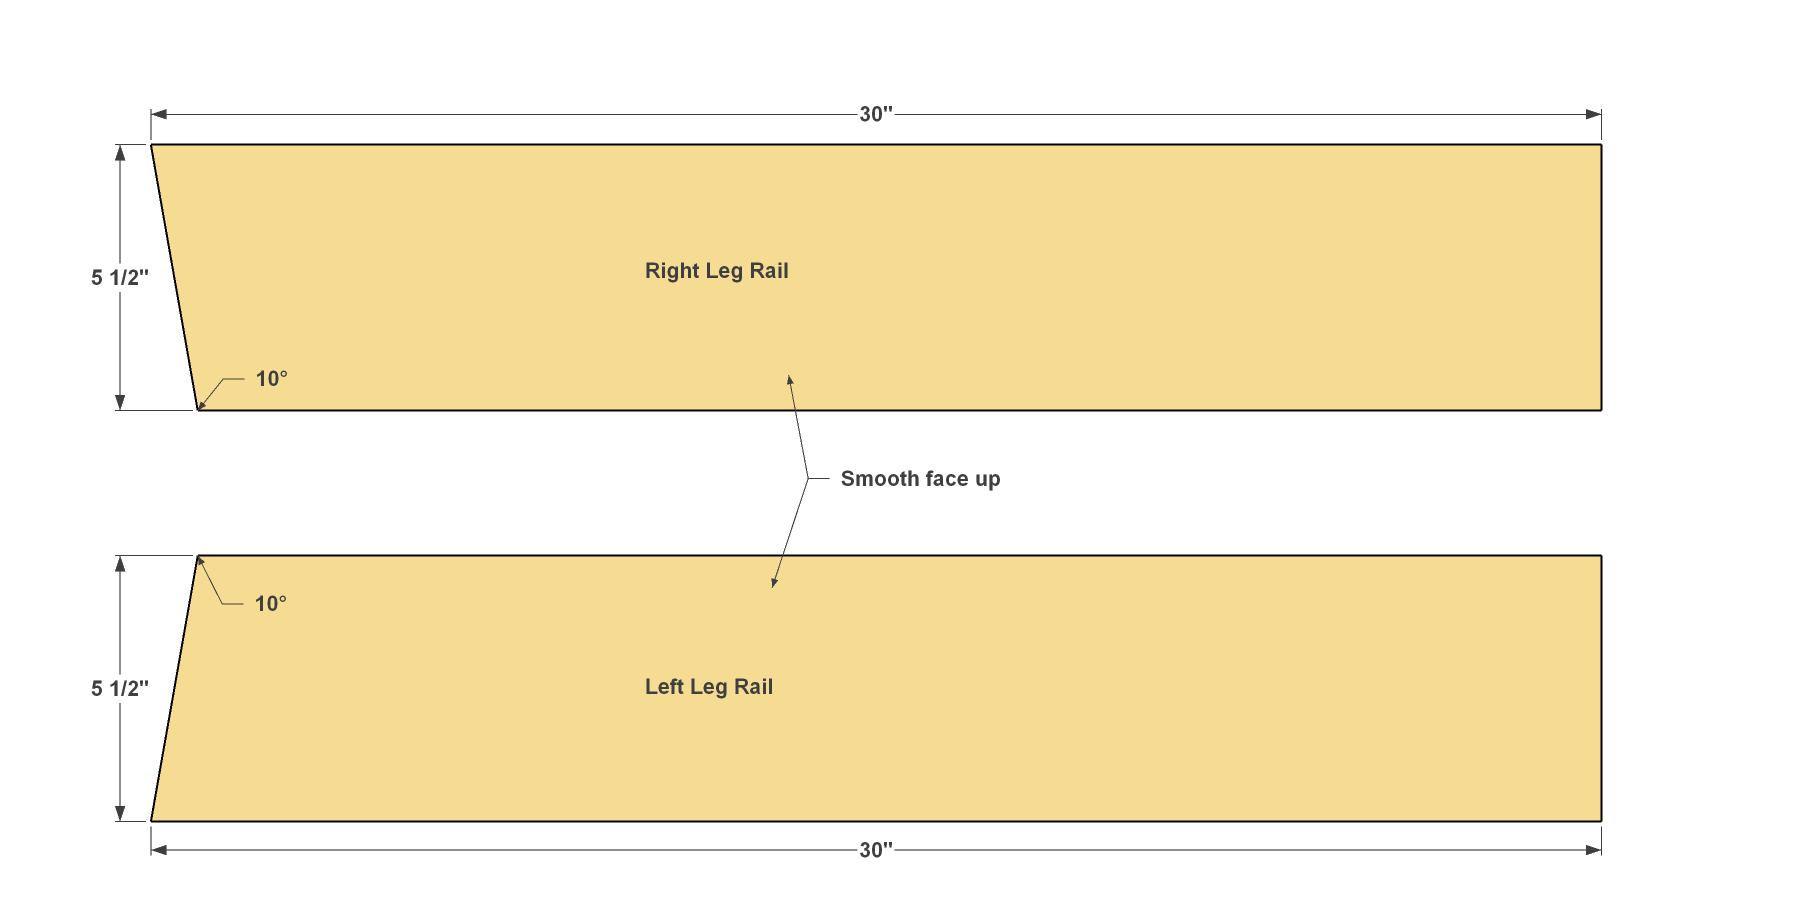
Cut two Legs Rails to length from 1x6 Cedar boards, as shown in the cutting diagram. Note that one end of each Leg Rail is cut square, while the other is cut at a 10° angle.
3Make the Seat Rails
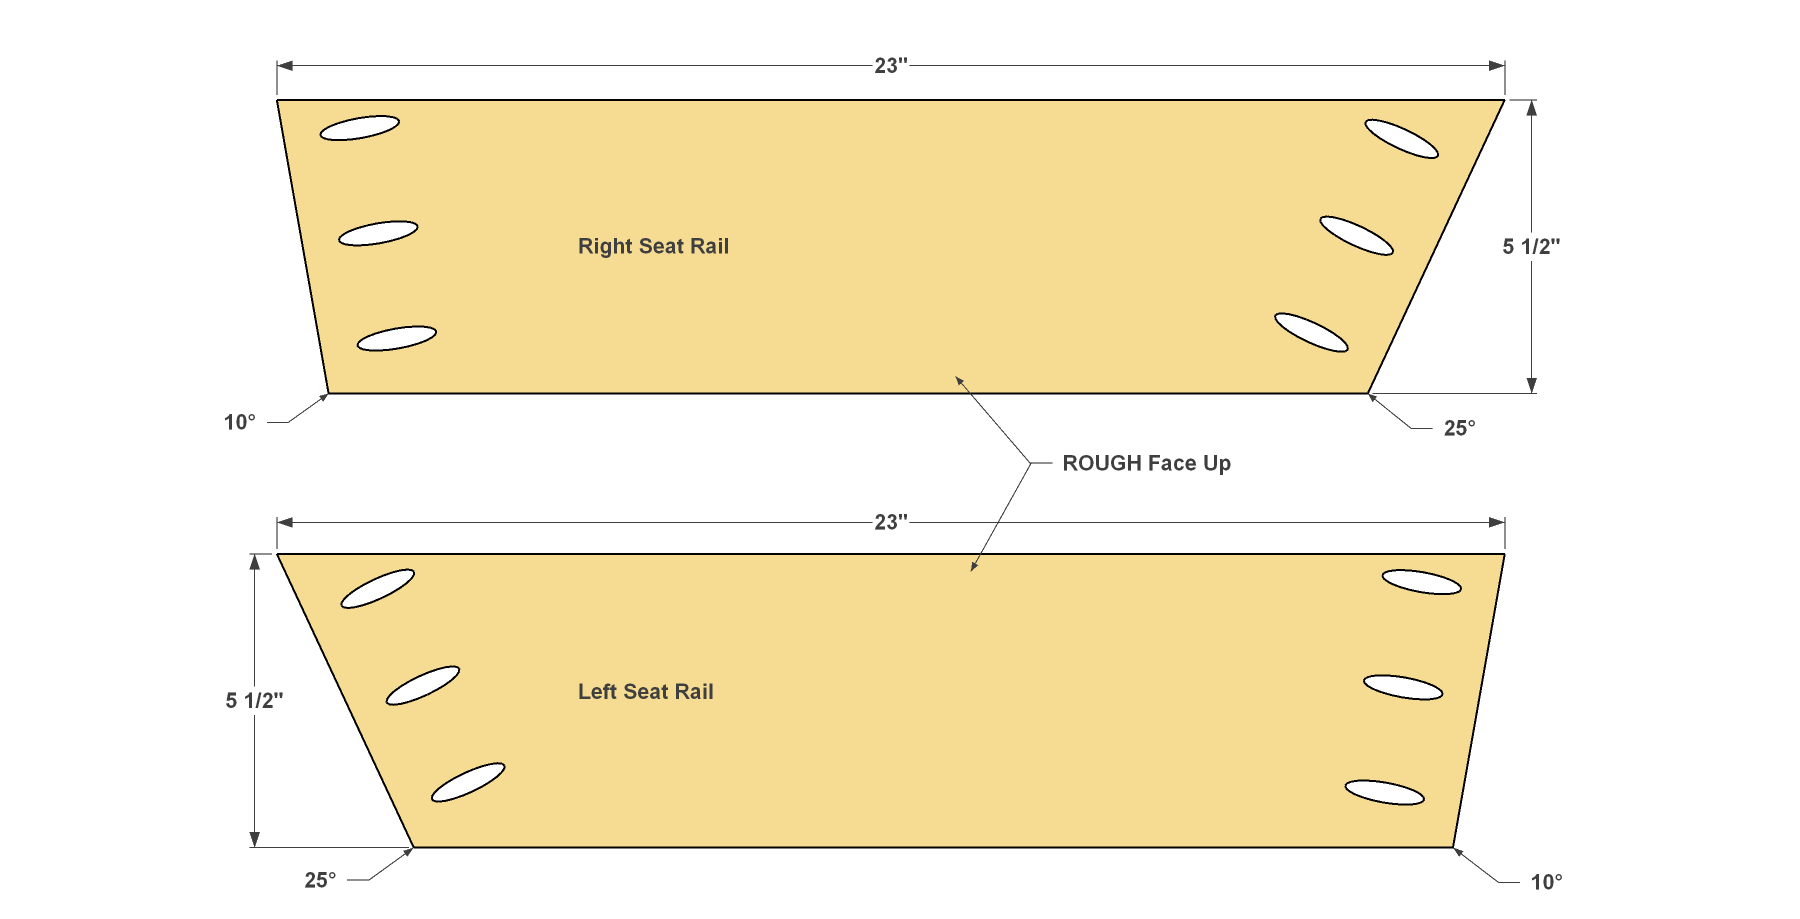
- Cut two Seat Rails to length from 1x6 Cedar boards, as shown in the cutting diagram. On the Seat Rails, both ends are angled—one end at 25°, and the other at 10°. With the pieces cut, you can drill pocket holes in the ends, as shown. Make sure you drill into the ROUGH face on both pieces.
- Set your Kreg® Pocket-Hole Jig for 3/4"-thick material. Exact positioning of each hole isn’t critical. You just want to fit three across the width of each end. If you haven’t drilled pocket holes in an angled piece before, note that the pocket holes should be perpendicular to the end.
4Assemble the Side Rails
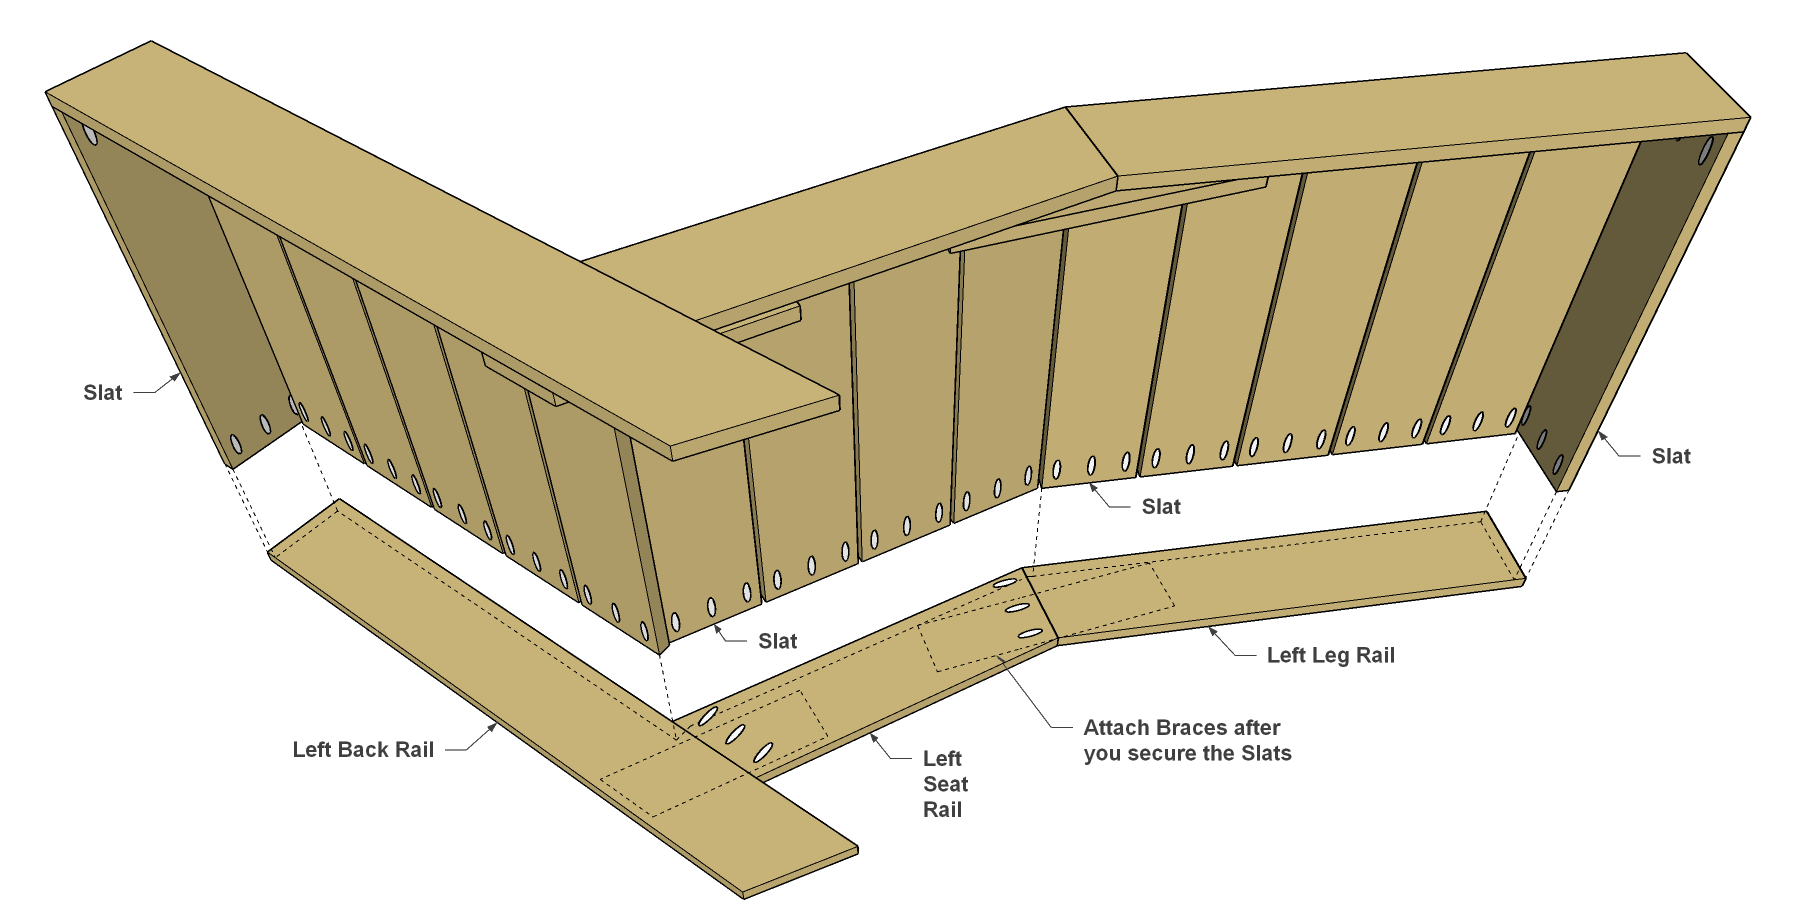
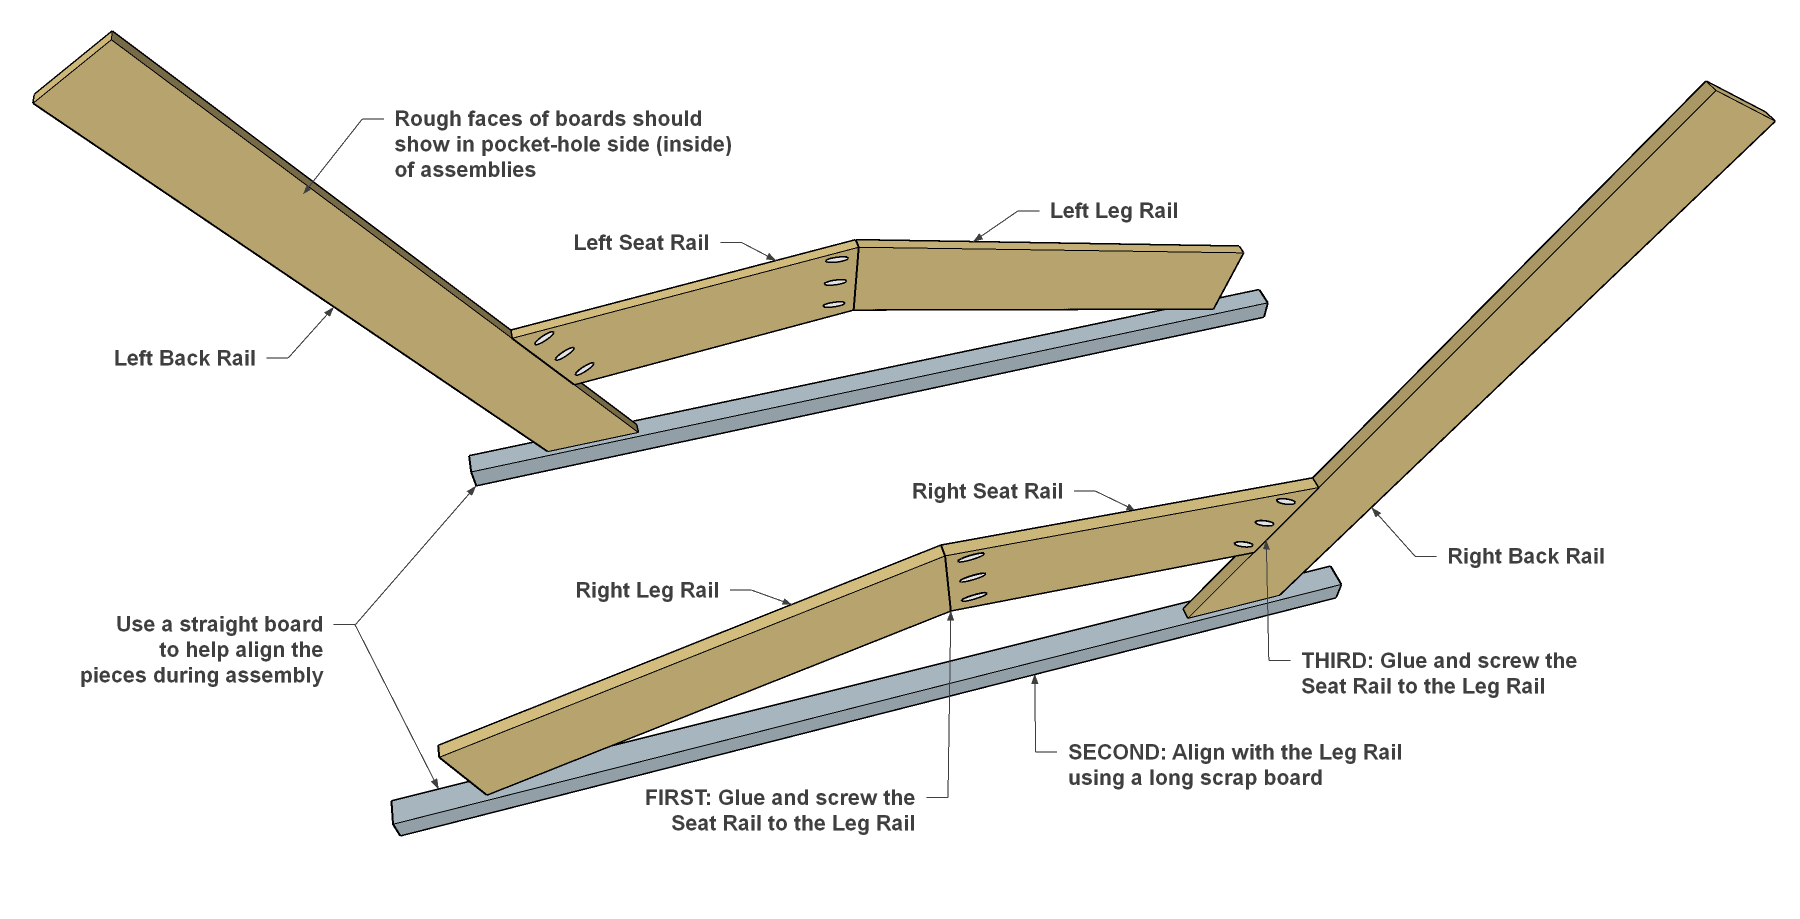
- Now lay the left and right Rails all out as they’ll fit together, making sure the pocket holes and rough faces of all the pieces are facing up.
- First, spreads waterproof exterior glue on the angled end of the Leg Rail.
- Then attach it to the Seat Rail using 1 1/4" Kreg Blue-Kote™ Pocket-Hole Screws.
- Now you can attach this assembly to the Back Rail. It could be tough to measure the exact location where the Seat Rail and Back Rail should meet. So, instead use a straight board at least 6'-long, as shown.
- Align the angled end of the Seat Rail with this board, then position the Leg/Seat Rail assembly so it fits tight against the Back Rail and touches the scrap board. Make couple layout marks on the seat rail.
- Then spread glue on the end of the Seat Rails, place it back in position, and secure it with 1 1/4" Blue-Kote™ Pocket-Hole Screws.
- Repeat these steps to assemble the other Rails.
5Make the Slats
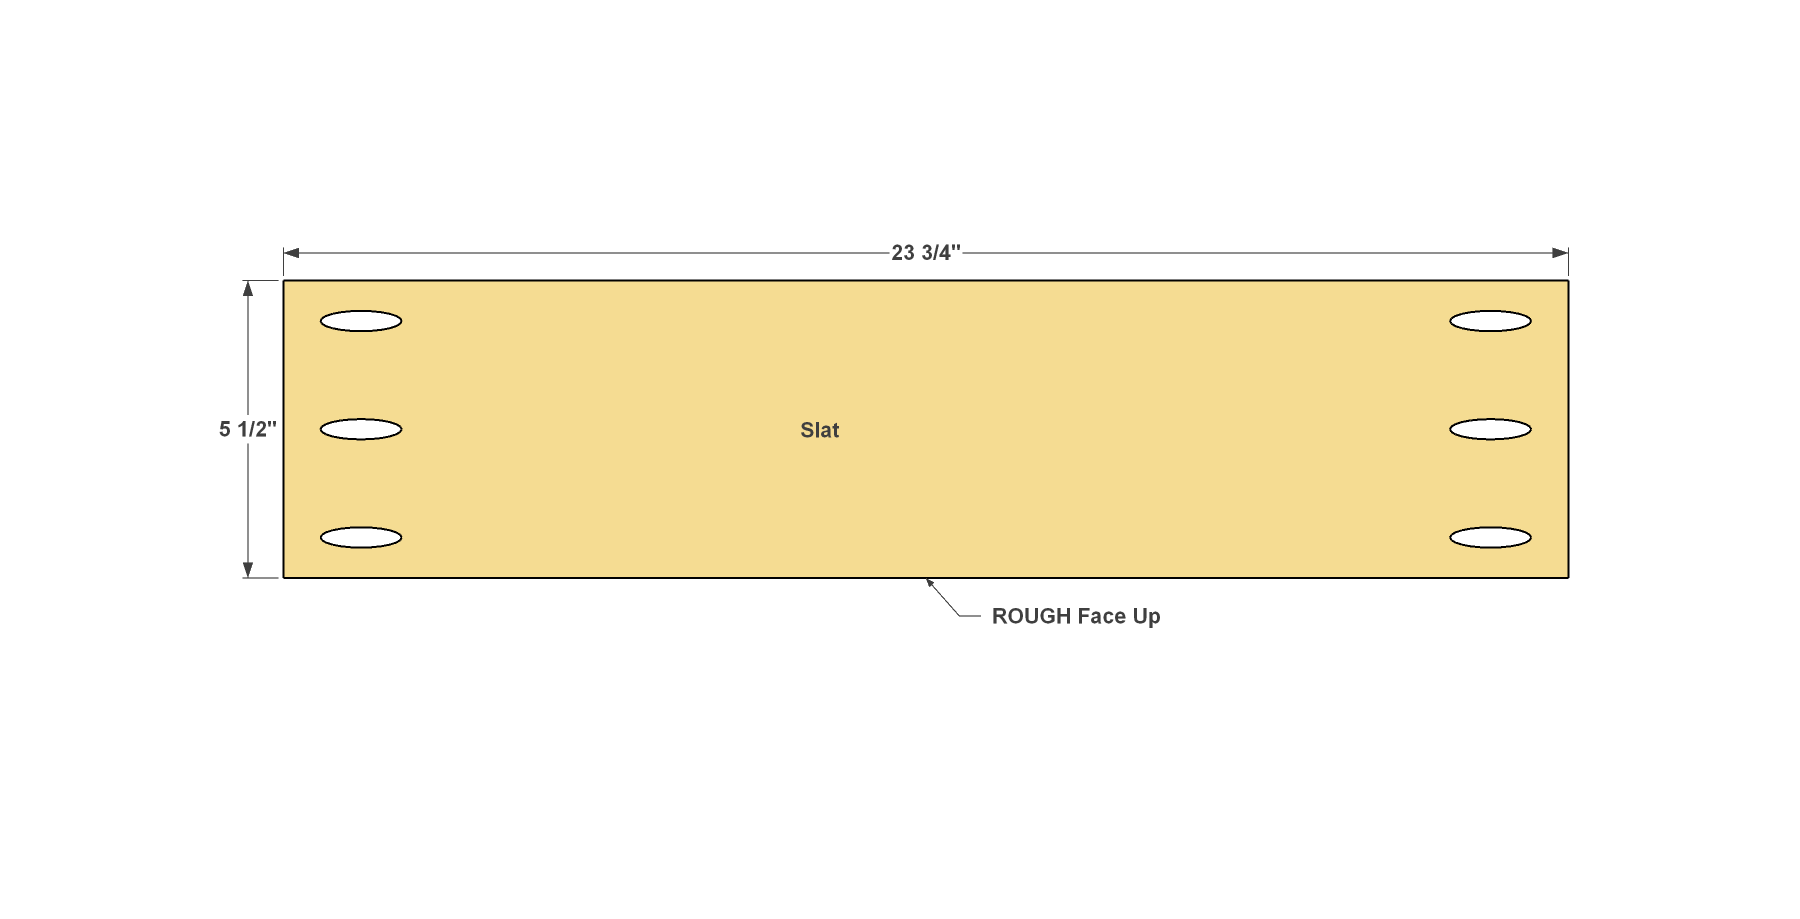
- Cut 16 Slats to length from 1x6 cedar boards, as shown in the cutting diagram.
- Drill pocket holes in the ends of the Slats. Making sure they are in the rough face, as shown.
6Connect the Slats to One Side Assembly
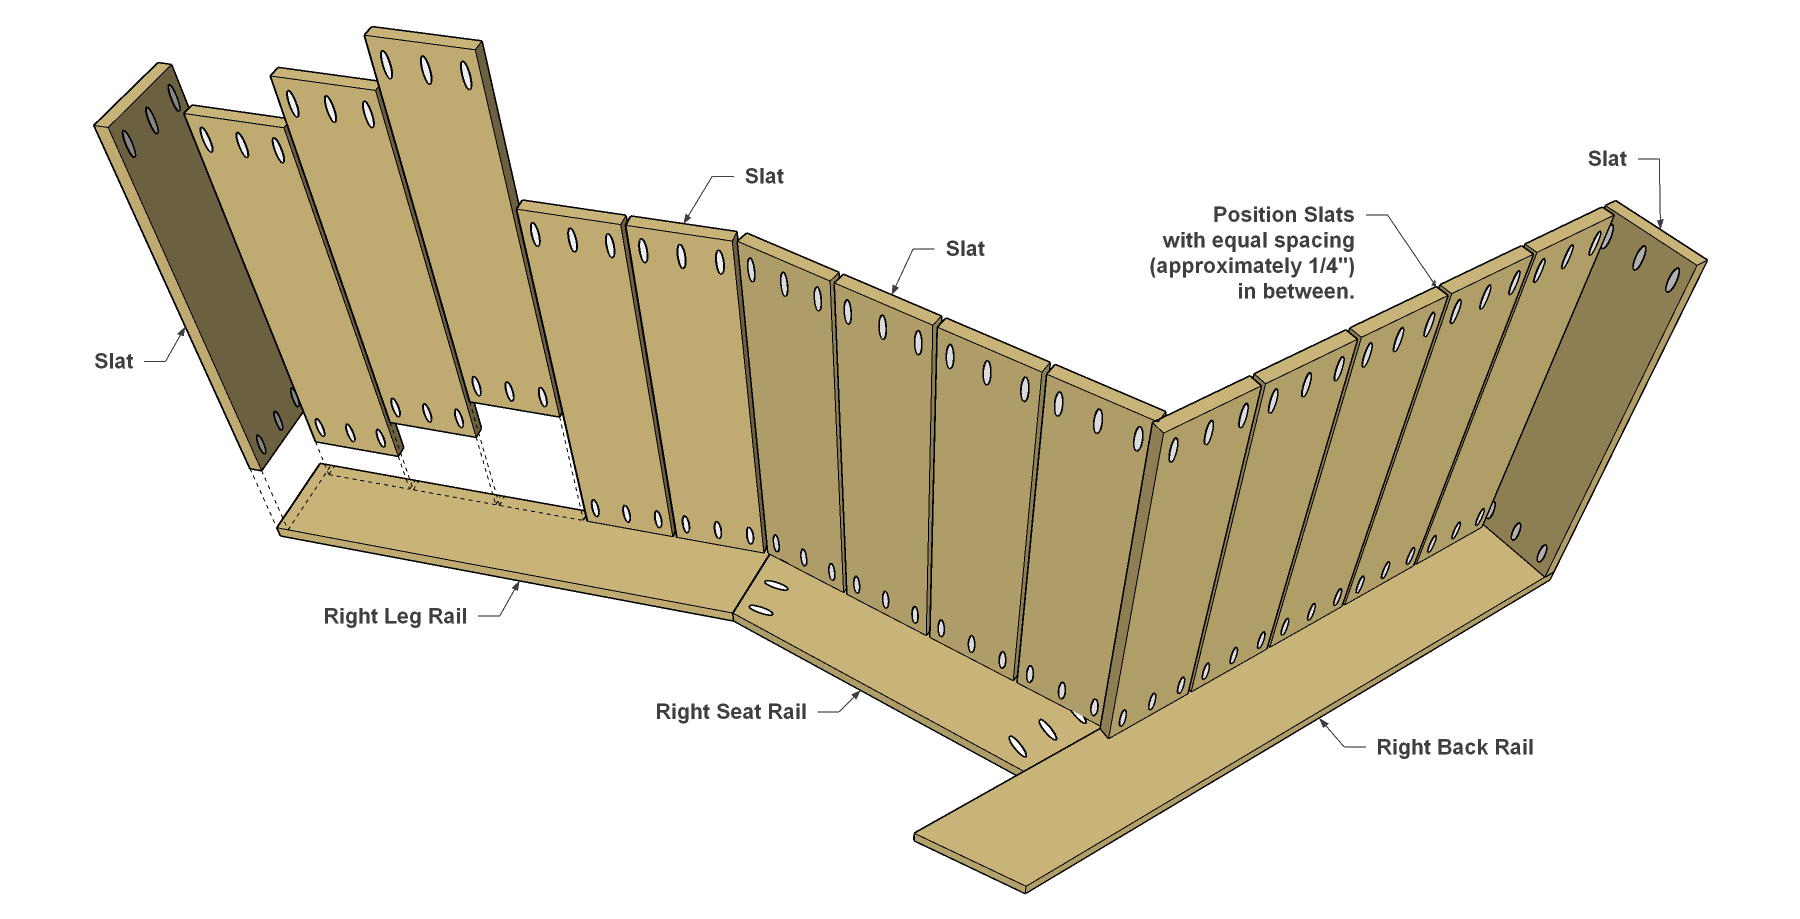
- Lay the righthand side assembly on a flat work surface, as shown.
- Attach the Slats at the very ends first using waterproof glue and 1 1/4" Blue-Kote™ Pocket-Hole Screws.
- Then position the other slats with equal gaps (about 1/4") between them, and glue and screw all the Slats in place.
7Make the Braces
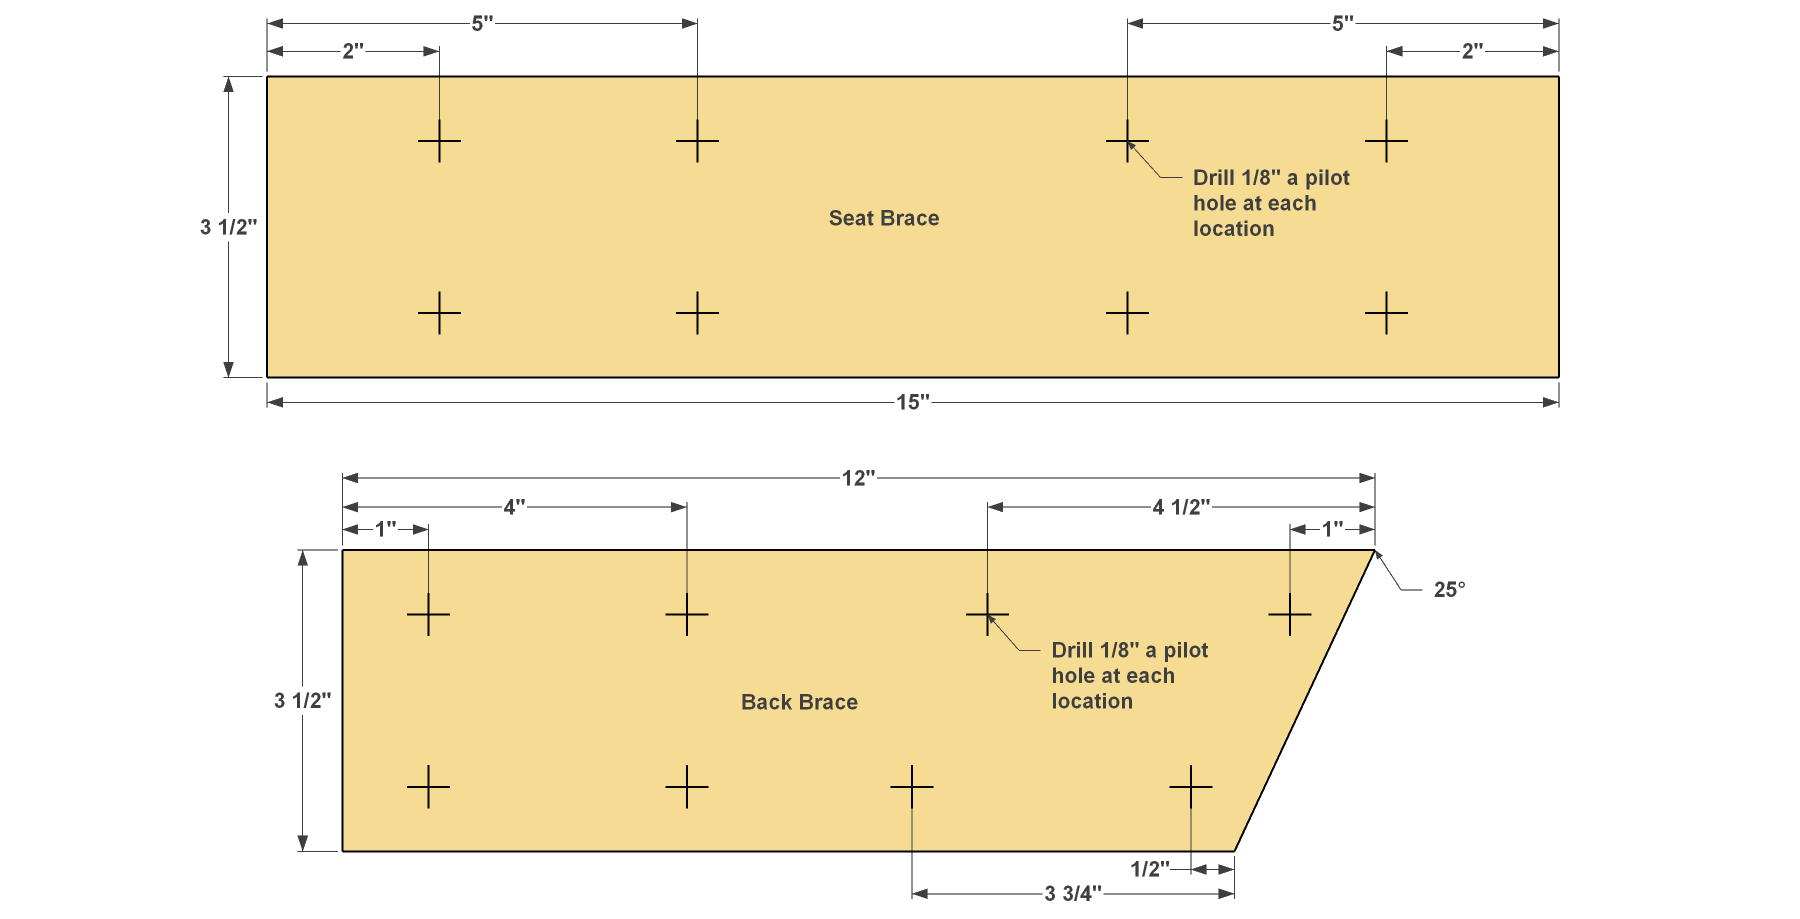
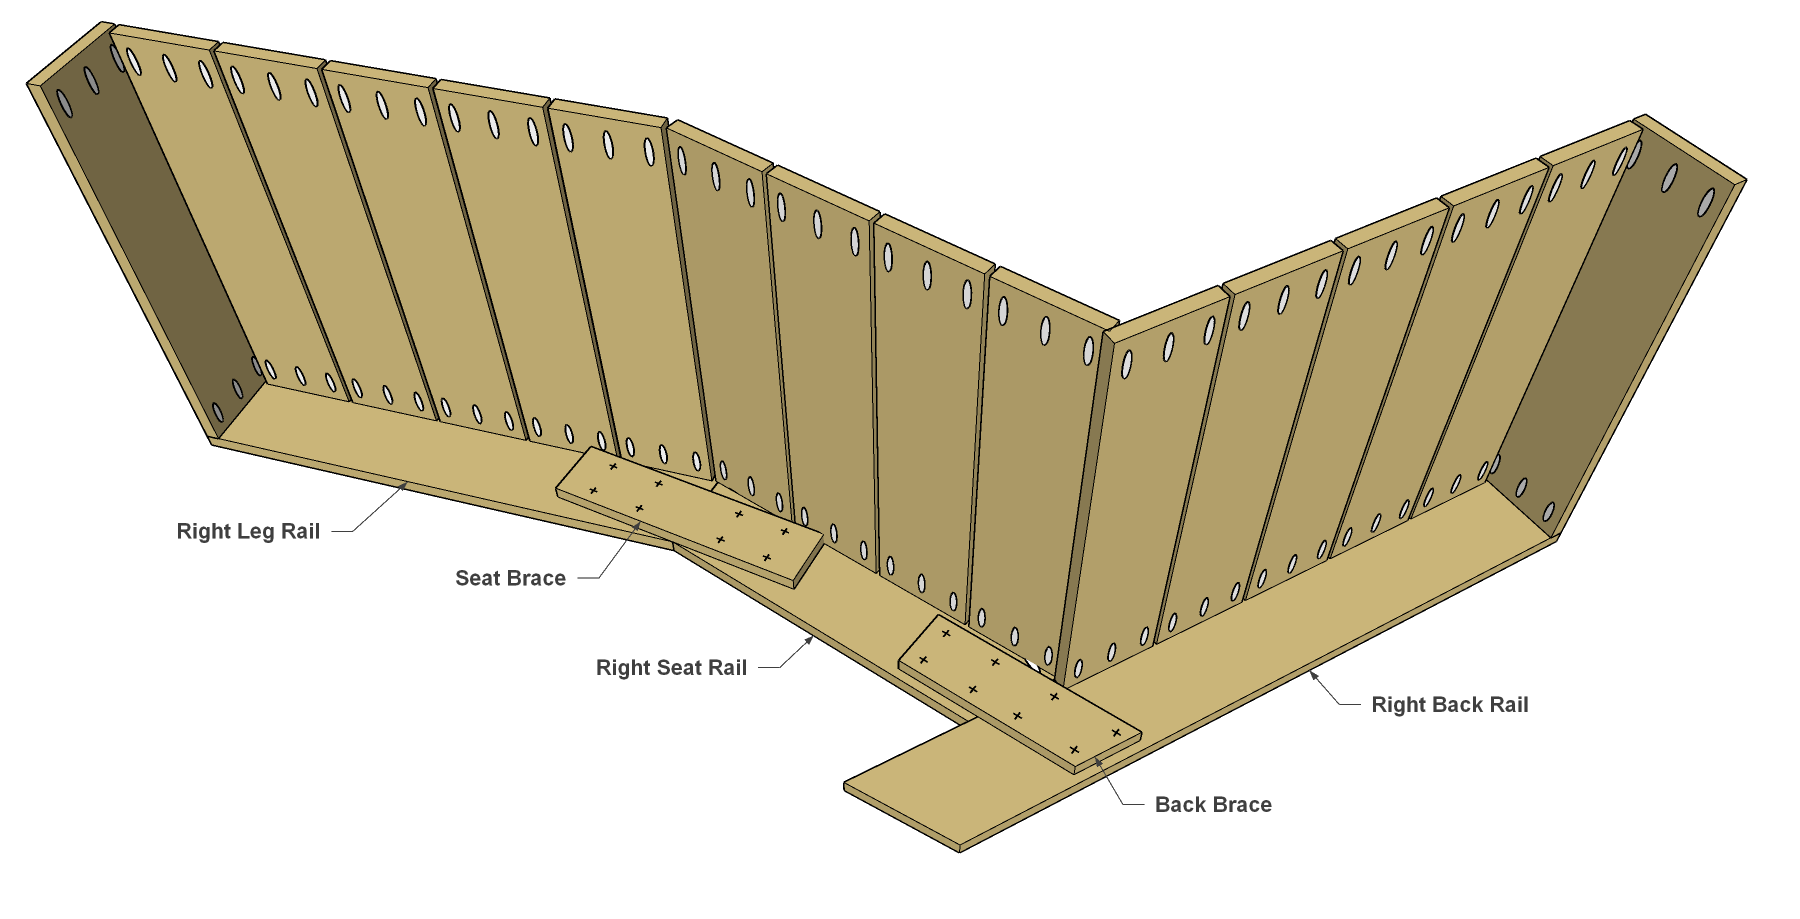
- Now you can cut two Seat Braces and two Back Braces to length from a 1x4 Cedar board, as shown in the cutting diagram. These will get glues and screwed across the Rail joints. These joints are under a lot of stress, and cedar is soft. Adding the Braces ensures that your chaise will stay strong for the long haul. Because these will be hidden on the underside of the chaise, it doesn’t matter which face is which.
- Drill 1/8" pilot holes in each Brace, as shown. You can speed this up by just marking Seat Brace and one Back Brace, then stacking the like Braces together as you drill through both.
8Secure the Braces
Spread glue on one face of a Seat Brace and a Back Brace, position them where shown, and then screw them down. You can use Blue-Kote™ Pocket-Hole Screws here, as well. Even though you’re not putting the screws in pocket holes, they work great in this type of application, too.
9Secure the Other Side
- Now you can glue and pocket-hole screw the Slats to the other side assembly. After that, attach the Braces, and your chaise lounge is almost complete. At this point, you’ll probably want to sand the outer surfaces. Because cedar is soft, this will go quickly with 120-grit sandpaper on a random-orbit sander. There’s no need to sand the underside.
- Then you can apply a finish you like. We brushed on a coat of “natural cedar” semi-transparent deck stain. If your chaise will live outside all the time, it’s a good idea to stain the underside, too. You won’t see most of it, but the stain will help protect the wood.