 Notch
DIY Miter Saw Hood – Build a Miter Saw Dust Hood
Step-by-step build — 14 steps. Also available as a print sheet.
1Check Your Saw Size
This dust hood was built to fit a 10" sliding compound miter saw. The dimensions are generous, and should fit a lot of saws out there, but before you start cutting parts, you’ll want to double check that yours will fit inside. To do that, swing the saw to full miter capacity in each direction, and measure the overall width. If that’s more than 31", you’ll need to make your hood wider. Also look at the overall depth required for your saw. From the front edge of the Bottom to the back of the hood, there’s almost 40" of depth, so that probably won’t be an issue.
2Assess Your Saw Accessories
You also need to think about what you’ll use for dust collection. Ours is connected to a woodworking dust collector that has 4"-diameter hose. So, we attached dust hoods of that size. If you’re using a shop vacuum instead, you can get ports that work with 2 1/4" or 2 1/2" hose. You’ll want to get your hoods first, and adjust the opening sizes accordingly. Finally, if you’re wondering about the fence and stop system, we used the Precision Trak & Stop Kit from Kreg. The side wings were built using instructions that come with that kit.
3Cut the Sides
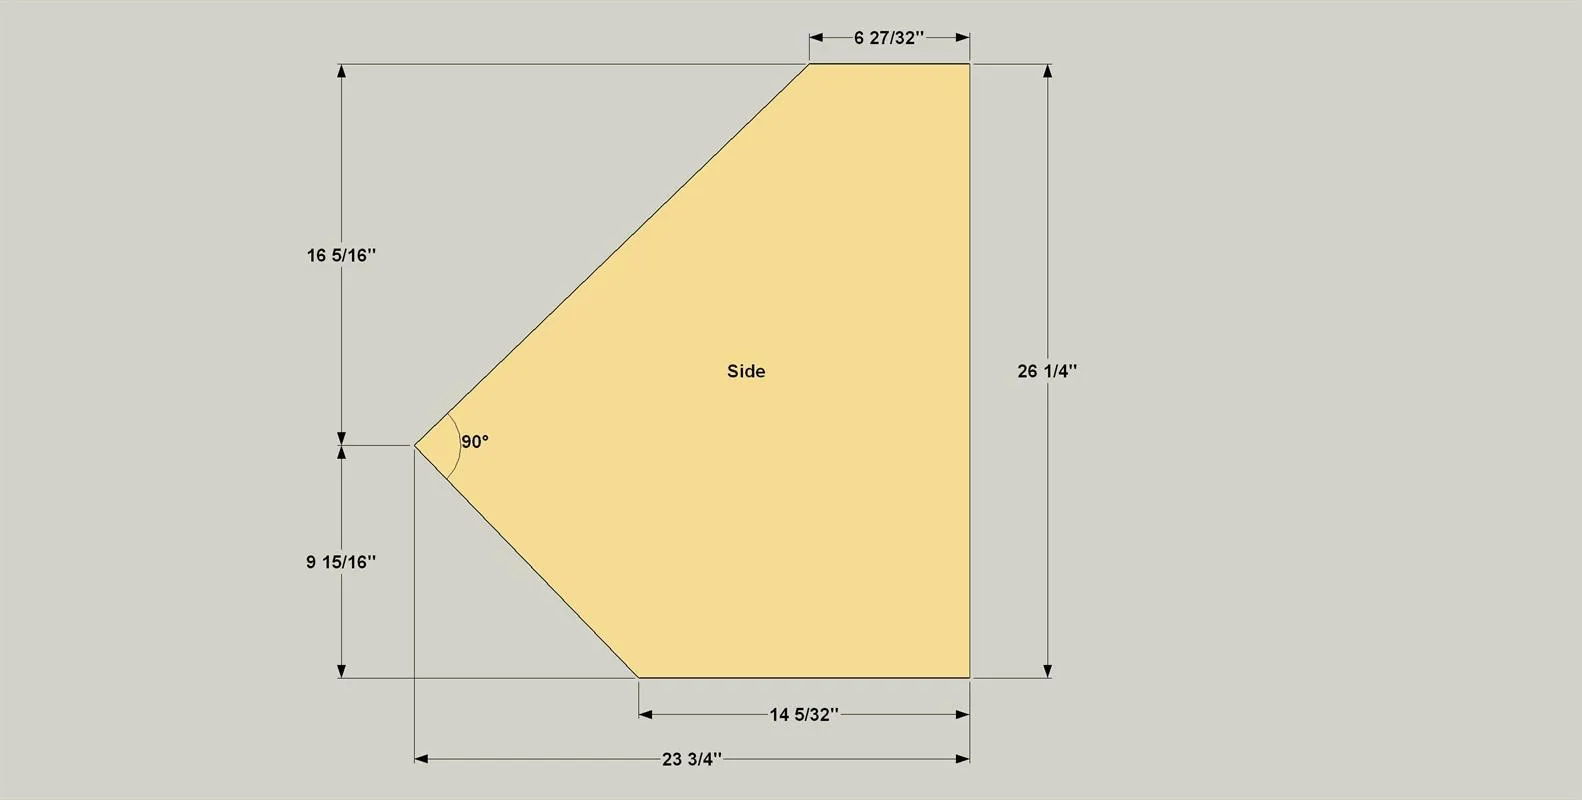
- Cut two Sides to rough size from a 3/4" x 48" x 96" sheet of plywood, as shown in the cutting diagram.
- Next, cut the Sides to final shape with a circular saw or a jigsaw.
- Sand the cut edges smooth as needed, and then sand the surfaces of the Sides. If you’re using better-quality “hardwood” plywood, such as birch, 150-grit sandpaper on a random-orbit sander should suffice. If you’re using a lower-grade sanded ply, start with 100- or 120-grit.
4Make the Back
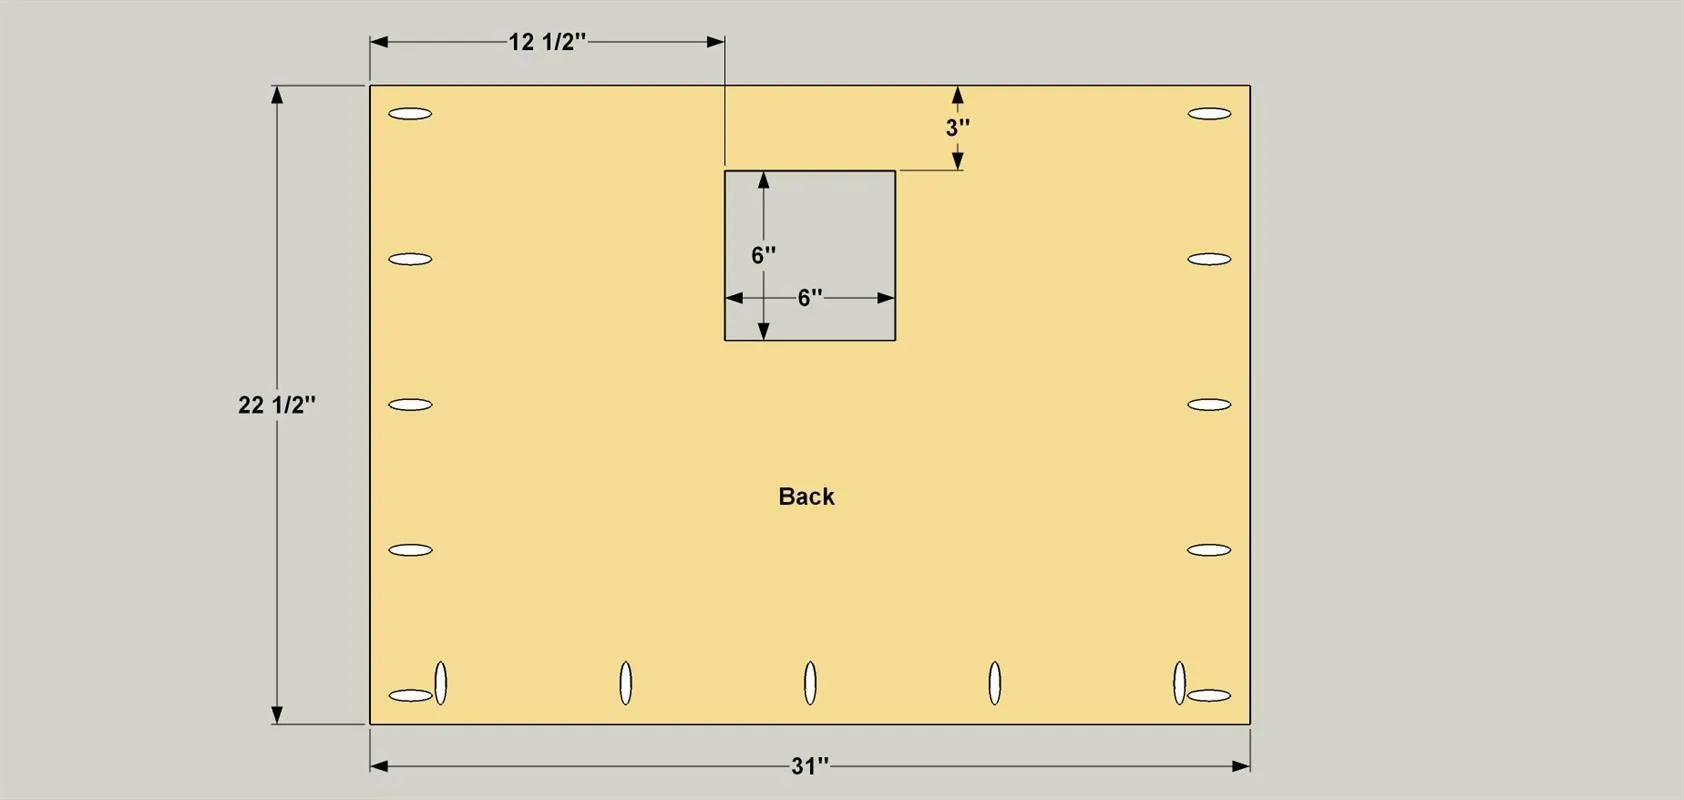
- Cut the Back to size, as shown in the cutting diagram.
- Set your pocket-hole jig for 3/4"-thick material, and then drill pocket holes in the Back at the locations shown.
- Finally, lay out the location of the dust port.
- Drill out the four corners of the hole with a 1/2" bit, and then cut out the dust port with a jigsaw and a fine tooth blade.
- Sand the opening smooth, and then sand the surfaces.
5Make the Lower Back
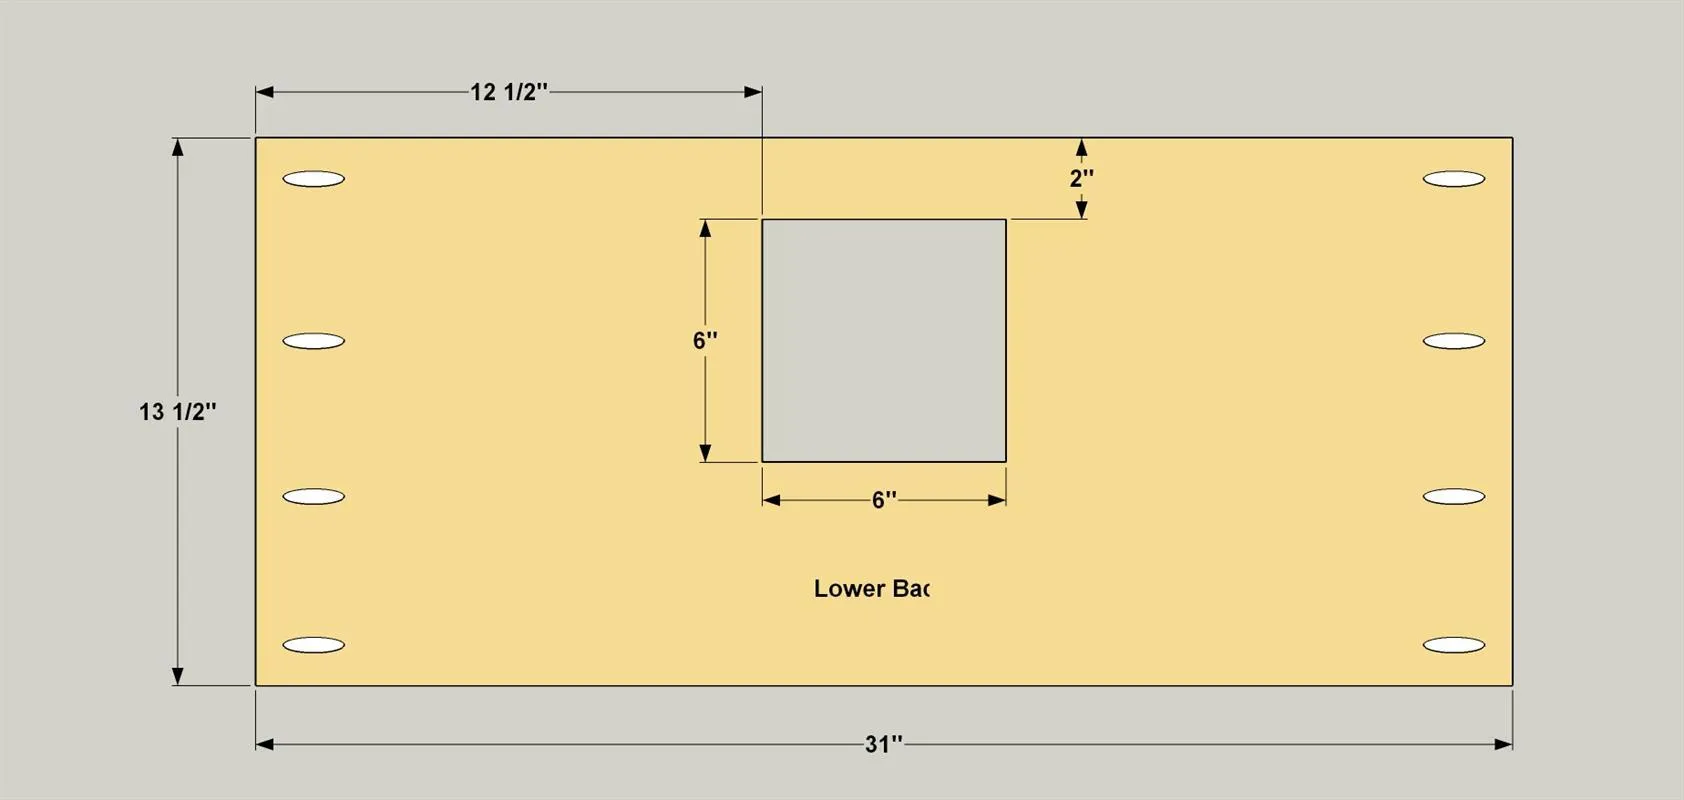
- Cut the Lower Back to size as shown in the cutting diagram.
- Drill pocket holes at the locations shown. Just as you did with the Back, lay out the location of the dust port in the Lower Back, and cut the opening.
- Then sand as you did on the other parts.
6Assemble the Backs
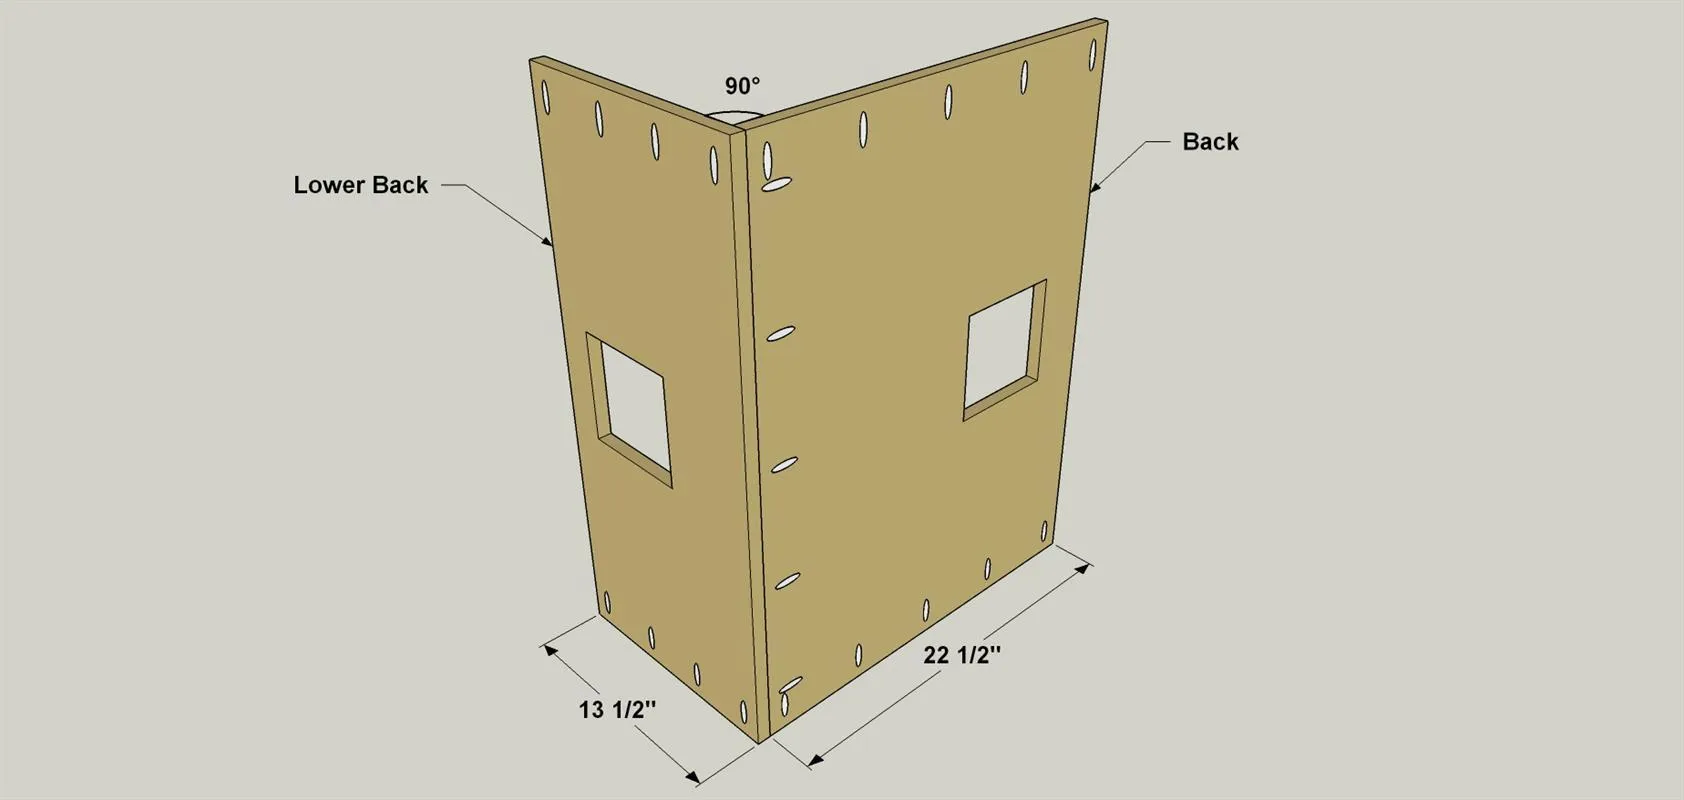
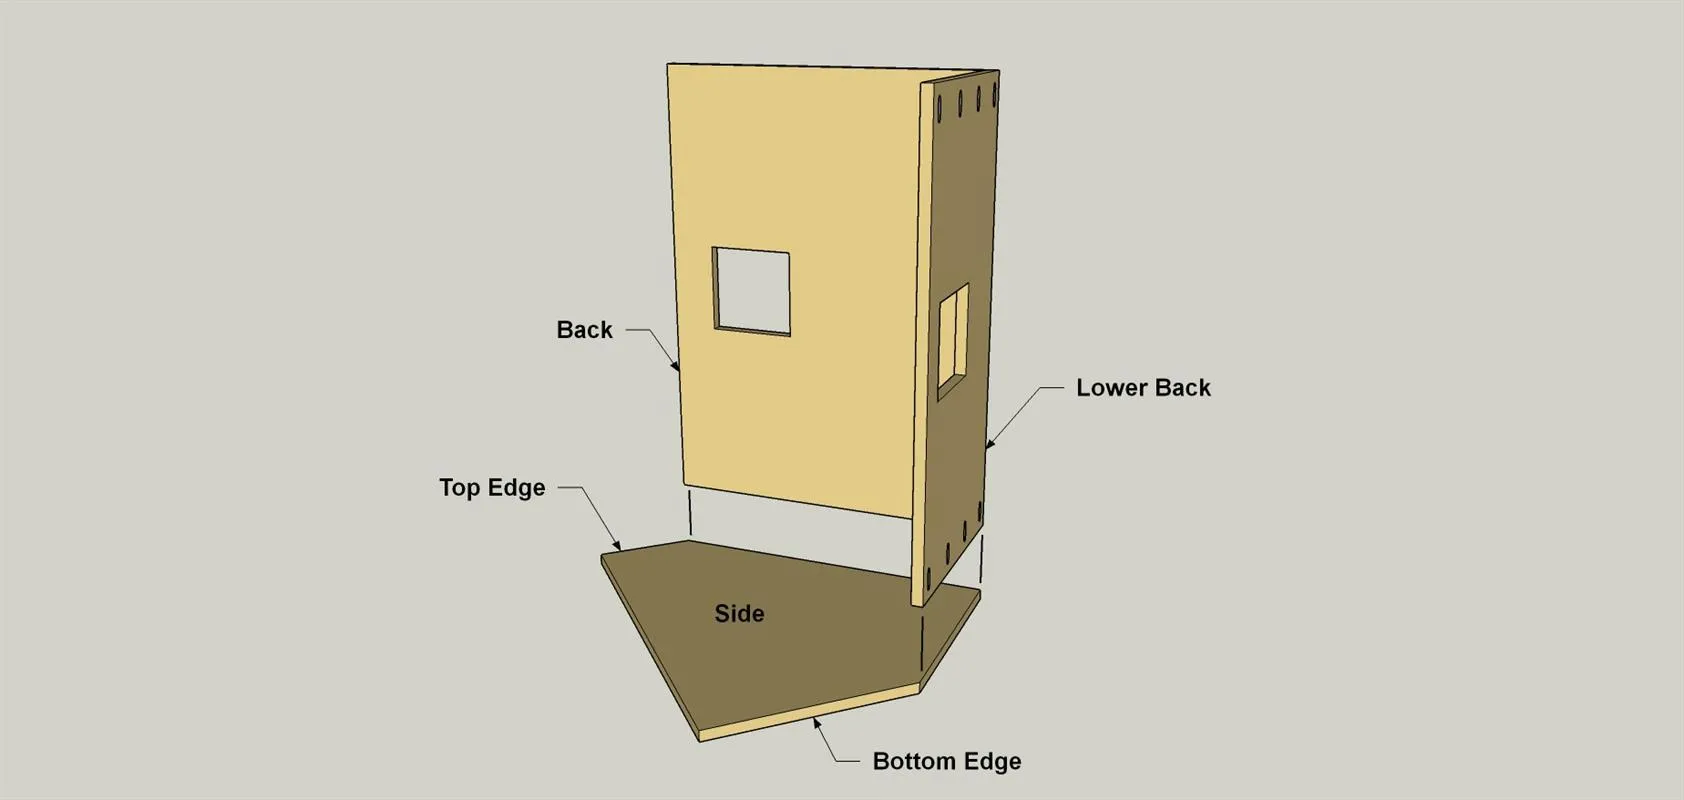
Glue and clamp the Back and Lower Back together as shown, making a 90° Corner. Secure the parts together with 1 1/4" coarse-thread pocket-hole screws.
7Attach the Backs to a Side
Lay one of the Sides flat on a work surface and then position the back assembly as shown. Apply glue to the edges and secure the back assembly to the Side using 1 1/4" coarse-thread pocket-hole screws.
8Make the Top
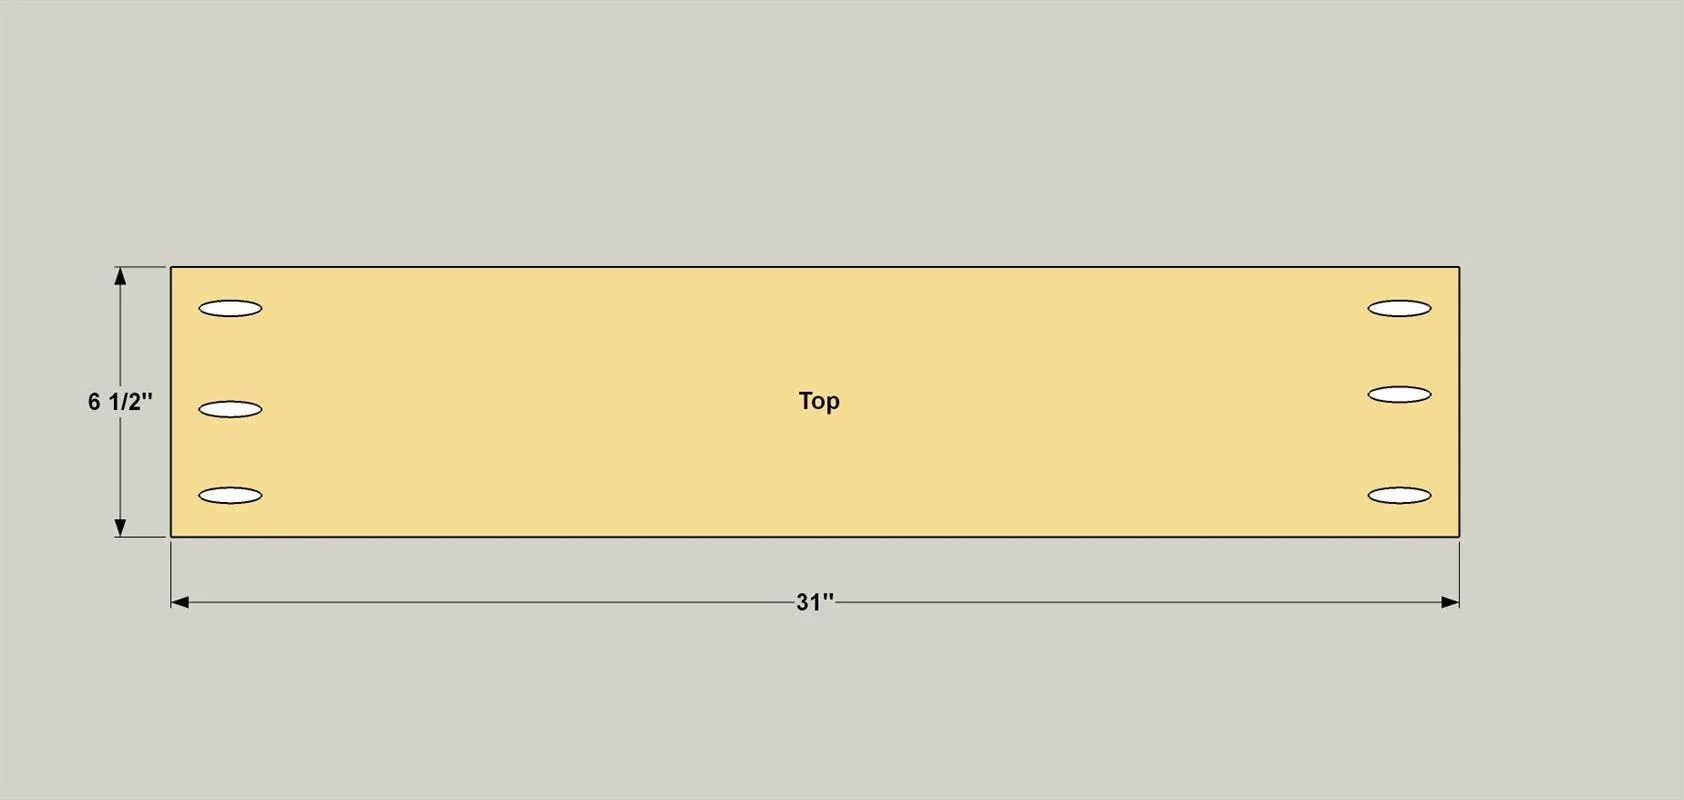
Cut the Top to size as shown in the cutting diagram. Drill pocket holes at the locations shown, and then sand the Top.
9Attach the Top to One Side
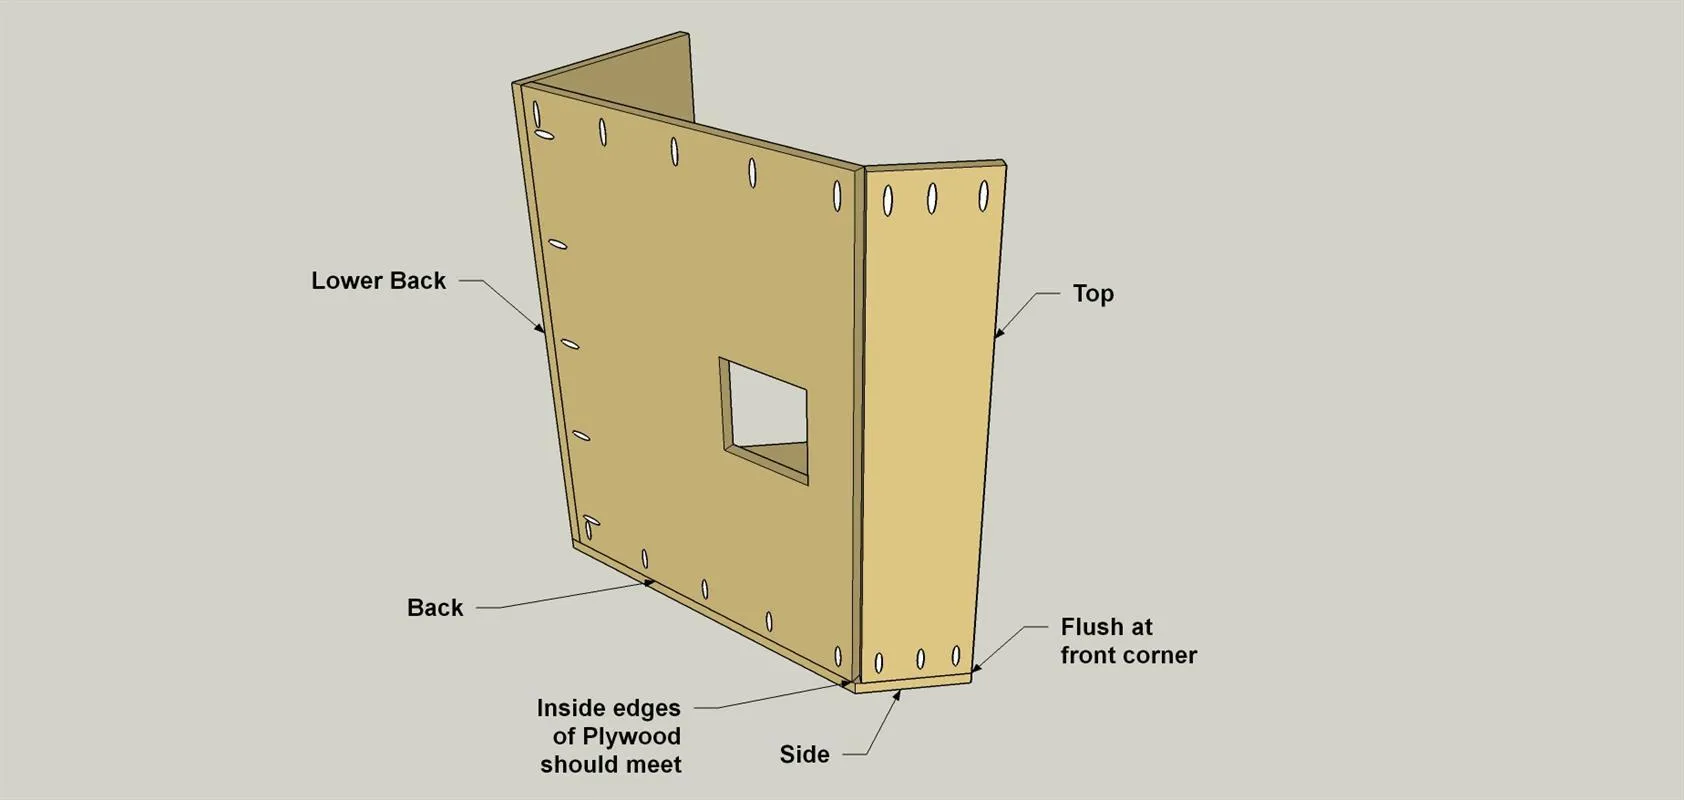
Position the Top in place on the Side as shown. Apply glue to the edge and secure the Top to the Side using 1 1/4" coarse-thread pocket-hole screws.
10Make the Bottom
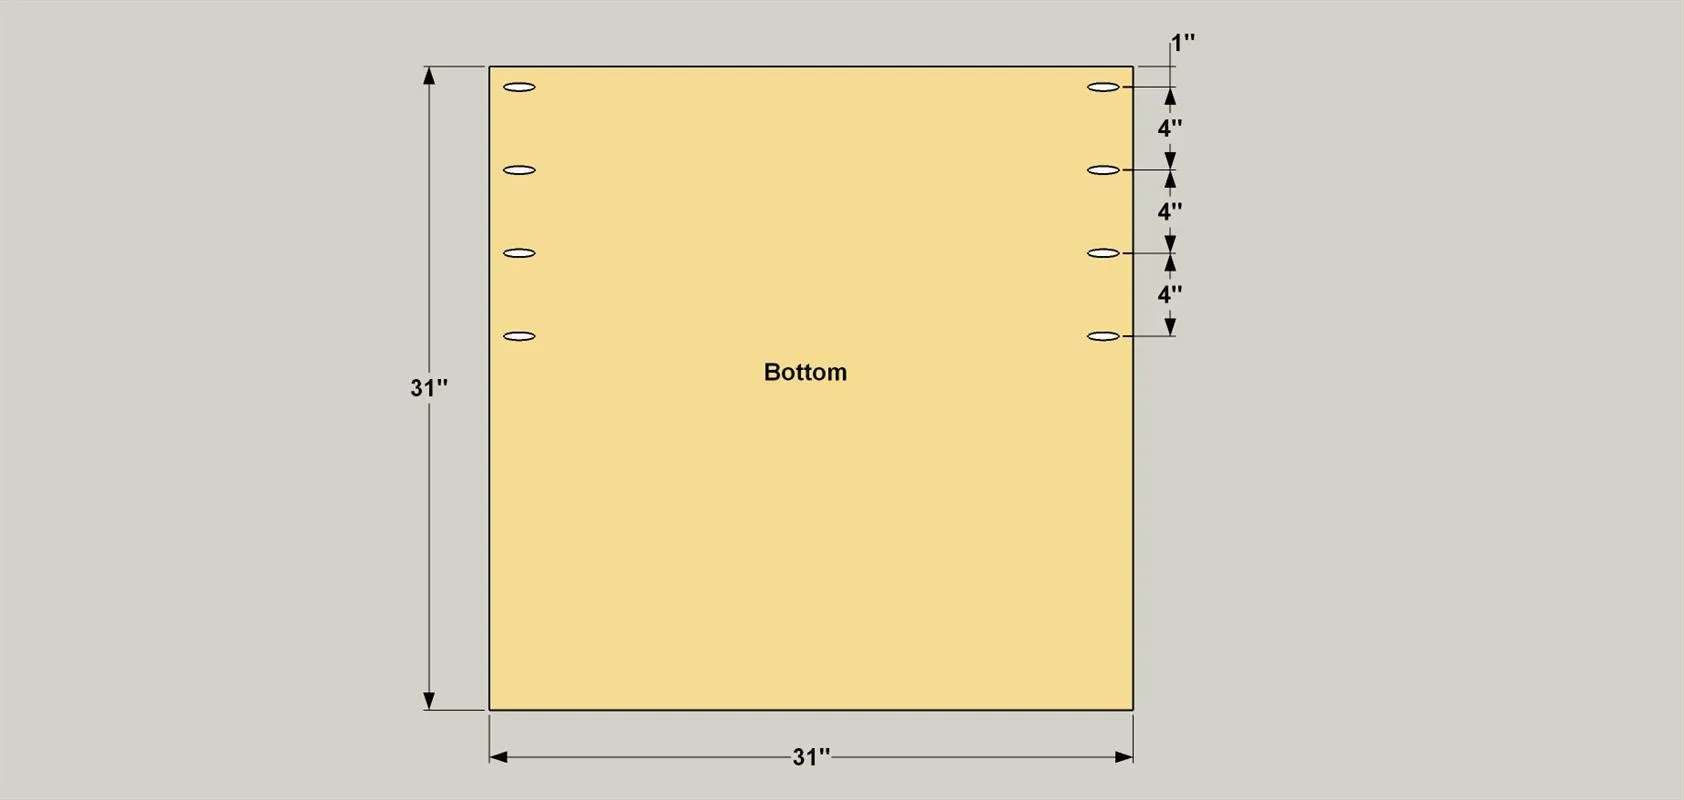
Cut the Bottom to size as shown in the cutting diagram. Drill pocket holes at the locations shown.
11Attach the Bottom
Position the Bottom in place on the Side as shown. Apply glue to the edge and secure the Top to the Side with 1 1/4" coarse-thread pocket-hole screws.
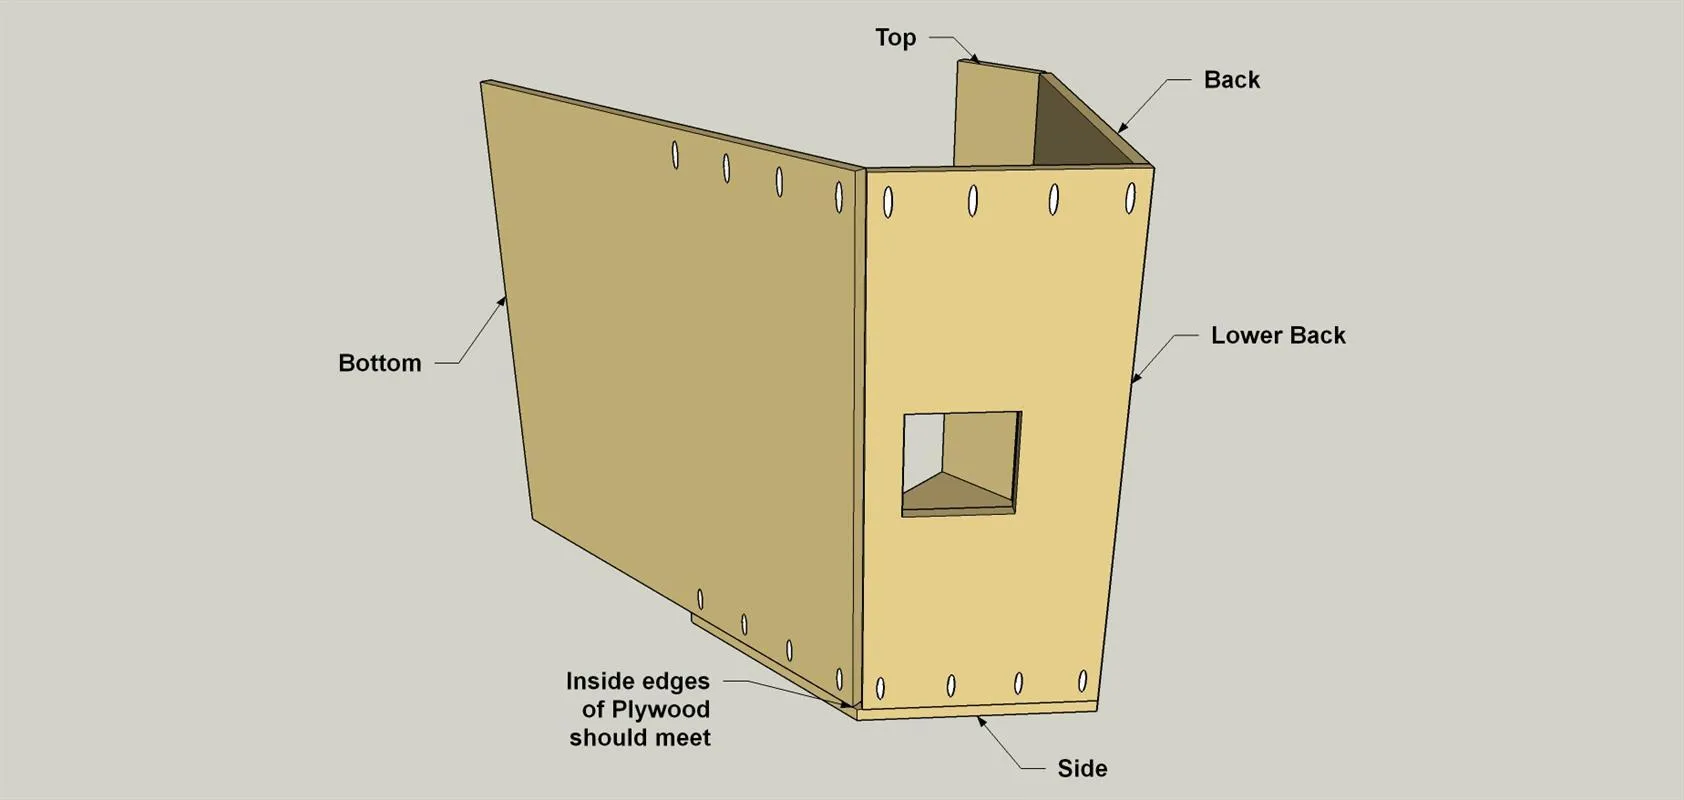
12Add the Second Side
Apply glue to the edges of the assembled parts and position the second side as shown. Secure the second Side to the other parts with 1 1/4" coarse-thread pocket-hole screws.
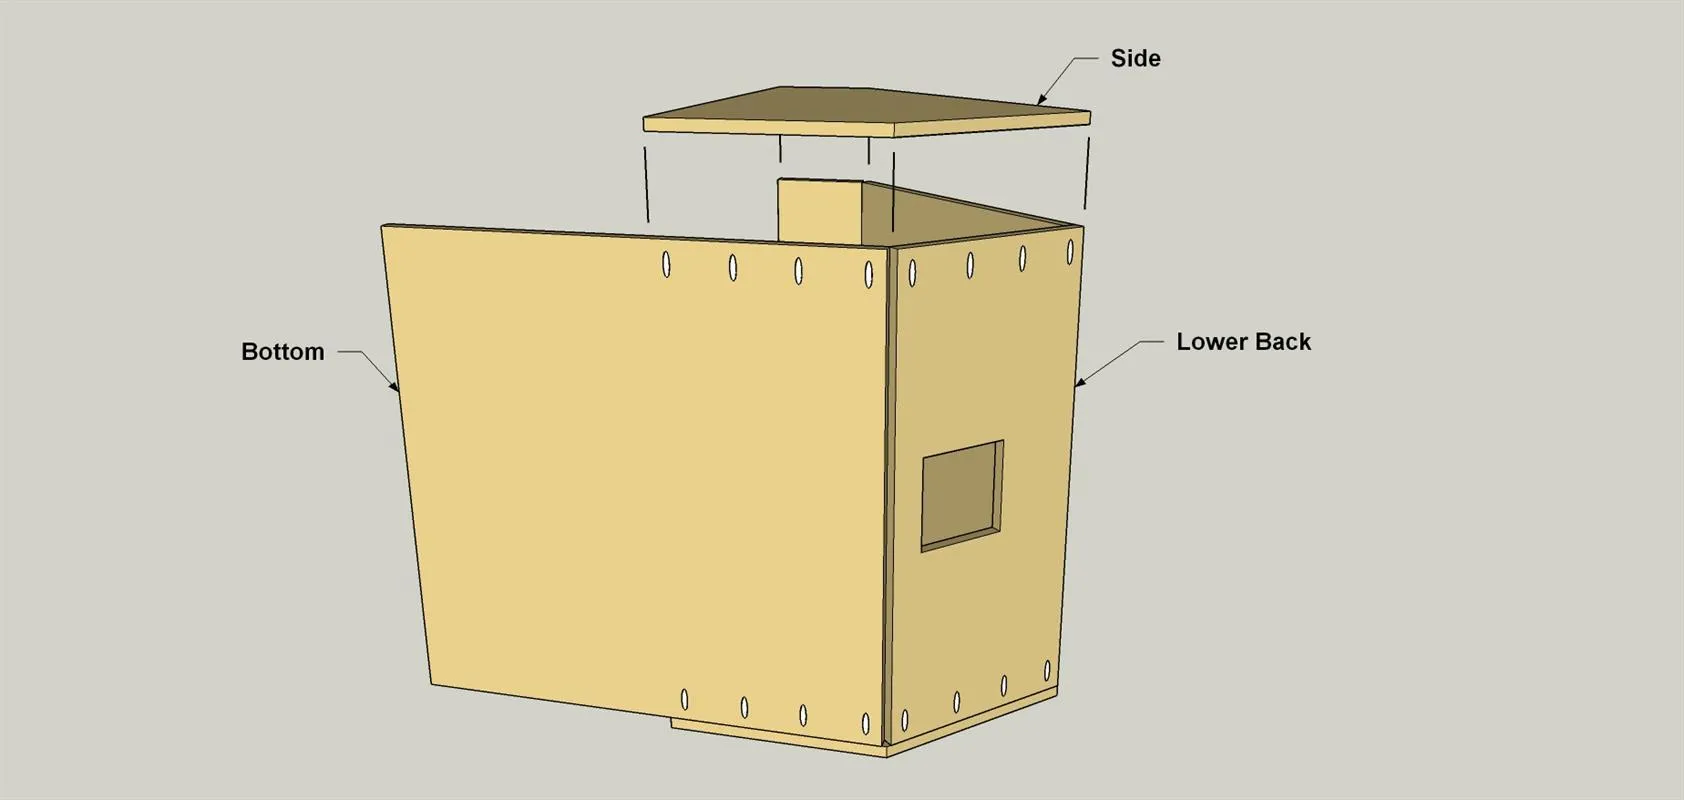
13Add a Finish and Hoods
With the assembly complete, do any final sanding that’s needed. Because this is a shop project, you could choose to leave it unfinished. That’s fine, but adding a coat or two of wipe-on varnish will help keep the plywood clean, and will make the dust wipe off more easily. After you apply the finish, position the plastic dust hoods over the openings you cut in the Back and Lower Back, drill pilot holes and secure the hoods using #8 x 3/4" pan-head wood screws. Snug the hoods down, but don’t over-drive the screws, as that could crack the plastic hoods.
14Mount Your Saw
- Position your saw on the Bottom, and make sure it’s set so that the saw can swing, bevel, and slide like it’s supposed to.
- Also make sure you can get to the handle and the power trigger.
- Then you can bolt your saw down. If you’re incorporating the hood into a miter saw station, as we did, make sure the saw lines up with the fences before you bolt it down.