 Notch
- Difficulty
- Expert
- Time
- 9.5–18.8 hours
- Cost
- $$$$
About this build
This desk perfectly captures the spirit of mid-century modern with its naturally finished maple wood, stainless steel hairpin legs, and strong lines. But this desk isn’t just about good looks. It offers lots of work space, storage, and a pair of drawers.
Tools
Essential
- Circular Saw
- Drill / Driver
- Miter Saw
- Pocket Hole Jig
- Random Orbit Sander
- Router
Optional / nice to have
- Bar / Pipe Clamps
- Combination Square
- Tape Measure
Materials
| Item | Qty |
|---|---|
| Plywood, 3/4" Thick Full Sheet | 1 board |
| Plywood, 3/4" Thick Half Sheet | 1 board |
| Plywood, 1/2" Thick Half Sheet | 1 board |
| Board, 1x2 96" | 6 board |
| 1" fine-thread panhead pocket-hole screws | 60 each |
| 1 1/4" fine-thread pocket hole screws | 100 each |
| #8 x 2" flathead wood screws | 22 each |
| #8 x 1 1/2" flathead wood screws | 8 each |
| #8 x 1 1/4" flathead wood screws | 12 each |
| 6" hairpin legs | 2 each |
| 24" hairpin legs | 2 each |
| #12 x 5/8" panhead screws | 12 each |
| 5mm shelf pins | 4 each |
| 1 1/2" no-mortise door hinges | 1 each |
| Cabinet door catch with strike | 1 each |
| 6" bar pulls | 3 each |
| 7/8" x 25 ft. roll birch iron-on veneer tape | 1 each |
| Quart oil-based or water-based clear finish | 1 each |
Overall cost: $$$$. Lumber prices vary by region, species, and season, so we give a band rather than a figure we would only be pretending to know.
Cut list
| Part | Qty | T × W × L |
|---|---|---|
| Top Long Edging | 2 | 3/4" × 1" × 94" |
| Bottom Long Edging | 2 | 3/4" × 1" × 45" |
| End Edging | 4 | 3/4" × 1" × 20" |
| Top Panel | 1 | 3" × 20" × 46" |
| Bottom Panel | 1 | 3" × 20" × 42" |
| Rail | 1 | 3/4" × 1" × 41" |
| Divider Edging | 6 | 3/4" × 1" × 4" |
| Back 1 | 1 | 3" × 4" × 14" |
| Back 2 | 1 | 3" × 4" × 23" |
| Divider Panel | 3 | 3" × 4" × 17" |
| Cabinet Top/Bottom Edging | 3 | 3/4" × 1" × 14" |
| Side Edging | 4 | 3/4" × 1" × 18" |
| Cabinet Top/Bottom Panel | 2 | 3" × 14" × 17" |
| Cabinet Side Panel | 2 | 3" × 17" × 18" |
| Cabinet Back | 1 | 3/4" × 14" × 17" |
| Shelf Edging | 1 | 3/4" × 1" × 14" |
| Shelf Panel | 1 | 3" × 14" × 17" |
| Door | 1 | 3" × 14" × 17" |
| Drawer 1 Front | 1 | 3" × 3" × 14" |
| Drawer 2 Front | 1 | 3" × 3" × 23" |
| Drawer 1 Back | 1 | 3" × 3" × 13" |
| Drawer 2 Back | 1 | 3" × 3" × 22" |
| Drawer Side | 4 | 1" × 3" × 19" |
| Drawer 1 Bottom | 1 | 1" × 13" × 14" |
| Drawer 2 Bottom | 1 | 1" × 14" × 22" |
What to buy
Buy 15 boards at 8 ft.
3" × 20"
1 board
3" × 17"
1 board
3" × 14"
1 board
3" × 4"
1 board
3" × 3"
1 board
1" × 14"
1 board
1" × 13"
1 board
1" × 3"
1 board
3/4" × 14"
1 board
3/4" × 1"
6 boards
Assumes 8 ft stock, a 1/8" saw kerf, and buying each part at its own width. Change the board size or kerf on the full board plan →
Instructions
1Create the Desk Top Parts
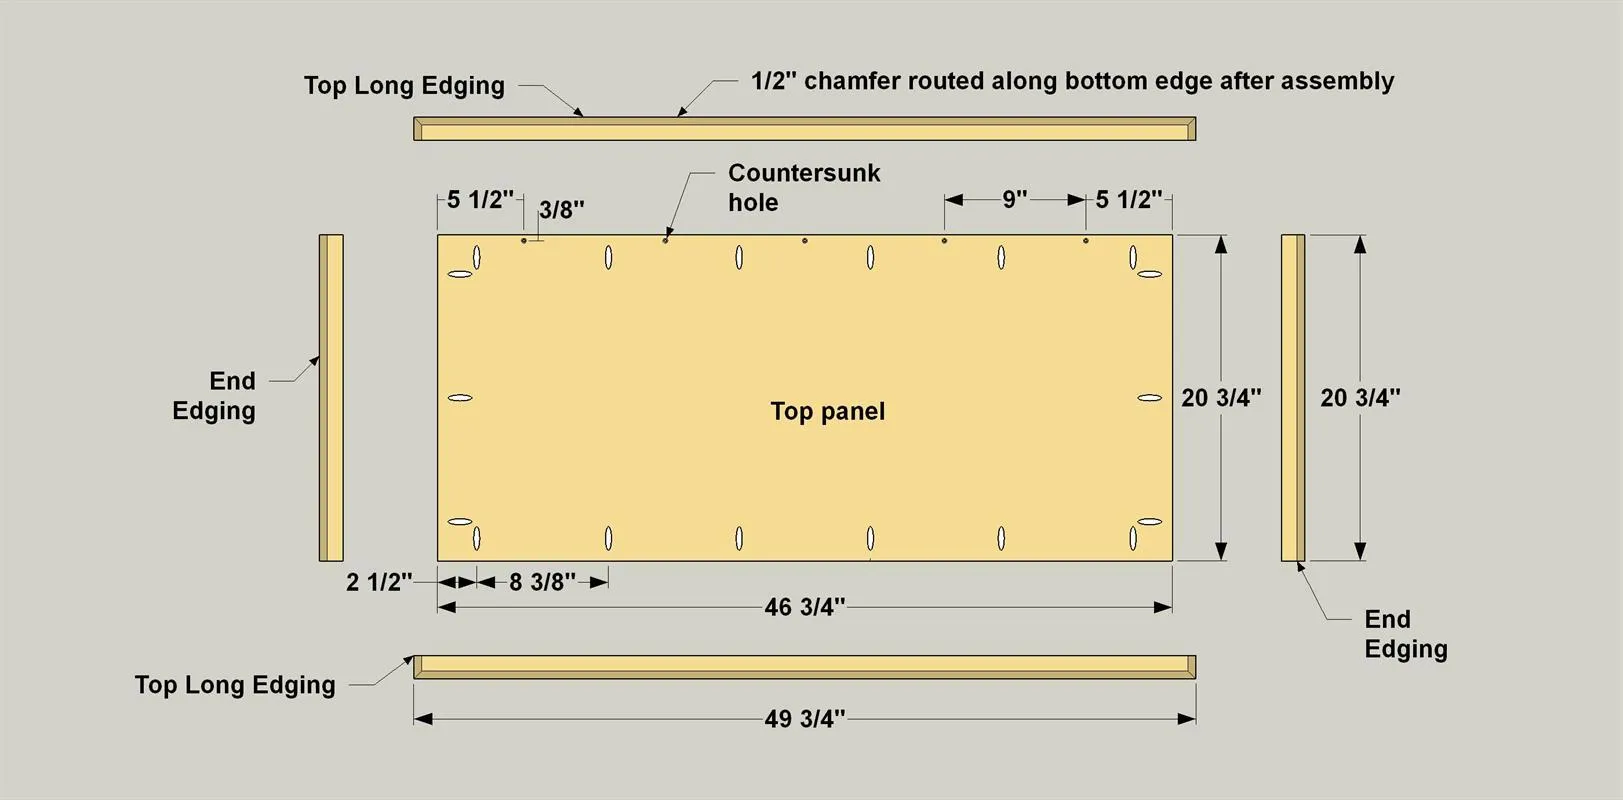
- Cut the two pieces of Top Long Edging and four pieces of End Edging to length from 1x2 boards, as shown in the cutting diagram.
- Measure and mark carefully to make sure all of the like parts are exactly the same length.
- Also cut the Top Panel to size from 3/4" plywood, as shown in the cutting diagram.
- Then, with your pocket hole jig set for 3/4" material, drill pocket holes in the underside face of the Top Panel. You also need to drill a series of countersunk holes for #8 flathead screws along the back edge of the Top Panel, as shown. These will be used to attach the desk Rail later.
2Attach the Top Edging
- Now you can attach the edging to the Top Panel.
- Start by attaching the End Edging using glue and 1 1/4" pocket-hole screws. Make sure the ends of the edging are flush with the edges of the Top Panel and edges of the panel are flush. After attaching the Edging, rout a 1/2" chamfer on the underside of the Edging. With that done, you can sand the Top assembly to prepare for finishing later. Don’t sand the plywood too aggressively, or you could sand through the thin veneer. You can probably start sanding with 150-grit, and then go to 180-grit.
Tip: Pay Special Attention with Plywood When you buy plywood, you’ll find that it has one better-looking face and one face with more defects. Make sure that you always have the better face be the one that shows, so you projects will look their best. Also, you’ll notice that plywood is always slightly thinner than the stated thickness. That means it may be thinner than the solid-wood edging you join to it. Make sure as you attach the edging that the “show” face of the plywood and the outside-face of the edging are flush.
3Create the Desk Bottom Parts
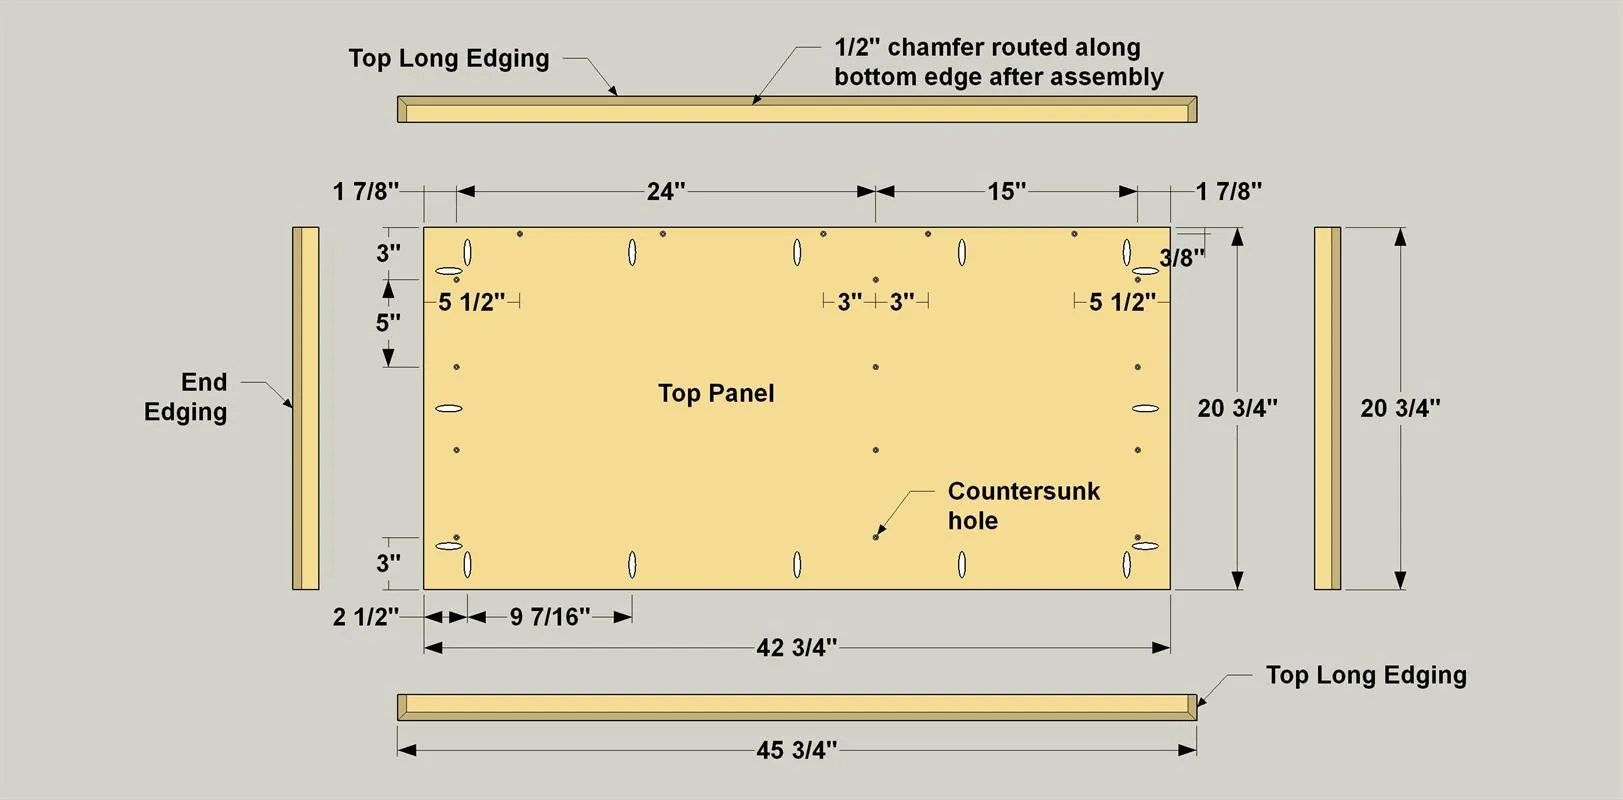
- Cut two pieces of Bottom Long Edging to length from 1x2 boards, as shown in the cutting diagram. Retrieve the two pieces of End Edging that you set aside earlier, as well.
- Also cut one Bottom Panel to size from 3/4" plywood, as shown in the cutting diagram. With your pocket hole jig set for 3/4" material, drill pocket holes in the underside face of the Bottom Panel. You also need to drill countersunk holes for #8 flathead screws in this panel where shown. These will be used to attach the Desk Bottom to the drawer box assembly later.
4Attach the Bottom Edging
Now you can attach the edging to the Bottom Panel in the same way you did with the Top Panel. Then rout a chamfer on the underside of this assembly, and then sand the assembly smooth.
5Cut the Rail and Drawer Box Parts
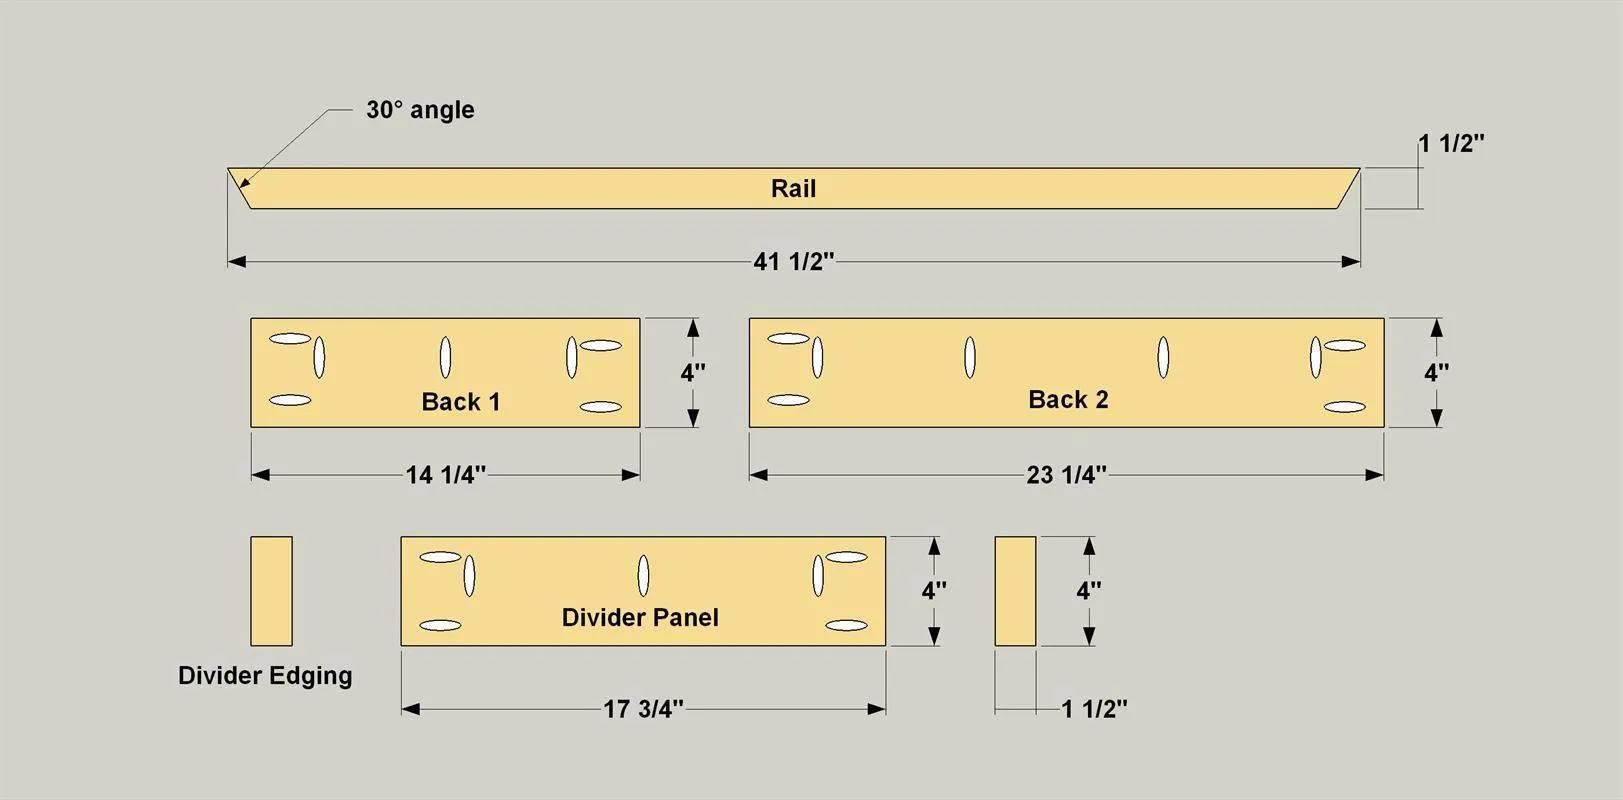
- Cut one Rail to length from a 1x2 maple board, as shown in the cutting diagram.
- Set you miter saw at 30° to cut the angled ends.
- Also cut six pieces of and Divider Edging to length from 1x2 maple boards.
- Cut a Back 1, a Back 2, and three Divider Panels to size from 3/4" maple plywood, as shown in the cutting diagram. With your pocket hole jig set for3/4"material, drill pocket holes in the inside faces of each Divider, as shown.
- Then you can attach the Divider Edging to the Divider Panels using 1 1/4" pocket-hole screws. Be sure to keep the outer faces of the Divider Edging flush with the outer “show” face of each divider. With the pieces assembled, you can sand them to prepare for finishing later.
6Attach the Rail
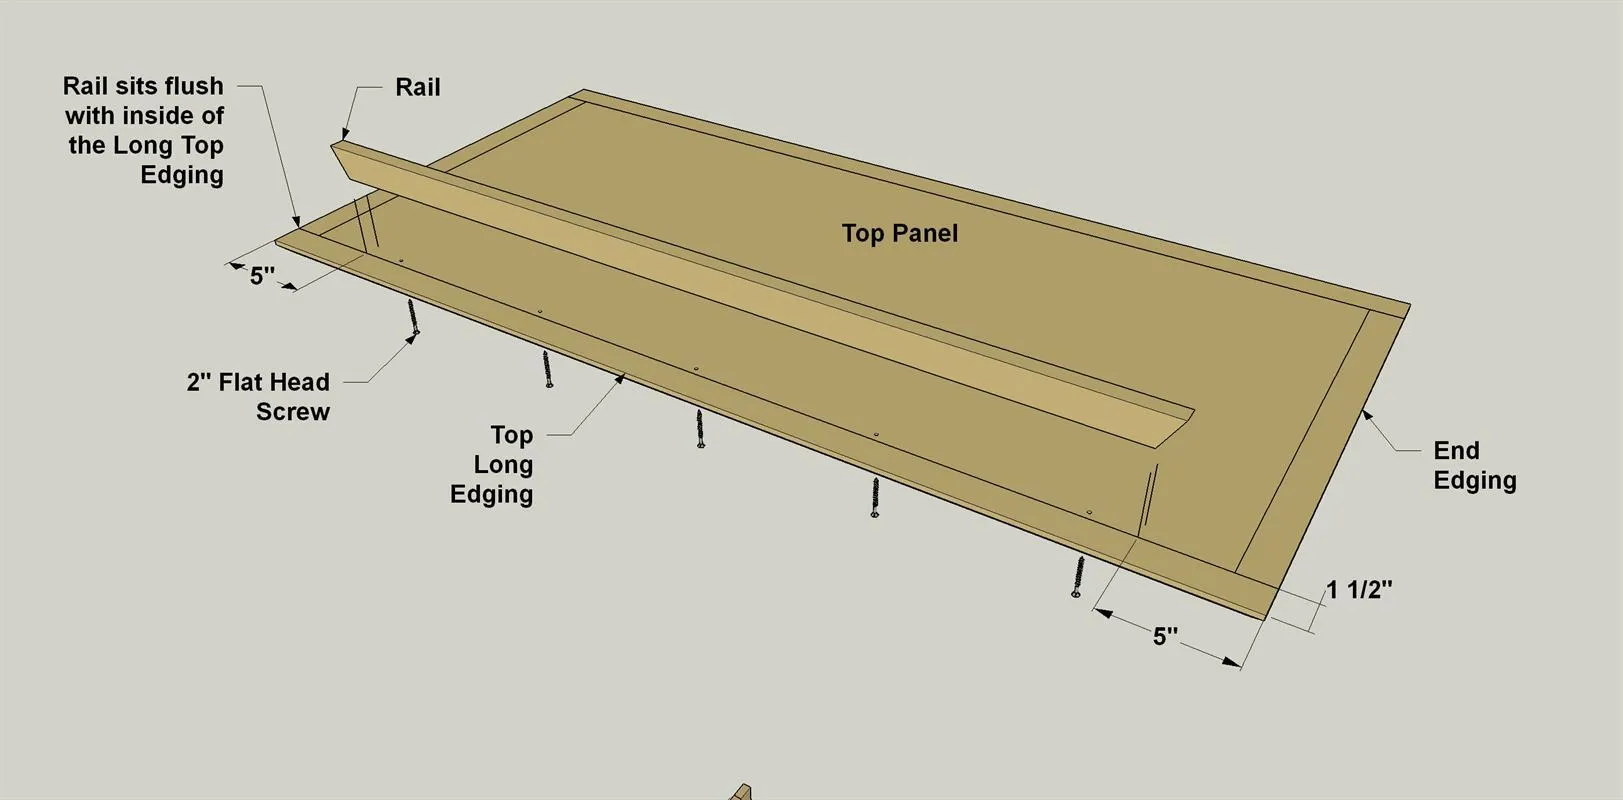
- Clamp the Rail to the Top Assembly, aligning the back face of the Rail with the inside edge of the rear Long Edging. Make sure the Rail is centered on the desk top assembly from end to end. Using the countersunk holes in the Top Panel as guides, drill pilot holes into the Rail.
- Then attach the rail using #8 x 2" flathead screws.
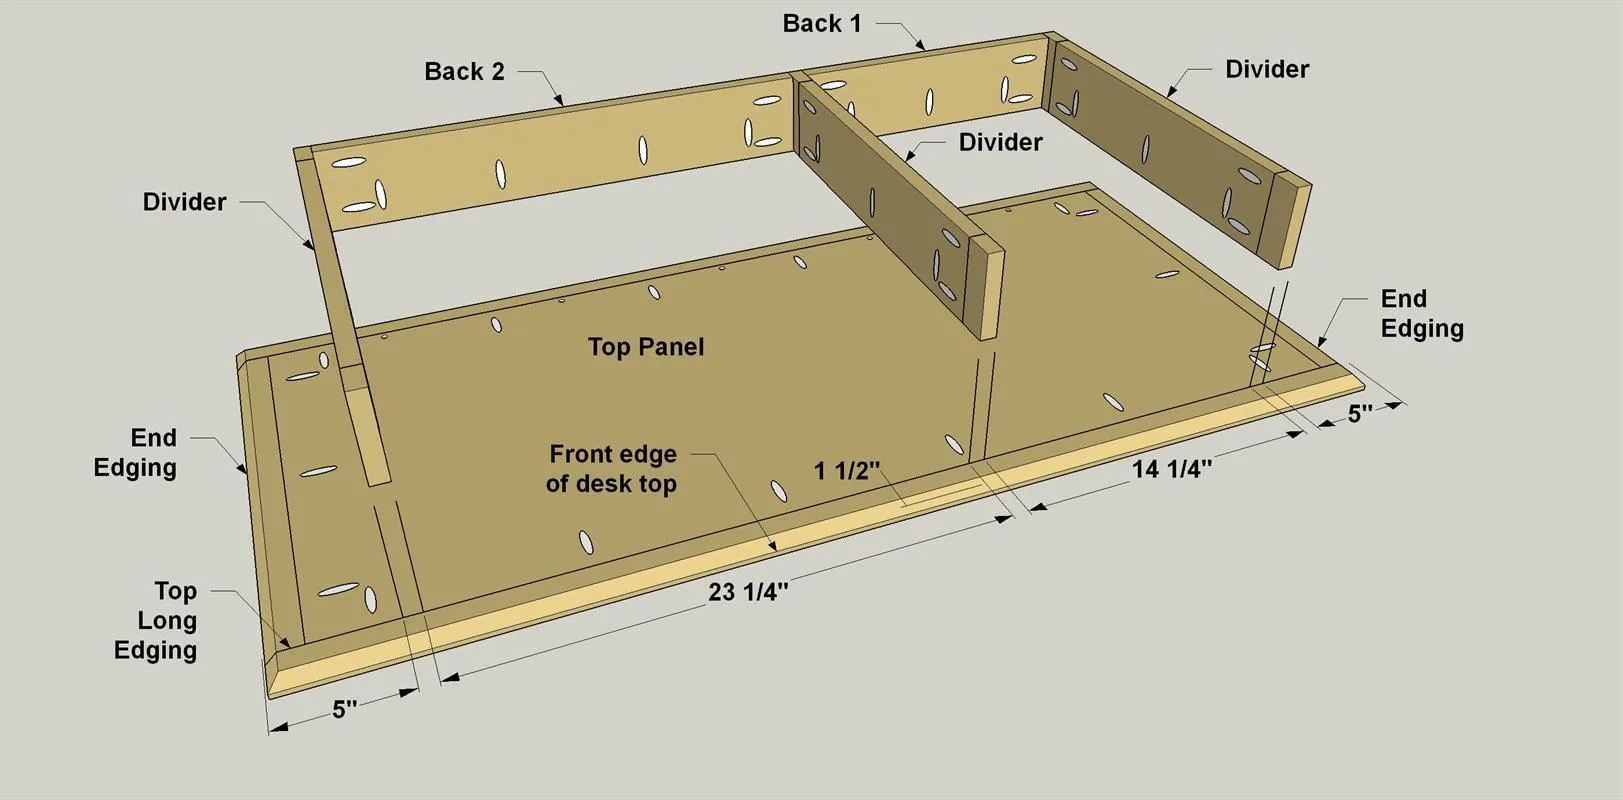
7Attach the Drawer Box to the Top
- Attach the Divider assemblies to Back1 and Back 2 using 1 1/4" pocket screws, keeping the rear edges of the Dividers and rear faces of the Backs flush.
- Position the divider/back assembly desk top, as shown, and then fasten just the Backs to the Top Panel with 1" panhead pocket-hole screws. Use a square to align the Dividers perpendicular to the Backs and measure to make sure the distances between the Dividers are the same at the front and rear.
- Clamp the Dividers to the Desk Top and drive 1" panhead pocket-hole screws. Before assembling the Backs and Dividers, make sure the Dividers fit between the Desk Top front and rear Long Edging. If necessary, trim the rear Divider Edging and sand the trimmed edges smooth.
8Attach the Bottom
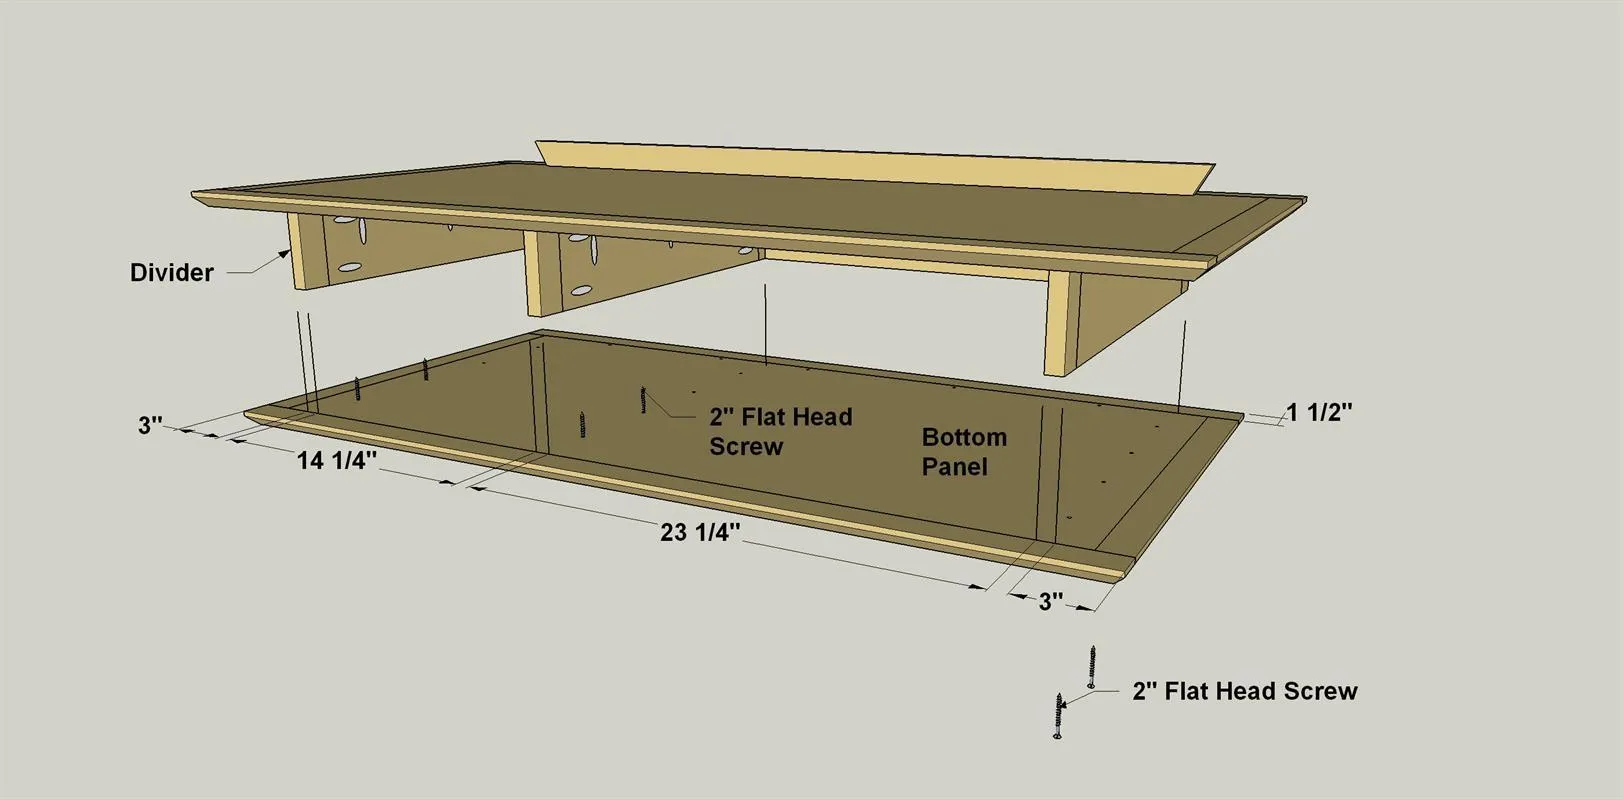
Center the Desk Bottom on the divider/back assembly, as shown, and clamp it in place. Using the countersunk holes in the Bottom Panel as guides, drill pilot holes into the Backs and Dividers and drive #8 x 2" flathead screws.
Tip: Drill Pilot Holes Before Assembly Don’t be tempted to drive the 2" flathead screws into the plywood Backs and Dividers without drilling pilot holes. Driving a screw into the edge of a plywood part without a pilot hole often splits the part.
9Make the Cabinet Parts
- Cut the Cabinet Top/Bottom Edging and Cabinet Side Edging to length from 1x2 maple boards, as shown in the cutting diagram.
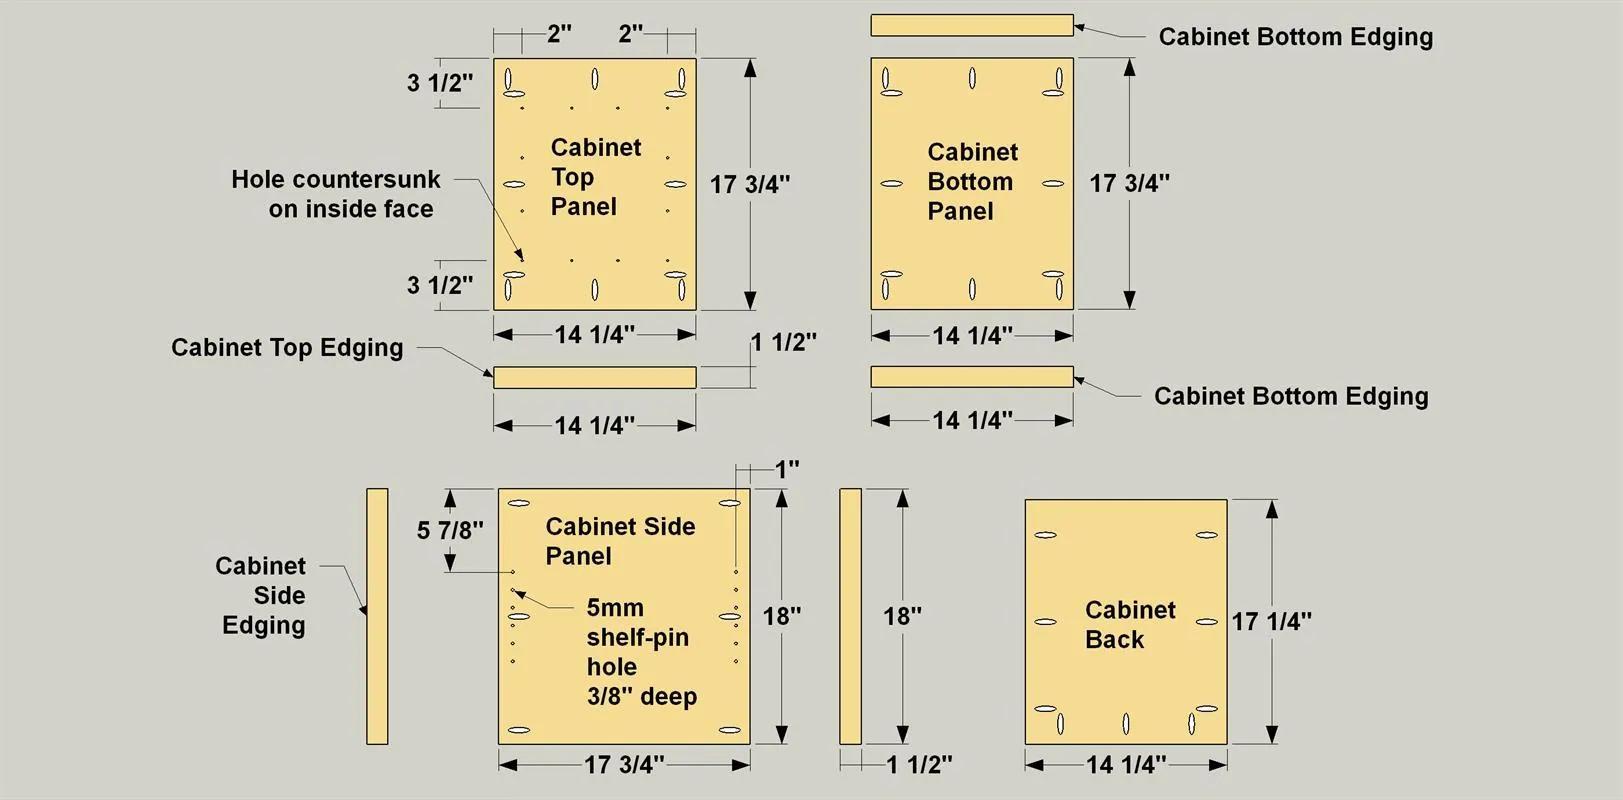
- Cut the Cabinet Top/Bottom Panels, Cabinet Side Panels, and Cabinet Back to size from 3/4" maple plywood, as shown in the cutting diagram. With your pocket hole jig set for 3/4" material, drill pocket holes in the outer face of the Top Panel, the lower face of the Bottom Panel, and inside faces of the Side Panels and Back, as shown.
- Drill holes in the Cabinet Top for the #8 screws that will fasten the cabinet to the Bottom Panel, countersinking them on the inside face (the face opposite the pocket holes).
10Add Shelf Pin Holes, Attach Edging
Use a shelf-pin jig to drill shelf-pin holes 3/8" deep, centered top-to-bottom, in the inside faces of the Side Panels. After that, you can attach the edging as shown to all of the cabinet parts.
11Assemble the Cabinet
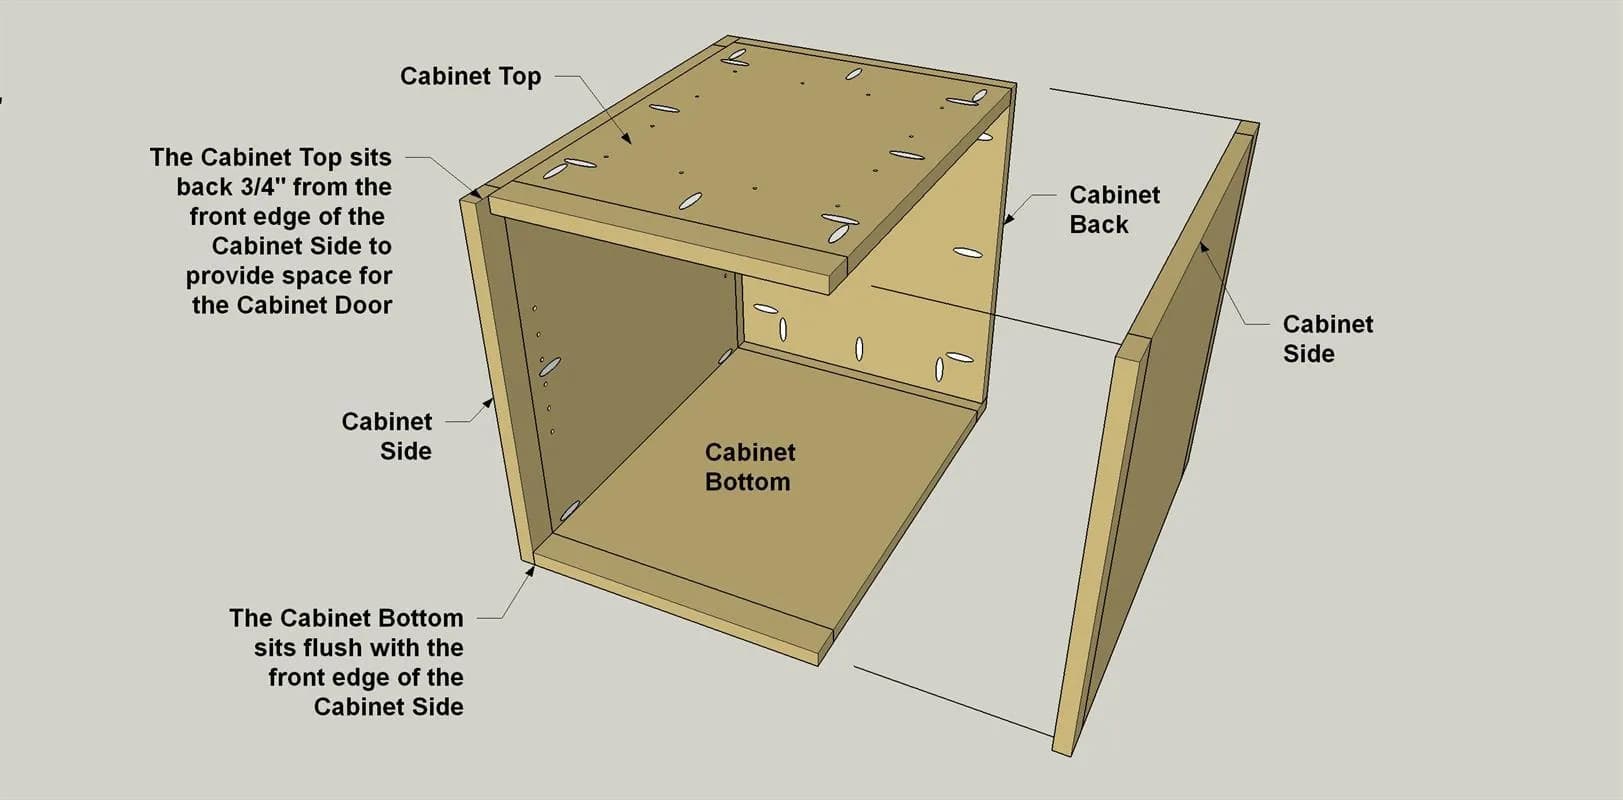
Now you can assemble the cabinet, as shown. Make sure that you align all of the pieces properly so that the cabinet top assembly is set back. This will provide space for the cabinet door when it gets attached later. Use 1" panhead pocket-hole screws to assemble the cabinet.
Tip: Use Iron-On Veneer to Close Gaps Because the plywood Side Panels are slightly thinner than the solid-wood Edging, there may be gaps between the edges of the Cabinet Top and Bottom and the Cabinet Sides. Driving pocket screws will pull the parts together, bowing the Sides inward. Before assembling the Cabinet, fill the gap by applying strips of iron-on veneer tape to the inside faces of the Sides along the top and bottom edges.
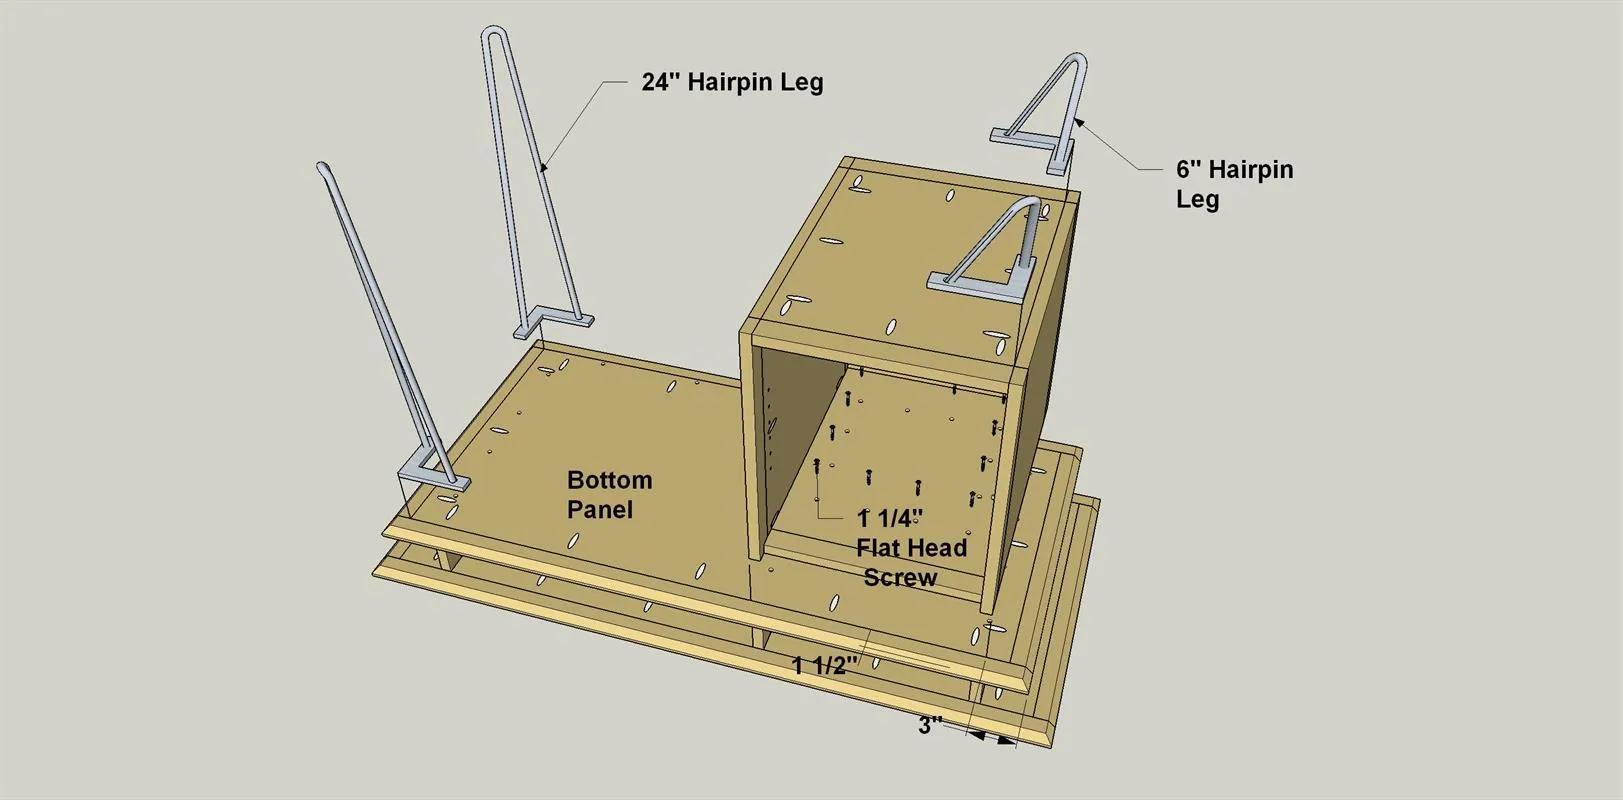
12Attach the Cabinet and Add the Legs
- Position the cabinet on the Bottom Panel as shown, aligning the Cabinet Sides with the end and middle Dividers.
- Clamp the cabinet in place and drive 1 1/4" flathead wood screws.
- Position the hairpin legs so the mounting plates nest into the corners formed by the Edging. Using the holes in the mounting plates as guides, trace mounting-hole locations onto the desk parts.
- Remove the legs and drill pilot holes. Replace the legs and drive #12 x 5/8" panhead screws.
13Make the Shelf and Door
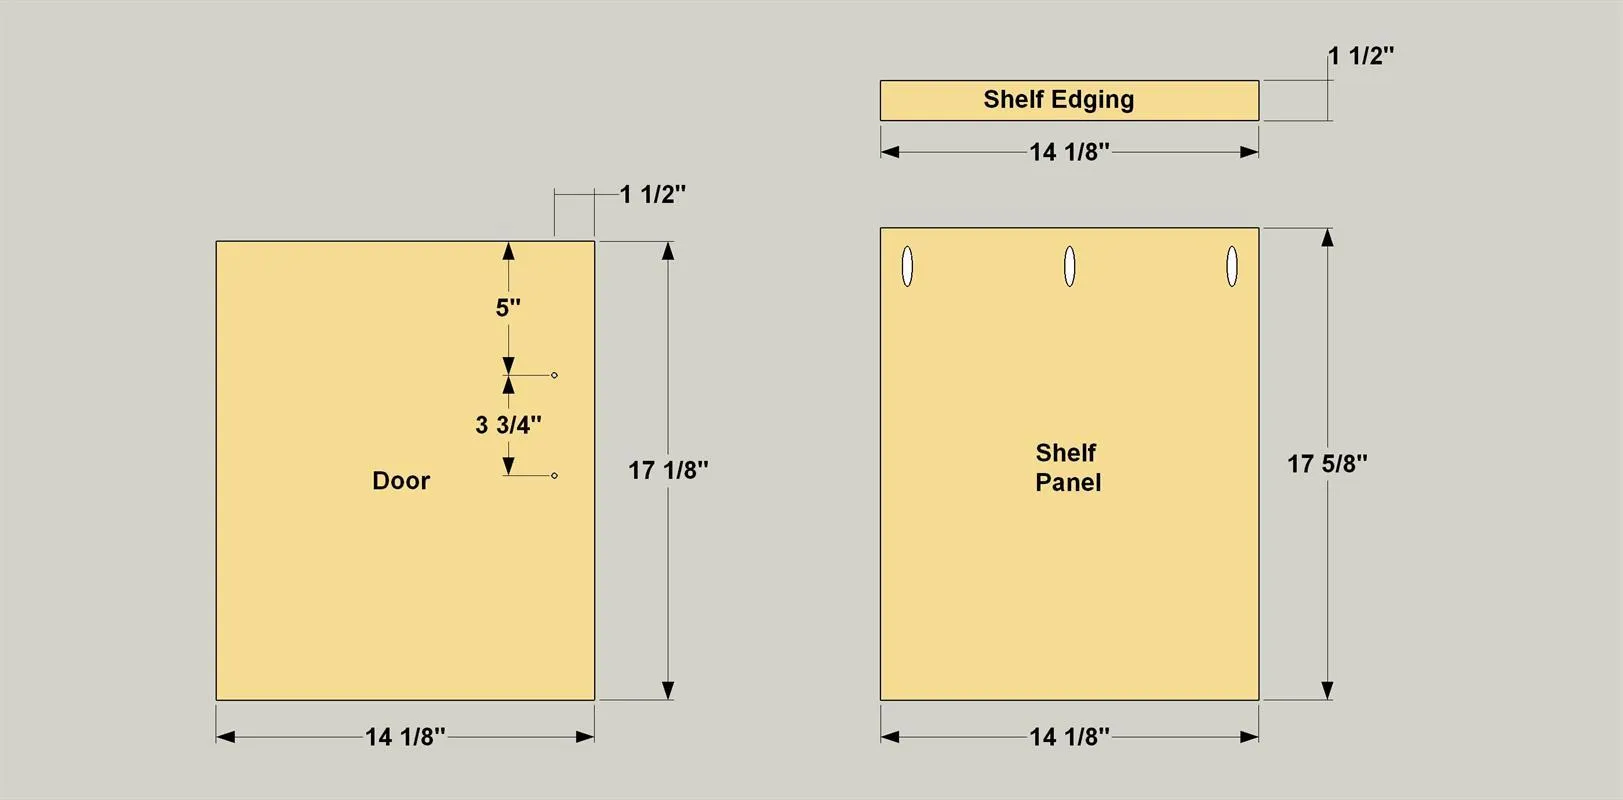
- Cut the Shelf Edging to length from a 1x2 maple board, as shown in the cutting diagram.
- Cut the Shelf Panel and Door to size from 3/4" maple plywood. With your pocket hole jig set for 3/4" material, drill pocket holes in the bottom face of the Shelf, as shown.
- Drill holes in the Door for mounting the pull. The dimensions on the drawing are for the 6" bar pull we used.
- Adjust the hole spacing for the pulls you choose.
- Apply iron-on birch veneer to the Door edges and trim the edging flush to the faces.
- Sand all of these parts.
14Hang the Door and Insert the Shelf
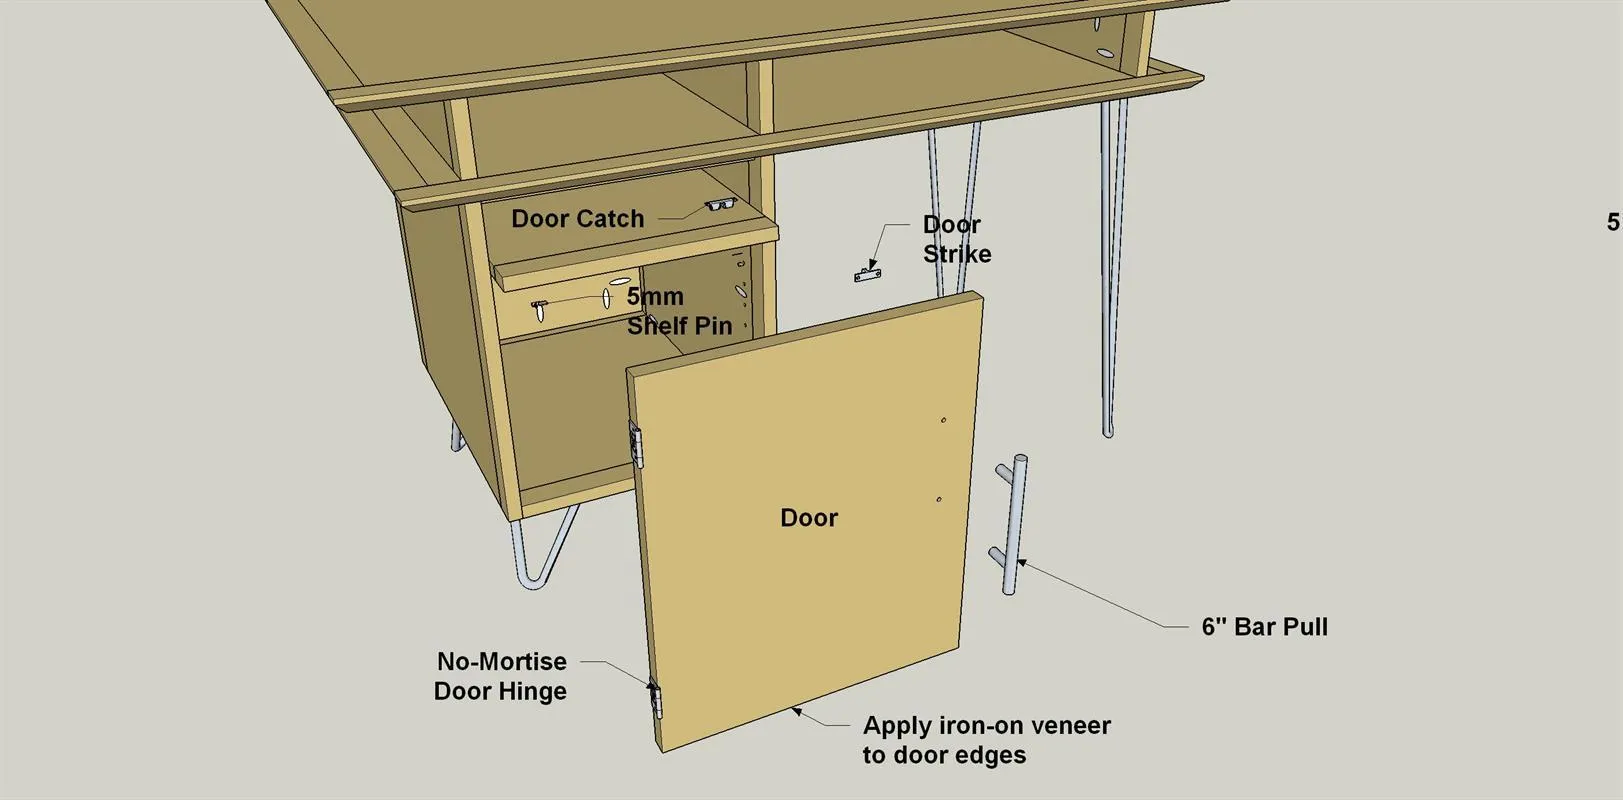
- Drill pilot holes and screw the no-mortise hinges to the left-hand Cabinet Side.
- Position the Door in the Cabinet opening, inserting shims to center it vertically in the opening.
- Mark the hinge positions on the edge of the Door.
- Remove the Door and the hinges.
- Position the hinges on the Door, mark hole locations, and drill pilot holes.
- Screw the hinges to the Door. Holding the Door in the open position, re-fasten the hinges to the Cabinet.
- Fasten the pull to the Door, the catch to the underside of the Cabinet Top, and the strike to the inside of the Door. Install shelf pins and the Shelf.
15Create the Drawer Parts
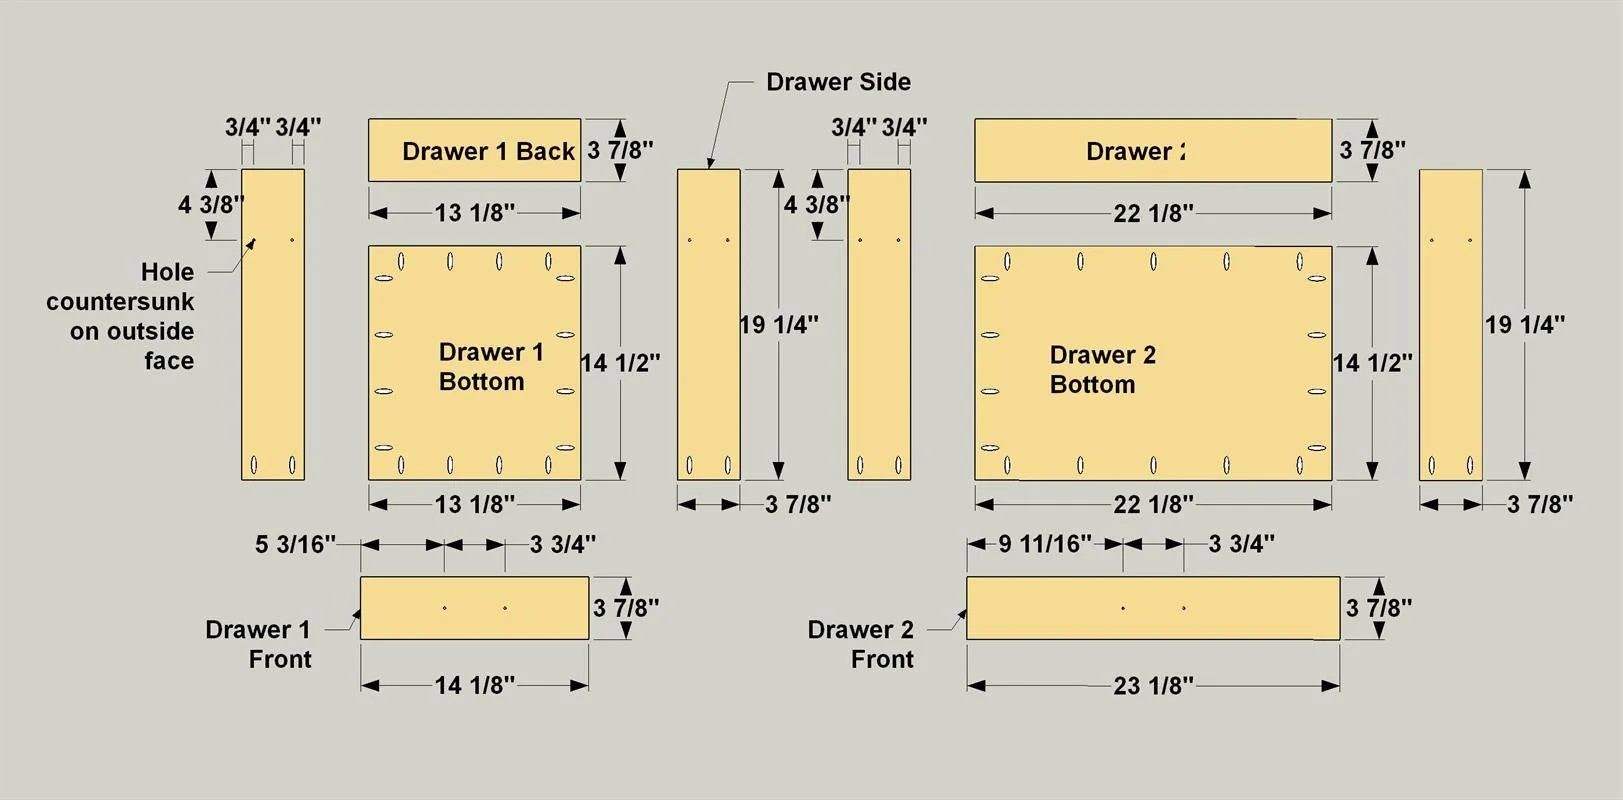
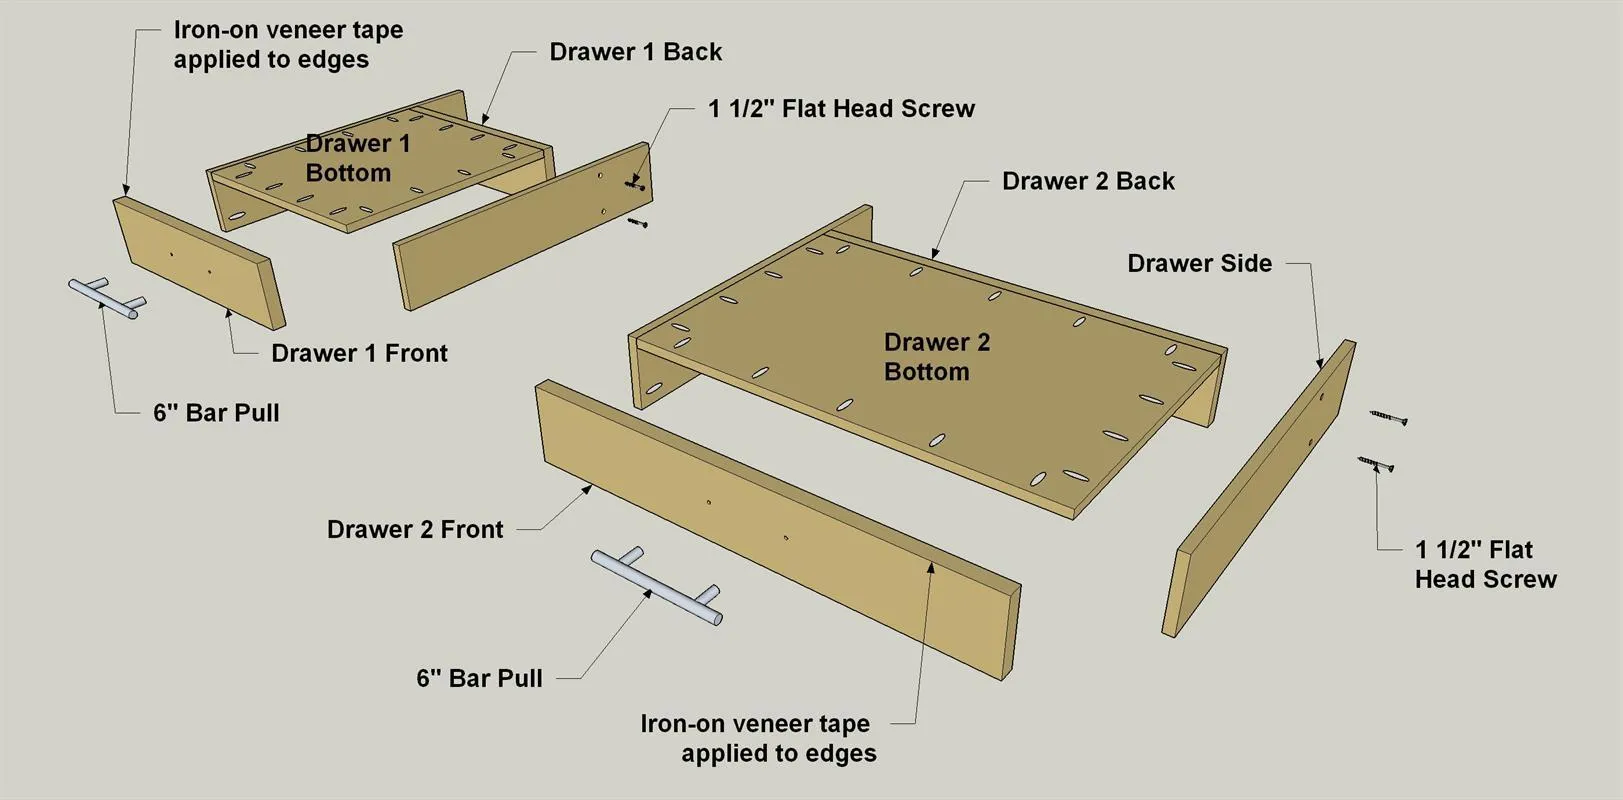
- Cut the Drawer 1 and Drawer 2 Fronts and Backs to size from 3/4" maple plywood.
- Cut the Drawer Sides and Drawer 1 and Drawer 2 Bottoms from 1/2" birch plywood. With your pocket hole jig set for ½” material and a Micro-Pocket drill guide block installed, drill pocket holes in the inside faces of the Drawer Sides and the bottom faces of the Drawer Bottoms where shown.
- Drill holes in the Drawer Sides for the #8 screws that fasten the Sides to the Backs, countersinking them on the outside faces (face opposite the pocket holes).
- Drill holes for the pulls in the Drawer 1 and Drawer 2 Fronts.
- Apply iron-on veneer to the edges of the Drawer Fronts edges and trim it flush to the faces.
- Sand the parts.
16Assemble the Drawers
- Clamp the Drawer Bottoms to the Drawer Backs with the ends and bottom edges flush. Drive 1" panhead pocket screws. In turn, clamp the Drawer sides to the Drawer Bottoms with the front ends and bottom edges flush. Drive 1" panhead pocket-hole screws. Using the countersunk holes in the Drawer Sides as guides, drill pilot holes into the Drawer Backs and drive #8 x 1 1/2" flathead wood screws.
- Clamp the Bottom/Back/Sides Assemblies to the Drawer Fronts with the ends and bottom edges flush and drive 1" panhead pocket-hole screws.
- Attach the pulls and slide the Drawers into the desk.
17Finishing and Final Assembly
- Remove the Drawers, Door, Shelf, and all hardware. Inspect all parts and assemblies and finish-sand where needed. Lightly “ease” all of the sharp corners with fine sandpaper.
- Apply a clear finish of your choice following the instructions on the can. With the finish is dry, reassemble the desk.
Tags
- Desks
- Advanced
Reviews & builds
No reviews yet
Sign in to review this plan or share your build.
No reviews yet. Be the first to build this.