 Notch
Laundry Hamper Bench
Step-by-step build — 15 steps. Also available as a print sheet.
1Step 1
Start by building two of the frames that are pictured! They will be your front and back frames, you will attach the legs to the top and bottom rails! The black ovals in the picture indicate pocket holes...the pocket holes in this step will be drilled at 1 1/2" depth and 2 1/2" screws along with glue will be used to attach!

2Step 2
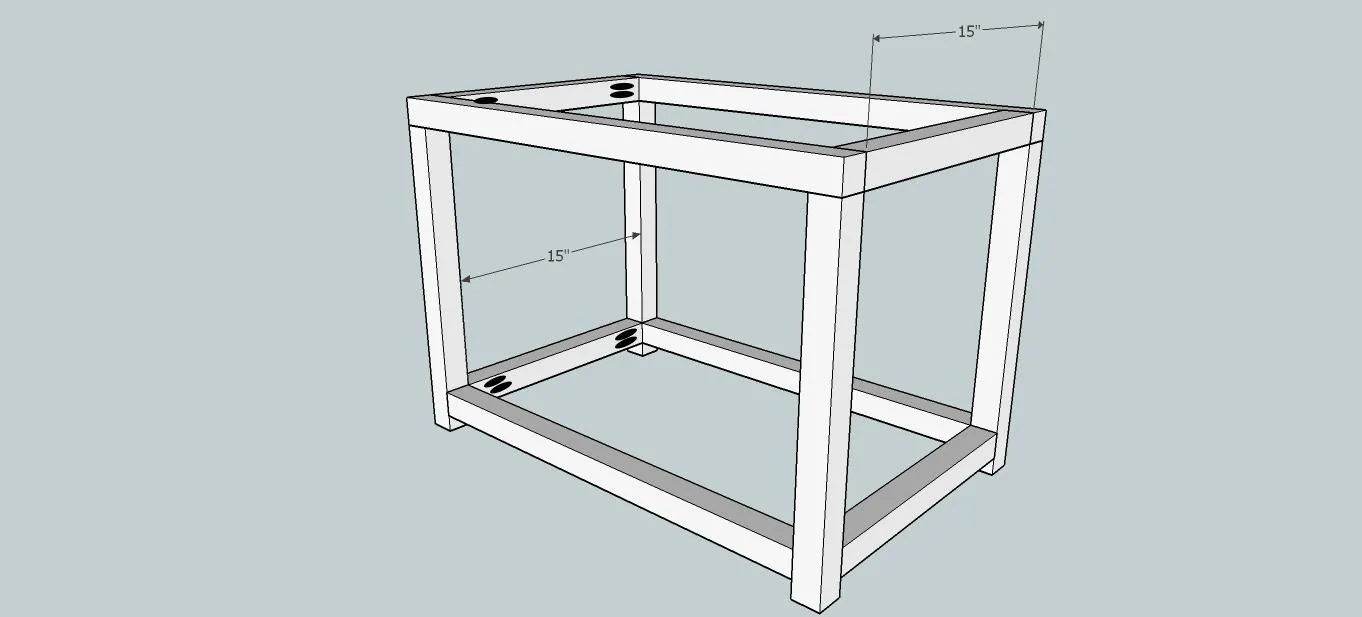
Attach the front and back frames with your side rails! You will again use 1 1/2" pocket holes with 2 1/2" pocket hole screws...and some wood glue!!
3Step 3
Cut your plywood sides down to size and pocket hole them in place! Using 1/2" holes drilled all around the piece of plywood, attach using 1" pocket hole screws! I set my plywood sides back 1/4", which helps the 1x2 drawer slide supports stay flush to the inside(they will be attached in the next step)!

4Step 4
Attach drawer slide guide, you can pocket hole this to the 2x2s or just glue and screw it into the plywood sides! This needs to be flush with the 2x2s so the drawer slides can be screwed in later!

5Step 5
Next, you will attach your plywood bench seat, again using 1/2" pocket holes drilled all the way around the piece of plywood and 1" pocket hole screws!

6Step 6
Attach top bench supports! I would pocket hole both of these boards as they will be helping support the top plywood, since we went a little thin with the 1/2" plywood...it should hold a lot of weight, but just in case, we will play it safe!! Use 3/4" pocket holes and 1 1/4" pocket hole screws...and of course glue!

7Step 7
Putting a few decorative touches on already, we will attach the top bench rails! I just used a lot of glue and 2" brad nails to attach, as these pieces are merely aesthetic and not structural at all!!

8Step 8
Time to build the drawer box! NOTE: you will want to measure your actual space before building the drawer box! I usually attach my drawer slides to the inside of my piece and then measure in between them to get the best measurement for the drawer! Attach the front and back drawer box pieces to the inside of the drawer box sides!! If you put the front pocket holes to the front and the back pocket holes to the back of the drawer you will never even know that the drawer was pocket holed!! Woohoo!!

9Step 9
Attach the bottom of the drawer to the drawer box! I just used 1/4" plywood, glued and brad nailed to the bottom, but if you are afraid of it not being sturdy enough, you can always use 1/2" plywood...you will just need to purchase more than a 1/2" sheet of 1/2" plywood!!

10Step 10
Cut your drawer front plywood and get ready to doctor it with lattice in the next step!!

11Step 11
Attach lattice strips to the drawer front using glue and 5/8" brad nails! I do this before I attach the drawer front to the drawer, but as far as i can tell, I only do it for preference...it doesn't have to be done in this exact order!!

12Step 12
Attach the drawer front to the drawer box! I used glue and brad nails from the inside!

13Step 13
Place the drawer in the bench and jump up and down if it works!! ;) Last we will add some finishing touches to the bench! I just glued and brad nailed the trim on! The top is simply 1x2s mitered at 45 degrees off square and the bottom are 1x3s done the same way! The side pieces on both the top and bottom do not have both ends cut at 45 degrees, they are just a regular old 90 at the back of the bench!

14Step 14
Woohoo!! It is complete!! I added some really small molding that I found at Home Depot to the inside of the drawer lattice, and along the bottom, right on top of the 1x3s! I really love how it turned out!!

15Step 15
In case anyone is interested in the laundry basket that fits quite well in the bench, I used the Rubberaid Flex N' Carry, perfect fit and so easy for my kiddos to handle taking to the laundry room for me!! #winning ;)
