 Notch
Notch- Difficulty
- Intermediate
- Time
- 12.3–24 hours
- Cost
- $$$
About this build
Organize your pocket-hole joinery with this rolling work center. It holds a Kreg Jig® on top, and there’s an optional fence system for the Kreg Jig K4. Plus, it has a drill holster, optional holders for Kreg cutting accessories, and storage shelves that hold a System Organizer and Screw Organizers.
Tools
Essential
- Circular Saw
- Drill / Driver
- Miter Saw
- Pocket Hole Jig
- Random Orbit Sander
Optional / nice to have
- Bar / Pipe Clamps
- Tape Measure
Materials
| Item | Qty |
|---|---|
| Plywood, 3/4" x 48" x 96" | 1 board |
| Plywood, 3/4" x 48" x 48" | 1 board |
| Hardboard, 1/4" x 24" x 24" | 1 board |
| Board, 1x4 x 48" | 1 board |
| Board, 1x4 x 72" | 1 board |
| Board, 1x3 x 48" | 3 board |
| 100-count package of 1 1/4" coarse-thread Kreg Pocket-Hole Screws | 2 each |
| #10 x 3/4" pan-head wood screws | 16 each |
| 1 1/4" flat-head wood screws | 4 each |
| 1 1/2" flat-head wood screws | 16 each |
| 2" flat-head wood screws | 4 each |
| Wood glue | 1 each |
| 3" double-locking swivel casters | 4 each |
Overall cost: $$$. Lumber prices vary by region, species, and season, so we give a band rather than a figure we would only be pretending to know.
Cut list
| Part | Qty | T × W × L |
|---|---|---|
| Divider | 1 | 3/4" × 20" × 30" |
| Back Side | 1 | 3/4" × 14" × 30" |
| Short Back Side | 1 | 3/4" × 10" × 14" |
| Top | 1 | 3/4" × 20" × 30" |
| Back Shelf | 3 | 3/4" × 14" × 18" |
| Side Shelf | 1 | 3/4" × 14" × 19" |
| Back | 1 | 3/4" × 19" × 19" |
| Front Side | 2 | 3/4" × 12" × 30" |
| Front Shelf | 3 | 3/4" × 12" × 18" |
| Bottom | 1 | 3/4" × 20" × 28" |
| Fence | 4 | 3/4" × 3" × 23" |
| Fence Guide | 2 | 1/4" × 5" × 8" |
| Fence Guide Cleat | 2 | 3/4" × 2" × 8" |
| Fence Guide Spacer | 2 | 1/4" × 2" × 8" |
| Back Guide Cleat | 2 | 3/4" × 3" × 8" |
| Back Guide Spacer | 2 | 1/4" × 3" × 8" |
| Fence Storage Stop | 1 | 3/4" × 2" × 7" |
| Fence Storage Side | 2 | 3/4" × 2" × 6" |
| Fence Storage Bottom | 1 | 3/4" × 2" × 9" |
| Drill Holster Arm | 1 | 3/4" × 2" × 10" |
| Drill Holster Spacer | 2 | 3/4" × 2" × 2" |
| Drill Holster Side | 1 | 3/4" × 2" × 3" |
| Hanger Cleat | 2 | 3/4" × 2" × 2" |
| Hanger Cleat Spacer | 2 | 3/4" × 1" × 2" |
| Slot Side | 2 | 3/4" × 2" × 23" |
| Slot Guide | 2 | 3/4" × 2" × 5" |
| Slot Bottom | 1 | 3/4" × 2" × 5" |
What to buy
Buy 15 boards at 8 ft.
3/4" × 20"
1 board
3/4" × 19"
1 board
3/4" × 14"
2 boards
3/4" × 12"
2 boards
3/4" × 10"
1 board
3/4" × 3"
2 boards
3/4" × 2"
2 boards
3/4" × 1"
1 board
1/4" × 5"
1 board
1/4" × 3"
1 board
1/4" × 2"
1 board
Assumes 8 ft stock, a 1/8" saw kerf, and buying each part at its own width. Change the board size or kerf on the full board plan →
Instructions
1Start with the Back Parts
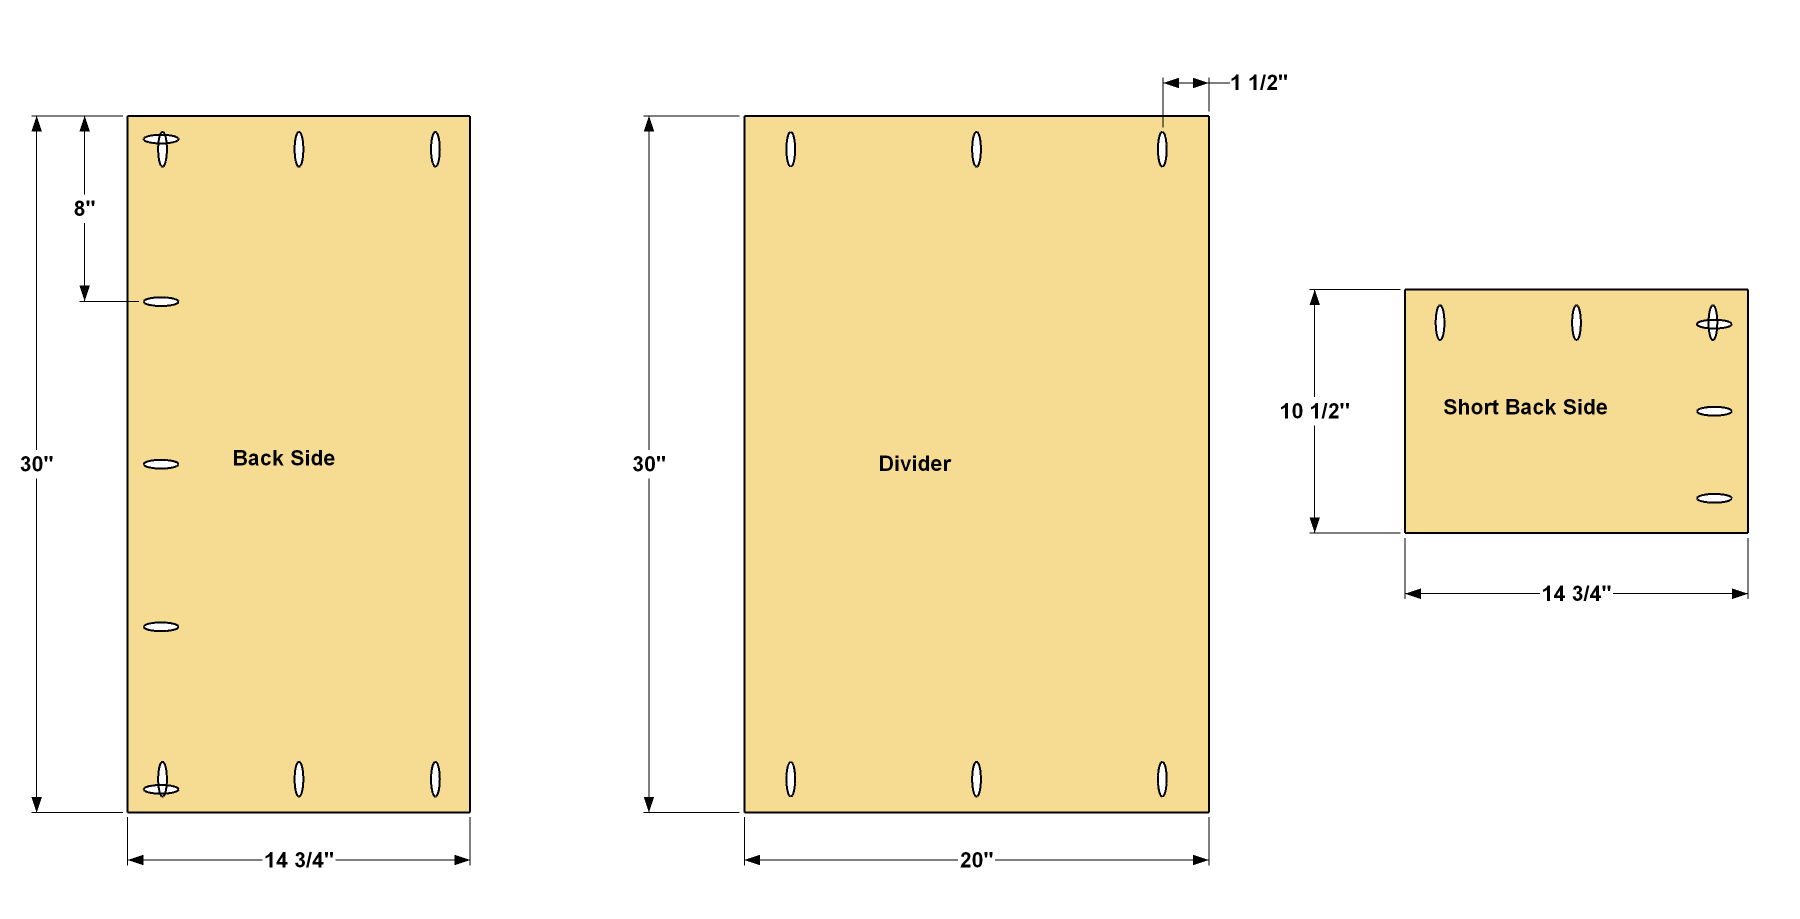
Cut the Divider, the Back Side and the Short Back Side to size from 3/4" plywood, as shown in the cutting diagram. We chose sanded pine plywood for this project. After cutting the parts, set your Kreg® Pocket-Hole Jig for 3/4"-thick material, and then drill pocket holes on the Back Side and Short Back Side at the locations shown.
2Assemble the Divider and Back Sides
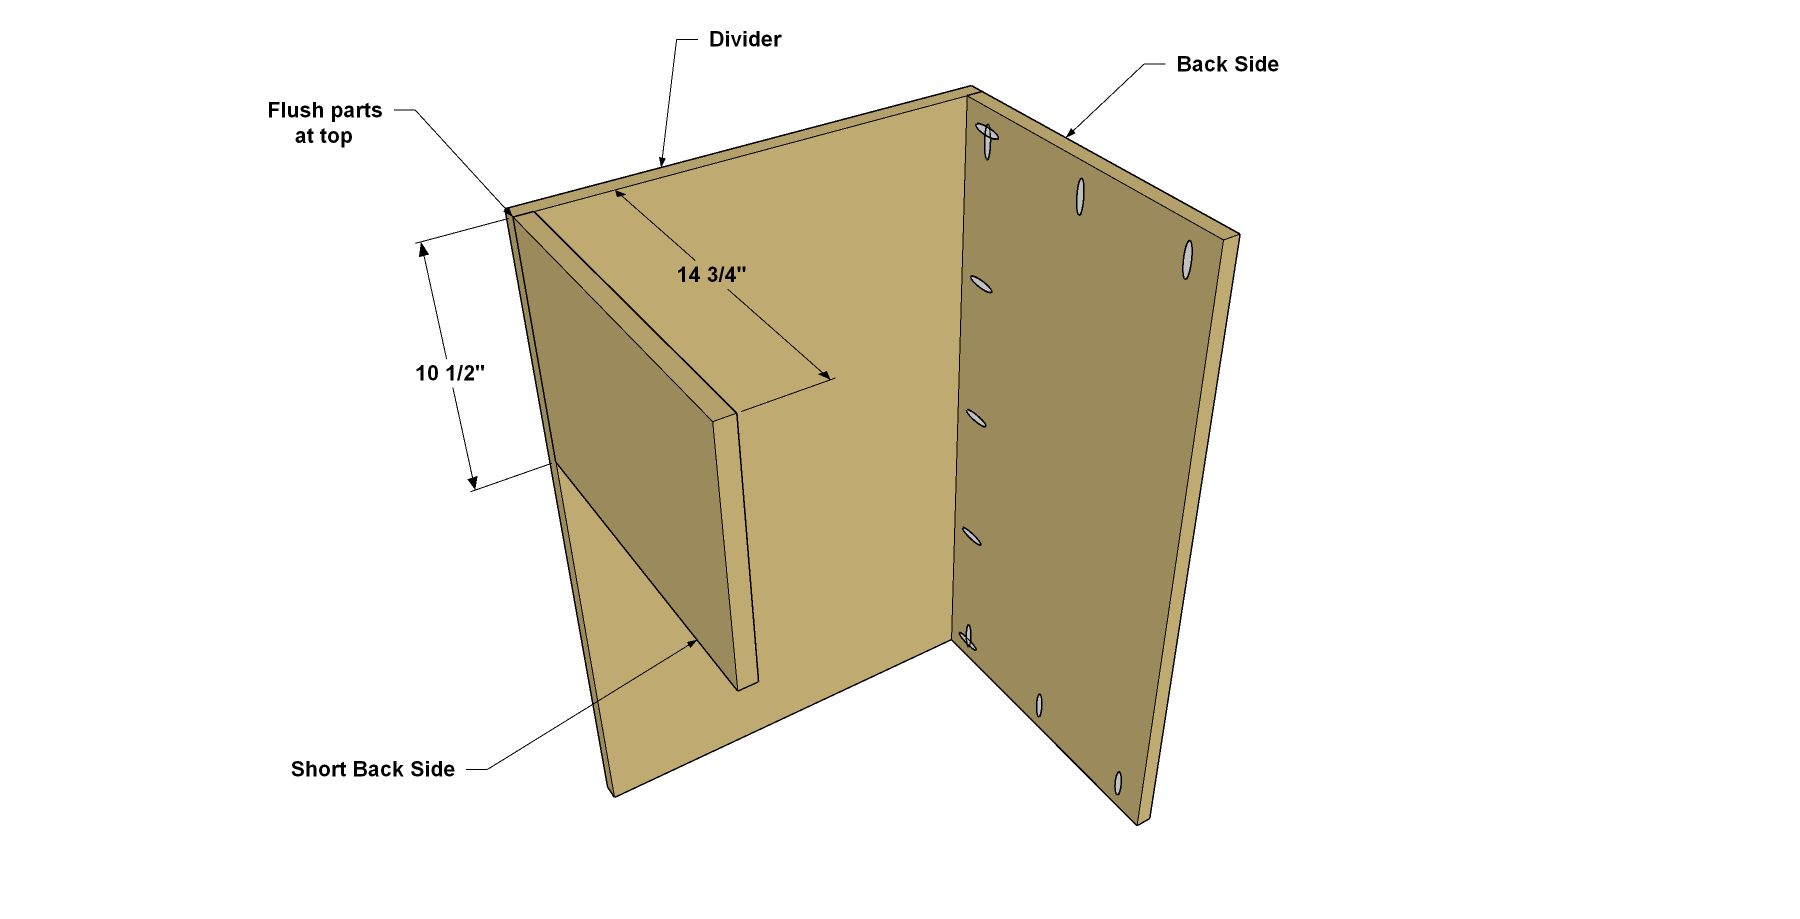
- Position the Back Side on the face of the Divider that does NOT have pocket holes, as shown, so that the Divider sits flush with one edge of the Divider and the ends of the parts are flush. Secure the Back Side using 1 1/4" coarse-thread pocket-hole screws as shown.
- Next, position the Short Back Side flush with the other edge of the Divider, and even with the upper end, as shown. Secure the Back Side using 1 1/4" coarse-thread Kreg Pocket-Hole Screws.
3Cut the Top Panel
Cut the Top to size from 3/4" sanded pine plywood as shown in the cut list.
4Make the Back Shelves
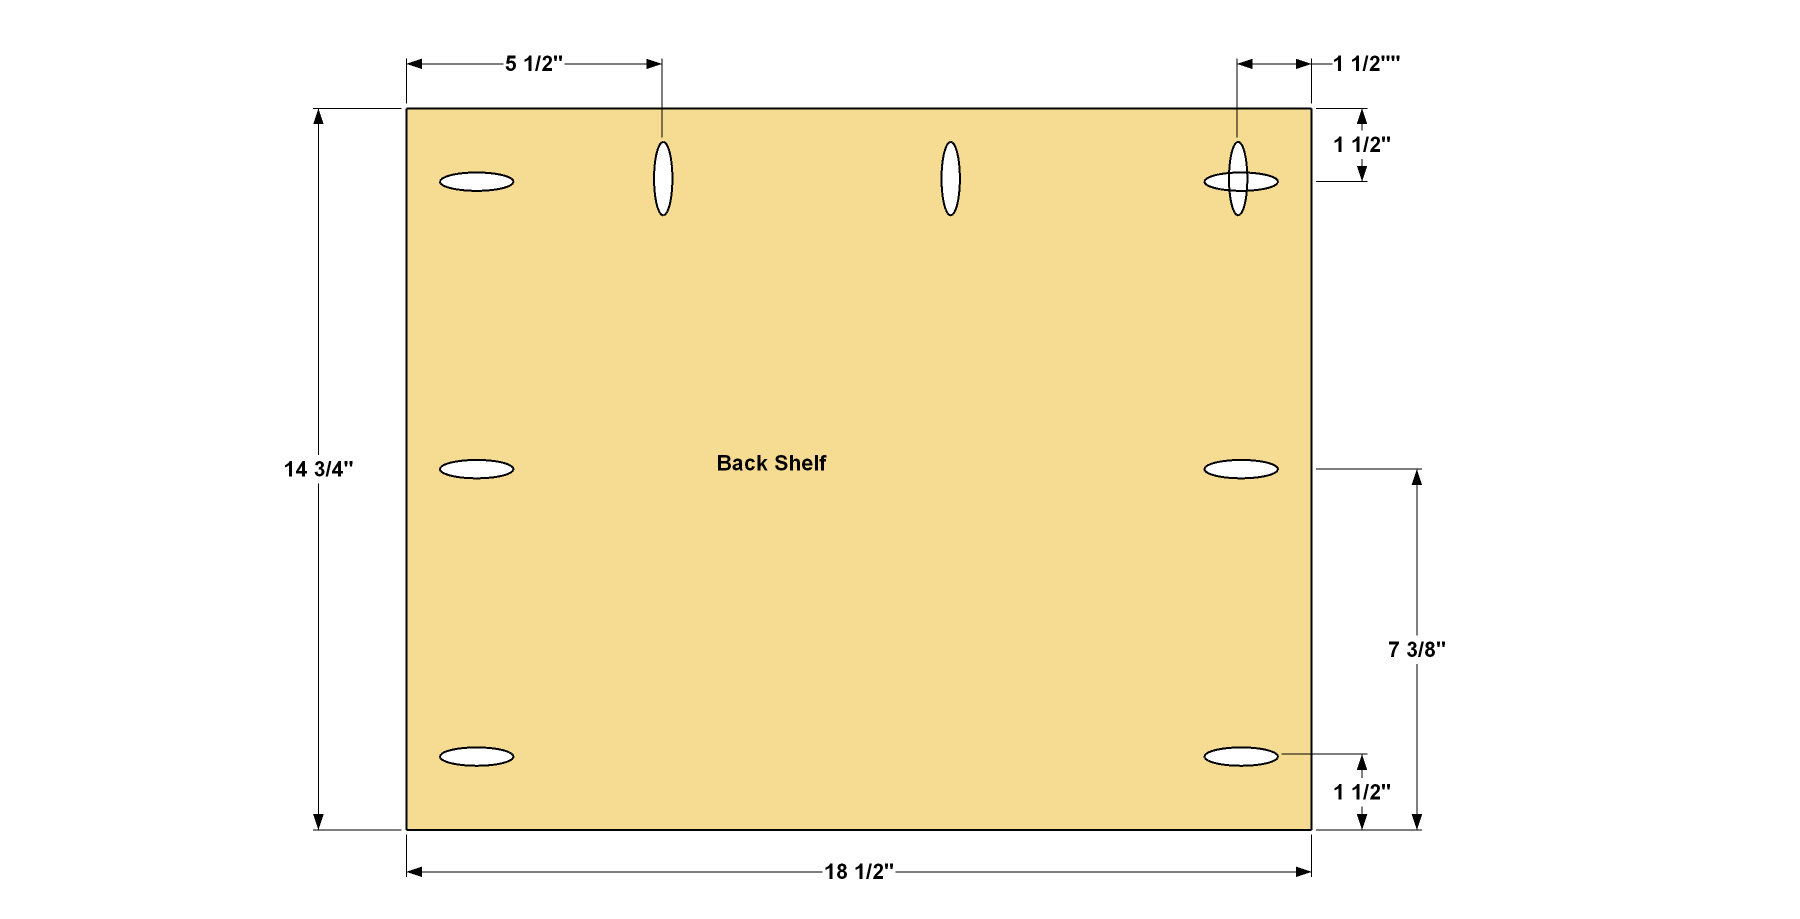
Cut three Back Shelves to size from 3/4" plywood, as shown in the cutting diagram. Drill pocket holes in each of the shelves at the locations shown.
5Install the Top and Back Shelves
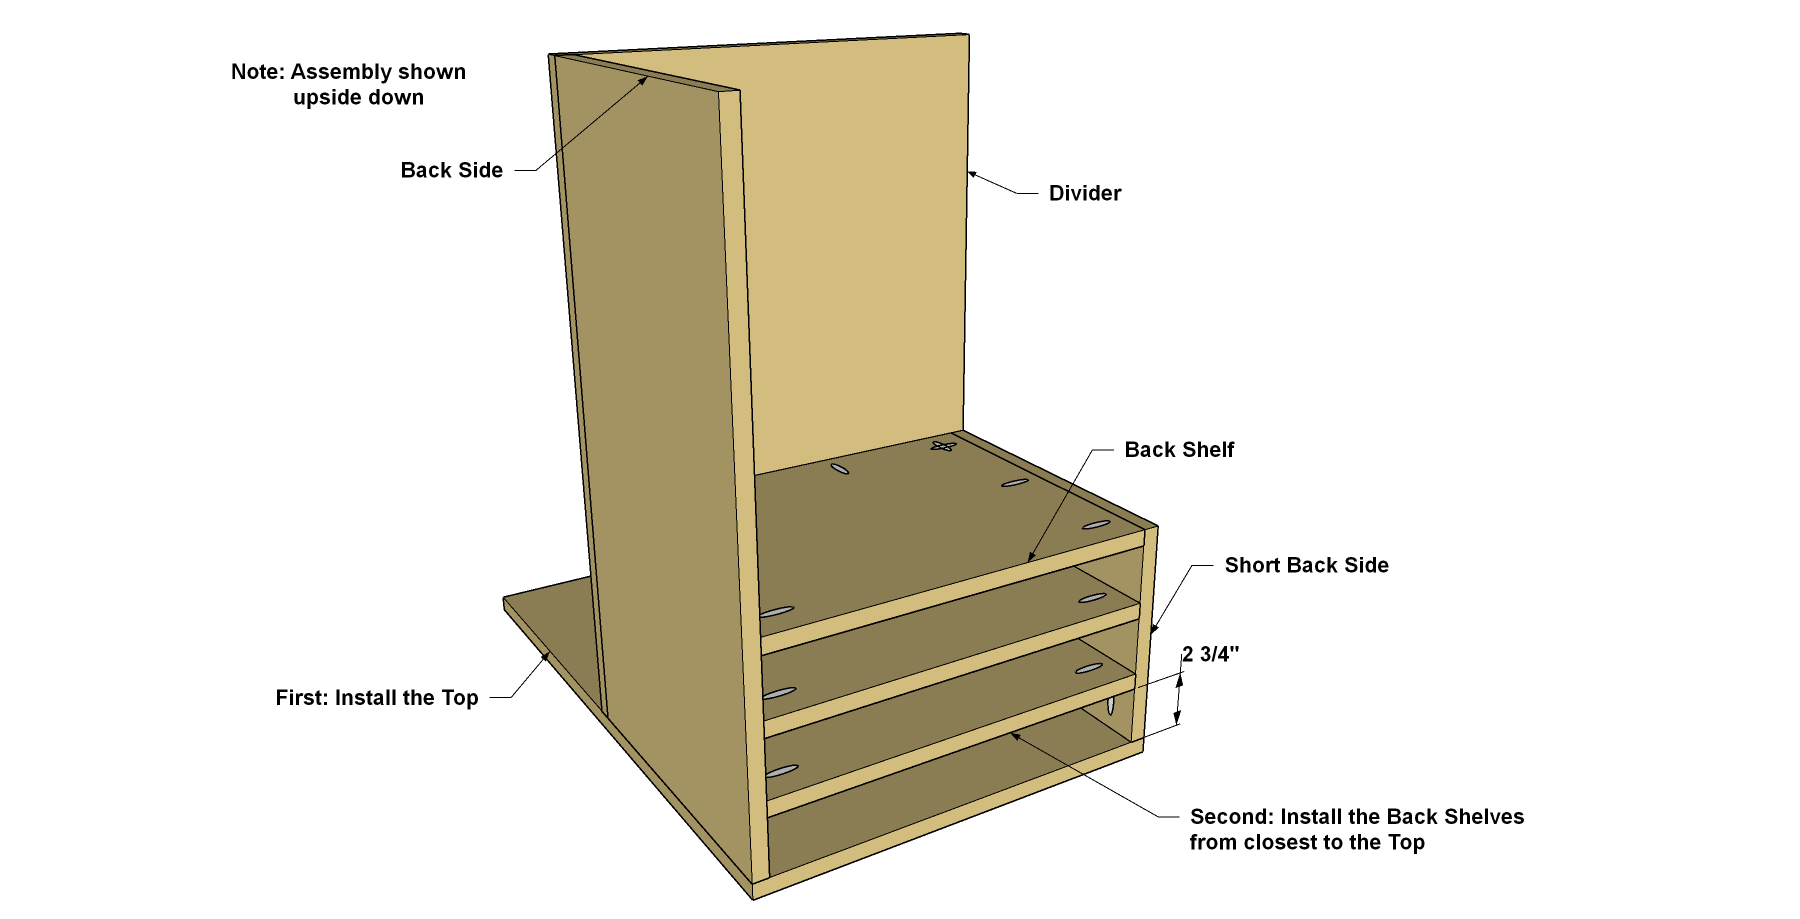
- To access the pocket holes easily, follow this assembly sequence for the Top and Back Shelves.
- Lay the Top facedown, and then set the back/divider assembly on it so the edges of the Top sit flush, and the assembly is aligned with the end of the Top, as shown.
- Now attach it to the Back Side, the Short Back Side, and the Divider to the Top using 1 1/4" coarse-thread Kreg Pocket-Hole Screws.
- Next, position the first Back Shelf closest to the Top, as shown, and secure it with 1 1/4" coarse-thread Kreg Pocket-Hole Screws.
6Make the Side Shelf
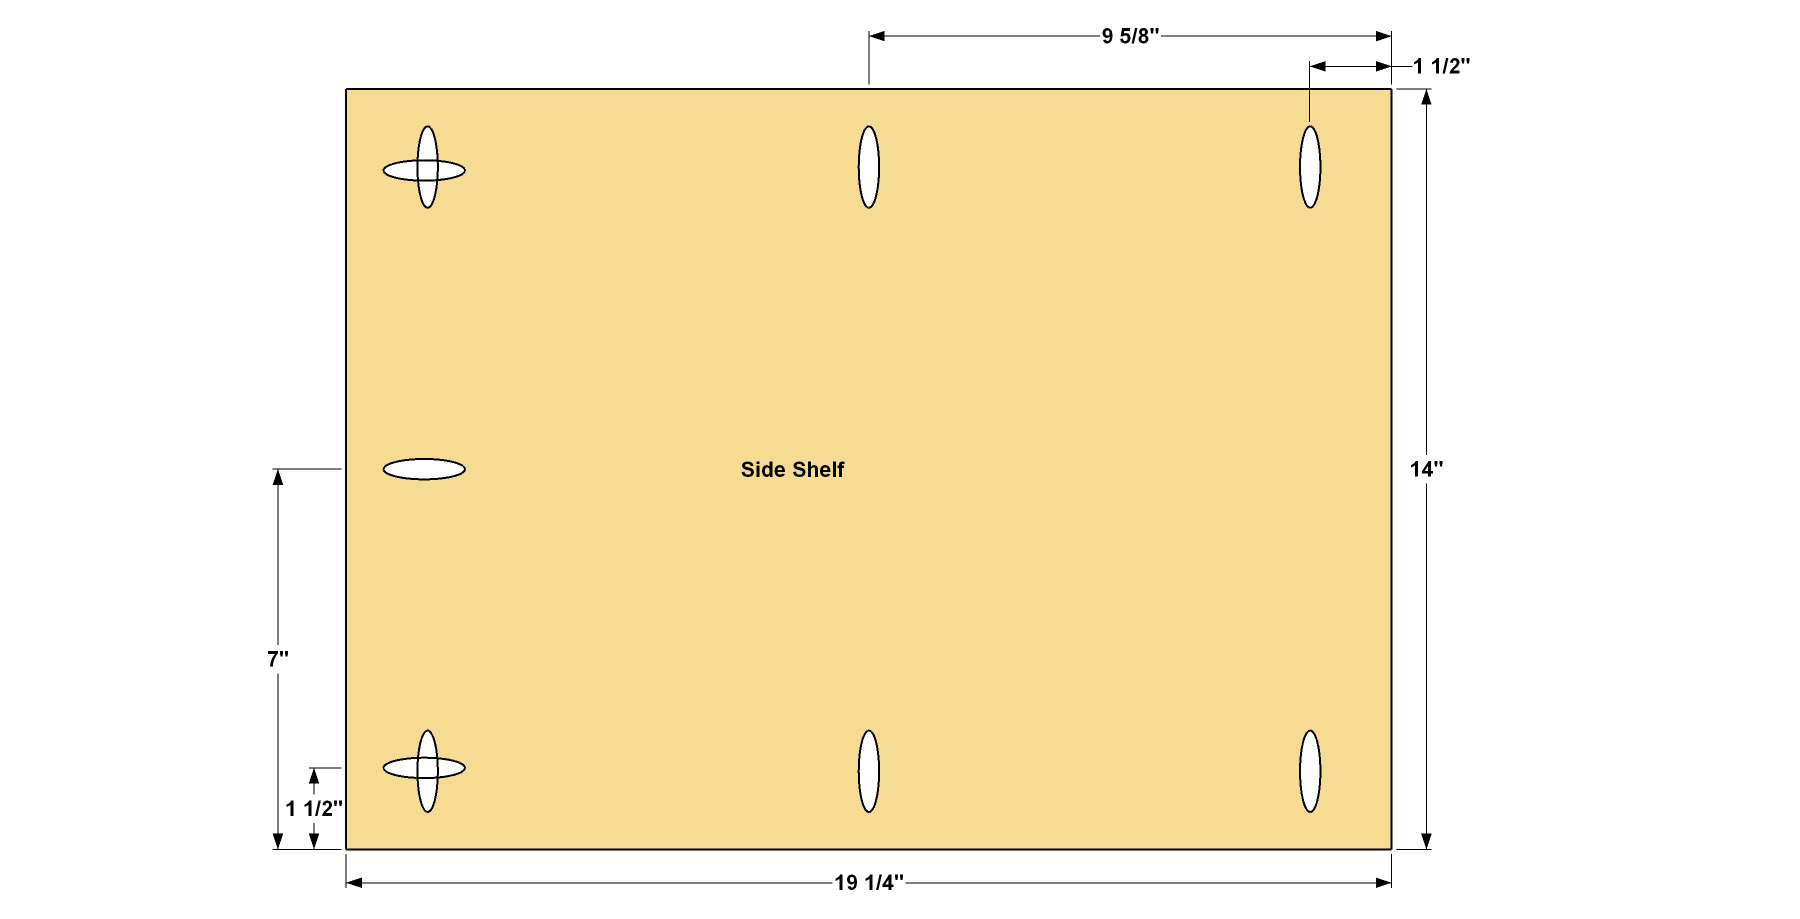
Now, cut a single Side Shelf to size from 3/4" plywood, and then drill pocket holes where shown.
7Install the Side Shelf
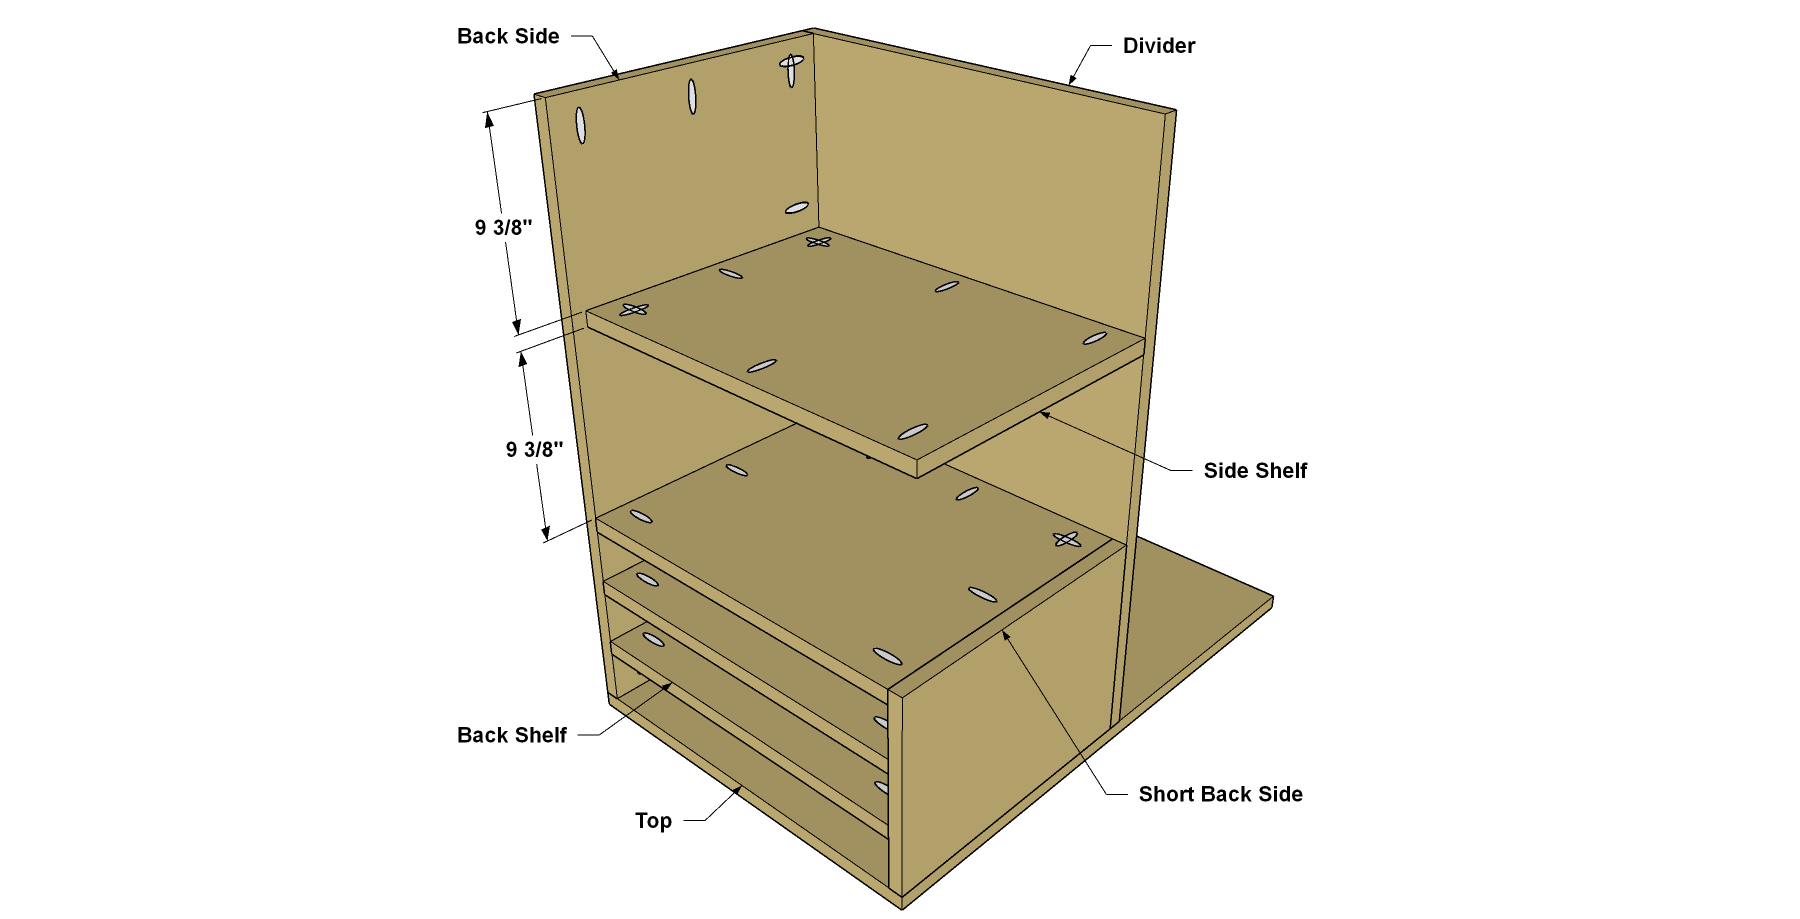
At the location shown, secure the Side Shelf to the Back Side and the Divider using 1 1/4" coarse-thread Kreg Pocket-Hole Screws. Note that there will be a 3/4" gap on one edge of the Side Shelf. That allows space to install the Back, which you’ll make next.
8Make the Back
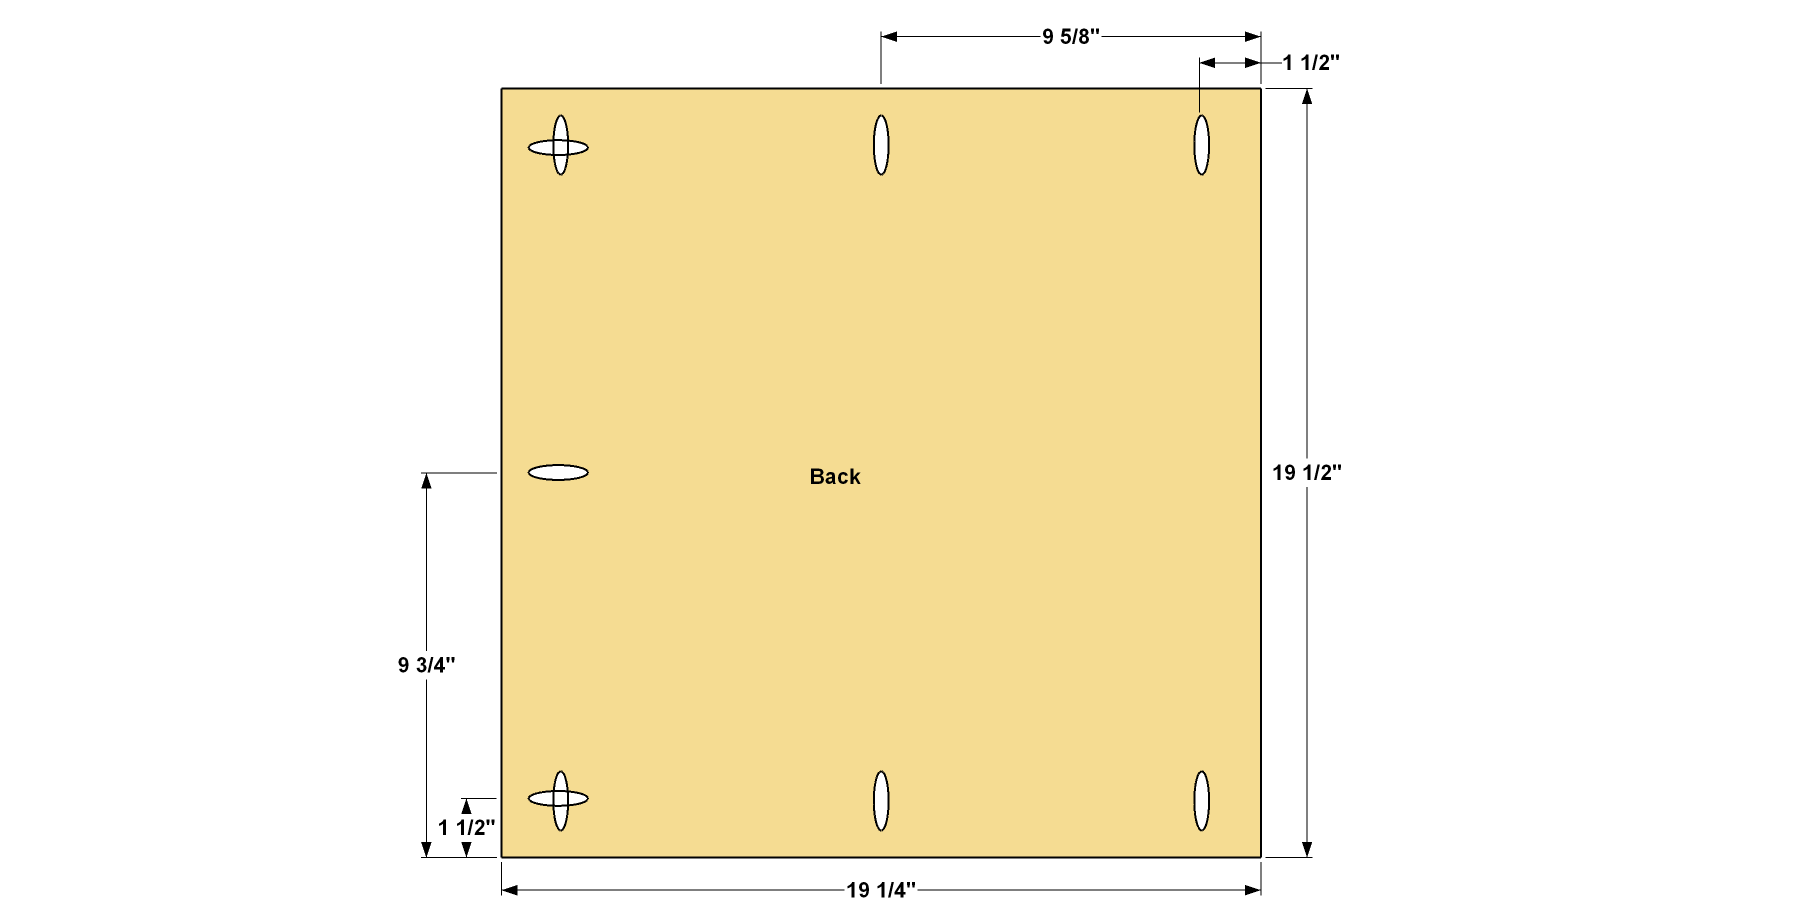
Cut the Back to size from 3/4" plywood, as shown in the cutting diagram. Drill pocket holes where shown.
9Attach the Back
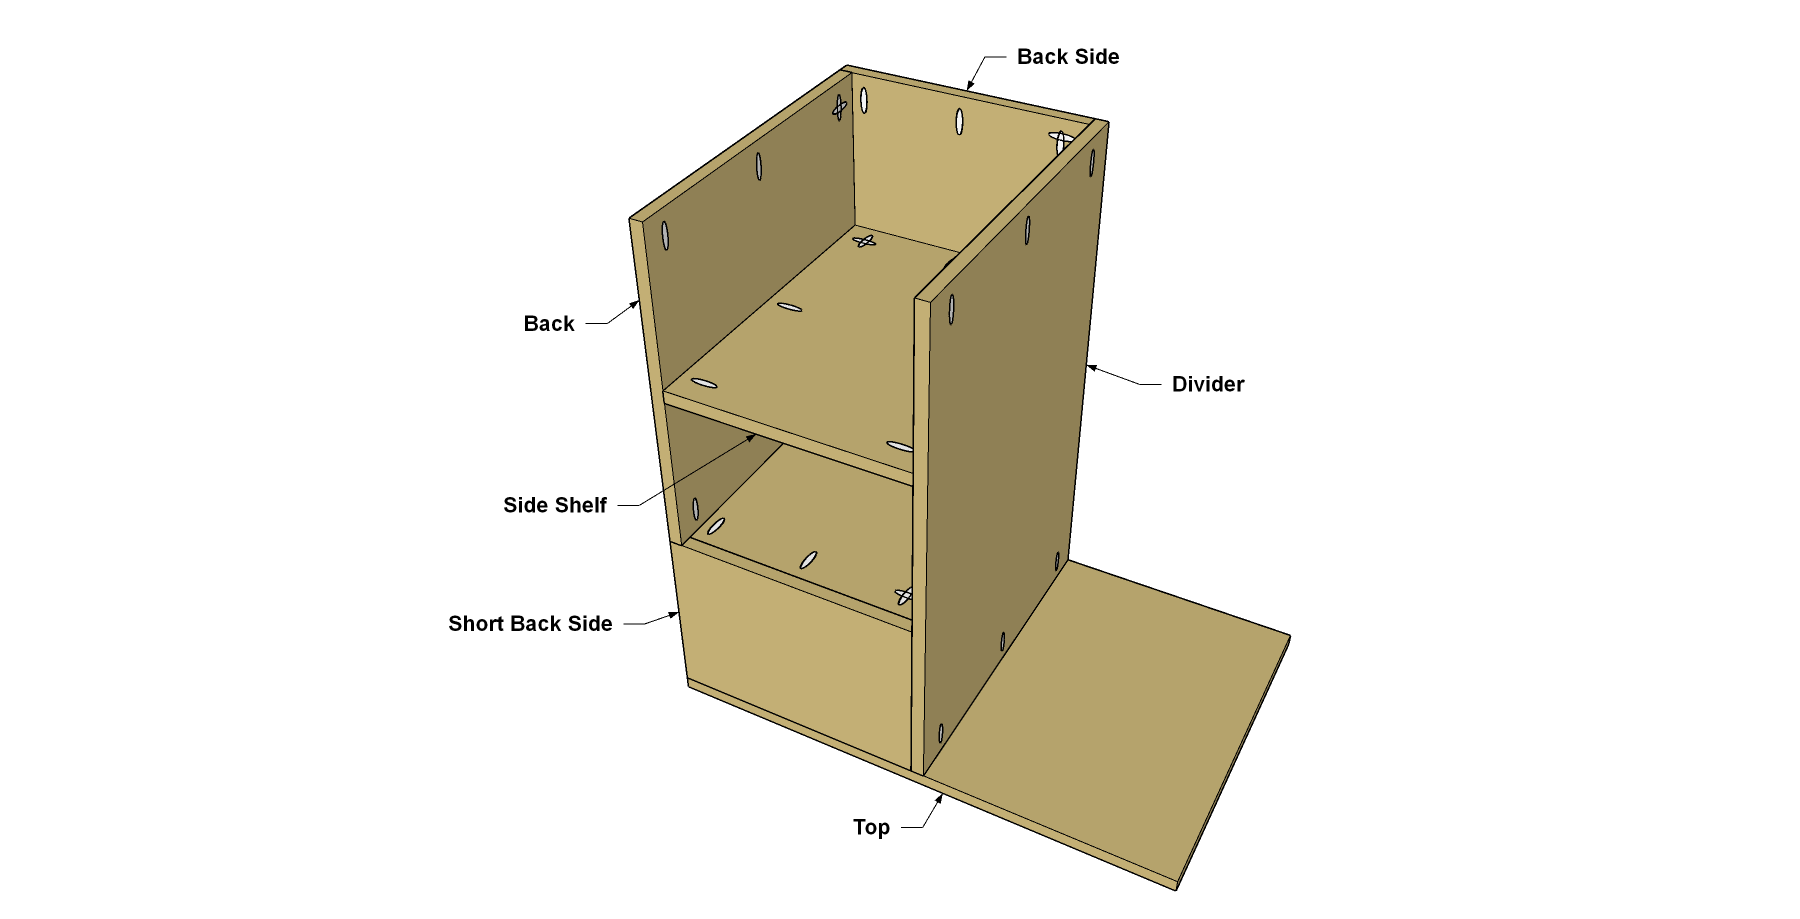
At the location shown, secure the Back to the Side Shelf, the Back Side and to the lowest Back Shelf using 1 1/4" coarse-thread Kreg Pocket-Hole Screws.
10Make the Front Sides
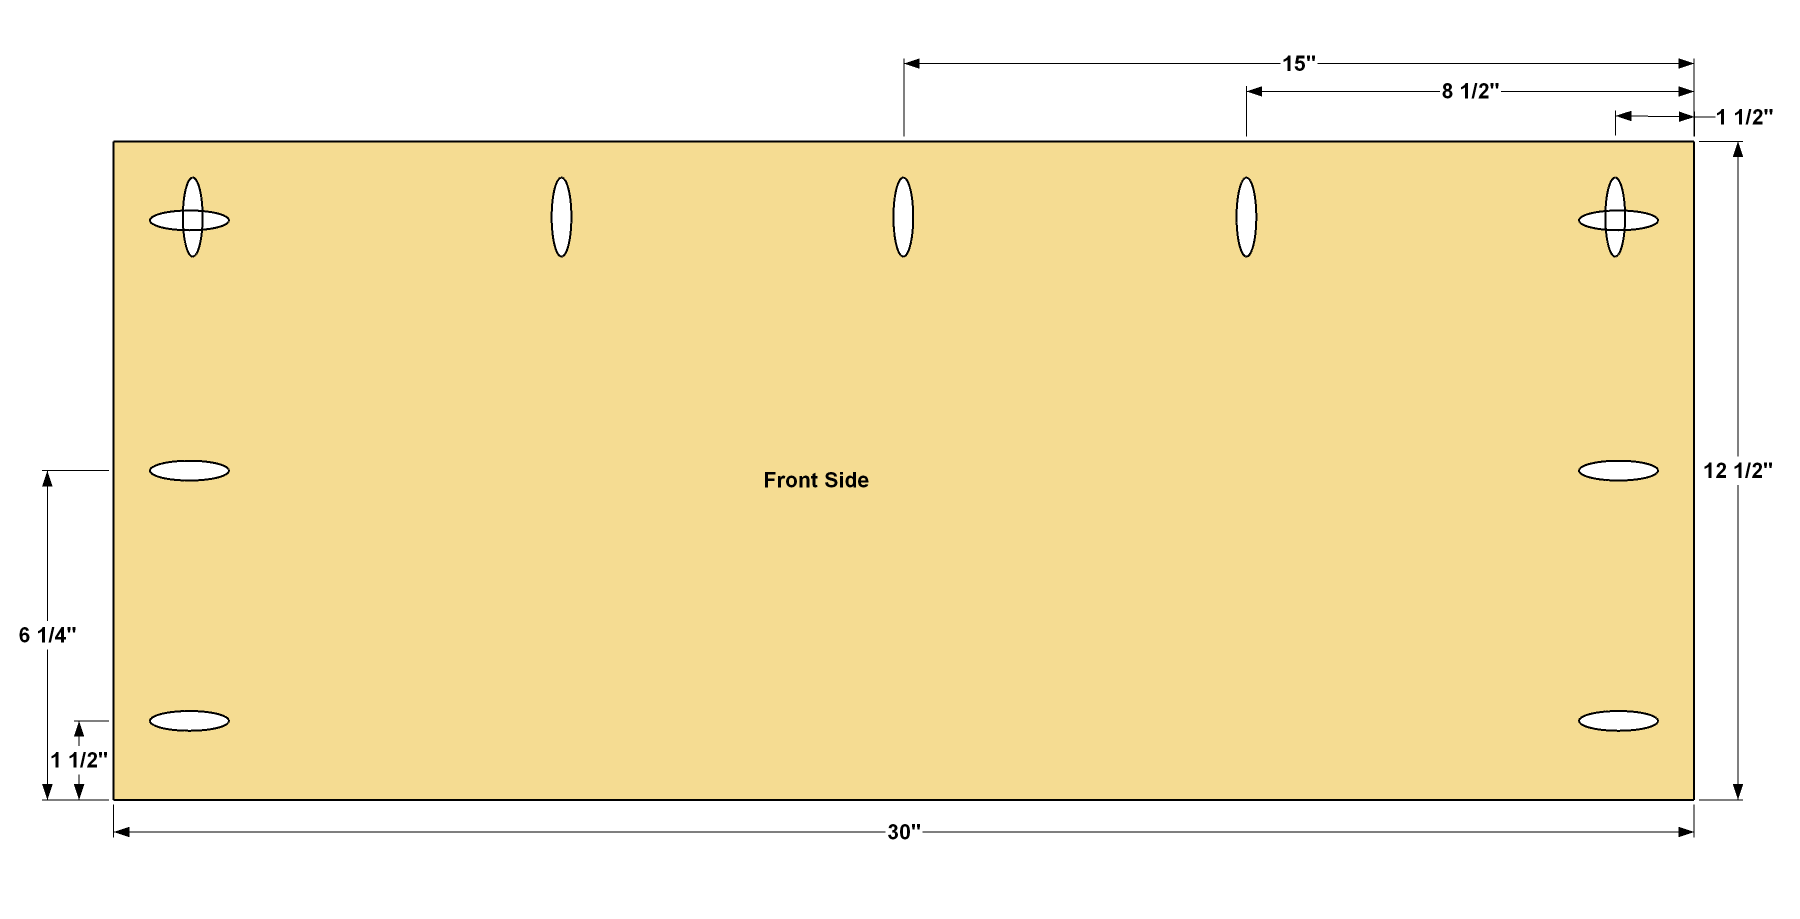
Cut two Front Sides to size from 3/4" plywood, as shown in the cutting diagram. Drill pocket holes at the locations shown.
11Attach the Front Sides
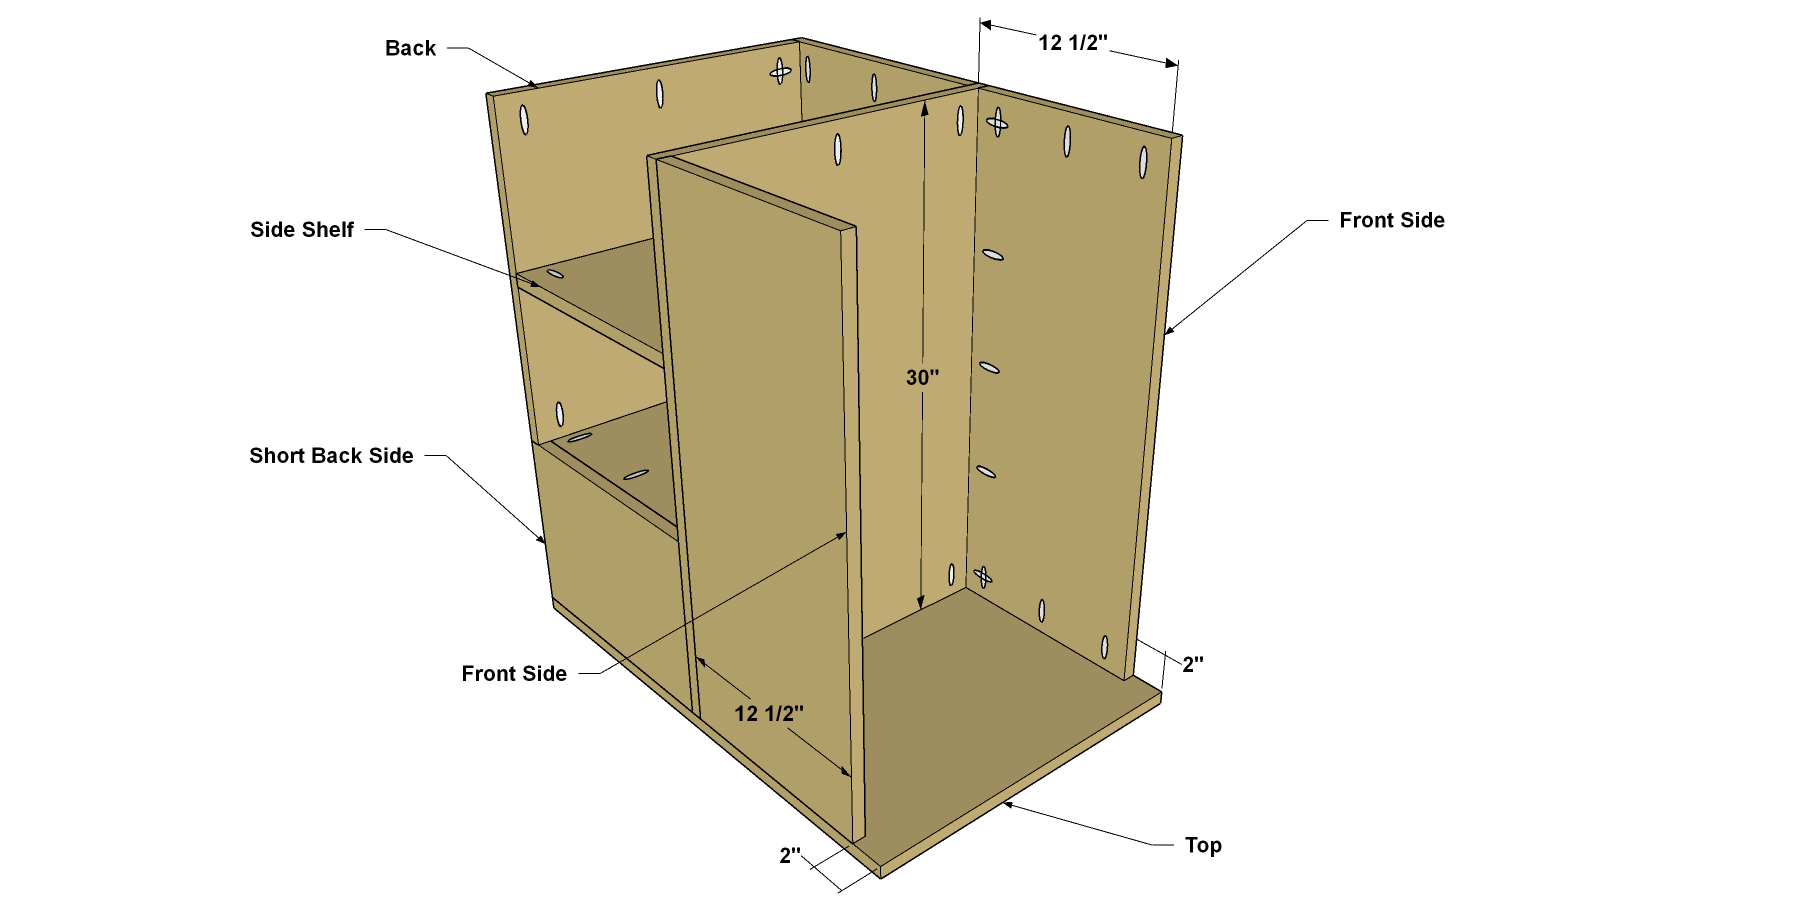
Set the Front Sides in place and screw them to the Divider and Top panels using 1 1/4" coarse-thread Kreg Pocket-Hole Screws.
12Make a Bottom and Front Shelves
- Cut the Bottom to size from 3/4" sanded pine plywood as shown in the cultist.
- Next, cut three Front Shelves to size from the same material, as shown.
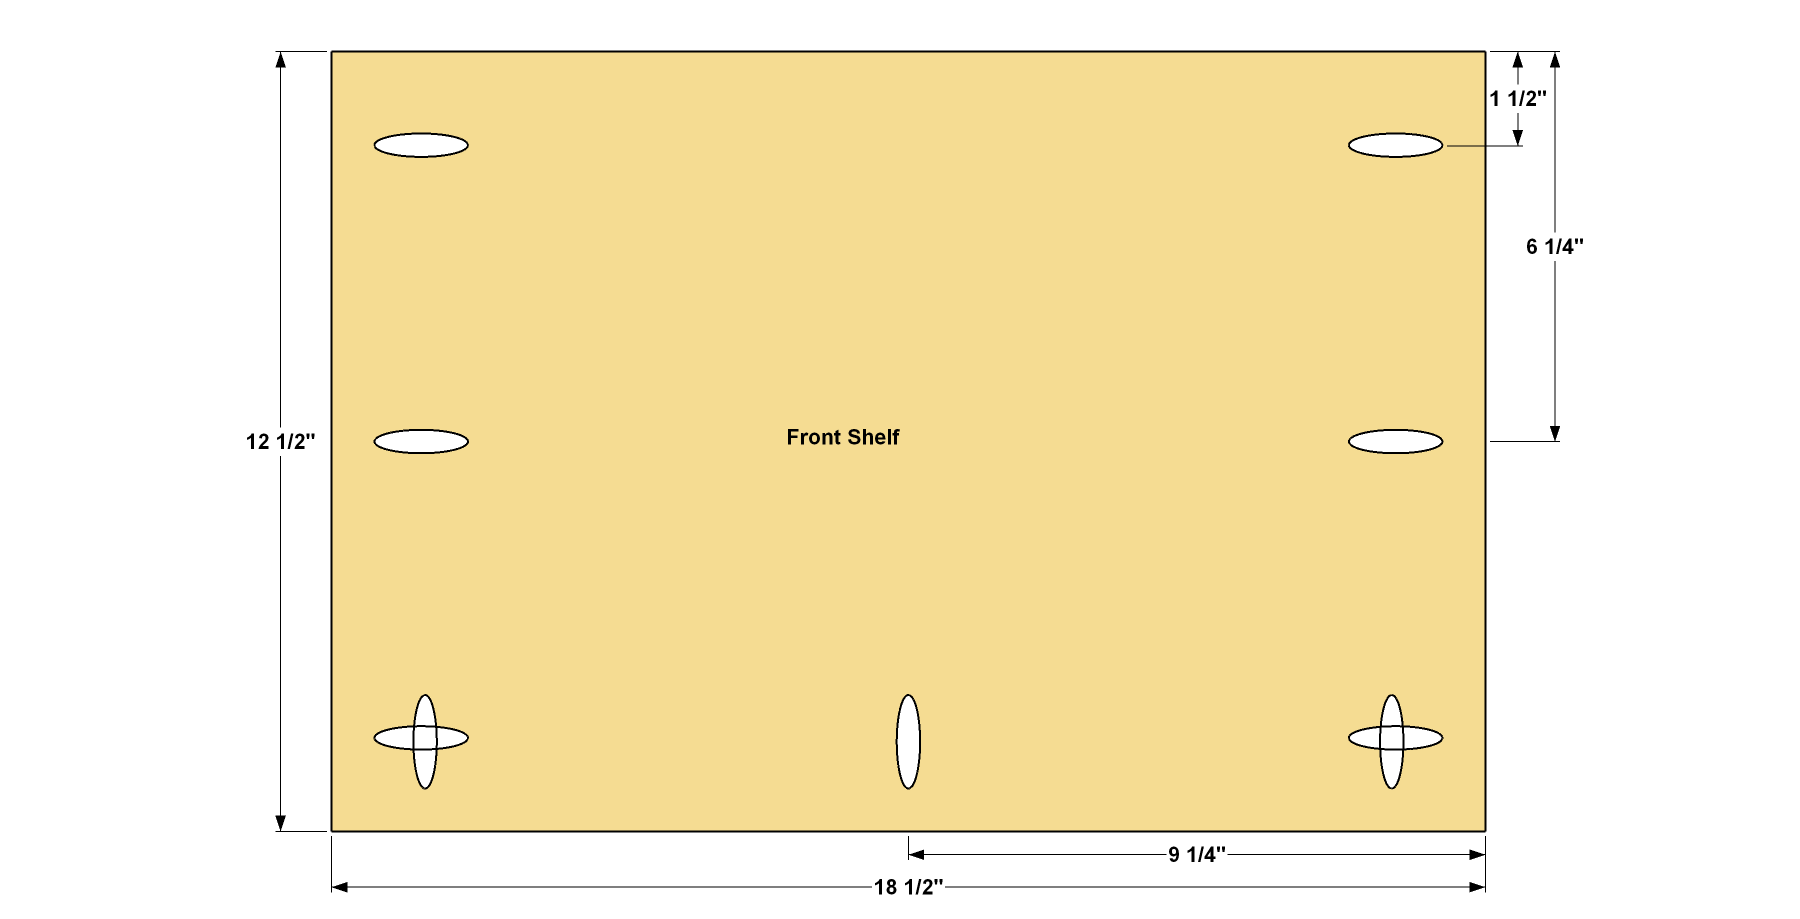
- Drill pocket holes on each Front Shelf at the locations shown.
13Add the Front Selves and the Bottom
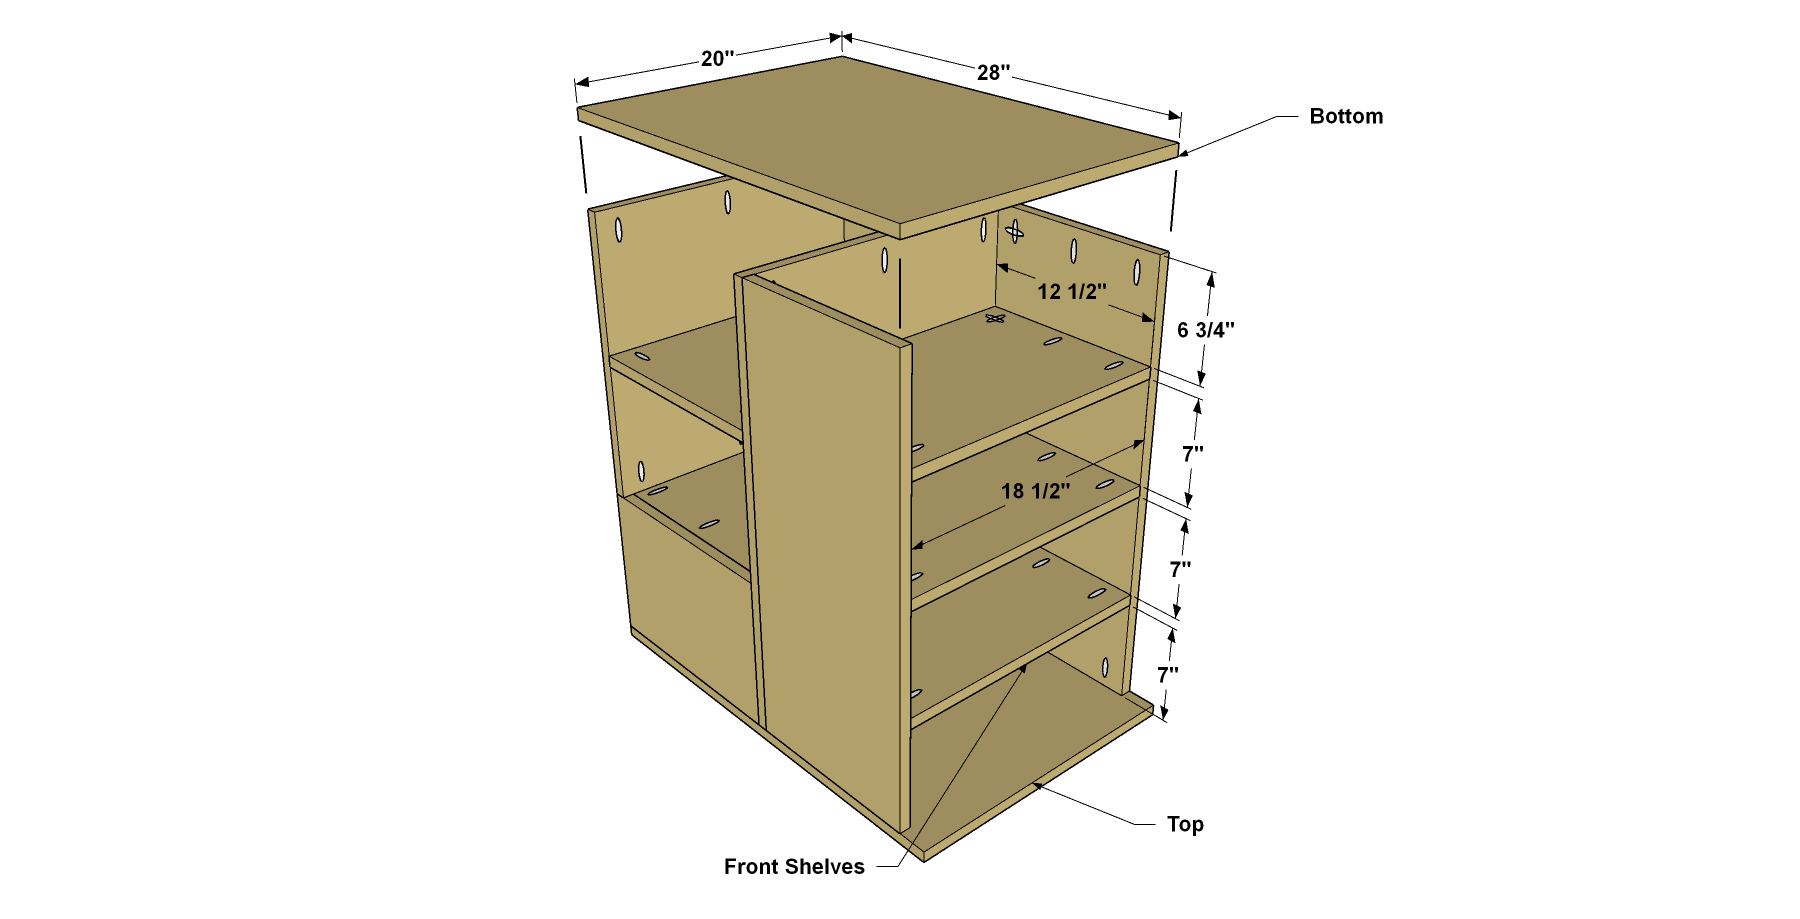
- Set the Bottom in place so that the edges are flush with the Sides and Back. Secure it in place using 1 1/4" coarse-thread pocket-hole screws.
- Next, position each Front Shelf, as shown, starting with the one nearest the Top, and then secure each Front Shelf in turn using 1 1/4" coarse-thread Kreg Pocket-Hole Screws.
14Add the Casters and a Finish
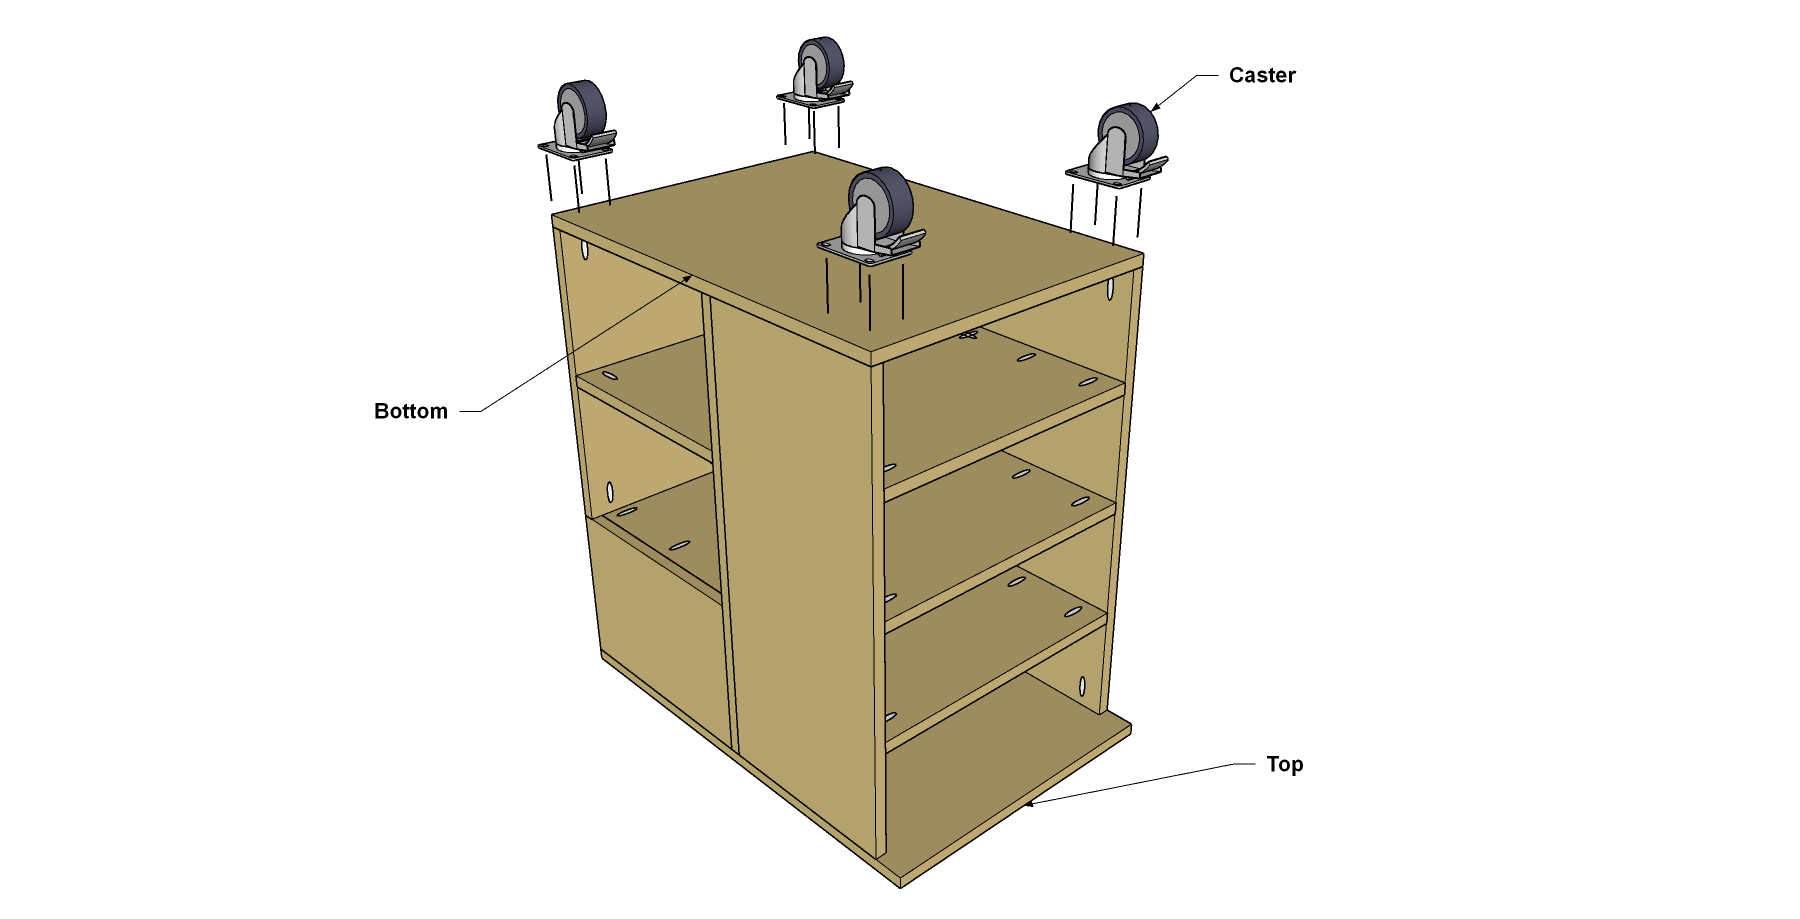
To complete the main work center, position the casters, as shown and then attach them. Use “dual-locking” casters, which lock both the roll and swivel functions, so that the work center will stay put while you’re working, but it will be easy to move when you’re done. Secure the casters to the Bottom using #10 x 3/4" pan-head wood screws. After that, sand any sharp or rough edges of the plywood panels. Since this is a utility project, it doesn’t necessarily need a finish. However, we chose to wipe on a simple oil finish to protect it from dirt, and to give the work center a little color. Now, you can add custom touches to your work center, if desired.
15Check Out the Storage Accessories
We added a few accessories to make the work center even handier for pocket-hole joinery. One is a fence system that works with the Kreg Jig® K4 shown in the photos. If you have the Kreg Jig K5 model, it has built-in wigs, so you won’t need the fence system. The fences provide wide supports for long pieces or large panels. They’re made from 1-by material plus 1/4"-thick hardboard spacers to achieve the right height. And of course, there’s an onboard storage system. You can also make a drill holster. Finally, we added two holders for a couple of Kreg Cutting Solutions: The Rip-Cut™ and the Accu-Cut™. If you have either or both of these cutting tools, you can add the onboard holders for them.
16Make the Fence Parts
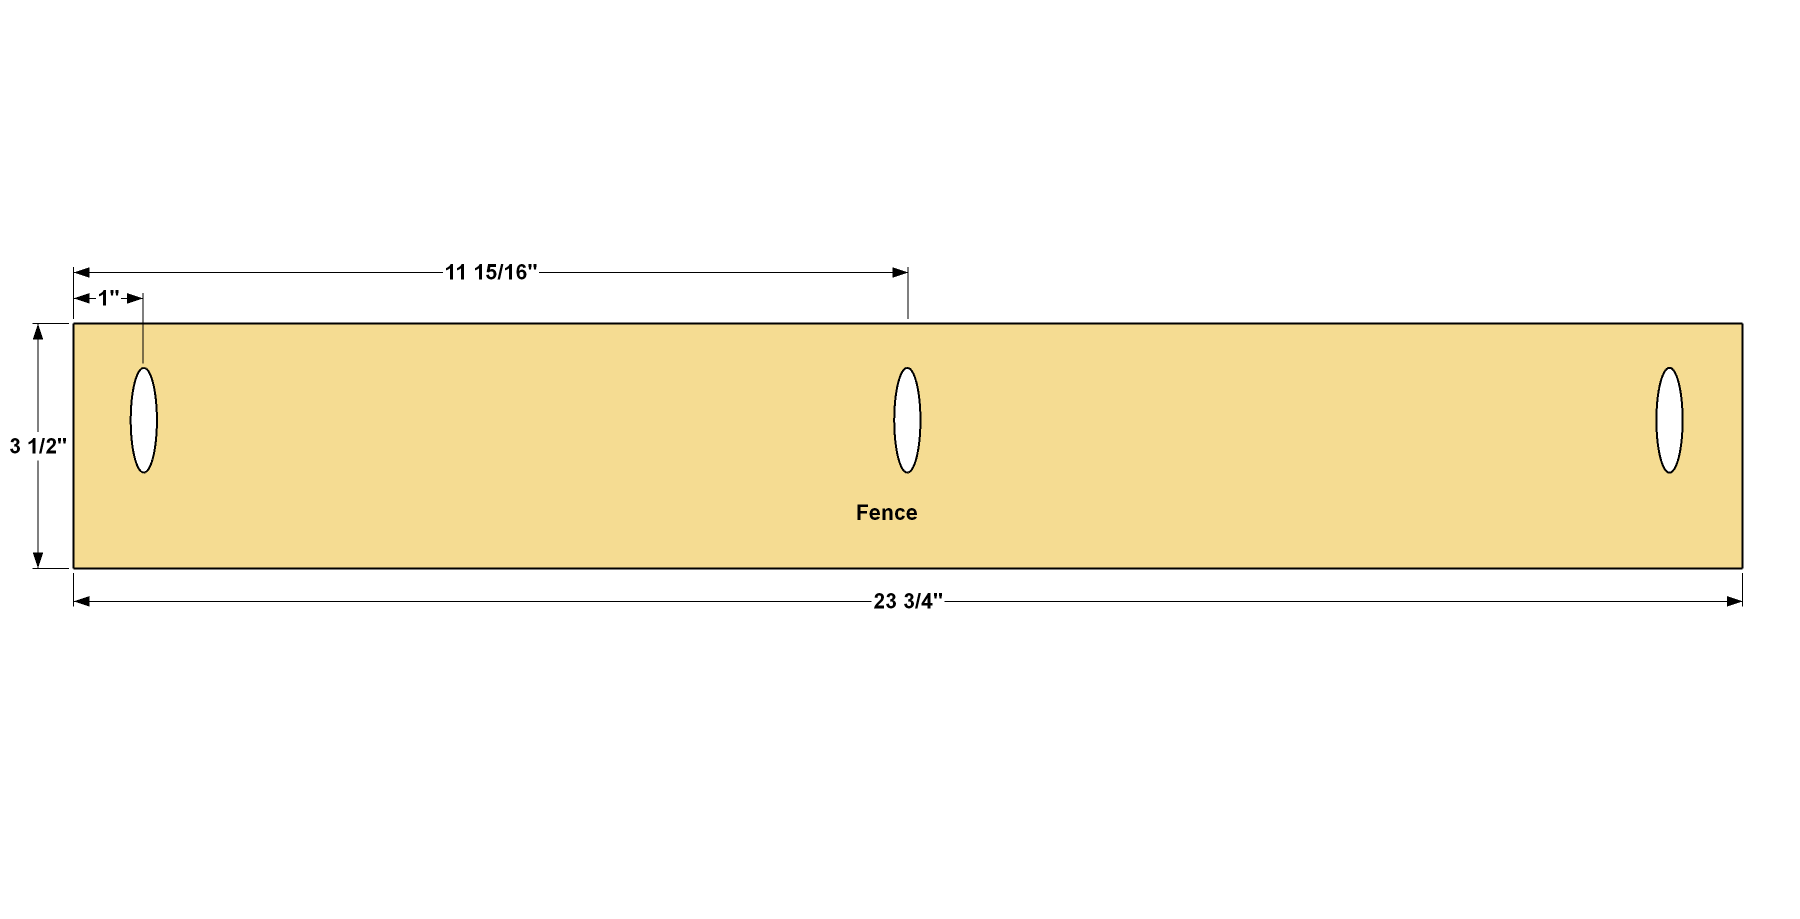
Cut four Fence pieces from 1x4 boards as shown in the cut list. Make sure your pocket-hole jig is set for 3/4" material, and then drill pocket holes on just two of the boards at the locations shown.
17Assemble the Fences
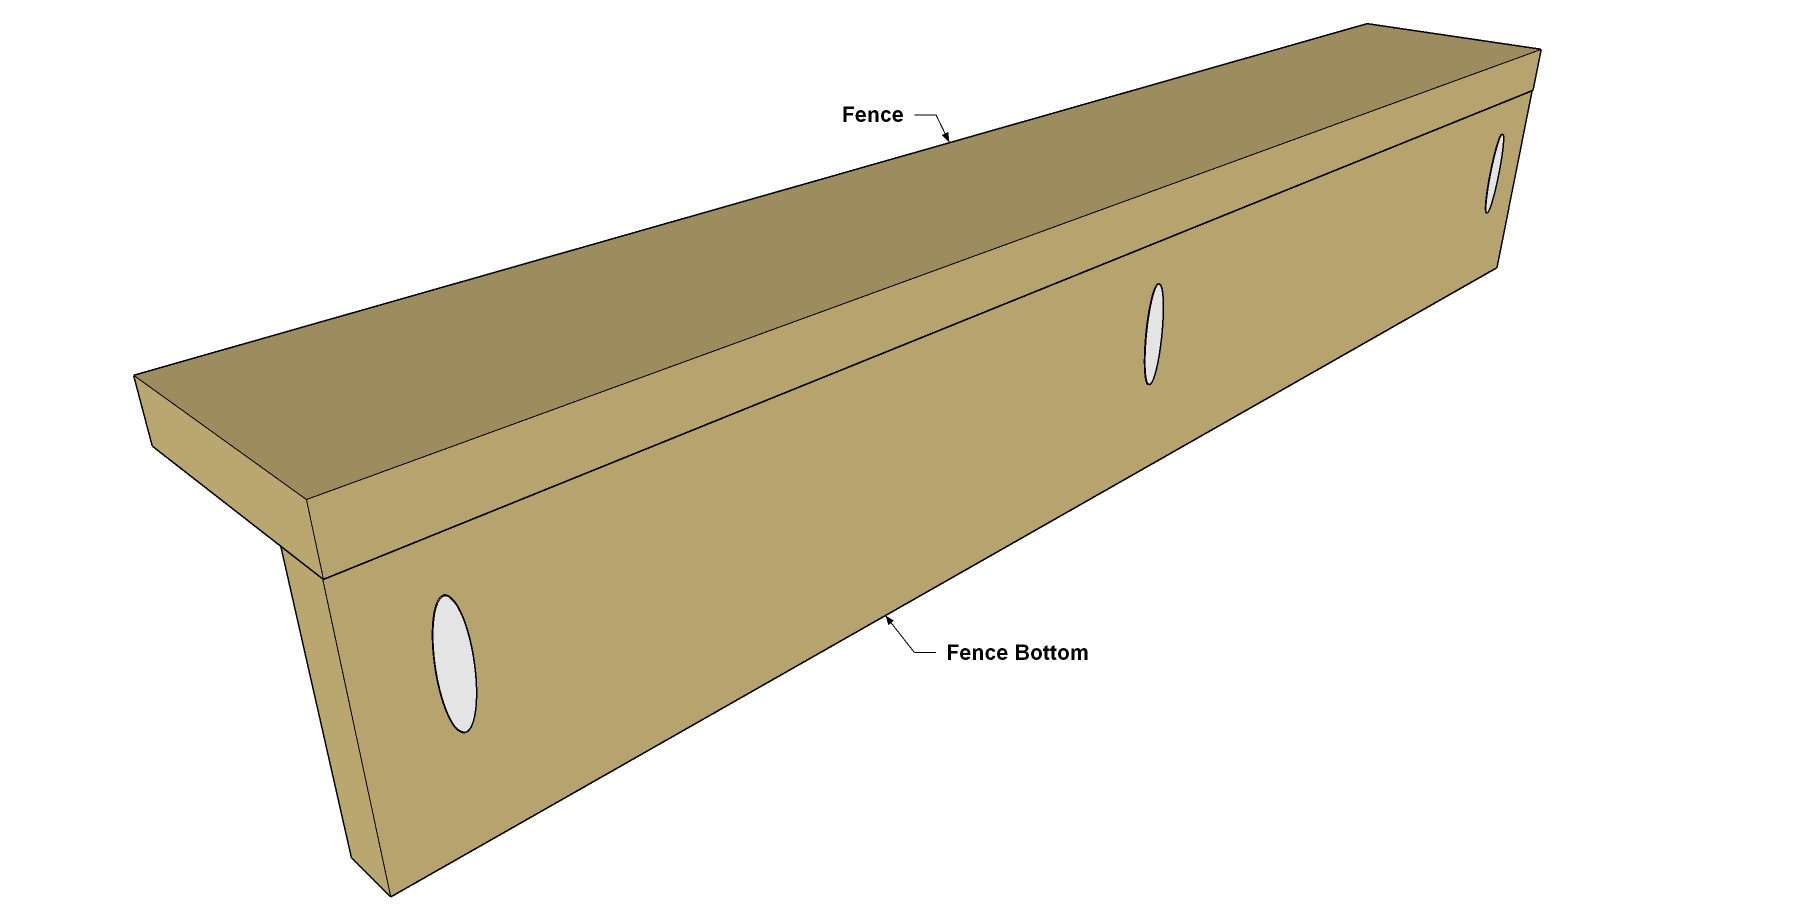
Secure two Fence Boards together (one board with pocket holes and one without) using 1 1/4" coarse-thread Kreg Pocket-Hole Screws as shown.
18Make the Fence Guides
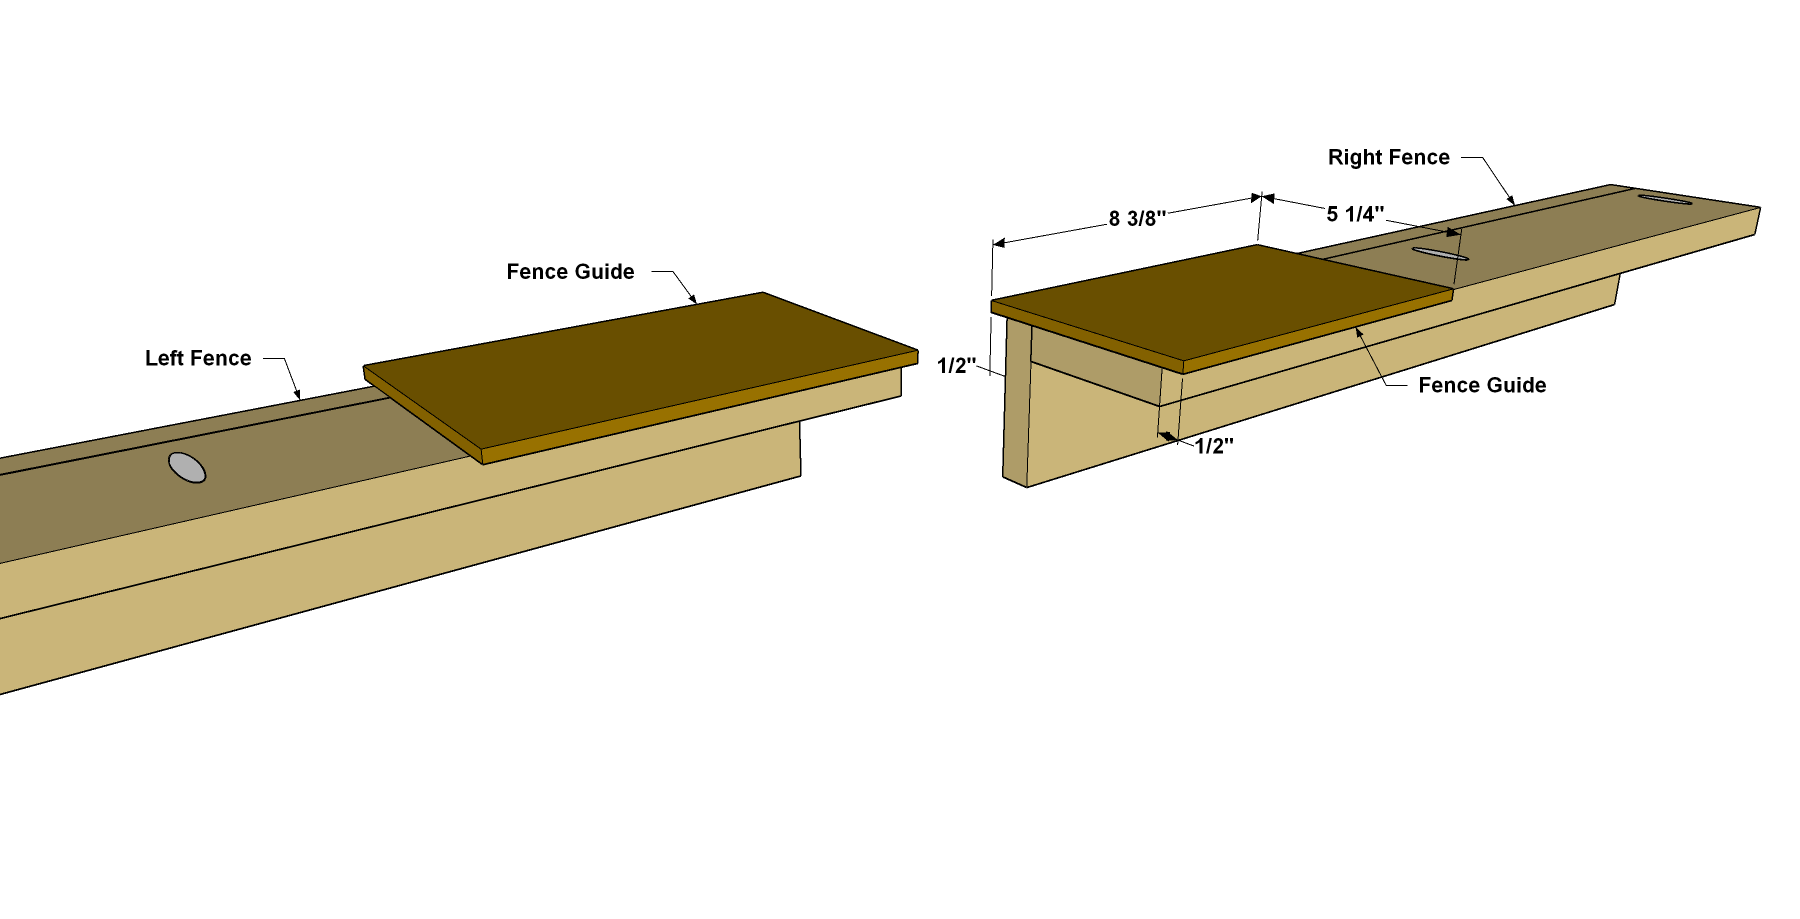
Using 1/4" hardboard, cut two Fence Guides, two Front Guide Spacers, and two Back Guide Spacers to size, as shown in the cutting diagram.
19Attach the Fence Guides
Glue and Clamp the Fence Guides to the bottom of each Fence as shown. Note that Guide location determines a left and right Fence.
20Make the Fence Cleats
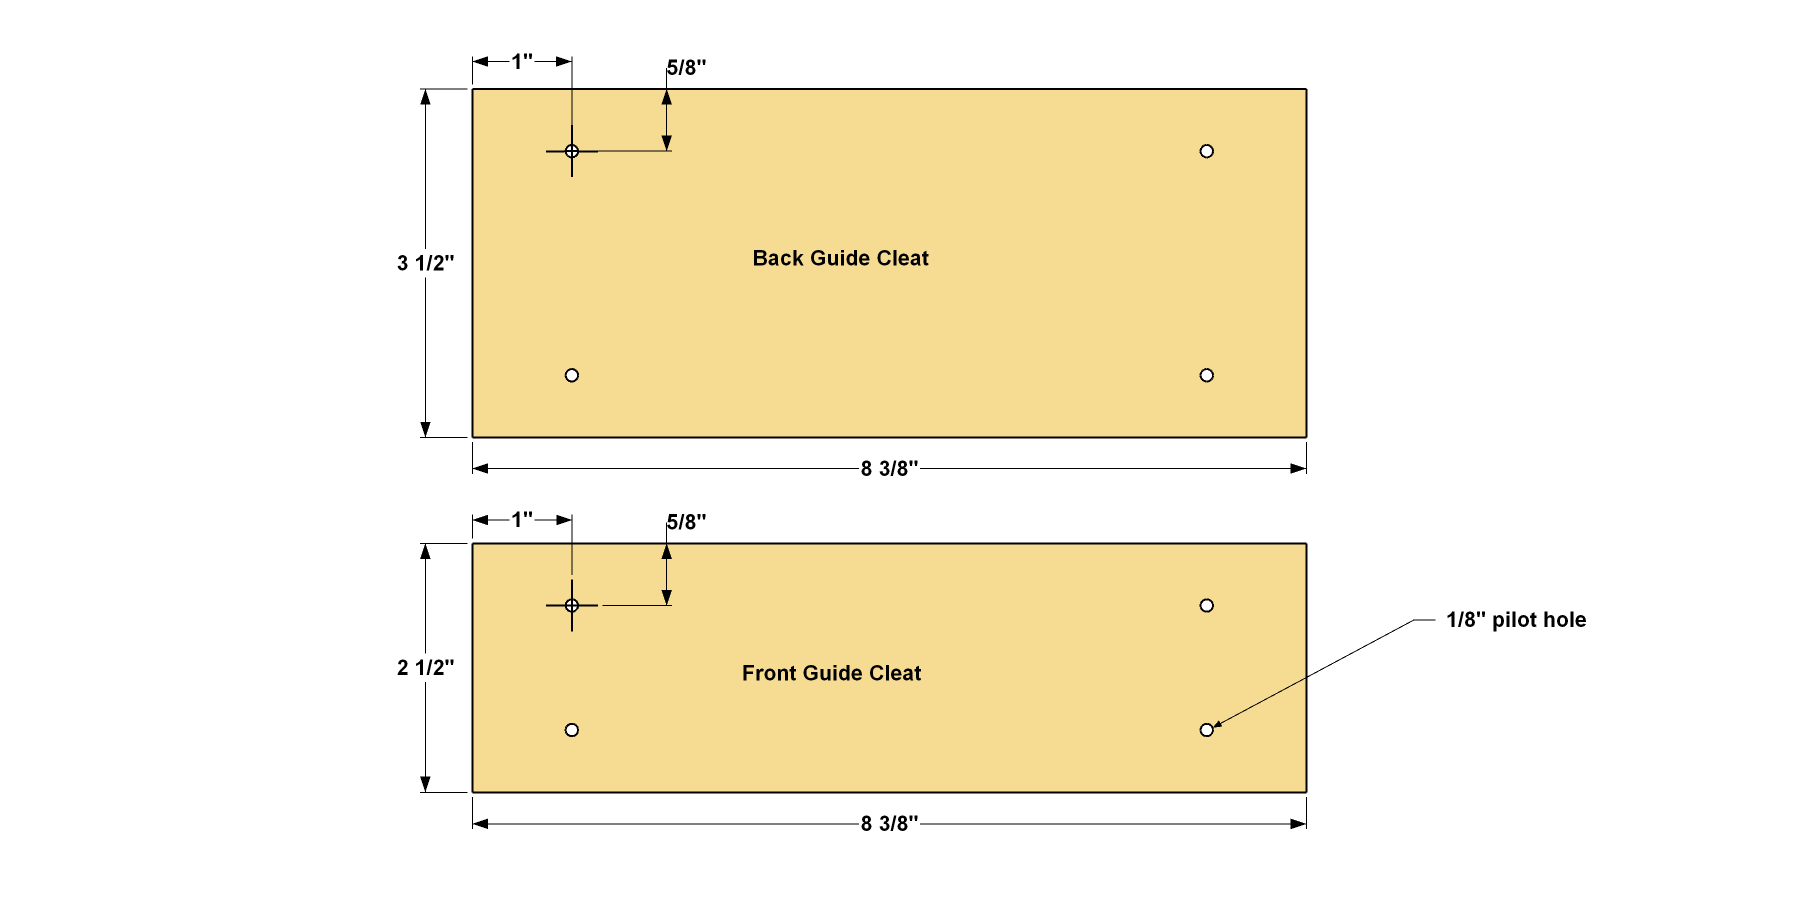
Cut two Front Fence Cleats from a 1x3 board and two Back Fence Cleats from a 1x4 board as shown in the cut list. Drill pilot holes at the locations shown.
21Assemble the Fence Cleats
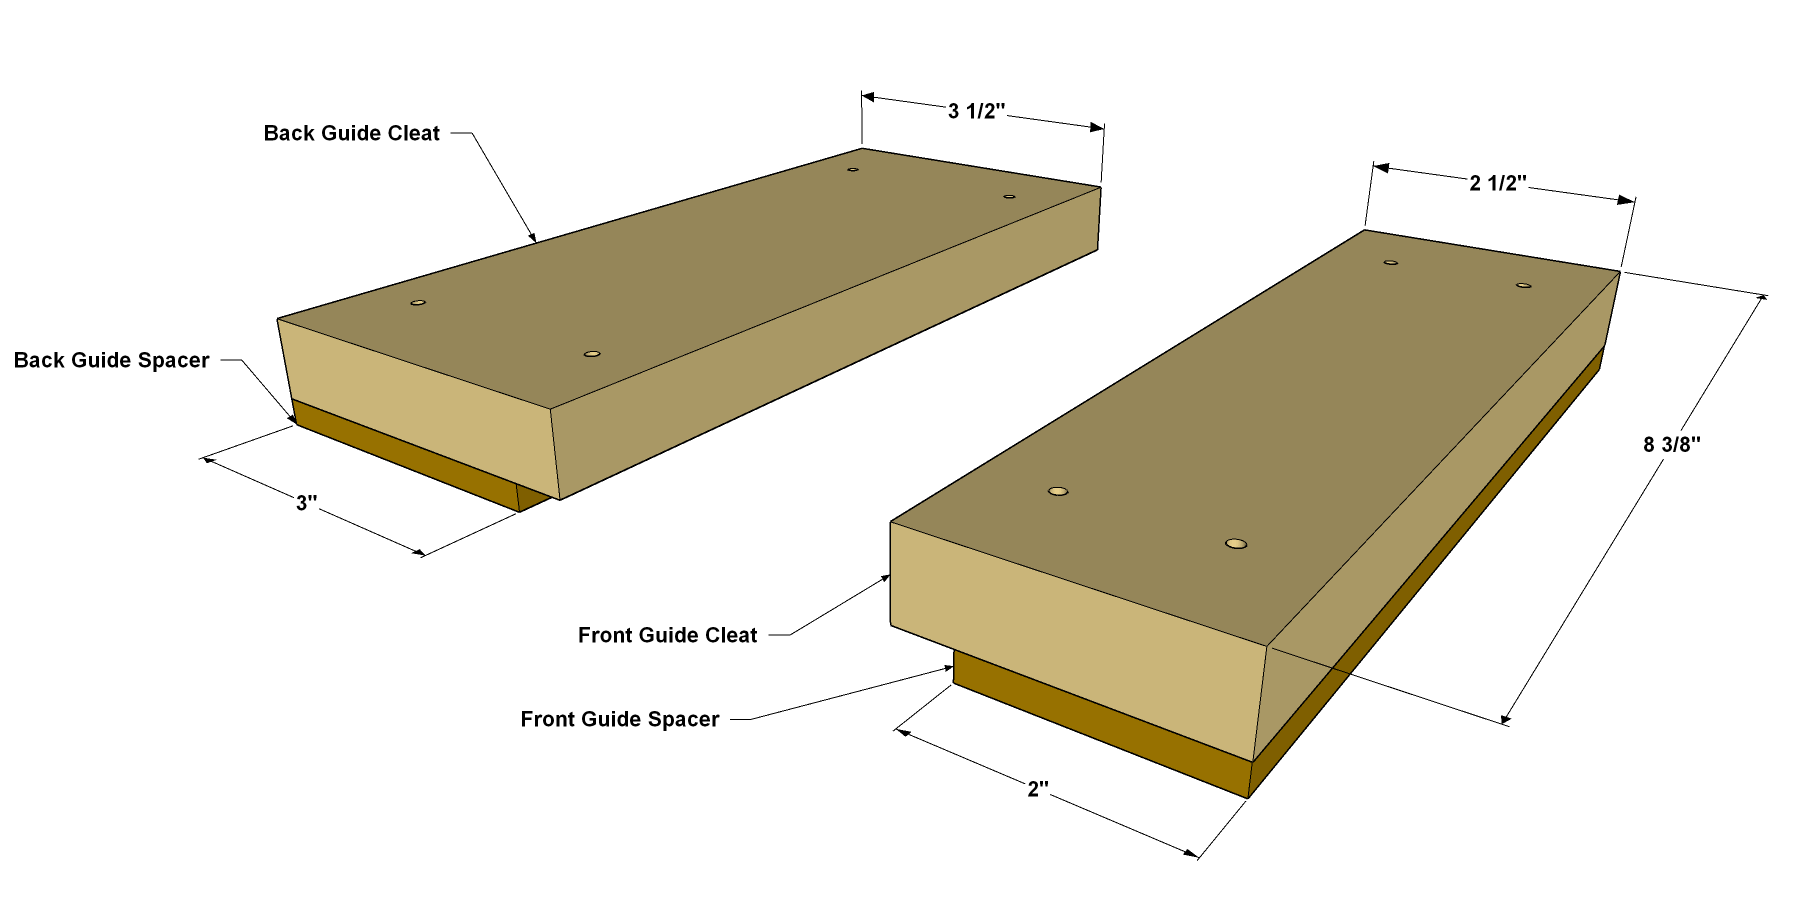
- Glue and clamp the Front Guide Spacer to the each of the Front Guide Cleats as shown. Make sure the edges are flush on three sides.
- Repeat the process for the Back Guide Cleats and Spacers.
22Attach the Front Cleats to the Case
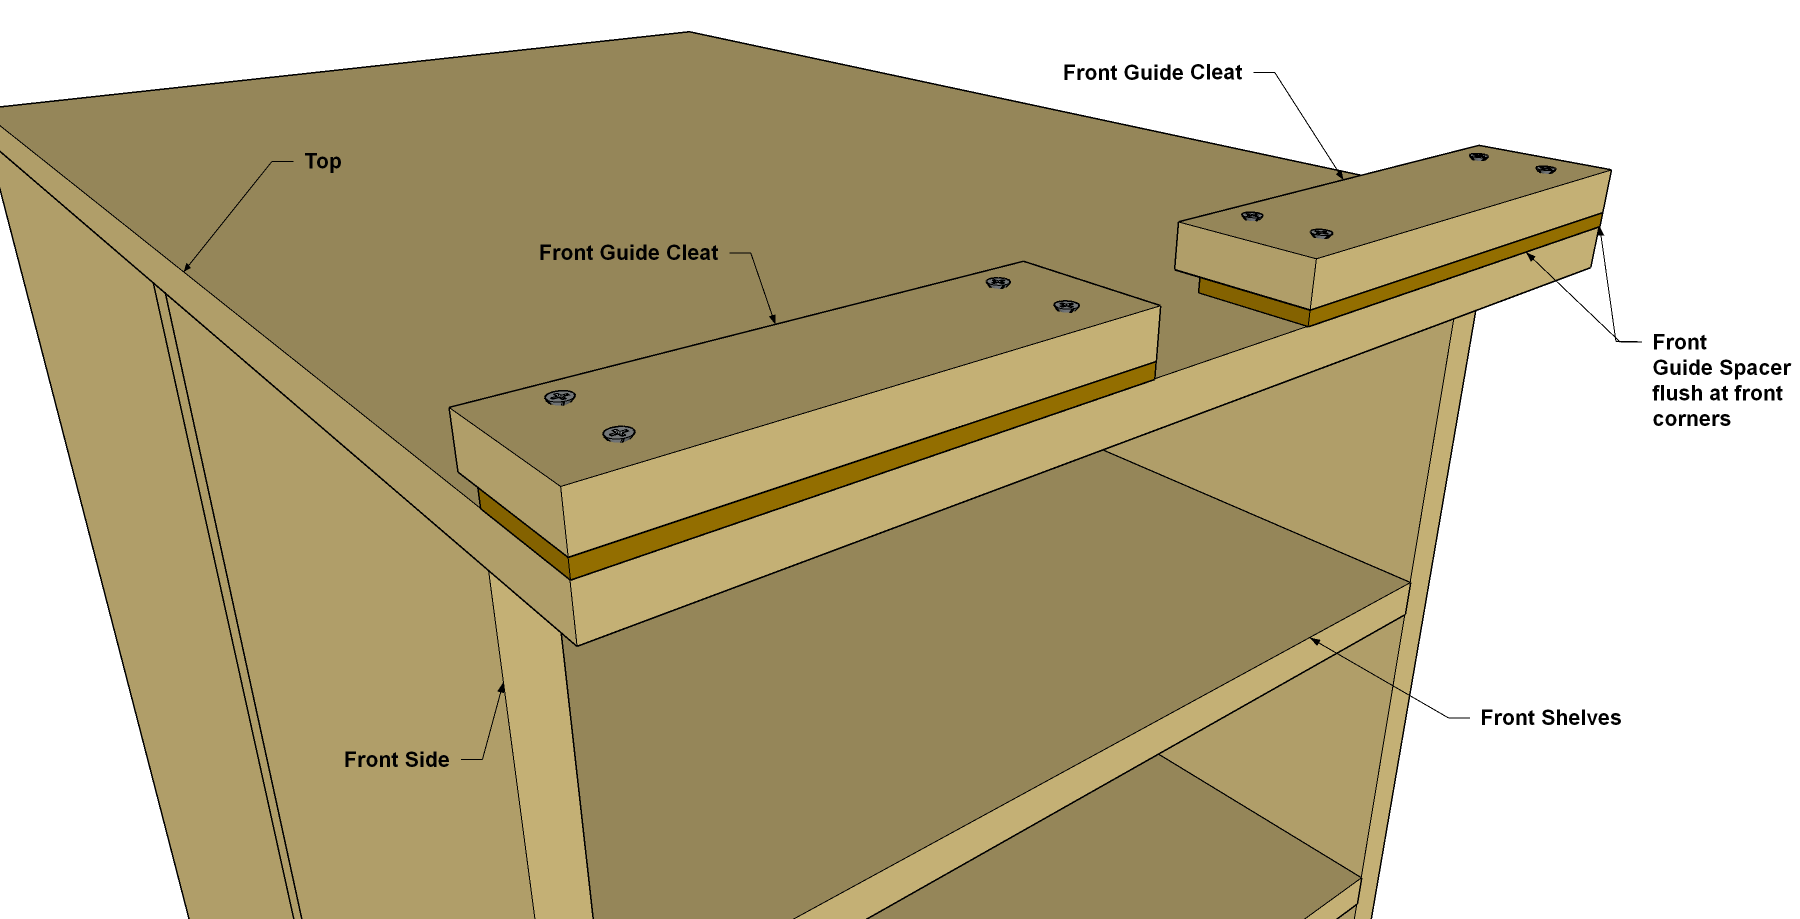
- Apply glue to the underside of each Front Guide Spacer and then set these assemblies in place as shown. Make sure that your Kreg Jig fits between them.
- Clamp the assemblies in position while you drive four 1 1/2" flat-head wood screws through the Cleats and into the Top.
23Add the Back Fence Cleats
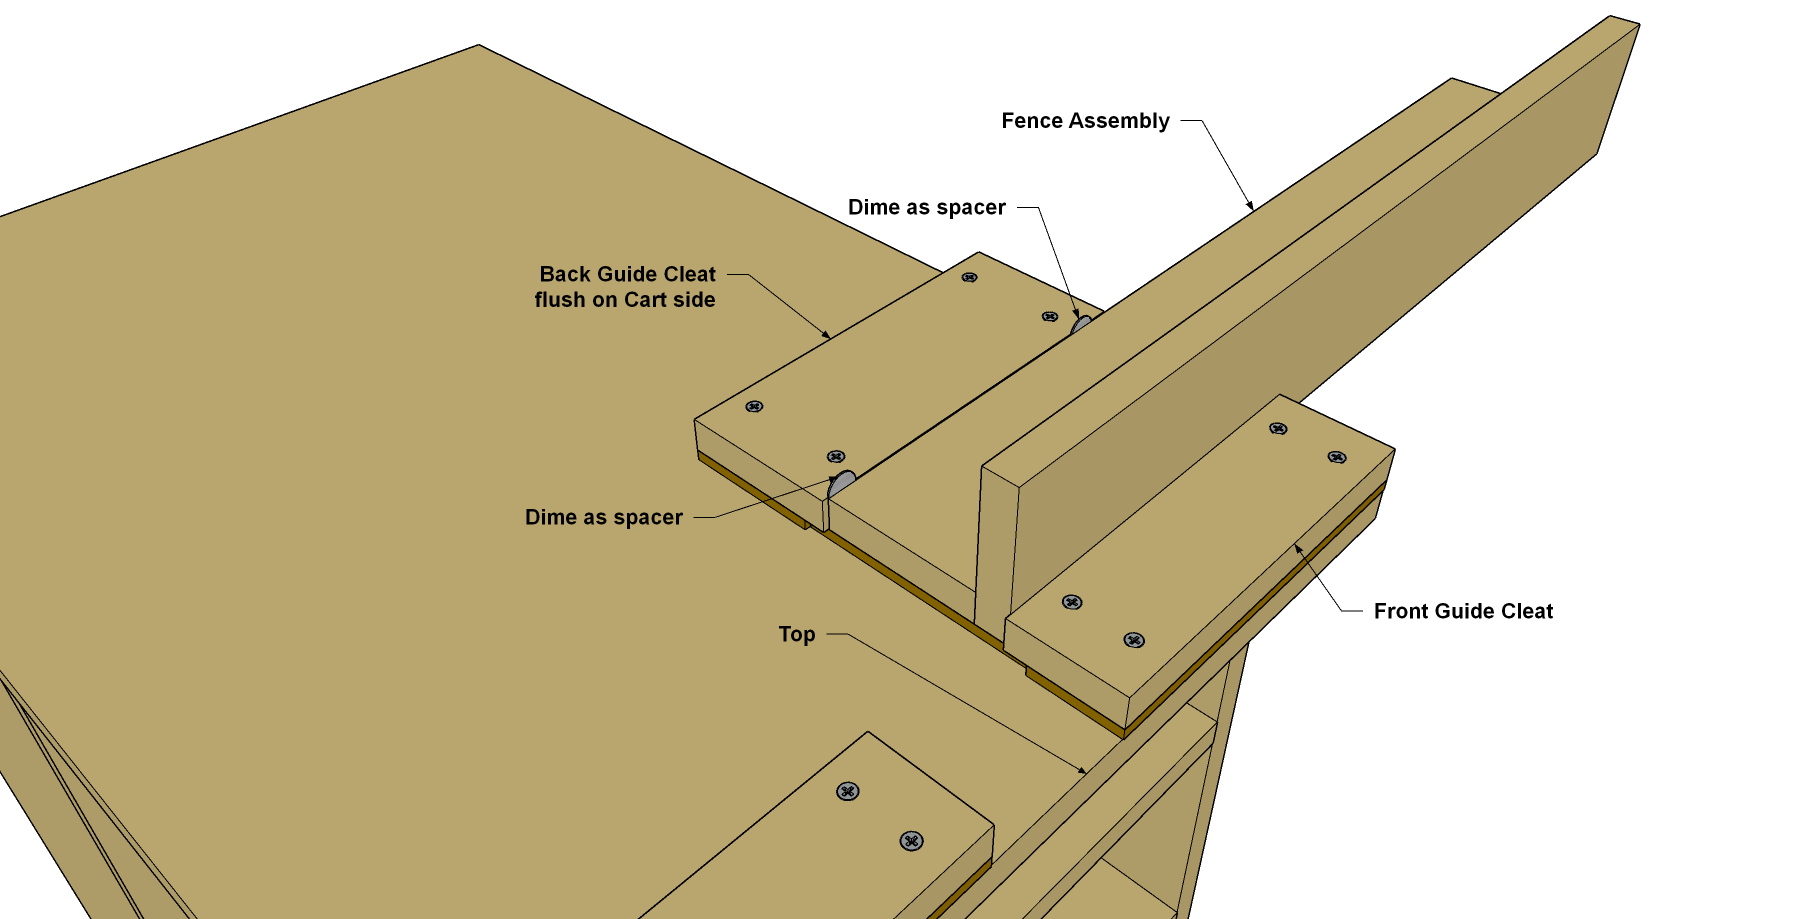
- Set the two Fences in place with the Guides positioned under the front guides, as shown.
- Add glue to the bottom of the Back Fence Cleats and position them on the other side of the Fence as shown.
- Apply glue to the underside of the Back Spacers, and position each cleat assembly on the Top, as shown. Use a couple of dimes as spacers to make room for the fences to easily slide in and out.
- Clamp the Cleats in place and attach them with four 1 1/2" flat-head wood screws. After attaching the guides, if the fences are difficult to slide in place, lightly sand the underside of the Fence Guides and then apply some paste wax to help them slide.
24Make the Fence Storage Parts
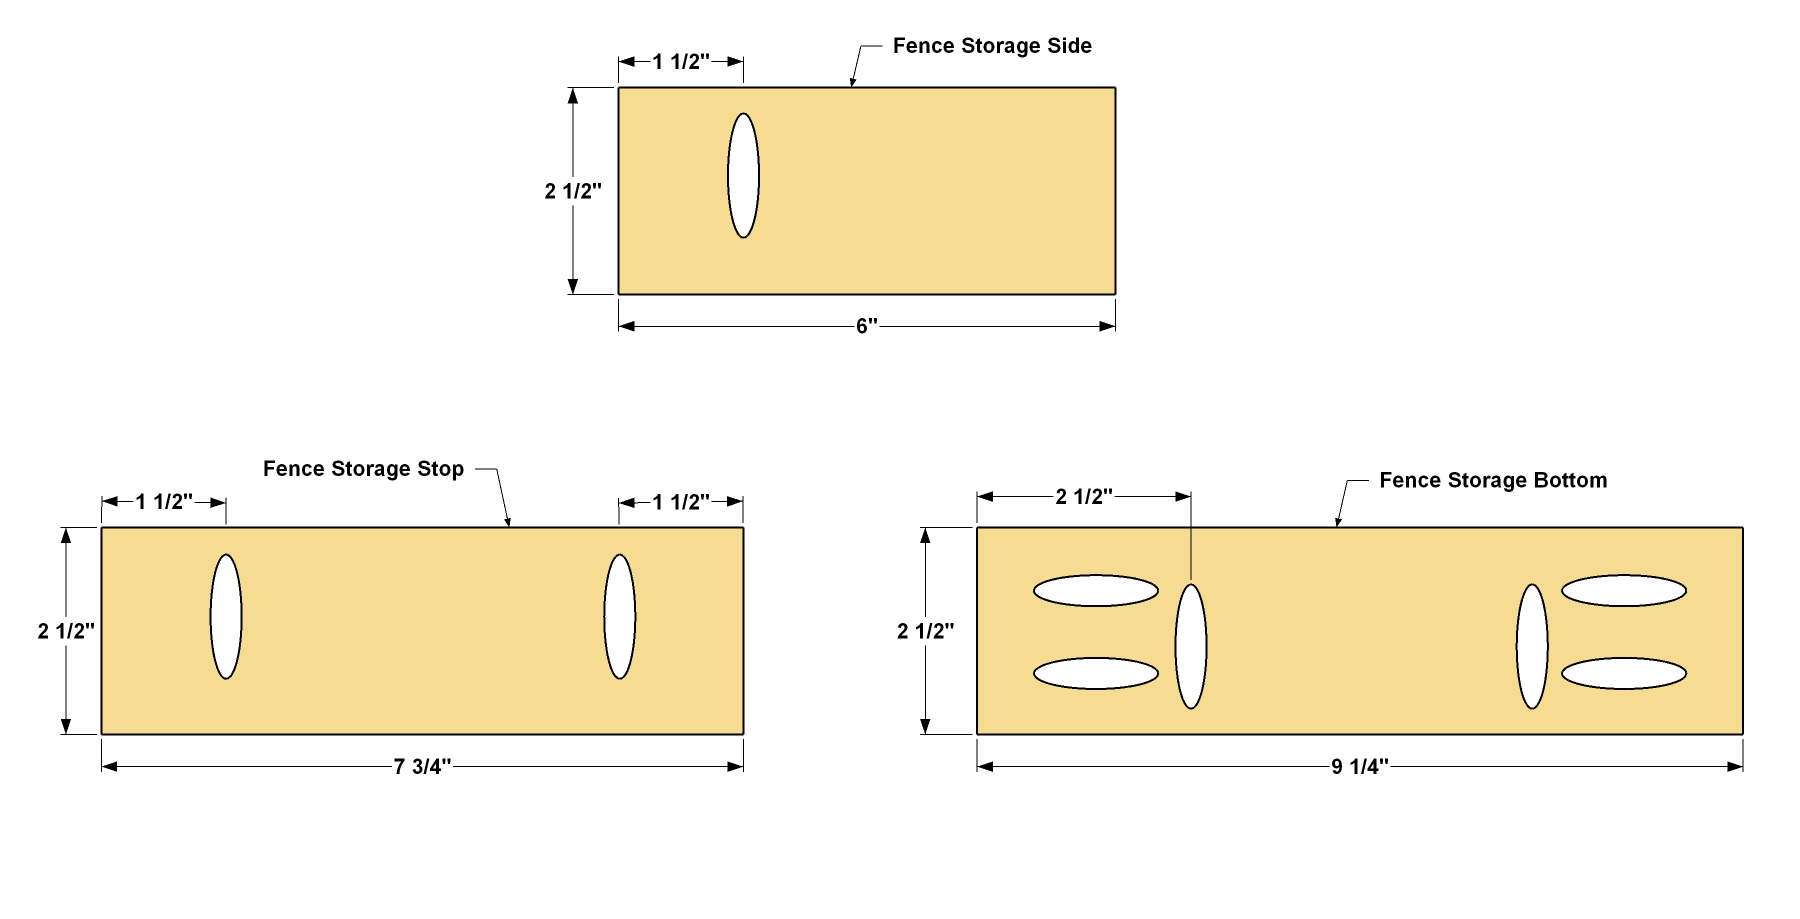
When the Fences are not in use, they can be stored on the side of the work center. From a 1x3 board, cut two Fence Storage Sides, one Fence Storage Bottom and one Fence Storage Stop, as shown in the cutting diagram. Drill pocket holes where shown.
25Assemble the Fence Bracket
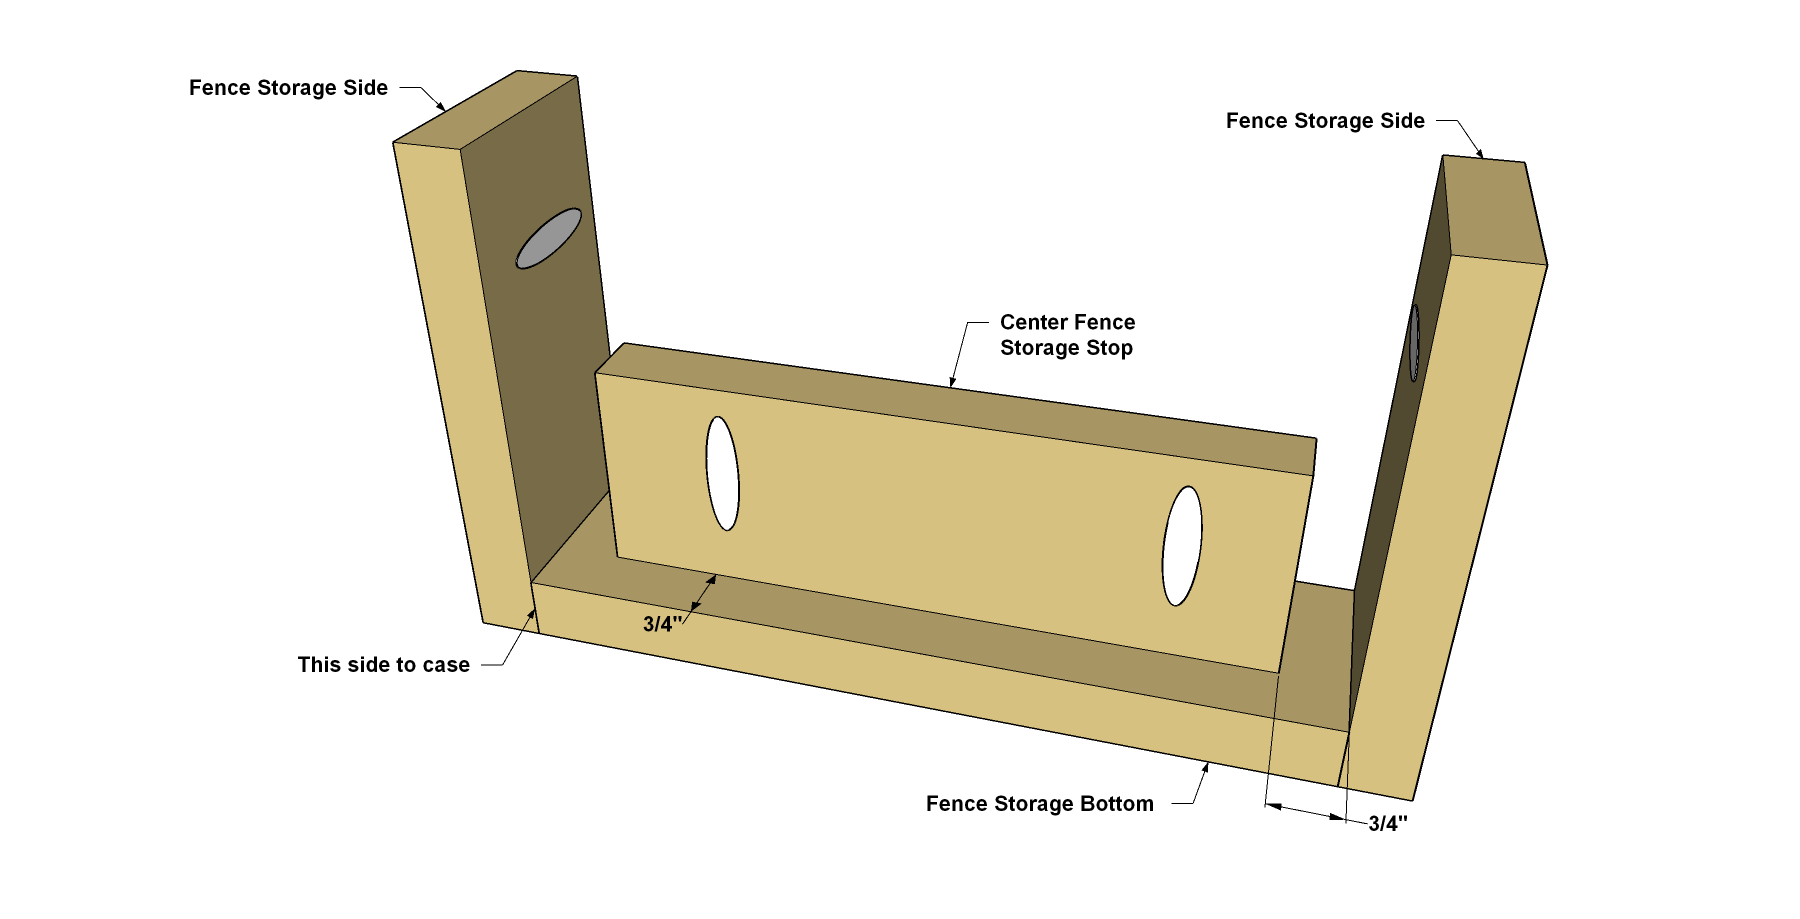
Assemble the fence storage bracket as shown using 1 1/4" coarse-thread Kreg Pocket-Hole Screws. When the assembly is complete attach it to one of the Front Sides at the location shown using 1 1/4" coarse-thread Kreg Pocket-Hole Screws.
26Attach the Fence Bracket
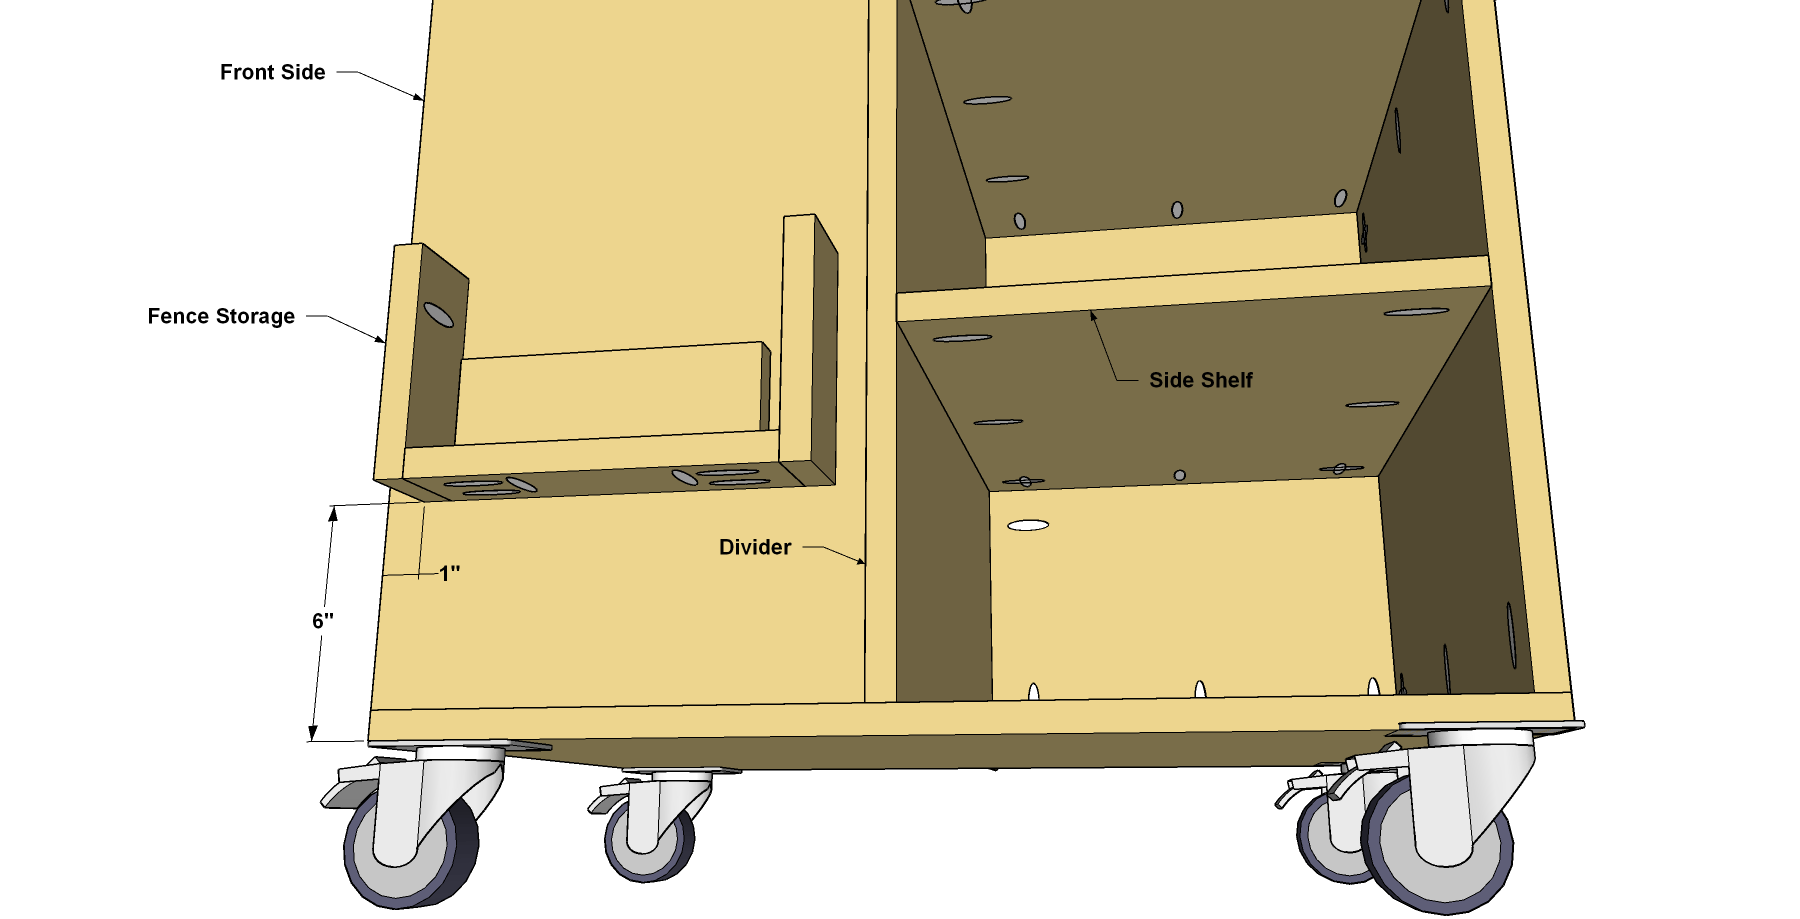
When the assembly is complete attach it to one of the Front Sides at the location shown using 1 1/4" coarse-thread Kreg Pocket-Hole Screws.
27Make the Drill Holster Parts
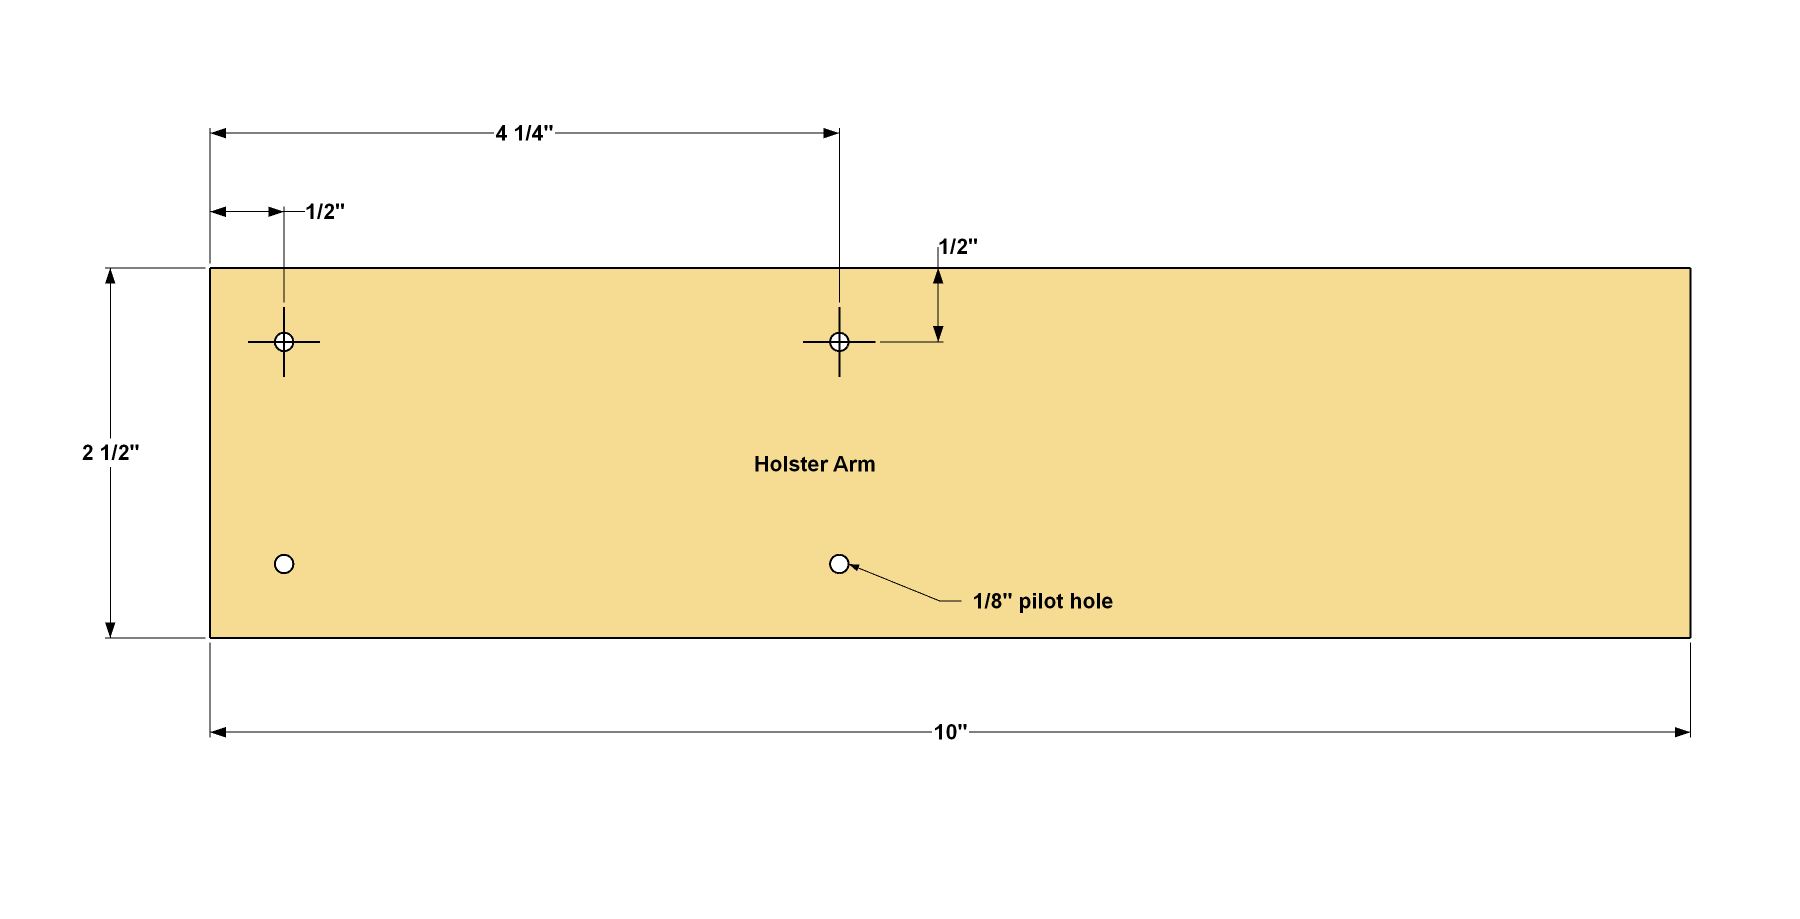
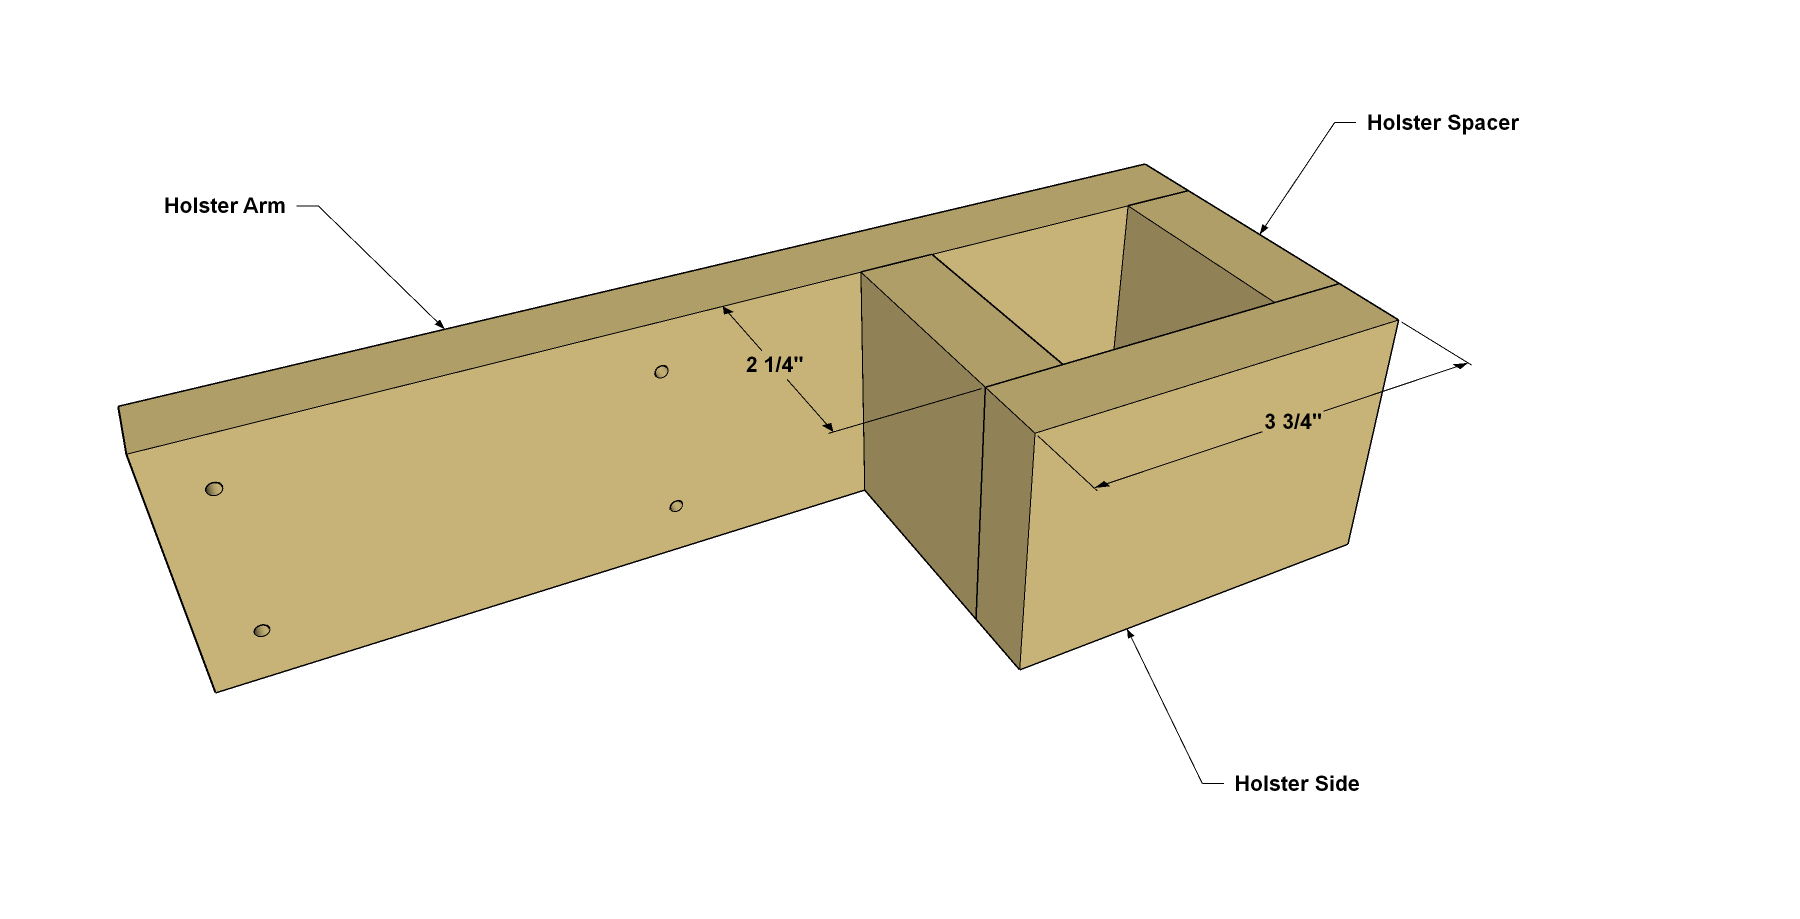
Cut one Holster Arm, two Holster Spacers, and one Holster Side from a 1x3 board, as shown in the cutting diagram. Drill pilot holes in the Hanger Arm at the locations shown.
28Assemble the Holster
- Apply glue to the two Holster Spacers and apply them to the Holster Arm at the location shown.
- Next, apply glue to the Holster Side and position it on the Spacers.
- Align the assembly, clamp it together and let the glue dry.
- Add a few nails for extra holding power, if desired.
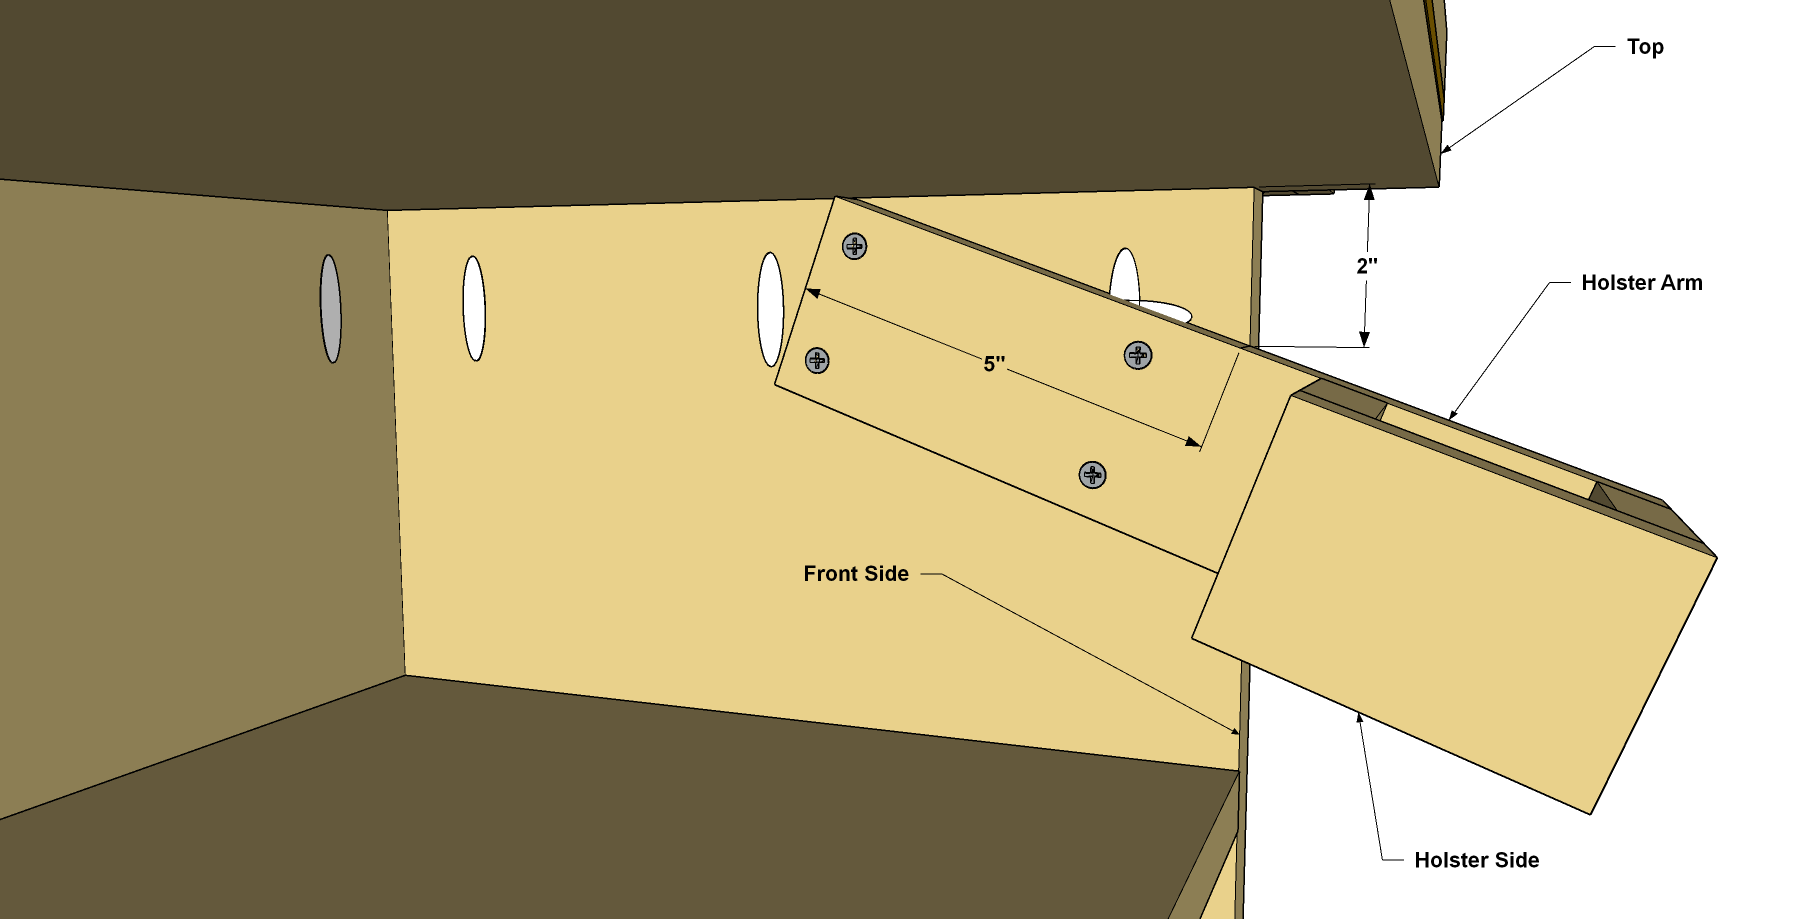
29Install the Holster
When the glue dries, position the Holster as shown, under the Top, and then attach it using four 1 1/4" flat-head wood screws. Lightly sand any sharp edges as needed.
30Make the Rip-Cut™ Cleats
- If you have a Kreg Rip-Cut™ Circular Saw Guide, you can store it onboard, as well.
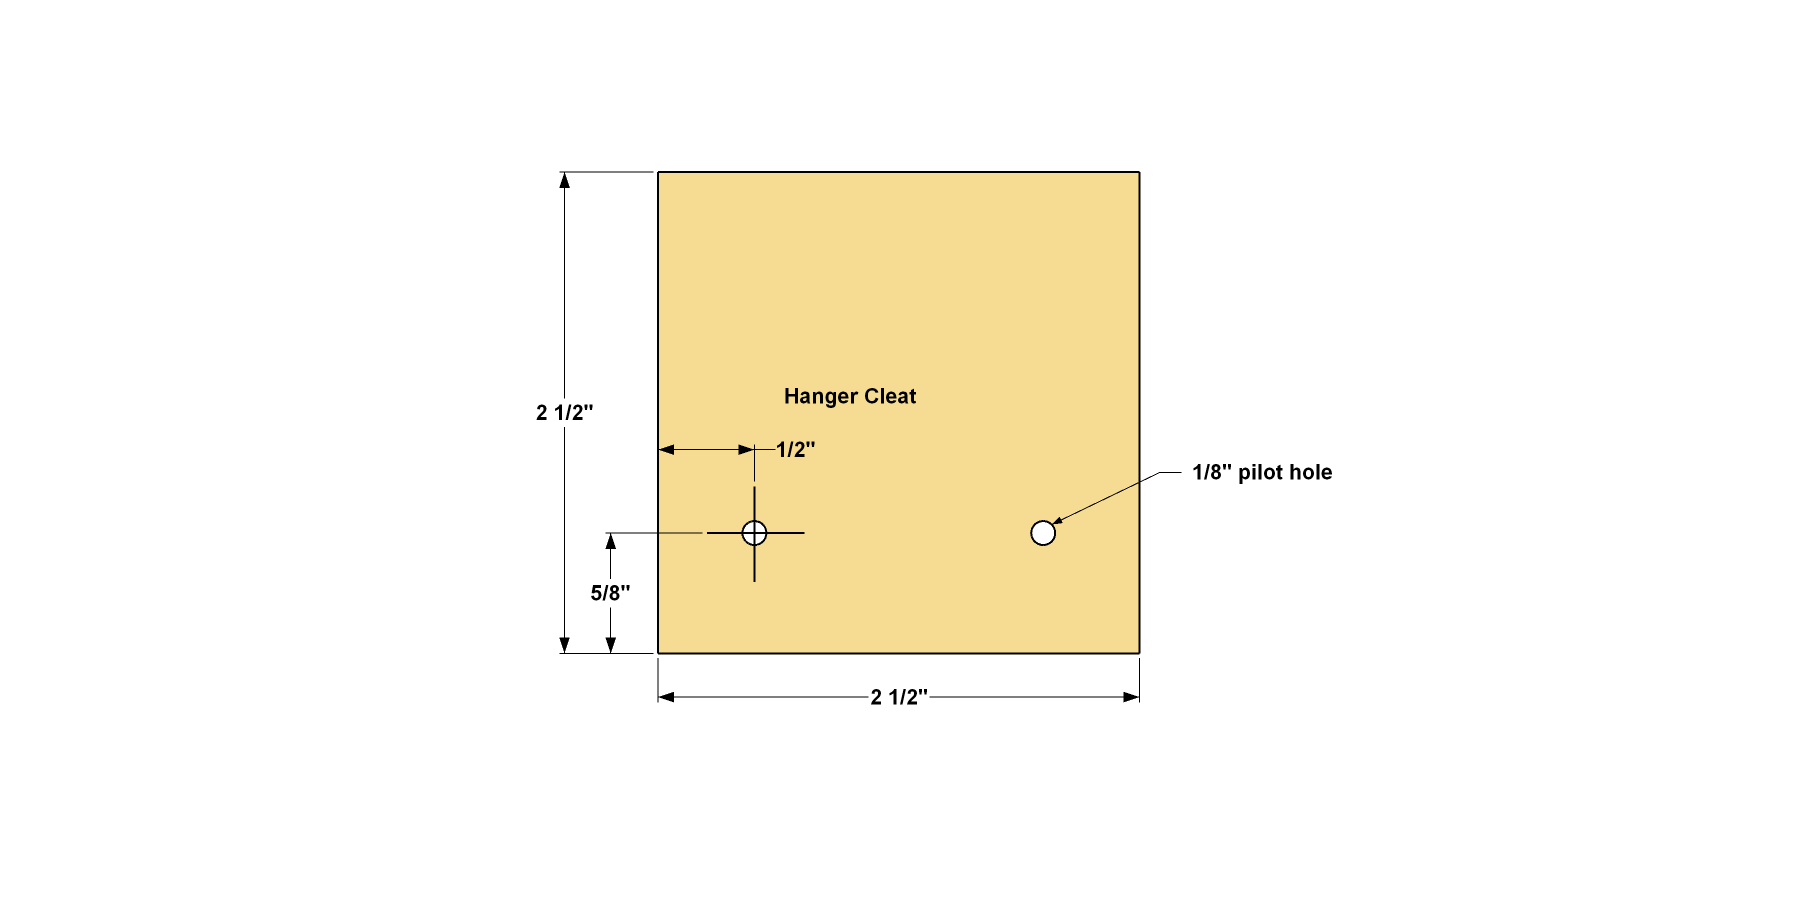
- Cut two Hanger Cleats, and two Hanger Spacers from a 1x3 board, as shown in the cutting diagram.
- Glue and clamp the Hanger to the Spacer as shown. After the glue dries, drill pilot holes through the Hanger and Spacer at the locations shown.
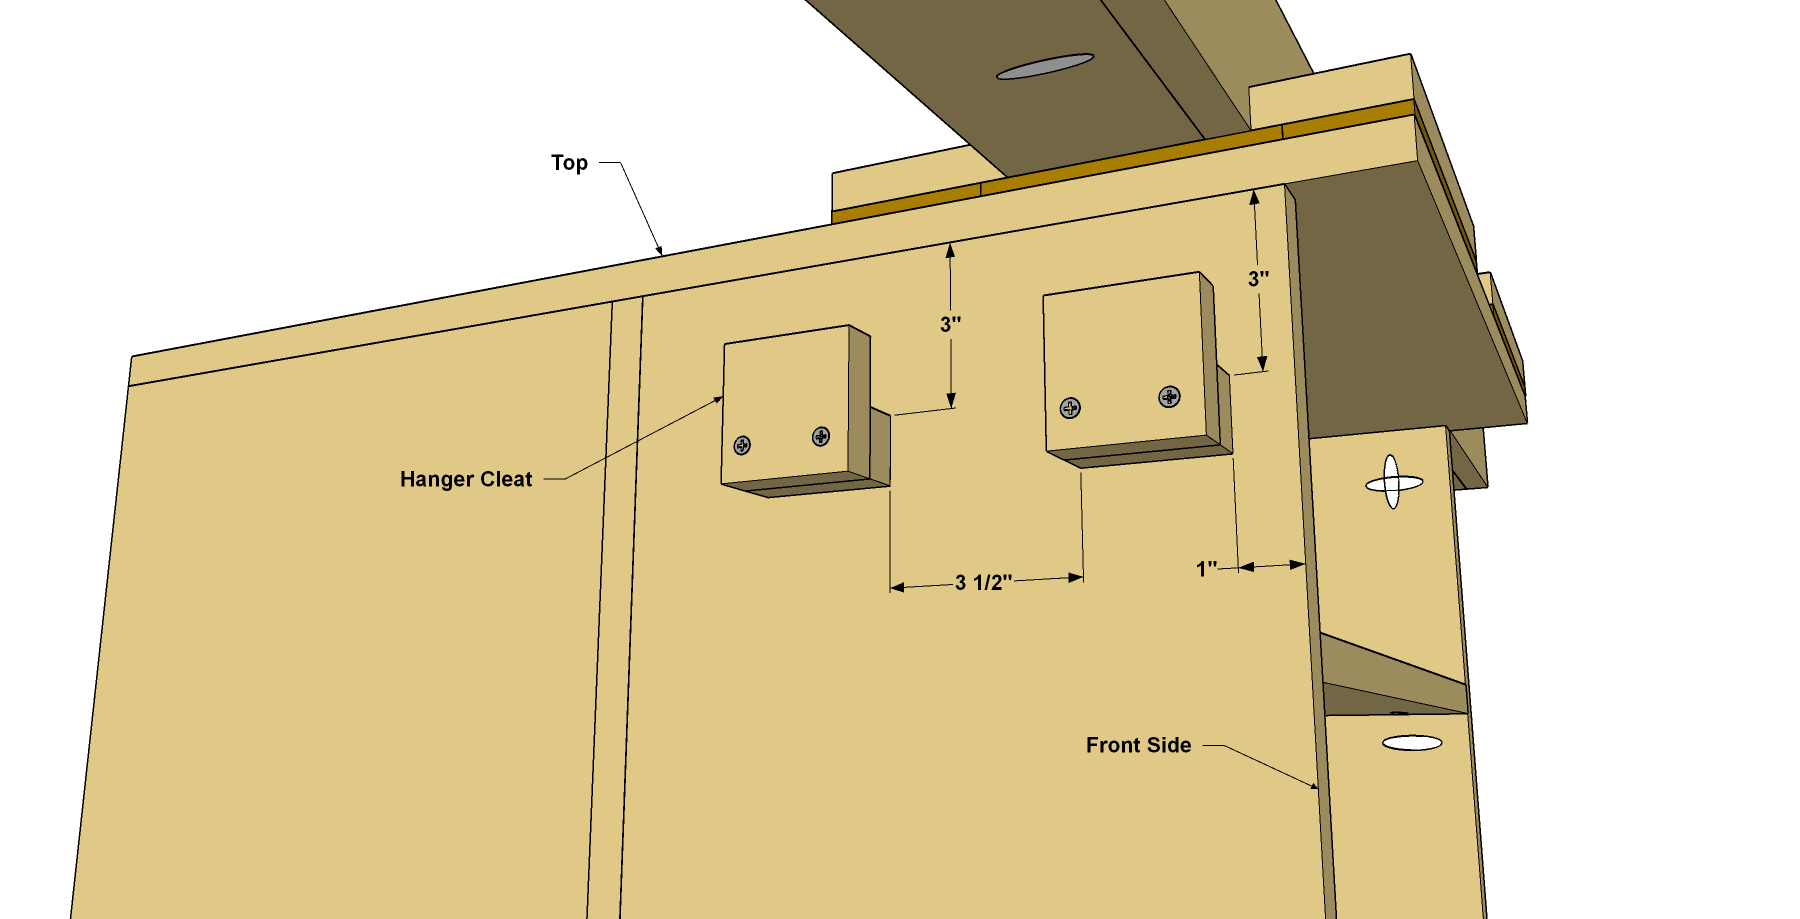
31Attach the Cleats
After the glue is dried, Hold the first hanger assembly at the location shown, and then secure it to the Front Side using two 2" flat-head wood screws. Repeat the process for the second bracket.
32Cut the Storage Slot Parts
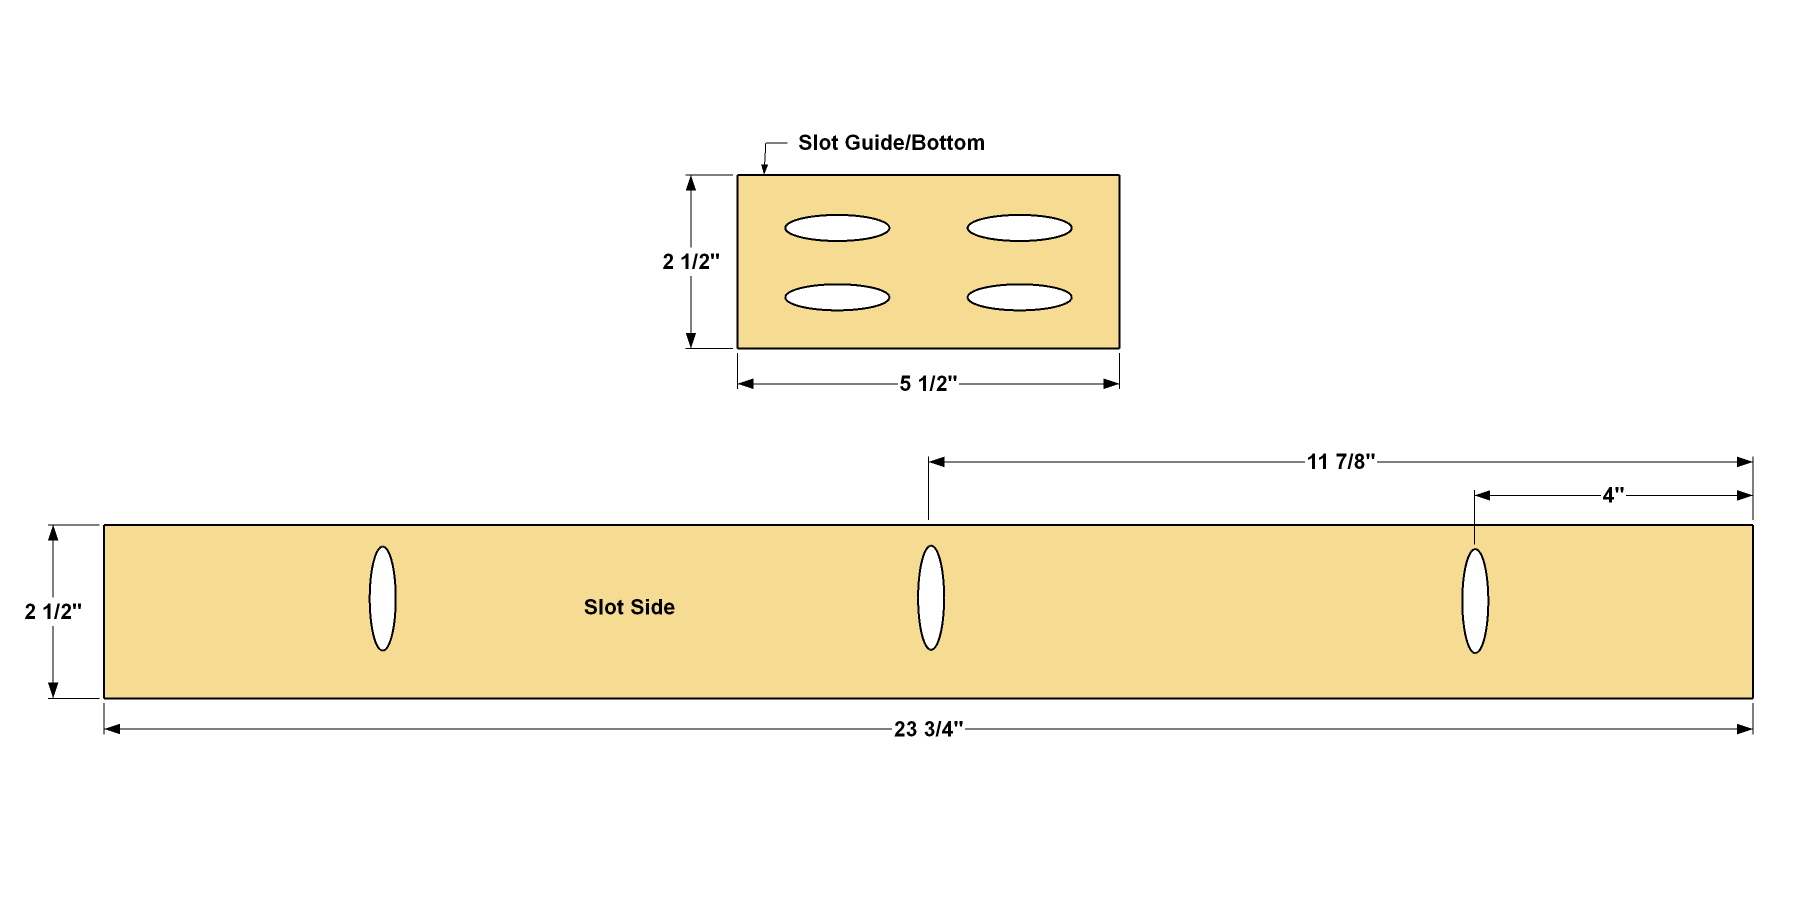
- Finally, if you have a Kreg Accu-Cut™, you can make a storage slot for it.
- Cut two Slot Sides, one Slot Bottom and two Slot Guides to length from a 1x3 board, as shown in the cutting diagram.
- Drill pocket holes in all of the parts at the locations shown.
33Assemble and Mount the Storage Slot
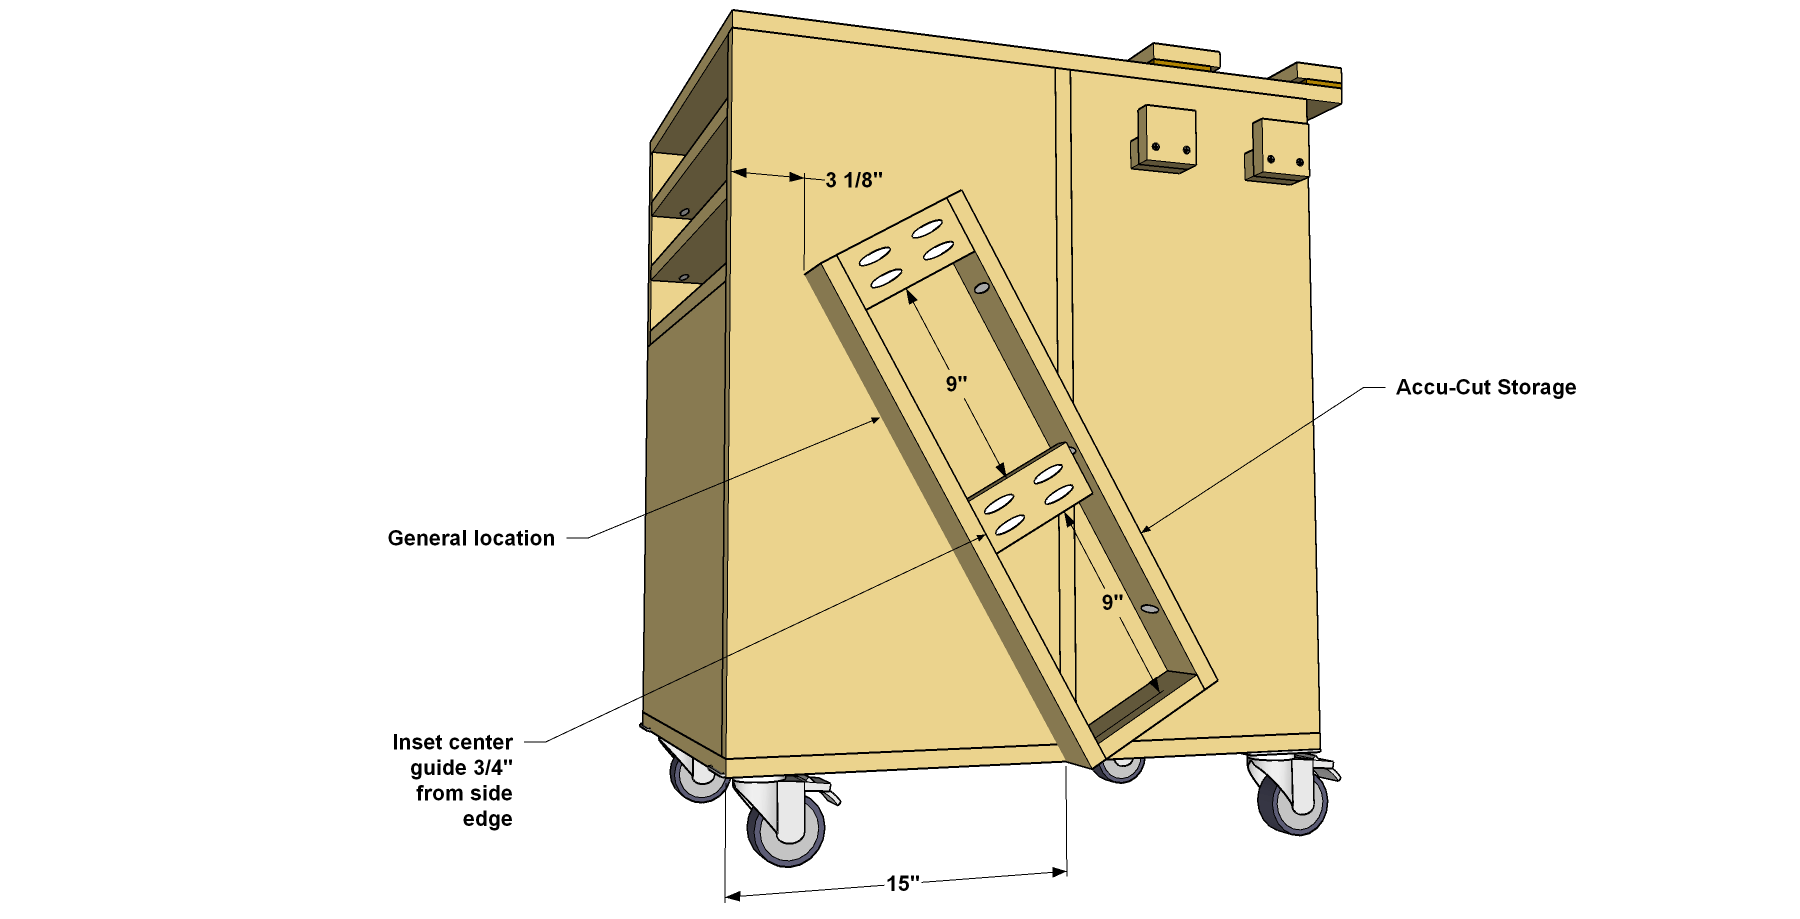
Assemble the storage slot, as shown, using 1 1/4" coarse-thread Kreg Pocket-Hole Screws. Position the Slot on the work center at the location shown, and then secure it with 1 1/4" coarse-thread Kreg Pocket-Hole Screws, as well.
Tags
- Workbenches
- Intermediate
Reviews & builds
No reviews yet
Sign in to review this plan or share your build.
No reviews yet. Be the first to build this.