 Notch
Notch- Difficulty
- Expert
- Time
- 10.8–21.3 hours
- Cost
- $$$$
About this build
Make a bold statement in your kitchen or dining room, and add storage space with this one-of-a-kind hutch. It offers ample enclosed space below, plus shelves up above that create a beautiful display space. You can easily change up the look to suit your style depending on the stain you choose.
Tools
Essential
- Brad Nailer
- Circular Saw
- Drill / Driver
- Jigsaw
- Miter Saw
- Pocket Hole Jig
- Random Orbit Sander
Optional / nice to have
- Bar / Pipe Clamps
- Combination Square
- Tape Measure
Materials
| Item | Qty |
|---|---|
| Plywood, 3/4" Thick Full Sheet | 2 board |
| Plywood, 1/4" Thick Full Sheet | 1 board |
| Square Dowel, 1/4" x 1/4" 36" | 18 board |
| Board, 1x3 96" | 2 board |
| Board, 3x3 36" | 1 board |
| 1 1/4" coarse-thread pocket-hole screws | 70 each |
| 1 1/4" fine-thread pocket-hole screws | 16 each |
| #8 x 1 1/2" flat head wood screws | 24 each |
| (4-pack) nail on furniture glides | 1 each |
| Quart General Finishes Gel Stain, Gray | 1 each |
| Pint General Finishes Stain, Whitewash | 1 each |
| 1" Brad Nails | 78 each |
| 3/4" x 50' iron-on oak veneer edge banding | 1 each |
| Veneer Edge Trimmer | 1 each |
Overall cost: $$$$. Lumber prices vary by region, species, and season, so we give a band rather than a figure we would only be pretending to know.
Cut list
| Part | Qty | T × W × L |
|---|---|---|
| Side Panel | 2 | 3/4" × 23" × 66" |
| Bottom Panel | 1 | 3/4" × 23" × 46" |
| Top Panel | 1 | 3/4" × 23" × 46" |
| Lower Shelf | 2 | 3/4" × 22" × 22" |
| Lower Divider | 1 | 3/4" × 21" × 22" |
| Upper Shelf | 3 | 3/4" × 10" × 46" |
| Back Panel | 1 | 1/4" × 47" × 65" |
| Legs | 4 | 2" × 2" × 8" |
| Long Rail | 2 | 3/4" × 2" × 42" |
| Short Rail | 2 | 3/4" × 2" × 18" |
| Corner Brace | 4 | 3/4" × 2" × 6" |
| Long Door Track | 12 | 1/4" × 1/4" × 23" |
| Short Door Track | 6 | 1/4" × 1/4" × 22" |
| Door | 2 | 1/4" × 21" × 23" |
What to buy
Buy 17 boards at 8 ft.
2" × 2"
1 board
3/4" × 23"
3 boards
3/4" × 22"
1 board
3/4" × 21"
1 board
3/4" × 10"
2 boards
3/4" × 2"
2 boards
1/4" × 47"
1 board
1/4" × 21"
1 board
1/4" × 1/4"
5 boards
Assumes 8 ft stock, a 1/8" saw kerf, and buying each part at its own width. Change the board size or kerf on the full board plan →
Instructions
1Cut the Sides
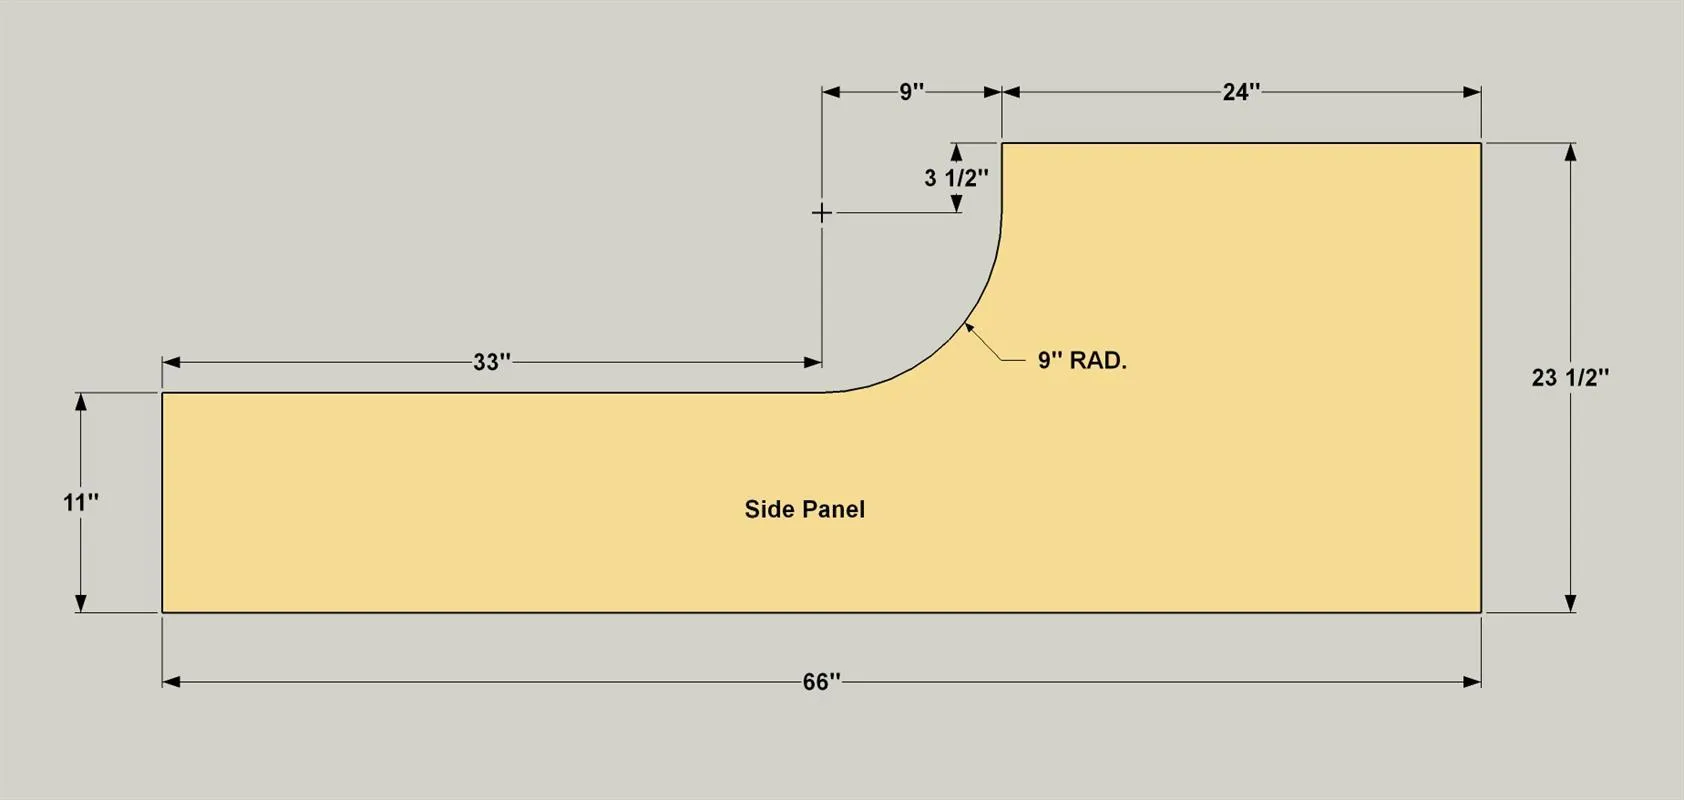
- From 3/4" Oak plywood, cut the two Side Panels to rough size as shown in the cutting diagram. On one Side, lay out the profile with a pencil and then cut out the profile with a jigsaw and a fine tooth blade.
- Sand the edge smooth to the pencil line.
- Lay this cut Side Panel on the second Side Panel, and trace the pattern with pencil.
- Cut the shape out of the second Side.
- Clamp the two Sides together so they are flush at the back and the bottom, and then sand the front edges so they are equal.
2Veneer the Side Panel Edges
- Now you can cover the forward-facing edges of the plywood. To do that, Cut two lengths of veneer edge banding slightly longer than the upper curved edges of the sides, and cut two lengths slightly longer than the lower straight edges of the Sides. With a hot iron, adhere the lower sections of edging to each Side Panel first. When the glue cools, carefully trim the length with a sharp utility knife and then trim the edging to width using a veneer edge trimmer.
- Once that’s done, add eh edging to the upper edges, as well, and then trim it flush. When done, gently sand all of the edging so it is flush with the panel faces, and it’s smooth.
Tip: IRON ON A FINISHED EDGE Plywood is a wonderful material for building projects. Most of the time, though, you don’t want the raw exposed edges to show. To hide them, you can use iron-on edging. It comes with adhesive already applied. You just cut it to rough size, apply it using a hot iron, and then trim it with a utility knife and sand the trimmed areas smooth.
3Cut the Case Parts
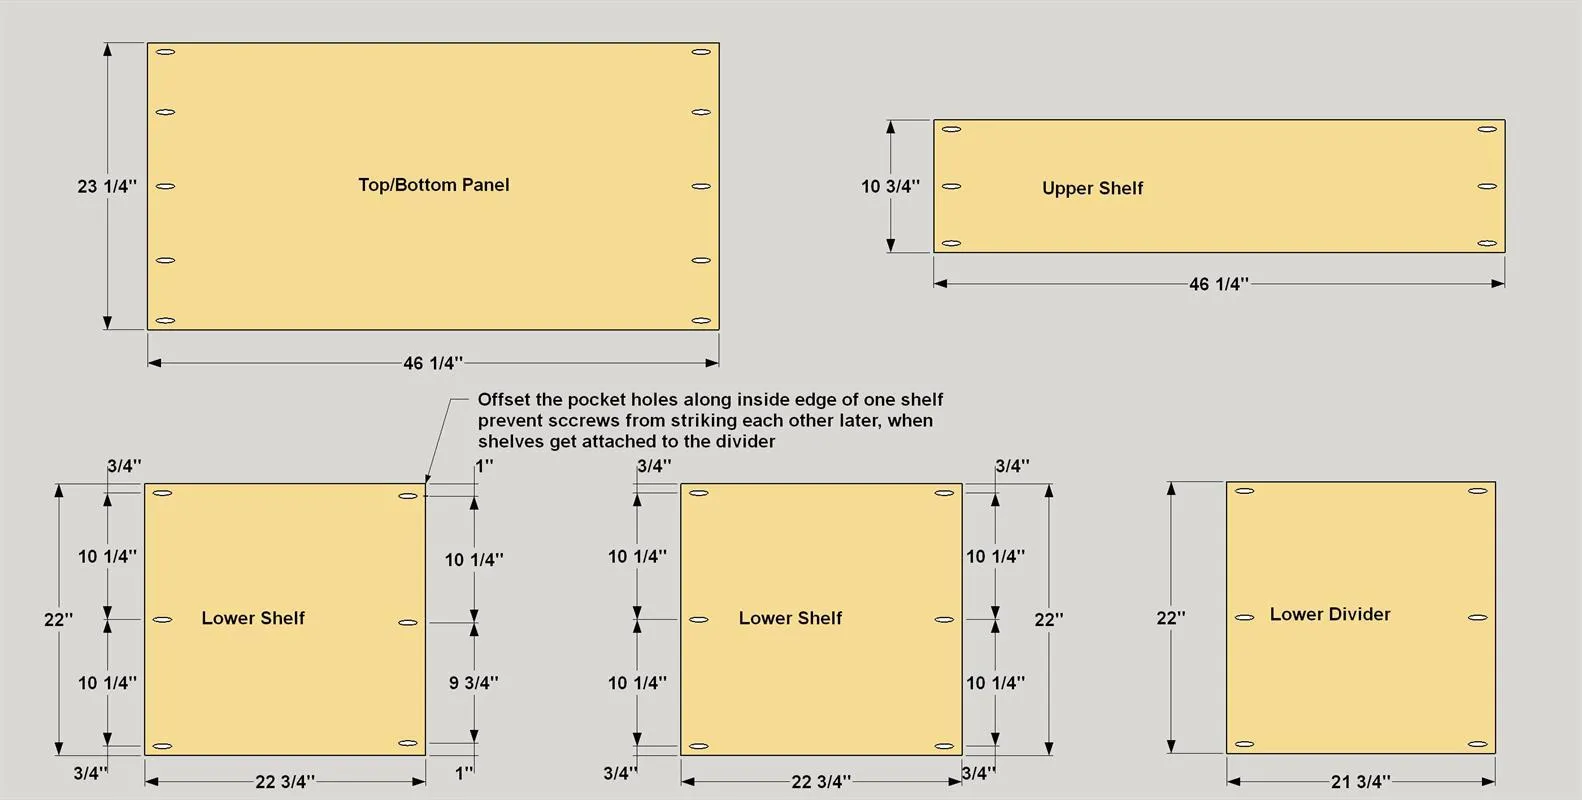
- Cut three Upper Shelves, two Lower Shelves, the Lower Divider, and the top and Bottom Panels to size, as shown in the cutting diagram.
- Set your pocket-hole jig for 3/4"-thick material, and then drill pocket holes where shown in each part. Note that the pocket holes on the inside edge of the Lower Shelves are offset from one another. That way, when you attach the Lower Shelves to the Divider, the screws won’t run into one another.
4Veneer the Case Parts
Now you need to apply veneer edging to the front edge of each of these parts, as well. Cut a strip slightly extra-long for each piece, and then apply it using the same techniques that you used on the Sides
5Start Finishing Early
With all of the case parts completed, this is a good time to stain and finish all of the parts before final assembly. That way, you can get to all of the surfaces easily. Do any final sanding that’s necessary, wipe down all of the parts to get rid of dust, and then apply the finish of your choice. We used a gray gel stain, followed by a couple of coats of satin wiping varnish. Make sure you allow the proper amount of time for the parts to dry, per the manufacturer’s recommendations.
6Start the Assembly
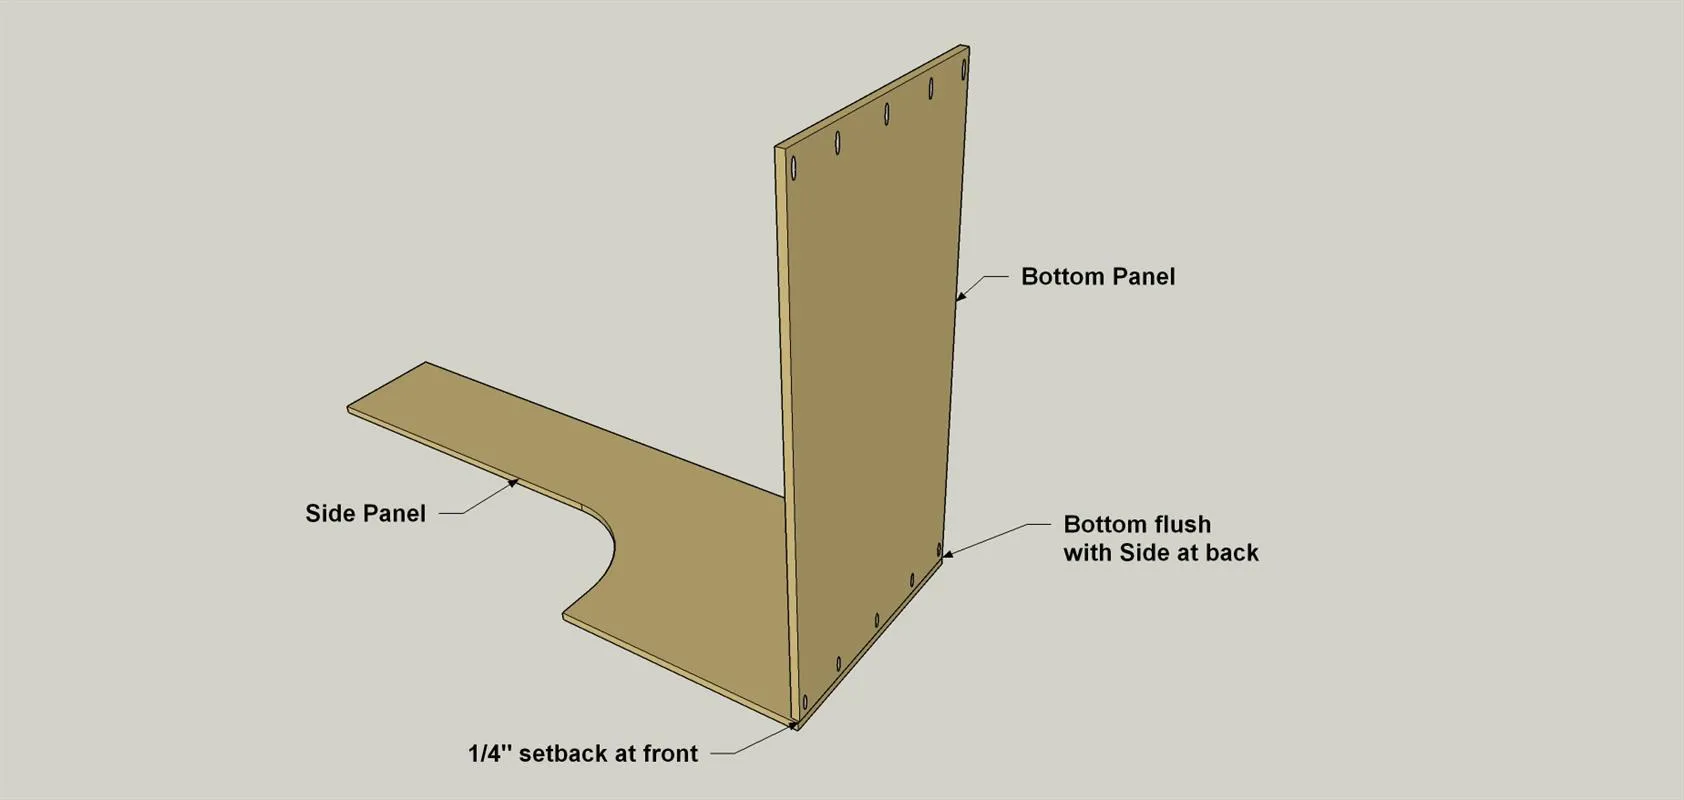
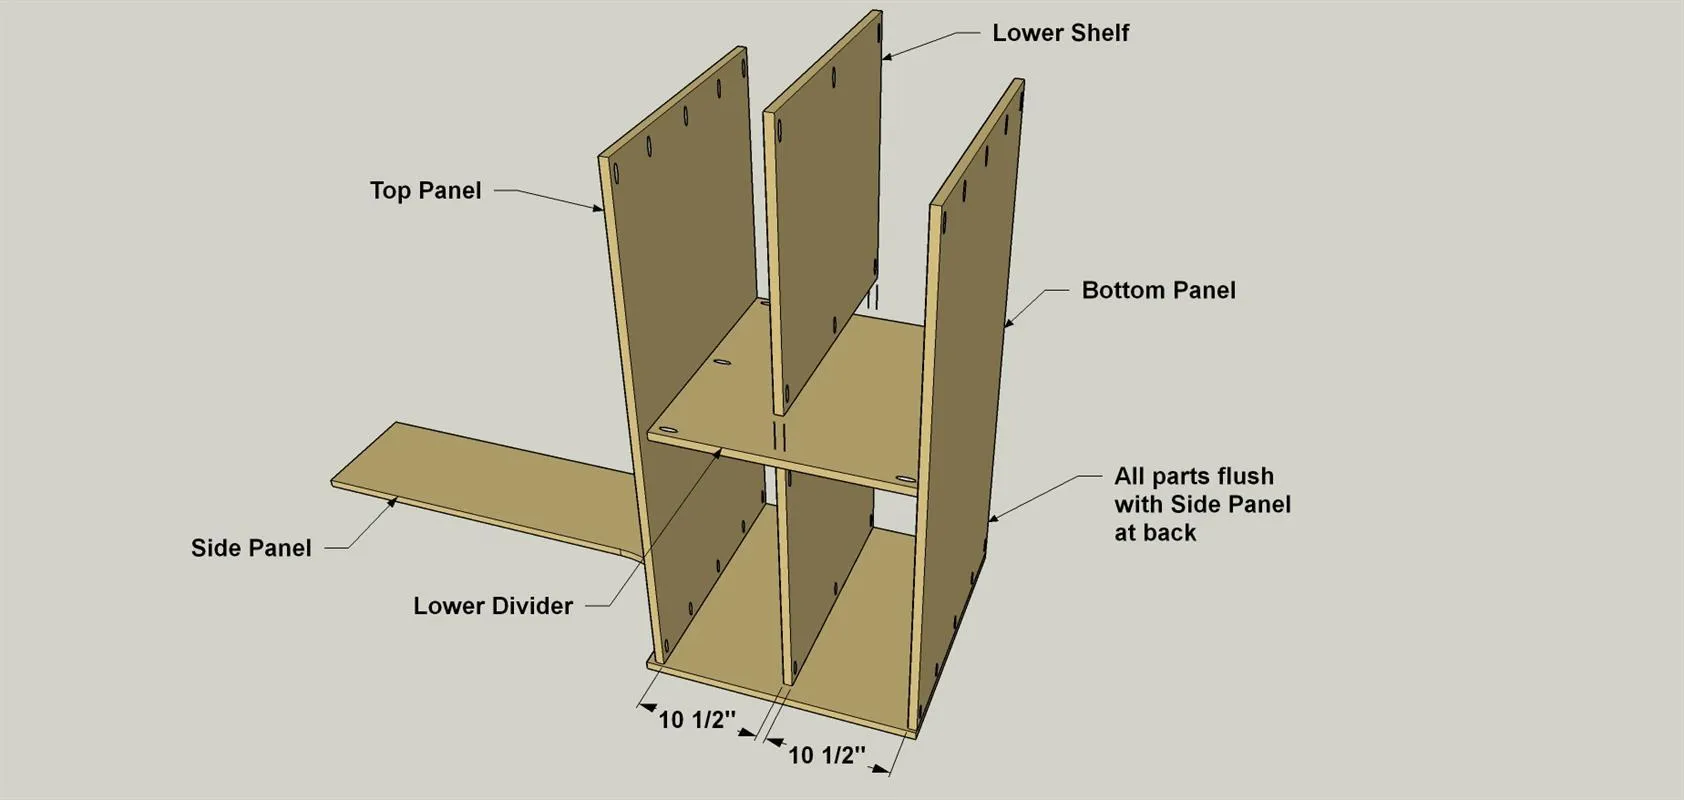
- Lay one Side Panel flat on a work surface, with the inside face up.
- Position the Bottom Panel as shown, so it is flush with the lower end of the Side Panel, and flush with the rear edge of the Side Panel. This leaves the Bottom Panel set back 1/4" from the front edge of the Side Panel. The pocket holes should face down, as shown. Secure the Bottom to the Side using 1 1/4" coarse-thread pocket-hole screws.
7Set the First Shelf and Top
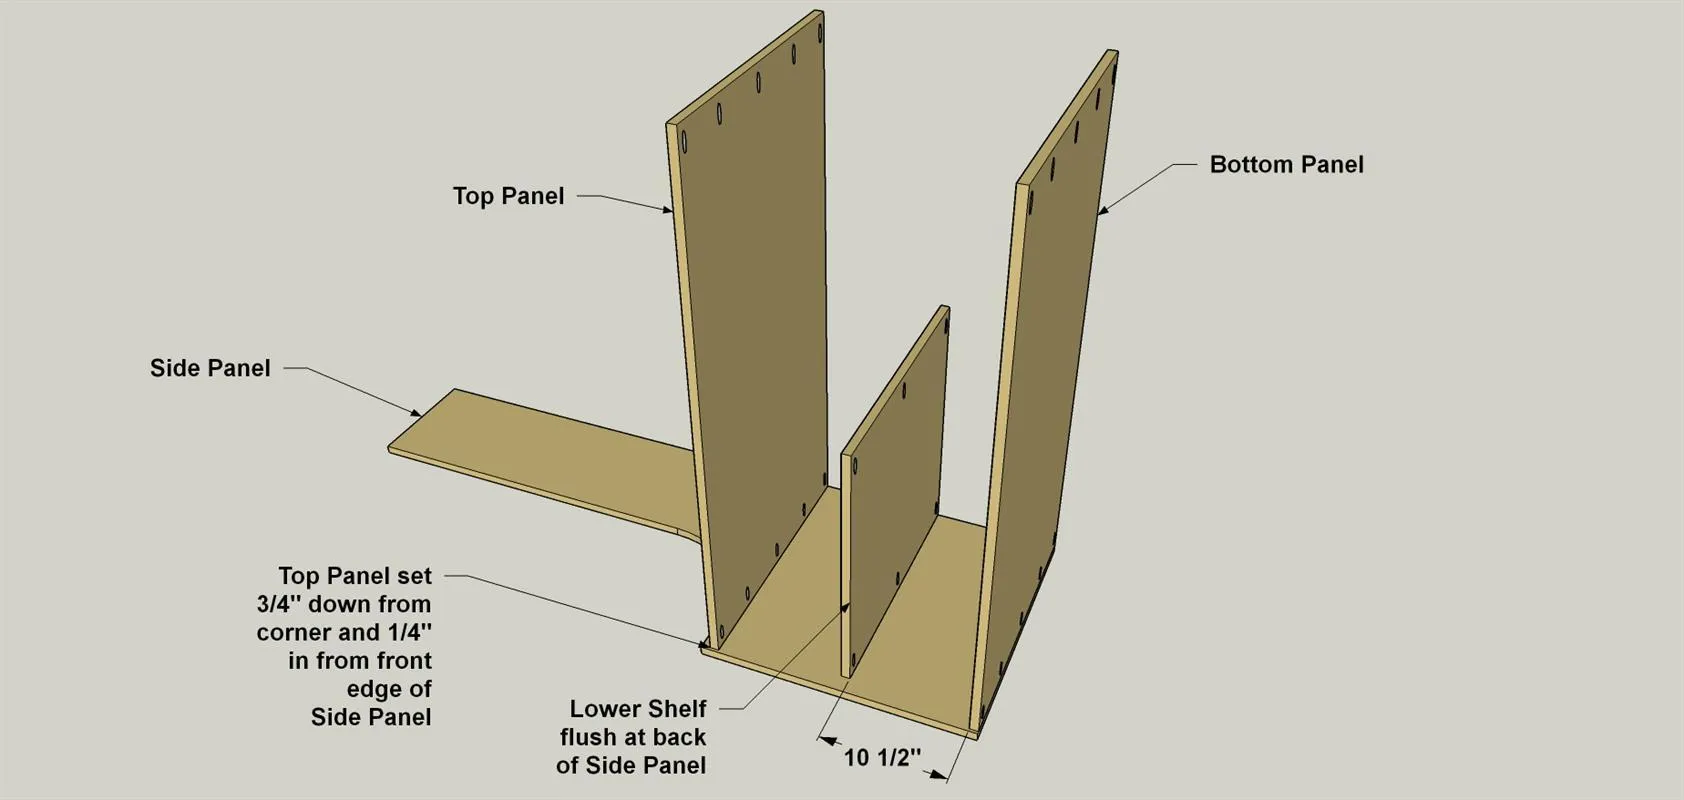
- Set the first Lower Shelf in place at the location shown. Make sure the Shelf is parallel to the Bottom. Secure this Lower Shelf to the Side using 1 1/4" coarse-thread pocket-hole screws.
- Next, set the Top Panel in place at the location shown, and secure it to the Side Panel using 1 1/4" coarse-thread pocket-hole screws.
8Add the Divider and Second Shelf
- Set the Lower Divider between the Top and Bottom Panels in the position shown. Secure the Divider to the Top and Bottom Panels first using 1 1/4" coarse-thread pocket-hole screws.
- Next, verify the position of the First Shelf and then secure it to the Lower Divider with 1 1/4" coarse-thread pocket-hole screws.
- Finally, set the second Shelf in place and secure it to the Lower Divider.
9Add the Upper Shelves
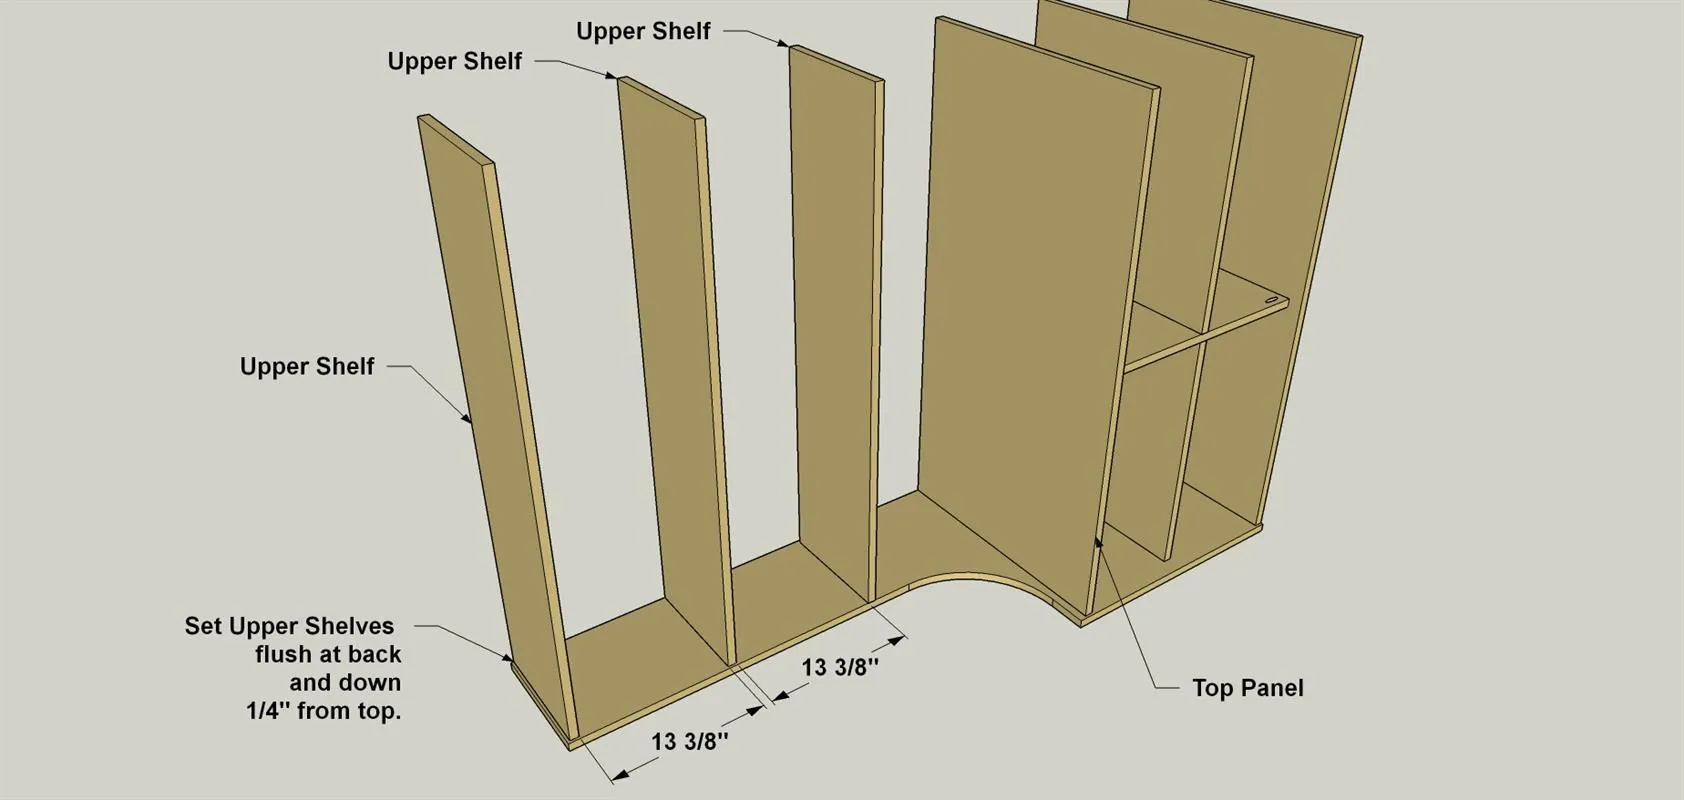
- Set the top Upper shelf in place, 1/4" down from the upper edge of the Side Panel, and flush with the back edge of the Side Panel. Secure the Shelf with 1 1/4" coarse-thread pocket-hole screws.
- Set the other two Upper Shelves at the locations shown, and then secure them to the Side Panel.
10Add the Second Side
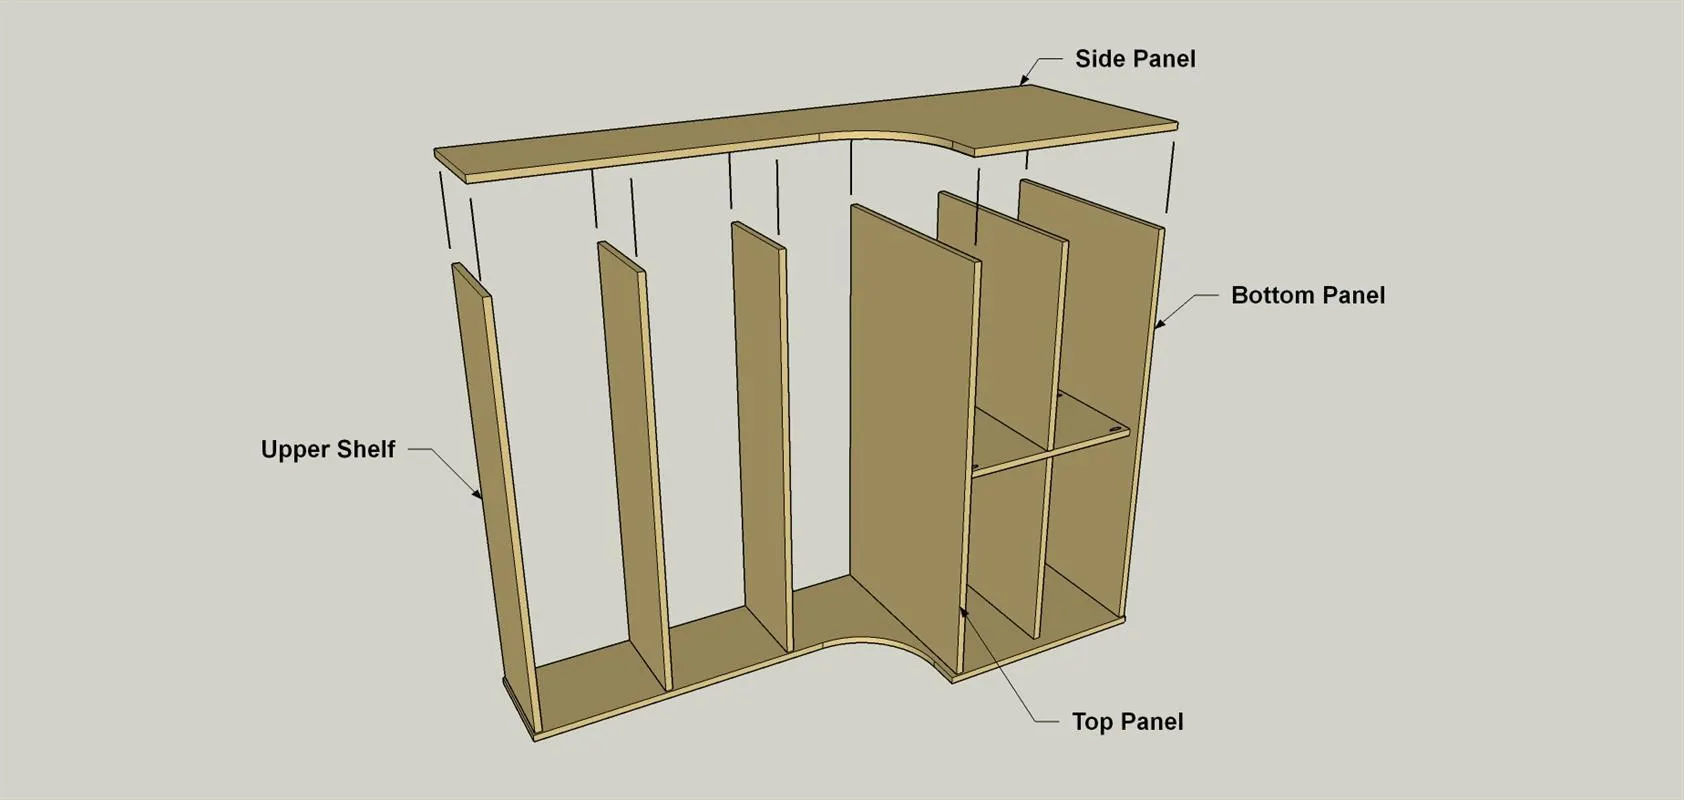
Place the second Side Panel on the Case assembly, align the shelves and panels and secure them using 1 1/4" coarse-thread pocket-hole screws.
11Cut the Back Panel
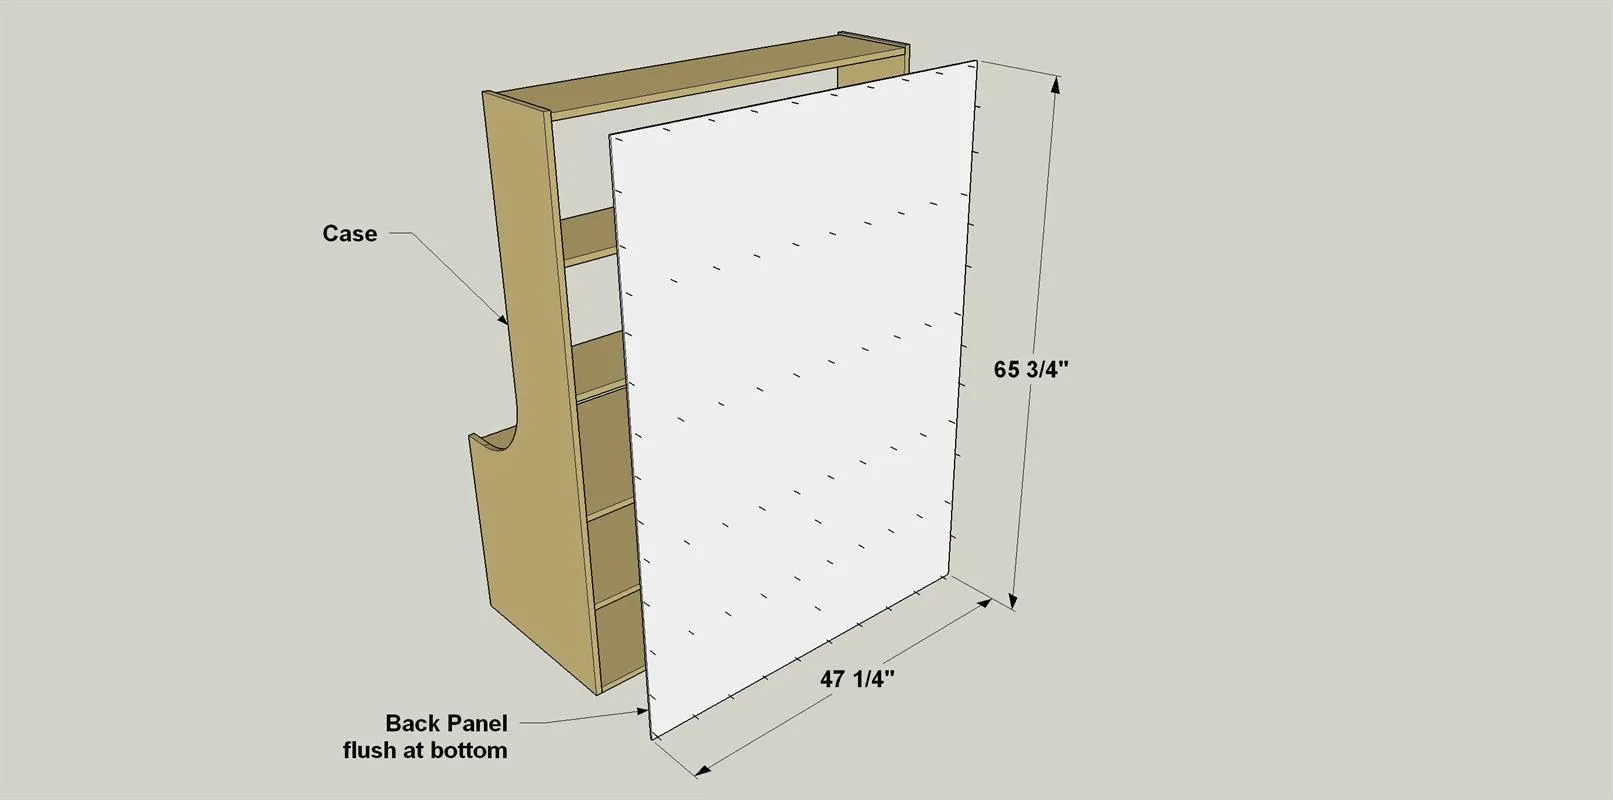
From 1/4" oak plywood, cut the Back Panel to size, as shown in the cutting Diagram. Sand as needed, wipe down the Panel, and then apply stain and finish. Here, we applied a “whitewash” stain, and then wiping varnish. Allow the stain and finish to dry completely.
12Attach the Back Panel
- Stand the hutch case assembly upright on your work surface or floor so it rests on the Bottom Panel.
- Then Center the Back Panel on the back of the Case and secure it to the Bottom Panel with 1" brad nails. If you have access to a brad nailer, that’s the easiest tool to use. If not, you can use a hammer and conventional nails.
- Adjust the case side as needed to make sure that the assembly is square, and that the Back Panel is positioned equally spaced on each side.
- Then secure the Back Panel to the Side Panels and the Top Shelf with 1" brad nails.
- Measure and mark the center locations of the Upper Shelves and the Top Panel, and then nail the back at these locations.
13Cut the Legs
Cut four legs to length from a 3x3 oak board, as shown in the cutting diagram. Set them aside for now.
14Make the Rails
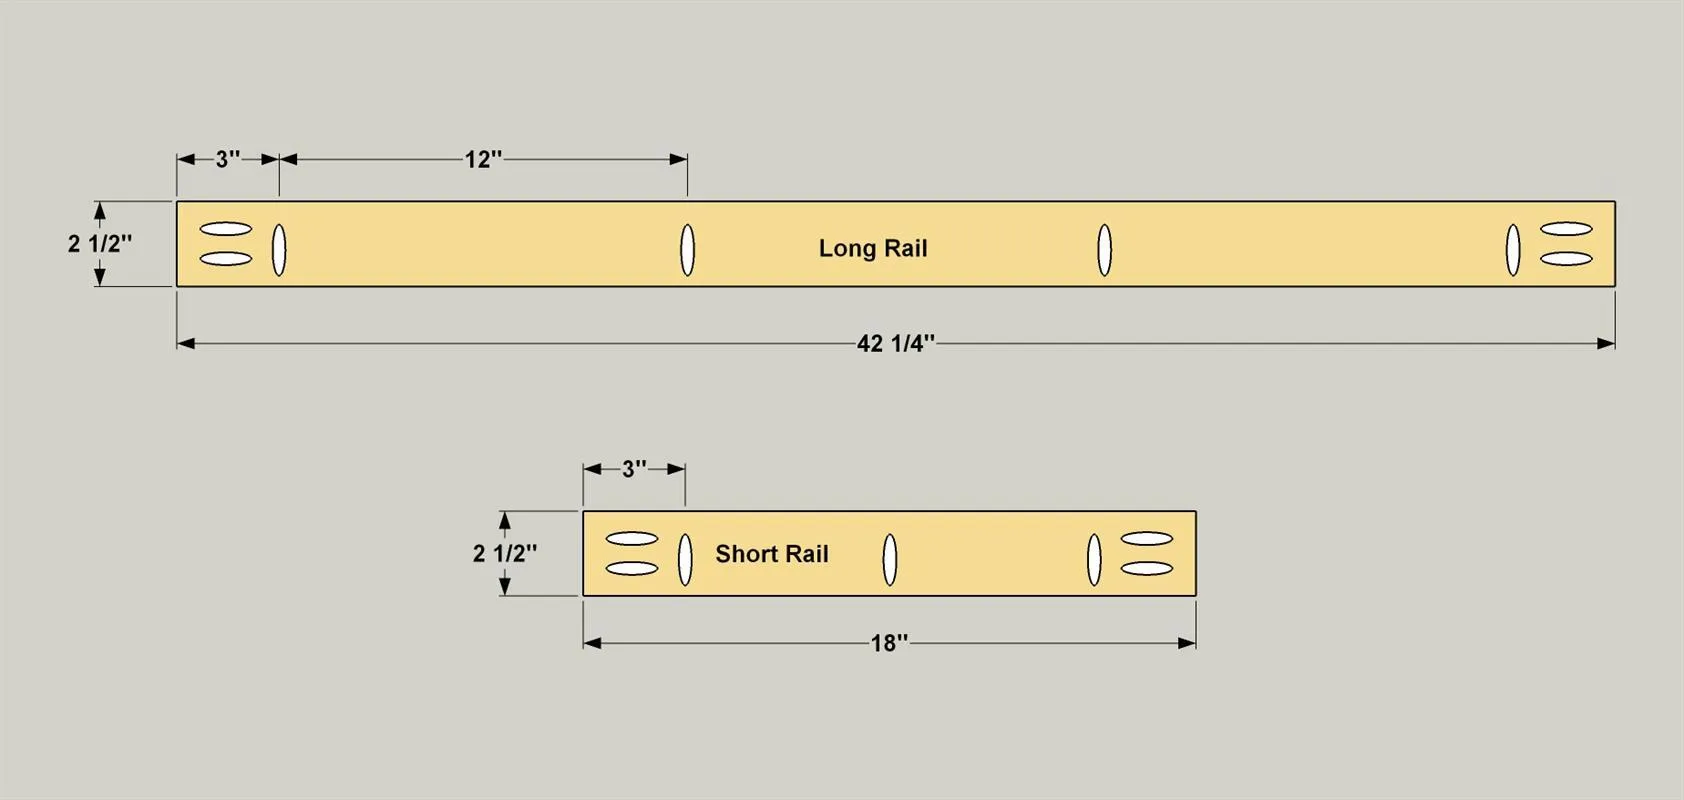
Cut two Long Rails and two Short Rails to length, as shown in the cutting diagram. With your pocket-hole jig still set for 3/4" think material, drill pocket holes in all four of the rails at the locations shown.
15Assemble the Base Legs and Rails
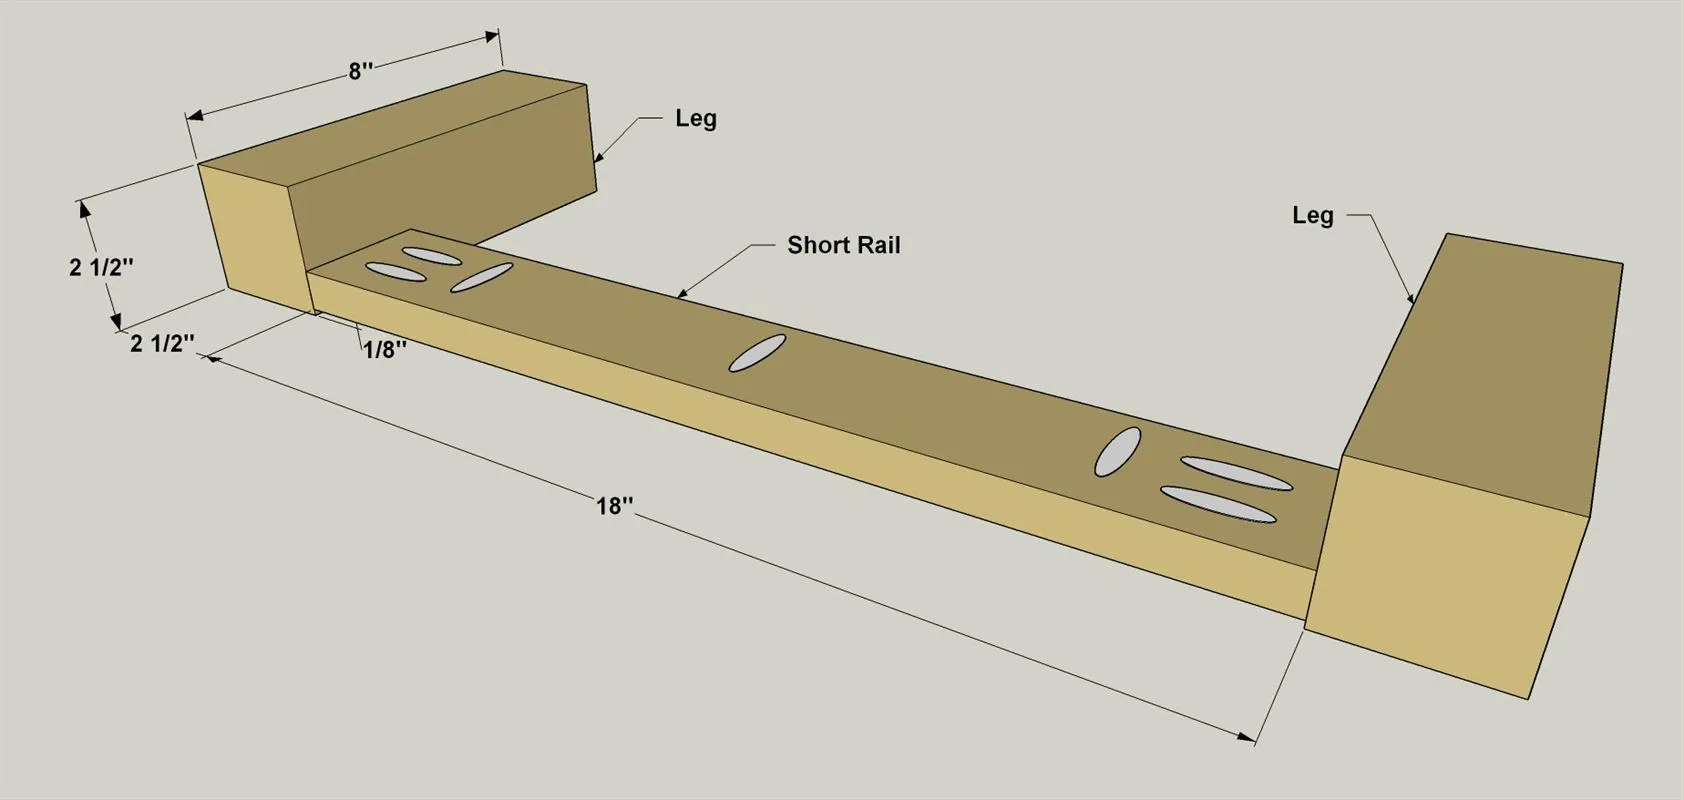
- Set one Short Rail between two Legs at the location shown and clamp the parts together. Make sure the pocket holes along the length of the Rails, which will secure the Base to the hutch case, are oriented upward. Secure the Short Rail to the Legs using 1 1/4" fine-thread pocket-hole screws. Complete the same process for the other Base Side.
- Now position the Long Rails, and attach them to the Legs in the same way.
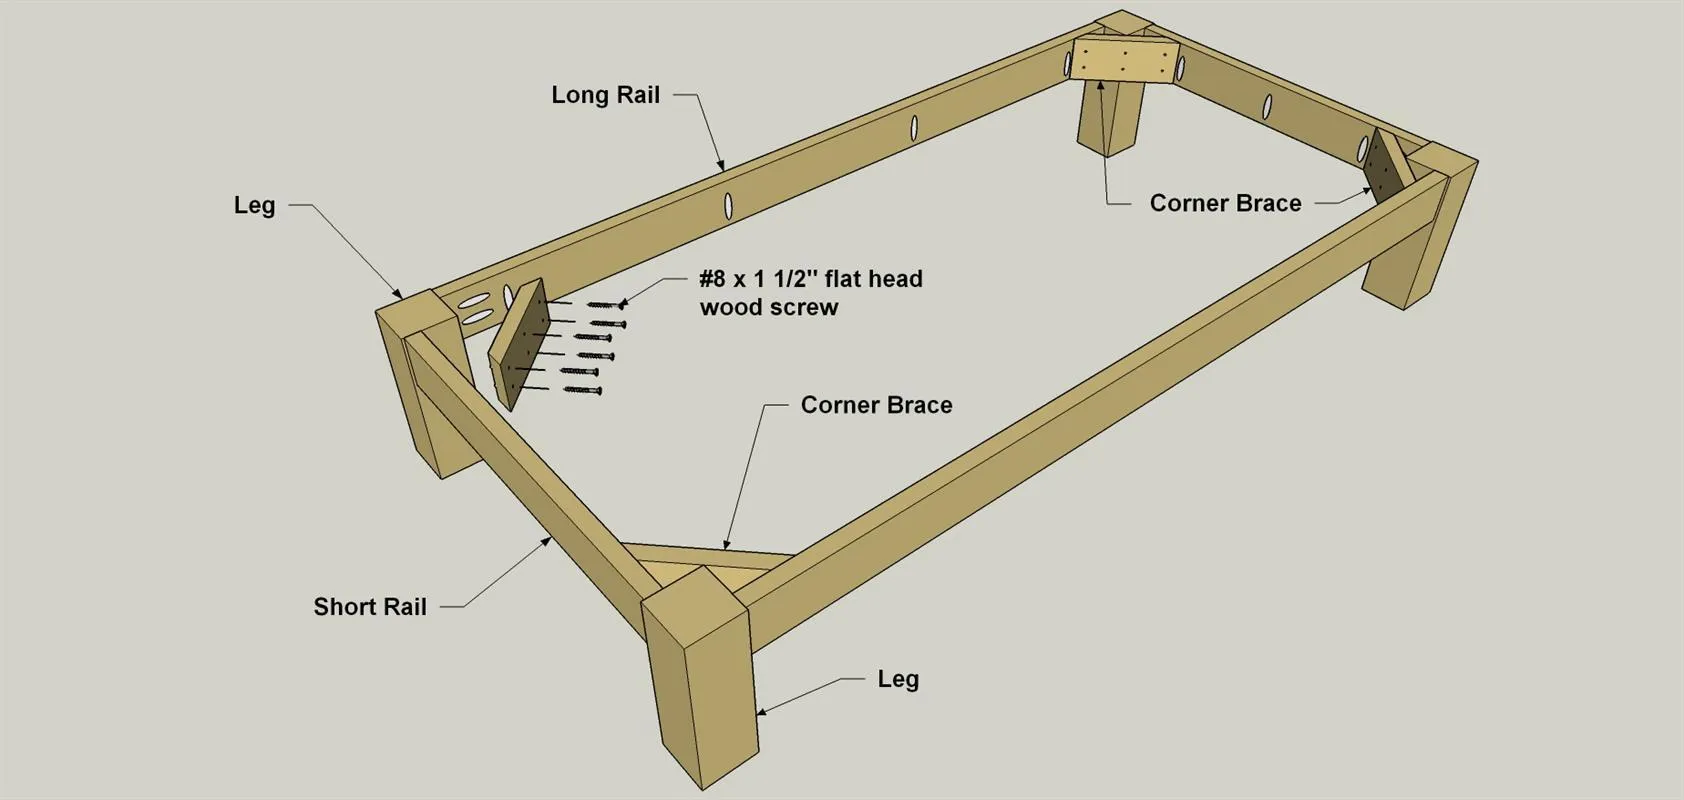
Tip: Check To See if the Base is Square To check if the base is square, measure diagonally from corner to corner in one direction, and then in the other. If the dimensions are equal, the base is square. If one dimension is greater, clamp the Base diagonally on the larger dimension. Tighten the clamp and check the dimensions until the two numbers are equal. When the base is square, install the corner braces.
16Create Corner Braces
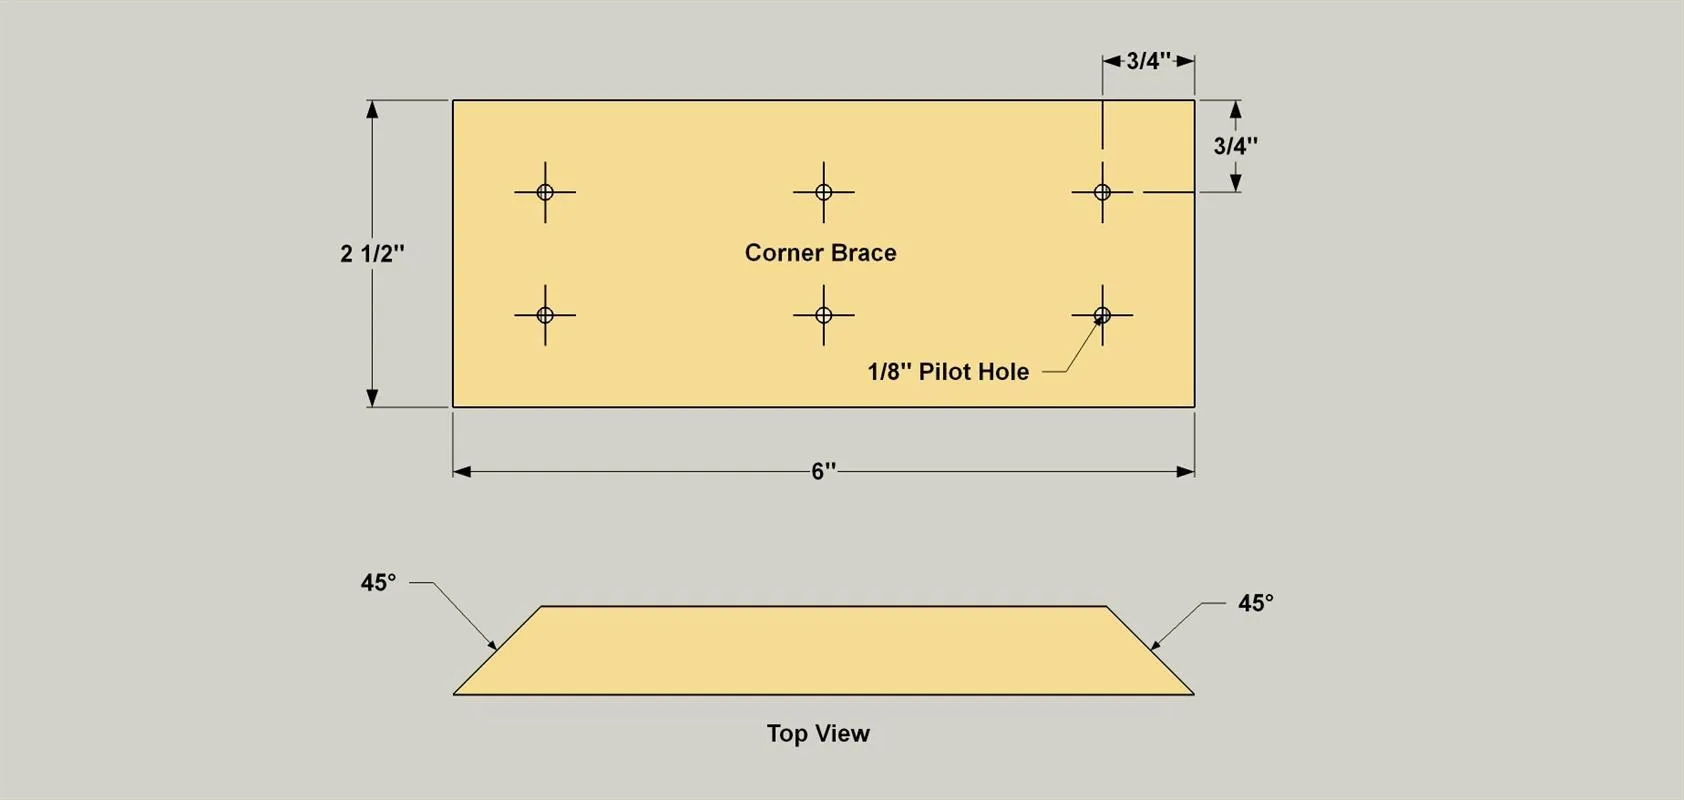
Cut four corner braces to length, beveling he ends at 45°, as shown in the cutting diagram. Drill six pilot holes at the locations shown.
17Install the Corner Braces
- With the assembled Base standing upright, apply glue the ends of one Corner Brace, set it in one corner, and lightly clamp it in place.
- Drill through the pilot holes into the Rails and Legs.
- Then drive 1 1/2" flat-head wood screws to attach the Brace. Install the other three braces the same way.
18Attach the Base to the Case
- Set the Case on its back on a work surface.
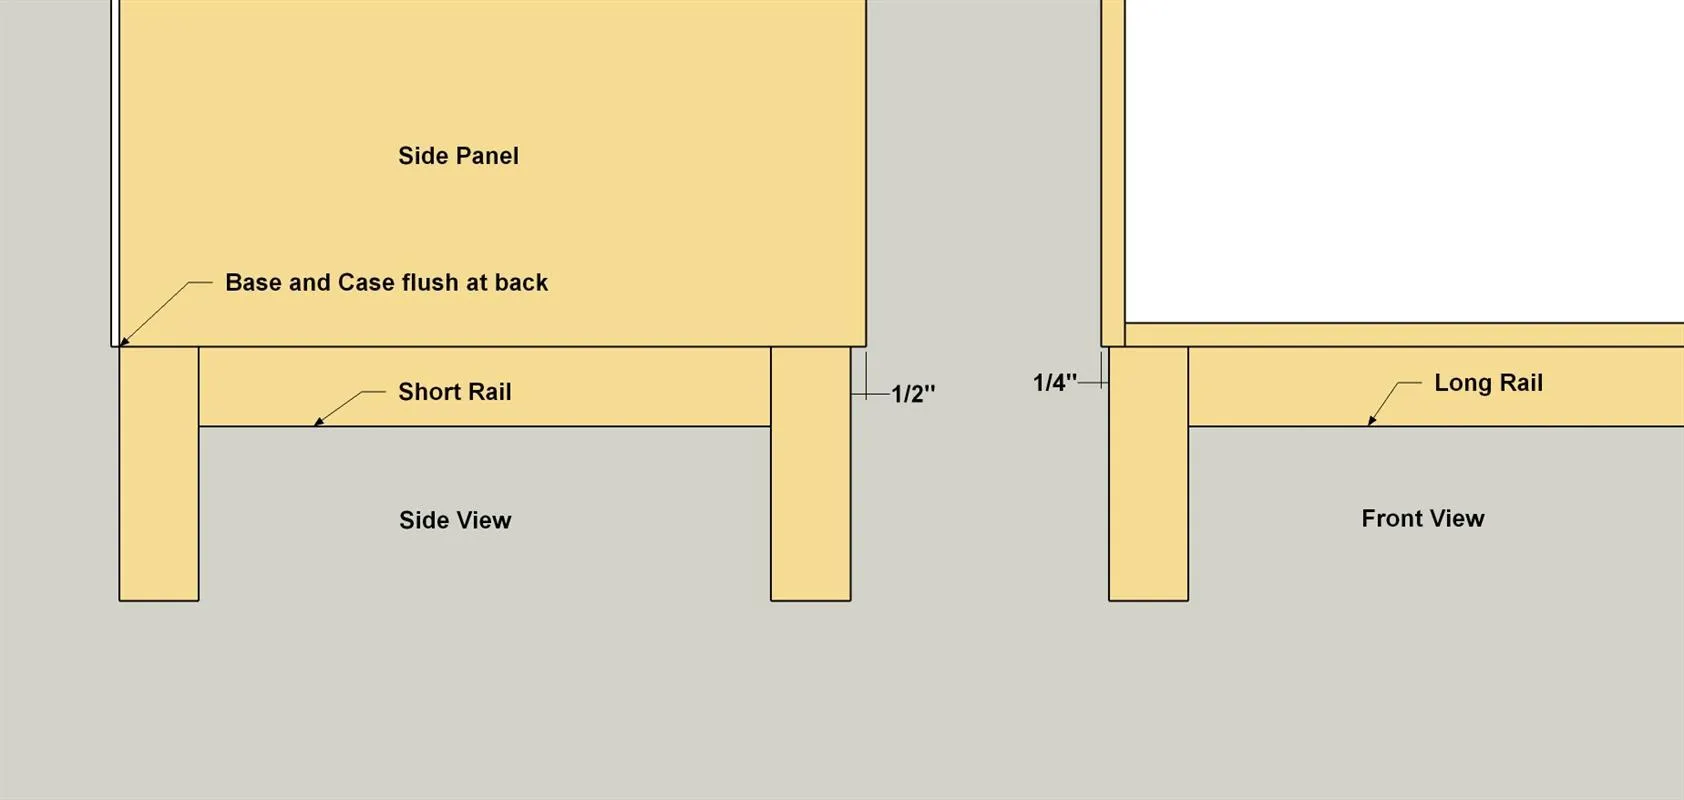
- Position the base on the case so that the rear Legs are flush with the rear edge of the Side Panels. Secure the base to the Case using 1 1/4" coarse-thread pocket-hole screws.
19Make the Doors
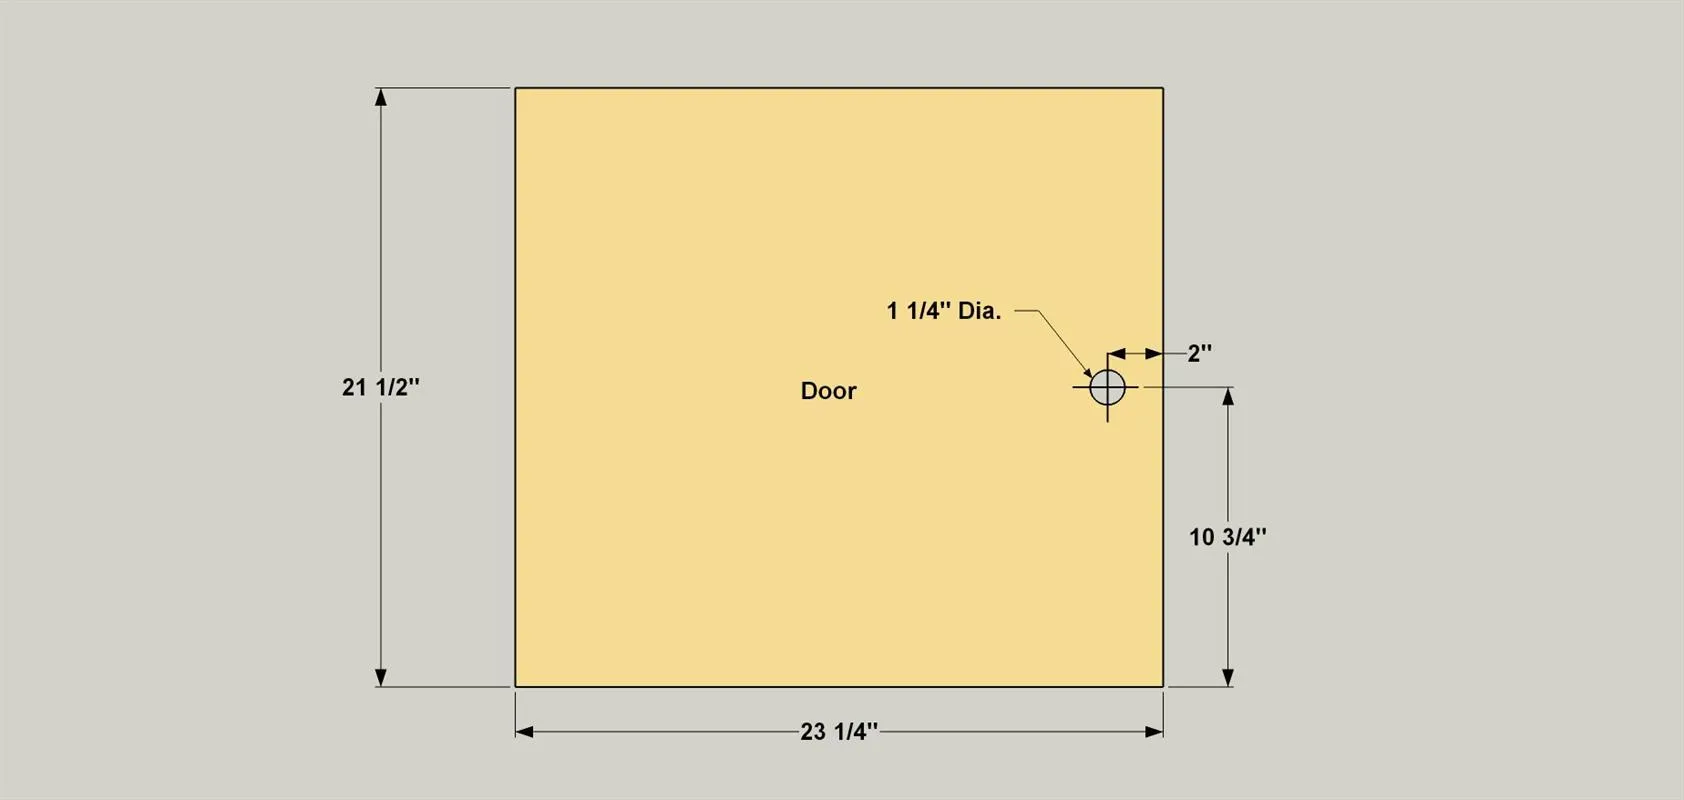
- Cut the two bypass Doors from 1/4" oak plywood, as shown in the cutting diagram.
- Drill the finger holes at the locations shown.
- Sand all of the edges and the holes smooth.
- Sand the Door faces as needed, and apply stain and finish.
- Set the Doors aside for now.
20Add Lower Door Tracks
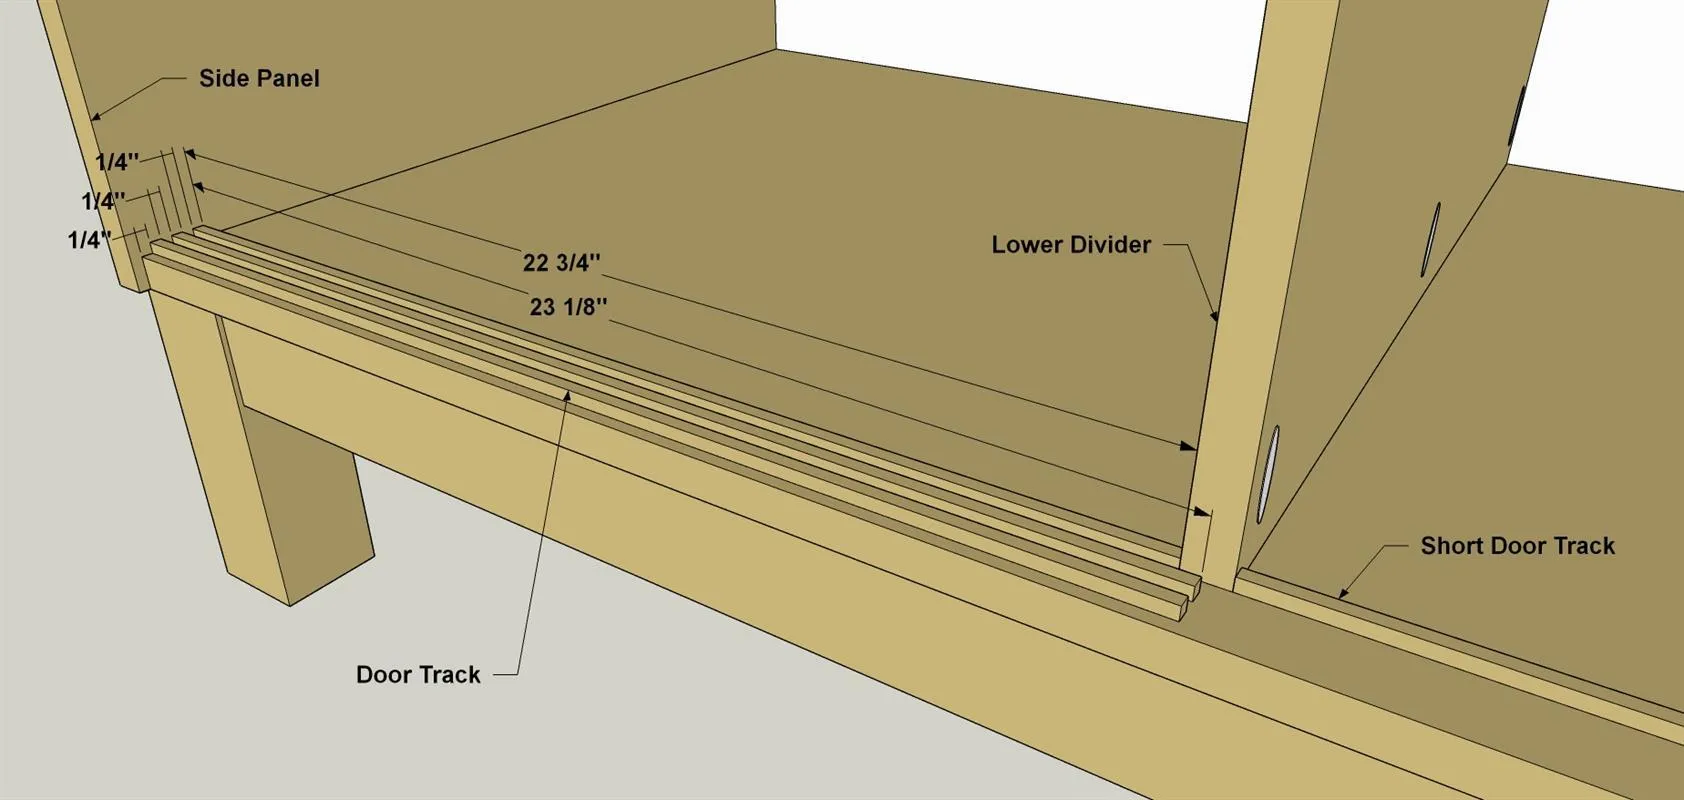
- Lightly sand two of the Short Tracks and four of the Long Tracks, and then apply stain and finish. Install the tracks by first positioning the pieces on the Bottom Panel, as shown.
- Start with the Short Door Tracks. They sit flush with the front edge of the Lower Divider.
- Apply a thin bead of glue to the bottom edge of the Short Door Tracks, and then clamp them in place. When the glue dries, you can install the Long Door Tracks. Use a scraps of square dowel as spacers between the Tracks as you go.
21Install the Doors
- Once the glue on the tracks has dried, you can install the doors.
- Take the first Door, tip the top inward at a slight angle, and slide it up into into the innermost upper track until it stops.
- Next, tip the bottom of the Door inward and set in the same track on the Bottom Panel.
- Repeat the process for the second door but place it into the outermost track. To make the Doors slide more easily, you can apply a small amount of paste wax inside the Tracks.
- Finally attach a furniture glide to the bottom of each Leg to protect your floors.
22Add Upper Door Tracks
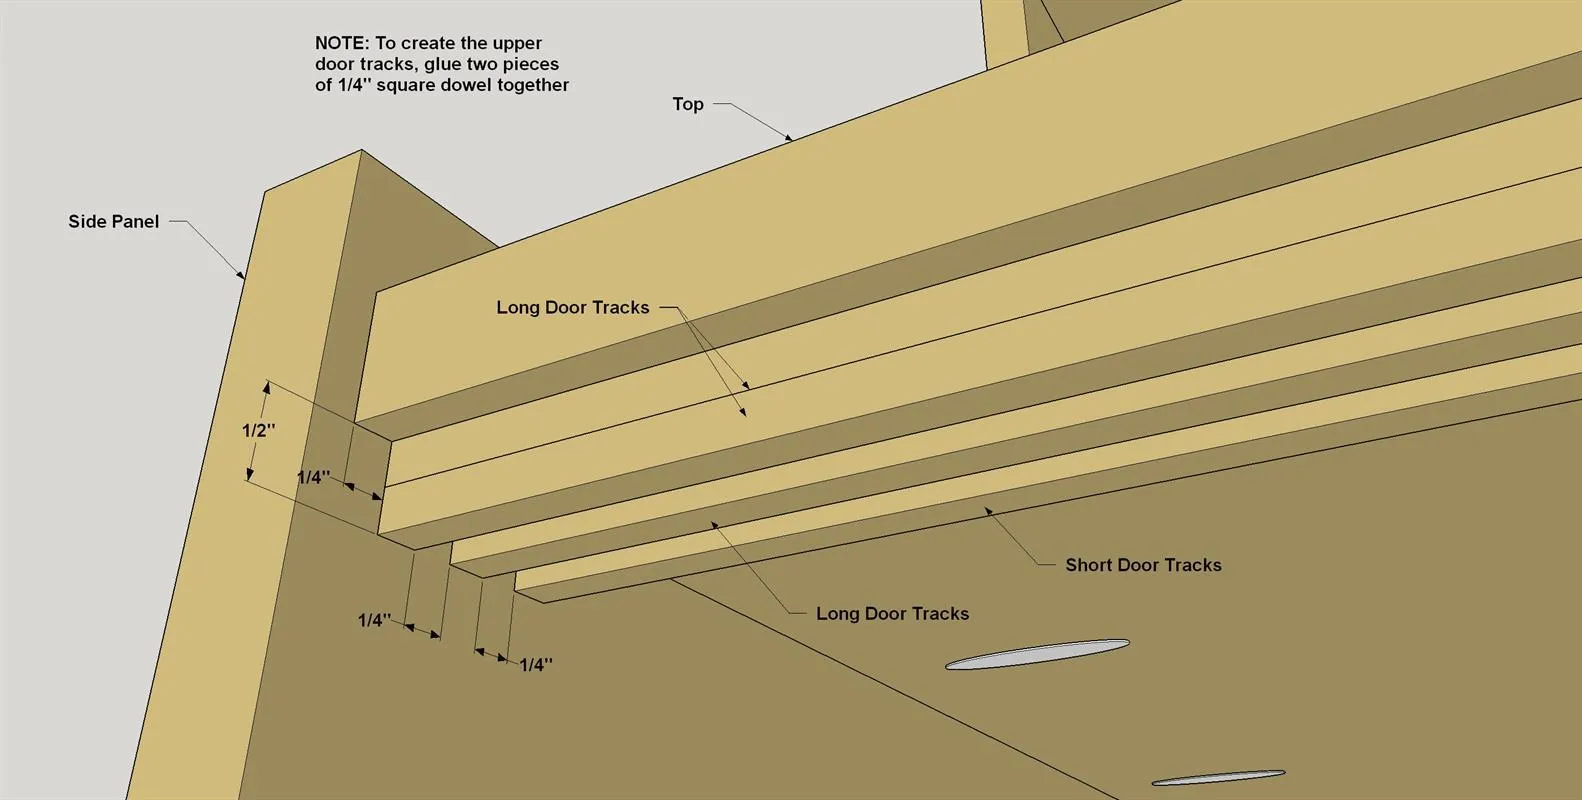
- Now you can add the upper door tracks. These are a little different, because the recesses need to be twice as deep as the lower tracks. That way, you'll be able slip the doors into place in the next step. So, start by gluing the remaining Short Tracks and Long Track together in pairs to form pieces that are 1/2" tall by 1/4" wide. When the glue dries, you can lightly sand these pieces, and then apply stain and finish.
- Then install these upper tracks on the underside of the Top Panel, as shown, by repeating the process used for the lower tracks.
23Cut Door Tracks to Length
Now you can begin to create the sets of tracks that the Doors ride in. They're made by gluing lengths of 1/4" square dowel to the inside face of the Bottom Panel and Top Panel. To start, cut six Short Door Tracks to 22 3/4" long, and cut and twelve Long Door Tracks to 23 1/8" long from 36" square dowel, as shown in the cutting diagram.
Tags
- Buffet, Hutch, & Sideboards
- Advanced
Reviews & builds
No reviews yet
Sign in to review this plan or share your build.
No reviews yet. Be the first to build this.