 Notch
- Difficulty
- Easy
- Time
- 2.8–5.5 hours
- Cost
- $$
About this build
This 9 space cubby organizer can be put together quickly with off the shelf lumber and finished however you'd like. A great storage solution for crafts, toys, shoes, or even office supplies.
Tools
Essential
- Brad Nailer
- Circular Saw
- Drill / Driver
- Impact Driver
- Miter Saw
- Pocket Hole Jig
- Random Orbit Sander
Optional / nice to have
- Combination Square
- Tape Measure
Materials
| Item | Qty |
|---|---|
| Board, 2x2 96" | 8 board |
| Board, 2x3 96" | 1 board |
| Board, 2x4 96" | 1 board |
| Board, 1x4 96" | 1 board |
| Board, 1x4 72" | 1 board |
| Moulding, 1/2" x 1/2" square wood trim 120" | 1 board |
| 2-1/2" pocket hole screws | 150 each |
| 1-1/4" pocket hole screws | 30 each |
| Wood glue | 1 each |
| 18-gauge finish nails/brads | 27 each |
| Sandpaper | 1 each |
| Stain or paint | 1 each |
| Clear top coat | 1 each |
| Paste wax | 1 each |
Overall cost: $$. Lumber prices vary by region, species, and season, so we give a band rather than a figure we would only be pretending to know.
Cut list
| Part | Qty | T × W × L |
|---|---|---|
| Vertical Posts | 4 | 1 1/2" × 1 1/2" × 47 1/2" |
| Horizontal Supports | 24 | 1 1/2" × 1 1/2" × 13" |
| 2 x 2 Rails | 2 | 1 1/2" × 1 1/2" × 10 1/2" |
| 2 x 3 Rails | 6 | 1 1/2" × 2 1/2" × 10 1/2" |
| 2 x 4 Rails | 6 | 1 1/2" × 3 1/2" × 10 1/2" |
| Top Board | 3 | 3/4" × 3 1/2" × 42" |
| Stop Blocks | 9 | 1/2" × 1/2" × 13" |
What to buy
Buy 12 boards at 8 ft.
1 1/2" × 3 1/2"
1 board
1 1/2" × 2 1/2"
1 board
1 1/2" × 1 1/2"
6 boards
3/4" × 3 1/2"
2 boards
1/2" × 1/2"
2 boards
Assumes 8 ft stock, a 1/8" saw kerf, and buying each part at its own width. Change the board size or kerf on the full board plan →
Instructions
1Lay out vertical posts
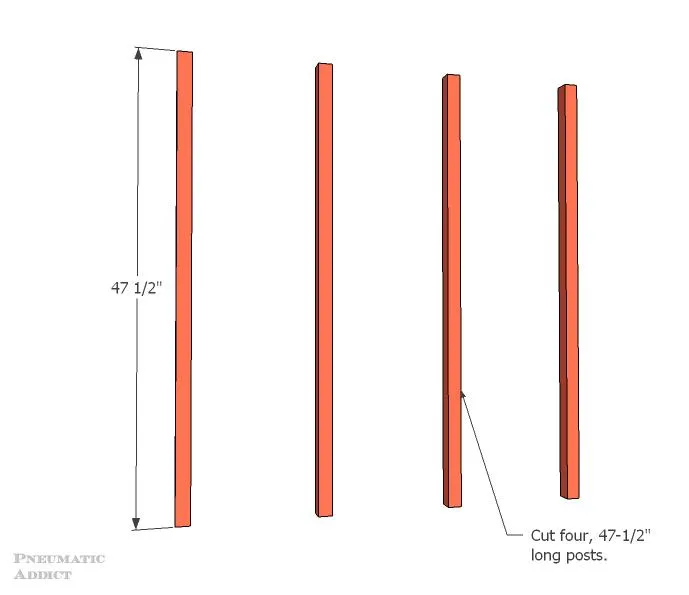
Cut eight, 2 x 2 x 47-1/2" posts. Lay out four posts on your work surface.
2Assemble grids
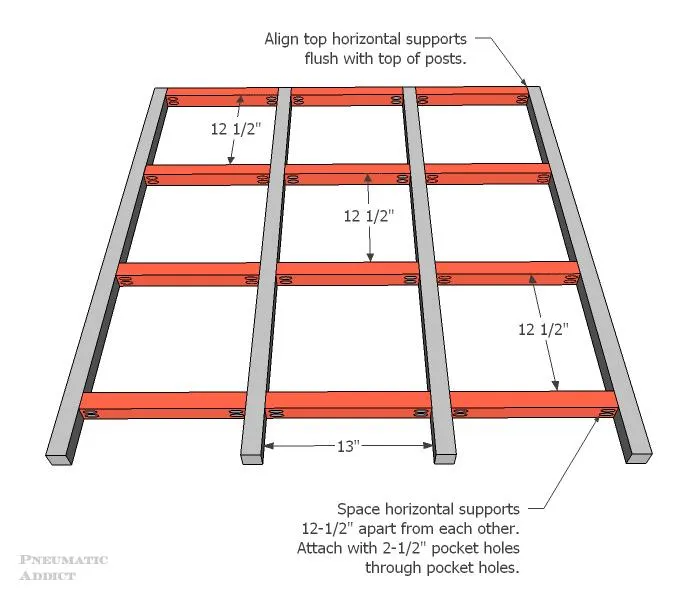
- Cut 24, 2 x 2 x 13" horizontal support pieces. To create each grid: Align a horizontal support between each post, making sure each sits flush to the top of the posts. Using pocket holes and 2-1/2" screws, connect posts and supports.
- Measure 12-1/2" from the bottom of the supports and ascribe a line.
- Align the next row of supports on the line and attach with screws through pocket holes.
- Attach two more rows of horizontal supports in the same manner, ultimately creating a grid with nine, 13" x 12-1/2" openings.
- Repeat the above steps to create a second grid with remaining vertical posts and horizontal supports.
3Attach rails
- Cut rails from 2 x 2, 2 x 3 and 2 x 4 boards.
- Drill 2-3 pocket holes, evenly spaced on each end of each rail.
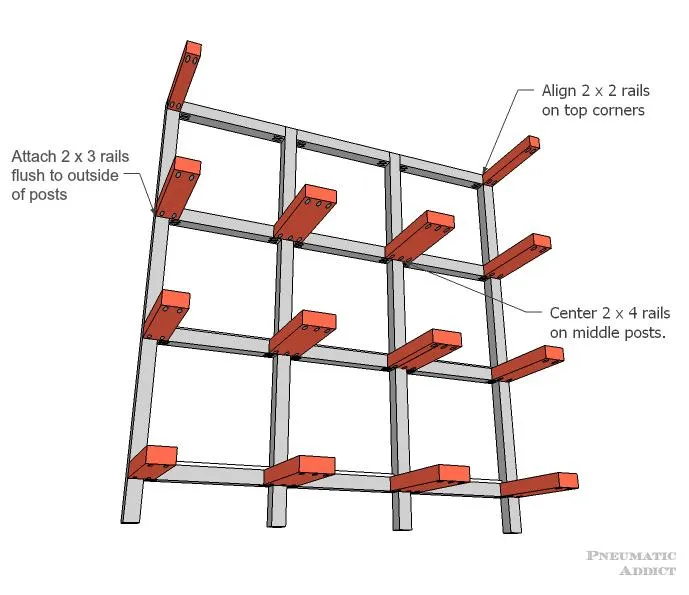
- Flip one assembled grid onto your work surface, face-down. Using pocket holes and 2-1/2" screws, attach the 2 x 2 rails in the top corners.
- Attach 2 x 3 rails at the intersecting grid points, along the outer posts, keeping the rails flush to the outside.
- Attach 2 x 4 rails, centered on the remaining intersecting grid points.
4Connect frame
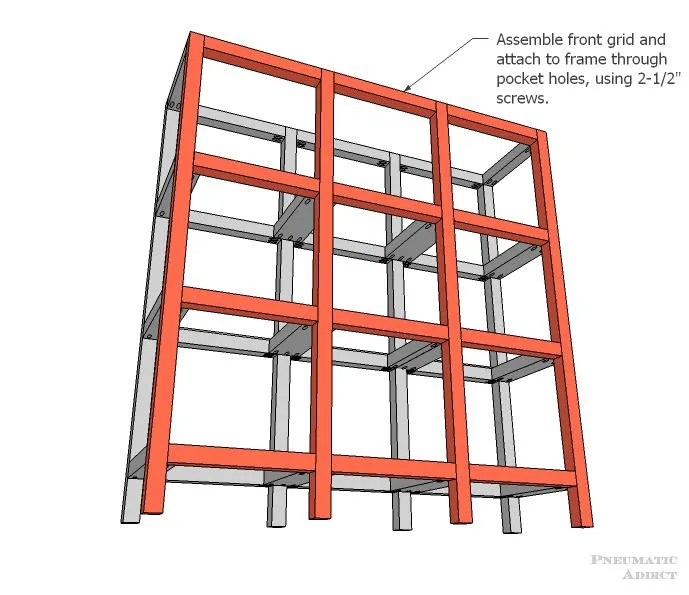
- Flip the second grid, face-down onto the work surface. Invert the first grid (with attach rails) onto the second grid.
- Align the rails and connect with pocket holes and 2-1/2" screws.
5Build and attach top
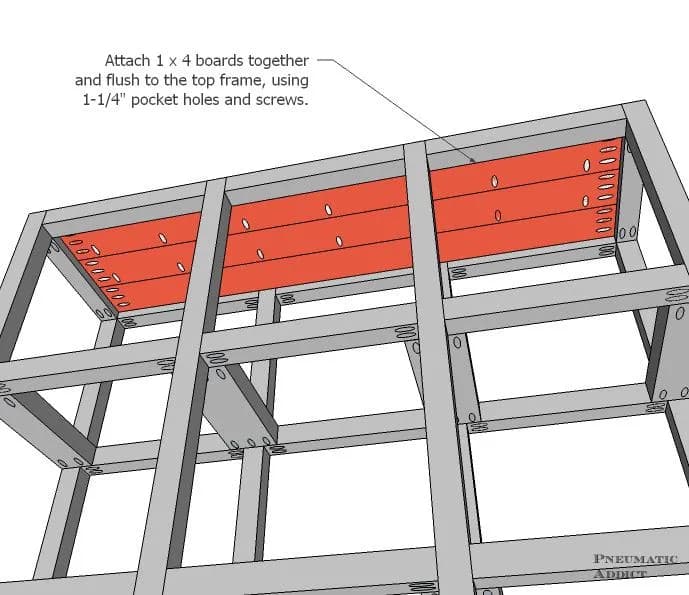
- *First measure the opening on the top side of the assembled frame. If the opening is not 42" x 10-1/2", adjustments to the size of the top may be needed.
- Cut three, 1 x 4 x 42" boards.
- Join boards edge to edge with pocket holes and 1-1/4" screws.
- Drill additional pocket holes around the perimeter of the joined top.
- Insert the top into the opening on the top of the frame.
- Attach the top to the frame using the perimeter pocket holes and 1-1/4" screws.
6Attach stop blocks
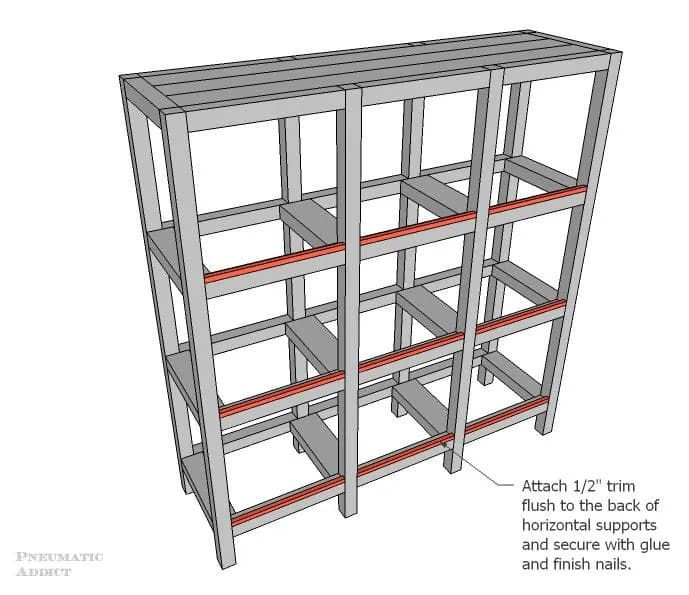
- Cut nine, 13" lengths of 1/2" x 1/2" square wood trim. On the backside of the frame, place a stop block on the top side of each horizontal support, flush to the back.
- Attach with wood glue and 18 gauge finish nails. This should provide a 1" wide strip of horizontal support exposed.
7Storage cubbies
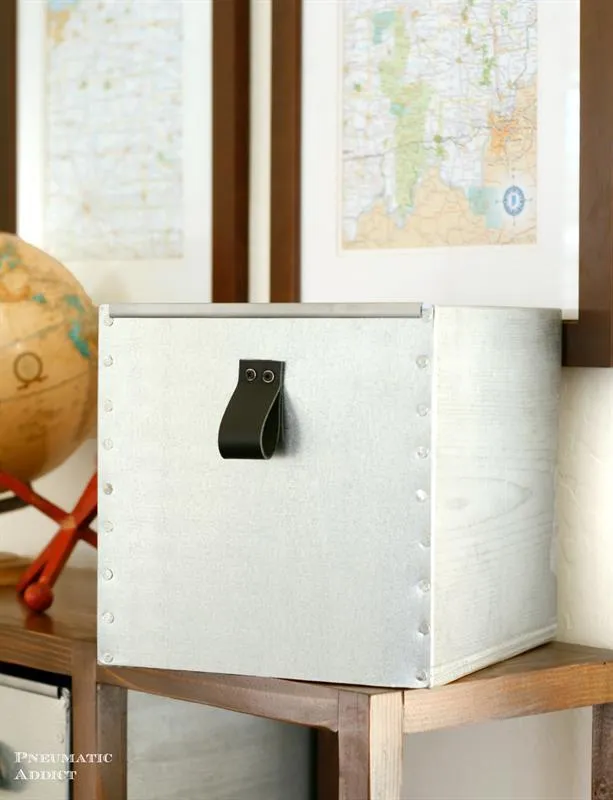
The frame will accommodate standard, 12" storage cubbies. To make a set of DIY, Industrial style storage cubbies from wood and off-the-shelf steel panels, check out this tutorial: http://www.pneumaticaddict.com/2016/02/diy-industrial-storage-cubbies.html
8Sand and finish
Sand the entire frame, making sure to knock down sharp edges. For a painted finish, sand up to a minimum of a 120 grit and for a stained finish, a minimum of a 220 grit. For smoother movement and extra protection, apply 1-2 coats of paste wax to the rails before adding storage cubbies.
Tags
- Kid Spaces and Play Room
- Beginner
Reviews & builds
No reviews yet
Sign in to review this plan or share your build.
No reviews yet. Be the first to build this.