 Notch
Notch- Difficulty
- Intermediate
- Time
- 4.8–9 hours
- Cost
- $$$
About this build
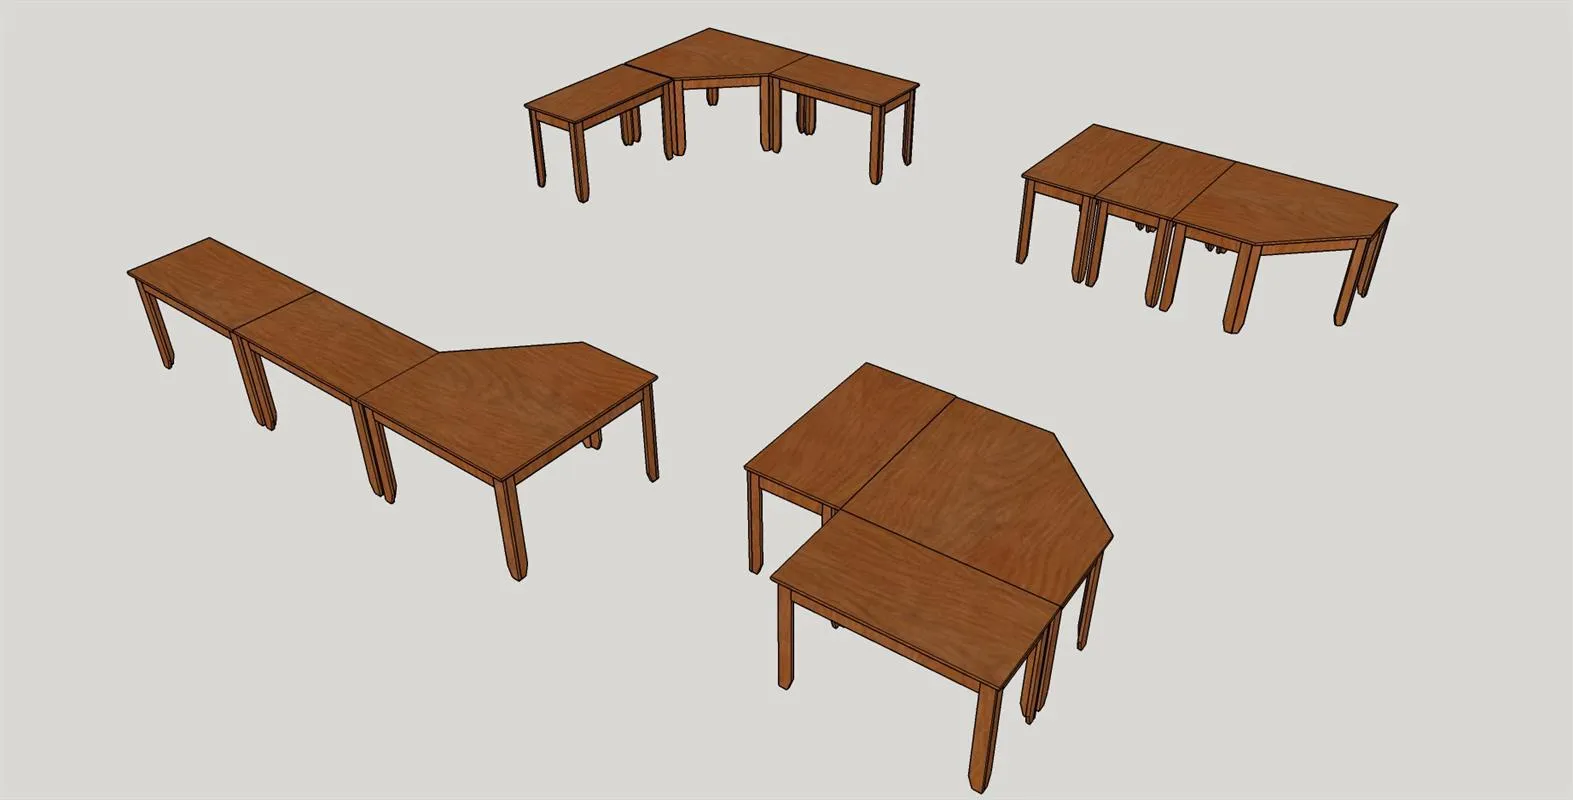
This versatile and handy set of tables will be a useful addition to your hobby room, office, laundry or garage. It can be built in a weekend from one 3/4″ sheet of plywood and six 1X8X96″ boards. It’s flexible and practical design allows you to arrange a layout that best fits your needs.
Tools
Essential
- Band Saw
- Brad Nailer
- Circular Saw
- Drill / Driver
- Miter Saw
- Pocket Hole Jig
- Random Orbit Sander
- Router
- Router Table
- Table Saw
Optional / nice to have
- Bar / Pipe Clamps
- Tape Measure
Materials
| Item | Qty |
|---|---|
| Oak Plywood, 3/4" Thick Full Sheet | 1 board |
| 3/4" Oak, 1x8 96" | 6 board |
| Kreg 1 1/4" coarse and fine pocket hole screws | 150 each |
| 1 1/4" brad nails | 150 each |
| 100 - 220 grit sandpaper | 12 each |
| Feet oak edge banding | 50 each |
| Minwax Tung Oil | 1 each |
| Minwax Golden Oak Stain | 1 each |
Overall cost: $$$. Lumber prices vary by region, species, and season, so we give a band rather than a figure we would only be pretending to know.
Cut list
| Part | Qty | T × W × L |
|---|---|---|
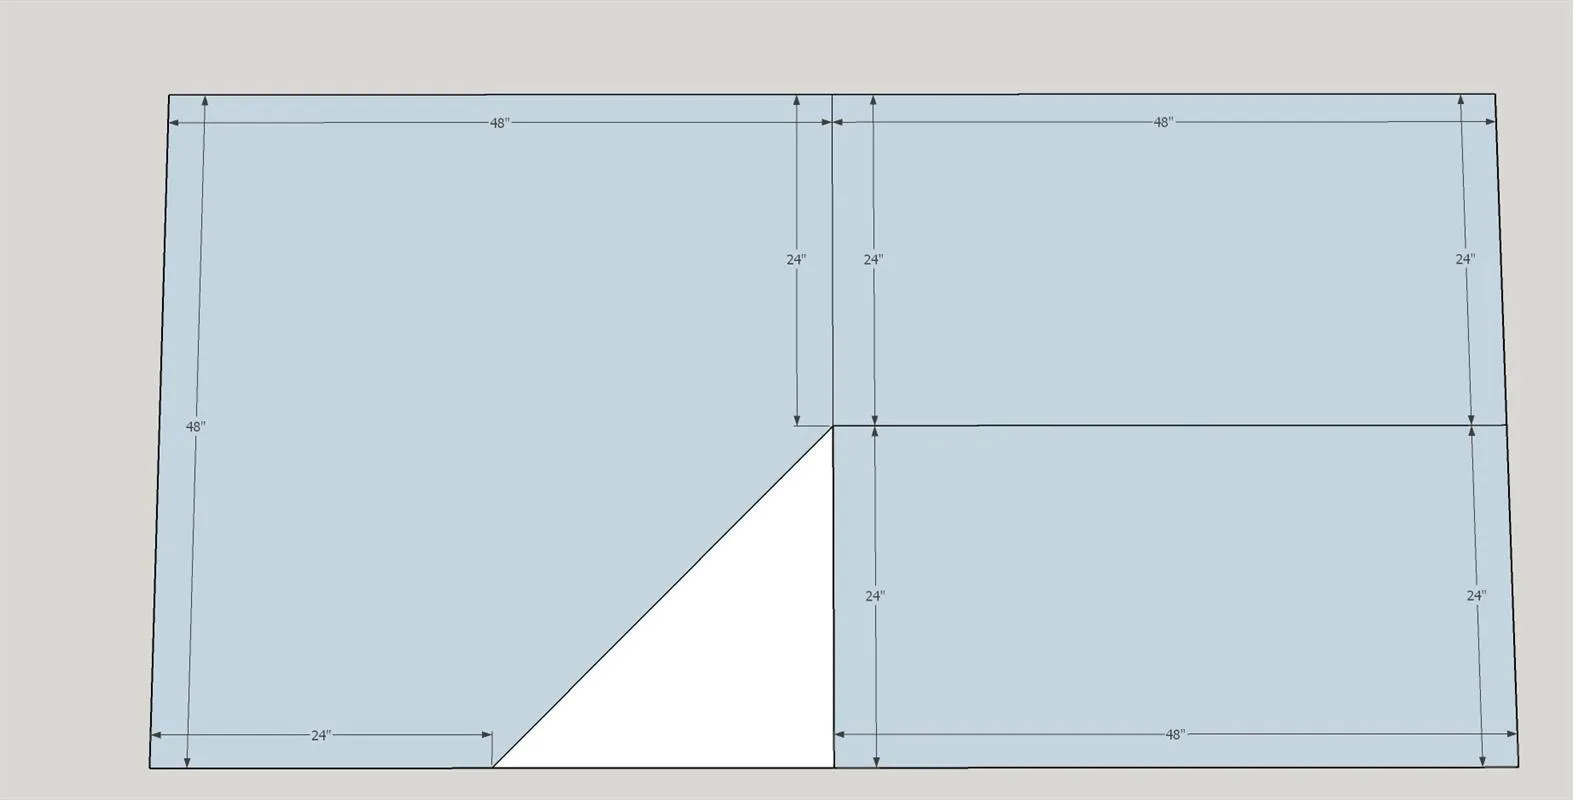
| Center Table Top Plywood | 1 | 3/4" × 48" × 48" |
| Side Table Tops Plywood | 2 | 3/4" × 24" × 48" |
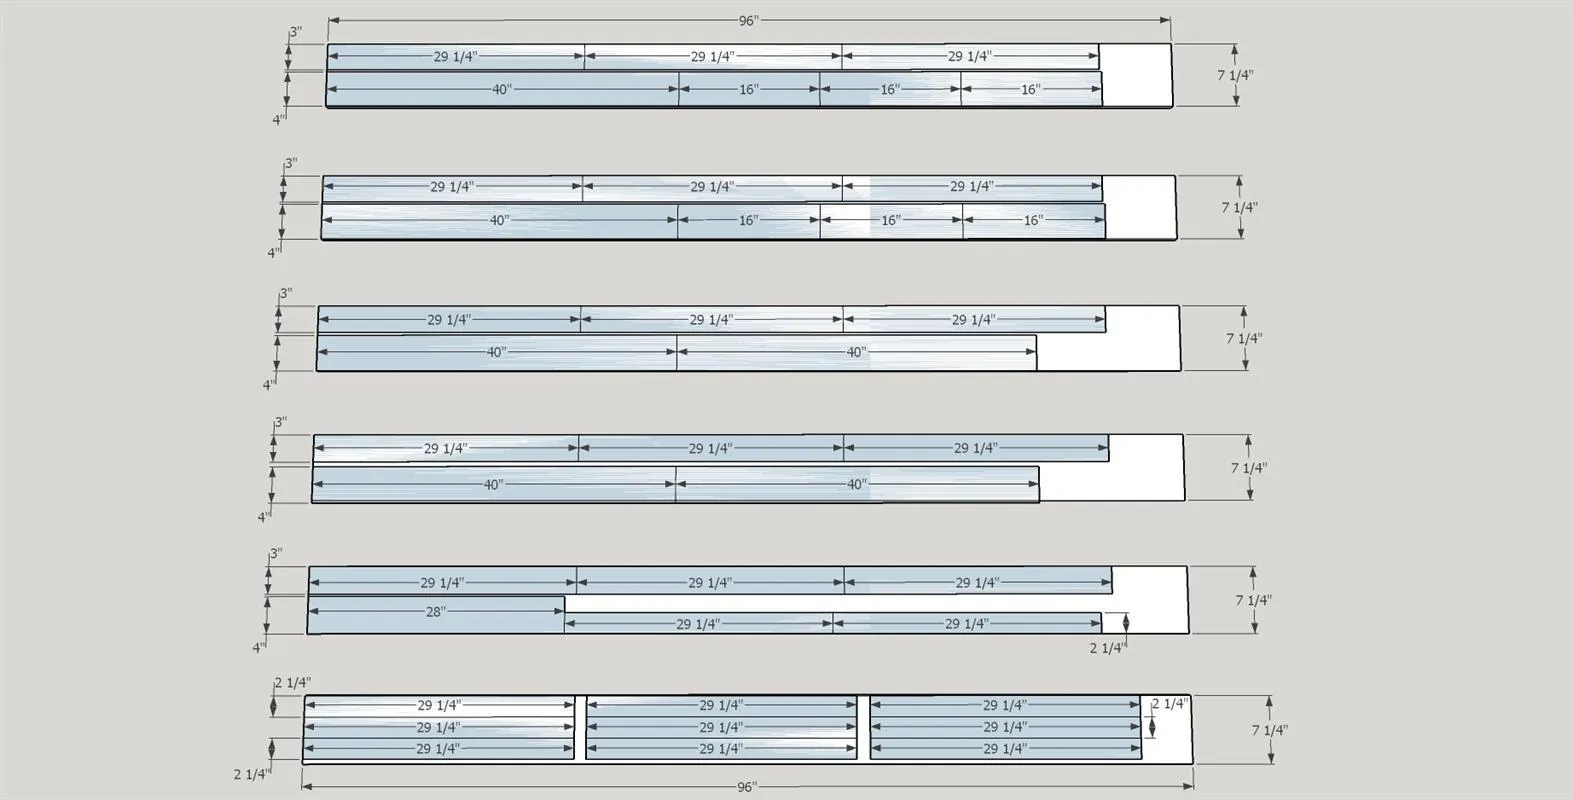
| Regular Table Legs Oak | 13 | 3/4" × 3" × 29" |
| Center Front Table Legs Oak ripped 45 degrees | 2 | 3/4" × 3" × 29" |
| Regular Table Legs Oak | 11 | 3/4" × 2" × 29" |
| Long Table Skirts Oak | 6 | 3/4" × 4" × 40" |
| Center Front Table Skirt Oak | 1 | 3/4" × 4" × 28" |
| Short Table Skirts Oak | 6 | 3/4" × 4" × 16" |
What to buy
Buy 17 boards at 8 ft.
3/4" × 48"
1 board
3/4" × 24"
2 boards
3/4" × 4"
5 boards
3/4" × 3"
5 boards
3/4" × 2"
4 boards
Assumes 8 ft stock, a 1/8" saw kerf, and buying each part at its own width. Change the board size or kerf on the full board plan →
Instructions
1Edge band the tops
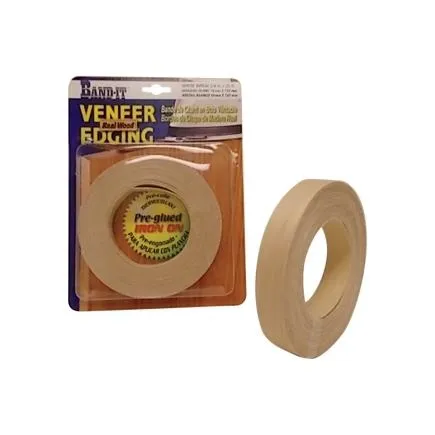
- Attach wood veneer edge banding to the edges of the three tops. I used oak banding with heat activated glue. I used an old electric iron to heat the edging.
- Once it has cooled cut and sand away any excess veneer. Alternatively you can frame the outside with thin strips of wood which can be glued and pin nailed in place.
2Introduction
Please be sure to read through complete instructions before you begin any work on this project. I made two of these table sets, both were made with Oak. However, any good smooth surfaced plywood and hard or soft wood boards can be used. The tables I made are actually used as office desk sets. The beauty of these sets is they can be arranged to best fit your work style and your hobby/office area.
3Cut plywood pieces
Cut the three tops from the 3/4" plywood sheet as shown in the attached diagram.Use 100 - 150 grit sandpaper to smooth the parts.
4Cut 3/4" Oak pieces
Using the dimensions in the following diagram cut the pieces required for assembly. Use 100 - 150 grit sandpaper to smooth the parts.
5Prepare the table skirts
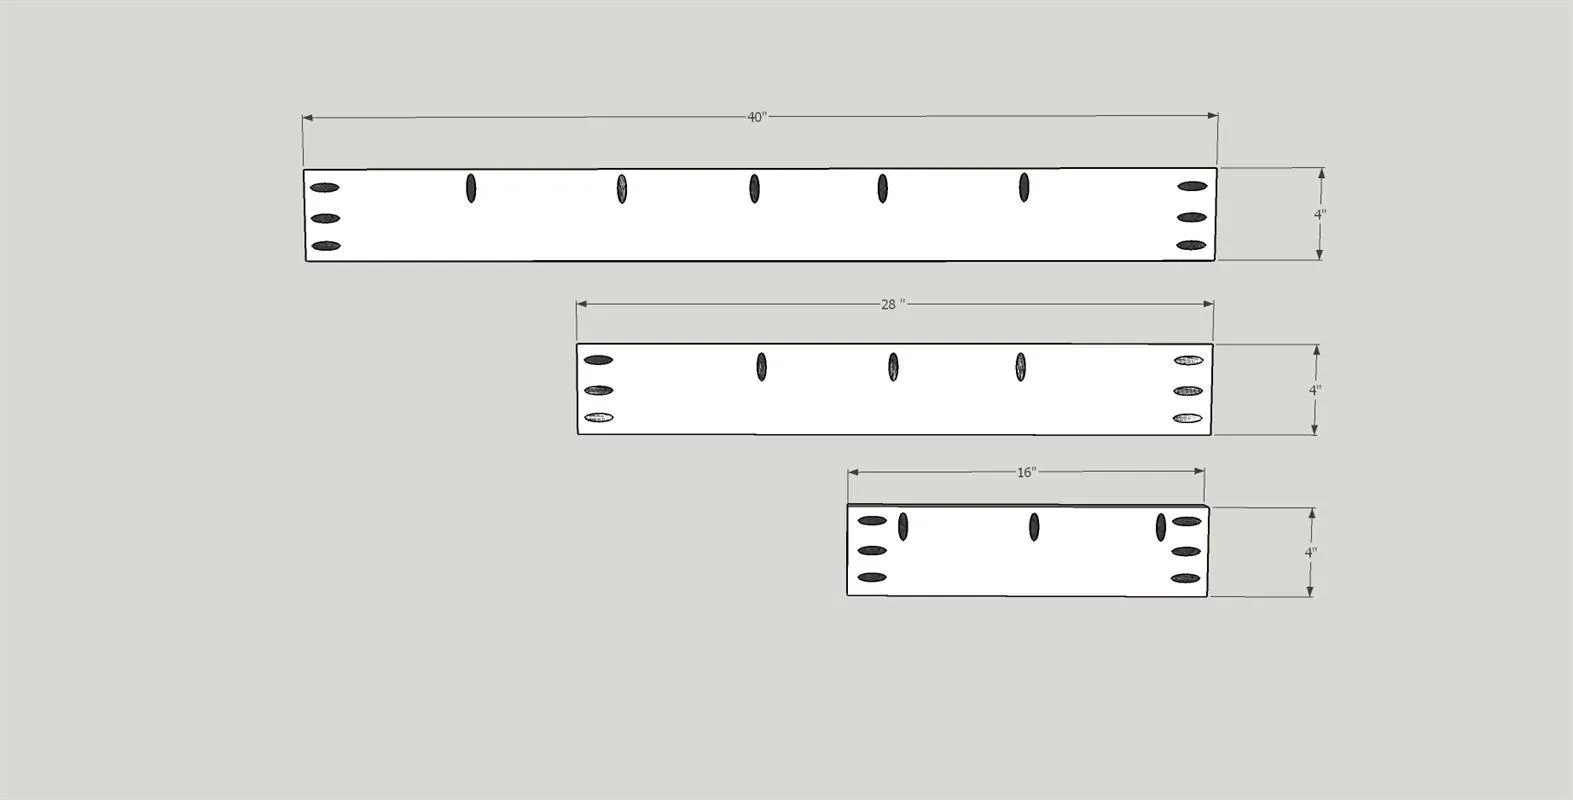
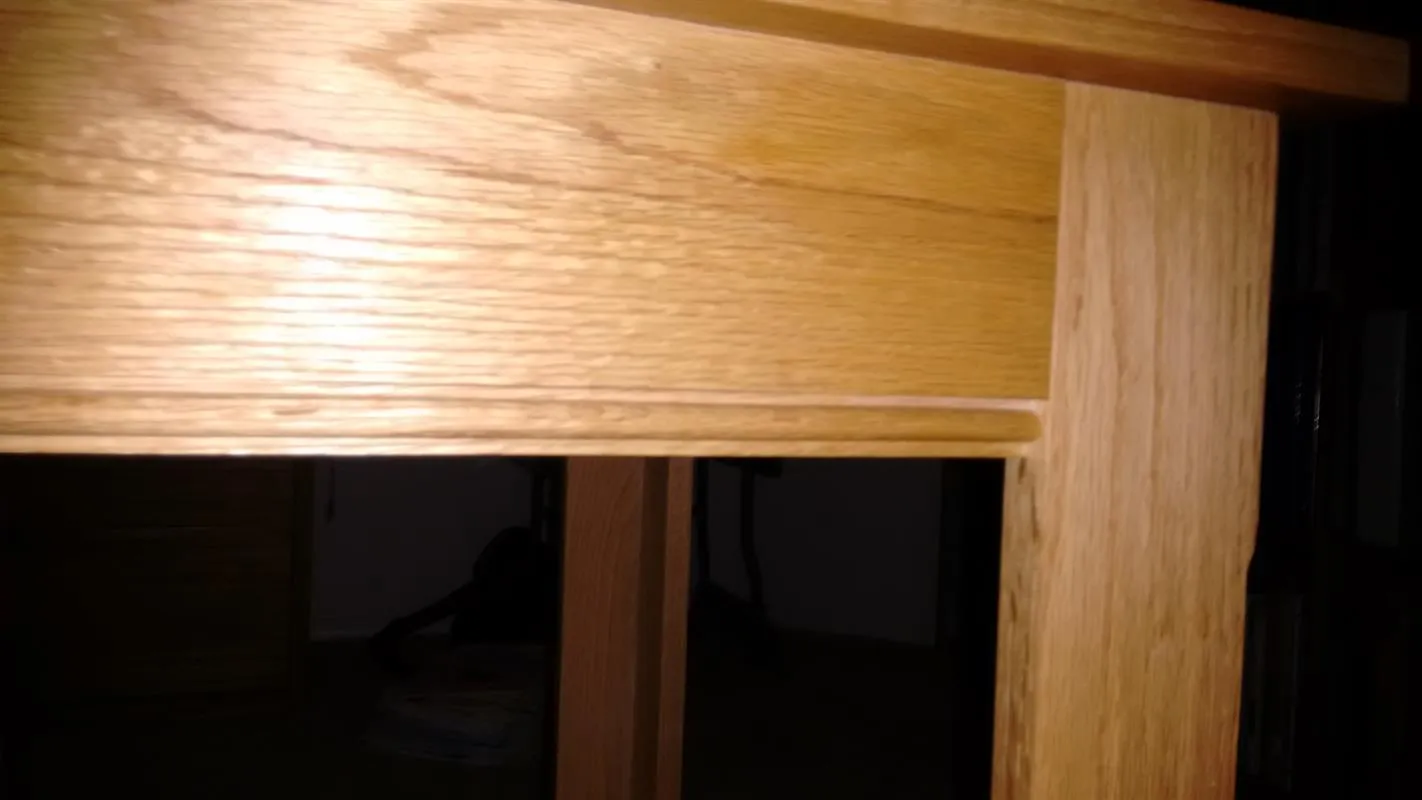
There are thirteen table skirt pieces that will be used to assemble the tables. Use a Kreg Pocket Hole Jig (set to 3/4") to drill pocket holes in both ends and the top edges as shown in the attached diagram. It is a good idea to mark where you are putting the holes to prevent mistakes. I also added a bead detail to the bottom edge of all the skirt boards. I used a Freud 80-104 3/16" radius beading bit mounted in my Kreg router table. See picture in step 12 for detail.
6Prepare regular table legs.
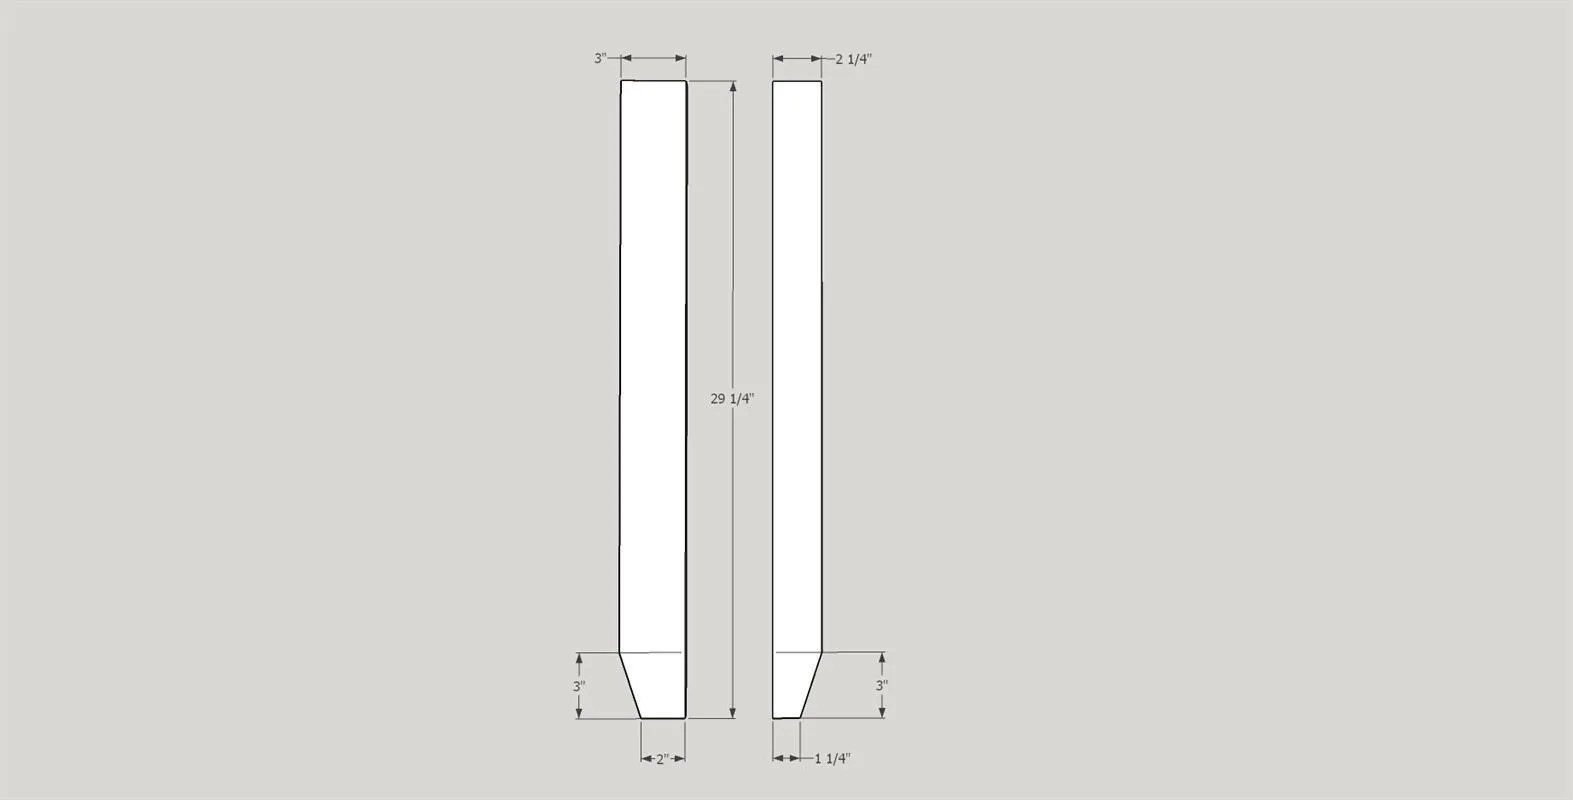
- Mark the lower leg cuts on the fifteen 3" legs and the eleven 2 1/4" legs. Two of the 3" legs will require further processing which will be shown in the next step.
- Also keep in mind that during assembly you will need to make sure that the cuts are positioned going in the correct direction.
7Prepare center front table legs
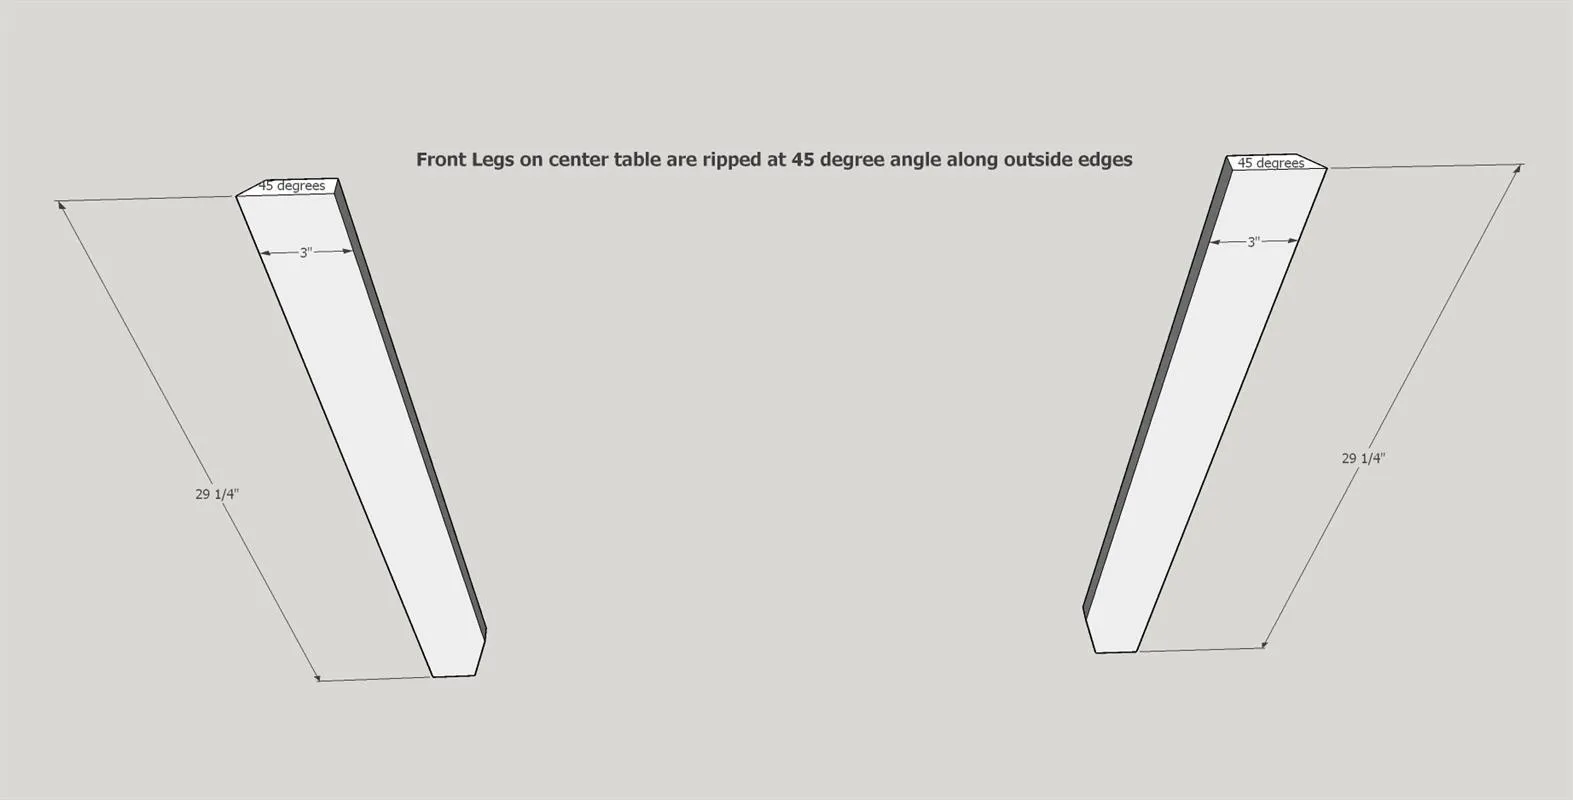
Set up your table saw to rip a 45 degree angle on a 3" wide board. It is a good idea to make some test cuts with scrap lumber to get the cut set to exactly 3" wide. When you are all set cut your two center table front legs as shown. Note that there is a left and a right side (mirror images) so be careful that you cut the legs correctly.
8Regular leg assemblies
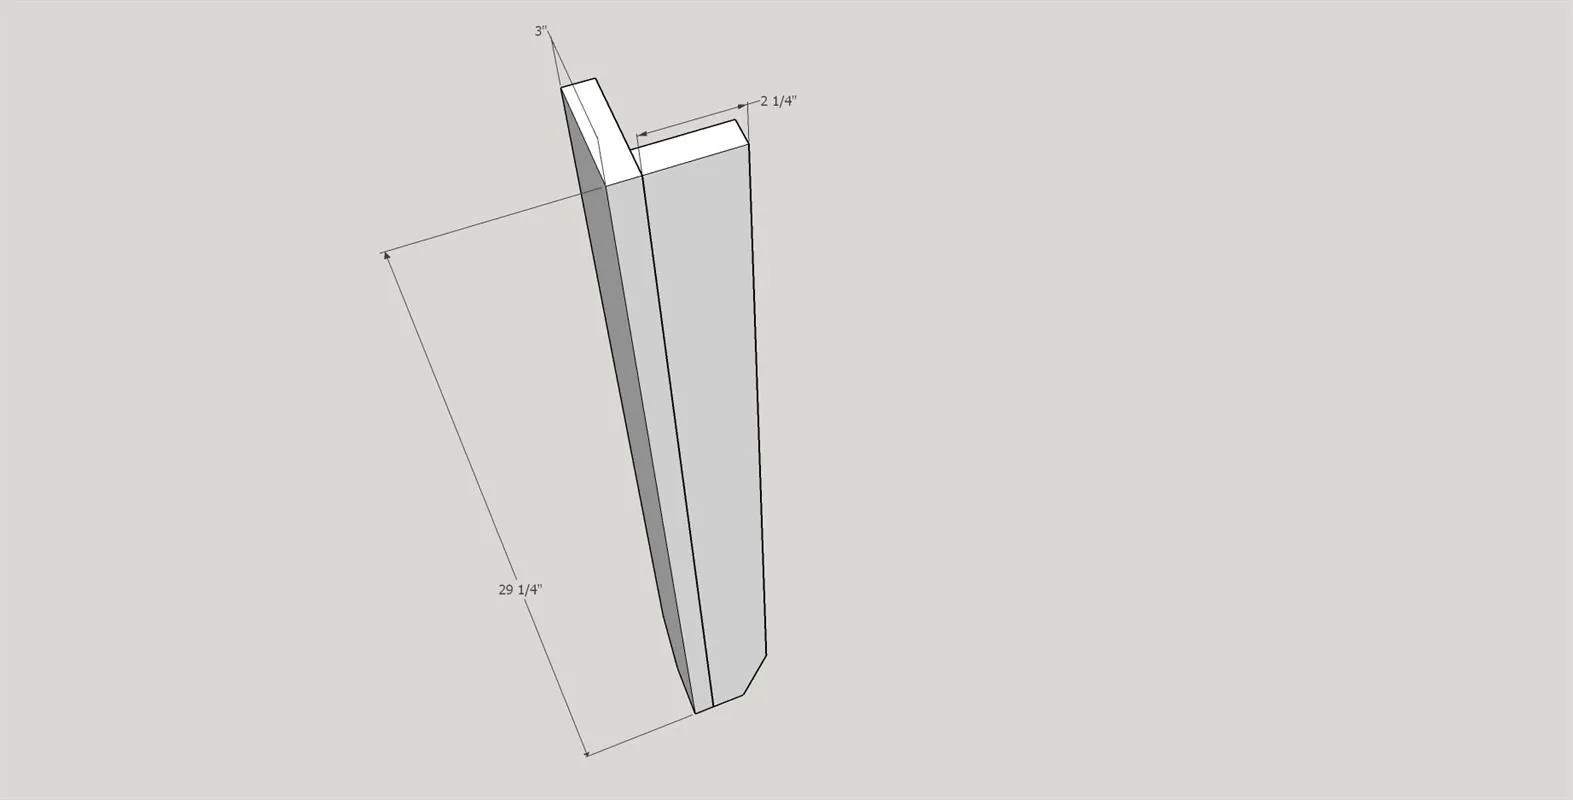
Using Titebond I wood glue and 1 1/4" brad nails assemble eleven sets of regular legs using one 3" and one 2 1/4" leg piece per assembly. See attached diagram.
9Center front leg assemblies
Using Titebond I wood glue and 1 1/4" brad nails assemble the two sets of center front legs using one regular 3" leg piece and one 3" center front table leg piece. See attached diagram. Note that there is a left and a right side (mirror images) so be careful that you assemble the legs correctly.
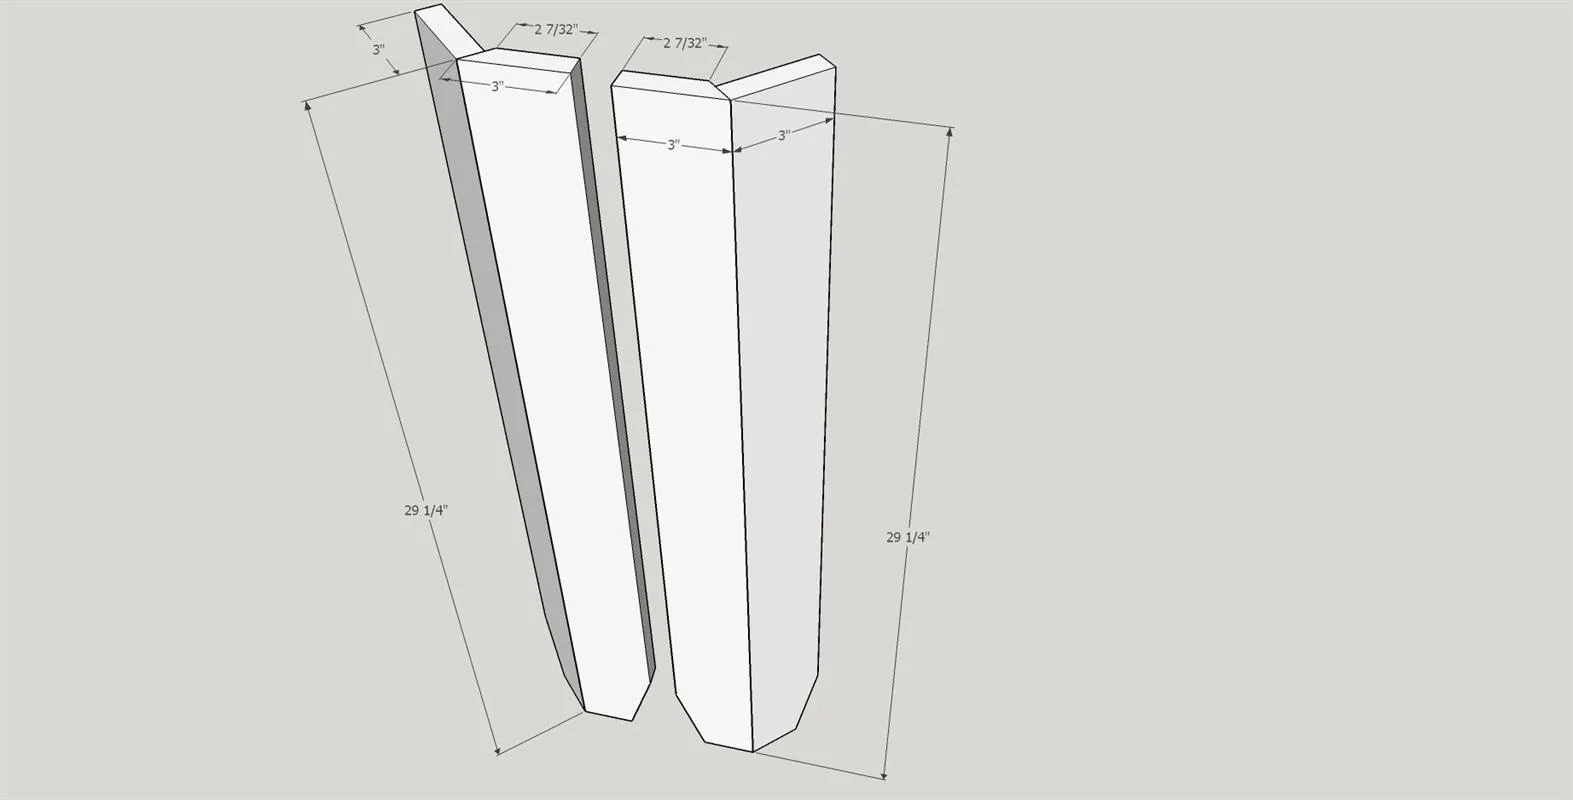
10Assemble three table bases.
Attach the appropriate table skirts to their leg assemblies using wood glue and 1 1/4" Kreg fine pocket screws as shown in the attached diagram.
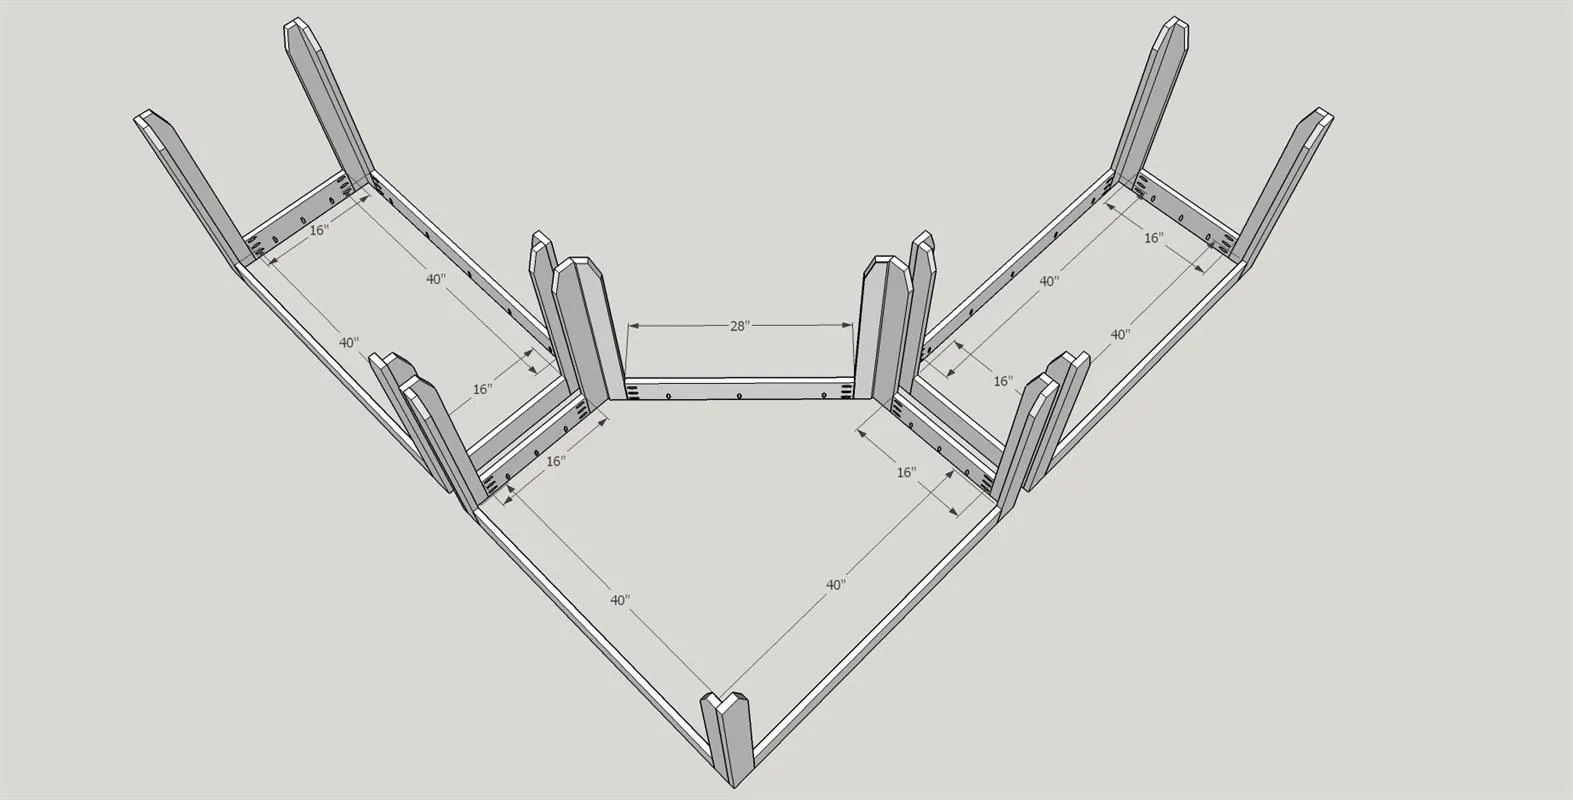
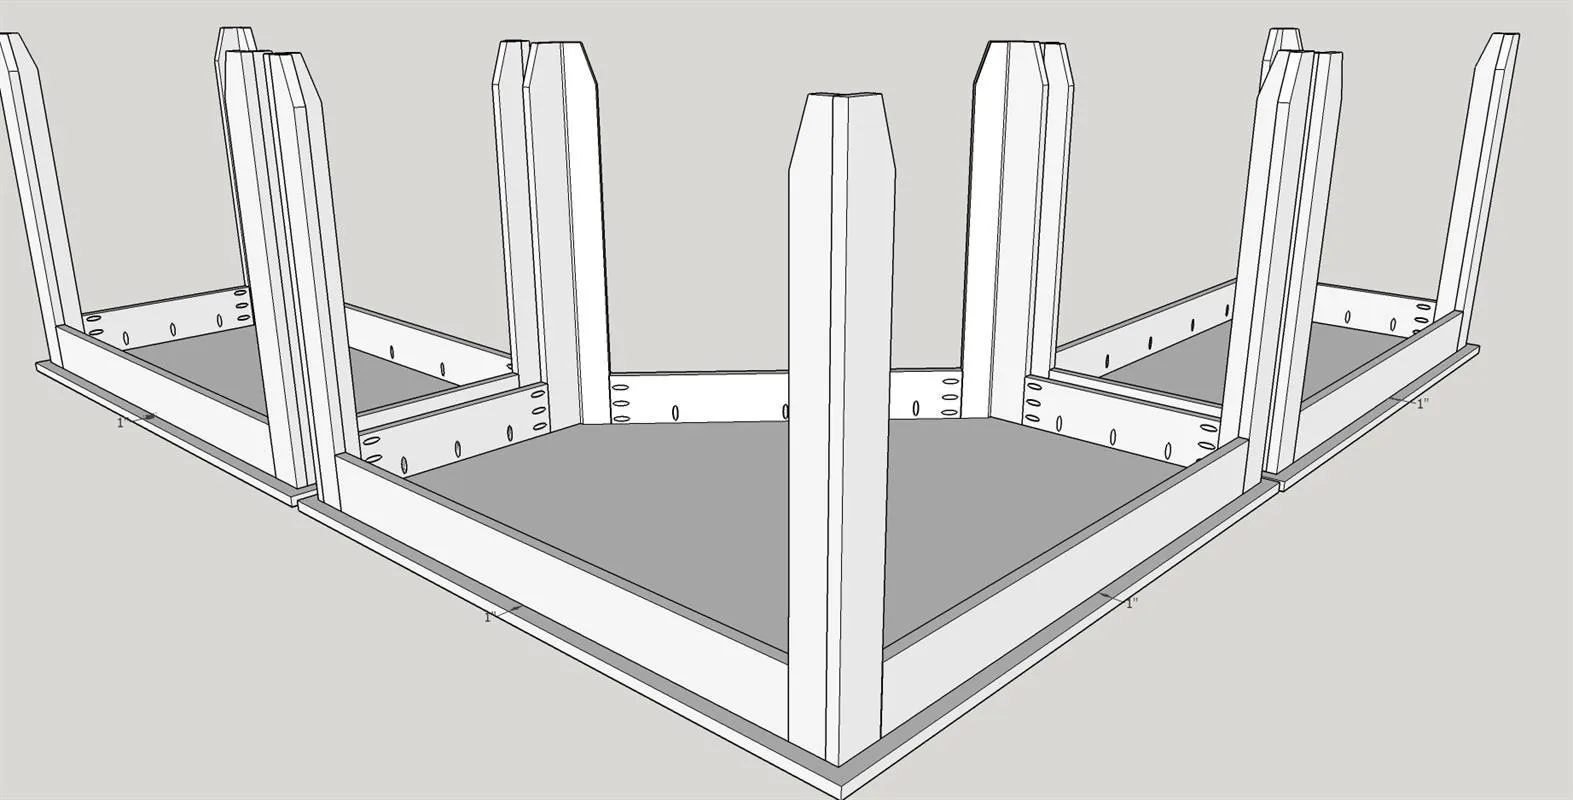
11Attach table tops
Using 1 1/4" Kreg coarse pocket screws attach the appropriate top to its table base. There should be about 1" of overlap on each side.
12Finish
- Now that the build is complete fill all nail holes and other imperfections with wood putty, let it dry.
- Then use 100 - 220 sandpaper to do a once over on all surfaces in preparation for the finish.
- Clean well to remove all dust. (I use compressed air and clean dry rags). I used Golden Oak Minwax Stain. After the stain was dry I used Minwax Tung Oil finish. I gave the tables three coats following manufacturers instructions.
Tags
- Craft Area
- Intermediate
Reviews & builds
No reviews yet
Sign in to review this plan or share your build.
No reviews yet. Be the first to build this.