 Notch
NotchHobby Bench
Step-by-step build — 18 steps. Also available as a print sheet.
1Make Legs and Short Stretchers
- Start by cutting four Legs to length from 4x4 boards.
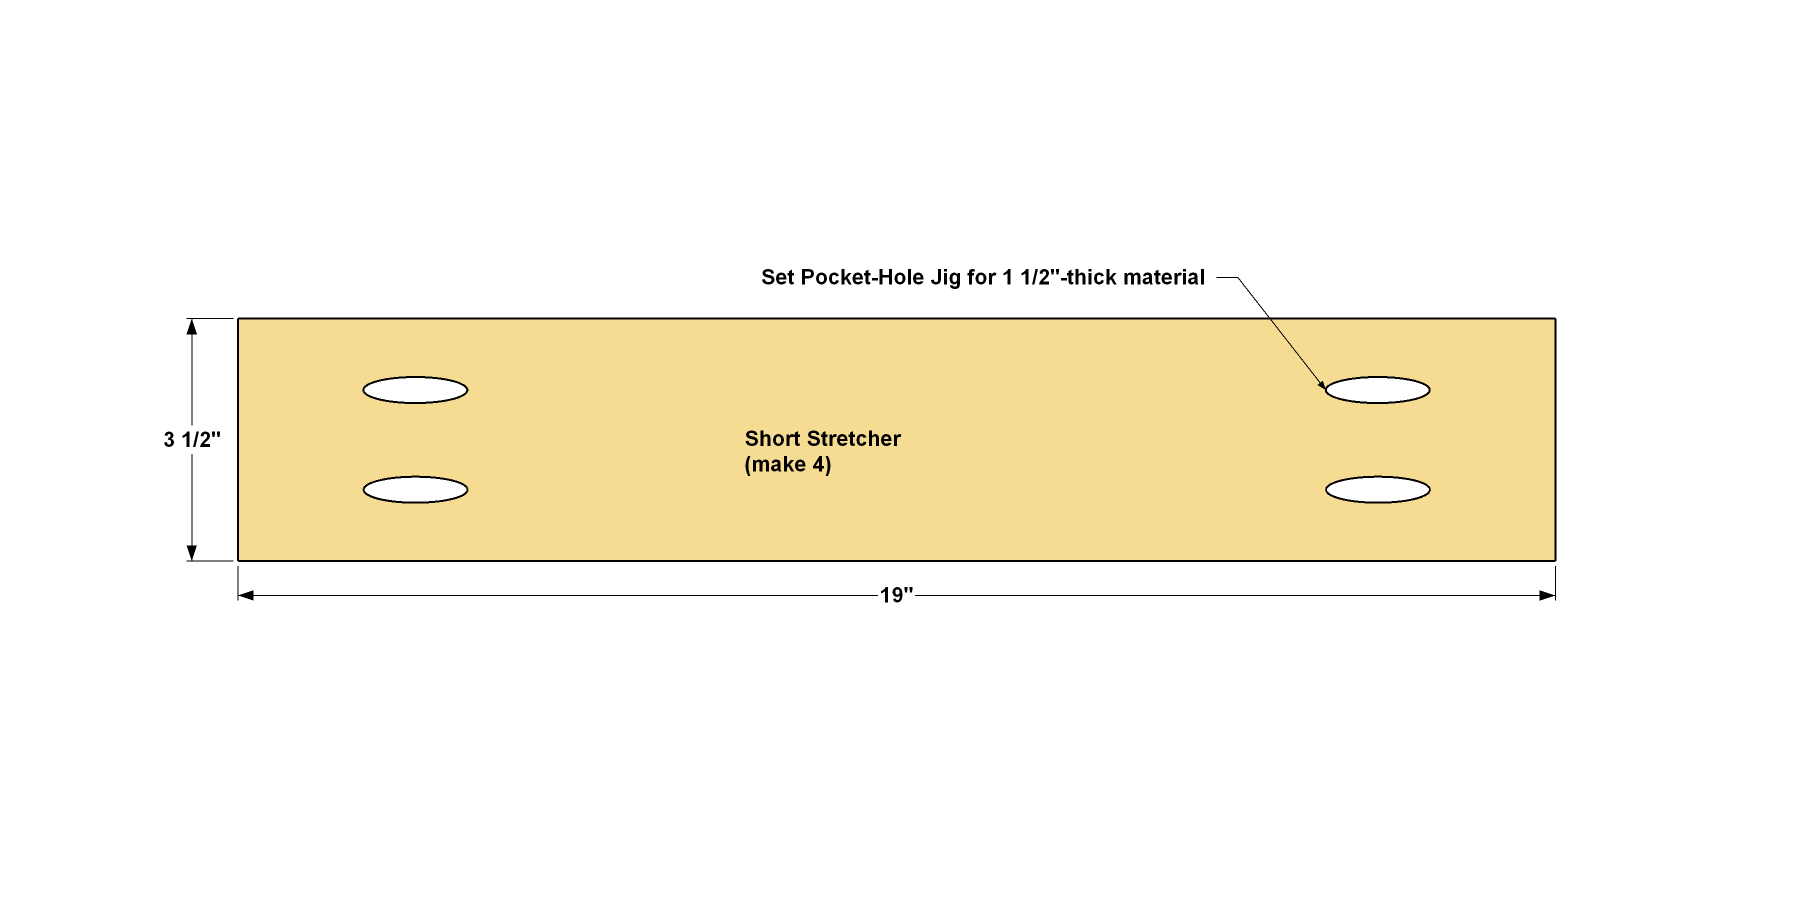
- Then cut four Short Stretchers from 2x4 boards, as shown in the cutting diagram.
- Next, with your Kreg® Pocket-Hole Jig set up for 1 1/2" material, drill pocket holes in the Short Stretchers where shown.
2Assemble the Ends
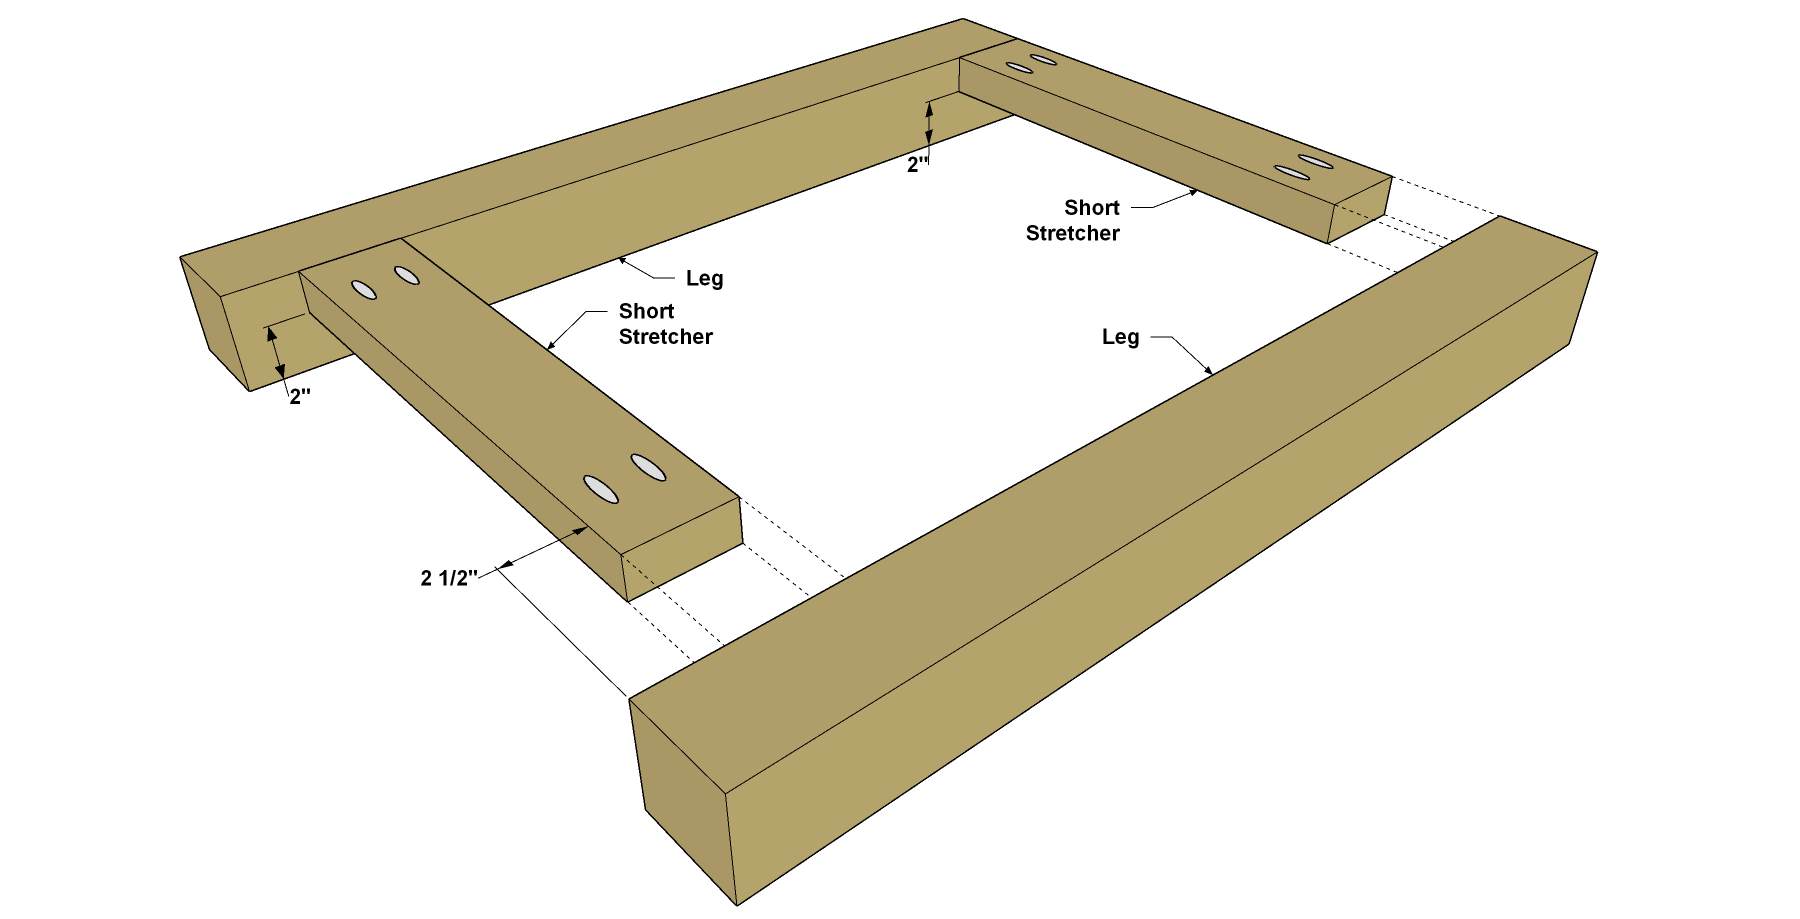
Assemble the bench ends by attaching the Short Stretchers to the Legs using 2 1/2" Kreg Pocket-Hole Screws, as shown.
3Make the Long Stretchers
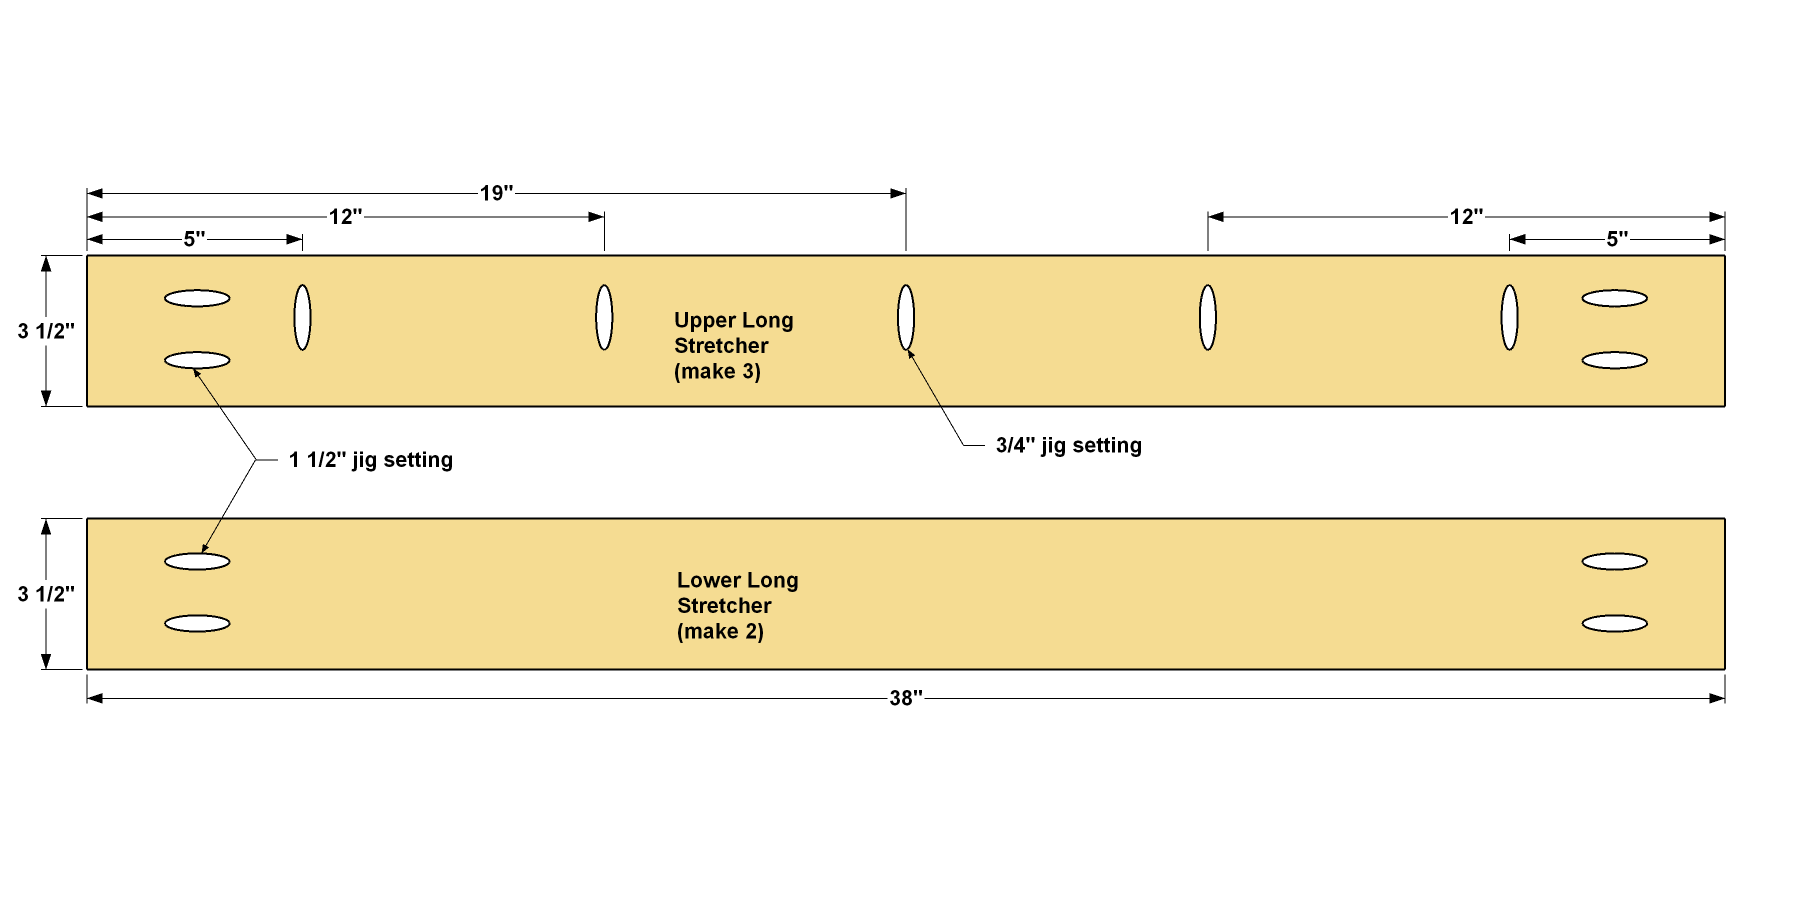
- Cut five Long Stretchers to length from 2x4 boards, as shown in the cutting diagram. With your pocket hole jig set up for 1 1/2" material, drill pocket holes in the ends of all five pieces, as shown.
- Set two aside to be the Long Lower Stretchers. In the other three, you need to drill pocket holes along the edge for attaching the bench top later. To do that, set your jig and bit for 3/4"-thick material, and then drill pocket holes along the edge of three pieces to create the Long Upper Stretchers.
- Sand all the pieces smooth.
4Attach the Long Stretchers
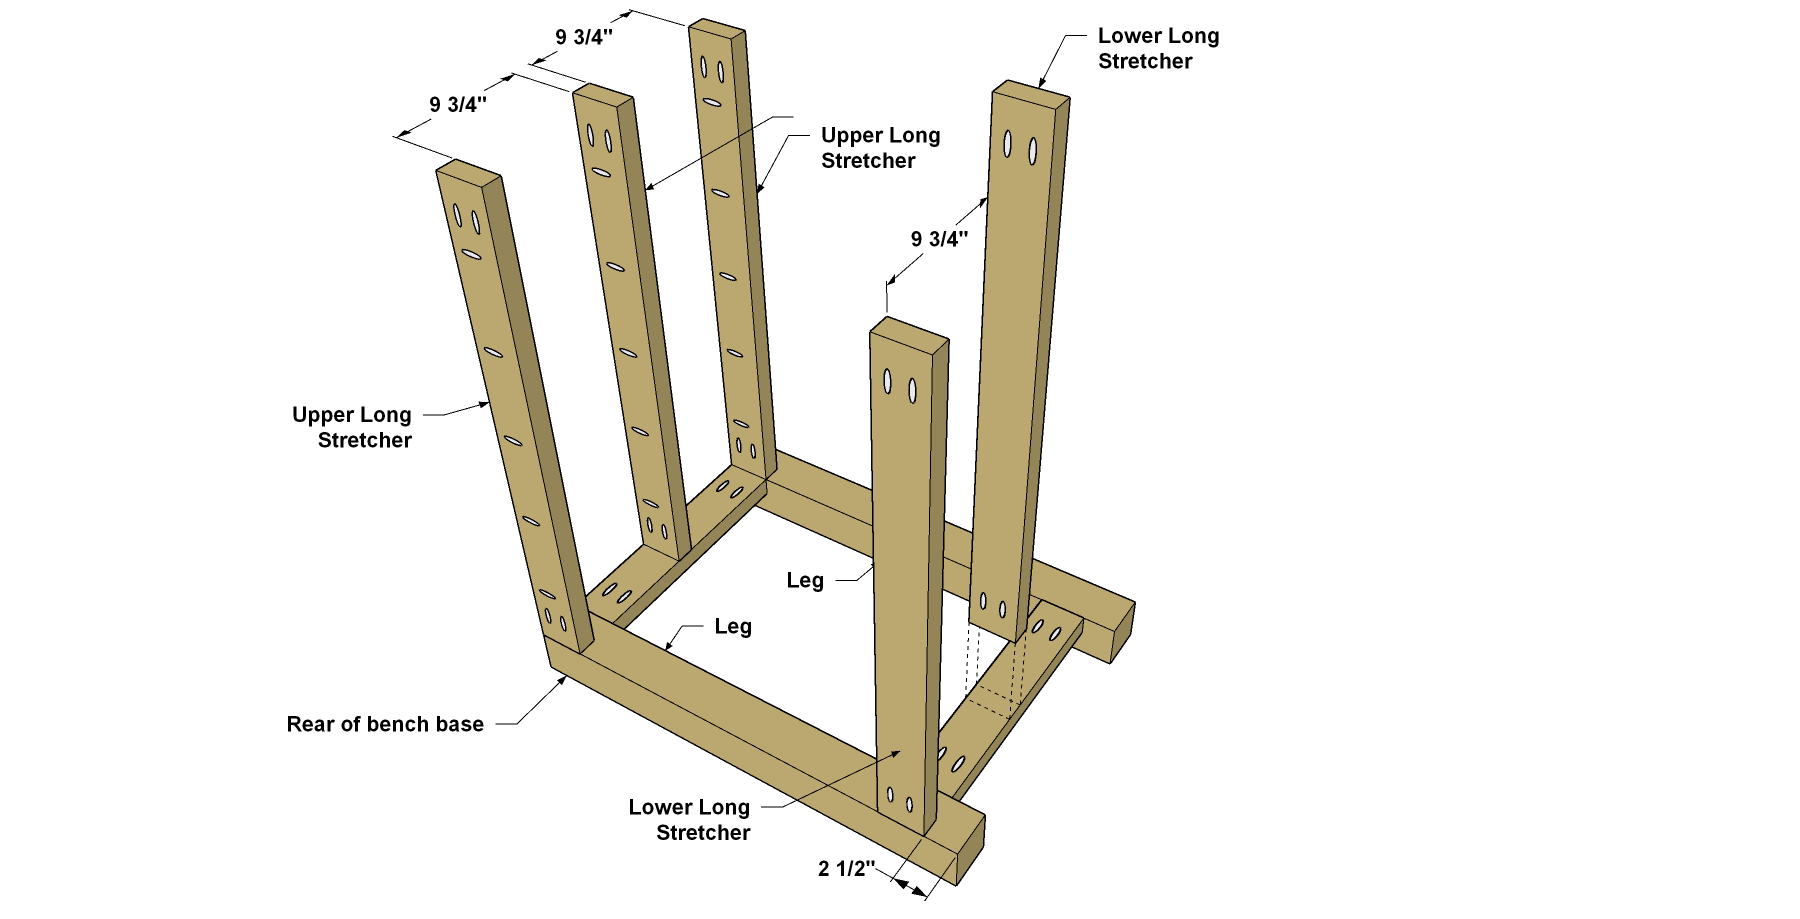
- Now you can attach the Upper Long Stretchers and Lower Long Stretchers to the one of the end assemblies using 2 1/2" pocket hole screws. Note that the end assembly should be positioned so that the Short Stretchers are positioned toward the inside.
- Also, pay attention to the positions of the Stretchers. The ones at the rear are flush with the outer face of the Legs. The front Upper Long Stretcher is flush with the inside face of the legs.
- Finally, the other two Long Stretchers aren’t centered. They’re both slightly closer to the back of the bench base. That way, the organizer you’ll add later can rest on the Stretchers.
- Once you’ve attached one end assembly, attach the other one.
5Make the Lower Bench Top
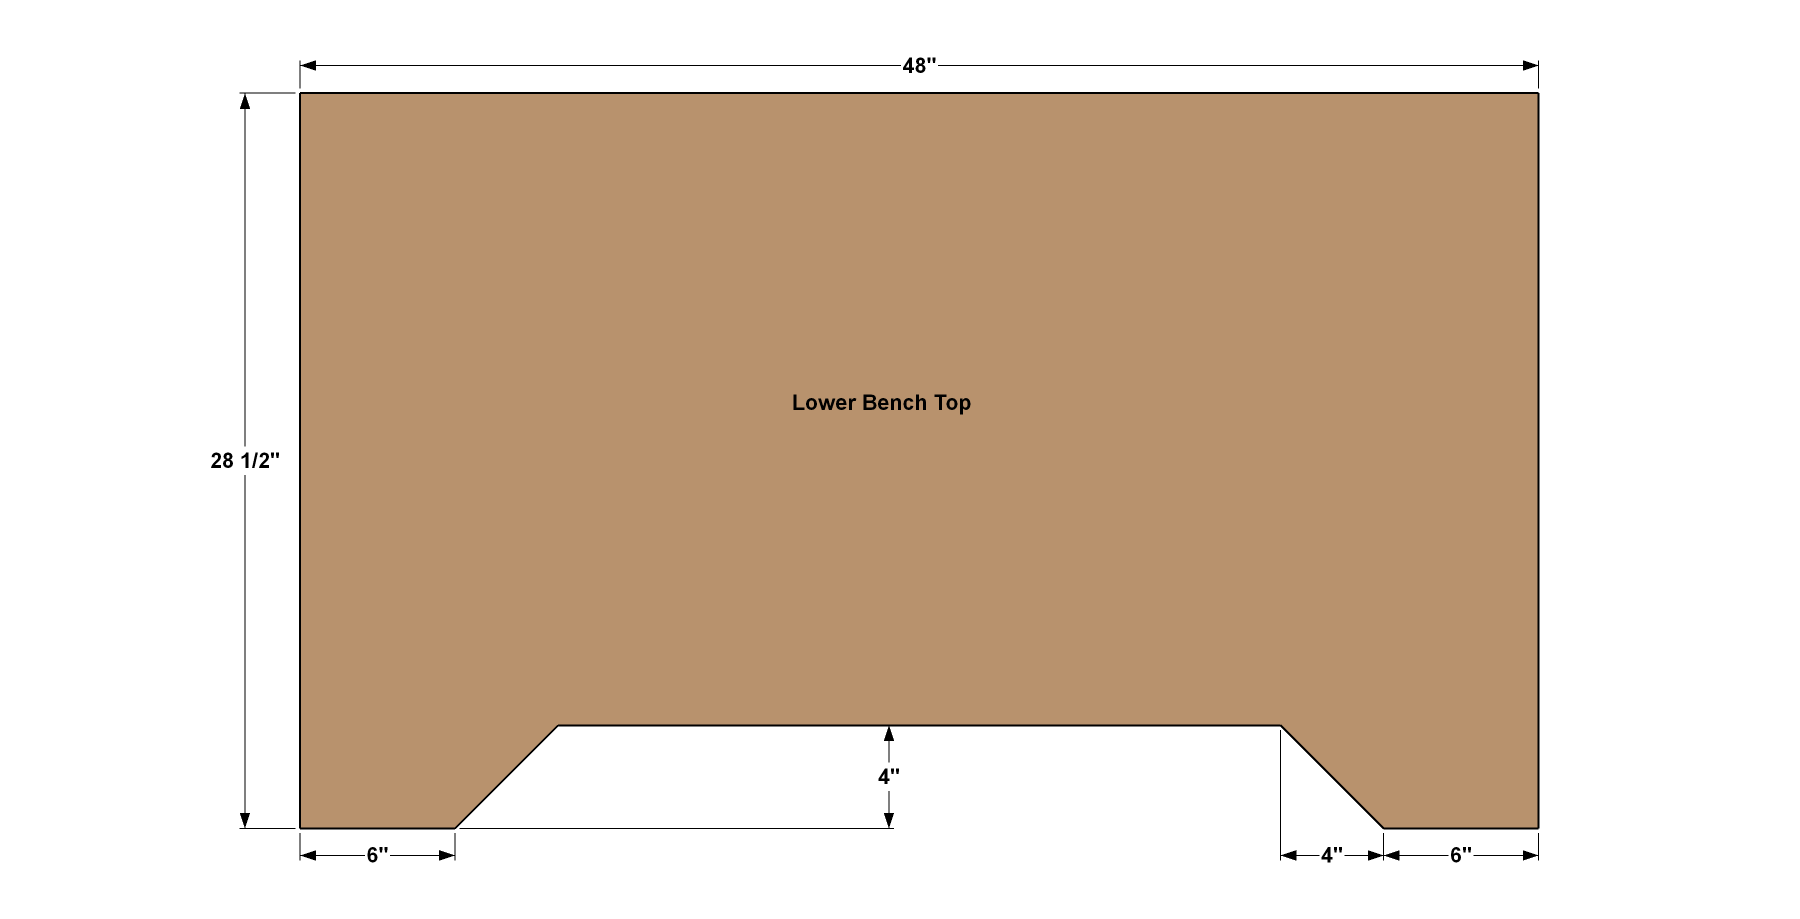
- Now you can create the bench top. It’s made of two layers of MDF (Medium Density Fiberboard).
- First, cut one Lower Bench Top to size from 3/4" MDF, as shown in the cutting diagram.
- Then lay out and cut the recess along the front edge using a jigsaw.
6Make the Upper Bench Top
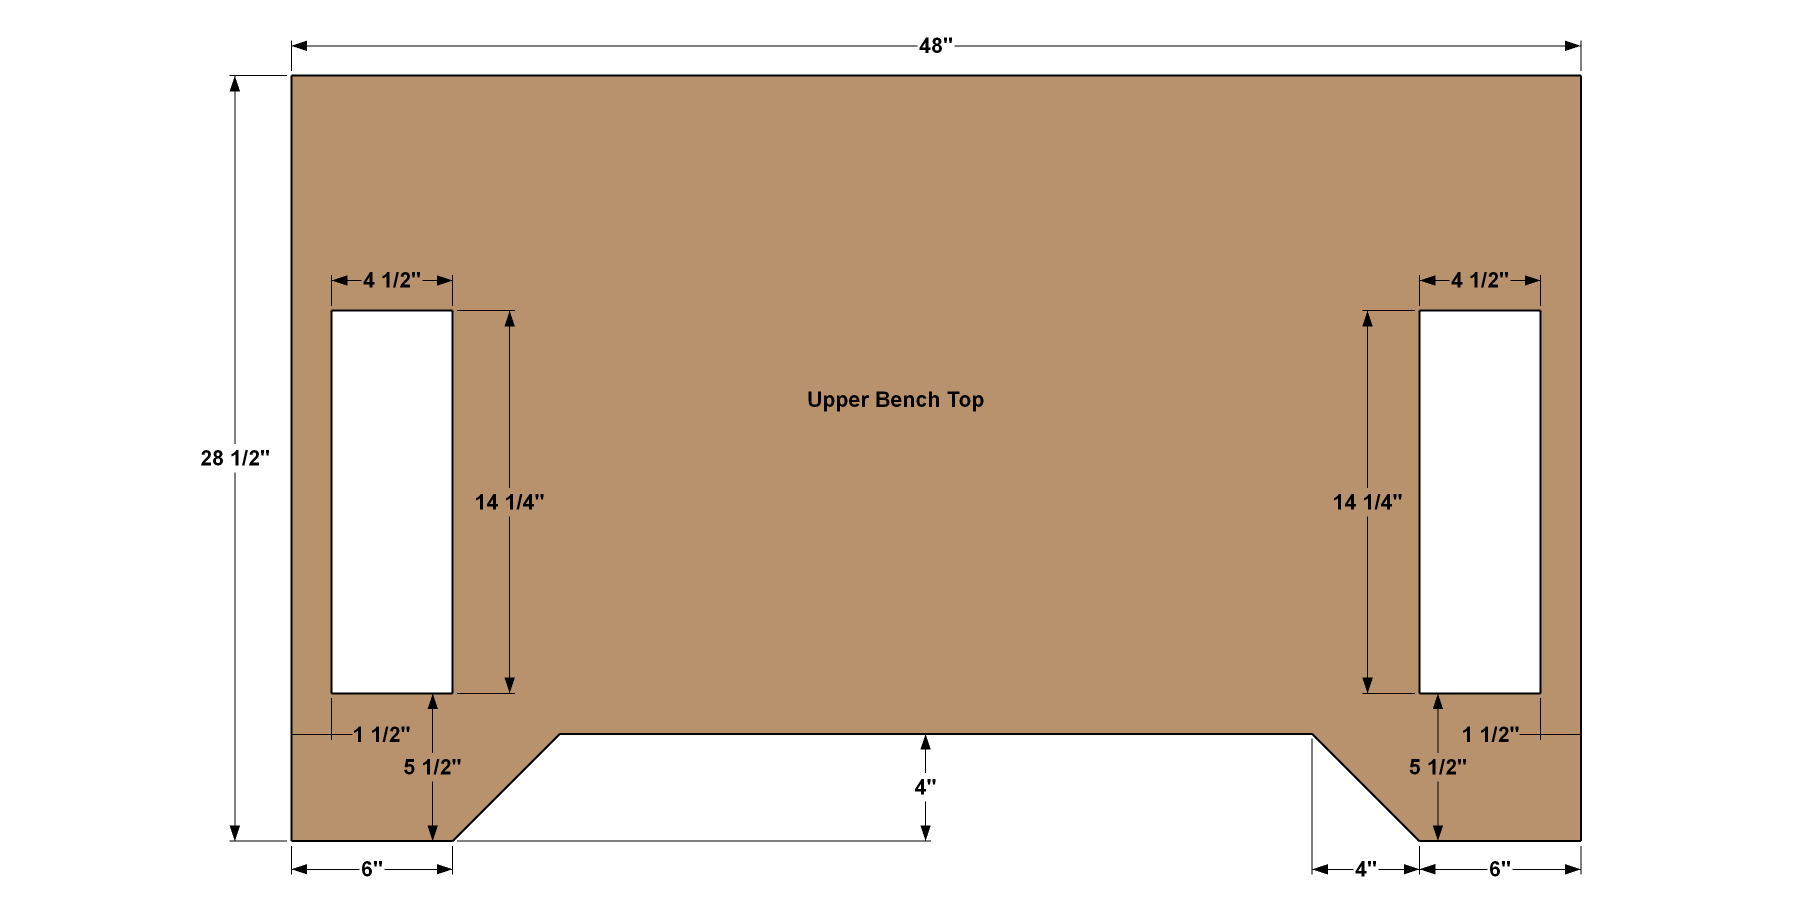
- Cut one Upper Bench Top to size from 3/4" MDF, as shown in the cutting diagram.
- Then lay out and cut the recess along the front edge using a jigsaw.
- Next, lay out and create the tray openings.
- Start by drilling a hole at each corner, then cutting along the lines with a jigsaw.
7Assemble the Top
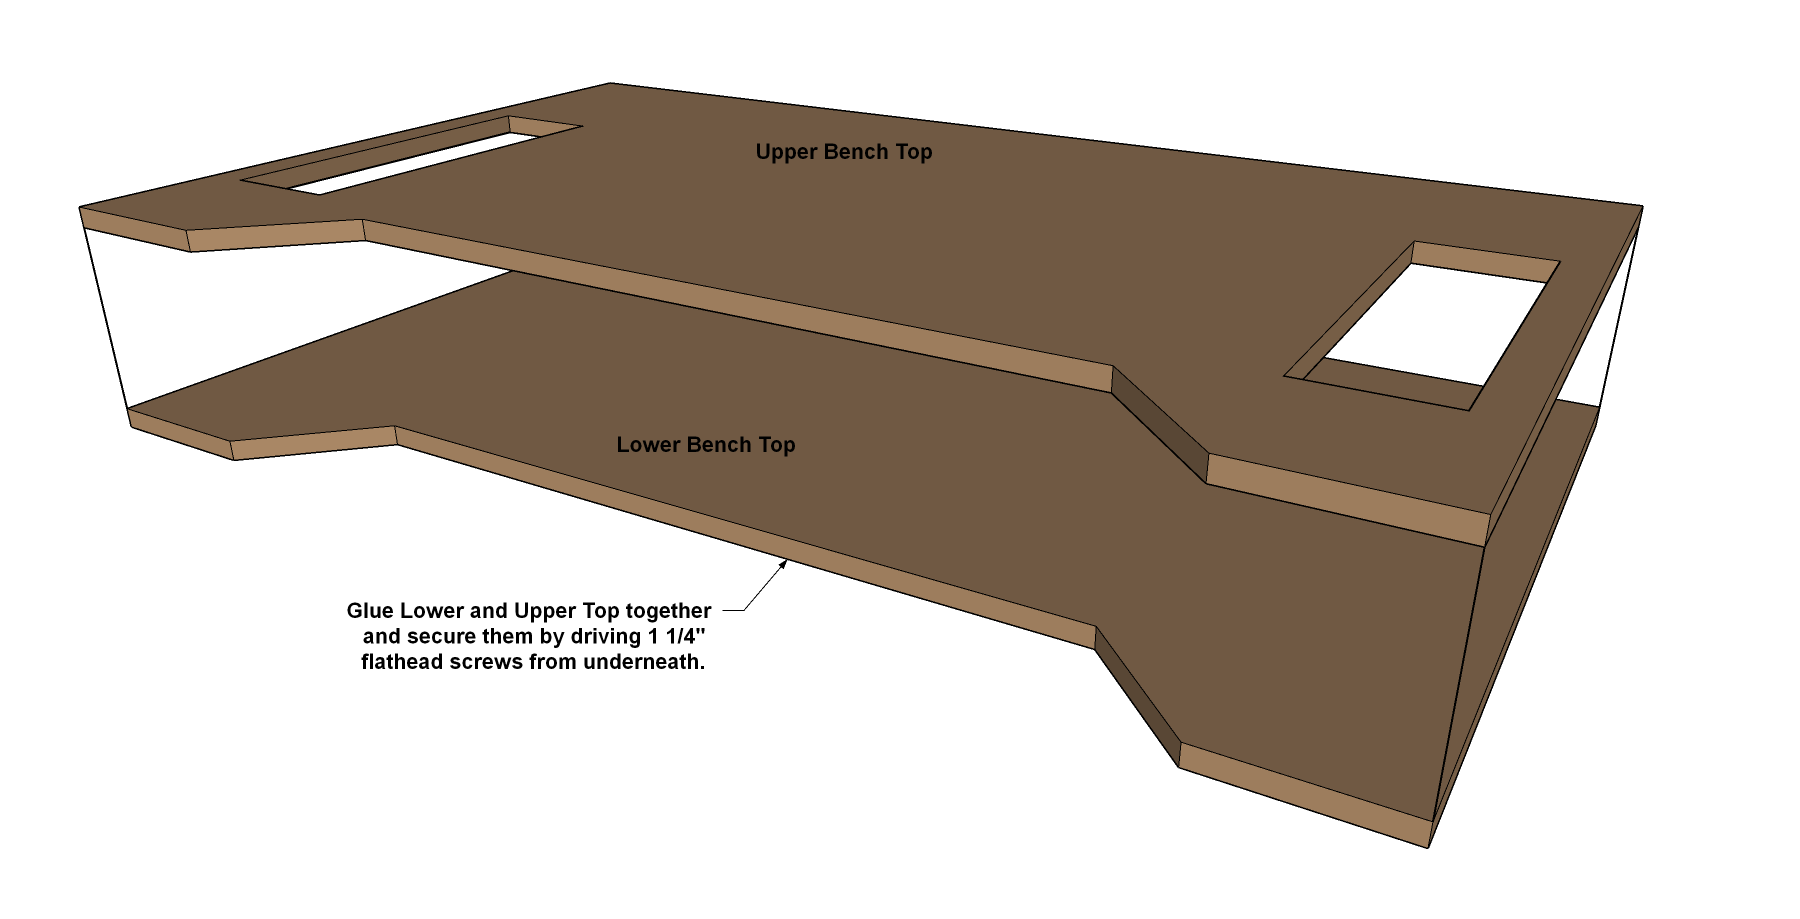
- Now you can join the Upper Bench Top to the Lower Bench Top.
- Spread wood glue on the underside of the Upper Bench Top, and then lay the Lower Bench Top in position.
- Clamp the pieces together, and then drill pilot holes and drive 1 1/4" flathead screws through the Lower Bench Top and into the Upper Bench Top. You don’t need to worry about exact screw placement, except to avoid driving screws into the recessed tray areas.
- Sand the edges of the top assembly as needed to make sure the edges are all flush on both pieces.
- Also, sand to slightly ease the sharp bench edges.
8Attach the Top
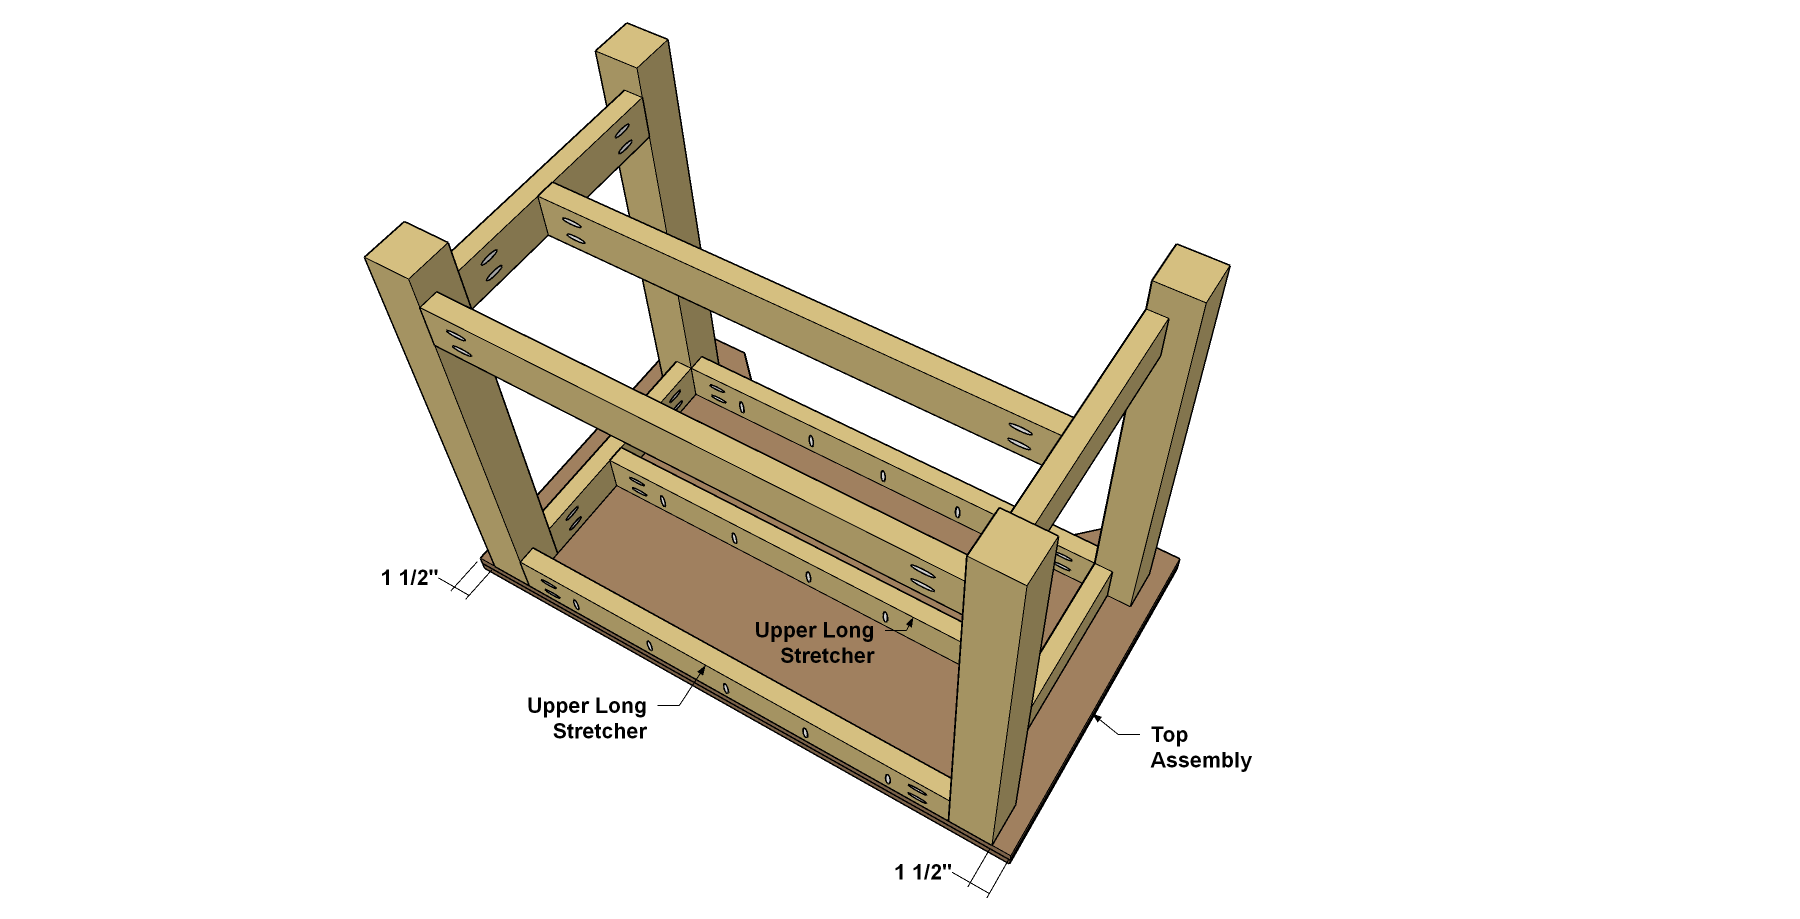
Now you can attach the top assembly to the bench base using 1 1/4" Kreg Pocket-Hole Screws. Make sure the top assembly is flush with the bench Legs at the back, and that the top assembly overhangs equally on each end.
9Make the Upper Shelves
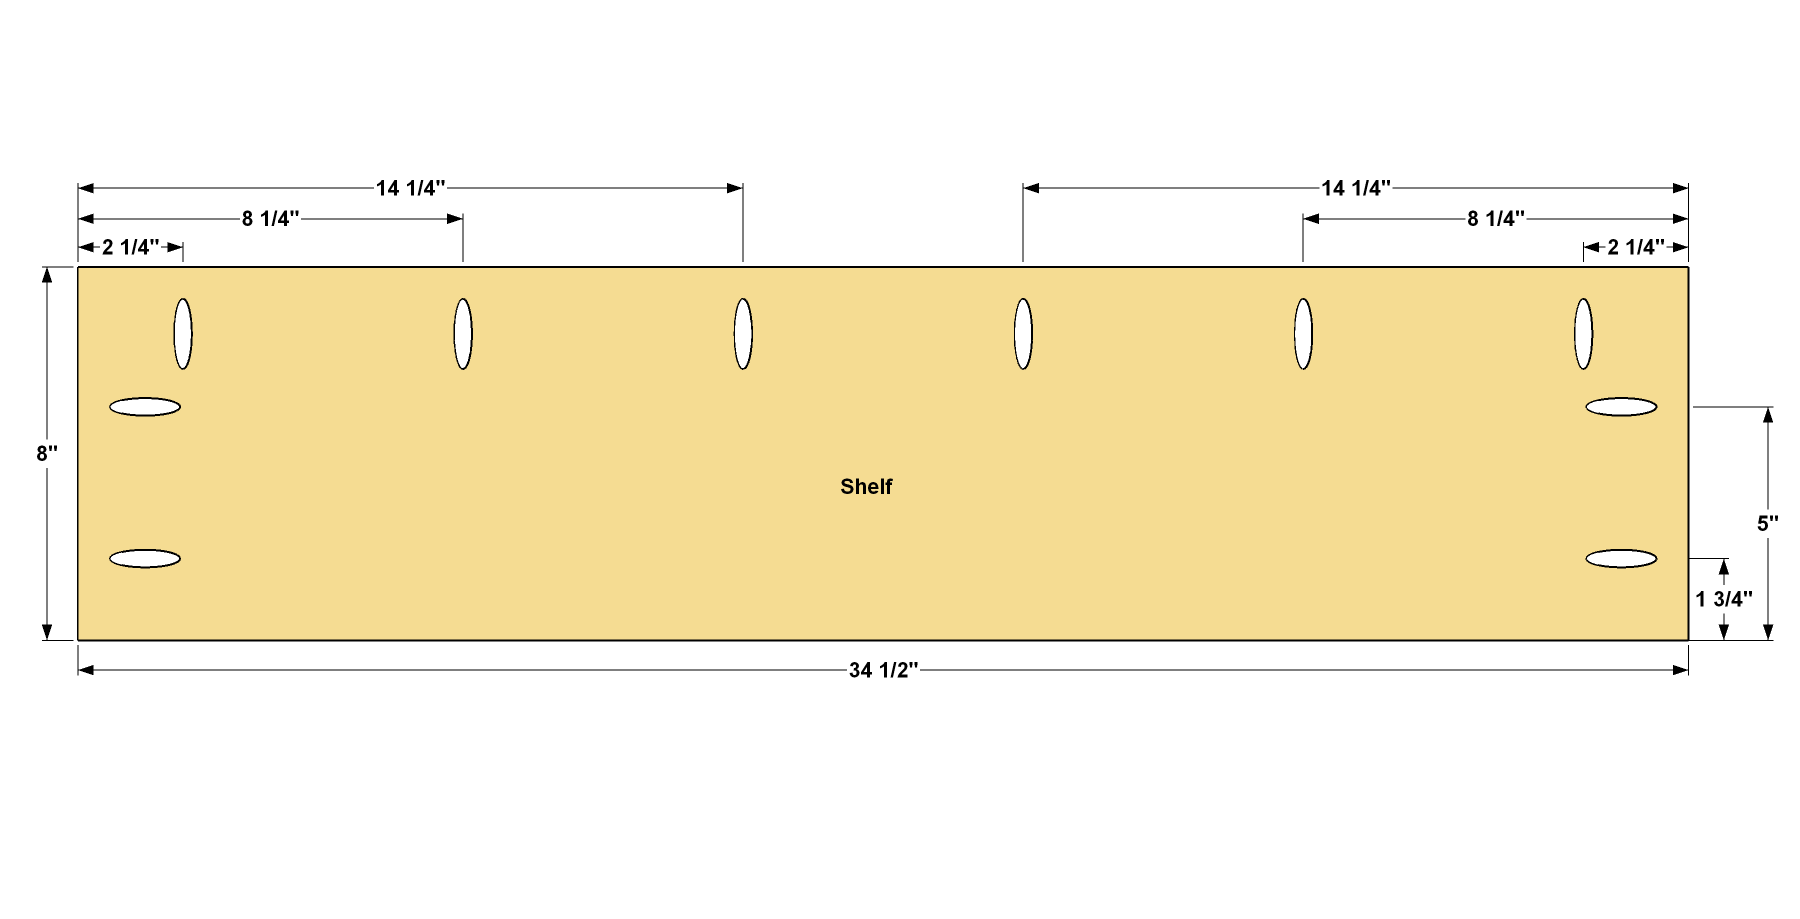
- Cut three Shelves to size from 3/4" MDF, as shown in the cutting diagram.
- Cut three Shelf Dividers while you’re at it.
- Then, with your Kreg Pocket-Hole Jig set up for 3/4" material, drill pocket holes in the Shelves, as shown.
10Make the Shelf Uprights
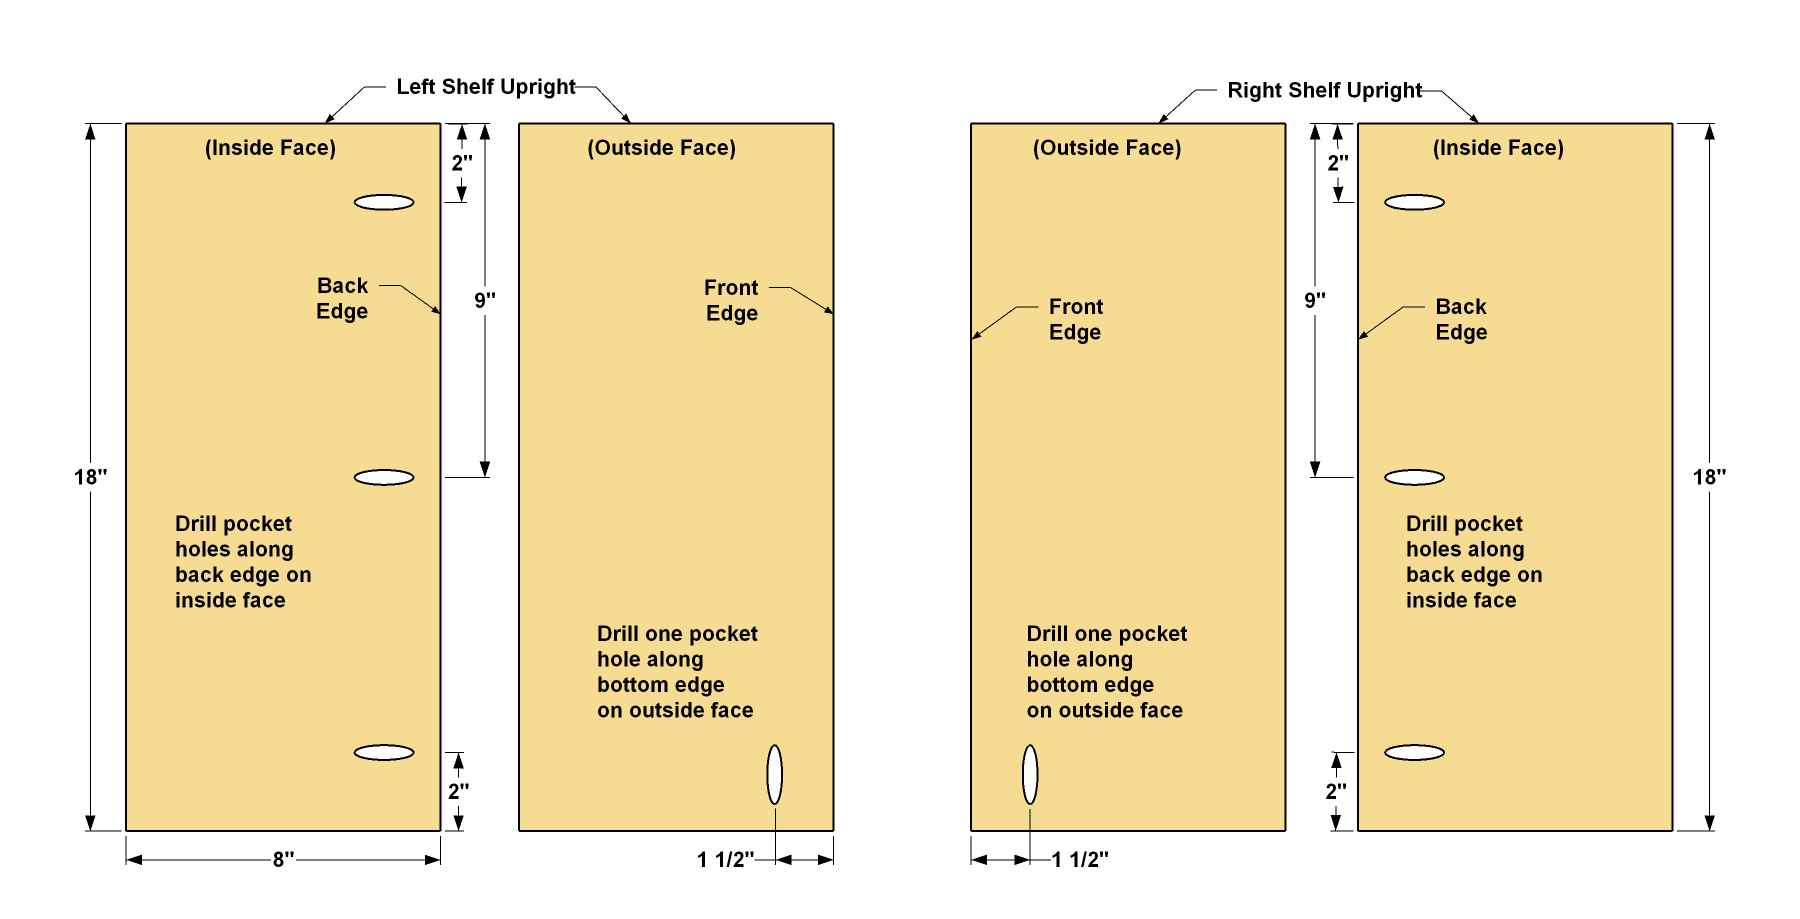
- Cut two Shelf Uprights to size from 3/4" MDF, as shown in the cutting diagram.
- Then drill pocket holes where shown with your Kreg Pocket-Hole Jig set up for 3/4" material. Note that you need to create a “matched pair” of uprights. You’ll drill pocket holes along the back edge of each one on the inside face.
- Then you need to drill one pocket hole in the outside face of each upright, as shown.
11Make the Shelf Back
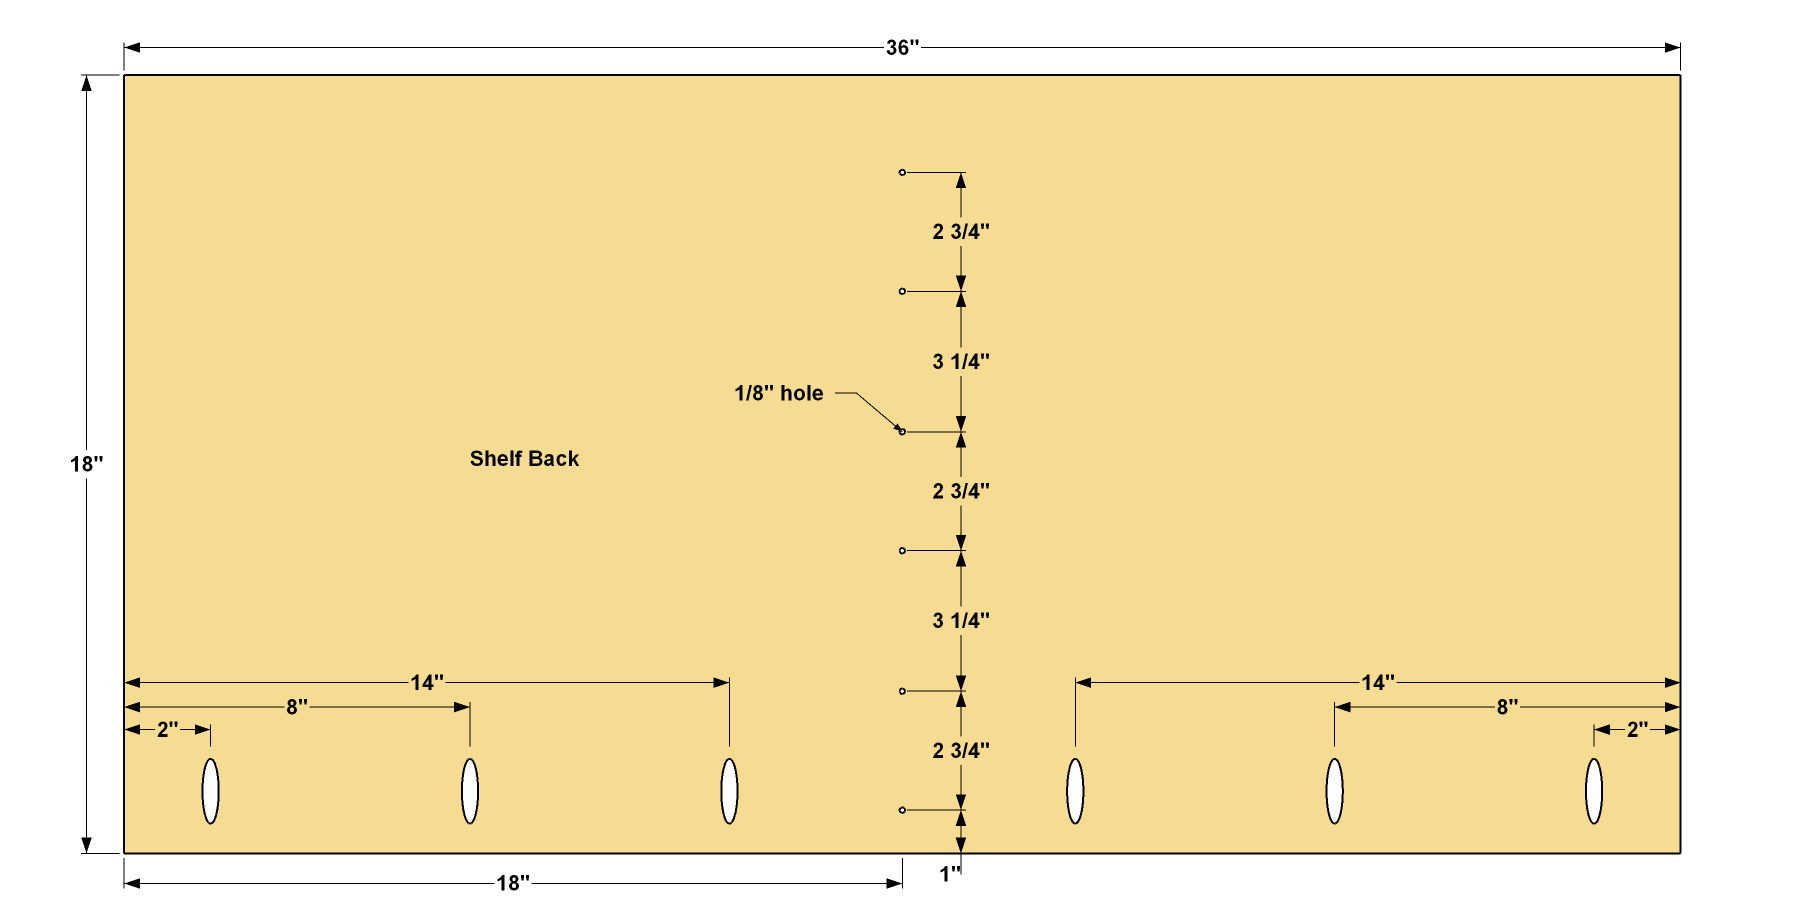
- Cut a Shelf Back to size from 3/4" MDF, as shown in the cutting diagram.
- Then drill pocket holes where shown. After that, you need to drill a row of holes through the Shelf Back, as shown. These will be used for screws that attach the Shelf Dividers.
12Start Shelf Assembly
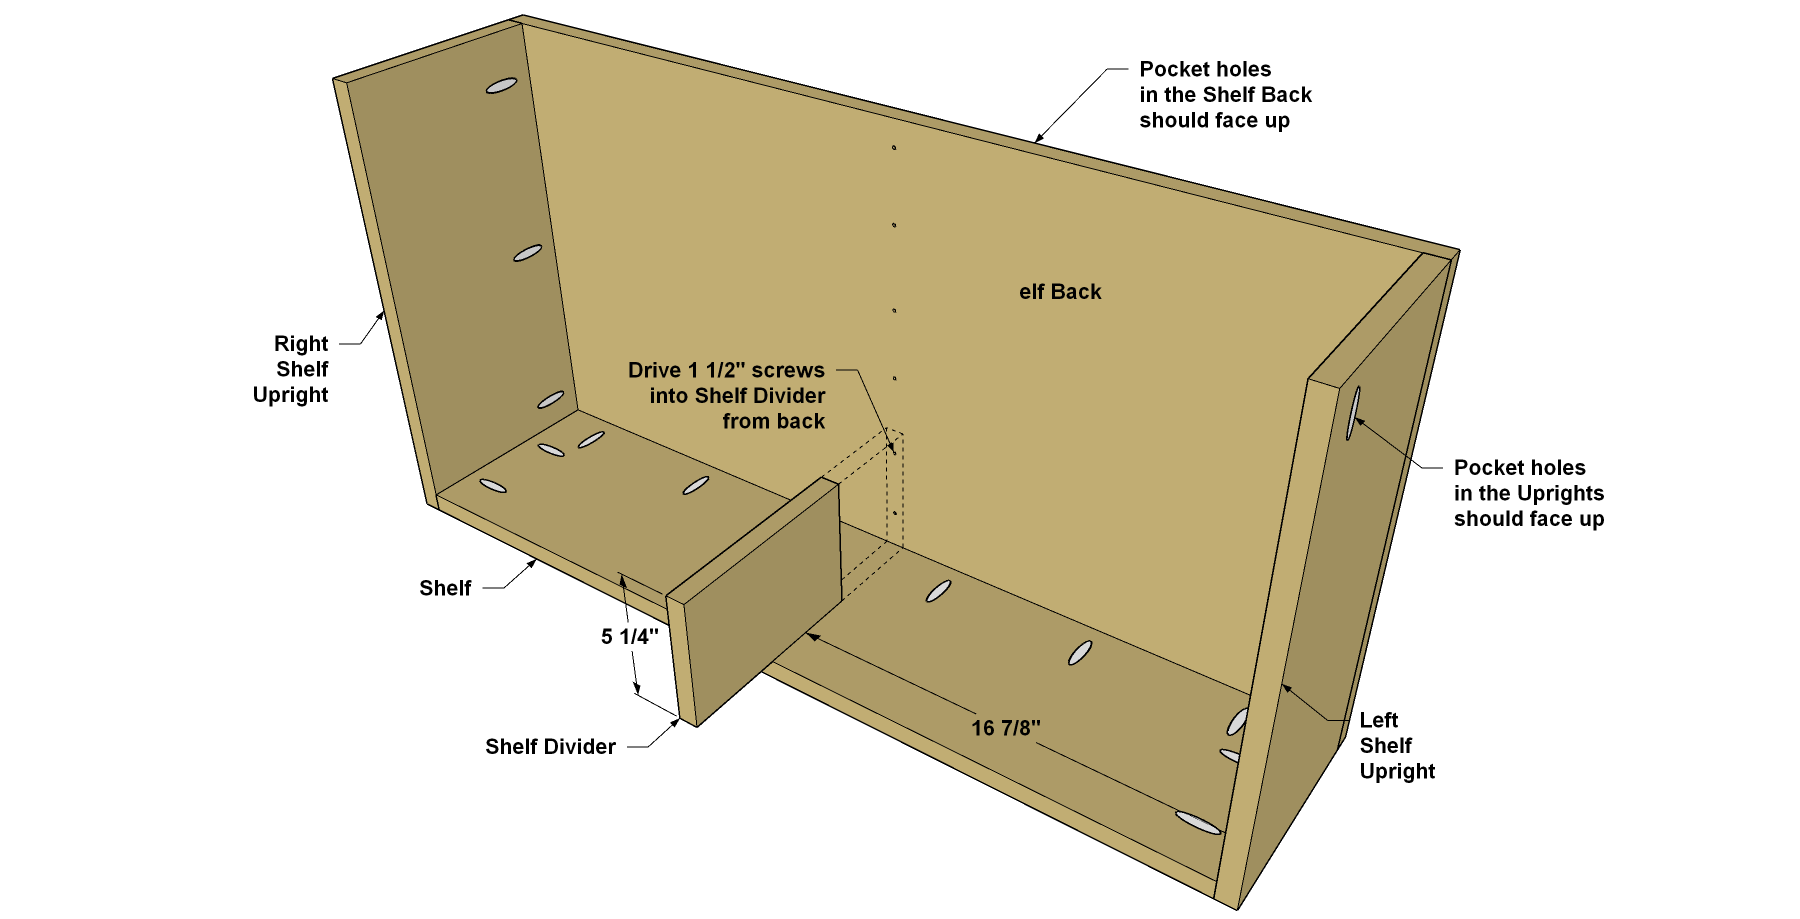
- Begin assembling the shelf unit by attaching one Shelf to the Shelf Uprights and the Shelf Back, as shown. Not that the unit is sitting upside down during assembly.
- Next, spread glue along one long edge of a Shelf Upright.
- Position the Shelf Divider so it’s centered on the length of the Shelf, and then drive 1 1/4" Kreg Pocket-Hole Screws through the Shelf Back and into the Divider. Even though the screws aren’t going into pocket holes, the self-tapping tips make them great for this application.
13Complete the Shelf Assembly
Now you can spread glue on the other edge of the Divider you just attached, and then position and attach the second Shelf. Glue and screw the next Divider in place, and then repeat the processes to add the final Shelf and Divider.
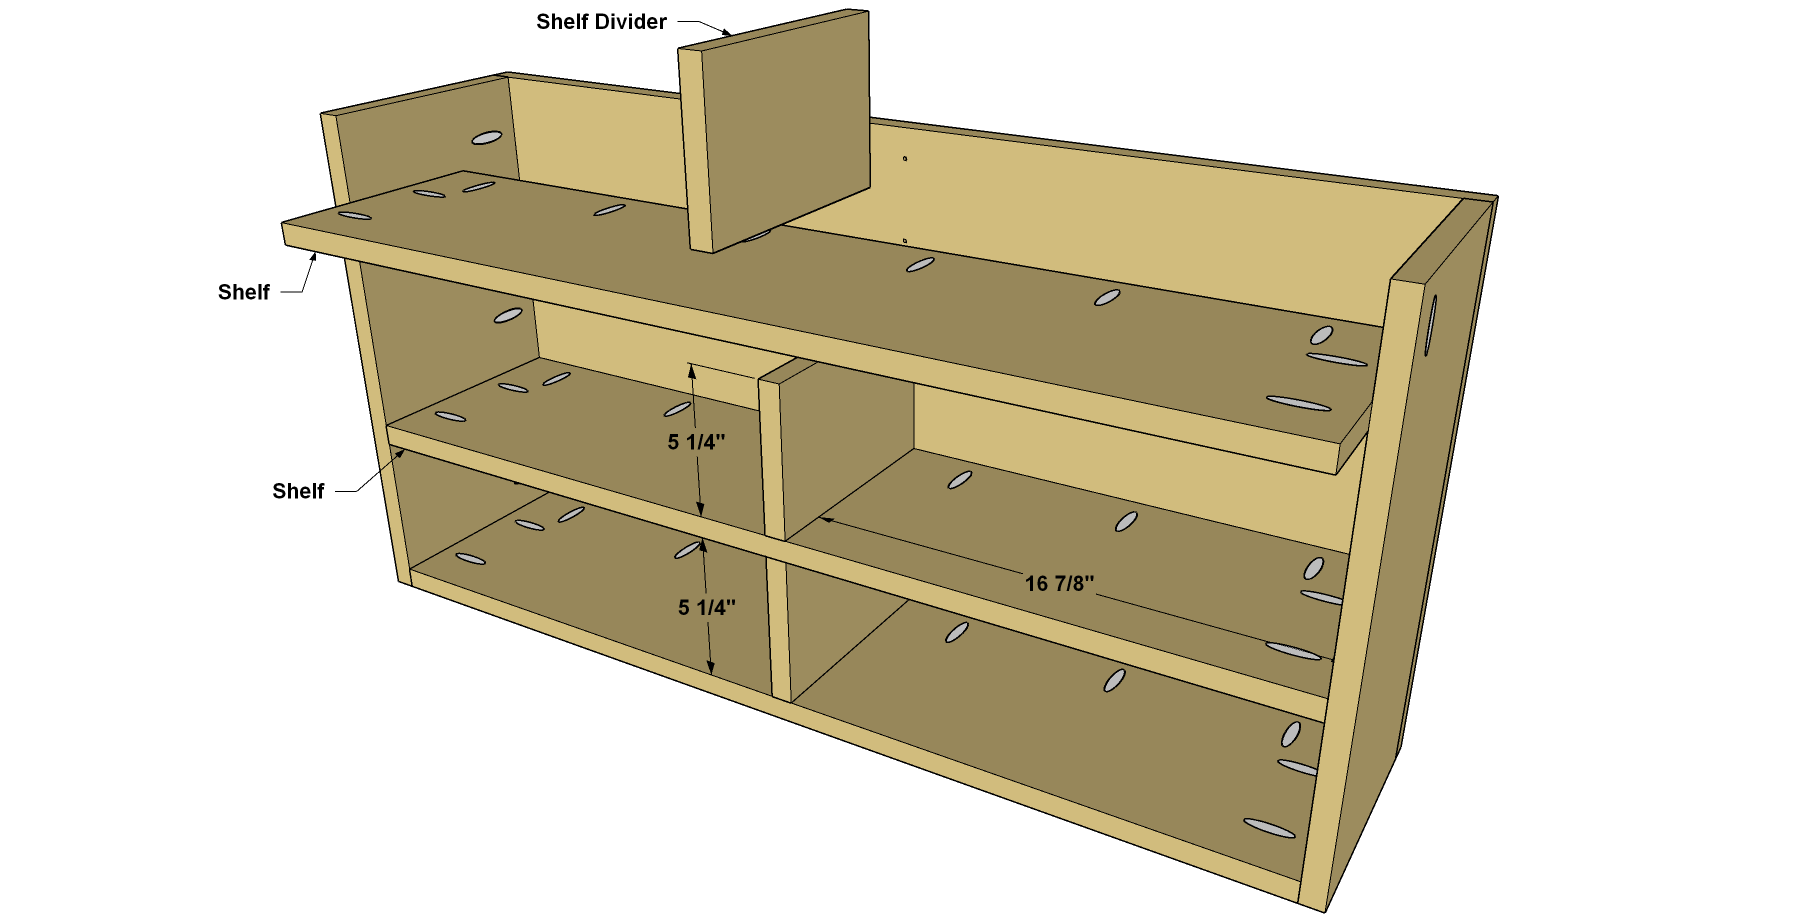
14Attach the Shelf Unit
With the shelf unit complete, you can attach it to the Bench. After checking the fit, spread glue on the edge of the lowest Shelf Divider, and then attach the shelf unit using 1 1/4" Kreg Pocket-Hole Screws.
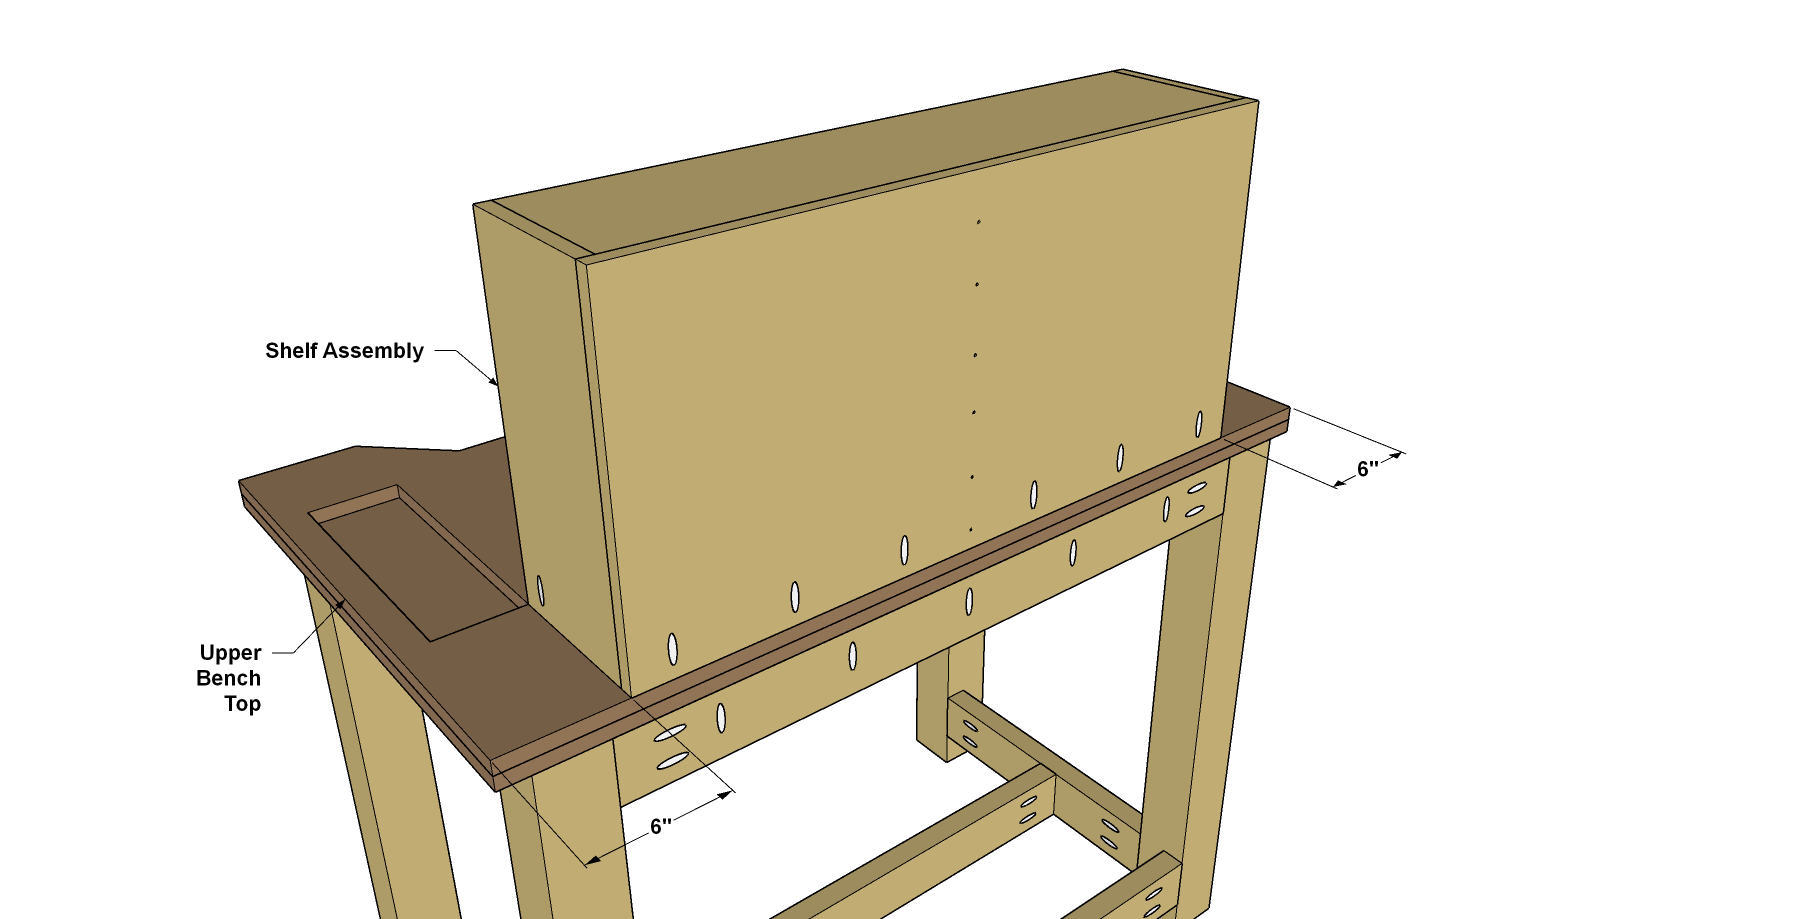
15Make the Organizer Top, Bottom and Back
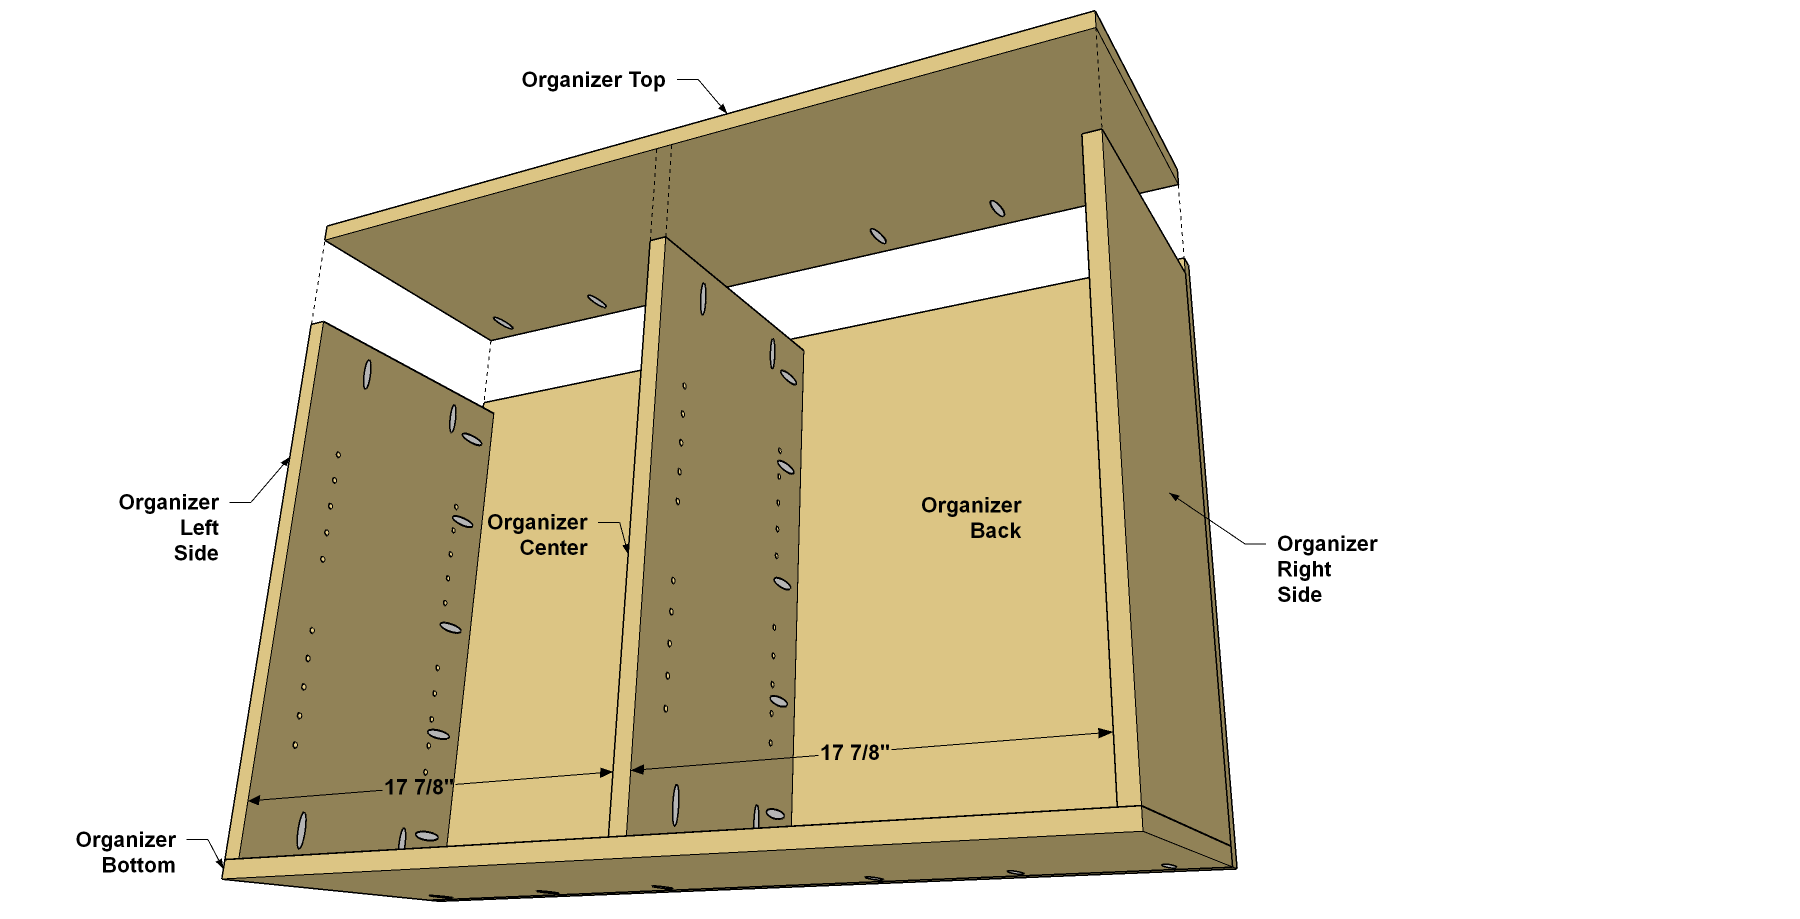
The organizer that goes under the bench comes next. Start by cutting one Organizer Back, one Organizer Top, and one Organizer Bottom to size from 3/4" MDF, as shown in the cutting diagram. With your pocket hole jig set up for 3/4" material, drill pocket holes in the Organizer Top and Bottom as shown.
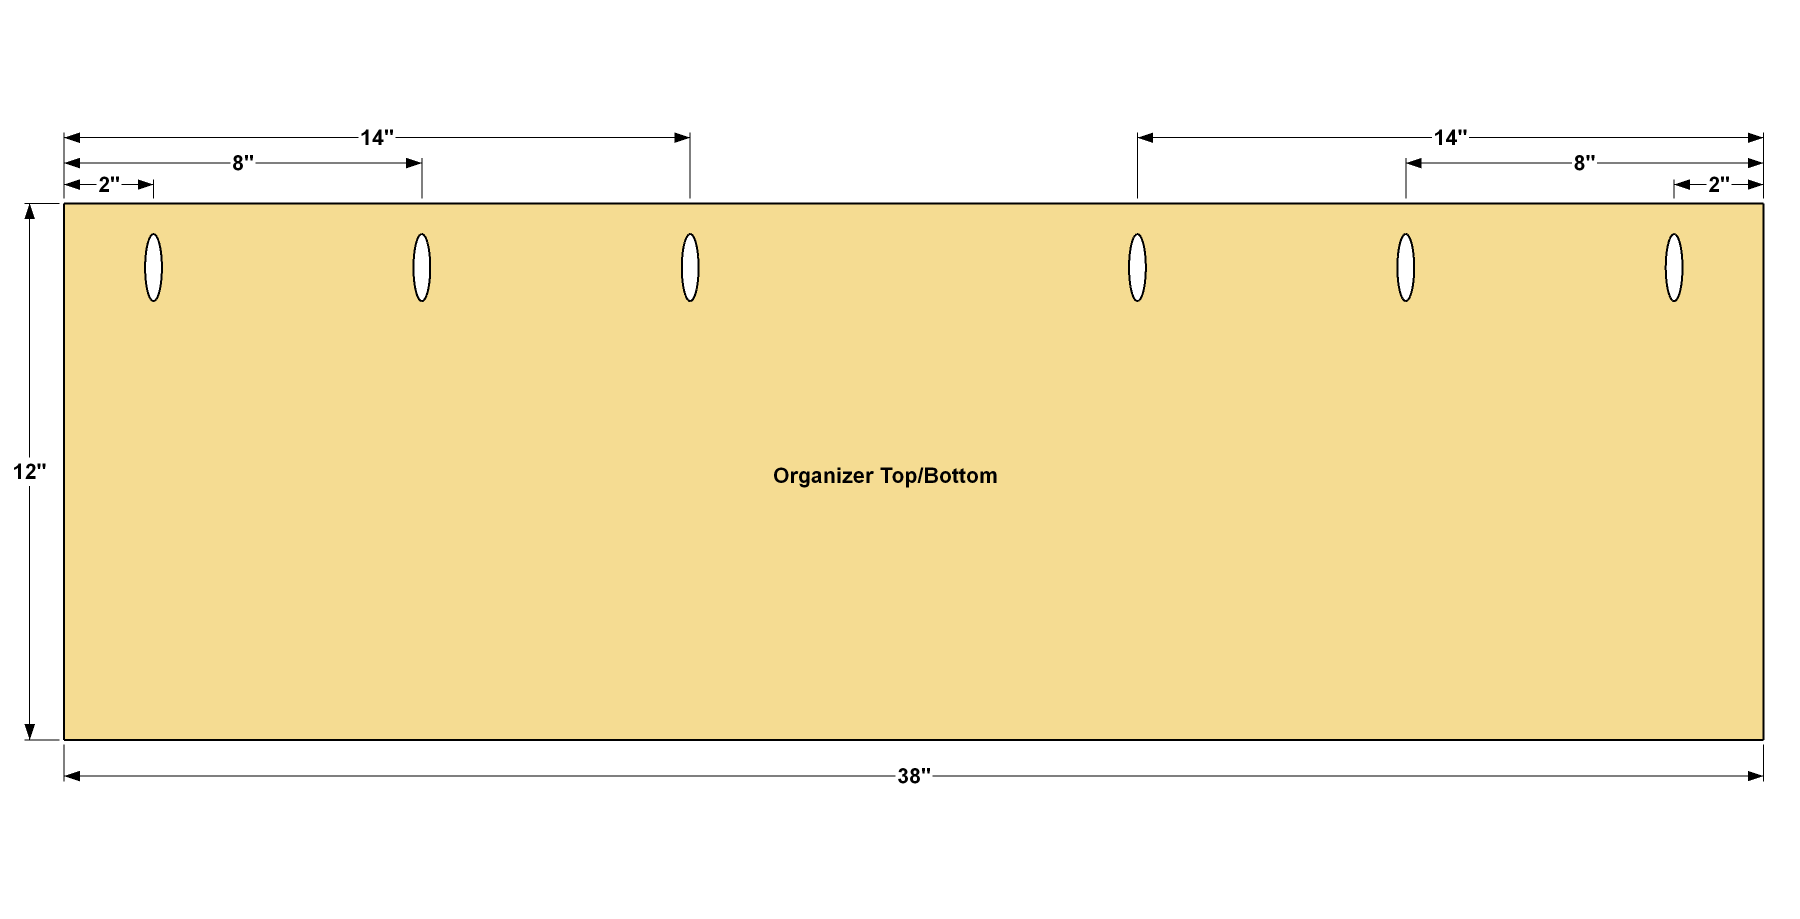
16Make Organizer Sides and a Divider
- Cut one Left Organizer Side, one Organizer Divider, and one Right Organizer Side to size from 3/4" MDF.
- Then you need to drill shelf pin holes in these parts. Before you do this, mark the bottom edge of each piece so you get all of the holes positioned correctly. Note that the Divider needs holes in both faces. The best way to drill these holes is to use a Kreg Shelf Pin Jig. That way, you’ll have aligned, evenly holes to ensure level, wobble-free shelves. After you drill the shelf pin holes, drill pocket holes, as shown, with your pocket hole jig set up for 3/4" material. Just make sure the pocket holes don’t hit the shelf-pin holes.
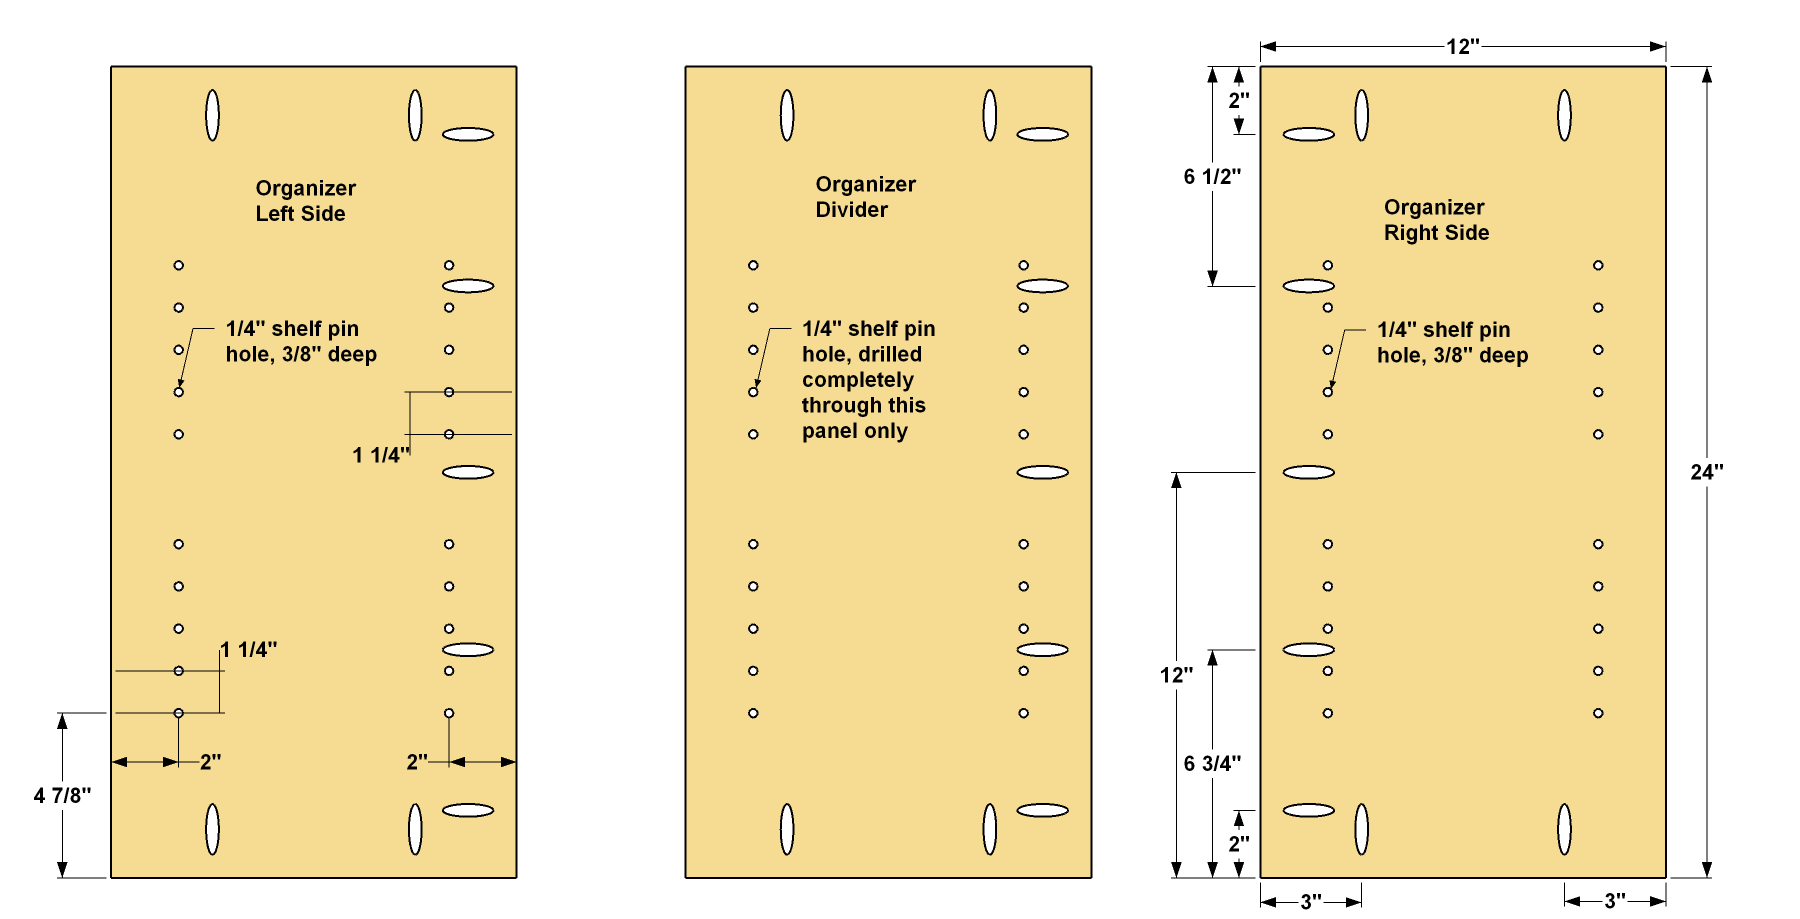
17Assemble the Organizer
- Now you can assemble the organizer by attaching the Organizer Sides and Divider to the Organizer Back, Top, and Bottom. Make sure that the Divider and Sides are oriented correctly.
- Then cut four Organizer Shelves to size from 3/4" MDF, as shown in the cutting diagram.
18Install the Organizer
- Now you can slip the organizer assembly into the bench.
- Drill a pair of pilot holes along the front edge of the Organizer Top, and a pair in the Organizer Bottom.
- Then attach the organizer assembly to the Long Stretchers using four 1 1/4" wood screws.
- Then you can paint or finish the bench. We used paint on the base and outer portions of the shelf unit and organizer, then coated the bench top and remaining surfaces with a penetrating oil finish.